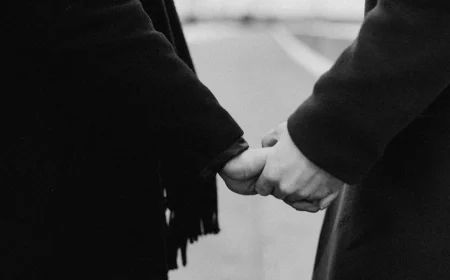
Skip the Store: 5 Awesome DIY Gifts Your Guy Will Actually Use
I’ve spent more time than I can count with my hands busy—working with wood, fabric, you name it. There’s just a certain honesty in making something from scratch. And I can tell you, a gift you make yourself just hits different. It holds the hours you spent, the little mistakes you fixed, and the genuine care you put into it. It’s basically a physical piece of your affection.
In this article
So, this guide isn’t about crafting perfect, store-bought clones. It’s about creating real, heartfelt gifts that are both useful and meaningful. We’re going to walk through five projects that range from super simple to a bit more involved. I’ll share the right techniques I’ve picked up, the simple science behind why they work, and the safety steps you absolutely can’t skip.
Before we dive in, let’s talk real-world commitment. The Beard Balm is your quickest and cheapest option—you can knock it out in under an hour for about $25-$30 in startup ingredients (which will last you for many batches). The Insulated Drink Sleeve is next, taking about an hour and costing under $20, especially if you have some fabric scraps. The Melted Crayon Art is a fast project, maybe an hour of active time, but the cost depends on the canvas size, probably around $25. The last two, the Photo Frame and the Accordion Box, are more of a weekend afternoon project, taking a few hours with drying time, and costing between $15 and $30 depending on the wood and supplies you choose. Okay, let’s get building.
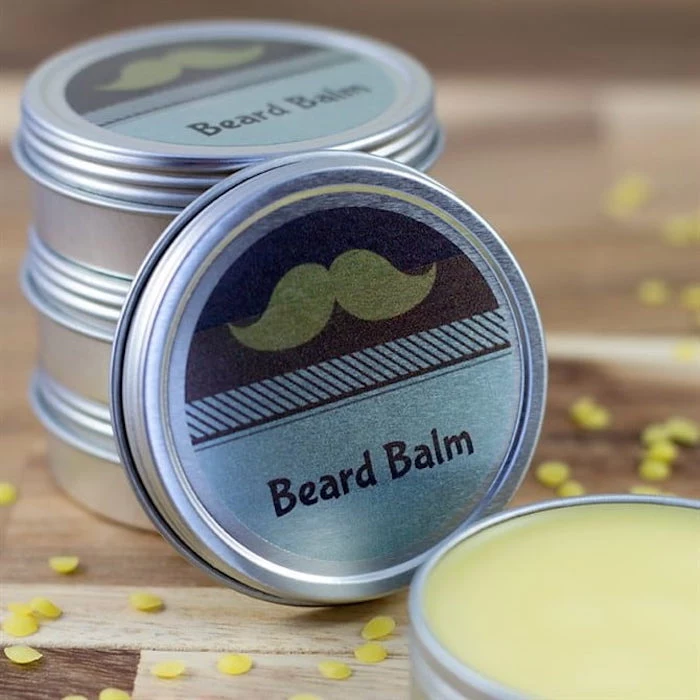
1. The Ultimate Homemade Beard Balm
So many guys take pride in their beards, and a quality balm can be a game-changer for comfort and style. The best part about making it yourself? You control everything. No weird chemicals or cheap fillers. This is a fantastic starting point if you’ve never made any simple cosmetics at home.
So, What’s in This Stuff?
A good beard balm really only does two things: condition the hair and moisturize the skin underneath. It’s not a random mix of oils; each ingredient has a job.
- Beeswax: This is the foundation, giving the balm its shape and hold. I always use cosmetic-grade pastilles (the little pellets) because they melt easily. You can find them on Amazon or at specialty soap-making suppliers online like Bramble Berry. Don’t grab the block from the hardware store; it’s not meant for skin!
- Shea Butter: This stuff is a powerhouse moisturizer, packed with vitamins. Its job is to tackle that dry, itchy skin under the beard that can cause ‘beardruff.’ Unrefined shea butter is best as it keeps more of its good properties.
- Carrier Oils (Jojoba & Argan): These oils do the heavy lifting for conditioning. Jojoba oil is fantastic because it’s incredibly similar to the oil our skin naturally produces, so it absorbs without feeling greasy. Argan oil is famous for softening hair and taming frizz.
- Vitamin E Oil: Think of this as the natural preservative. It’s an antioxidant that keeps the other oils from going bad too quickly, extending the shelf life from a few months to over a year.
- Essential Oils: This is purely for scent. Go for classic manly scents like cedarwood, sandalwood, or pine. A little goes a long way.
Safety, Sourcing, and Setup
Heads up! When you make something that goes on skin, you have to be clean and careful.
Before you even start, wash your hands and give your tools, tins, and work surface a quick wipe-down with rubbing alcohol. Let it all air dry. This is a simple step that keeps nasty bacteria out of your final product.
When it’s time to melt, never put your oils and wax directly on a stove burner. You can scorch them, which ruins their benefits and smells awful. The pro move is a double boiler. If you don’t have one, just place a heat-proof bowl (Pyrex or stainless steel is perfect) over a pot with a couple of inches of simmering water. Easy.
Allergy check: It’s always a good idea to jot down the ingredients on a little sticker for the bottom of the tin, just in case he has sensitivities.
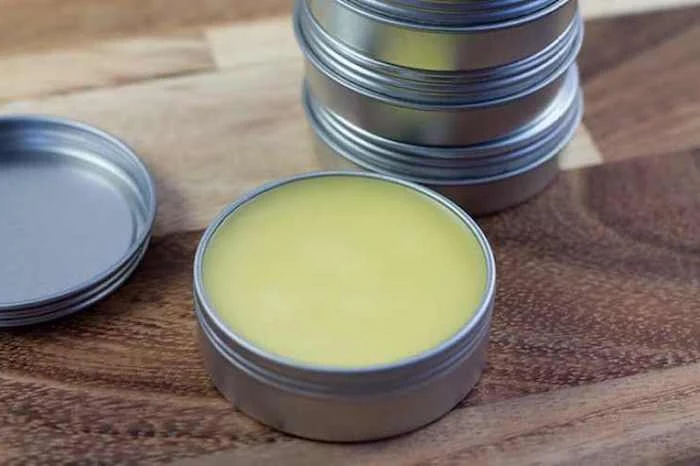
Let’s Make It: Step-by-Step
This recipe makes enough for two 2-ounce tins. A single tin should last him at least a month or two of daily use. Your initial investment in ingredients might be around $25-$30, but you’ll have enough left over for many more batches.
Shopping List:
– Two 2-oz metal tins with lids (around $5 for a pack)
– Digital kitchen scale (highly recommended for consistency)
– Double boiler setup
– 2 tbsp (about 28g) cosmetic-grade beeswax pastilles ($8)
– 2 tbsp (about 28g) raw shea butter ($7)
– 2 tbsp (about 30ml) jojoba oil ($6)
– 1 tbsp (about 15ml) argan oil ($8)
– 1/4 tsp vitamin E oil
– 15-20 drops of essential oil (cedarwood, pine, etc.)
– A wooden skewer for stirring
The Process:
1. Get your double boiler going with simmering (not boiling!) water.
2. Combine the beeswax, shea butter, jojoba oil, and argan oil in the top bowl. Using a scale for the solids is way better than spoons for getting the texture right every time.
3. Let it all melt slowly, stirring every few minutes. The beeswax will be the last to turn to liquid. This should take 10-15 minutes. Don’t rush it.
4. Once it’s all liquid and clear, take the bowl off the heat. Let it cool for just 2 or 3 minutes. This is CRITICAL. If you add the essential oils when it’s screaming hot, the scent will just evaporate.
5. Now, add your vitamin E oil and essential oils. Stir gently for about 30 seconds.
6. Carefully pour the liquid into your tins. It’s a good idea to do this over some newspaper just in case.
7. Let the tins sit at room temperature for a few hours until they’re completely solid. Don’t put them in the fridge to speed it up—rapid cooling can make the balm grainy or cracked.
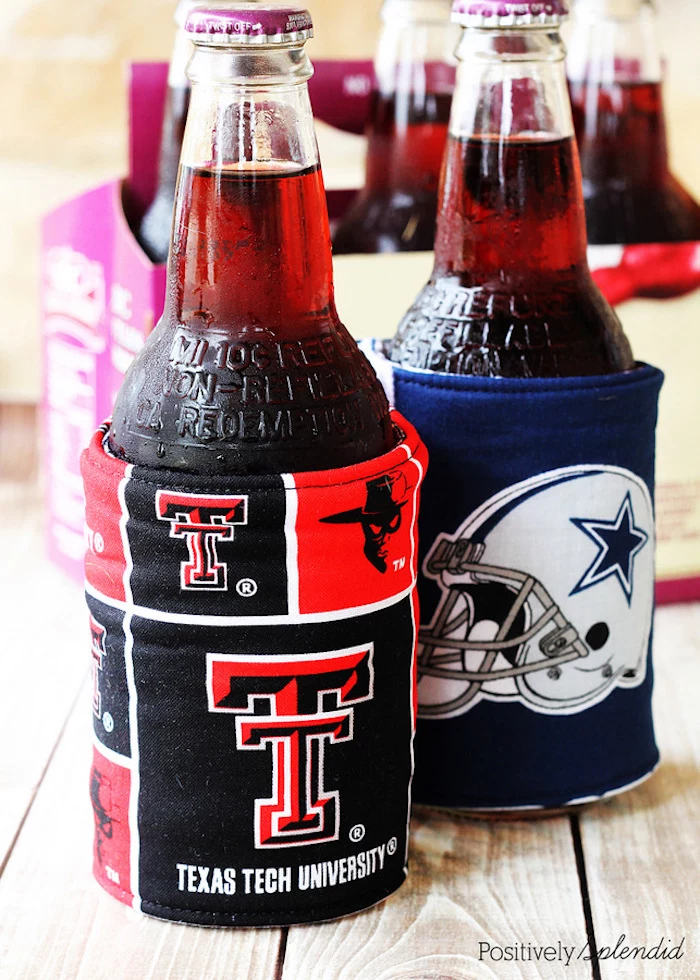
2. The High-Performance Drink Sleeve
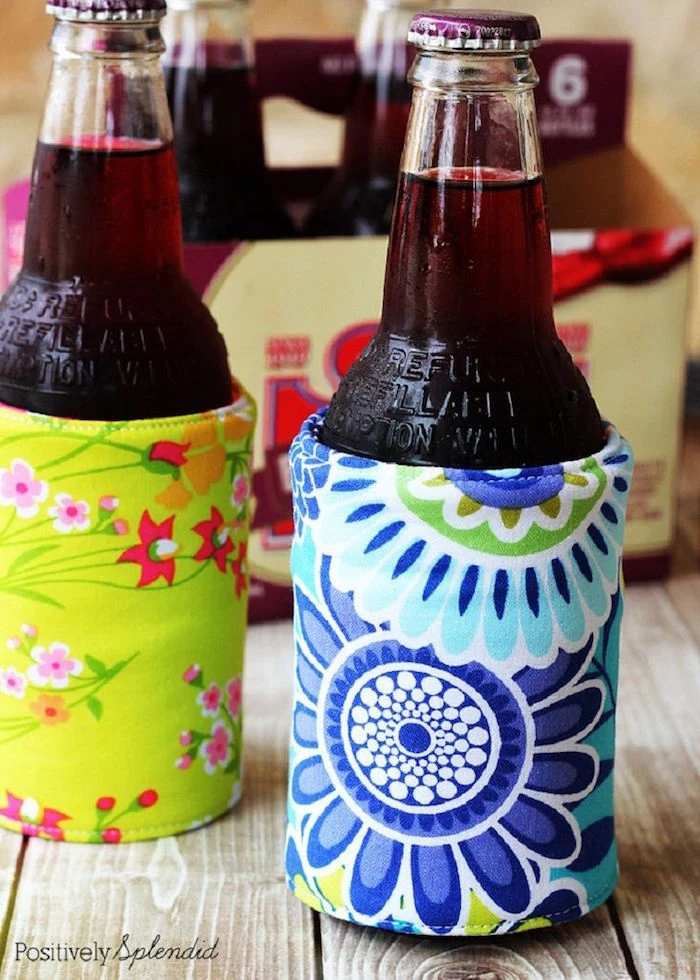
Anyone can make a simple fabric koozie, but we can do better. By using the right materials, we can make something that genuinely keeps drinks hot or cold for longer. It’s a great project for practicing basic sewing skills.
The ‘Why’ Behind the Materials
The real magic here is in the layering.
- Outer & Lining Fabric: I just use quilting cotton for this. It’s sturdy, comes in a million patterns, and it’s easy to wash. You can find it at Joann, Michaels, or any fabric store. Pick a cool pattern for the outside and a simple solid for the lining.
- Fusible Fleece: This is a layer of soft fleece with a heat-activated glue on one side. You iron it onto your fabric, and it gives the sleeve a nice, thick, substantial feel.
- The Secret Weapon: The key ingredient is a special insulating fabric. The most common brand has a metallic poly film inside that reflects thermal energy—it keeps cold things cold and hot things hot. It’s the same stuff used in oven mitts. You can get it at any big fabric store.
Heads up! Because of that metallic film, this sleeve is NOT microwave-safe. It’s a good idea to add a little tag that says so if you think it might end up on a coffee mug.
The Right Way to Sew It
Materials:
– Outer fabric: 11 x 5 inches
– Lining fabric: 11 x 5 inches
– Fusible fleece: Two pieces, 11 x 5 inches each
– Insulating fabric: 11 x 5 inches
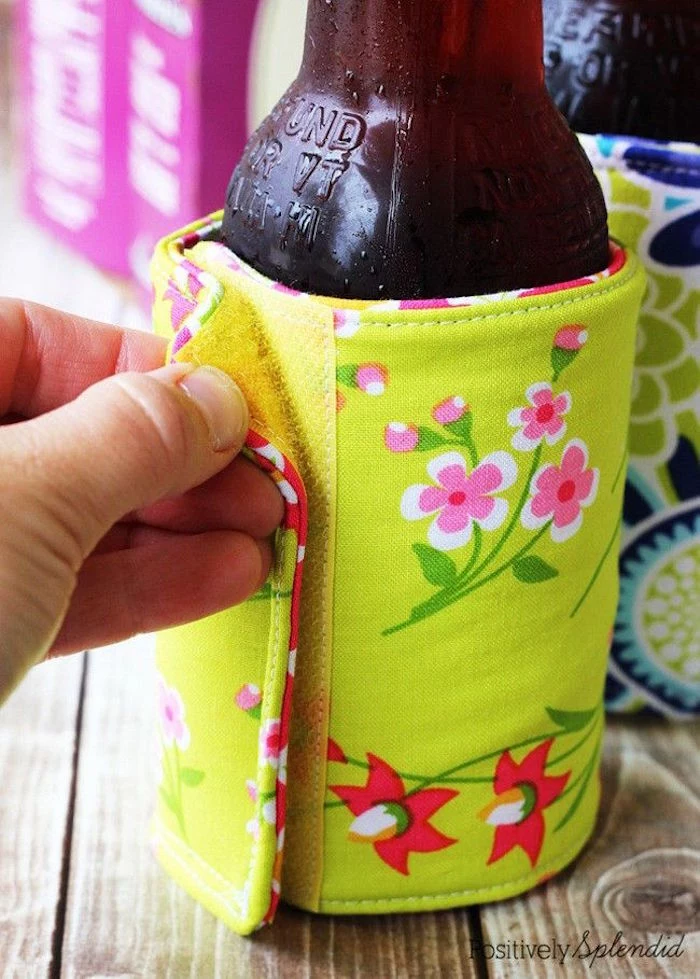
– Velcro (hook and loop): 4 inches long, 1.5 inches wide
– Sewing machine with a tough needle (a 90/14 denim needle is perfect)
– Iron, scissors, pins
Instructions:
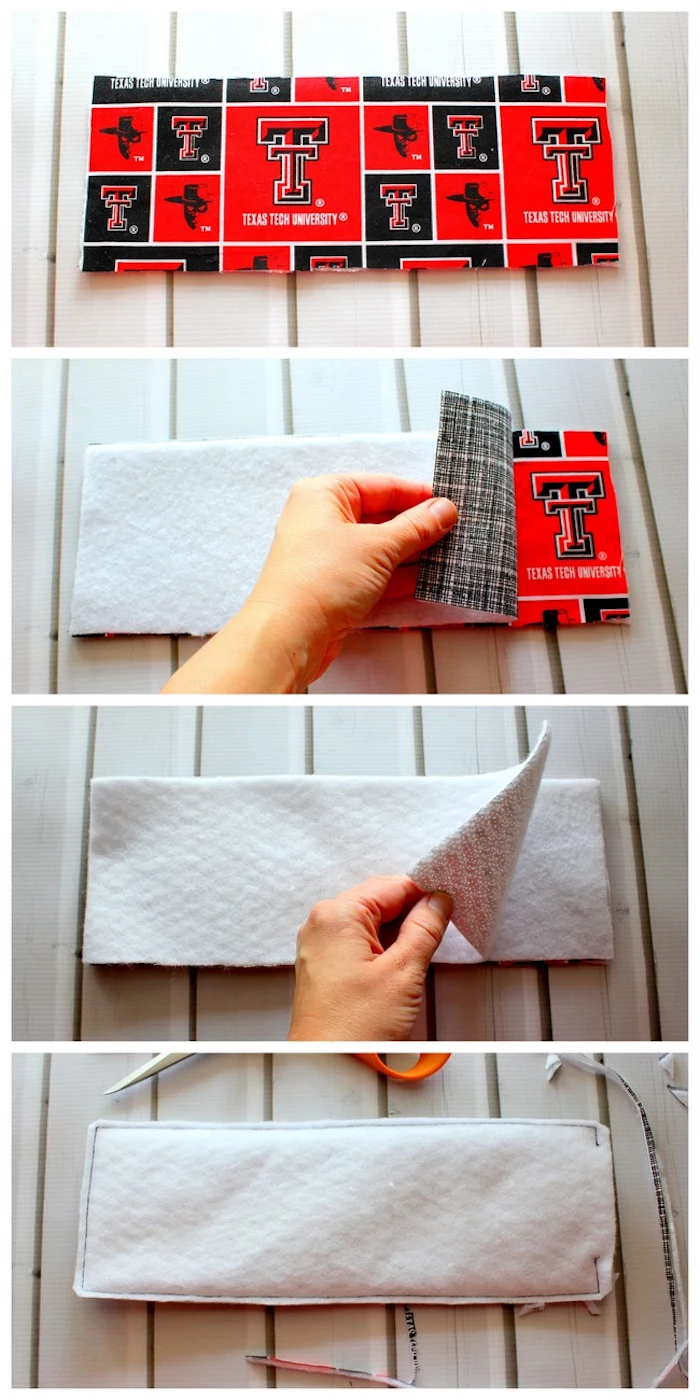
1. Fuse the Fleece: Iron one piece of fleece to the wrong side of your outer fabric. Repeat with the other fleece and the lining fabric.
2. Make the Sandwich: Lay your pieces down in this order: Insulating fabric on the bottom, then your outer fabric (right side facing up), and finally your lining fabric (right side facing down).
3. Pin and Sew: Pin the layers together. Sew around the whole rectangle with a 1/4-inch seam, but leave a 3-inch gap on one of the short sides for turning it right-side out.
4. Trim and Clip: Trim the seam and clip the four corners diagonally. This is a must-do step for getting sharp, flat corners.
5. Turn and Press: Carefully turn the sleeve right-side out through the hole. Use a chopstick to gently poke out the corners. Tuck in the raw edges of the opening and press the whole thing flat with your iron.
6. Topstitch: Sew a line of stitches 1/8-inch from the edge all the way around. This closes the opening and gives it a clean, finished look.
7. Add Velcro: On one short end, sew the rough (hook) side of the Velcro to the outer fabric. On the opposite end, sew the soft (loop) side to the lining fabric. Sewing a box with an ‘X’ through the middle makes it extra secure.
Quick Tips & Variations
No-Sew Version: Don’t have a sewing machine? No problem. Assemble the layers just the same, but use a strong permanent fabric glue like Fabri-Tac instead of stitching. It won’t be quite as durable in the wash, but it works great.
Custom Sizing: Is he more of a coffee mug or water bottle guy? Easy. Just wrap a measuring tape around his favorite cup, add about 1.5 inches for the Velcro overlap, and that’s your new length. The height is up to you!
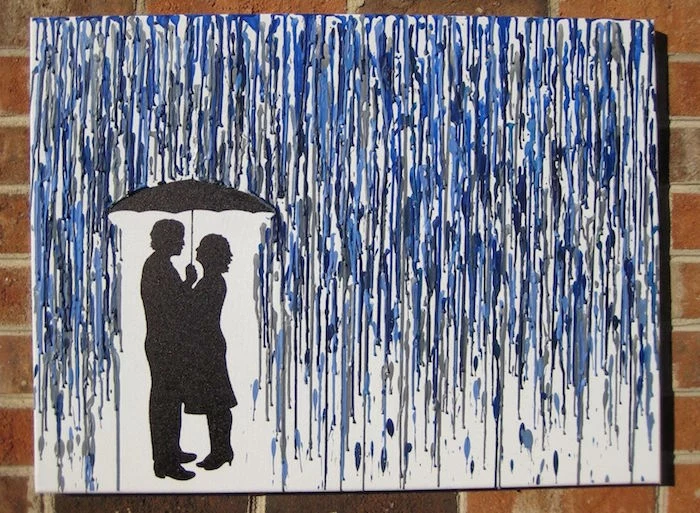
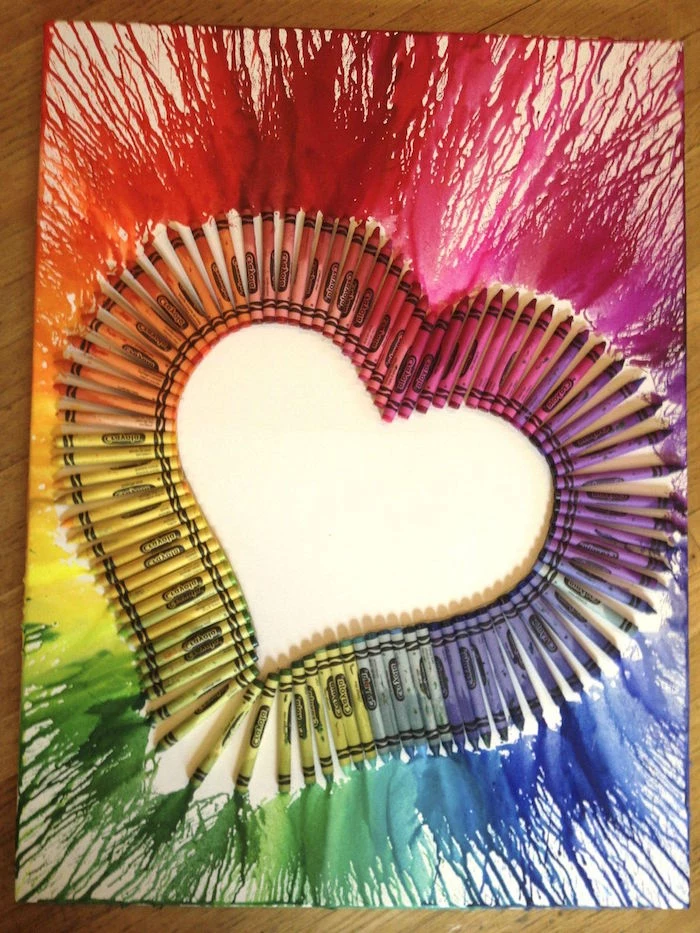
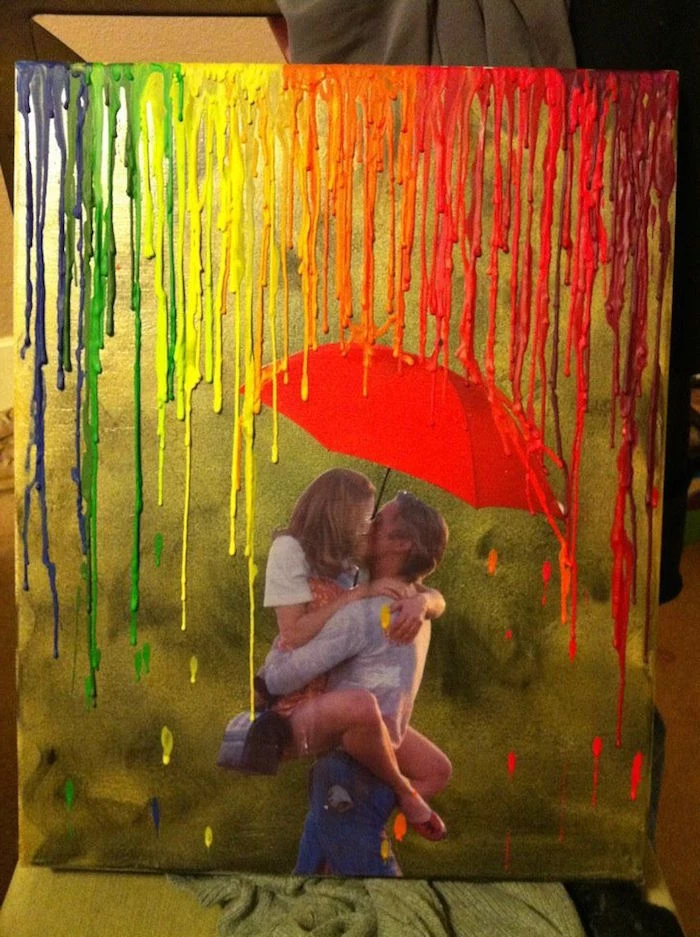
3. Controlled Melted Crayon Art
I’ve seen this project all over the internet, and honestly, I’ve seen it go wrong more often than it goes right. It can either be a striking piece of abstract art or a flammable, fuming mess. Let’s do it the right way.
Safety First. I’m Not Kidding.
I cannot stress this enough: you are melting wax, which is flammable and releases fumes. Please be careful.
Ventilation is everything. Do this outside, in an open garage, or in a well-ventilated room with a fan going. The fumes can give you a headache.
A heat gun is your best friend. A hair dryer blows air everywhere and will splatter hot wax all over the place. Trust me, I learned this the hard way and spent an hour scraping wax off a wall. A heat gun (about $20 at a hardware store) gives you focused heat with less air, so you have way more control. If you absolutely must use a hair dryer, use the lowest fan setting and highest heat.
And please, wear old clothes and safety glasses. A splatter of hot wax to the eye is no joke.
From Messy Craft to Cool Art
The secret is control.
Materials:
– Stretched canvas (any size)
– Crayons (a well-known, high-pigment brand works best). For a 12×16 inch canvas, you’ll probably need 30-40 crayons.
– High-temp hot glue gun
– Heat gun
– Drop cloth
Instructions:
1. Prep: Unwrap your crayons and lay them out along the top of your canvas to plan the color scheme. A simple rainbow is classic, but shades of one color can look really cool and modern.
2. Glue ’em Down: Use the hot glue gun to stick the crayons to the top edge of the canvas. Let the glue cool completely.
3. Set Up: Prop your canvas at an angle against a wall or in a box. A steeper angle means faster, thinner drips.
4. Melt: Aim your heat gun at the crayons, moving slowly across the line. You’ll see them start to glisten, then melt and drip. You can aim the heat at specific drips to guide where they go.
5. Cool Down: Once you’re happy with it, turn off the heat and let the canvas lie flat to cool for a few hours until the wax is hard.
Pro-Tip: Want to create a shape? Use painter’s tape to mask off an initial or a heart in the middle of the canvas. After you’re done melting and the wax is cool to the touch (but not rock hard), carefully peel the tape off for a cool negative space effect.
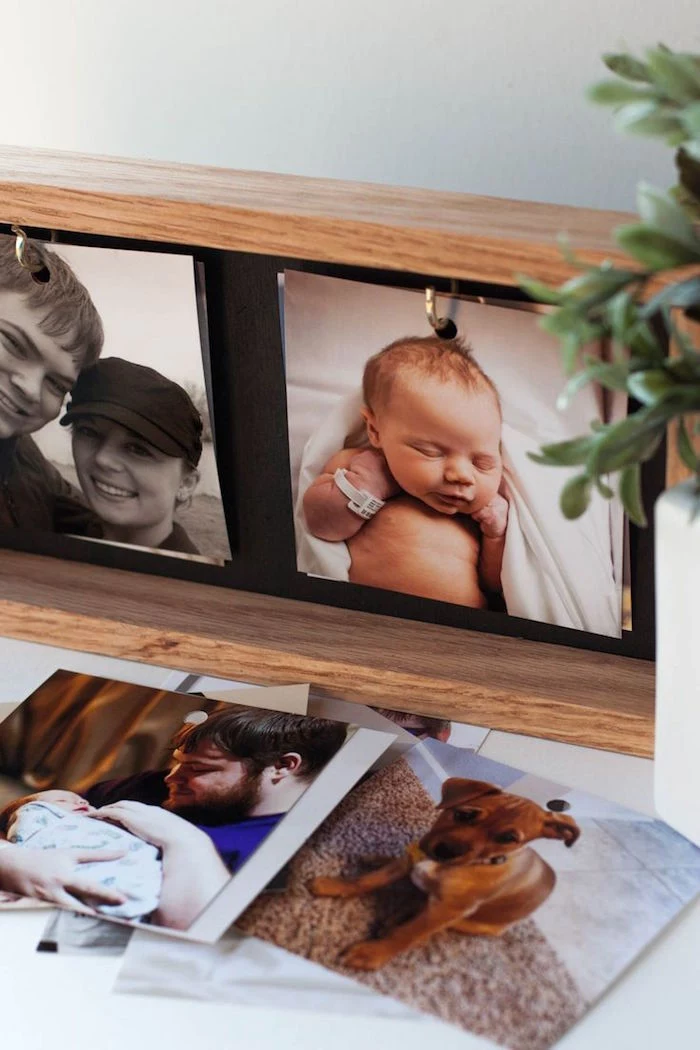
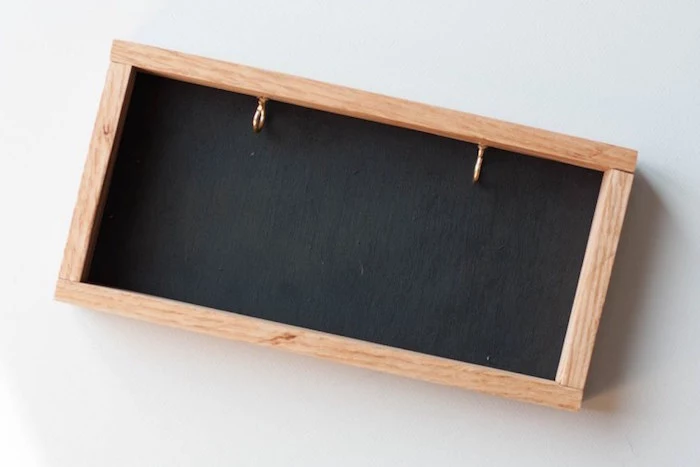
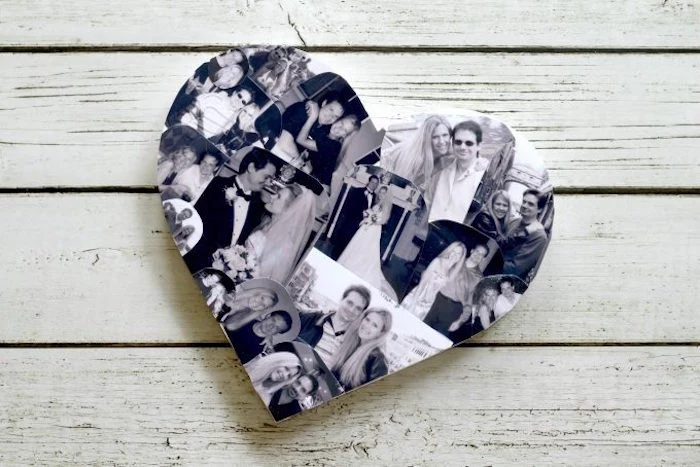
4. Rustic Hanging Photo Display
This is so much cooler than a standard picture frame. It’s a simple piece of custom woodwork that lets him swap out photos easily. It’s a great intro to basic wood finishing.
Woodworking Basics for Anyone
Choosing Wood: A simple 1×2 pine board from Home Depot or Lowe’s is perfect for this. It’s cheap (maybe $5 for a long board) and easy to work with. If you want a more premium look, oak is beautiful but a bit tougher to cut.
Making the Cuts: You can make simple butt joints, but for a pro look, grab a cheap plastic miter box and a hand saw (maybe $15 for the set). It will help you cut perfect 45-degree angles for clean corners.
A Quick Cut List: For a frame that displays 4×6 photos, a good size is to have two pieces cut to 8 inches and two pieces cut to 10 inches. This gives you a nice border around a central photo area.
Joinery Tip: Wood glue is what gives a frame its strength; nails just hold it together while the glue dries. Apply a thin layer of wood glue to your mitered corners, press them together, and use a small brad nail to secure it.
Finishing It Like You Mean It
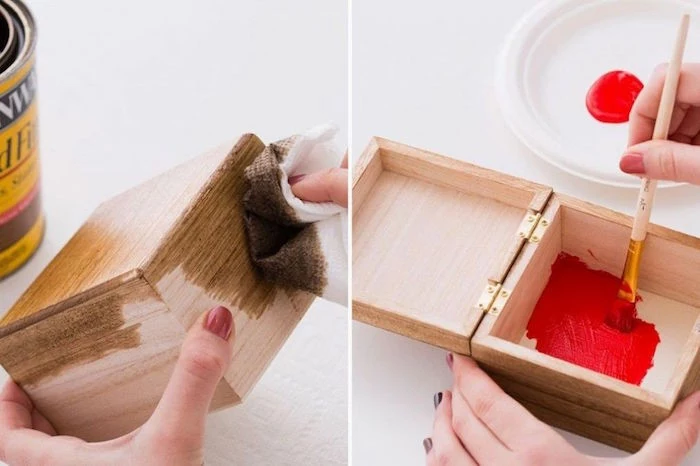
Stain & Topcoat: Stain just adds color. Wipe it on with a rag, let it sit for a few minutes, then wipe off all the excess. If you leave it on, it gets sticky. After the stain is dry (give it a full 24 hours), you need a protective topcoat. A simple wipe-on polyurethane is foolproof and gives it a durable, smooth finish.
The Final Assembly:
1. Cut, sand, and assemble your frame using glue and small nails.
2. Stain and seal the frame. Let it cure completely.
3. Screw a few small hooks into the top inside edge of the frame. Pre-drilling a tiny pilot hole first will keep the wood from splitting.
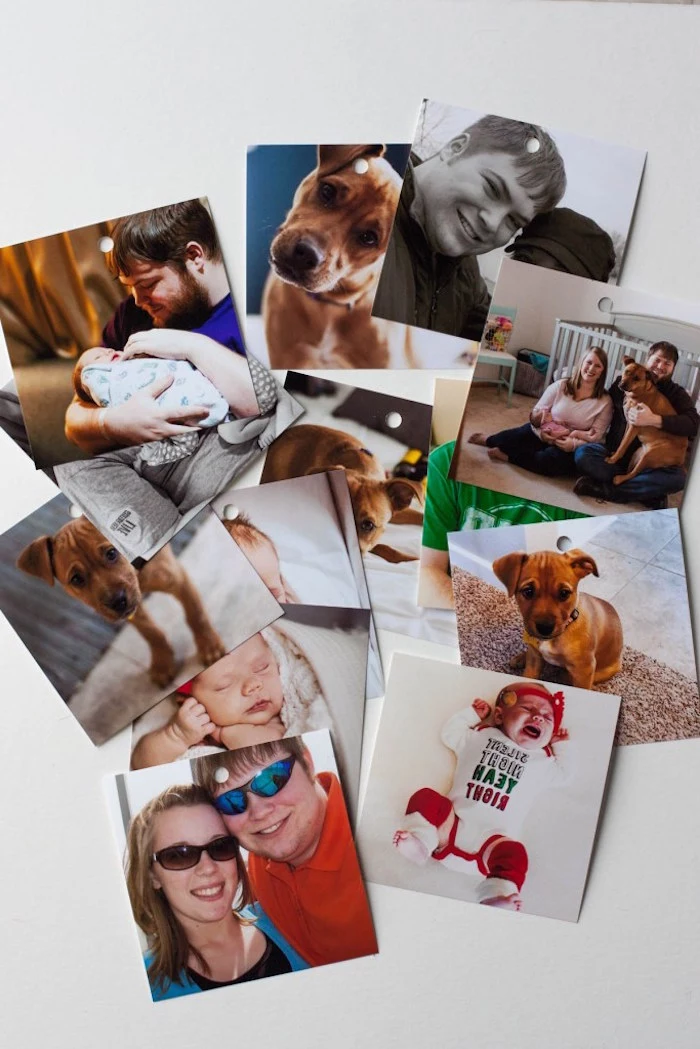
4. Punch holes in your favorite photos and hang them from the hooks. Now he can easily rotate them whenever he wants.
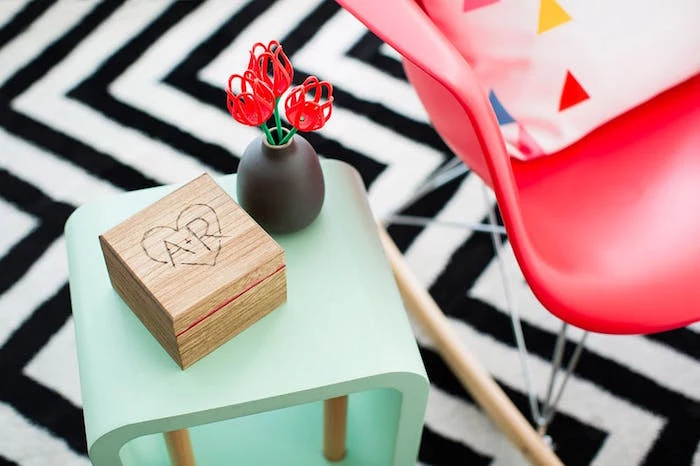
5. The Accordion Photo Box
Okay, this one’s a real heart-melter. It’s like a secret photo album hidden in a small wooden box. The magic is in the details.
The Box and the Paper
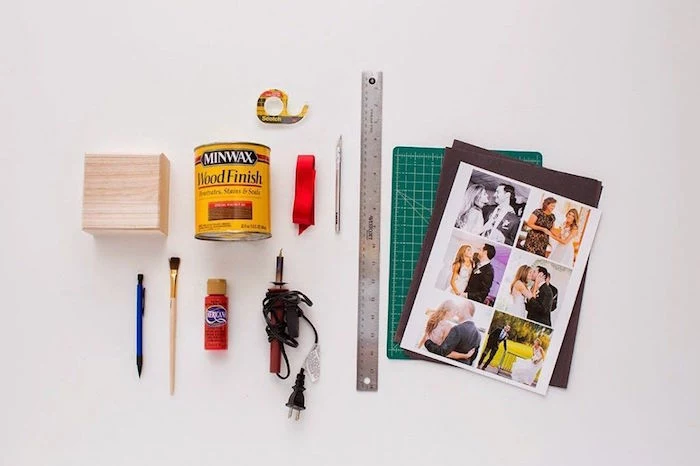
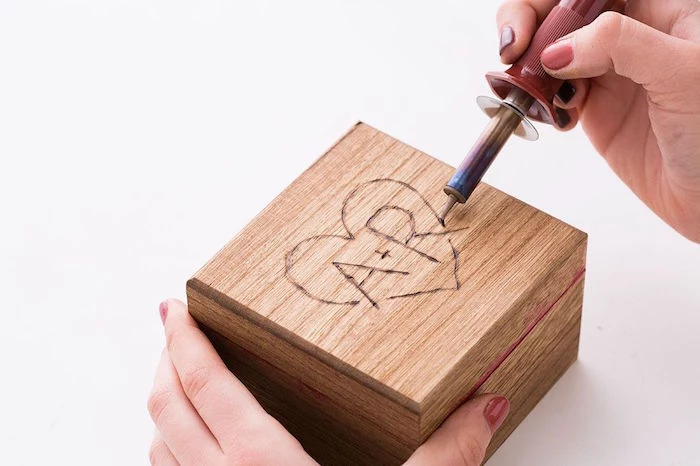
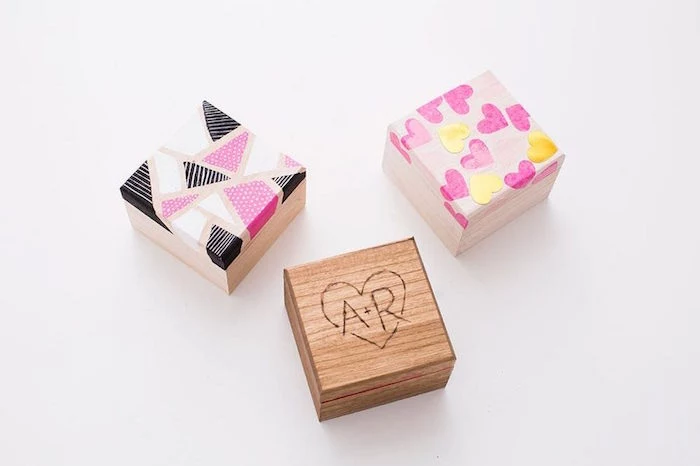
The Box: You can find small, unfinished wood boxes at any craft store like Michaels for about $5-$10. Give it a light sanding to prep it for stain or paint. For a really personal touch, you can use a basic wood-burning tool (pyrography pen) to add his initials to the lid. Just practice on a piece of scrap wood first!
The Paper: Don’t use regular printer paper; it’s too flimsy. You need heavy cardstock (look for 80 lb or higher). This will hold up to the folding and the weight of the photos.
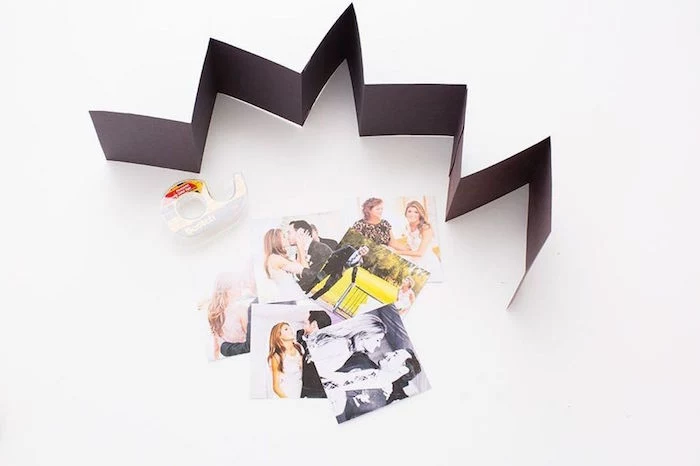
A Lesser-Known Trick: Getting your photos the right size is often the hardest part. Use a free tool like Canva to create custom-sized canvases (say, 3.5 x 3.5 inches), drop your photos in, print the sheet, and cut them out. They’ll be perfectly sized every time.
Putting It All Together
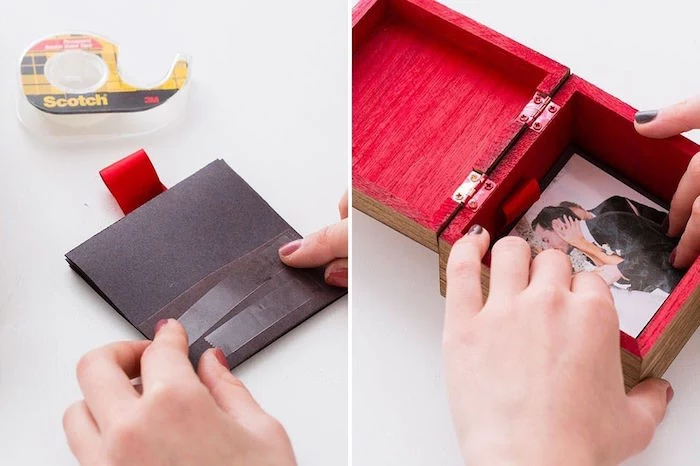
Crucial Step: Scoring. Before you fold the cardstock, you have to score it. Lay a ruler along your fold line and run a blunt tool along it—the back of a butter knife or an empty pen works perfectly. This creates a clean, crisp fold instead of a bumpy, cracked one.
Materials:
– Unfinished wood box ($5-$10)
– Stain or paint
– Heavy cardstock
– Printed photos
– Photo-safe glue stick or tape runner (archival quality is best, so the photos don’t yellow over time)
– Ruler and craft knife
– A small piece of ribbon
The Process:
1. Sand and finish your box. Add wood-burned initials if you want.
2. Cut your cardstock into a long strip that’s slightly narrower than the inside of your box.
3. Measure, mark, and score your fold lines to create equal-sized panels.
4. Fold the strip back and forth like an accordion.
5. Use your photo-safe adhesive to glue a photo onto each panel.
6. Create a pull tab by folding a small piece of ribbon into a loop and taping it to the back of the very top photo panel.
7. Glue the back of the very bottom panel into the bottom of the box.
8. Fold it all up neatly inside. The ribbon tab should be on top, ready to pull.
Honestly, the time you pour into these projects is the real gift. Don’t sweat the small imperfections; they’re what make it handmade and special. Just remember to work safely, take your time, and enjoy making something amazing with your own two hands.
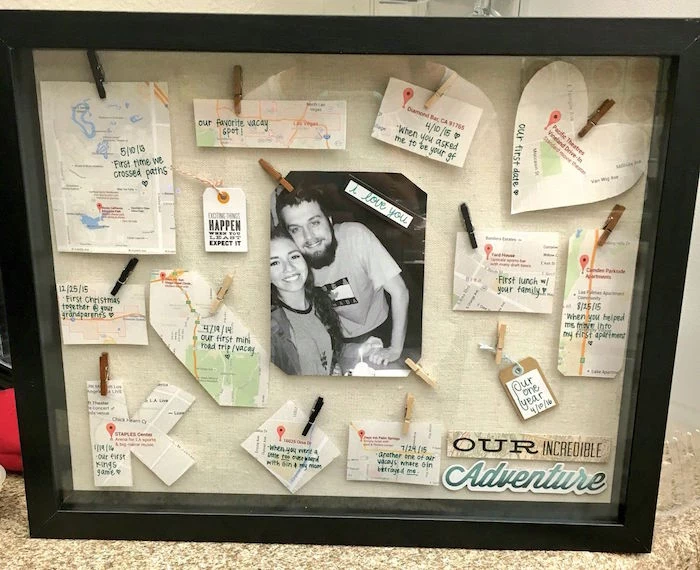
Inspirational Gallery
Don’t overlook the power of leather. A simple project like a personalized leather keychain or a cord organizer requires minimal tools—just a utility knife, a ruler, and a leather punch. You can buy small, affordable leather scraps on Etsy, and finish the project in under an hour. It’s a touch of rugged luxury that ages beautifully over time.
The secret to a pro-level finish: It’s all in the sanding. Don’t just sand at the end. For projects like the photo frame, sand the wood before assembly with 120-grit sandpaper, and then again with a finer 220-grit paper after the first coat of stain or sealer has dried. This simple extra step removes any raised grain and results in a surface that feels silky smooth to the touch.
A 2017 study found that givers of handmade gifts felt a stronger connection to the recipient, believing the gift symbolized their love more effectively than a store-bought one.
Want to take the Accordion Photo Box to the next level?
Think beyond just photos. Intersperse the images with small, meaningful additions. A ticket stub from your first concert together, a printed quote from his favorite movie, a tiny map marking a special location, or even a handwritten inside joke. These details transform a photo album into a rich, personal story.
For a gift that hits the spot, consider making a custom BBQ rub or a spicy hot sauce. It’s surprisingly easy and taps into a passion for grilling or cooking.
- For a classic smoky rub: Combine smoked paprika, brown sugar, garlic powder, onion powder, and a pinch of cayenne.
- For a simple hot sauce: Blend roasted jalapeños or habaneros with vinegar, garlic, and a little salt, then simmer briefly. Bottle it in a cool glass flask for a great presentation.
Wood Stain vs. Wood Oil: For a natural, matte look that lets the wood’s character shine, a finishing oil like Tung or Danish oil is a fantastic choice. It soaks into the wood and hardens, protecting it from within. Stain + Polyurethane: For a more durable, glossy finish and a specific color, a product like Minwax PolyShades combines stain and polyurethane in one step, saving time while offering robust protection.
My wood stain looks patchy and uneven. What went wrong?
This often happens with soft woods like pine, which absorb stain unevenly. The solution is a pre-stain wood conditioner. It’s a clear, thin liquid you apply before the stain. It partially seals the wood, forcing the stain to absorb at a more even rate, giving you a much more professional and less blotchy result. Brands like Varathane and Minwax offer excellent options.

- Adds a warm, masculine scent profile.
- Offers antifungal and antiseptic properties.
- Helps create a sense of calm and focus.
The secret? A few drops of Cedarwood essential oil. When making the beard balm, consider adding it to the mix along with Tea Tree or Sandalwood for a complex, woodsy aroma that’s far more unique than store-bought scents.
Did you know that beeswax, a key ingredient in the DIY balm, is a natural humectant? This means it attracts and locks in moisture, helping to keep both beard hair and the skin underneath hydrated throughout the day.
This is why homemade balms often feel more effective than commercial versions that may use petroleum-based fillers. The natural properties of beeswax provide hold while actively conditioning, making it a true skincare powerhouse.

A vegan alternative for your balm: If you want to avoid beeswax, Candelilla wax is your best bet. Harvested from the leaves of the Candelilla shrub, it’s a bit denser and less sticky than beeswax, so you’ll want to use about half the amount to achieve a similar texture. It provides excellent hold and a nice gloss, making it a perfect plant-based substitute.
Elevate the Insulated Drink Sleeve by adding a small, functional detail. A simple loop of leather or sturdy canvas webbing stitched into the side seam creates a convenient handle. It’s a small touch that adds a rugged, practical feel and makes the sleeve easier to carry.
- Old pallets can be disassembled for rustic wood (check for an


The ultimate personalization tool: A simple wood-burning pen, also known as a pyrography tool. For around $20, a kit like the Walnut Hollow Versa-Tool allows you to permanently etch initials, a significant date, or a simple design into any of your wood projects. It’s much more personal and permanent than paint.

Don’t just hand over your creation in a plastic bag. The presentation is part of the gift. Wrap a wooden box in simple brown kraft paper and tie it with twine. For the beard balm, place the tin in a small burlap or linen drawstring pouch. This small effort shows that every part of the gift was considered, making the moment of receiving it even more special.
How do I pick the right photos for a collage project?
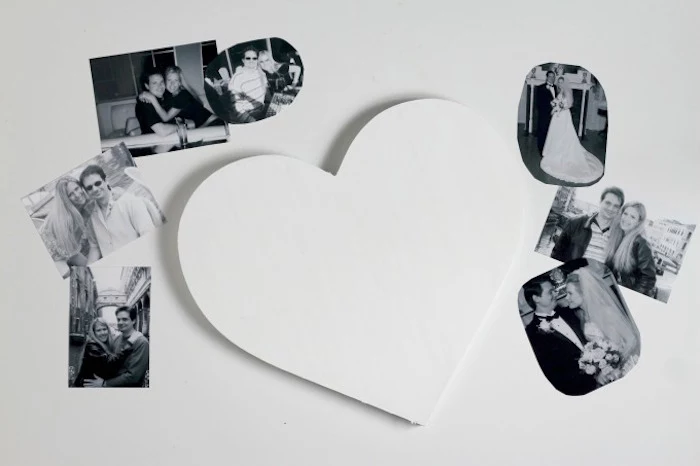
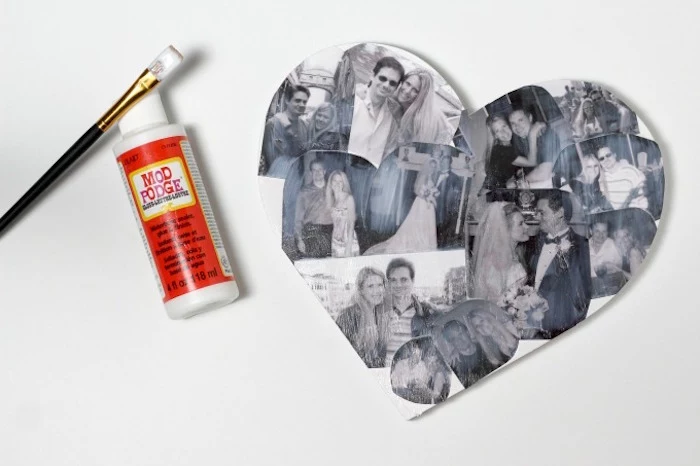
For a cohesive look, especially with the photo heart or box, try converting all your images to black and white. This eliminates clashing colors and puts the focus on expressions and composition. Alternatively, choose photos from a single event or time period to create a consistent color palette and a clear narrative.
Embrace the scent of making. The sharp, clean smell of freshly cut pine, the earthy aroma of melted beeswax and shea butter, the faint chemical tang of wood stain—these aren’t just side effects; they are part of the experience. They infuse your project with an invisible layer of effort and memory, a sensory story that a store-bought item can never tell.
The DIY trend is extending to tech. Consider crafting a simple dock for his phone and watch from a beautiful block of wood, or a monitor stand with small cubbies for desk organization. These projects merge the warmth of handmade craftsmanship with the utility of modern-day essentials.
This is the
For photo decoupage projects like the wooden heart, the right adhesive is crucial. While regular craft glue works, Mod Podge is the superior choice. It acts as an all-in-one glue, sealer, and finisher. Apply a thin layer to the wood, place your photo, and then brush another thin layer over the top. It dries clear, protecting the image from moisture and wear with a professional-looking finish.

- Protects against moisture and spills.
- Prevents the wood from drying out and cracking.
- Keeps the surface looking fresh and clean.
The secret? A simple care routine. For any finished wooden gift, a quick wipe with a soft cloth and a bit of furniture polish or wax (like Howard Feed-N-Wax) every few months is all it takes to maintain its beauty for years.

A common mistake: Rushing the drying time. Whether it’s glue on a photo box, stain on a frame, or the cooling of beard balm, patience is key. Following the recommended drying times on the product label prevents smudges, ensures proper bonding, and guarantees the durability of your gift. A rushed finish often looks exactly like that—rushed.
For small wood projects, the type of wood matters.
Pine: Inexpensive, lightweight, and widely available at stores like Home Depot. It’s soft and easy to cut but can dent easily and absorb stain unevenly without a conditioner.
Oak or Poplar: Harder, more durable woods with a more pronounced grain. They cost a bit more but give a project a satisfying heft and a more premium feel. They are also less prone to blotching when stained.
For a first project, pine is fine. For a gift meant to last, upgrading to a hardwood is worth it.
Shea butter is non-comedogenic, meaning it won’t clog pores. This makes it an ideal moisturizer for the sensitive skin under a beard, helping to reduce itchiness and dandruff without causing breakouts.
The beauty of a handmade gift isn’t in its perfection, but in its authenticity. A slightly imperfect corner, a visible brush stroke, a seam that isn’t perfectly straight—these aren’t flaws. They are the fingerprints of your effort, the undeniable proof that this object was made by a person, for a person. Embrace the imperfections; they are part of the story.