The Real Deal on Knee Tattoos: Pain, Cost, and What to Actually Expect
After more tattooing sessions than I can count, I’ve seen all kinds of trends. But one spot never fails to be a true test of grit for both the client and the artist: the knee. Let’s be real, it’s a statement piece. You can’t hide it in shorts, and it grabs your attention immediately. I’ve had so many people sit in my chair, buzzing with excitement but also super nervous, asking the exact same questions. Does it really hurt that bad? How will it heal? Is it going to look weird when I bend my leg?
In this article
They want the straight-up, honest truth, not just a curated gallery of perfect photos. So, here it is.
This is that honest answer. Over the years, I’ve learned what works on a knee and, more importantly, what absolutely doesn’t. The knee isn’t just another patch of skin to be decorated. It’s a complex, high-motion joint that demands some serious respect, smart technique, and careful planning. So forget the generic inspiration posts for a minute. Let’s get into what it really takes to get a knee tattoo you’ll be proud of for the rest of your life.
First Things First: Understanding the Canvas
Before any ink gets near the skin, a good artist really studies the area. A knee is nothing like a flat canvas like your forearm. It’s a sphere of bone, ligaments, and muscle, all covered by skin that has wildly different textures. Getting this anatomy is step one for a tattoo that won’t look like a mess later.
You’ve got the kneecap (the patella) right in the center. The skin here is super thin and sits directly on the bone. When you bend your leg, that skin stretches out tight like a drumhead. Straighten it, and it gets all loose and wrinkly. This constant back-and-forth is the main challenge. A design that looks perfect with a bent leg can turn into a distorted blob when you stand up. This is precisely why I always apply a stencil with the client standing, sitting, and bending their knee—we have to see it in every state.
Then there’s the back of the knee, which everyone in the biz calls the “knee ditch.” This spot is the complete opposite of the kneecap. The skin is incredibly soft, thin, and loaded with nerve endings. It’s a notoriously sensitive area that swells up like a balloon and is a high-risk zone for ink blowouts if the artist has a heavy hand. A blowout, by the way, is when ink goes too deep and spreads out, creating a permanent blurry, bruised look around your lines. It’s no joke.
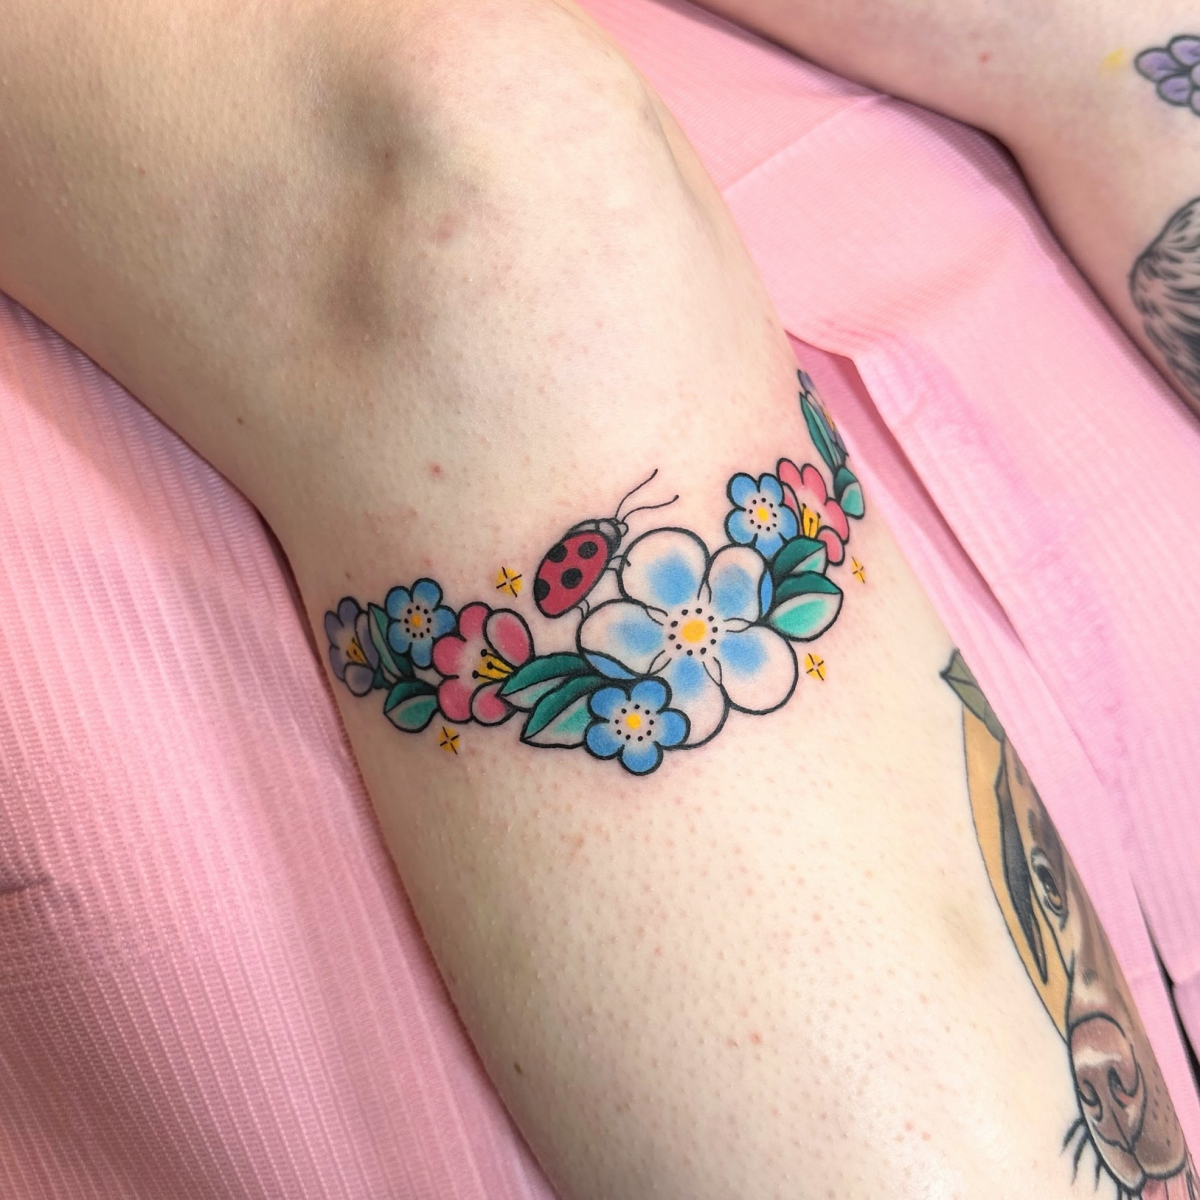
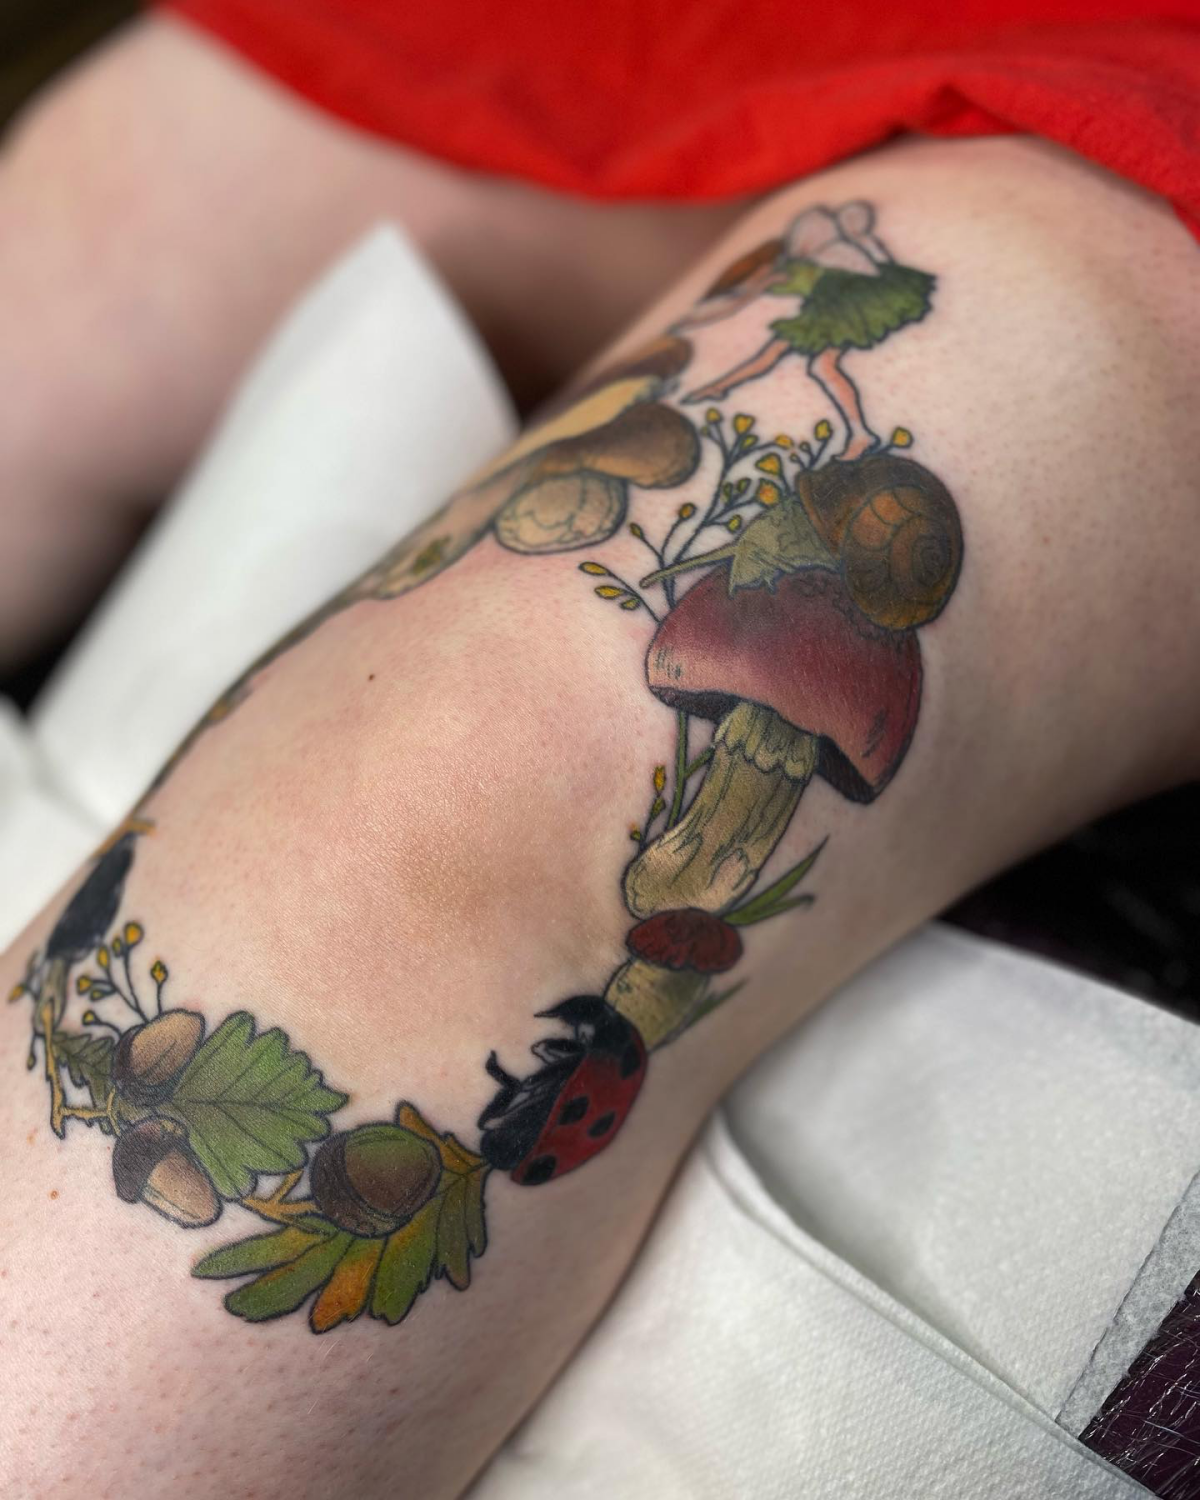
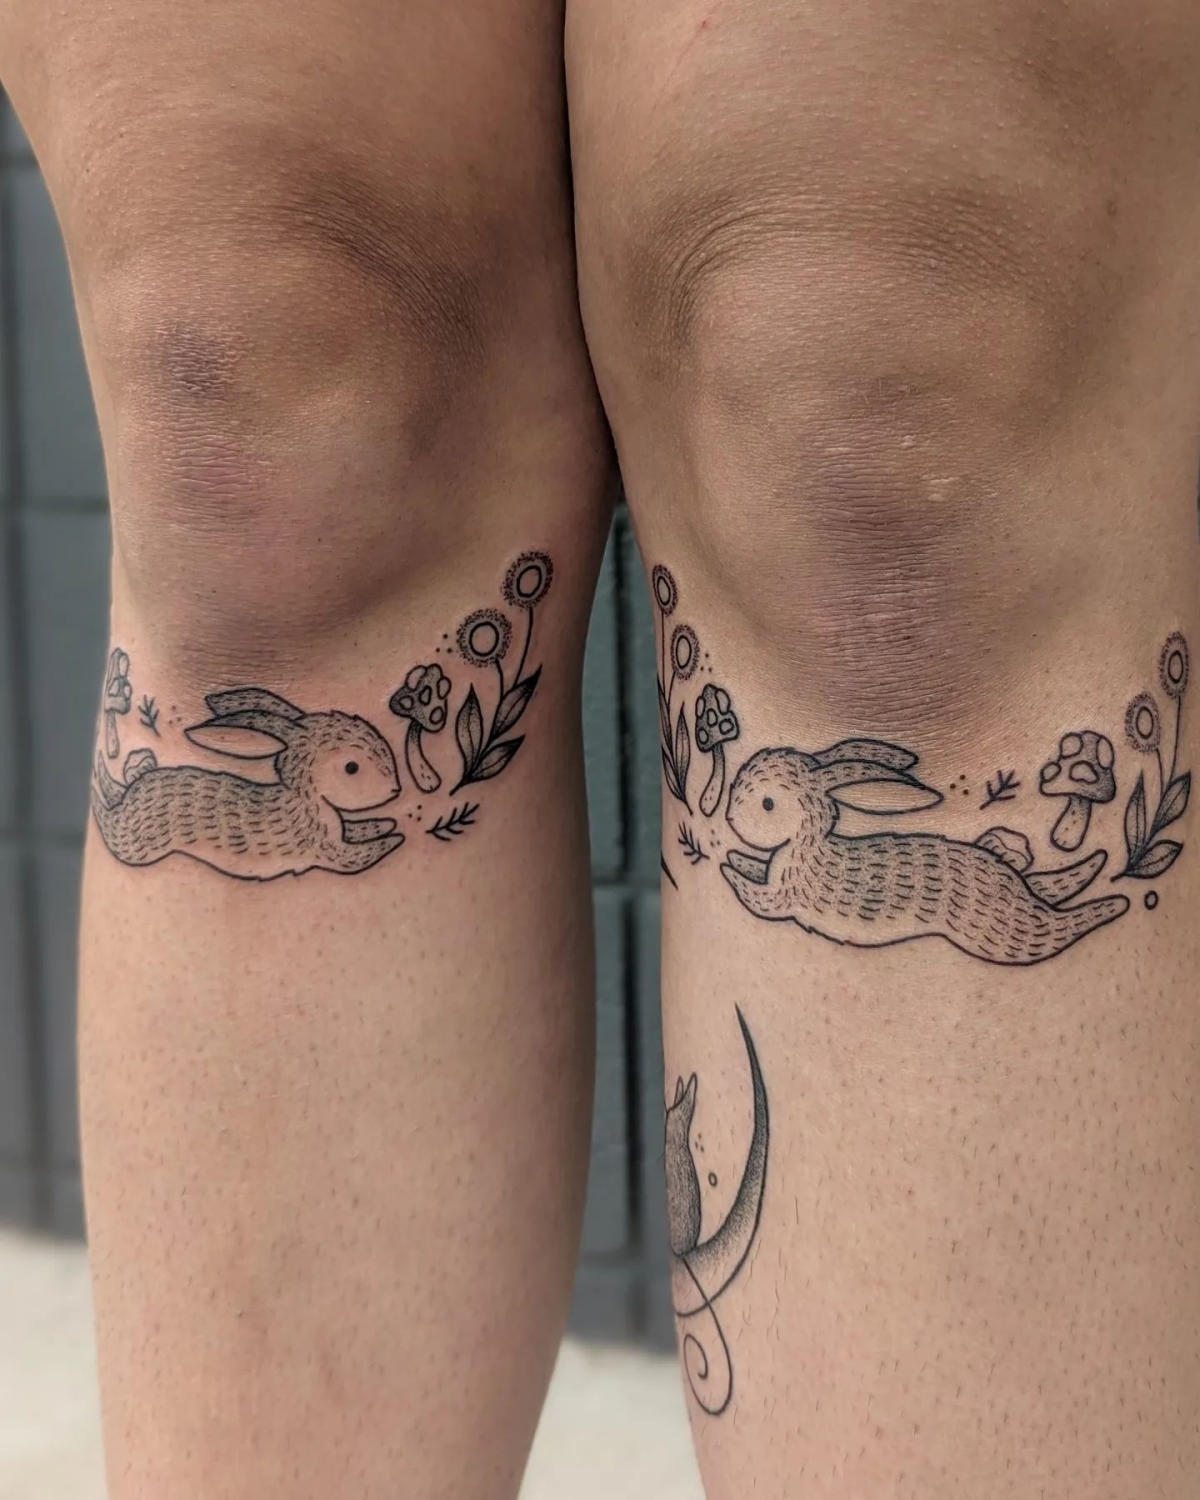
Finally, you have the sides of the knee and the surrounding areas on the thigh and shin. This skin is generally more stable and has a bit more padding. These spots are great for anchoring the main design and are usually less painful to get tattooed. A well-designed knee piece uses these areas to create a flow that works with the leg’s natural shape.
An Artist’s Approach: Techniques for a Killer Knee Tattoo
Tattooing a knee isn’t just about having a steady hand; it’s about a whole different approach. The goal is to pack the ink in solid, pull clean lines, and do it all while managing the skin’s unique challenges.
Design and Stencil Are Everything
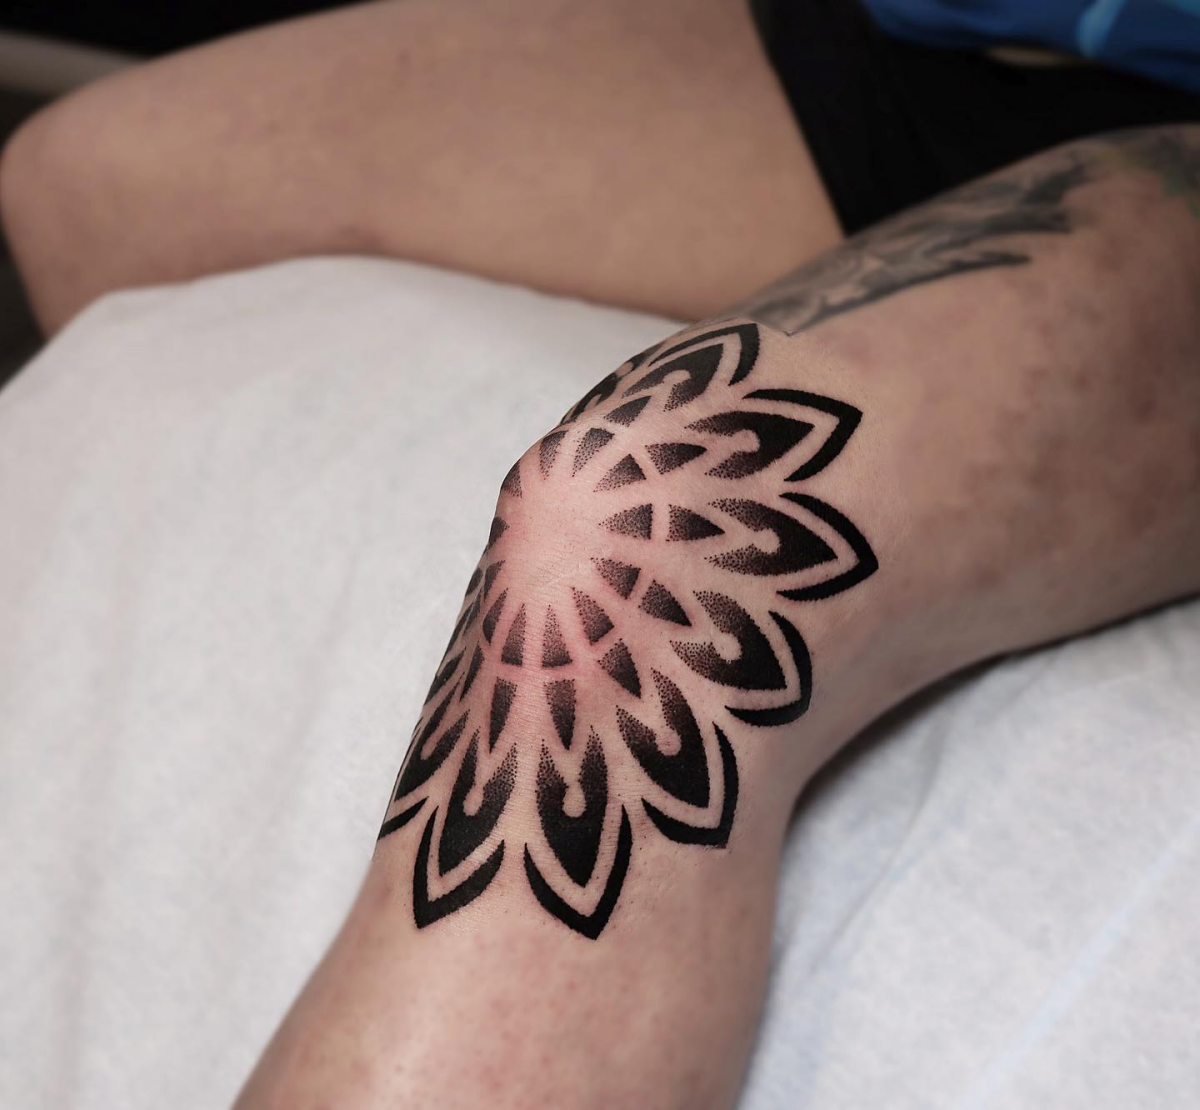
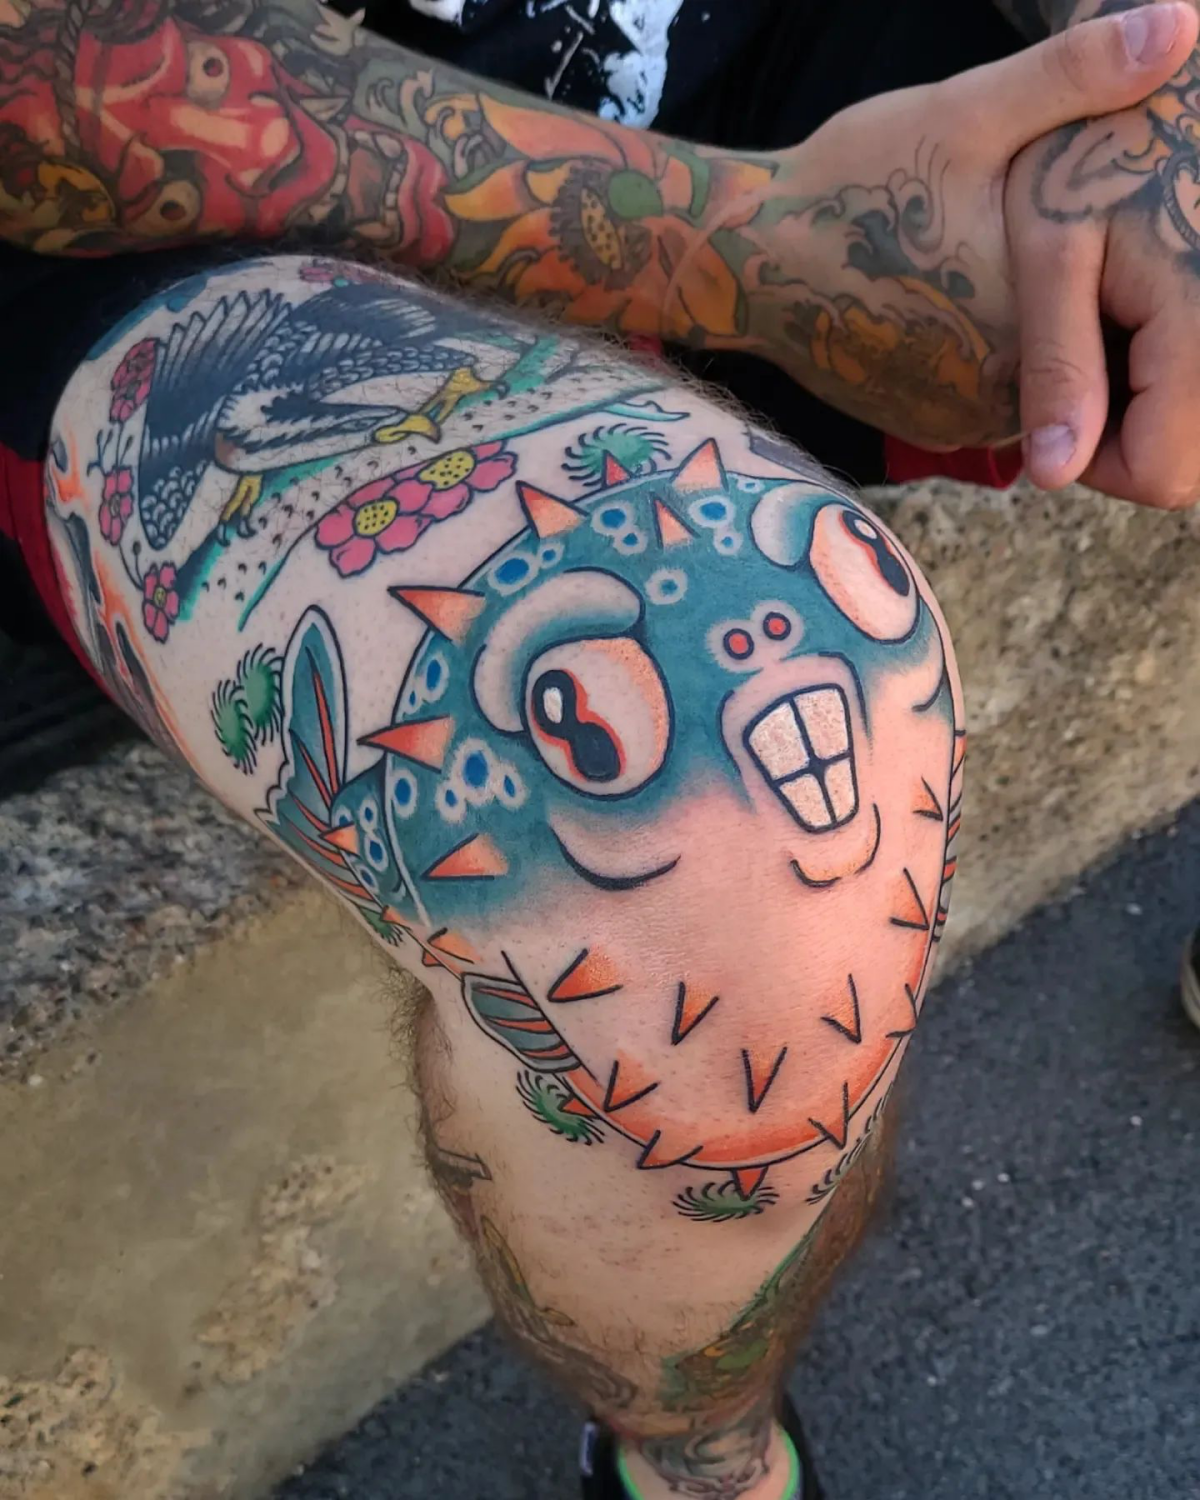
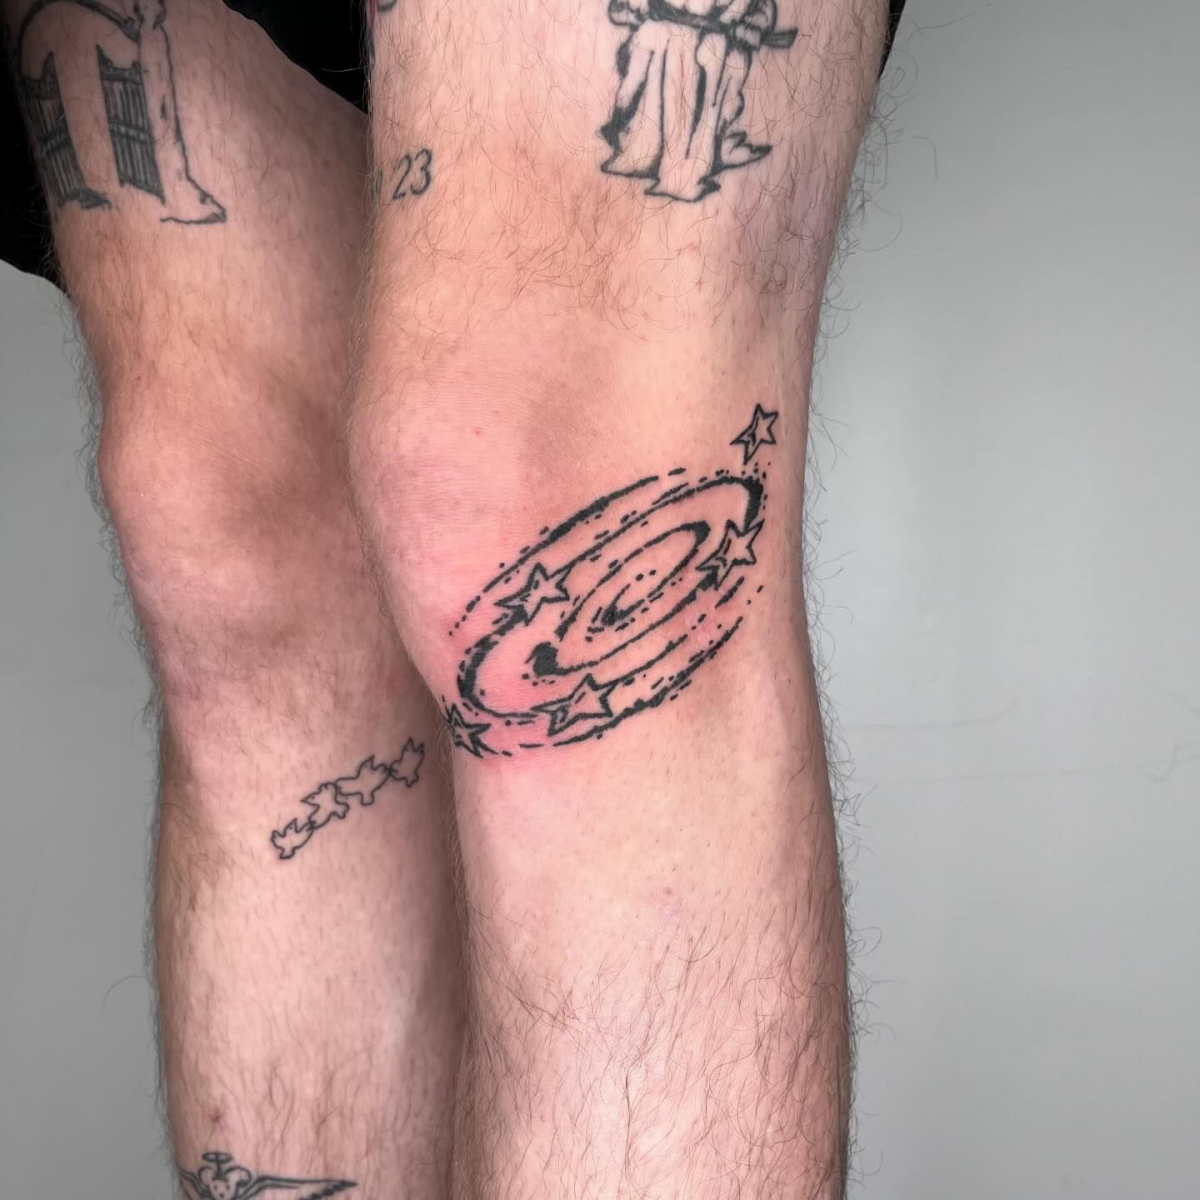
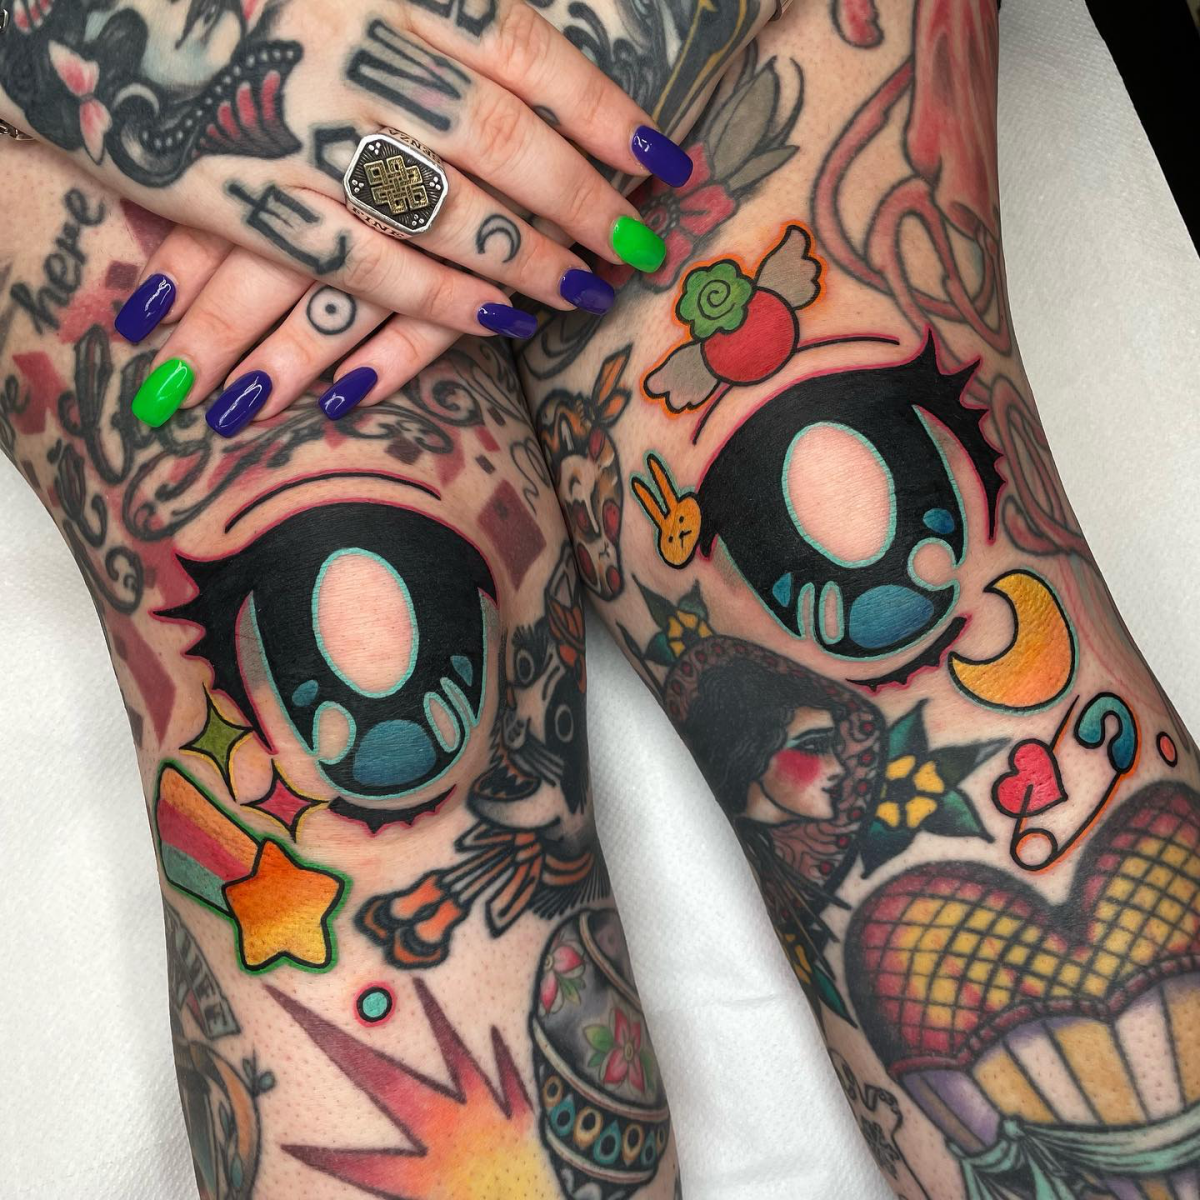
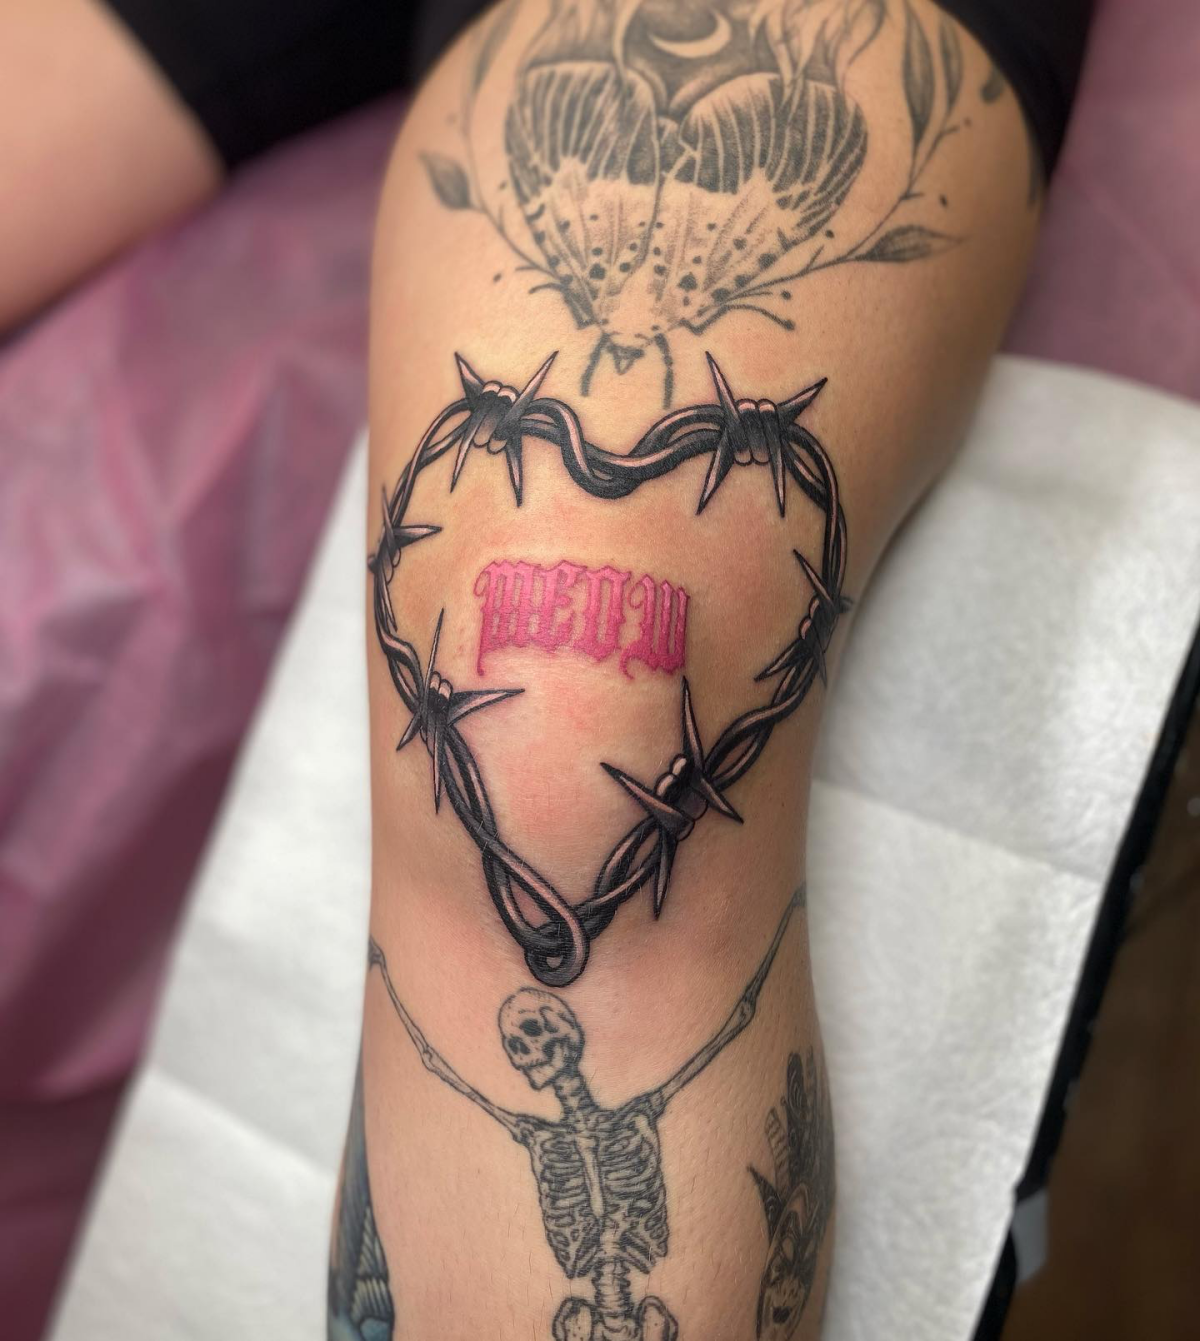
Honestly, this is the most critical part. There’s a reason you see so many circular, shield-like, or symmetrical designs on knees. Mandalas, animal faces, and traditional shields just work with the round shape. They have a clear center that sits right on the kneecap, and the design radiates outward, so it looks balanced whether your leg is bent or straight.
On the flip side, designs with perfect squares, long straight lines, or realistic portraits are a huge gamble. I’ll be blunt: I once had a client who was dead-set on a perfect geometric grid against my advice. A year later, he was back in my chair for a cover-up. The slightly warped lines drove him absolutely nuts. It’s always better to adjust the idea to fit the body part than to end up with a tattoo that looks “off” half the time.
Needles, Machines, and a Light Touch
For knees, I often switch up my gear. On the bony kneecap, a rotary machine is usually a bit kinder than a hard-hitting coil machine. For linework, a solid medium liner (like a 7RL or 9RL) is a good bet. Anything too small might get lost or fade over time, and anything too big can look clunky.
In the knee ditch, it’s all about finesse. I’ll often lower my machine’s voltage and use a very light touch to avoid going too deep and causing that dreaded blowout. It’s a constant adjustment based on how the skin feels under the needle.
Choosing Your Design: What Works and What Doesn’t
The best knee tattoos come from a collaboration between your vision and your artist’s deep understanding of the anatomy. Some styles are just made for this spot.
Designs That Totally Rock on Knees
- Mandalas & Geometric Patterns: Their radial symmetry is just so forgiving. The design looks great from every angle and moves with you.
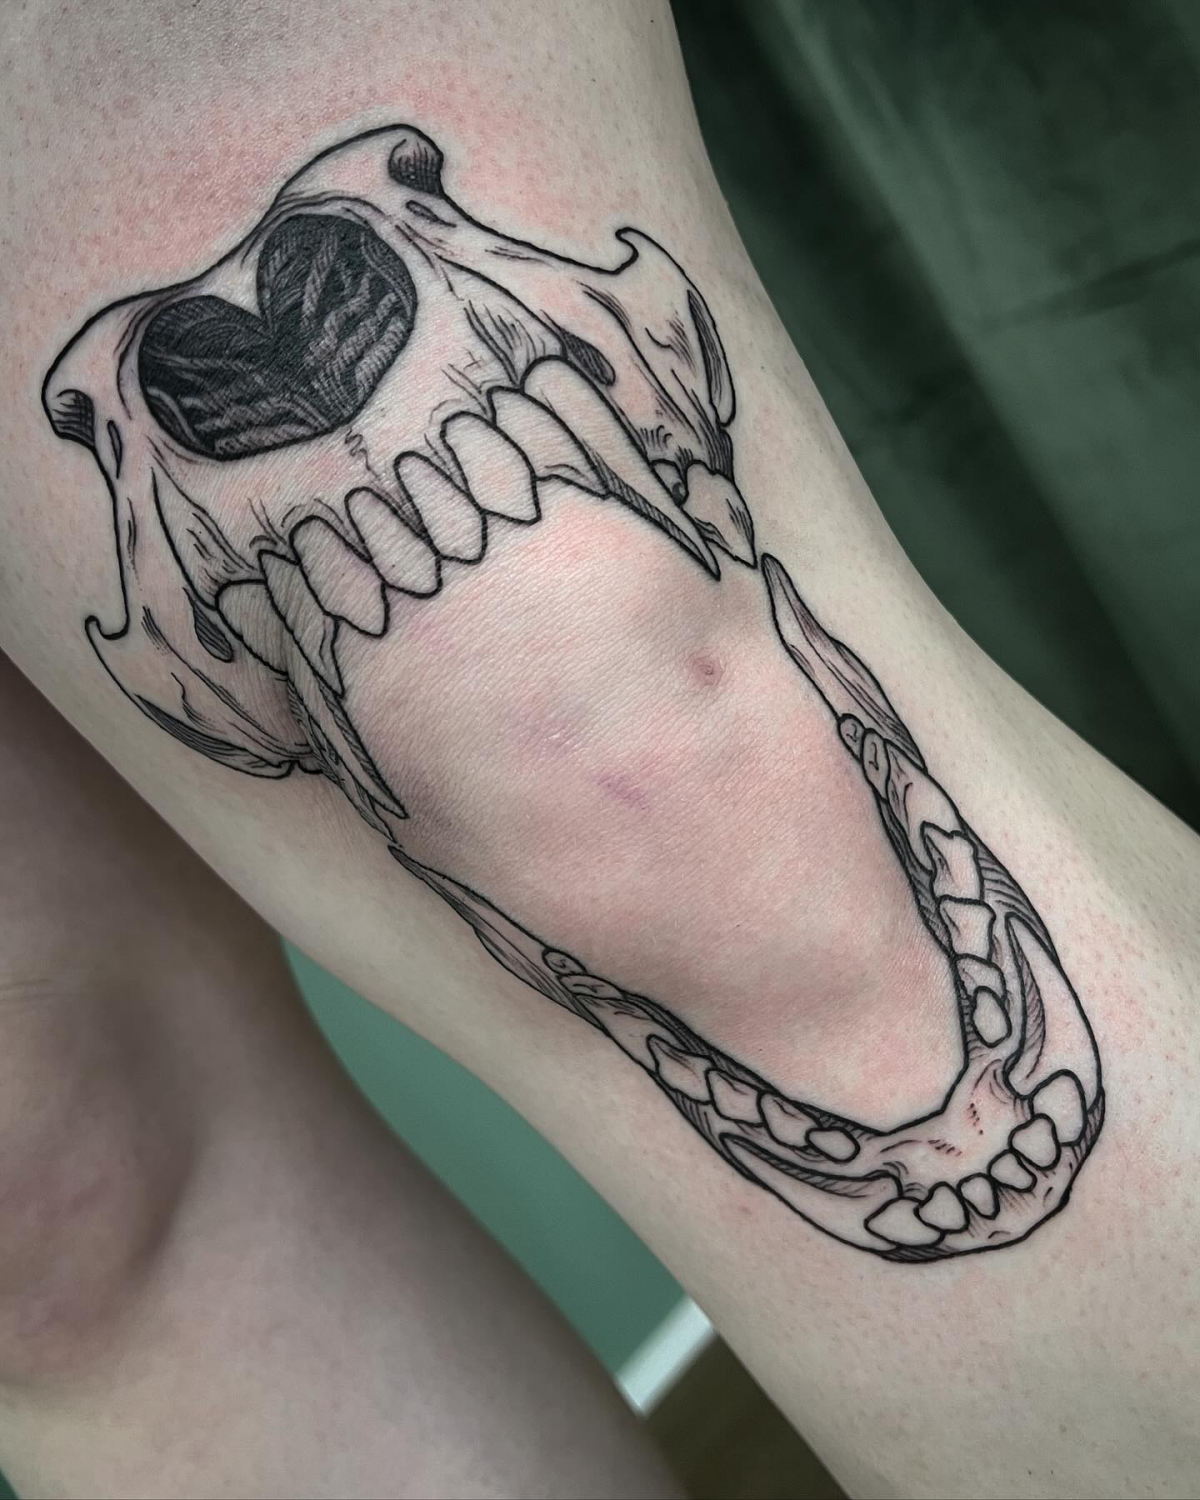
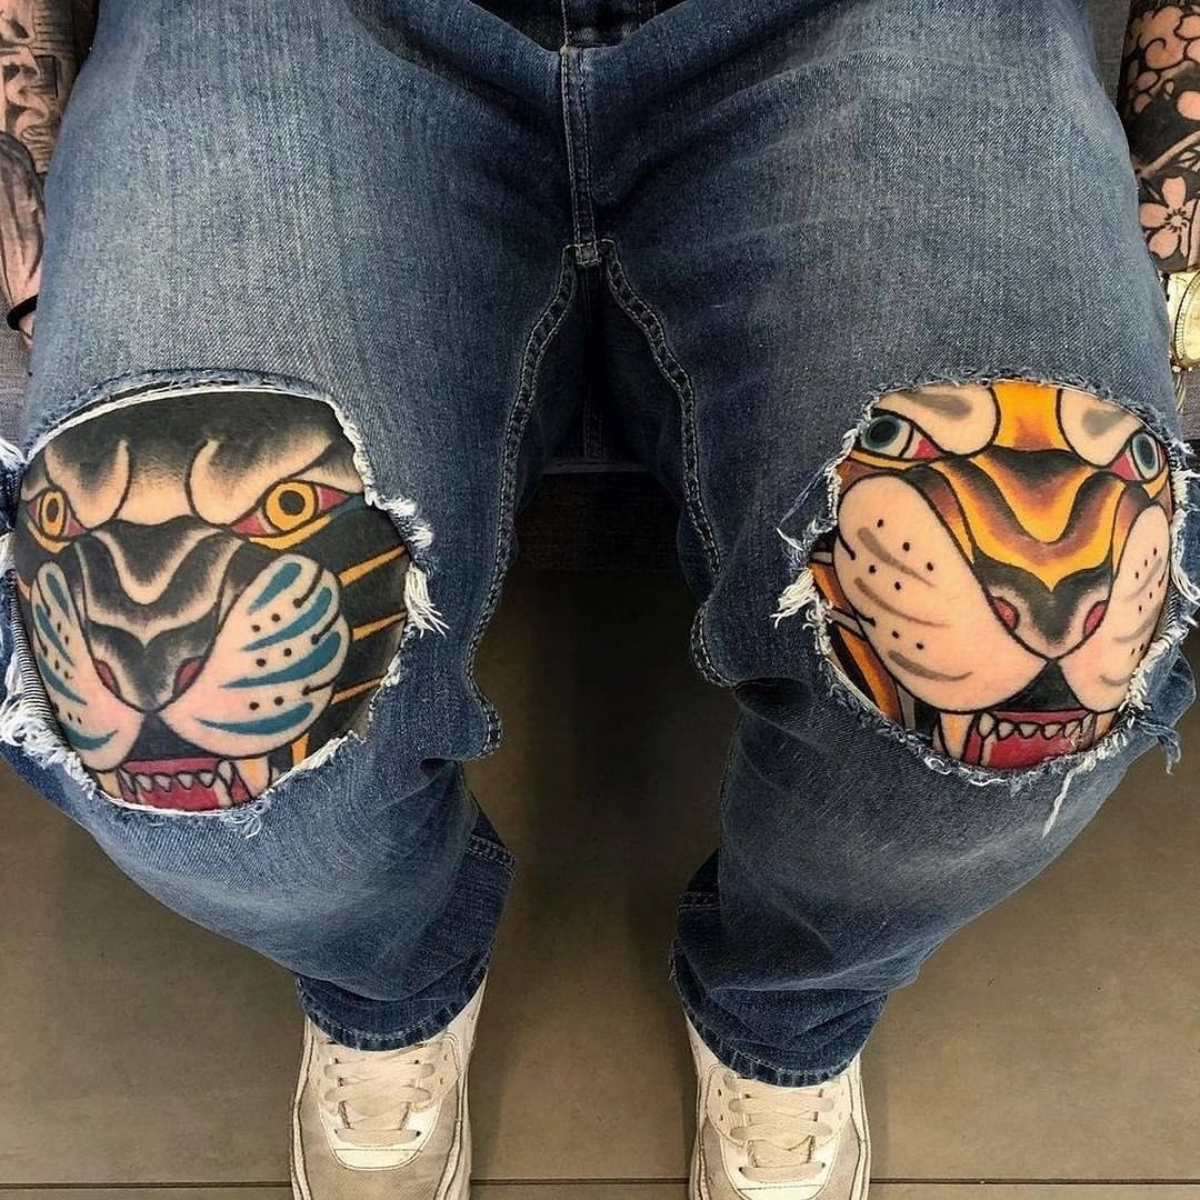
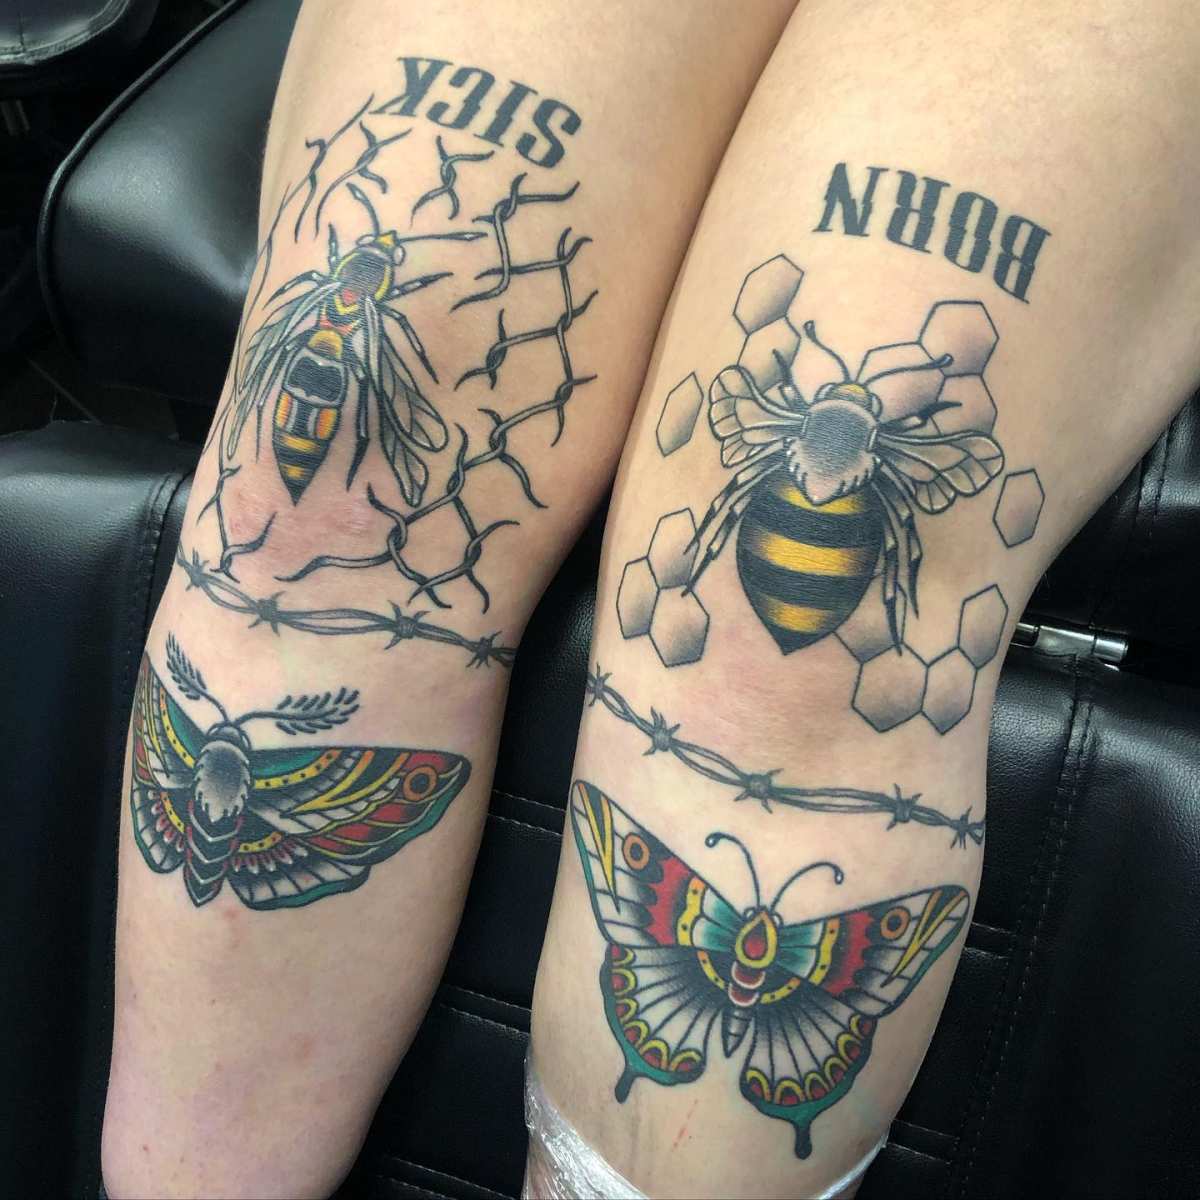
- Animal Faces: Think tigers, panthers, and bears. These are classics. The animal’s nose sits on the kneecap, and its features wrap around the joint. American Traditional style is especially durable here because of its bold lines and heavy shading.
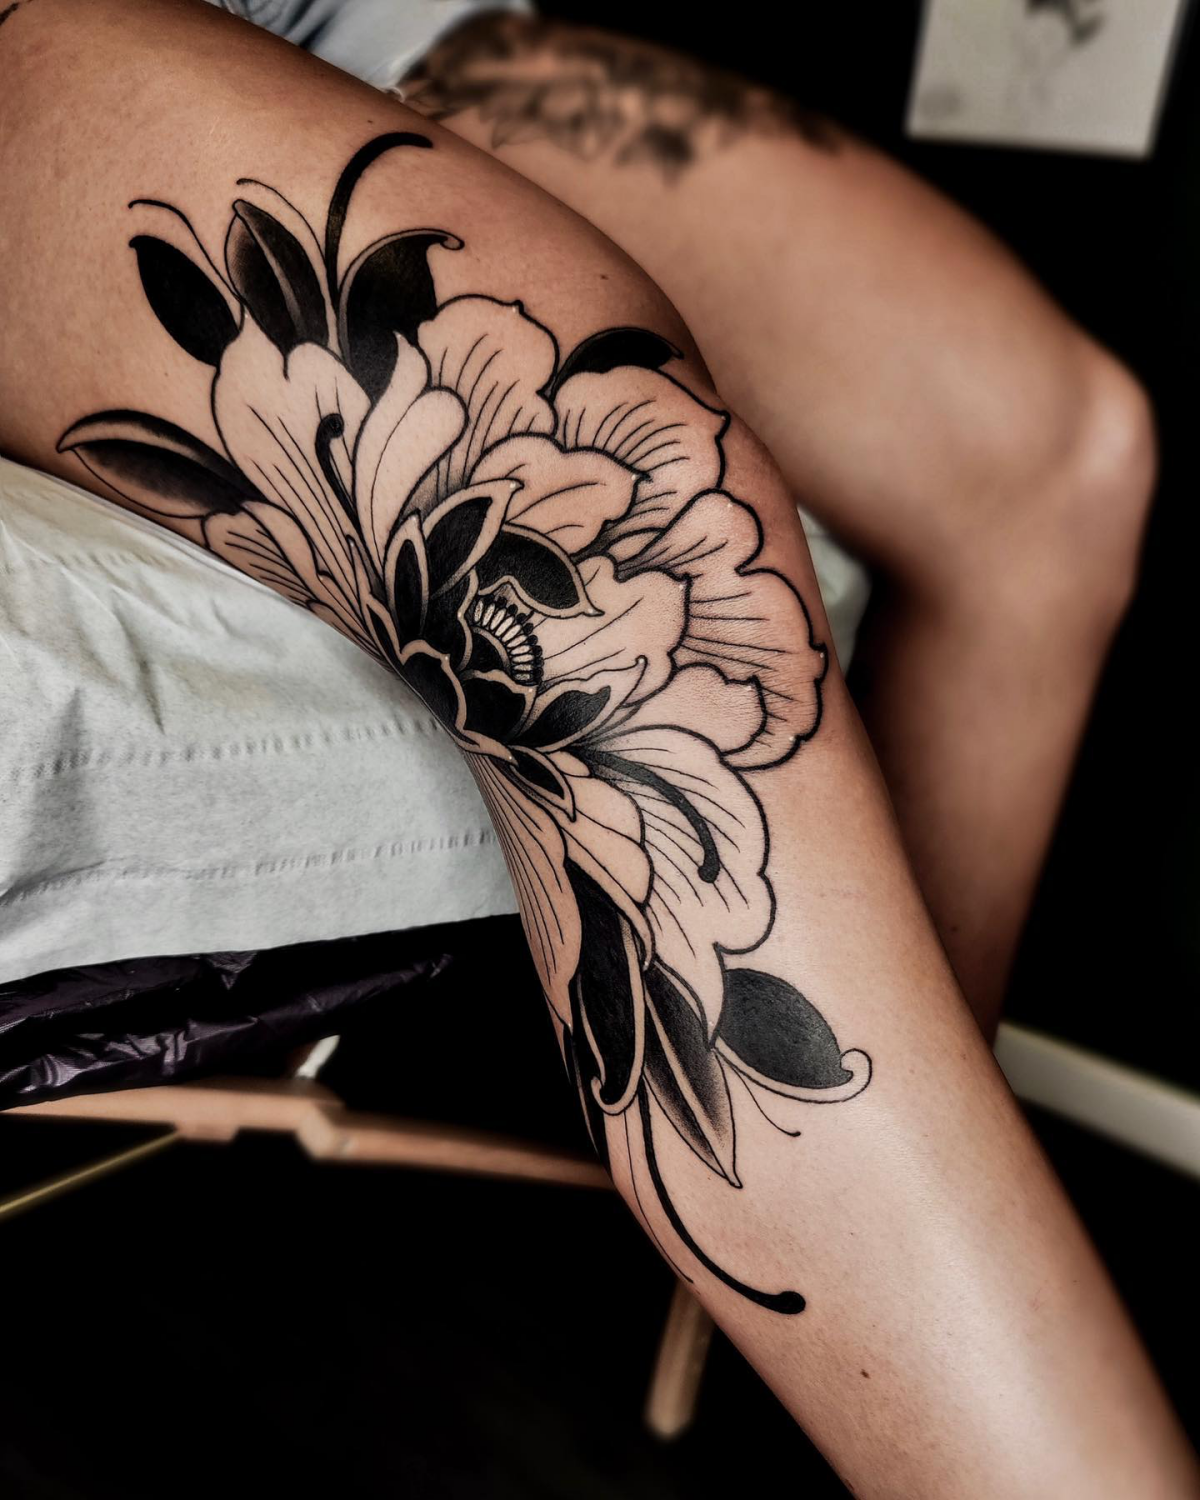
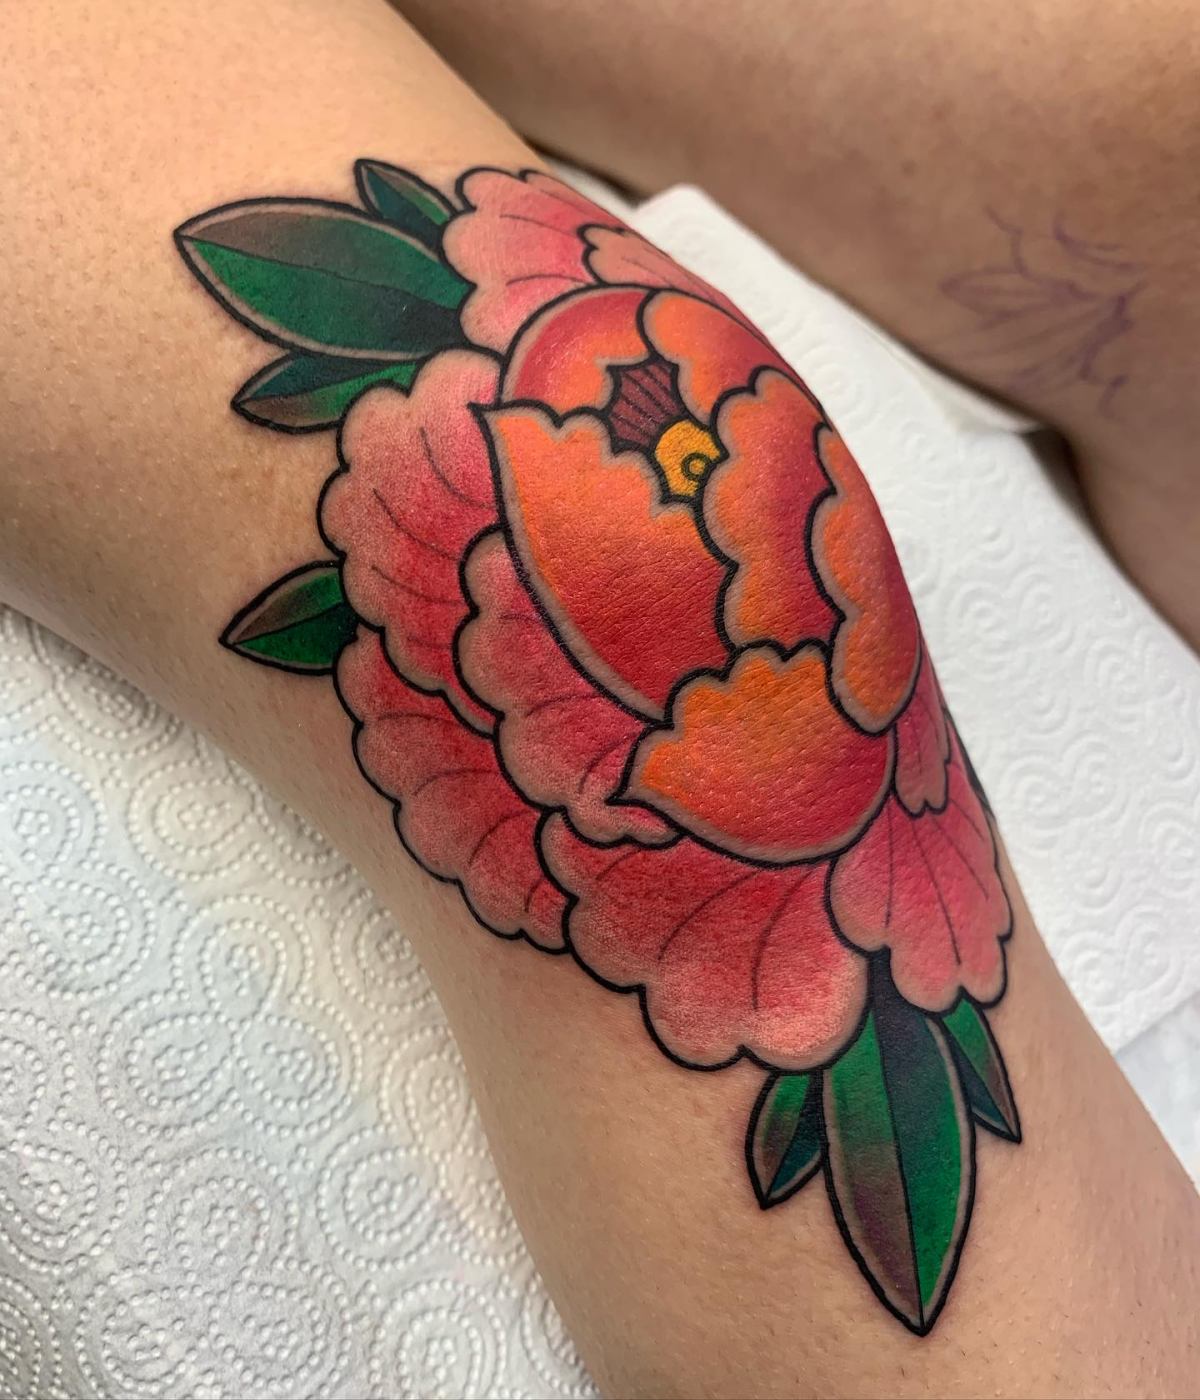
- Big Flowers: Chrysanthemums, peonies, and roses are perfect. The center of the flower becomes the center of your knee, and the petals can flow beautifully over the joint, connecting to your thigh or shin.
- Shields & Armor: The knee is a point of strength, so armor themes just feel right. A cool shield or some ornate filigree can look incredibly powerful.
Designs That Are a Bit… Risky
- Photorealism: Trying to put a realistic portrait on a knee is a bad idea 99% of the time. The constant stretching will distort the face, and it’s a recipe for disappointment.
- Tiny, Dainty Script: Fine lines and small letters tend to blur and fade on high-movement areas like the knee. They just don’t have the staying power.
- Perfectly Straight Lines/Grids: As my client learned the hard way, the knee’s curve will inevitably bend straight lines, making any tiny imperfection scream for attention.
Your Job: Prep, Pain, and Aftercare
Look, a great tattoo is a two-way street. Your preparation and aftercare are just as crucial as my technique, especially for a spot as tricky as the knee.
Prepping for Your Appointment
First, let’s talk about the big question: numbing cream. A lot of people want to show up with their knee pre-numbed. Heads up! Do NOT do this without talking to your artist first. Many artists dislike working on skin that’s been treated with numbing cream because it can make it feel rubbery and weirdly textured, which makes it harder to get the ink in properly. Some artists have a specific product they recommend; others might cancel your appointment if you show up with it on unannounced. The key is communication—just ask!
The day before, skip the alcohol. It thins your blood and can make you bleed more. Get a good night’s sleep, and on the day of your appointment, eat a big, solid meal an hour or two before you come in. Your body handles pain way better when it’s fueled up. Wear loose shorts or a skirt. Trust me, you do not want to pull tight jeans over a fresh, swollen knee tattoo. Bring a drink and a snack, too. Knee tattoos aren’t quick; you could be in the chair for three to six hours.
An Honest Guide to the Pain
I’m not going to lie to you. Yes, knee tattoos hurt. They’re consistently ranked as one of the most painful spots. But the pain isn’t the same all over.
Think of it on a 1-to-10 scale. The top of the kneecap is a solid 8/10. It’s less of a sharp pain and more of a deep, rattling vibration that you feel in your bones. It’s intense. Then you have the knee ditch… oh, the knee ditch. For most people, that’s a fiery, stinging 9/10. It’s packed with nerve endings, and it burns. The good news? The sides of the knee are much more manageable, maybe a 6/10, feeling more like a standard, spicy tattoo pain.
Healing: Here’s the Game Plan
The healing process for a knee tattoo is a journey. Be ready for a week or two of feeling pretty uncomfortable and not moving around much.
- Days 1-4: The Swollen & Stiff Phase. This is the worst of it. Your knee will likely swell up, feel sore, and be very stiff. Bending your leg is going to suck. Your job is to rest and elevate it as much as you can. Seriously, plan to be a couch potato for at least two days.
- Days 5-10: The Itchy, Peely Phase. The swelling will go down, and your new tattoo will start peeling like a sunburn. It will also get insanely itchy. Do. Not. Scratch. It. Picking at it can pull ink out. Lightly patting it is okay, but you’ll need some serious self-control here.
- Weeks 2-4: The “Cloudy” Phase. Your tattoo might look dull or faded for a bit. This is totally normal. A new layer of skin is healing over the ink, and it will take time for the vibrancy to come back.
Quick Tip: Thinking about work the next day? If you have a desk job, you’ll likely survive, but you’ll be stiff and uncomfortable. If your job is physical and involves walking, climbing, or squatting, I strongly recommend booking a day or two off. You’ll thank me later.

Your Aftercare Shopping List
To make it easy, here’s exactly what you need. You can get all of this for under $20 at any drugstore.
- Unscented Antibacterial Soap: Dial Gold is the classic for a reason. (~$5)
- Healing Ointment/Lotion: A thin layer of something like Aquaphor or Lubriderm is perfect. (~$10)
- Paper Towels: For patting your tattoo dry. Don’t use your fuzzy, bacteria-filled bath towel! (~$2)
For that crucial first wash: use lukewarm (never hot!) water. Lather the soap in your hands first, then gently wash the tattoo. Don’t rub the soap bar directly on it. Pat it completely dry with a clean paper towel before applying a very thin layer of ointment.
Cost, Time, and Finding the Right Artist
A quality knee tattoo is an investment. This is not the placement to go bargain hunting. Most experienced artists who are confident with knees charge anywhere from $150 to over $350 an hour, depending on their skill and location. A full, complex knee piece could easily run you $800 to $2,000+ and might take multiple long sessions to complete.
When you’re looking for an artist, be critical. Ask to see pictures of HEALED knee tattoos they’ve done. A photo taken a year later is the true test of skill—it shows if the lines held up and if the design aged well.
A few red flags to watch for:
- They only show fresh, glossy photos and have no healed work to show you.
- Their studio looks messy or they make you feel uncomfortable.
- They pressure you to make a decision or start right away.
- They dismiss your concerns about design placement and distortion.
A knee tattoo is a badge of honor. It tests your pain tolerance and your patience during healing. But when you find a skilled artist who respects the body and you do your part with aftercare, the result is one of the most striking and impressive tattoos you can possibly get.
Galerie d’inspiration
The skin over a joint like the knee is in constant motion, undergoing tension and compression cycles thousands of times a day. This makes ink saturation and long-term stability a unique challenge for any tattoo artist.
Your artist did their part, now it’s your turn. Proper healing is non-negotiable for a knee tattoo. For the first few days, expect significant swelling and limited mobility. Keep your leg elevated when possible and resist the urge to bend it excessively. Gentle, fragrance-free soap and lukewarm water are your best friends. Pat dry with a clean paper towel—never rub—and apply a thin layer of recommended aftercare product. Patience here pays off for decades.
What about the ‘knee ditch’ pain?
The back of the knee is notoriously spicy. Why? The skin is thin, packed with nerve endings, and sits right over sensitive lymph nodes. Most people compare the sensation to a persistent, sharp burn. The key is communication with your artist. Don’t be a hero. Ask for short breaks if you need them. A good artist anticipates this and will work with you to manage the pain and ensure the best possible result without rushing.
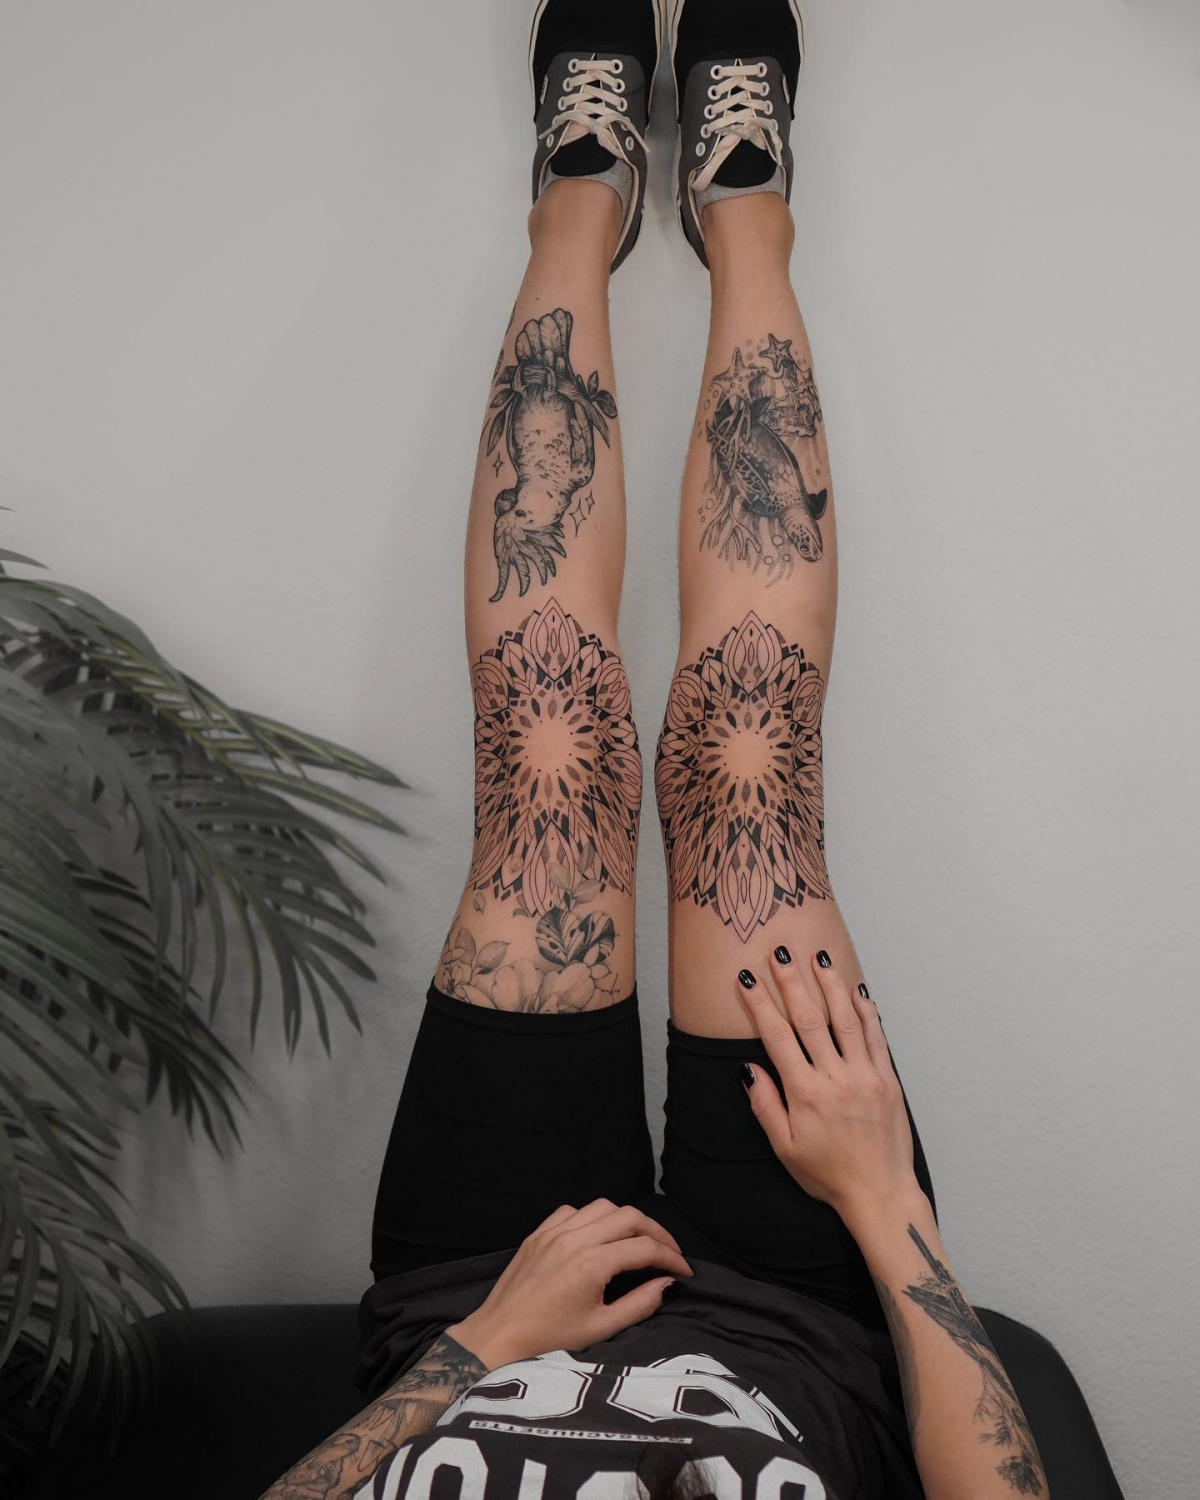
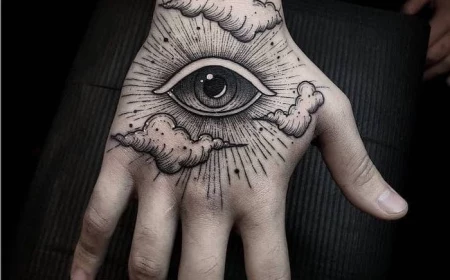
Circular Design: A mandala, rose, or animal face centered on the kneecap. It creates a powerful focal point and works with the knee’s natural shape, looking balanced whether the leg is bent or straight.
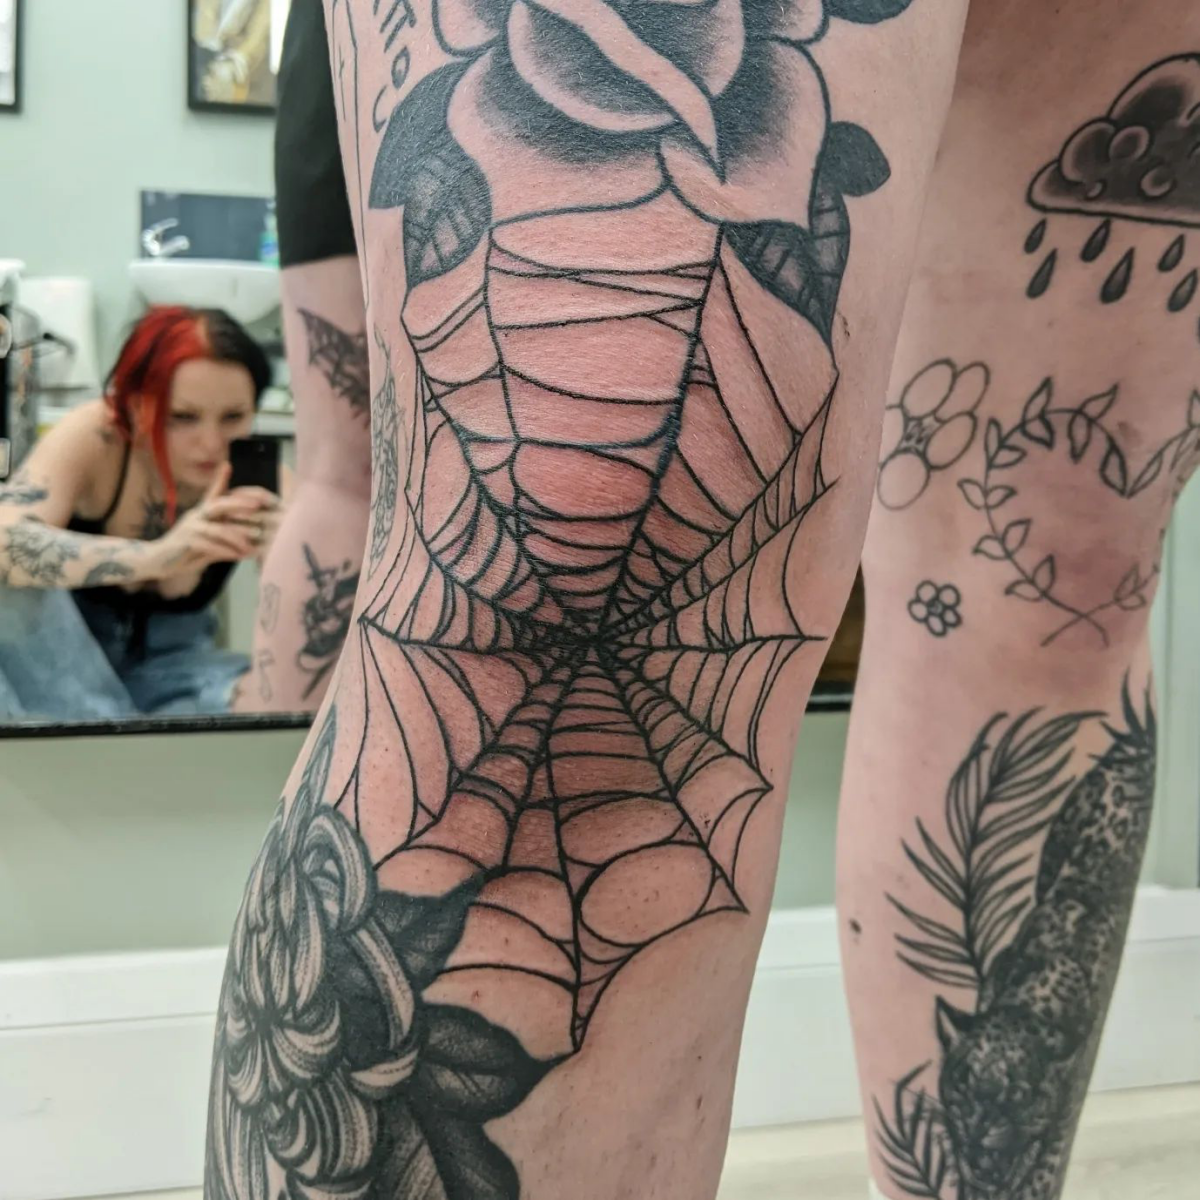
Wrap-Around Design: Vines, snakes, or ornamental patterns that encircle the joint. This approach cleverly distracts from the knee’s movement, as the design is meant to flow and has no single ‘correct’ state.
Your choice depends on whether you want to highlight the knee as a centerpiece or integrate it into a larger leg piece.
Thinking long-term is crucial. A design with tiny, intricate details might look incredible on day one, but the knee’s unique, thicker skin and constant movement can cause fine lines to blur or ‘blow out’ over the years. Bold lines and solid color or black-and-gray shading tend to age much more gracefully on this high-impact area. Trust your artist if they suggest simplifying or enlarging certain elements of your chosen design.
- Less scabbing and peeling.
- Protection from bacteria and friction.
- A waterproof barrier that allows you to shower easily.
The secret? A ‘second skin’ bandage. Many artists now recommend a medical-grade adhesive film like Saniderm or Tegaderm. Applied right after the session, it’s left on for several days, creating a sterile environment that lets the tattoo heal in its own plasma. It’s a game-changer for tricky spots like the knee.
For centuries, traditional Japanese tattoo masters (Horishi) have treated joints not as obstacles, but as opportunities. In a full leg suit (bodysuit), the knee is often the home of a powerful motif—the face of a Hannya mask, a roaring tiger, or a fully bloomed peony. The design is intentionally placed to look dynamic and alive with the body’s movement, embodying the philosophy that the tattoo should complement the human form, not just sit on top of it.
A 2018 study in the Journal of Cutaneous and Aesthetic Surgery found that sun exposure is the single greatest contributing factor to tattoo fading and color degradation.
This is doubly true for a knee tattoo, which is frequently exposed during warmer months. Once fully healed, make sunscreen a daily ritual. A high-SPF, broad-spectrum mineral sunscreen (like EltaMD or Blue Lizard) will create a physical barrier to protect the crispness of your lines and the vibrancy of your colors for years to come.
Pro Tip: Don’t bargain shop for a knee tattoo. The price reflects the artist’s expertise in navigating a highly complex area. You are paying for their knowledge of how to stretch the skin, their precise needle depth to avoid blowouts, and their skill in designing a piece that won’t distort. It’s an investment in permanent art on a very prominent part of your body.
Once your knee tattoo is healed, you’ll need to adapt your workouts, at least for a while. High-impact or high-friction exercises can irritate the new tattoo.
- Avoid lunges or deep squats that put excessive strain on the skin.
- Be cautious with gym equipment where your knee might rub, like leg extension machines.
- Choose swimming or cycling once the tattoo is fully sealed and healed (usually after 2-3 weeks) to maintain fitness without compromising your ink.
Traditional Ointment: A classic approach using products like Aquaphor or Hustle Butter Deluxe. Requires washing and reapplying a thin layer 2-3 times a day. It’s effective but demands a consistent routine.
Adhesive Bandage: The ‘set it and forget it’ method with brands like Saniderm. The bandage stays on for 3-5 days, locking in moisture and protecting the tattoo. It drastically simplifies the early, messy stages of healing.
The best method often depends on your artist’s preference and your lifestyle.
Don’t be surprised if your knee tattoo requires a touch-up session after it’s fully healed. Because of the tough, mobile skin, it’s common for certain spots to have minor ink fallout or inconsistencies. This is completely normal. Most artists include a free touch-up session within a year for this very reason. It’s the final step to ensuring your piece is perfectly saturated and solid for the long haul.
There’s a unique confidence that comes with rocking a healed knee tattoo. It’s a testament to your endurance and a bold piece of your personal story. The way a striking design peeks out from ripped jeans or becomes the centerpiece of a summer outfit is a powerful form of self-expression. It’s more than just ink; it’s a permanent badge of honor.