Your Unfussy Guide to a Stunning Easter Table
For years, I’ve been in the business of creating beautiful spaces for people to gather. Whether it’s a huge event or just a quiet dinner at home, the goal is always the same: make a space that feels special, a place where people want to stick around and talk for hours. And honestly, an Easter table has a kind of magic all its own. It’s all about celebrating spring, new beginnings, and just being together.
In this article
The best part? You absolutely do not need to spend a fortune to make it happen. It’s all about the thoughtful little details and getting your hands a little dirty. I once designed a table that looked like a meadow had sprung up indoors, using a runner made of real moss dotted with tiny quail eggs. That kind of sensory touch is what people remember. So, let’s walk through how to build a gorgeous Easter table from scratch, using the same approach the pros do.
First Things First: The Ground Rules of Good Table Design
Before you even think about flowers or plates, it helps to have a little roadmap. These are the core ideas that keep a table looking intentional and beautiful, not just cluttered.
Let’s Talk Color and Vibe
Color is your most powerful tool for setting a mood. So, what feeling are you going for?
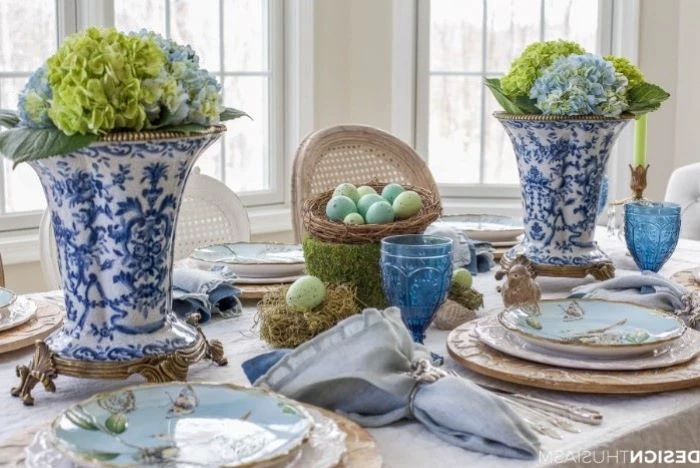
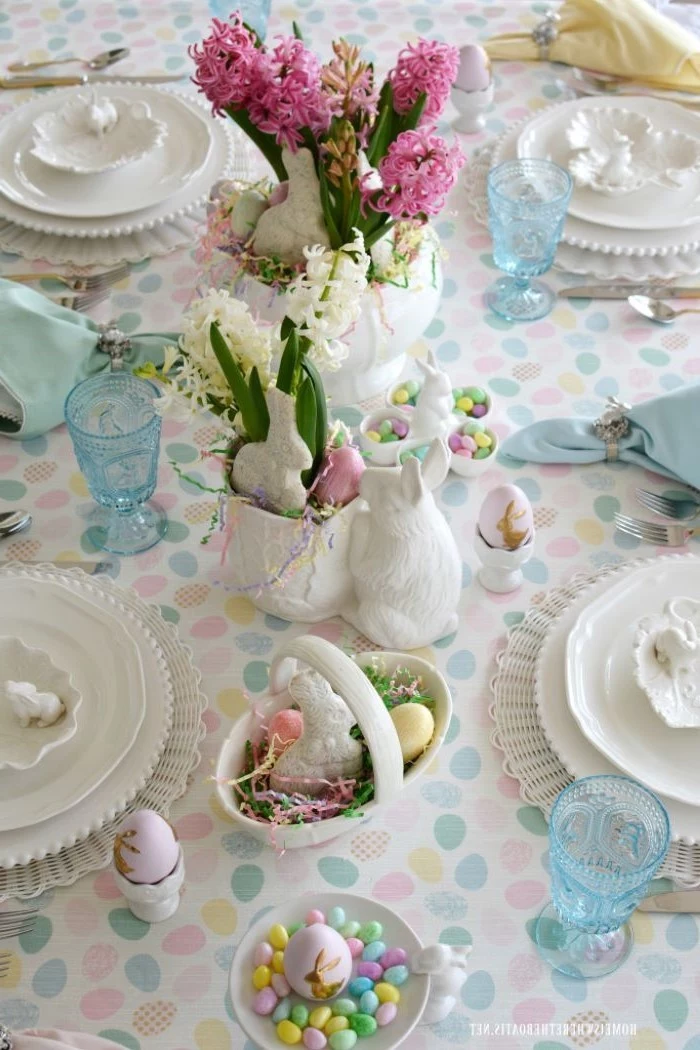
If you want something soft, classic, and serene, think about using colors that are similar to each other. This could mean using different shades of the same color—like pale yellow, soft cream, and a touch of gold—or colors that sit right next to each other on the color wheel, like blush pink, lavender, and pale blue. These palettes are super restful and always look elegant.
But if you want your table to feel more lively and energetic, go for complementary colors. These are opposites on the color wheel, and they create a fun, dynamic pop. Think about bright yellow daffodils paired with deep purple irises. The trick is to pick one color to be the star of the show and use the other as an accent. It keeps things exciting without being overwhelming.
Getting the Size and Flow Right
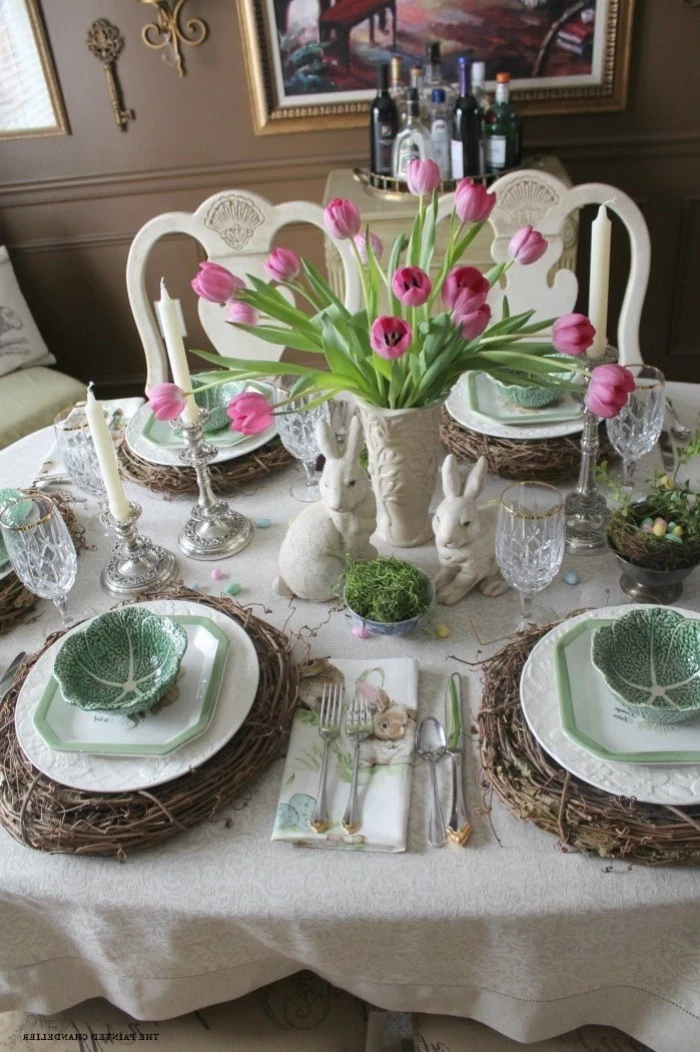
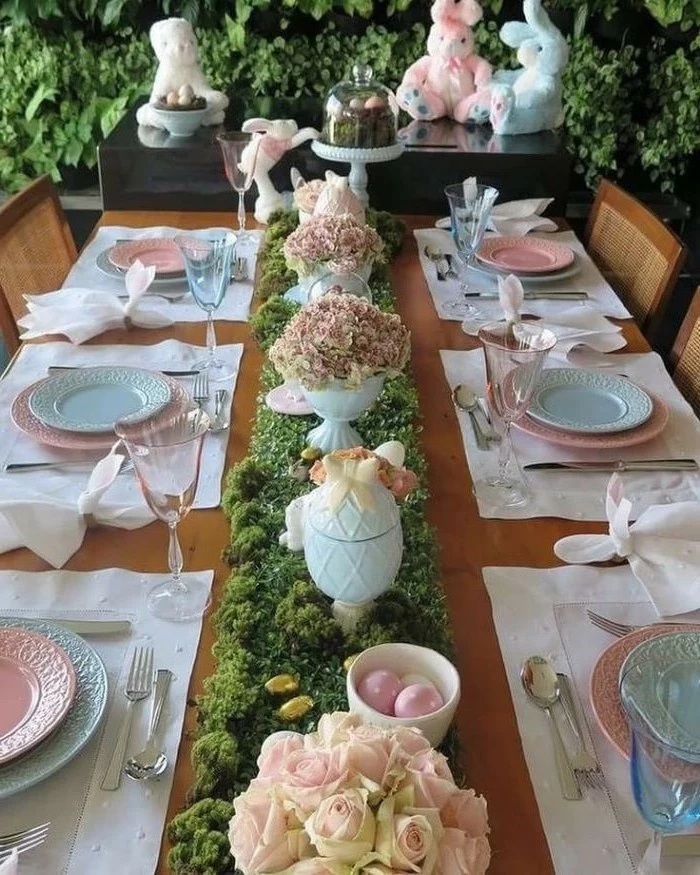
Here’s a common mistake I see all the time: a centerpiece so huge that your guests have to play peek-a-boo to talk to each other. A good rule of thumb is to keep your main centerpiece no taller than 12-14 inches off the table.
If you’re craving some height, go for skinny items like tapered candles or tall, wispy branches that are easy to see around. Another great option is to create a ‘tablescape,’ which is basically a low-profile arrangement that runs down the center of the table. It gives you that lush, full look without building a wall between your guests. Conversation is key!
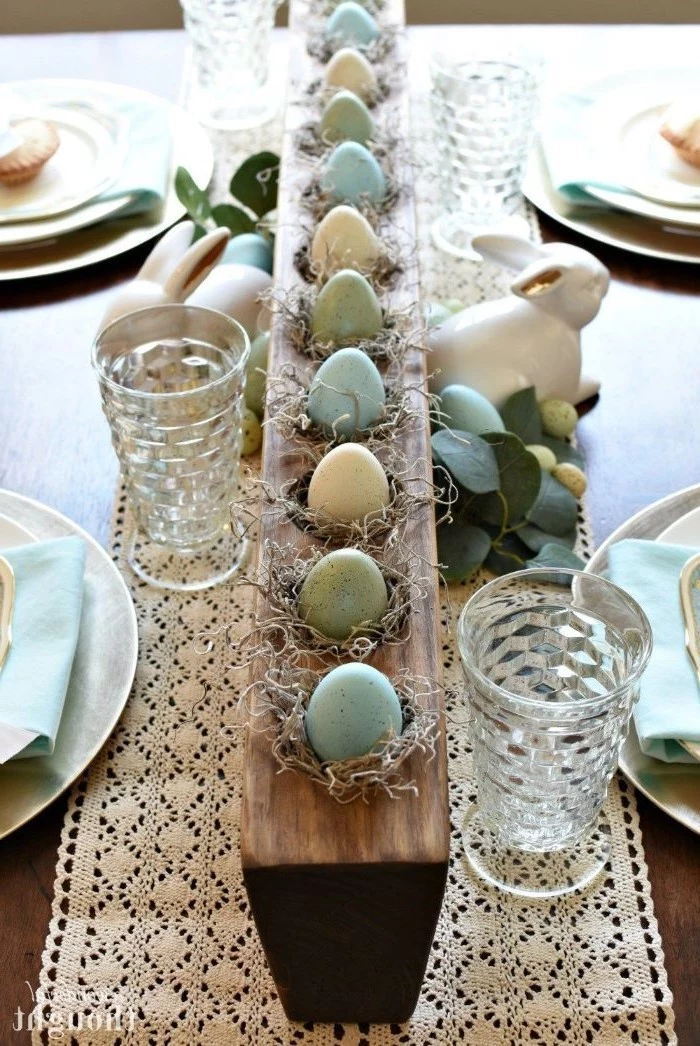
The Magic of Texture
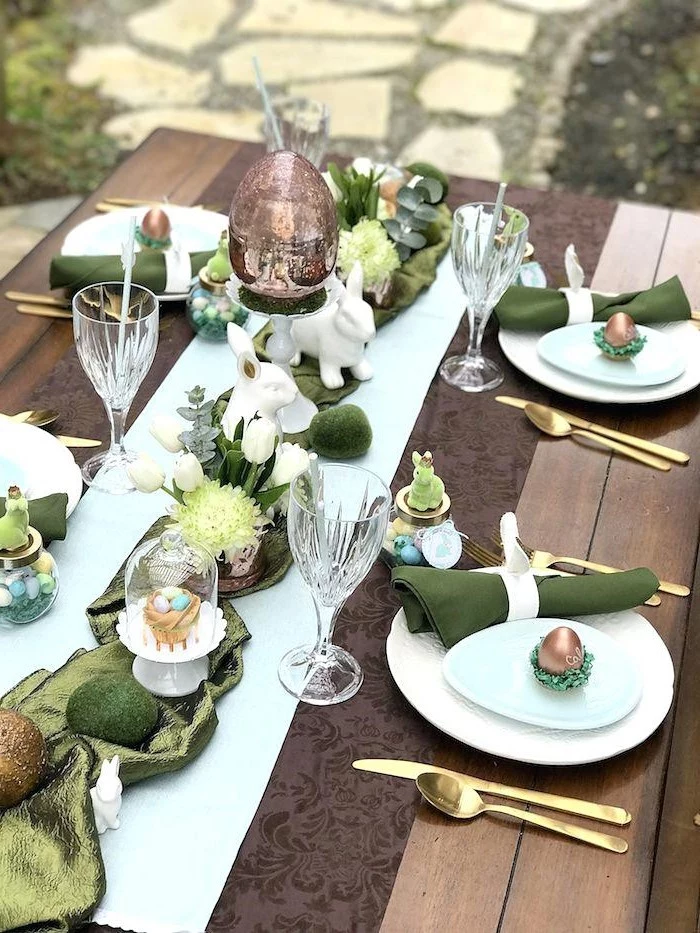
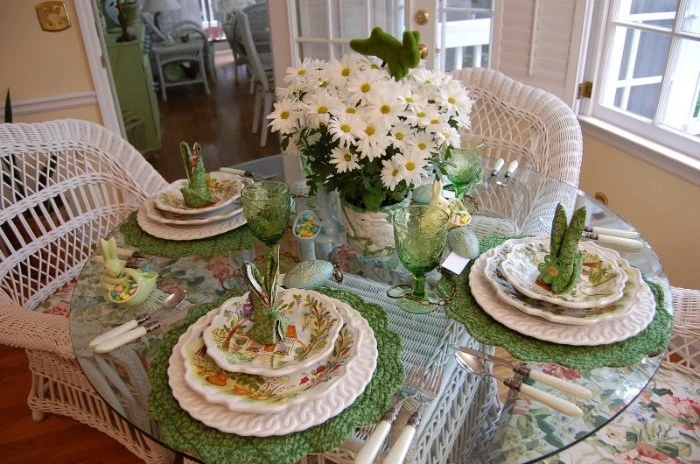
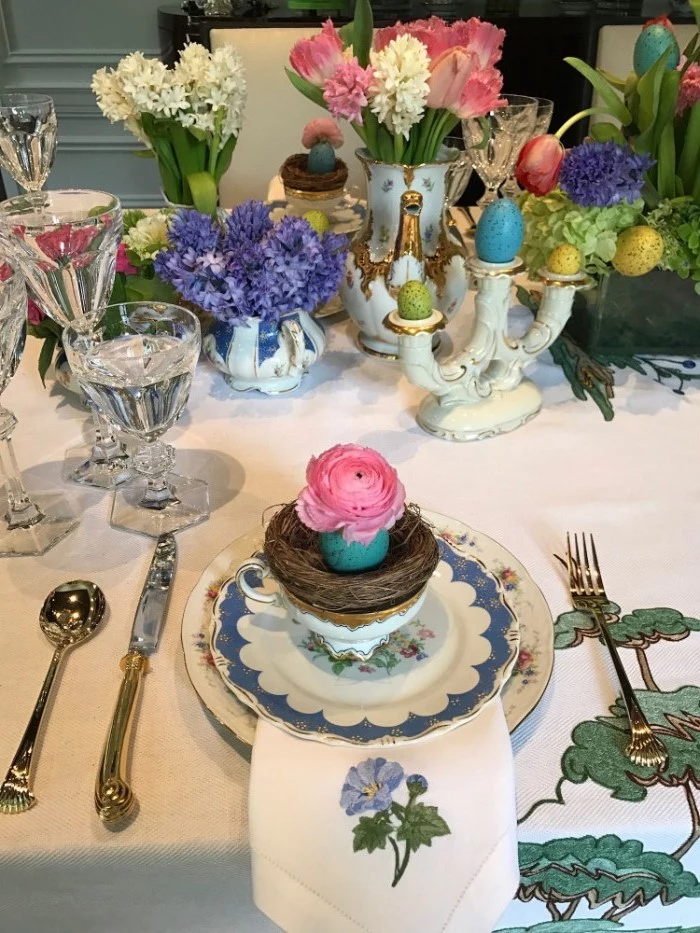
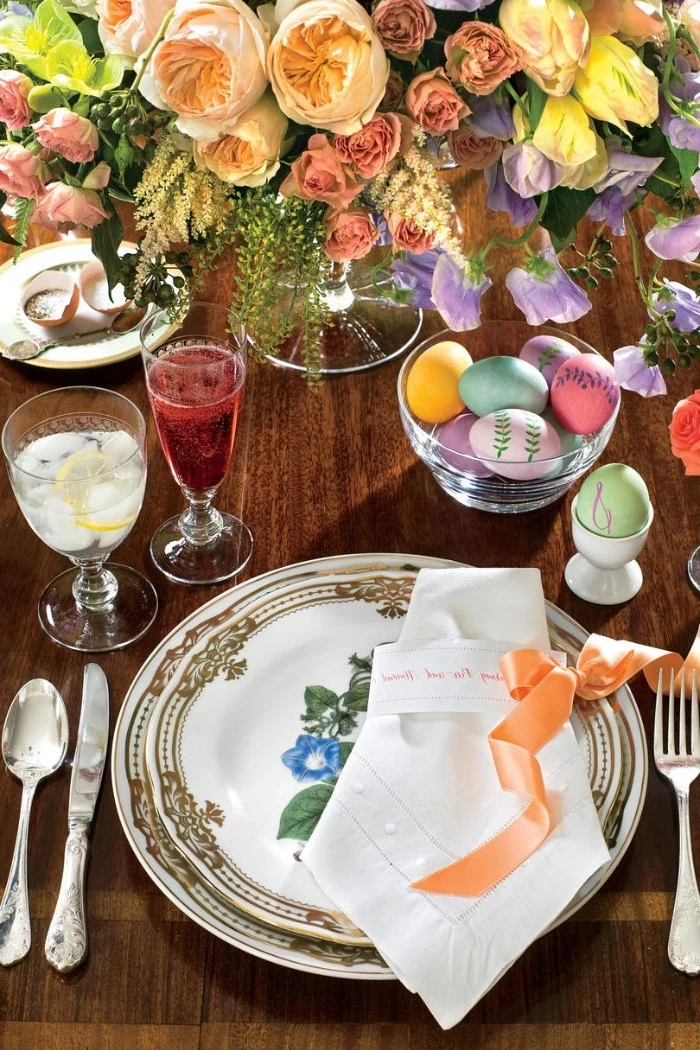
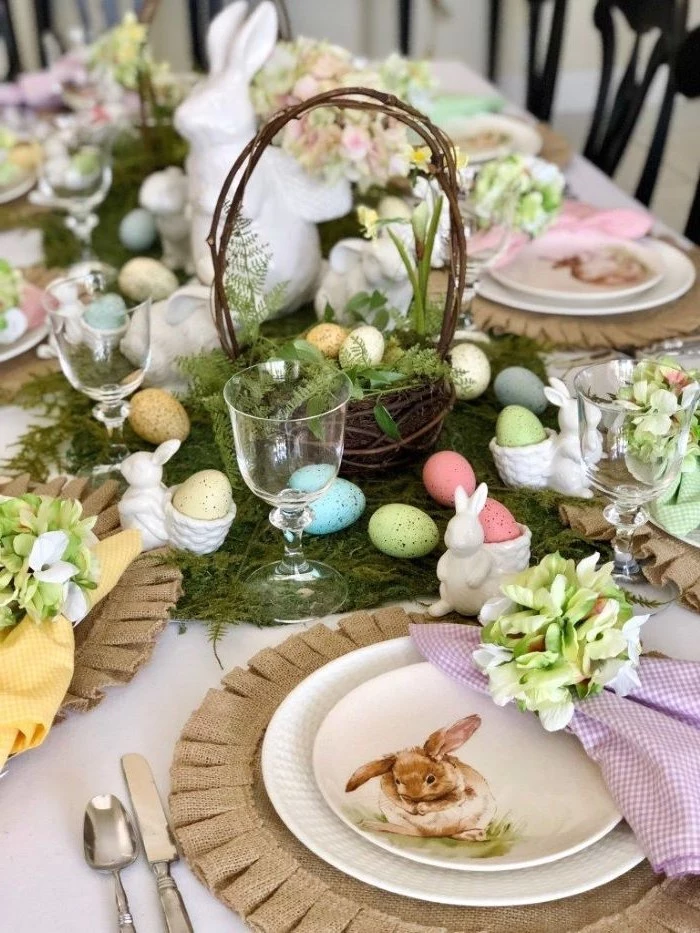
A table where everything is smooth and shiny can feel a little one-dimensional. The secret to adding depth and making your table feel more interesting is to layer different textures. Imagine the feeling of a crisp linen napkin against a rustic wooden charger plate (that’s the big decorative plate that sits under your actual dinner plate, by the way). Or the smoothness of a ceramic dish next to a tiny, fuzzy nest made from twine. Mix it up! Glass, wood, porcelain, linen, and natural bits like moss or branches make the whole experience more engaging before the first bite is even served.
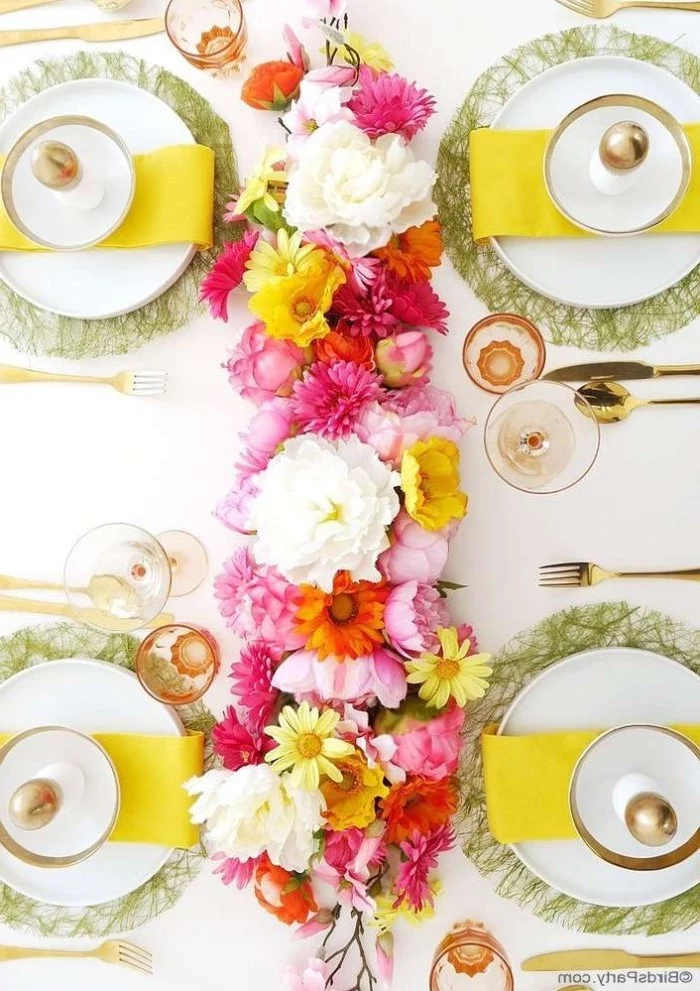
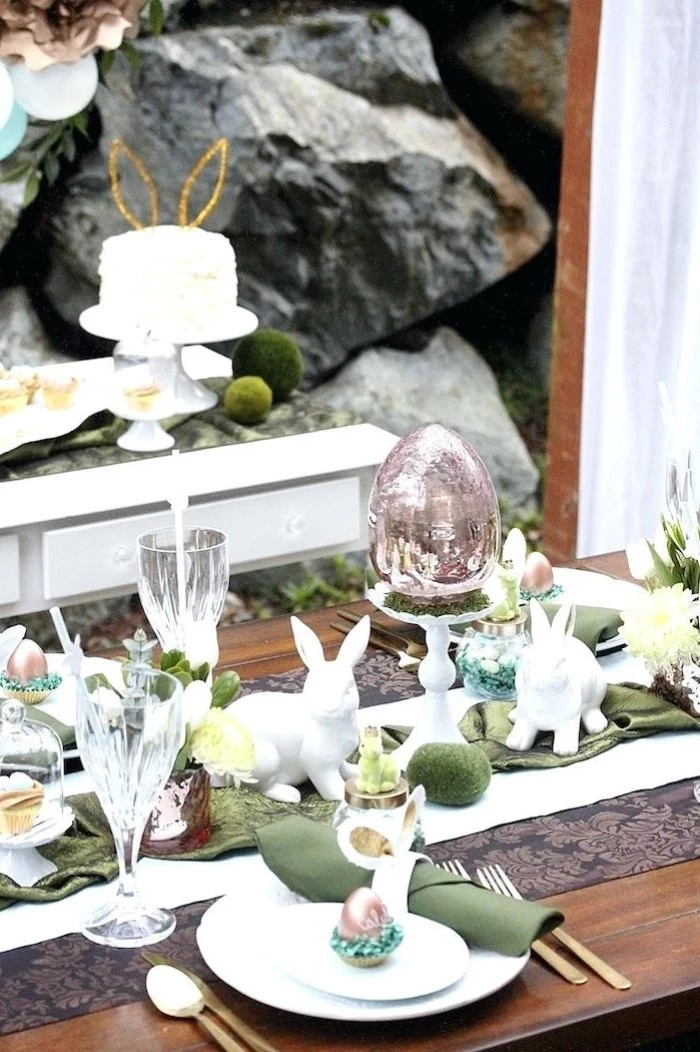
Pro-Level Flower Tricks for Your Centerpiece
Flowers are usually the main event on an Easter table, but getting them to look great and last through a long lunch takes a bit more than just plunking them in a vase. Here are a few industry secrets.
Step 1: You HAVE to Condition Your Flowers
I can’t stress this enough—this is the one step most people skip, and it’s the most important for making your flowers last. Conditioning is just the fancy term for getting them to drink as much water as possible. It can add days to their life.
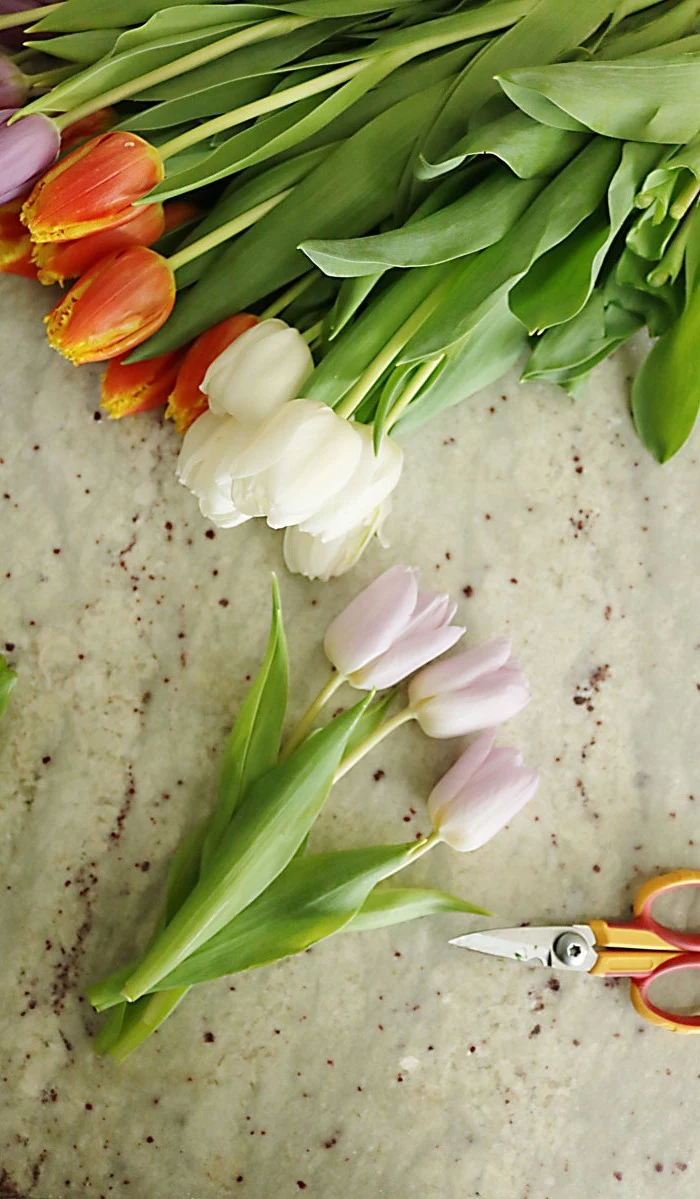
First, grab a clean bucket, fill it with cool water, and mix in one of those flower food packets that come with your bouquet. Now, using a sharp floral knife (you can get one for under $10 online) or very sharp shears, cut at least an inch off the bottom of each stem at a 45-degree angle. Quick tip: Don’t use regular kitchen scissors! They crush the stems and stop them from drinking properly. As soon as you cut a stem, plunge it into the water. Oh yeah, and pull off any leaves that will be below the waterline in your final arrangement. Soaked leaves rot, creating bacteria that will kill your beautiful flowers. Let them hydrate in a cool, dark spot for at least four hours (or even overnight) before you start arranging.
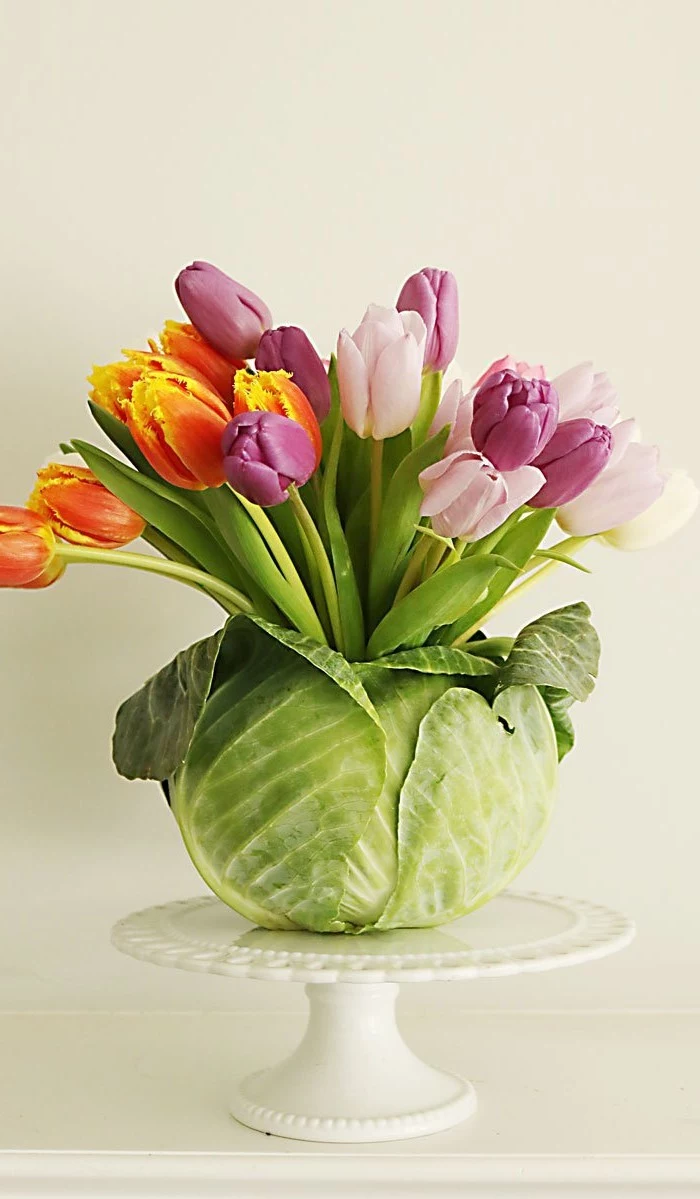
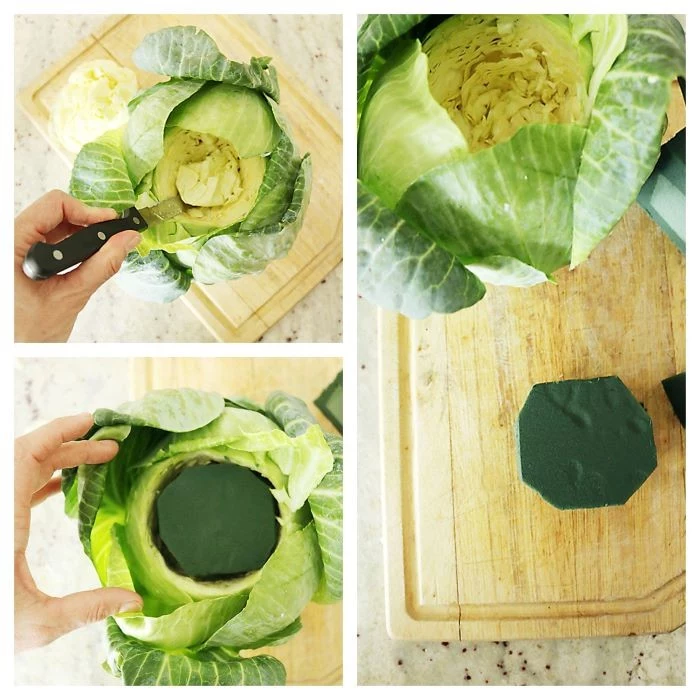
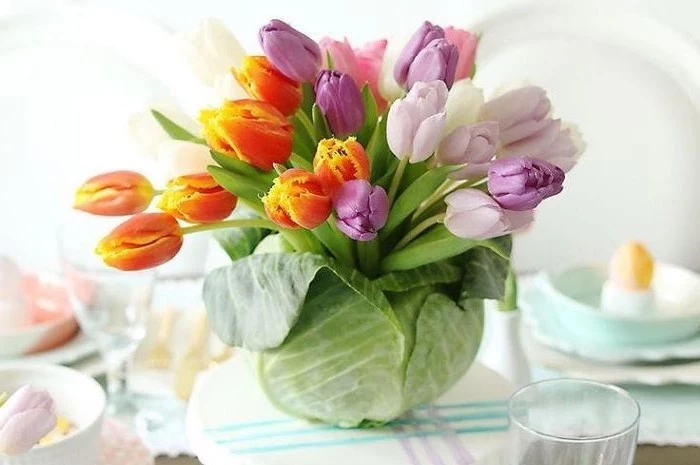
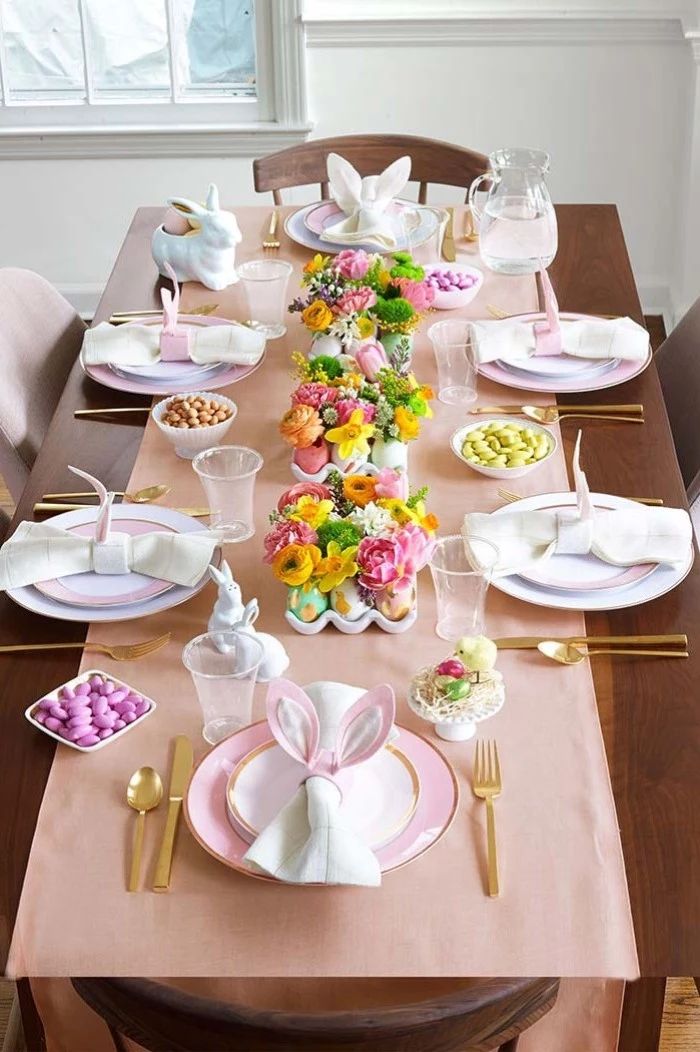
Project: The Famous Cabbage Vase Centerpiece
This is a showstopper, and it’s surprisingly easy to pull off. It’s rustic, charming, and always gets people talking. Best of all, it’s a budget-friendly project that looks like a million bucks.
Here’s what you’ll need:
- One large Savoy or red cabbage: Savoy has that gorgeous crinkly texture. (Cost: about $4)
- A small plastic cup or the bottom of a water bottle: This is your hidden liner.
- A small block of wet floral foam: The Oasis brand is the standard and available at any craft store like Michael’s or Jo-Ann. (Cost: about $3)
- A selection of spring flowers: A grocery store bouquet of tulips, ranunculus, or hyacinths works perfectly. (Cost: $10-$15)
- A sharp paring knife and a spoon.
Let’s build it:
- First, slice a small flat spot on the bottom of the cabbage so it sits nice and steady.
- With your paring knife, carefully carve a circle into the top of the cabbage, about the size of your plastic cup. Don’t go all the way through! Just cut about two-thirds of the way down.
- Now, switch to the spoon. Scoop out the cabbage inside the circle to create a hollow spot. It’s way safer than trying to do it all with the knife.
- Pop your plastic cup into the cavity. This is the secret pro move that prevents water from seeping out and ruining your tablecloth.
- Soak your floral foam until it’s fully saturated (let it sink on its own, don’t push it down), then cut a piece to fit snugly inside your plastic liner.
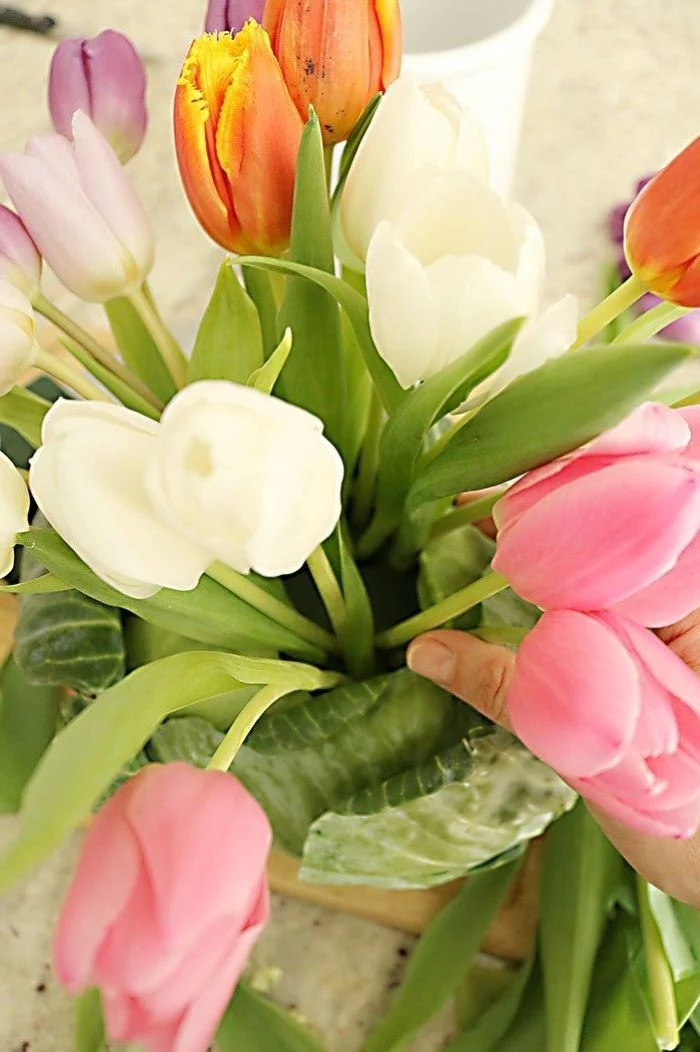
- Time for the fun part! Start arranging your flowers. Cut the stems short and at an angle, then insert them firmly into the foam. I like to start with the biggest flowers, like tulips, and then fill in the gaps with smaller filler flowers. Keep turning the cabbage as you work to make sure it looks good from every angle.
Heads up! If your flowers feel wobbly, the stems probably aren’t deep enough in the foam. They need to go in at least 1.5 to 2 inches to be secure and get enough water. Once it’s done, you can store the whole arrangement in the fridge overnight to keep it extra crisp for the big day!
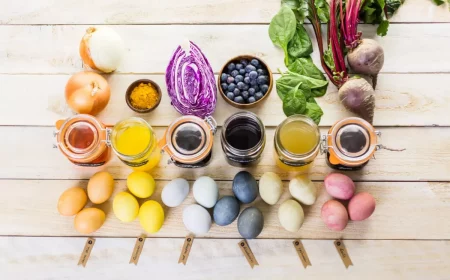
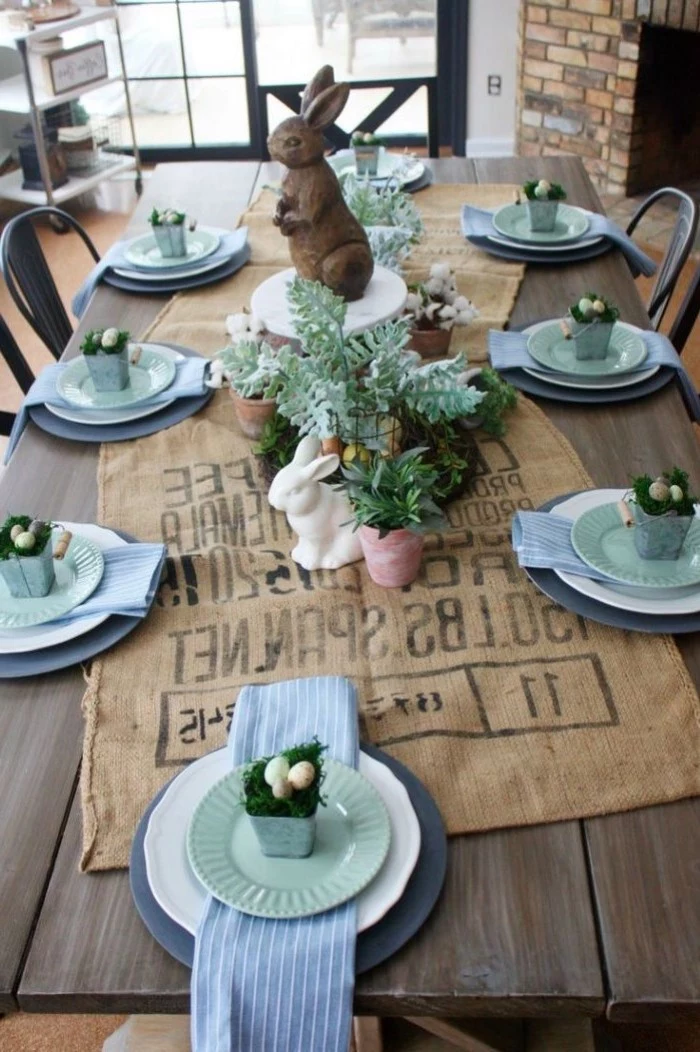
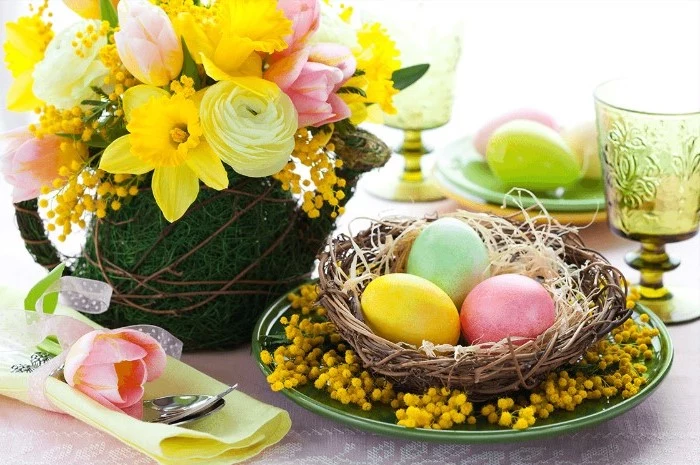
Working with Eggs: Dyes and Delicate Details
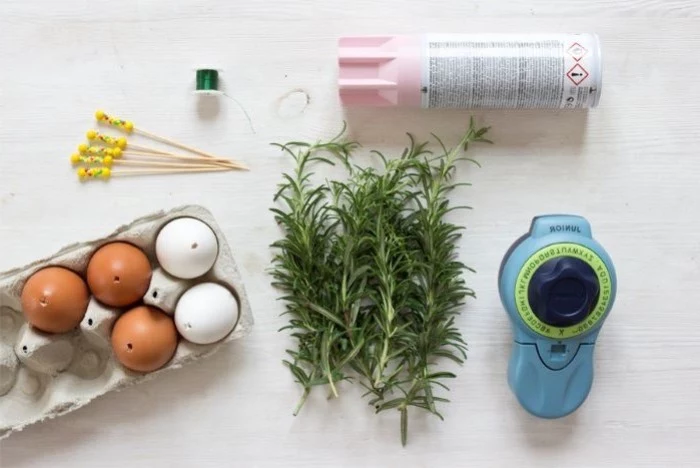
You can’t have an Easter table without eggs, right? While the store-bought dye kits are fine, making your own natural dyes is a really rewarding process that creates much more beautiful, organic colors.
How to Make Your Own Natural Dyes
It’s simpler than it sounds. You’re basically just boiling plants to release their color and then using a little white vinegar to help the color stick to the eggshell. It’s an old-school technique that works wonders.
Here are a few of my favorite go-to recipes. Each one makes enough dye for about a half-dozen eggs:
- For a Vibrant Sunny Yellow: Boil 3 tablespoons of turmeric in 4 cups of water. This one gives you a super cheerful, modern yellow.
- For a Deep, Rustic Red-Brown: Use the papery outer skins from about 6 yellow onions in 4 cups of water. It creates a rich, earthy color that’s just gorgeous.
- For a Muted, Moody Blue: Roughly chop half a head of red cabbage and boil it in 4 cups of water. It’s weird, but red cabbage makes a beautiful blue!
- For a Soft, Blushing Pink: Add 1 cup of chopped beets to 4 cups of water.
Just simmer your chosen ingredient in the water for about 30 minutes, then strain out all the solids. Stir 2 tablespoons of white vinegar into the colored liquid, and you’re ready to dye! You can use hard-boiled eggs or cook raw eggs right in the dye. The longer you soak them, the deeper the color will be.
Good to know: For a pale, pastel shade, soak the eggs for 1-2 hours. For a nice medium tone, let them sit for 4-6 hours. If you want a really deep, saturated color, pop them in the dye in a sealed container and leave them in the fridge overnight. The results are worth the wait!
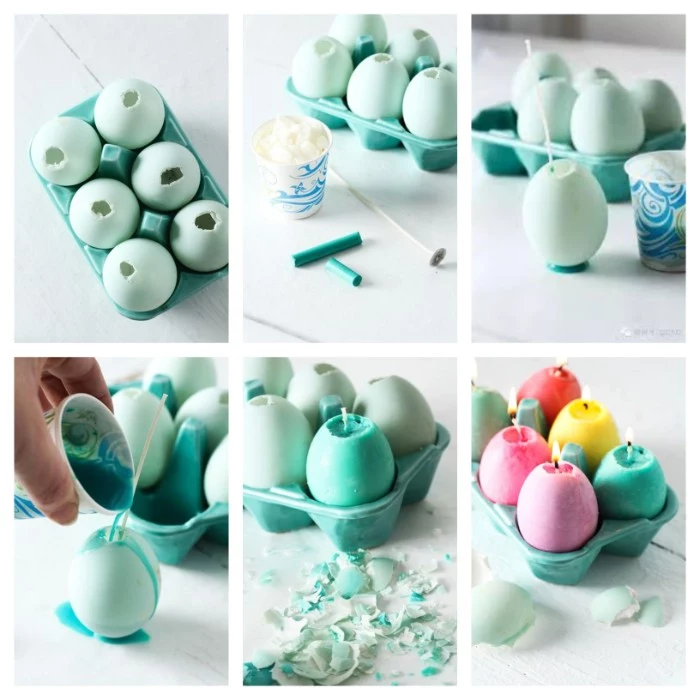
Project: Tiny Blown-Out Egg Vases
This is such a delicate and lovely touch. Placing one at each place setting is a detail your guests will definitely notice.
How to do it:
- Take a raw egg and use a pin to carefully poke a tiny hole in the pointy end and a slightly larger hole in the wide end.
- Hold the egg over a bowl and blow firmly into the small hole. The egg insides will come right out the other end.
- Pro-tip: To be frank, this can make you feel a bit light-headed. If you’re struggling, look for a cheap ‘egg blower’ tool online or at a craft store. It’s a little rubber bulb that does the work for you and is a total lifesaver.
- Gently rinse the empty shell with water and let it dry completely before you dye or paint it.
- To make it stand, you can use a small bottle cap or a dedicated egg cup. Carefully use an eyedropper to add a tiny bit of water inside the shell. Then, insert a single, delicate flower stem, like a sprig of baby’s breath or grape hyacinth. So simple, so beautiful.
Don’t Forget the Details: Budget Tips and Safety
A beautiful table is wonderful, but a safe and stress-free one is even better. Let’s cover a few final, practical points.
How to Get This Look on a Budget
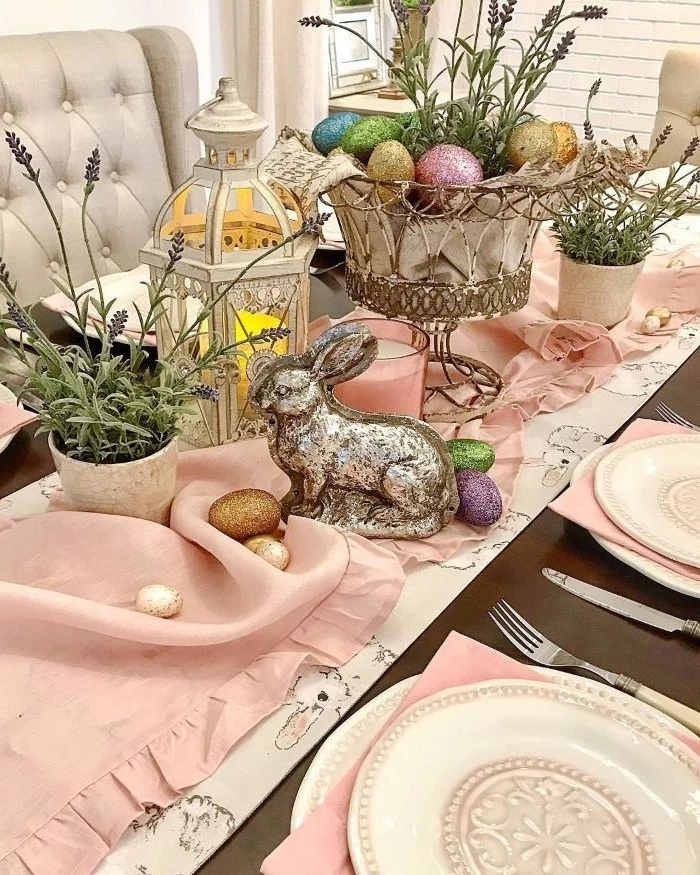
Great style doesn’t have to be expensive. If fancy flowers like ranunculus aren’t in the budget, don’t sweat it! Carnations are a fantastic, long-lasting alternative that come in every color imaginable. You can also literally shop your backyard. A few artfully arranged branches with new spring buds can look incredibly chic and modern. For things like napkins, you can often find great, affordable linen-blends at places like HomeGoods, World Market, or Target if you keep an eye out.
A Serious Warning About Pet Safety
This is non-negotiable. Many common spring flowers are extremely toxic to pets. Lilies, in particular, are deadly to cats—every part of the plant can cause fatal kidney failure. Tulips and hyacinths can also cause serious issues if ingested. If you have pets, you MUST use pet-safe alternatives like roses, snapdragons, gerbera daisies, or freesia. Before you buy anything, please, pull out your phone and search for the ‘ASPCA Toxic and Non-Toxic Plants List.’ It’s a simple search that could save a life.
A Realistic Timeline to Avoid Stress
The key to actually enjoying the holiday is to not leave everything to the last minute. Here’s a relaxed schedule for a Sunday lunch:
- The Weekend Before: Plan your menu and table design. Make your shopping list for everything from flowers to napkins.
- Thursday: Buy your fresh flowers.
- Friday: Condition your flowers. Dye your eggs.
- Saturday: Iron and fold your napkins. Arrange your centerpieces (and pop them in the fridge!). Set out all your plates, glasses, and silverware.
By doing this, all you have to worry about on Sunday is the food and having a good time with the people you love. Creating a special table is an act of care, a way of saying, “I’m so glad you’re here.” It doesn’t have to be perfect. It just has to be from you.
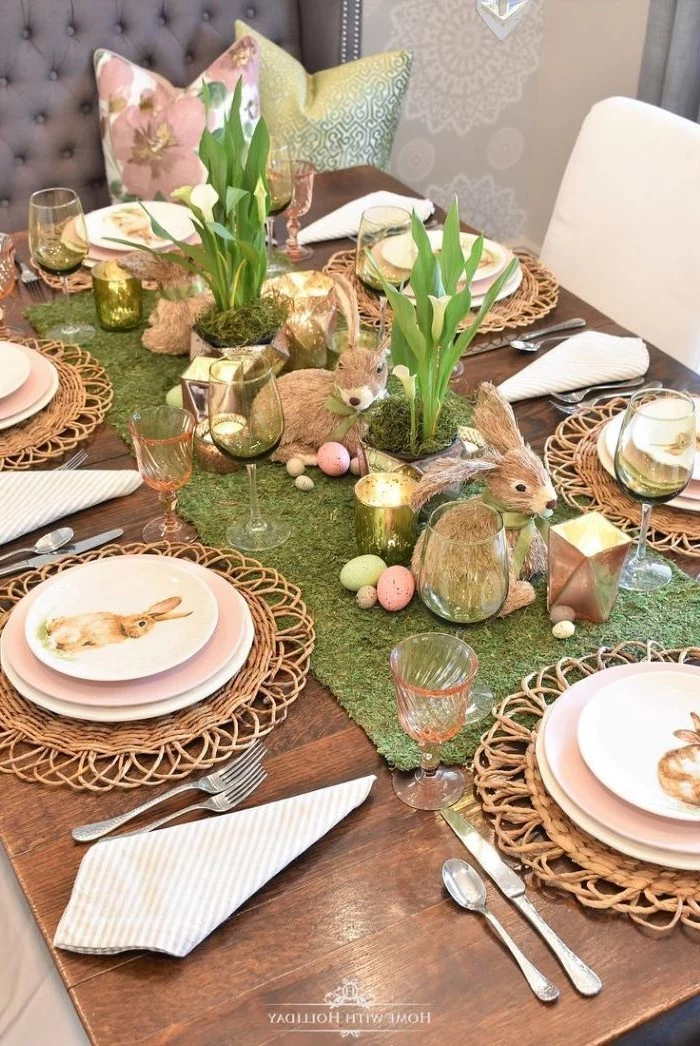
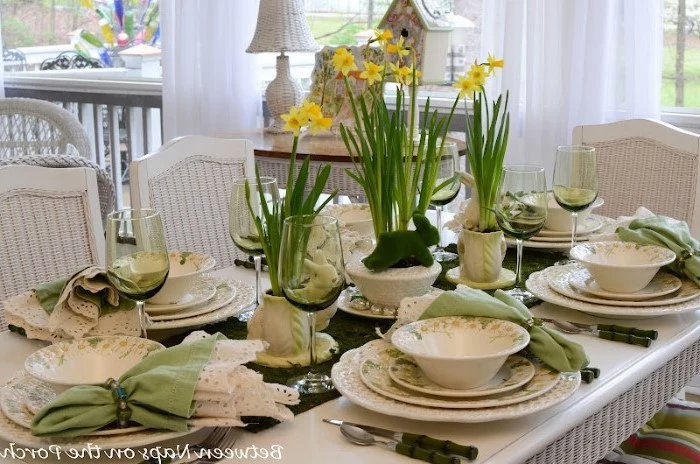
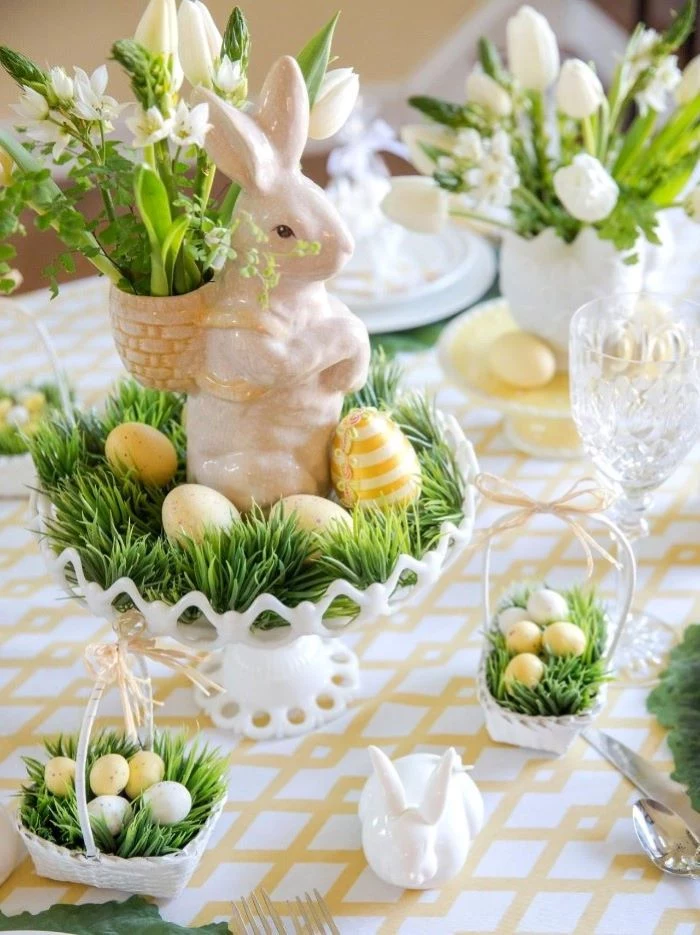
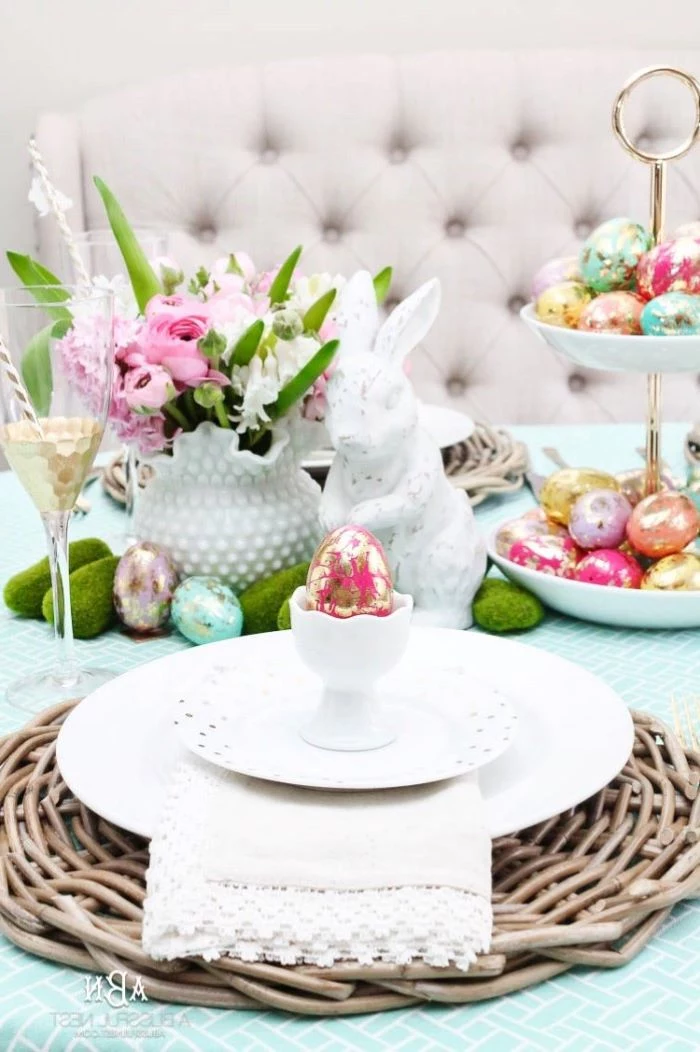
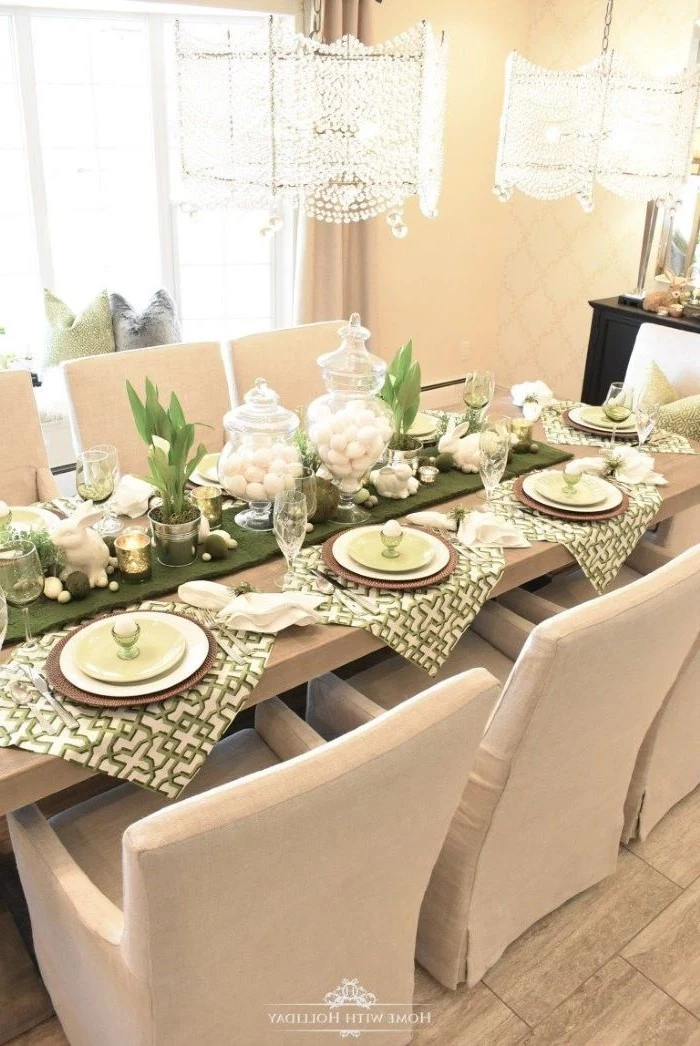
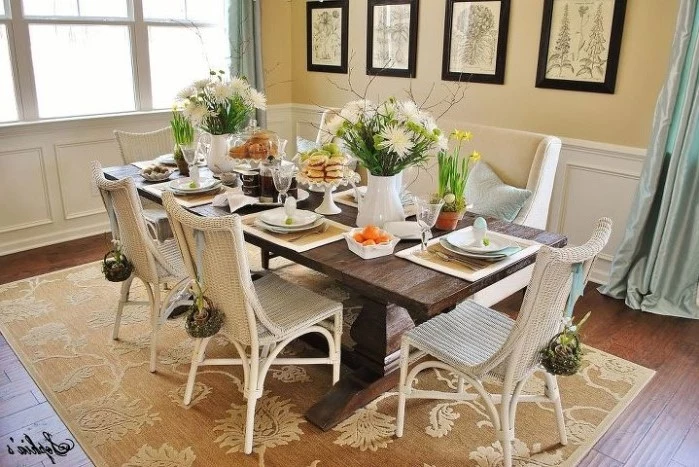
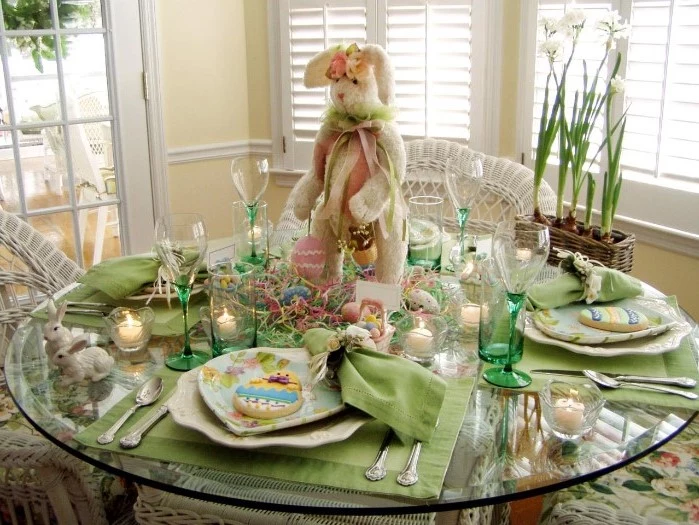
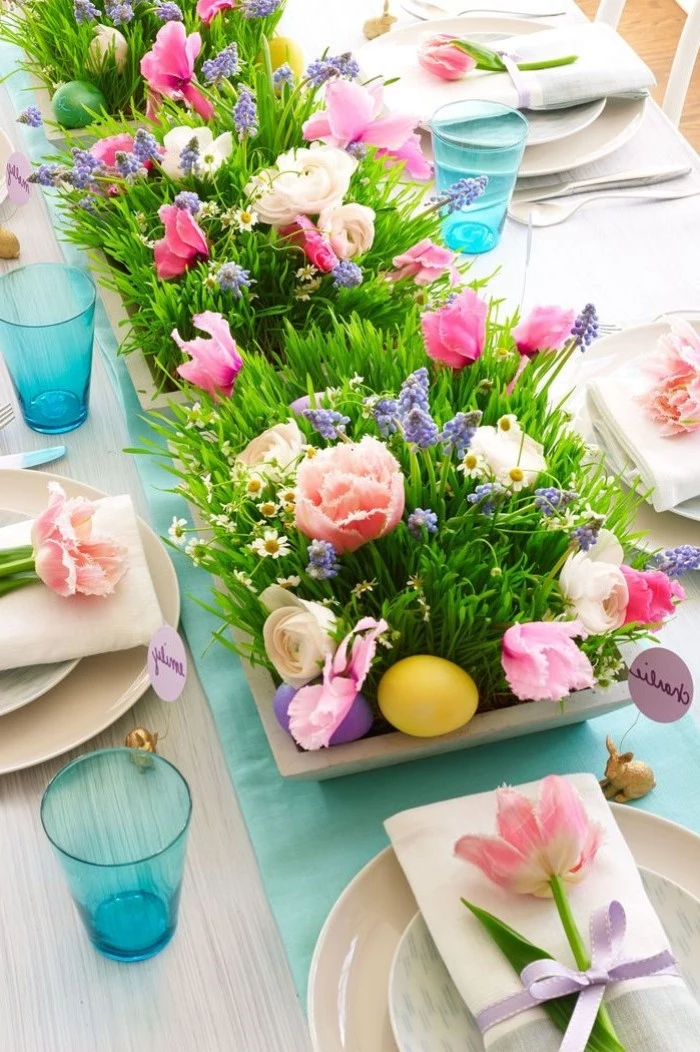
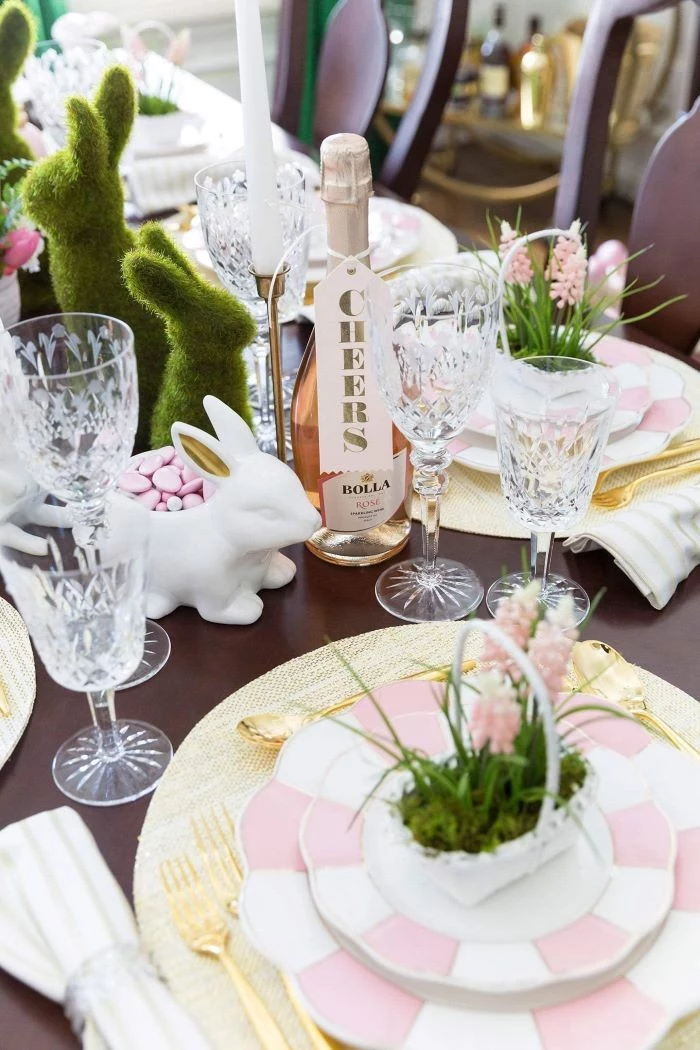
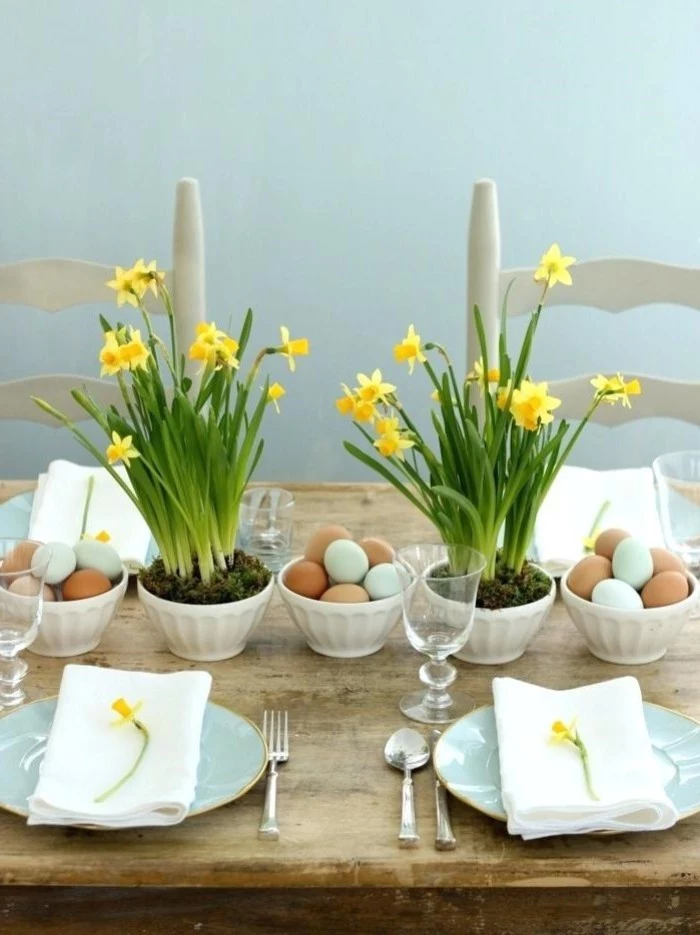
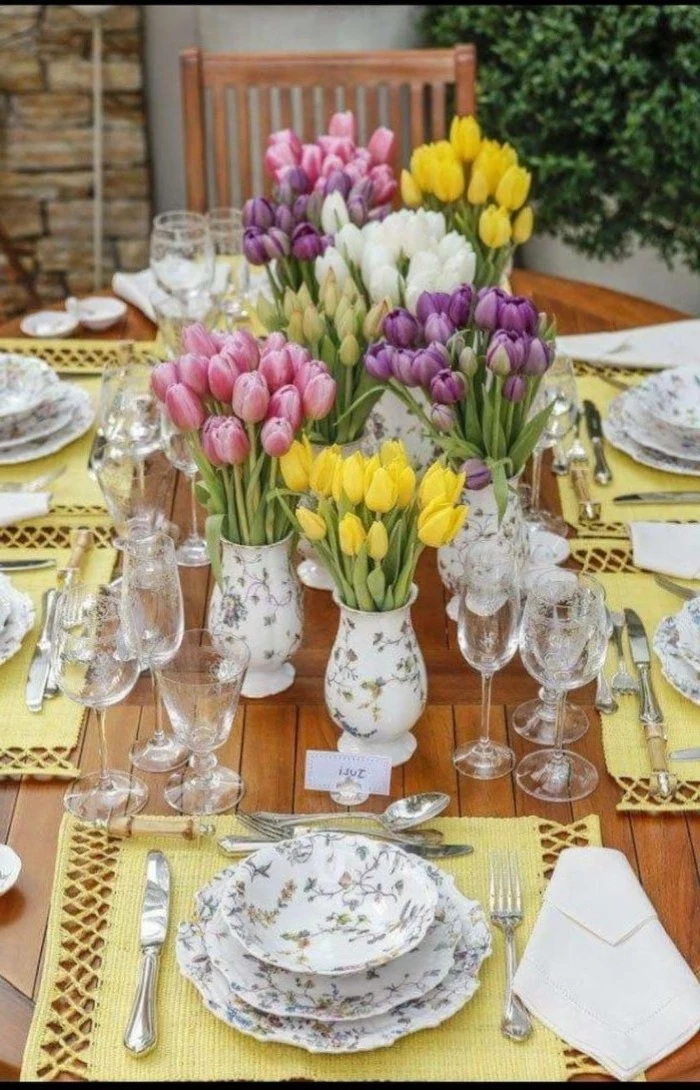
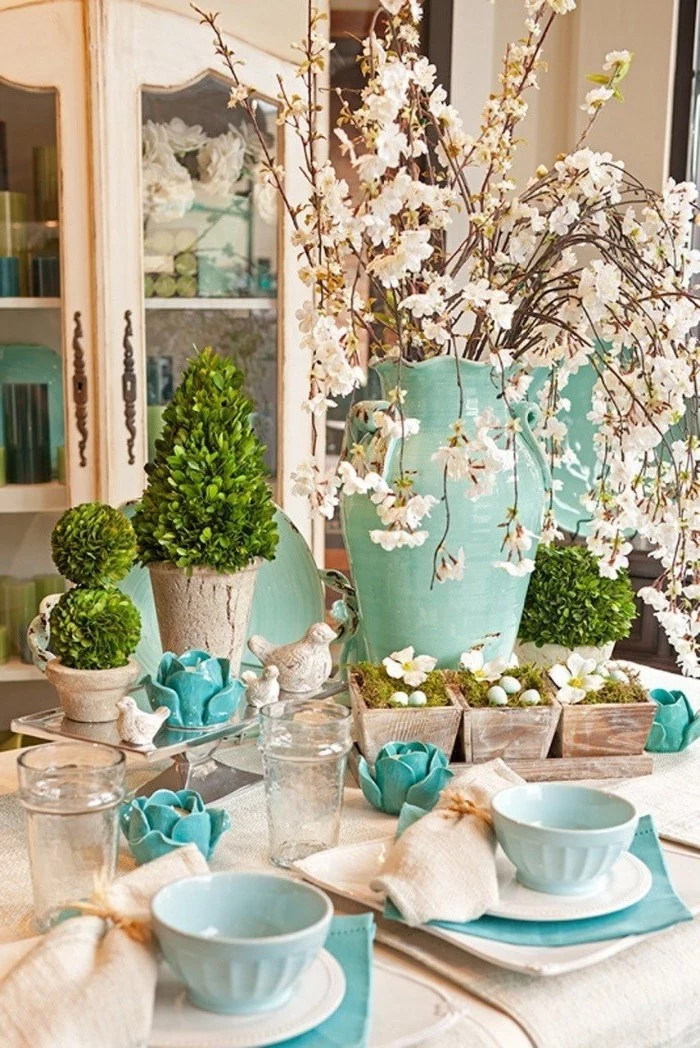
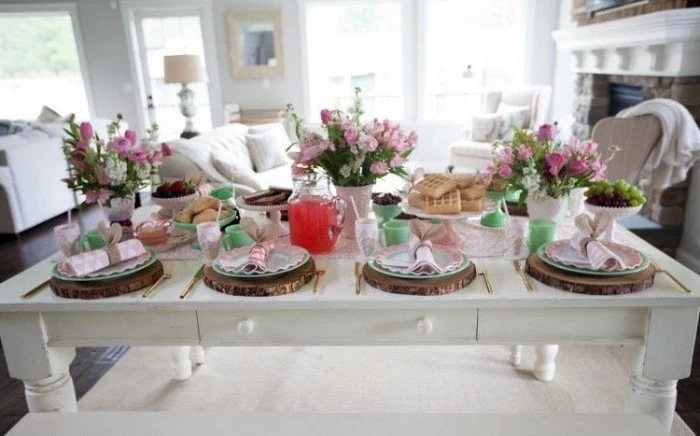
Inspiration Gallery
When choosing your foundation, think texture. A pure linen tablecloth, like those from Crate & Barrel or Parachute Home, offers a relaxed, organic feel that improves with every wash. Its natural wrinkles are part of its charm. For a crisper, more formal look, a high-quality, heavyweight cotton sateen provides a smooth, elegant canvas for your dishes and decor.
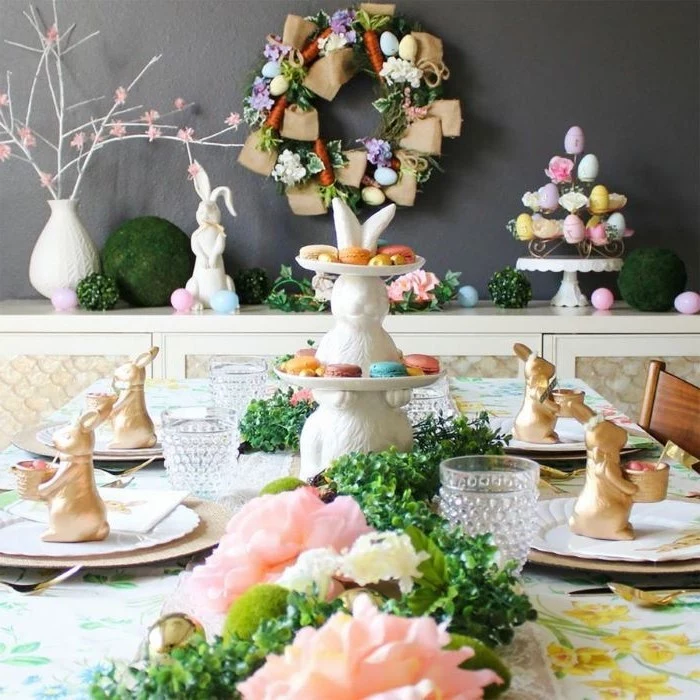
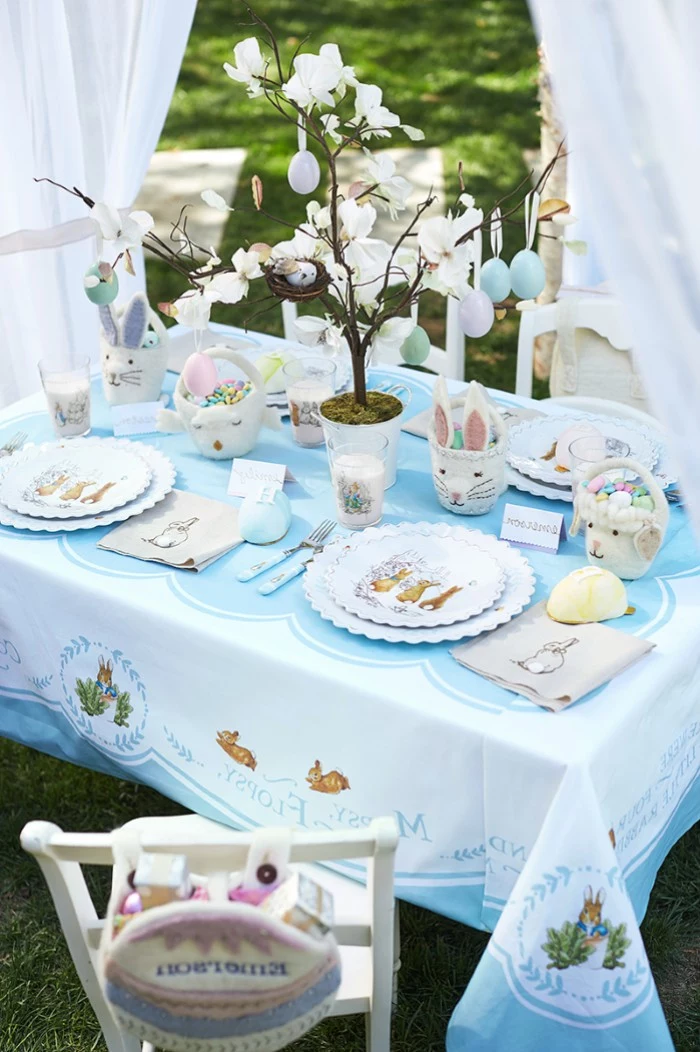
The tradition of the Easter bunny delivering eggs, known as ‘Osterhase,’ originated with German Lutherans in the 17th century.
Weave this history into your decor with subtle, vintage-inspired rabbit figures or by hiding small, beautifully wrapped chocolate eggs for your guests to discover at their seats, continuing the tale of the judging bunny.
Want a centerpiece with impact but you’re no florist?
Massing a single element is a powerful designer trick. Fill a large, clear glass trifle bowl or a series of hurricane vases with one item. Think vibrant lemons, mossy green artichokes, or a pile of pastel-painted wooden eggs. It’s dramatic, modern, and requires zero arranging skills.

The centerpiece height rule: Your stunning floral arrangement should never block conversation. A good rule of thumb is to keep major decorative elements either below 12 inches or above 24 inches high. This ensures guests can make eye contact and chat easily across the table. If you love a tall arrangement, consider moving it to a sideboard once everyone is seated.
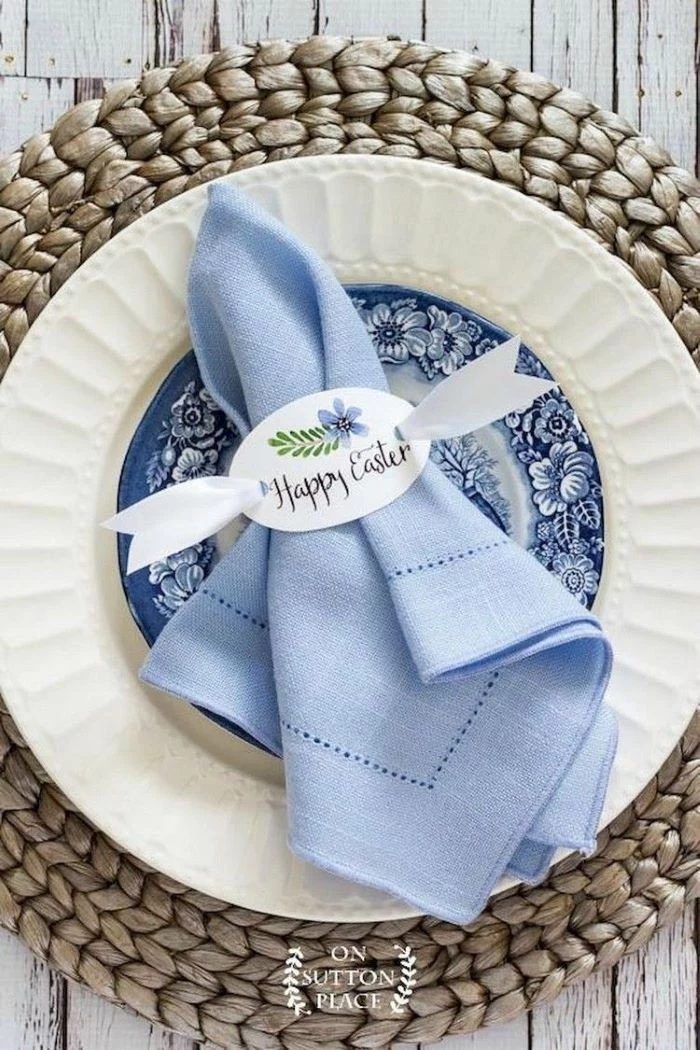
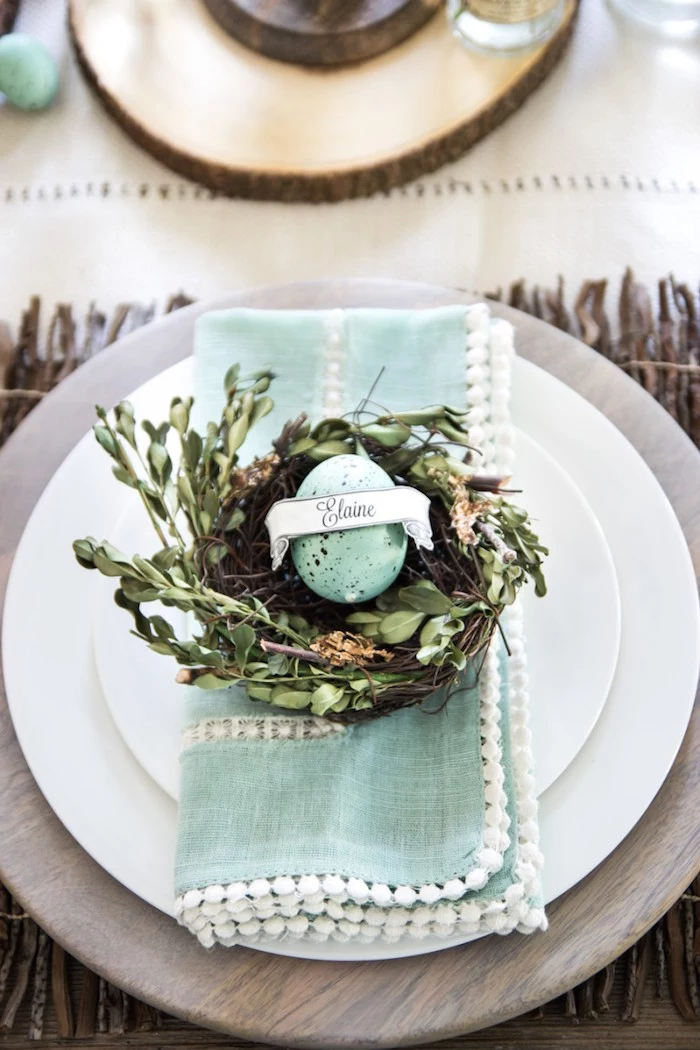
Layering is key to a table that feels rich and considered. Think beyond just a placemat and plate.
- Start with a woven rattan or seagrass charger for natural texture.
- Place a crisp white dinner plate on top.
- Finish with a smaller salad plate in a pastel shade or with a subtle botanical print from a collection like Wedgwood’s Wild Strawberry.
- Adds an instant touch of elegance.
- Keeps breadcrumbs contained.
- Creates a personalized welcome.
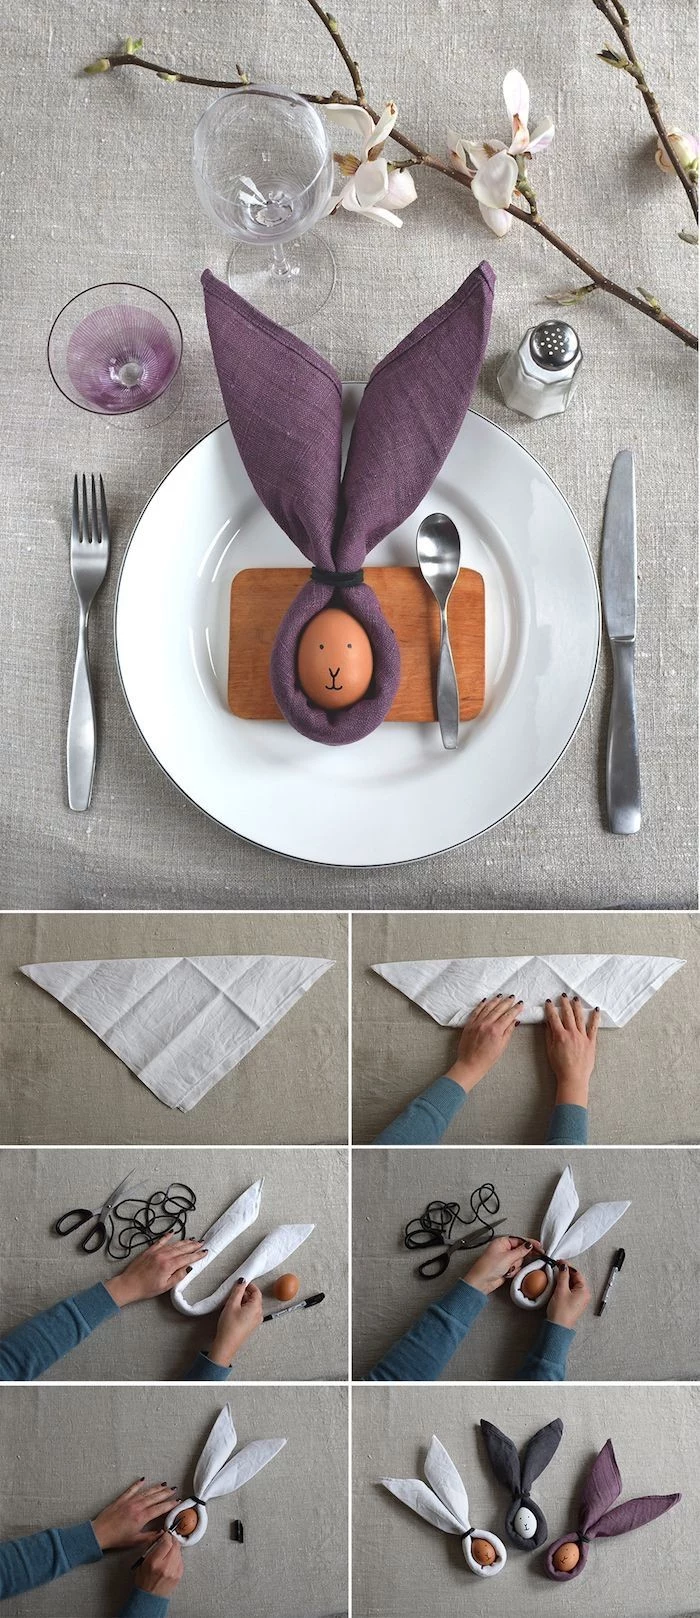
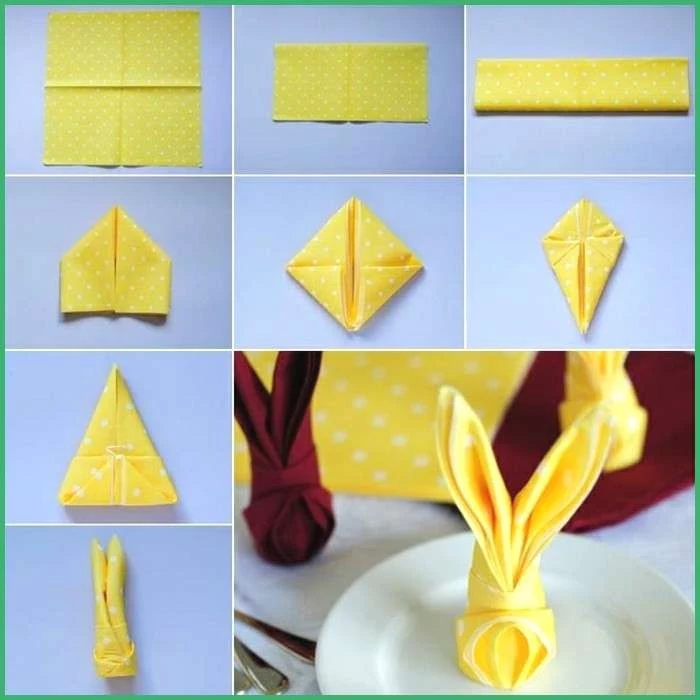
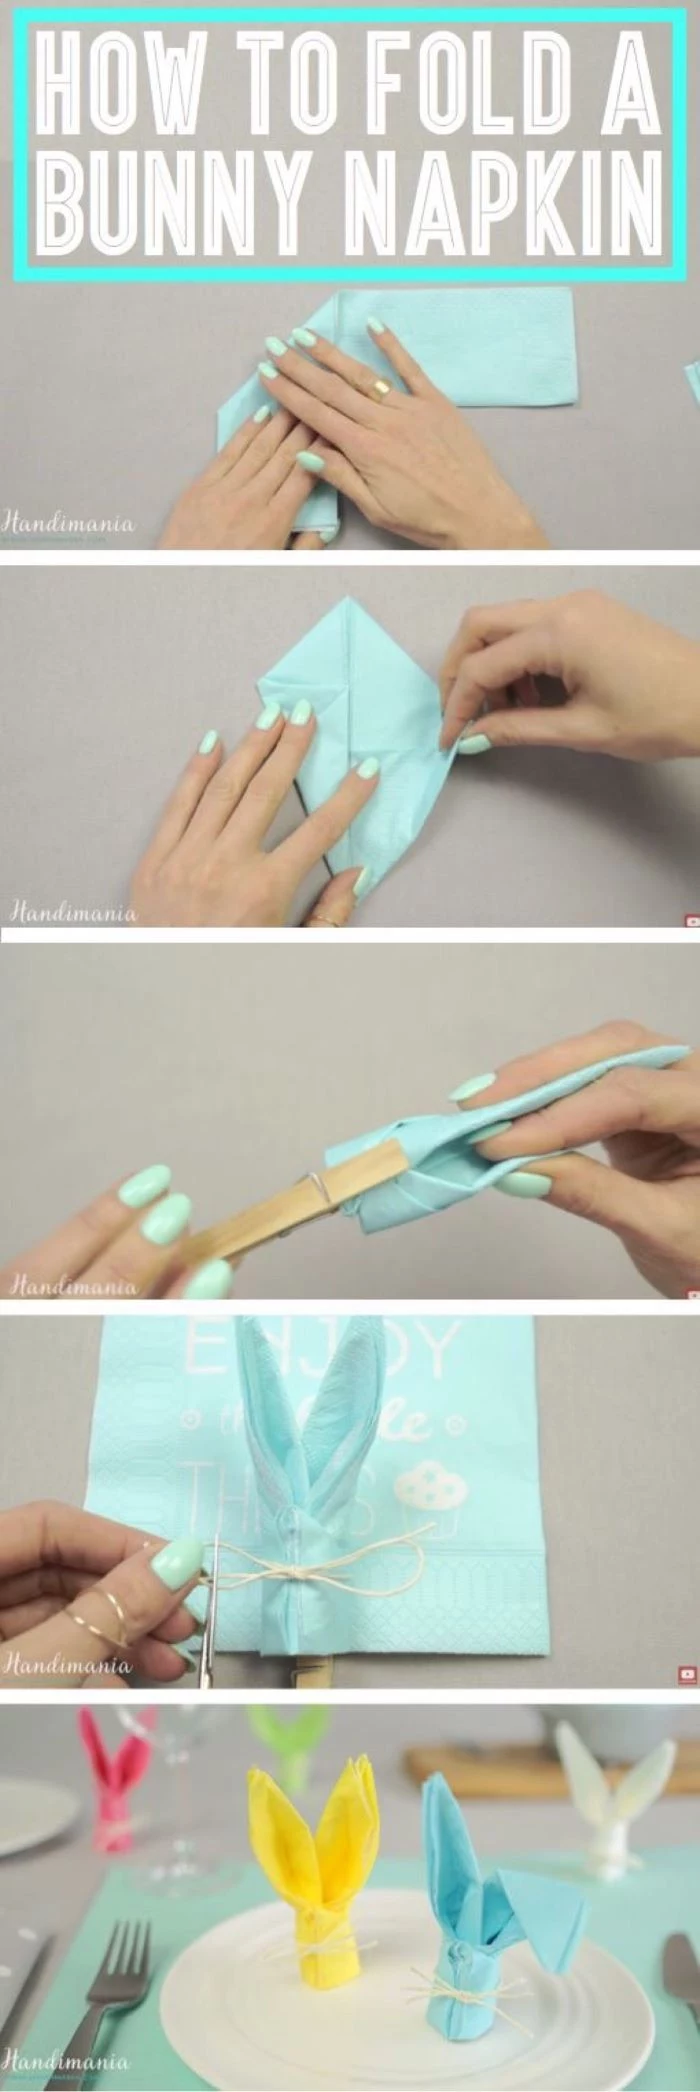
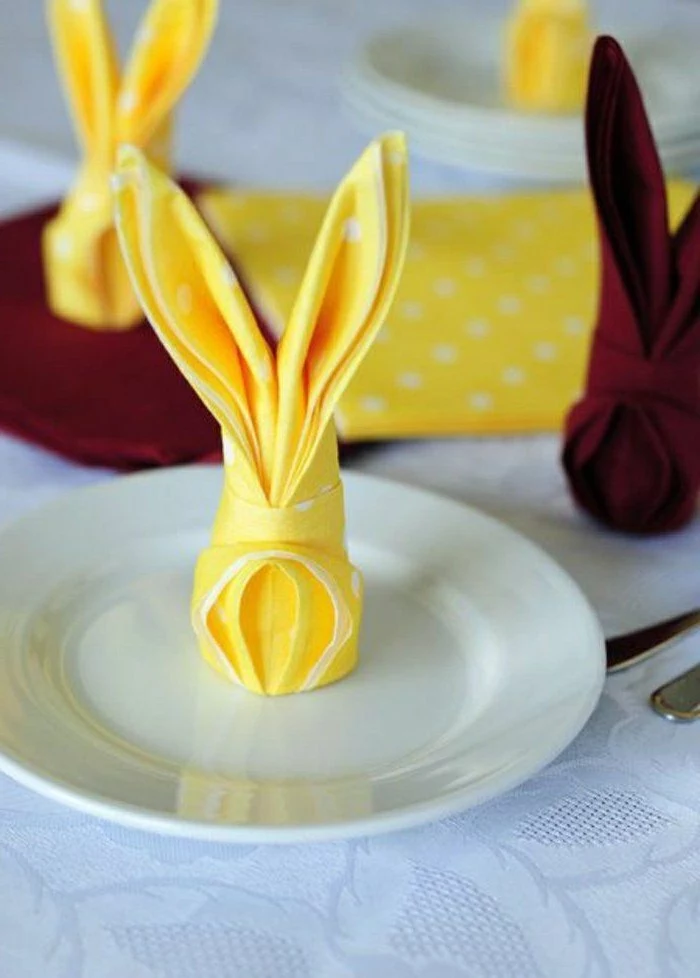
The secret? A simple napkin fold. The pocket fold is foolproof: fold your napkin in half, then in half again to make a square. Fold one layer back diagonally to form a pocket, perfect for tucking in a sprig of rosemary, a personalized menu, or even a single vibrant tulip.

Foraged Branches: Free, organic, and beautifully rustic. Look for branches with interesting shapes or budding leaves, like cherry blossom or forsythia. They create stunning architectural lines.
Store-Bought Flowers: Offer guaranteed color and lushness. Tulips, hyacinths, and ranunculus are classic spring choices. You have full control over the palette.
For a pro look, combine both: use foraged branches for height and structure, with a few store-bought blooms at the base for color.
Create your own natural egg dyes for a soft, matte, artisanal finish. It’s a beautiful activity to do with kids before the big day.
- Yellow: Simmer eggs in water with 3 tablespoons of turmeric.
- Pink/Red: Use the water from boiled beets.
- Blue: Boil with chopped red cabbage (it’s a magic color change!).
- Brown: A strong brew of coffee or black tea works wonders.

How do you make cut flowers last through a long Easter lunch?
The trick is a fresh cut. Just before arranging, trim at least an inch off each stem at a sharp angle under running water. This increases the surface area for water absorption. Use the little packet of flower food that comes with your bouquet; it contains a biocide to prevent bacteria from clogging the stems.

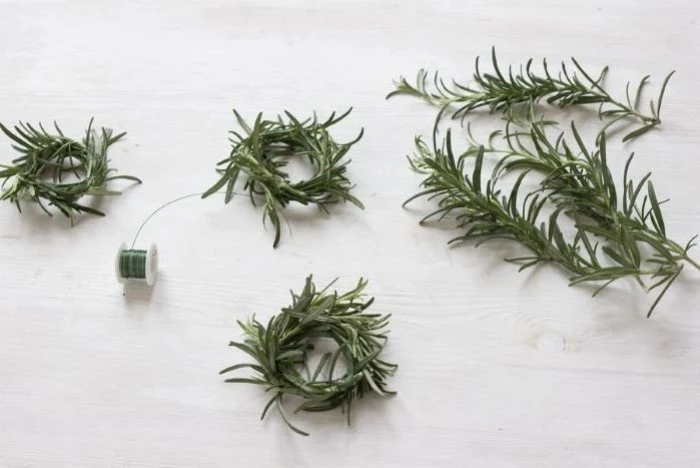
Don’t overlook the power of scent to create an atmosphere. But avoid heavily perfumed candles that will compete with the aroma of your food. Instead, weave subtle, natural scents into the decor itself. Tuck sprigs of fresh rosemary or mint into napkin rings, or place a few potted hyacinths on a nearby sideboard for a gentle floral fragrance that whispers ‘spring’.
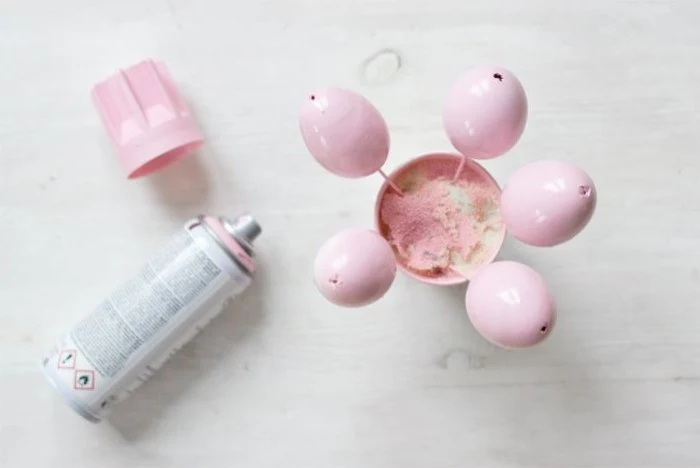
Matte Spray Paint: For an organic, chalky finish, use a paint like Krylon Chalky Finish in ‘Misty Gray’ or Rust-Oleum Chalked in ‘Blush Pink’. This gives eggs a modern, almost ceramic-like appearance.
Glossy Spray Paint: For a high-impact, lacquered look that pops, a classic glossy finish is perfect. It reflects light beautifully and gives a more playful, candy-like vibe.


Look to Scandinavia for minimalist Easter inspiration. In Sweden, the ‘Påskris’ is a beloved tradition. It consists of birch branches placed in a vase and decorated simply with brightly colored feathers and small hanging egg ornaments. It’s an incredibly chic and airy alternative to a dense floral centerpiece.
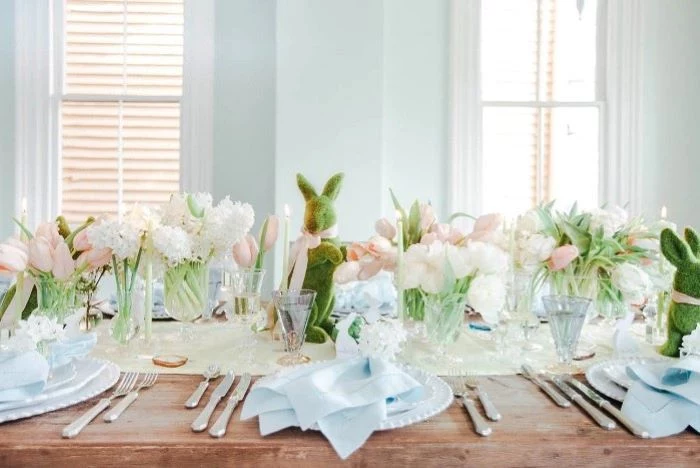
On average, beeswax candles burn up to three times longer than paraffin candles and are naturally dripless when kept out of drafts.
Opt for pure beeswax tapers for your Easter table. Not only do they offer a longer, cleaner burn, but they also emit a subtle, honeyed scent and a warm, natural light that is far more flattering and atmospheric than the harsh light of paraffin.
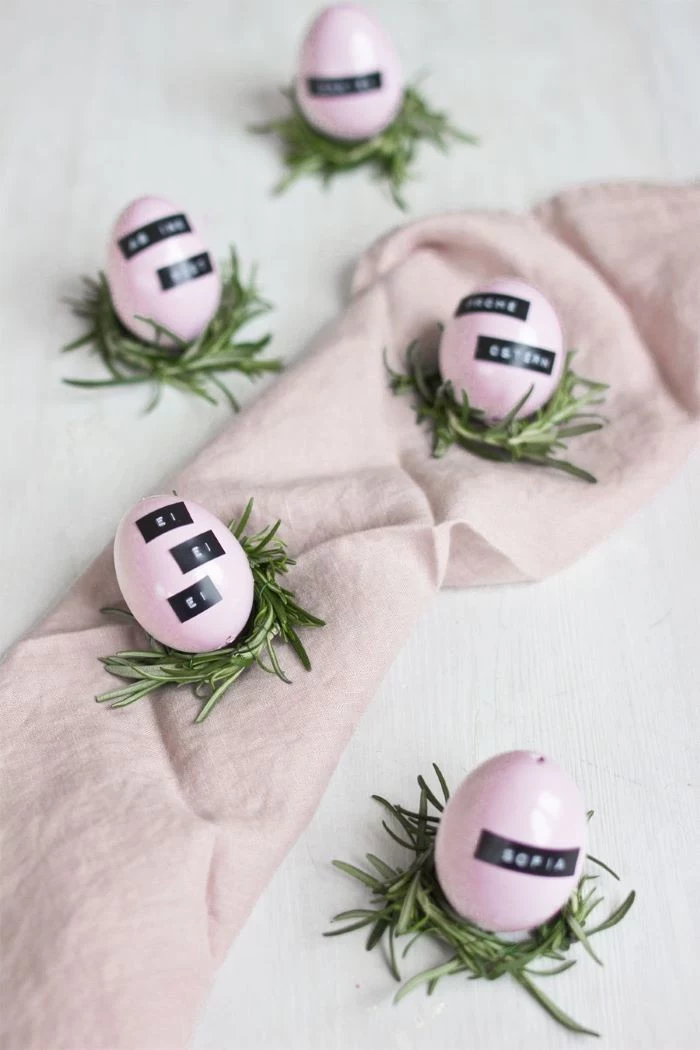
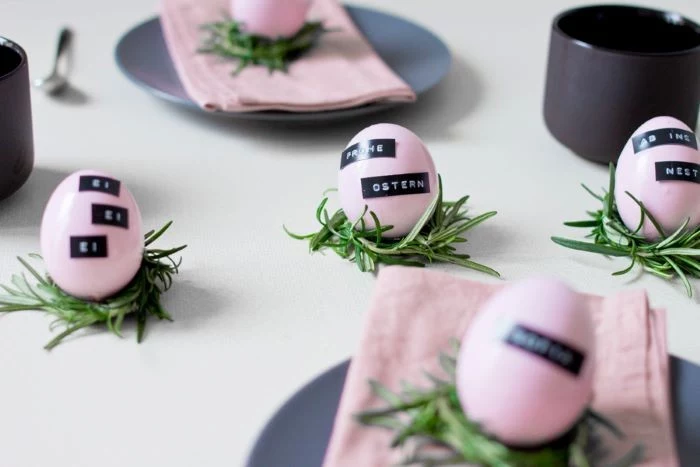
The easiest personal touch: Use a Dymo-style label maker to create guests’ names. Stick the embossed labels onto large, smooth leaves (like magnolia or camellia), smooth stones collected from the garden, or even the surface of a painted egg. It’s a quirky, modern take on the traditional place card.
Engage the little ones and make them feel part of the celebration. Give them specific, manageable tasks.
- Let them be in charge of placing a single Cadbury Mini Egg on everyone’s plate.
- Have them carefully fold the napkins (perfection is not the goal!).
- Ask them to write or draw on simple cardstock place cards.
A common mistake that can ruin the mood?
Bad lighting. Harsh overhead lighting feels clinical and unflattering. The goal is a warm, inviting glow. If you don’t have a dimmer switch, turn off the main light and rely on layers of ambient light from lamps in the room, combined with the intimate flicker of plenty of candles on the table itself.
- Prevents serving dishes from wobbling.
- Grounds the entire place setting visually.
- Adds a layer of color or texture.
The secret is a charger plate. It’s a purely decorative base that sits under your dinner plate. They are never eaten off of but are essential for a ‘finished’ look. Options range from rustic woven hyacinth at Target to elegant gold-rimmed porcelain from Williams Sonoma.
Think beyond pastels. One of the biggest trends is incorporating unexpected, earthy tones into an Easter palette. Imagine a table set with terracotta-colored linens, sage green plates, and dried grasses mixed with a few pale yellow tulips. It feels sophisticated, grounded, and uniquely modern.
A 2021 survey found that 58% of people find mismatched or clashing patterns to be a major interior design faux pas.
Apply this to your table. If your tablecloth has a bold floral print, opt for solid-colored napkins and plates. If your plates feature an intricate pattern, choose a simple, neutral tablecloth. Let one element be the star to maintain a sense of calm and intention.
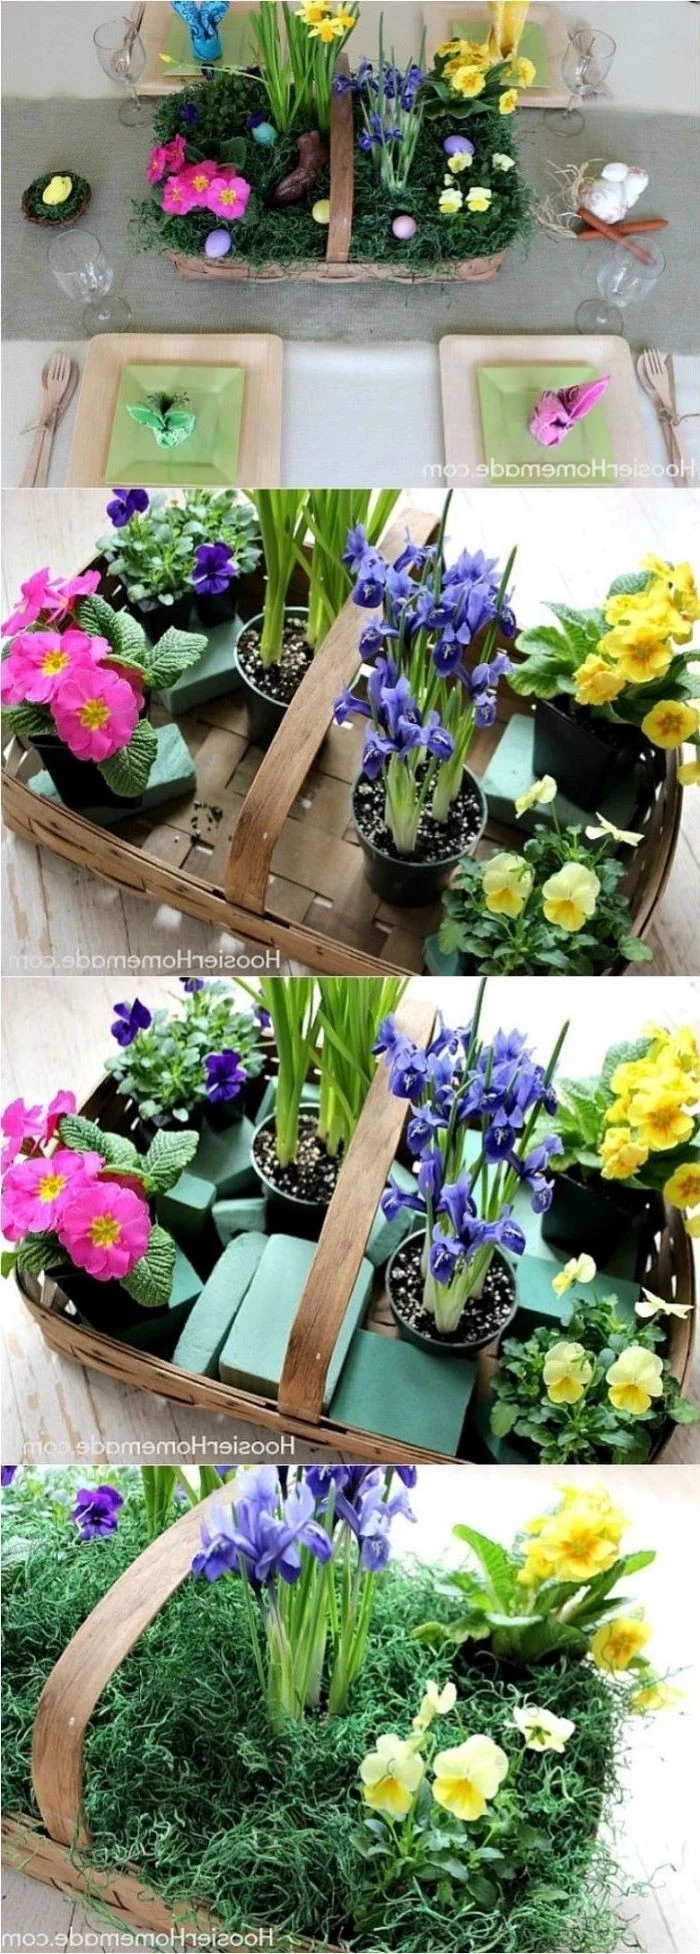
For a truly sustainable table, choose potted plants over cut flowers. Small pots of muscari, mini daffodils, or hyacinths can be clustered down the center of the table to create a living runner. After the meal, you can plant them in your garden or gift them to guests as a lasting party favor.

Problem: The dreaded candle wax drip on your best linen tablecloth.
Don’t panic. Let the wax harden completely. Once solid, gently scrape off the excess with a dull knife. Then, place a paper bag or paper towel over the stain and press with a warm iron. The paper will absorb the melted wax. Repeat with fresh paper until the wax is gone.
Looking for a budget-friendly way to fill space?
Glassware is your answer. Grouping different sizes of simple, clear drinking glasses or small bud vases and placing a single stem (like a ranunculus or a daisy) in each one creates a delicate, light-filled tablescape that looks far more expensive than it is. It’s minimalist, yet impactful.
Gingham Pattern: Evokes a sense of a cheerful, rustic country picnic. It feels informal, joyful, and a bit nostalgic. Pairs beautifully with simple wildflowers and wooden serving pieces.
Floral Pattern: Can range from romantic and traditional to bold and modern. A Liberty London floral print feels classic and delicate, while a large-scale abstract floral is contemporary and artistic. Choose the scale and color to match your desired mood.