Think Outside the Box: Your Guide to Building Real Furniture with Cardboard
I built my first piece of cardboard furniture ages ago. It was a simple set of shelves for my workshop, made from leftover appliance boxes. Honestly, my friends were skeptical. They saw cardboard as trash, something you put out on the curb for recycling. But I saw potential. I saw an engineering material with a surprising inner strength. And you know what? Those shelves, loaded down with tools and supplies, stood strong for years. They taught me the one thing I really want you to take away from this: when you treat it right, cardboard is a legitimate, versatile, and incredibly tough material for building things.
In this article
- First, Understand Your Material: It’s All About Paper and Air
- Getting Set Up: The Tools You Actually Need (and What They Cost)
- Your First Build: A Quick-Win Laptop Stand
- The Weekend Project: The Incredibly Strong Laminated Stool
- Advanced Moves and Making It Last
- The Most Important Part: Safety & Knowing Your Limits
- Inspiration Gallery
Since then, I’ve gone from workshop shelves to creating massive installations for trade shows and crafting custom displays for retail. I’ve seen what works, and maybe more importantly, I’ve learned from what spectacularly fails. This guide isn’t about cutesy craft projects. It’s about sharing the real techniques, the material know-how, and the structural principles you need to create pieces that are not only cool to look at but are genuinely built to last. We’re going to get into the nitty-gritty of the material, the tools that actually make a difference, and the methods that separate a wobbly box from a solid piece of furniture.
By the way, before you dive in, grab a scrap cardboard box right now. Try to fold it. Now, take a butter knife, press firmly, and score a line down the middle. Fold it again. See that clean, crisp edge? That’s the secret sauce. You’re already on your way.
First, Understand Your Material: It’s All About Paper and Air
Success with cardboard starts way before you make a single cut. It begins with understanding the material itself. Not all cardboard is the same, and picking the right type is probably the most critical decision you’ll make. Let’s clear up some confusion and talk about what really matters.
Corrugated Fiberboard: The Workhorse
This is the stuff you’re thinking of. It’s an engineered sandwich made of two flat sheets (the liner) with a wavy, zig-zag piece of paper (the medium or flute) in between. That wavy part is pure genius—it creates a series of strong arches that distribute weight and absorb impacts, kind of like a tiny truss bridge. The direction of these flutes is EVERYTHING.
- Flute Direction is Key: For any part that needs to hold weight, like the legs of a table or the vertical supports on a shelf, the flutes absolutely MUST run vertically, like columns. This gives it incredible compressive strength. Run them sideways, and your project will sag and fail almost instantly. I learned this the hard way on an early bookshelf prototype that slowly bowed into a sad smile overnight.
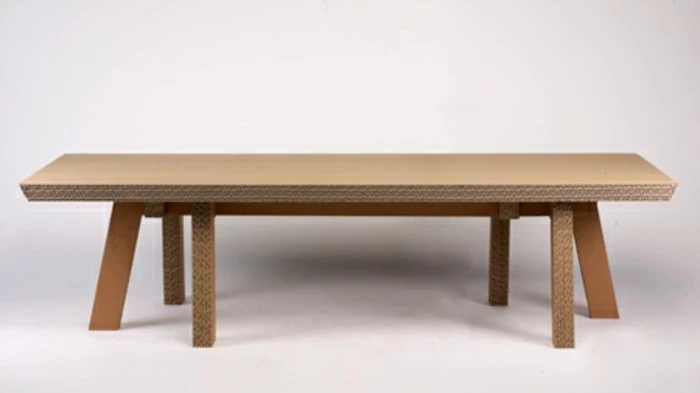
- Wall Types: You’ll see single-wall, double-wall, and even triple-wall board. For furniture, just forget about single-wall; it’s for light boxes and models. I almost exclusively use double-wall or triple-wall. Double-wall, with two layers of that wavy flute, is the sweet spot for strength and workability. Pro tip: appliance and bicycle shops are goldmines for huge, clean sheets of this stuff and are usually happy to give it away.
- Strength Ratings: If you really want to geek out, look for the Edge Crush Test (ECT) rating, which is often printed on the box flap. It measures how much stacking force the edge can handle. For any serious project, I look for an ECT rating of at least 44 for double-wall board. It’s a good benchmark for sturdiness.
Honeycomb Cardboard: The Lightweight Champion
Honeycomb board is a whole different animal. It has a core of hexagonal paper cells, just like a beehive, pressed between two strong liners. The strength-to-weight ratio is off the charts. We’ve used it in the shop to build massive conference tables and exhibition walls that needed to be rock-solid but also portable.
The downside? It’s more expensive and harder to find. You usually have to buy it from specialized packaging suppliers. It’s fantastic for big, flat surfaces like tabletops because it resists bending, but it’s a bit tougher to cut cleanly and doesn’t like to curve.
Getting Set Up: The Tools You Actually Need (and What They Cost)
Building with precision is what elevates cardboard from a craft to a real fabrication process. Clean cuts and strong bonds are non-negotiable. To be frank, getting the right tools from the start will save you a world of frustration. And you can get properly set up for about $50 to $75.
- Cutting Tool: Forget that clunky utility knife. You need a high-quality snap-off blade knife, like the ones made by OLFA. A good one will set you back about $15, but it’s the best money you’ll spend. The key is to always use a razor-sharp blade. A dull blade crushes more than it cuts. I snap off a new segment constantly, especially with double-wall board. A sharp blade is also a safer blade because you don’t have to force it.
- Cutting Surface: A large self-healing cutting mat is a must. They run about $20-$40 depending on the size. Cutting on your garage floor will kill your blade in a single pass.
- Straight Edge: Get a heavy, steel safety ruler. Period. It should cost around $25. The weight pins the cardboard down, and the raised edge protects your fingers. I’ve seen people try to use flimsy aluminum rulers, and it’s a recipe for the knife to jump the track and cause a nasty cut.
- Scoring Tool: For perfect folds, you need to crease the liner without cutting it. A bone folder (used in bookbinding) is ideal, but the back of a butter knife or an empty ballpoint pen works great in a pinch.
- The Right Glue: White school glue is out. You need a quality PVA wood glue. My go-to is Titebond II. It has a high solids content that creates a super-strong bond, and its water resistance is a nice little insurance policy. For big jobs, use a small paint roller to apply a thin, even coat. Hot glue is only for temporarily tacking things together—never for a structural joint.
- Clamps & Weights: No need for fancy woodworking clamps. Heavy books, paint cans, or gym weights are perfect. Just remember to use a piece of scrap wood on top to spread the pressure out and avoid denting your work.
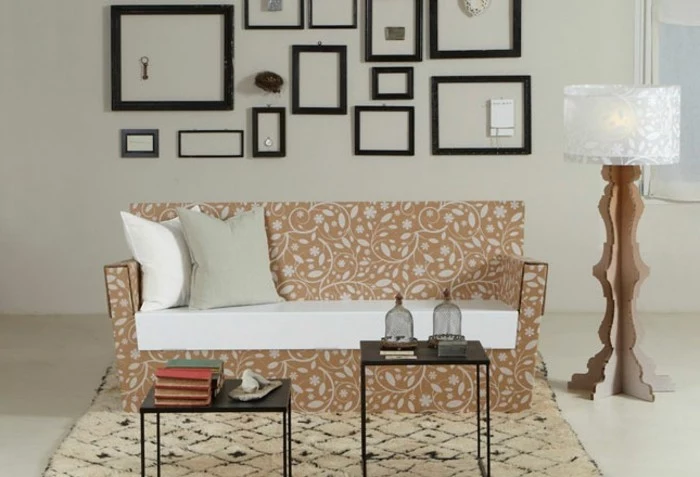
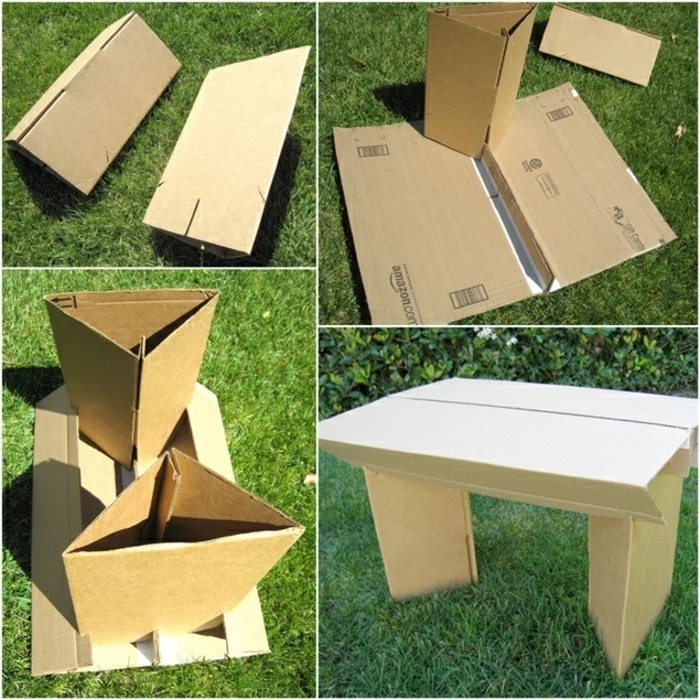
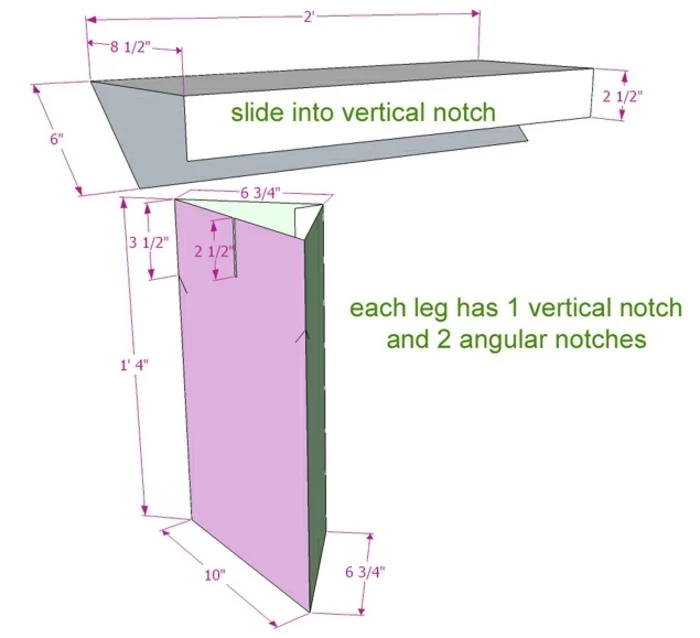
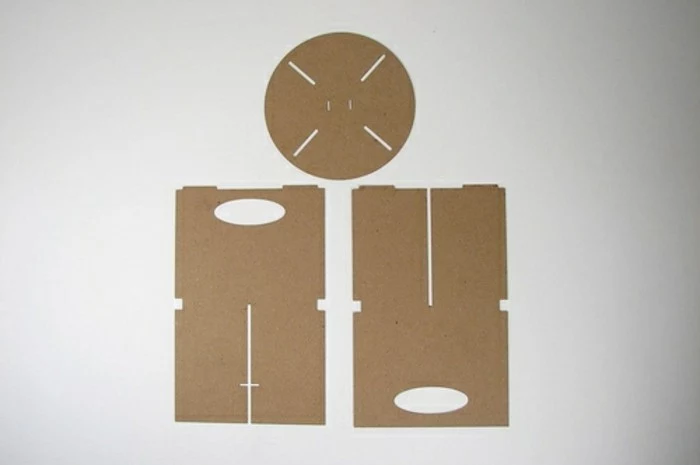
Your First Build: A Quick-Win Laptop Stand
The laminated stool is an awesome project, but cutting 30 perfect circles is a big commitment for your first time. Let’s start with something smaller to get a feel for the process. This simple laptop stand uses just one piece of cardboard and teaches the basics of scoring and interlocking.
- Measure & Mark: Grab a piece of double-wall cardboard about 24 inches wide and 12 inches deep. The flutes should run along the 12-inch depth (this is for strength).
- Draw Your Shape: You’ll be making two identical support legs. Each one will be a simple shape: a 10-inch base, a 9-inch back, and an angled top surface for the laptop. At the center of the back of each leg, mark a slot that is halfway up and as wide as your cardboard is thick (about 1/4 inch). On one leg, the slot goes from the top down. On the other, it goes from the bottom up.
- Cut & Slot: Carefully cut out your two leg pieces with your sharp knife and steel ruler. Cut out the slots precisely.
- Assemble: Slide the two pieces together at the slots. They should form a stable ‘X’ shape. That’s it! You now have a sturdy, functional laptop stand and a feel for how precisely cut pieces can create a strong structure.
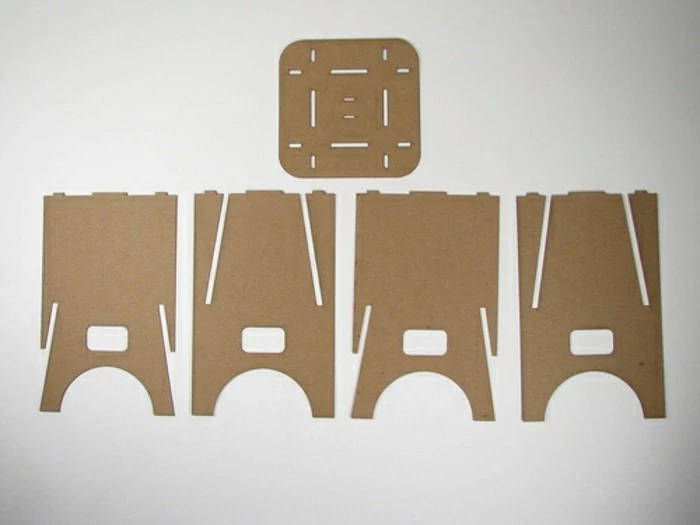
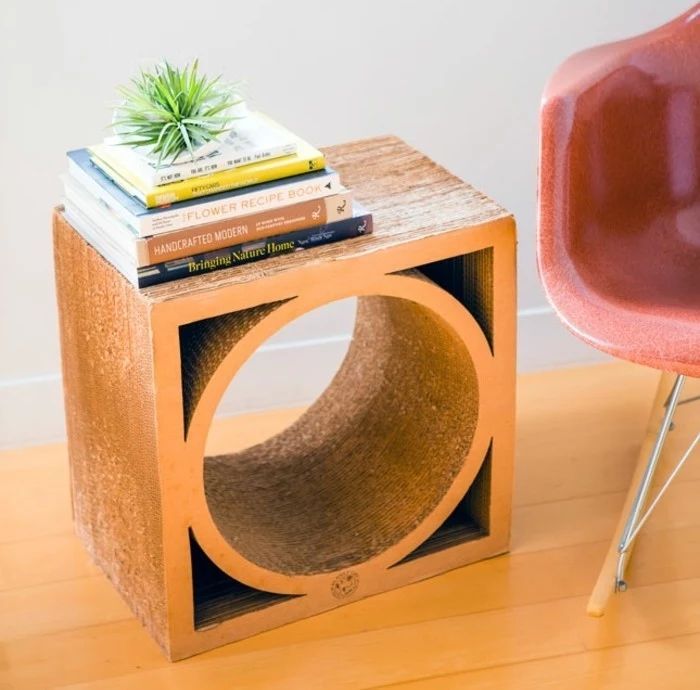
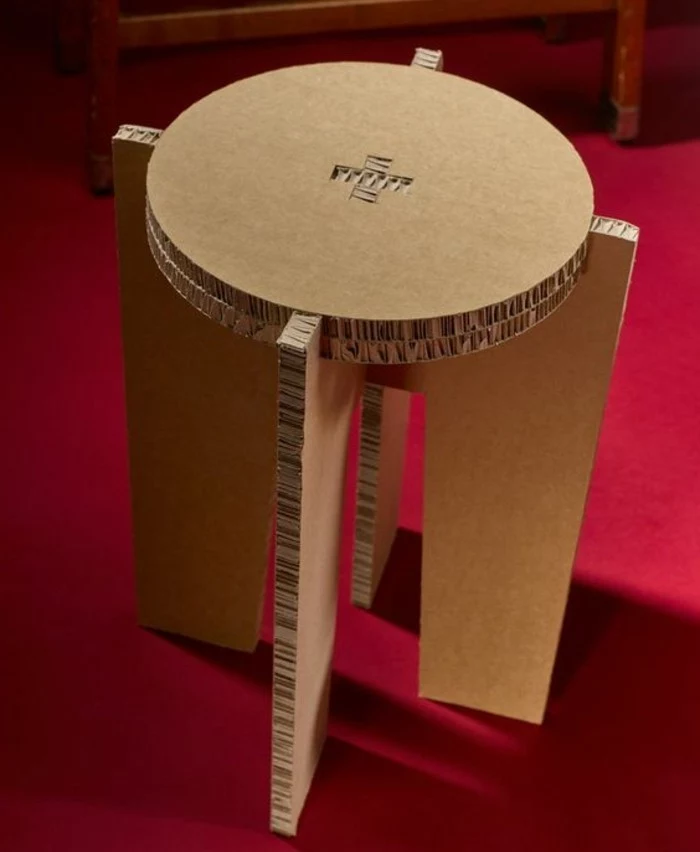
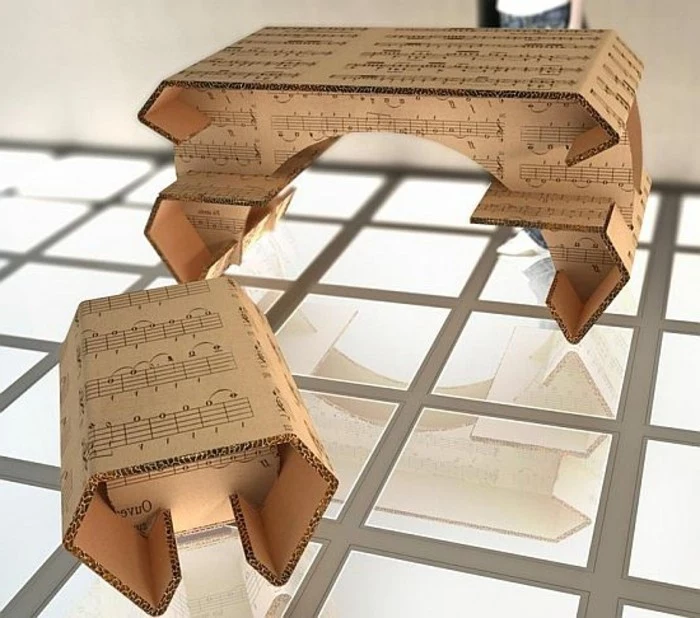
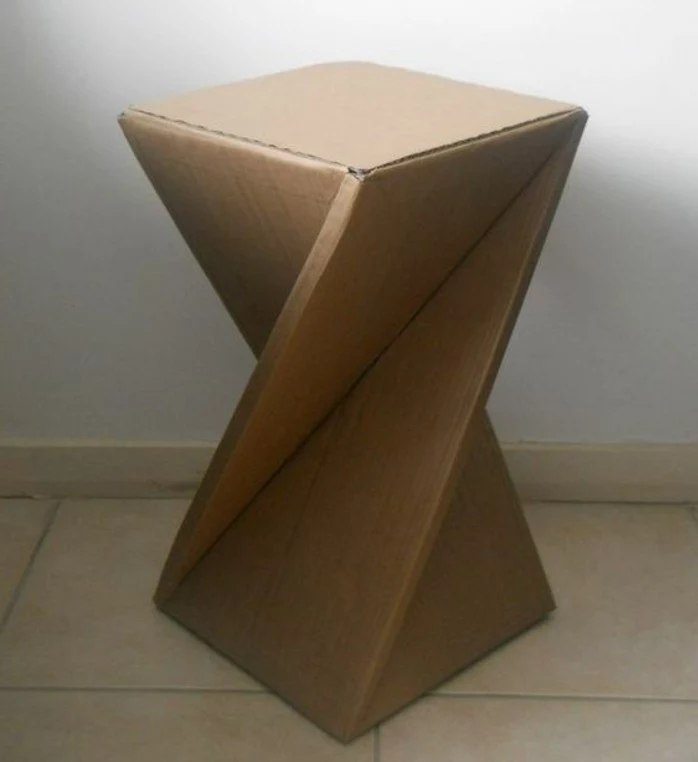
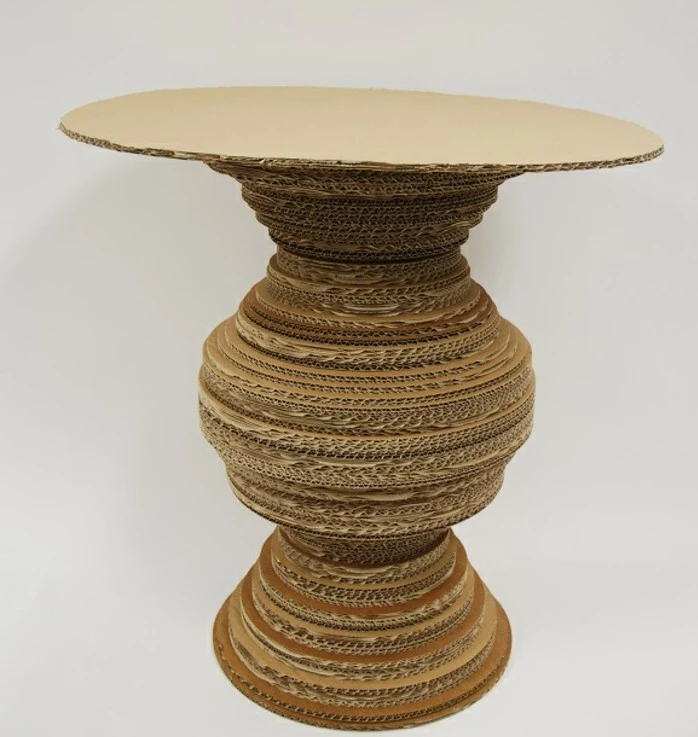
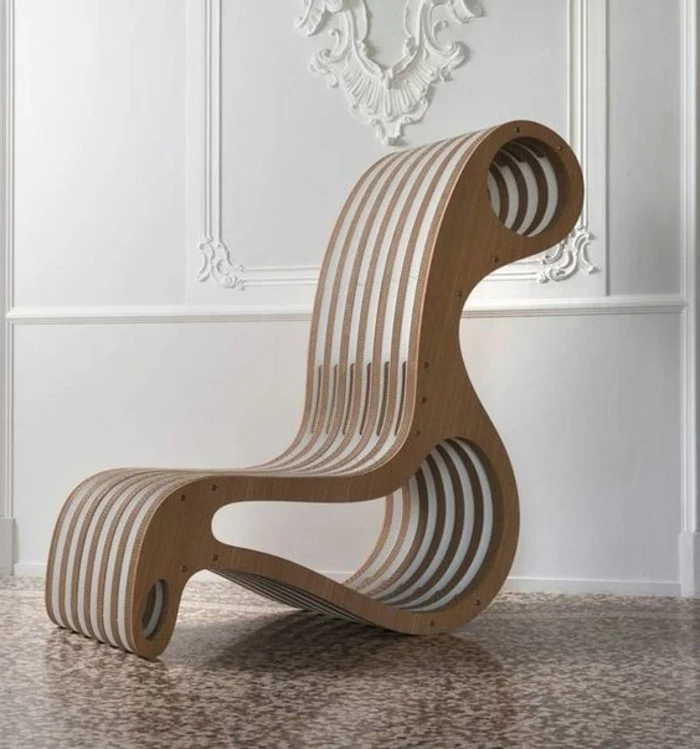
The Weekend Project: The Incredibly Strong Laminated Stool
Ready for the next level? This stool is a fantastic project that teaches the most important technique: lamination. It might look simple, but it’s strong enough to last for years.
Heads up on time: Set aside a weekend. Expect 3-4 hours for cutting and tracing, about an hour for gluing, and then a full 24-hour wait for it to cure.
Materials & Tools:
- A large, clean sheet of double-wall cardboard (an old fridge box is perfect).
- PVA wood glue (like Titebond II).
- Your knife, ruler, and cutting mat.
- A pencil and a compass (or a big dinner plate).
- A small paint roller for the glue.
- Weights and a flat piece of scrap wood.
The Build:
- Create Your Template: Draw a circle about 14 inches in diameter. Lesser-known trick: Don’t make your main template out of cardboard. A cardboard template gets chewed up after the 5th trace. Cut your first one from a scrap of thin plywood or hardboard if you have it. It’ll give you perfectly consistent circles.
- Cut the Layers: Trace your template onto the cardboard. You’ll need about 25-30 layers for a stool height of around 18 inches. This is the grind, so put on some music. For half the circles, make sure the flutes run north-to-south. For the other half, have them run east-to-west. This is CRITICAL for stability.
- Start Laminating: Lay down your first circle. Roll on a thin, even layer of wood glue. Don’t slop it on—too much moisture will make the cardboard soggy and weak. Place a second circle on top, making sure its flutes are turned 90 degrees to the first. Press down and align the edges.
- Stack and Glue: Keep going, alternating the flute direction each time. I find it’s easiest to work in batches of 5 or 6 layers at a time.
- Press and Cure: Once all your layers are glued, put the flat piece of scrap wood on top and then load it up with weights. You need some serious pressure here, at least 40-50 lbs. Now for the hard part: walk away. Let it cure for a full 24 hours. Don’t get impatient!
- Finishing: After 24 hours, you’ll have a solid block. The edges will be a little uneven, and that’s fine. You can now treat it like wood. Use a sanding block with 120-grit sandpaper to smooth the sides. The layers will create a beautiful striped pattern. You can even round the top edge for comfort. Wipe off the dust, and you’re done.
Advanced Moves and Making It Last
Once you’ve got the basics down, you can start getting fancy.
Creating Curves and Bends
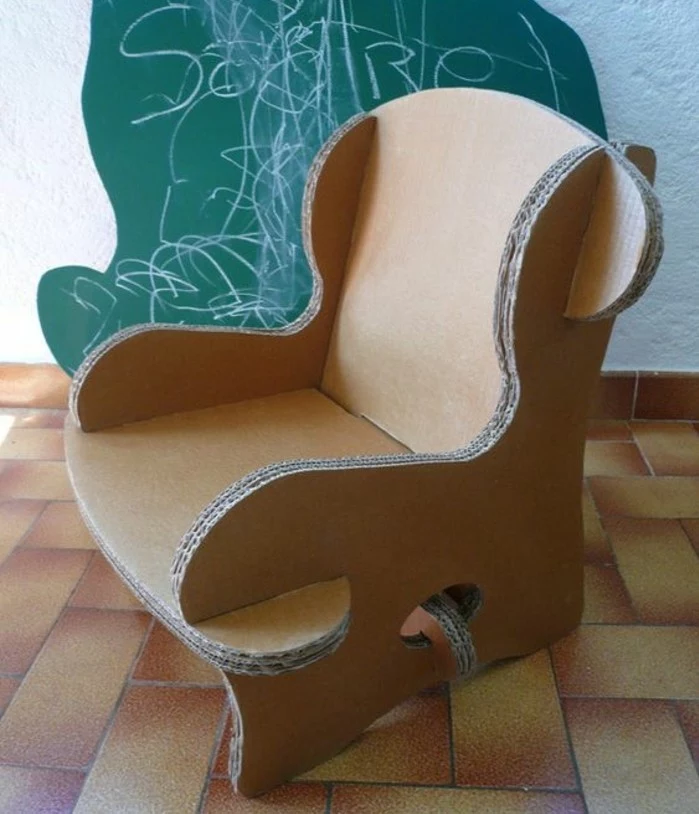
To get a smooth bend, you can use a technique called kerf bending. This involves making a series of parallel cuts through just the inner liner and the flute, leaving the outer liner as a flexible hinge. For a gentle curve, try making cuts about 1/2-inch apart. For a really tight corner, you might need them every 1/8-inch. Always practice on a scrap piece first to get a feel for it!
Sealing and Protecting Your Work
Raw cardboard is a magnet for moisture and stains. Sealing your finished piece isn’t optional if you want it to last. The best thing I’ve found is a water-based polyurethane varnish, the kind you’d use for hardwood floors. It creates a durable, waterproof, and non-toxic finish.
Apply three thin coats with a foam brush, letting each coat dry completely. Important warning: ALWAYS test your sealant on a scrap piece of the exact same cardboard you used. Some sealants can make the ink on printed boxes bleed, which can ruin your beautiful project right at the finish line.
The Most Important Part: Safety & Knowing Your Limits
Okay, let’s be serious for a minute. We’re using razor-sharp tools to build things people will actually sit on.
- Respect the Knife: I cannot stress this enough. Always cut away from your body. Keep your free hand far from the blade’s path, ideally planted firmly on your steel ruler. A moment of distraction is all it takes. I have a small scar on my thumb from my early days that serves as a permanent reminder.
- Structural Honesty: Water is the enemy. Even when sealed, this furniture is for indoor use only. It won’t survive a rainstorm or a steamy bathroom. Also, be smart about what you build. I would never build a stepladder, a child’s crib, or anything where failure could lead to serious injury. This is not a replacement for wood or steel in every situation. Know the material’s limits.
Building with cardboard is an amazing process that turns a throwaway material into something with real value and permanence. It just takes a bit of precision, patience, and respect for the material. Start small, learn its strengths, and you’ll open up a whole new world of creativity, all built from little more than paper and air.
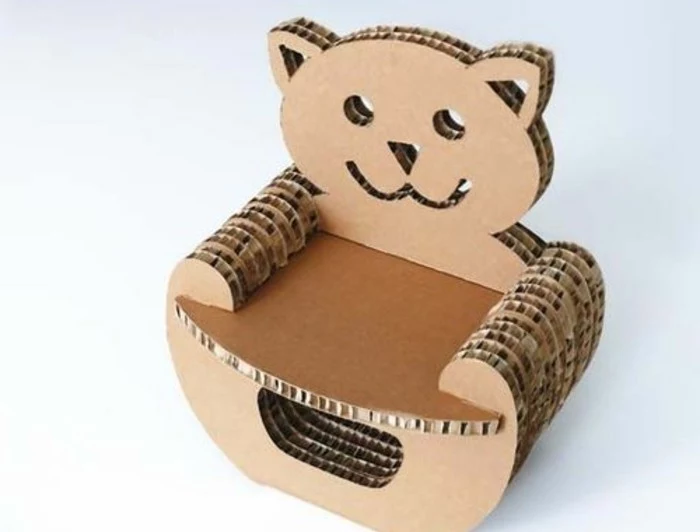
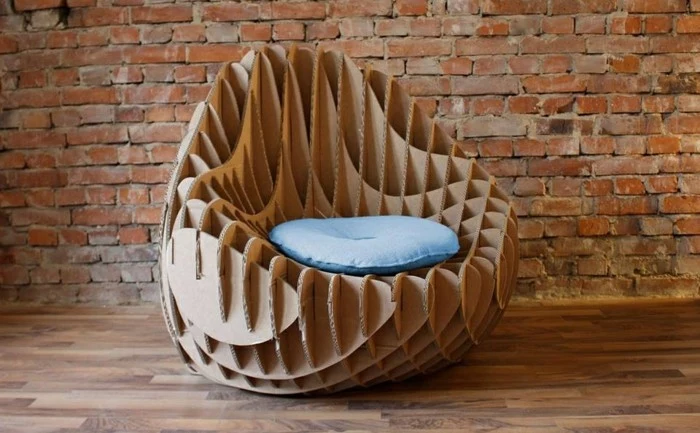
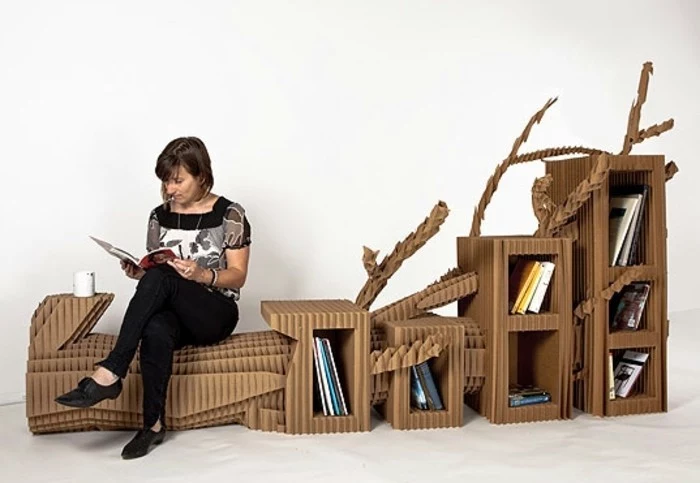
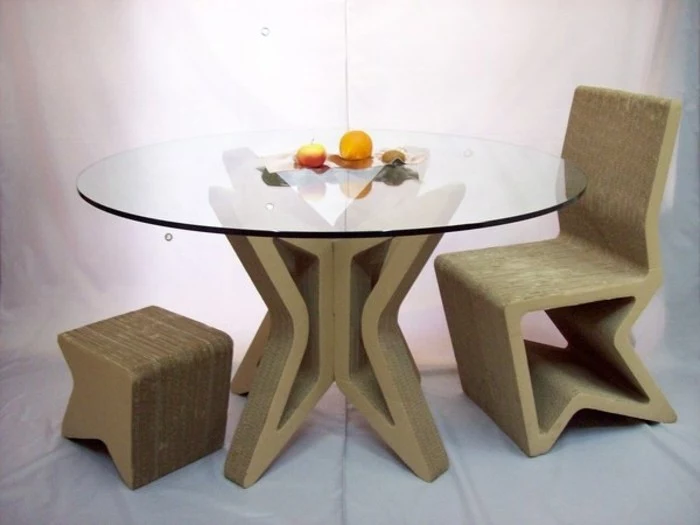
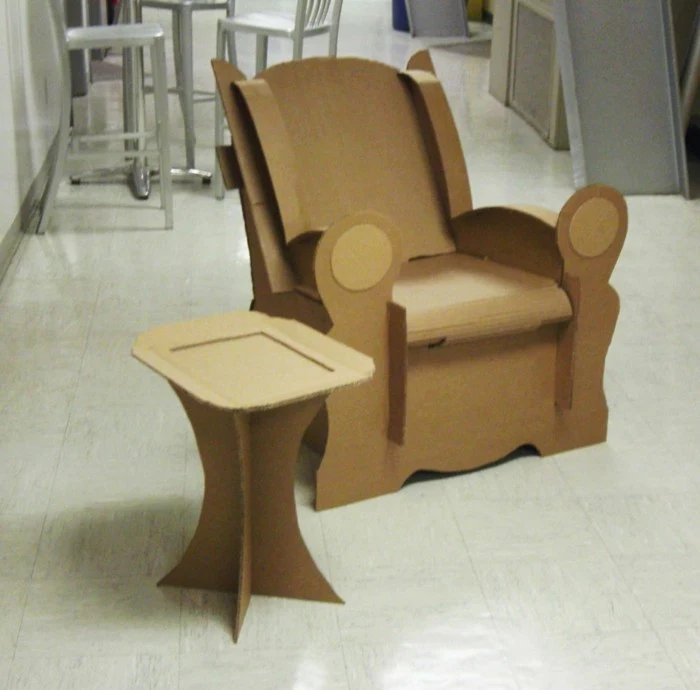
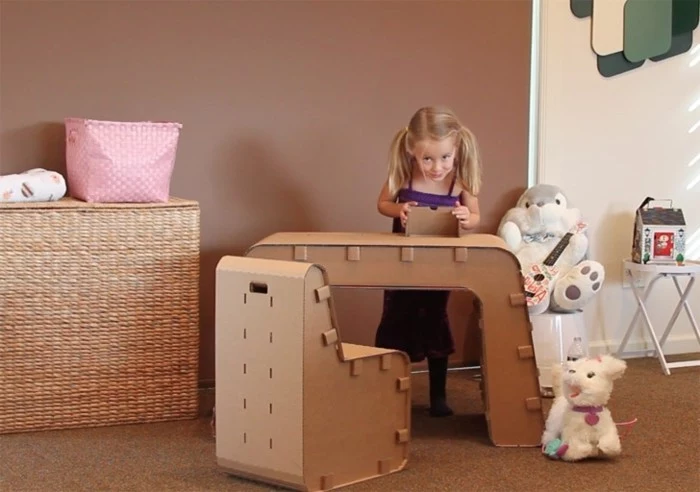
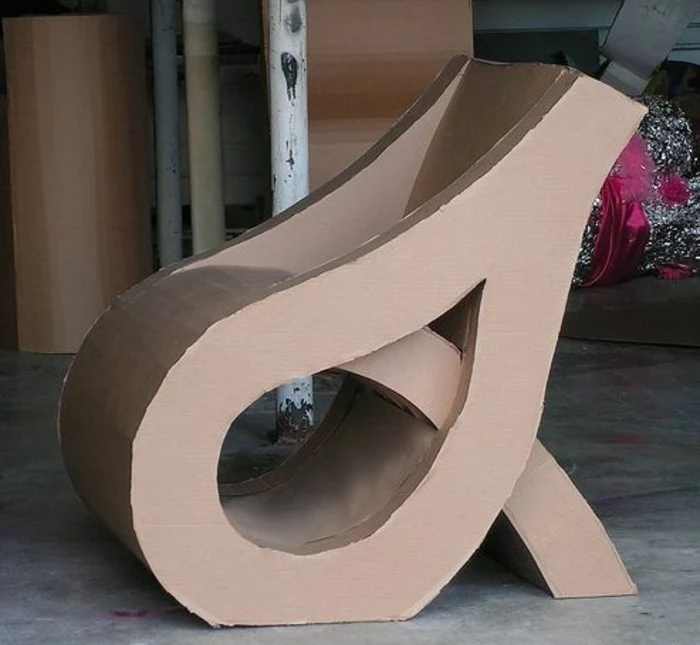
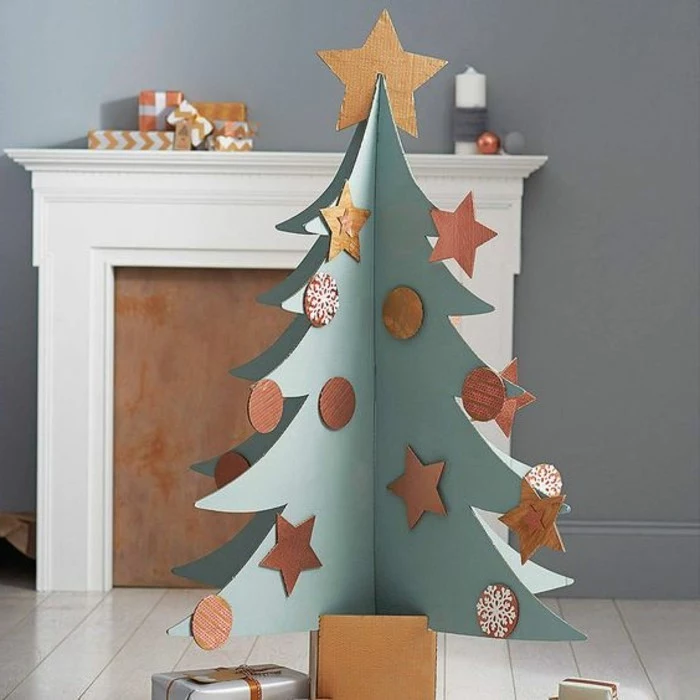
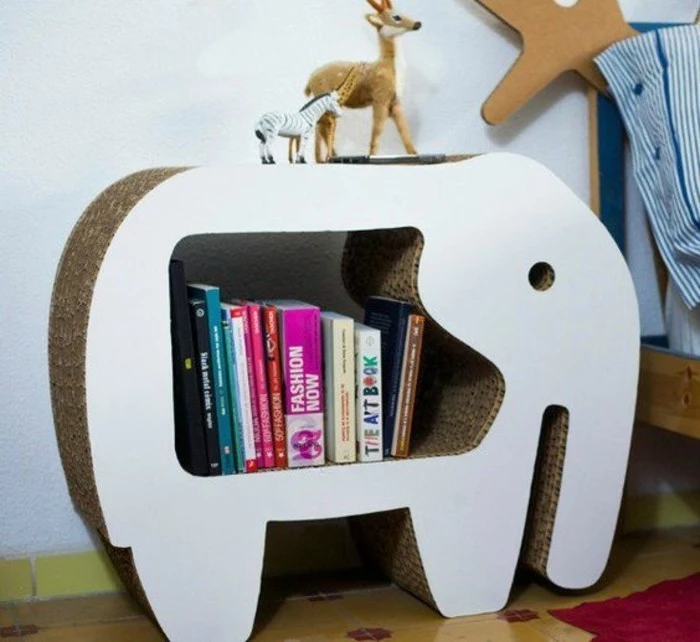
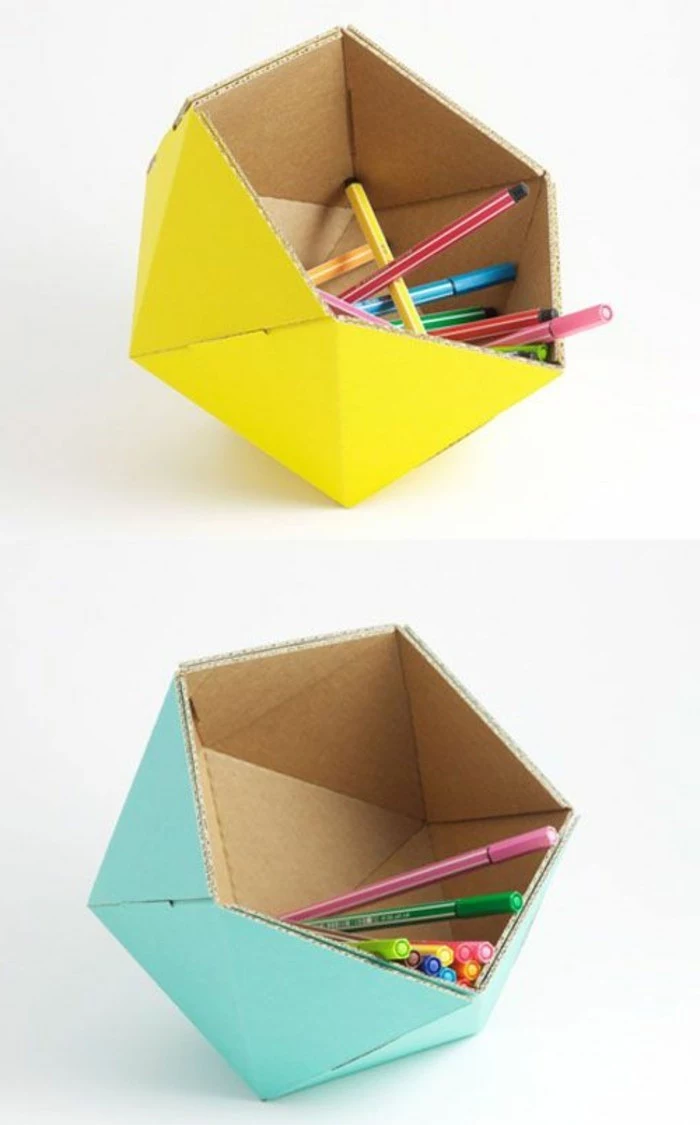
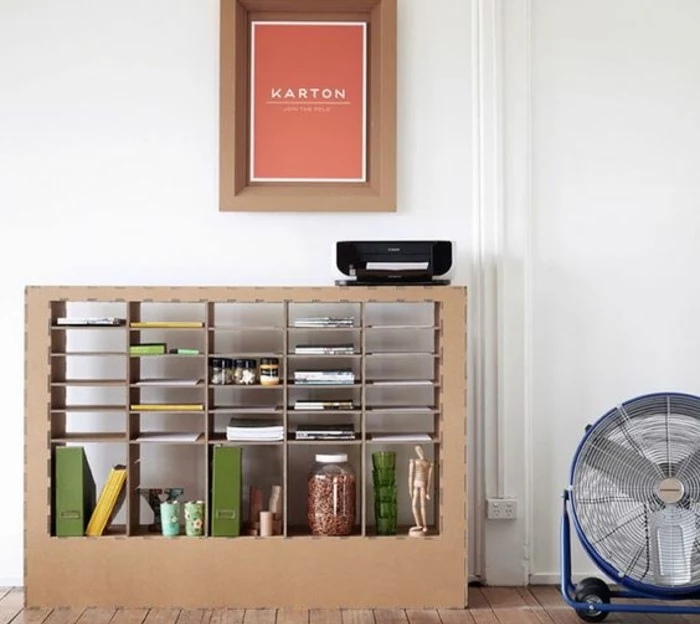
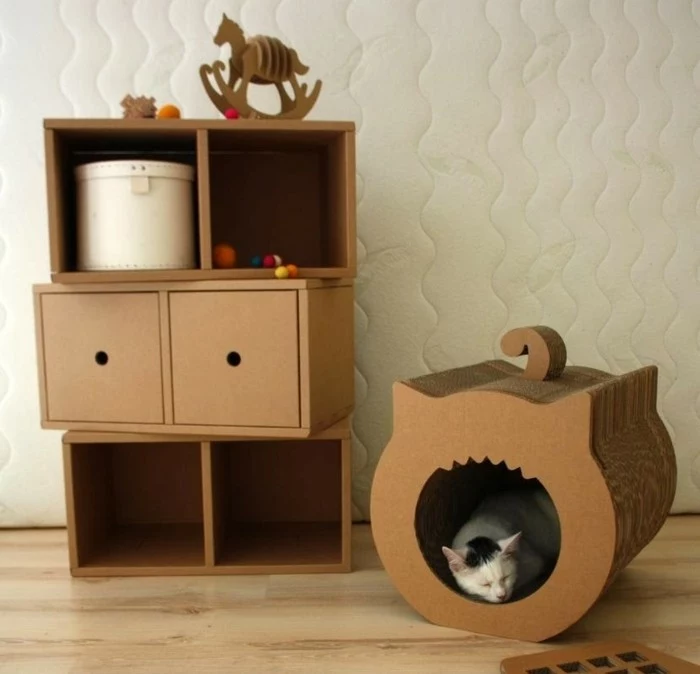
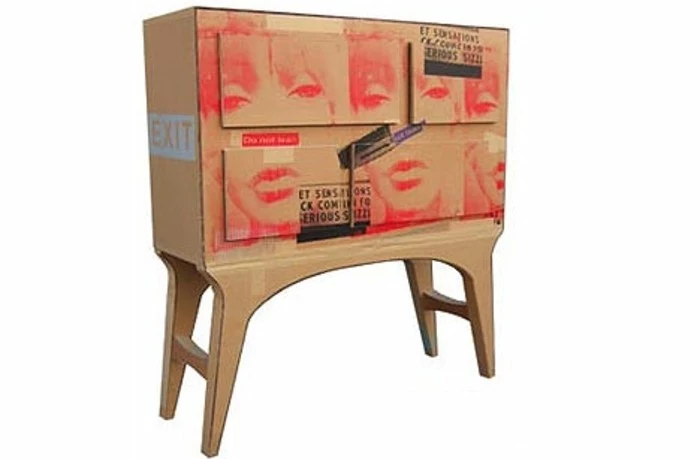
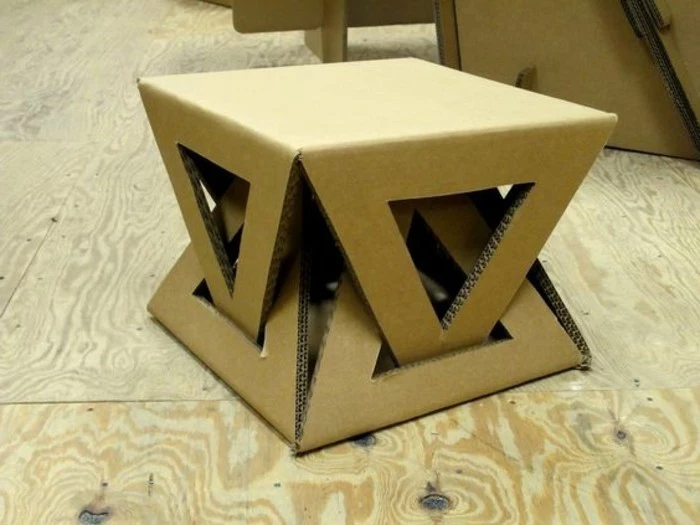
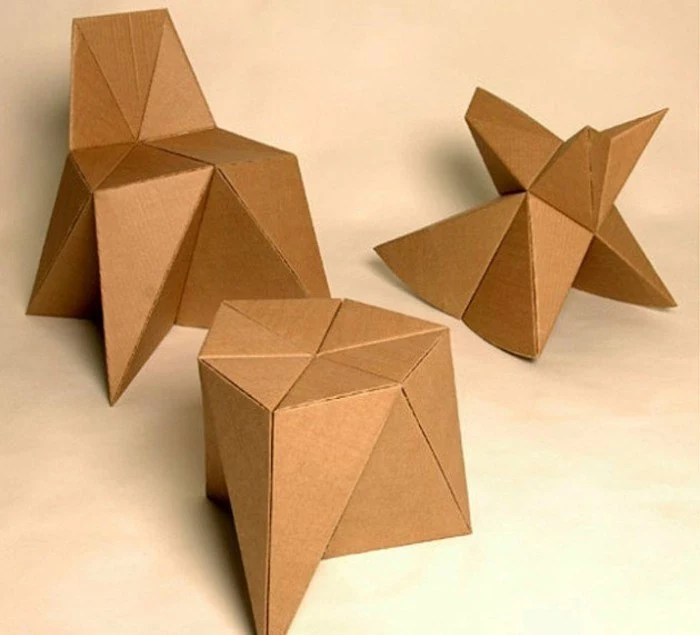
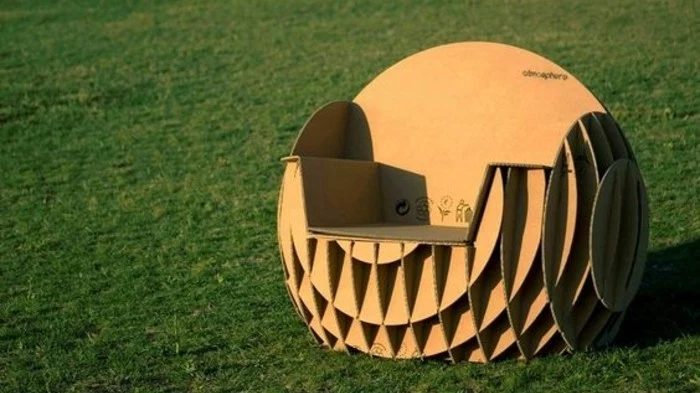
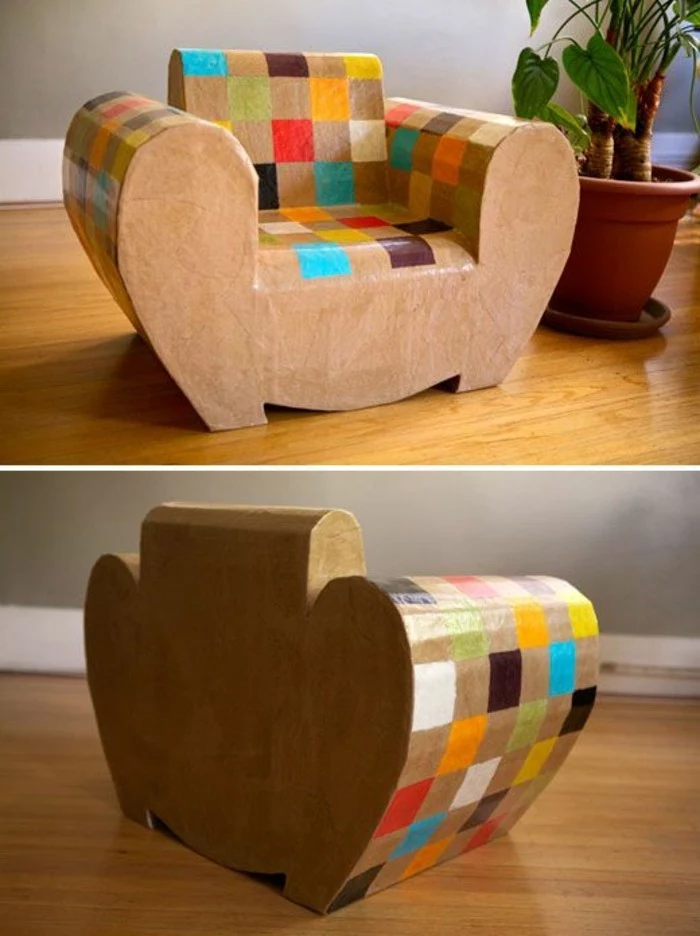
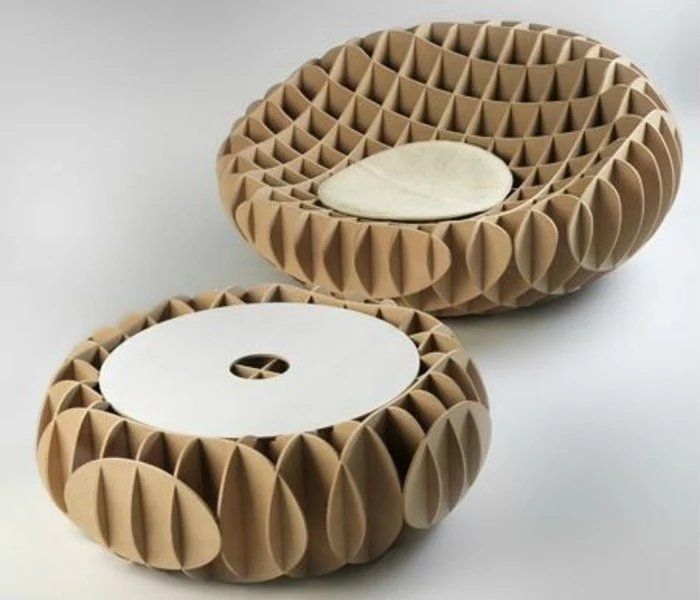
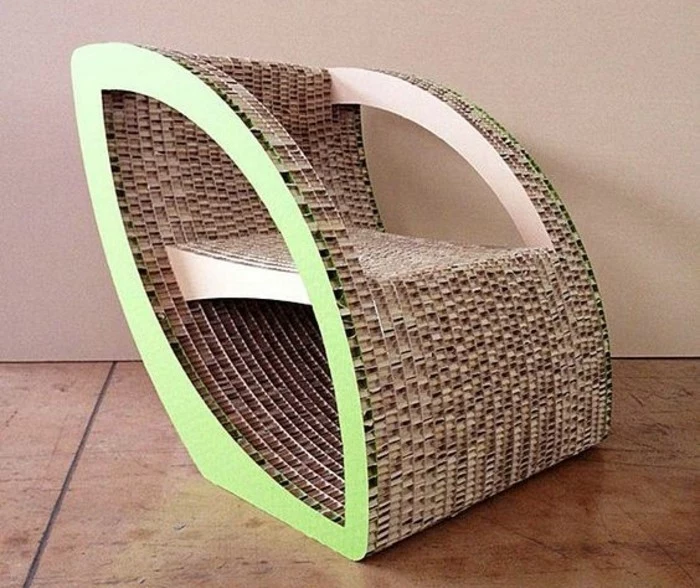
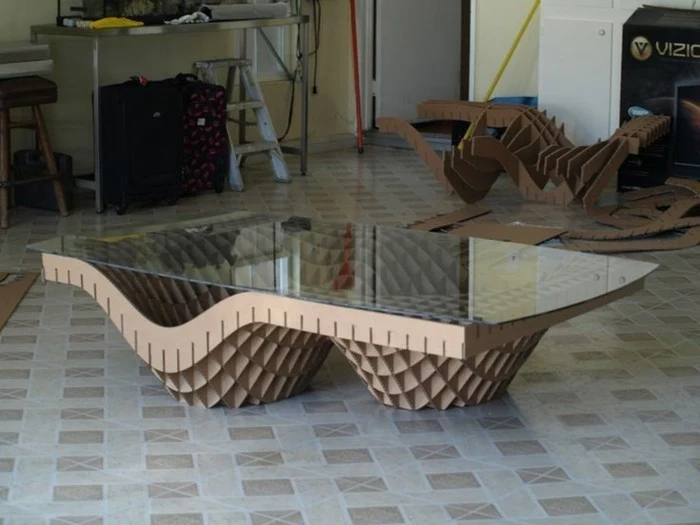
Inspiration Gallery
The Glue Dilemma: Not all adhesives are created equal in the world of cardboard. For structural integrity, a high-quality PVA wood glue, like Titebond II, is your best friend. It soaks into the paper fibers and creates an unbreakable bond when clamped and dried. Hot glue is fantastic for quickly tacking pieces in place while the main glue sets, but it should never be used for primary structural joints as it can become brittle and fail under load.

“I found I could resolve the problem of the chair. I found that cardboard has a structural integrity of its own. I was fascinated by that.” – Frank Gehry, on creating his iconic 1972 ‘Wiggle’ Chair.
Think beyond the utility knife. To truly elevate your cardboard construction, you’ll need a few specialized tools:
- A self-healing cutting mat: Protects your work surface and keeps your blades sharper for longer. A large one from a brand like Olfa or Fiskars is a worthy investment.
- A bone folder: Traditionally used in bookbinding, this simple tool creates incredibly crisp, clean score lines for perfect folds without tearing the paper.
- Long metal ruler with a cork back: The length ensures straight cuts on large pieces, and the cork backing prevents any slipping.
Can you really make it waterproof?
Absolutely. The key is to seal the entire surface, including the exposed flutes on the edges. Several coats of a water-based polyurethane varnish, like Varathane or Minwax Polycrylic, will create a durable, moisture-resistant, and wipeable surface. For maximum protection in a kitchen or bathroom setting, consider applying a coat of shellac as a primer before the polyurethane; it provides an excellent barrier against water vapor.
The single most common mistake: Ignoring the orientation of the flutes. The internal wavy structure of the cardboard provides immense strength in one direction. Always orient the flutes so they run vertically on load-bearing parts, like the legs of a table or the sides of a bookshelf. Running them horizontally is a recipe for sagging and collapse.
- Create furniture that perfectly fits your space, down to the last millimeter.
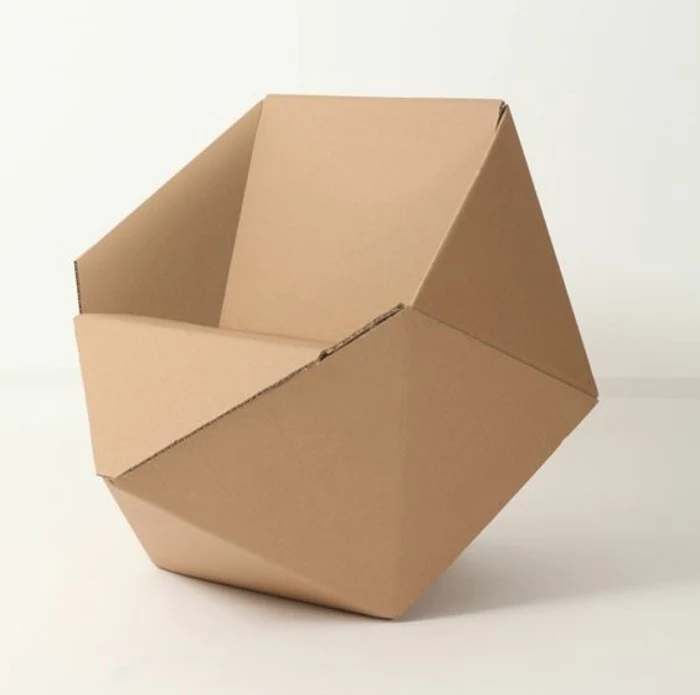
- Achieve complex curves and organic shapes impossible with traditional woodworking.
- Feel the deep satisfaction of turning “trash” into a functional, beautiful object.
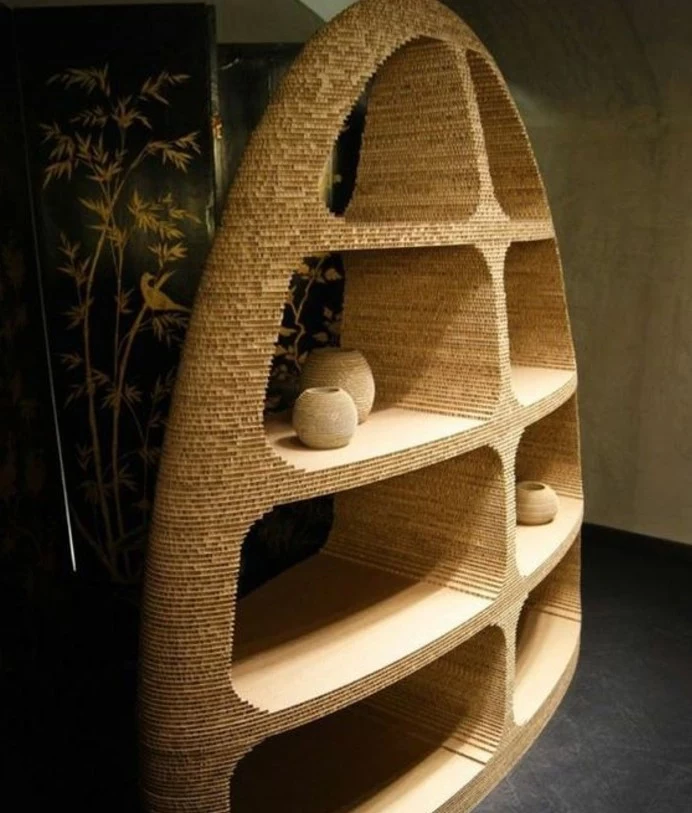
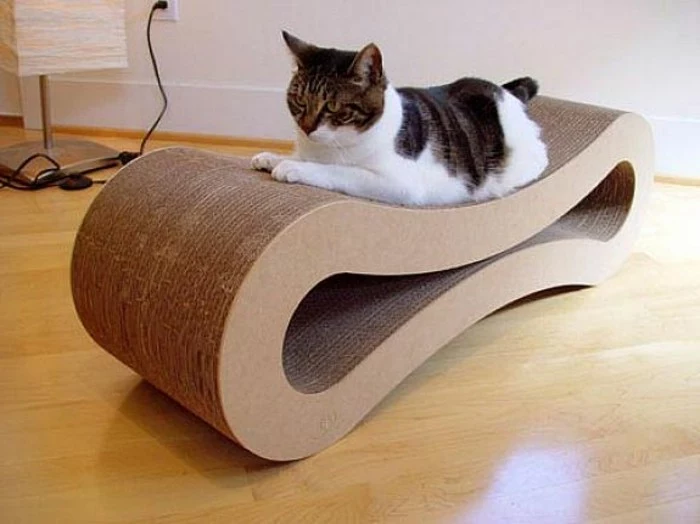
The secret? A technique called lamination. By gluing multiple profiled sheets together, you build a solid, carvable block of cardboard with incredible strength.
According to the American Forest & Paper Association, over 91% of corrugated cardboard is recovered for recycling in the U.S.
By building with salvaged cardboard, you’re participating in one of the most successful recycling stories. You’re not just diverting waste; you’re giving it a high-value second life as durable furniture, extending its utility far beyond that of a simple shipping box before it eventually returns to the recycling stream.

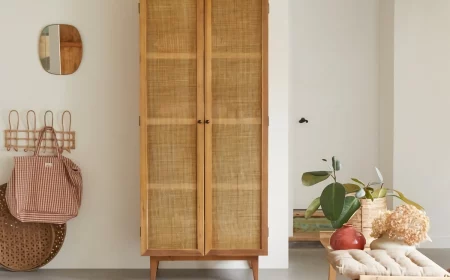
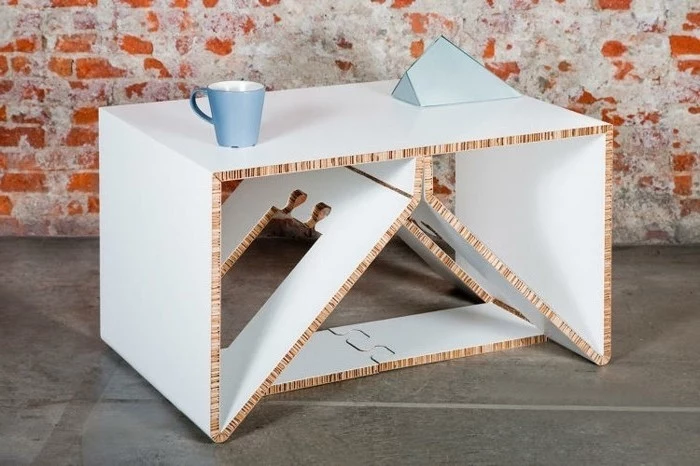
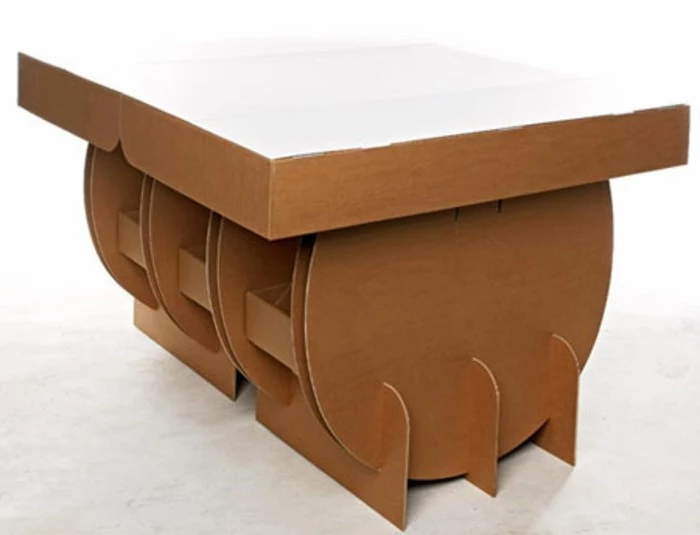
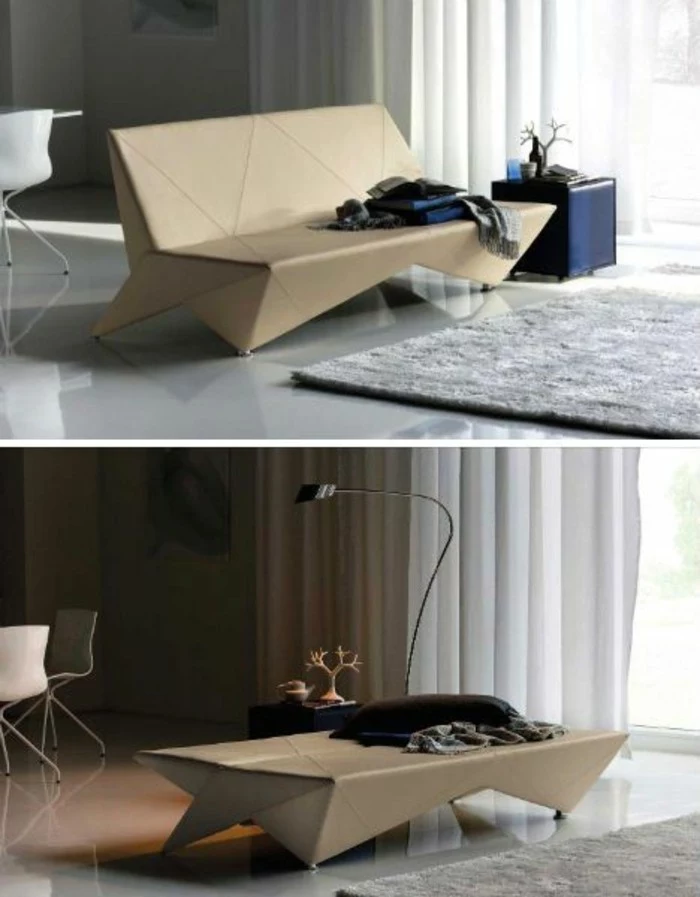
Don’t be afraid to mix materials. Cardboard’s warm, neutral texture provides a stunning contrast to other elements. A sheet of tempered glass on top of a laminated cardboard base makes for a sleek and modern coffee table. Introducing simple wooden dowels as legs for a small stool or incorporating metal drawer pulls can elevate a simple piece into something truly sophisticated.

Sourcing Free Cardboard: Appliance and bicycle shops are gold mines for large, sturdy double-wall sheets. The key is to ask nicely and find out their delivery days.
Buying New Sheets: For pristine, uniform material, especially for a large project, consider buying new. Suppliers like Uline or local packaging companies sell large sheets of single, double, or even triple-wall board, ensuring a consistent starting point.
Ultimately, free is great for experimenting, but for a polished final piece, buying new can be worth the small cost.

For a flawless finish, preparation is everything. Before you even think about paint or varnish, take the time to fill any dents or exposed joints. A lightweight spackling compound, applied with a small putty knife, works wonders. Once dry, sand it smooth, starting with 120-grit sandpaper and finishing with a finer 220-grit for a surface that feels almost like wood.
How do I cut perfect curves?
Forget trying to do it in one pass. First, use a sharp utility knife, like a Stanley 10-777, to lightly score the curve, creating a guide track. Then, make a series of shallow passes, cutting a little deeper each time. This prevents the blade from wandering and tearing the cardboard. For tight interior curves, a swivel-blade craft knife or even a scroll saw with a fine blade on a low speed setting can give you unparalleled precision.
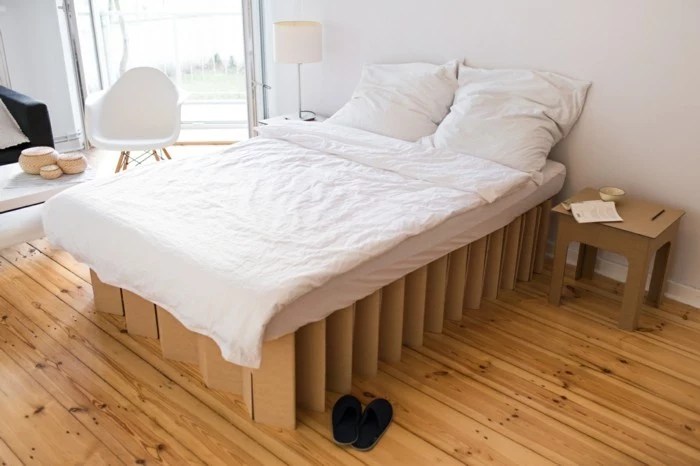
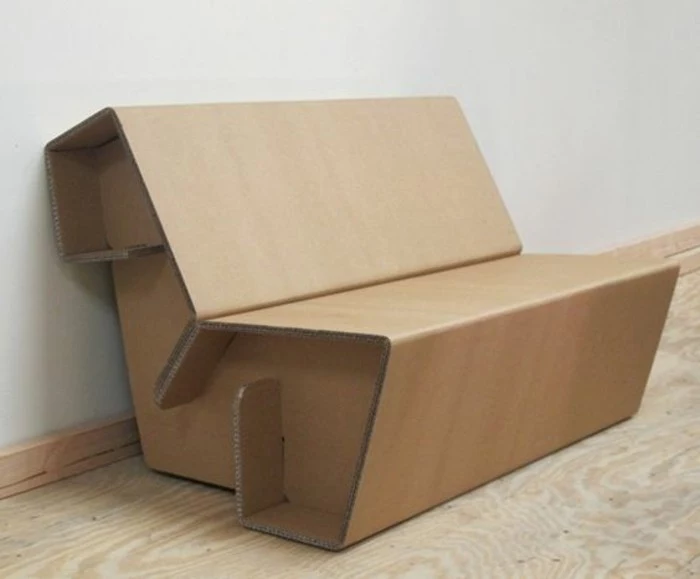
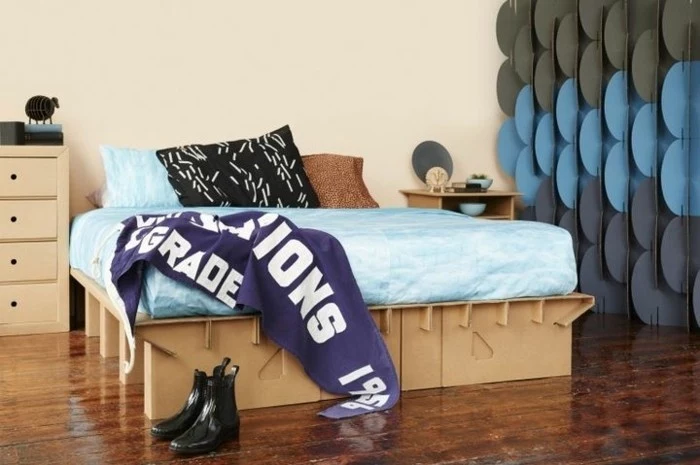
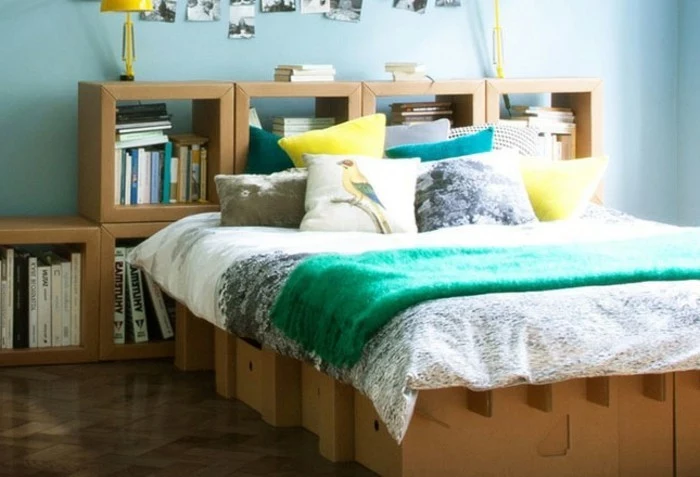
A triple-wall corrugated fiberboard can have a bursting strength of over 1100 PSI (pounds per square inch).
This means it takes an incredible amount of focused pressure to puncture it. When you laminate these sheets together, the resulting material is strong enough to be used for weight-bearing structures like bed frames and benches, defying all expectations of “mere” cardboard.
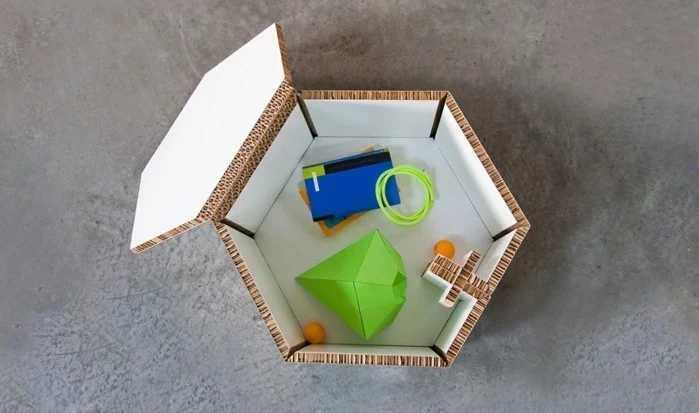
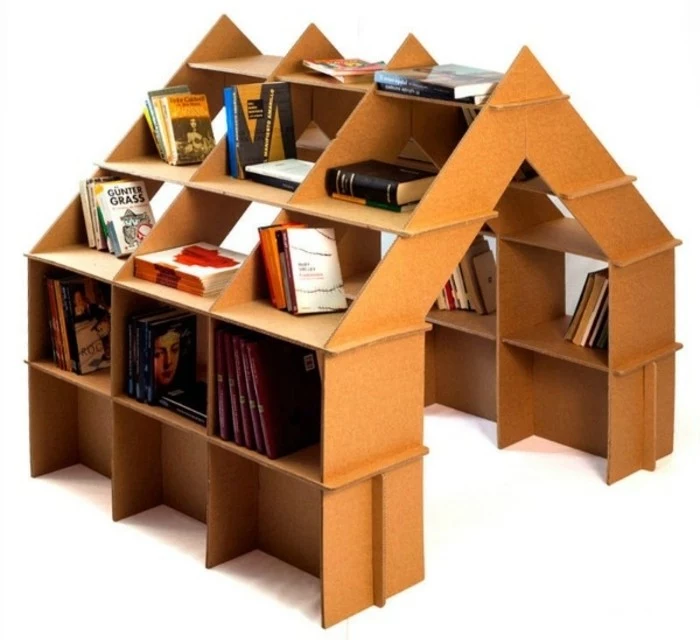
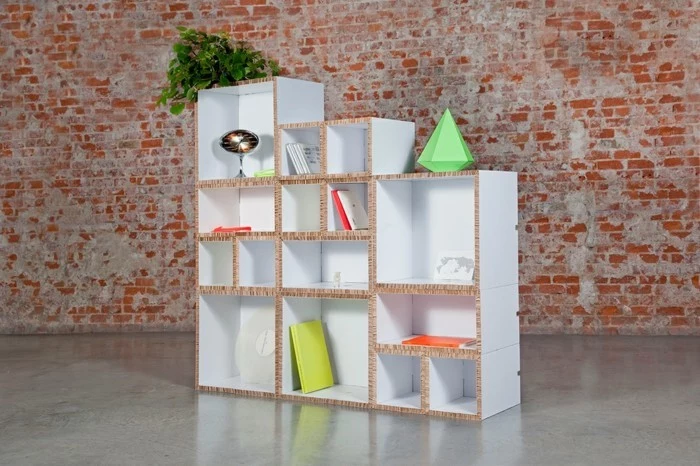
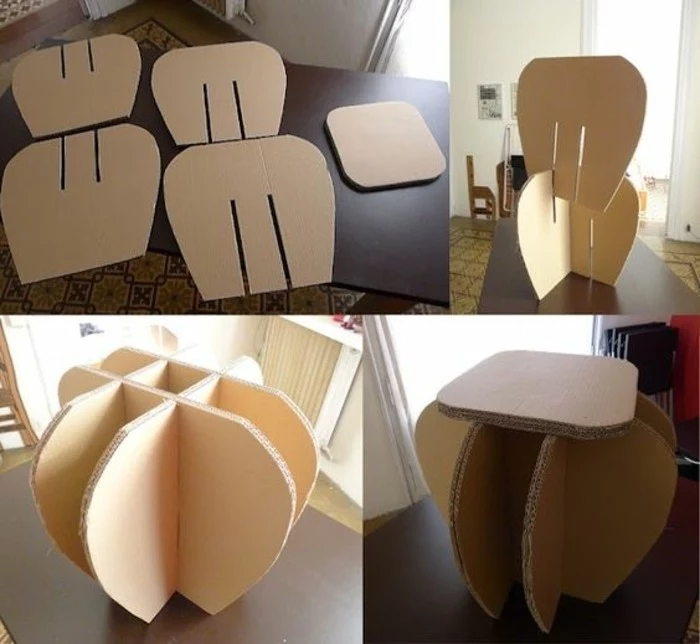
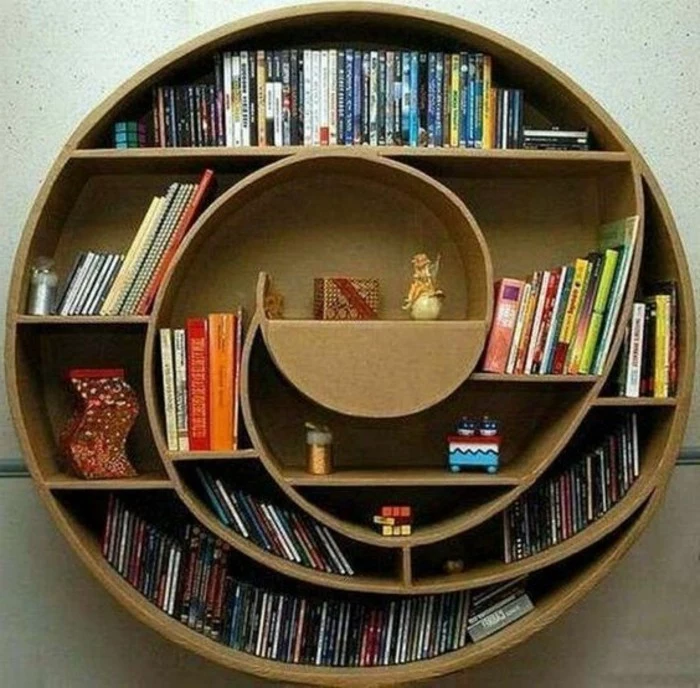
Looking for a great first project? Try a modular hexagonal shelf. It’s simple, stylish, and teaches you the core principles of cutting and gluing.
- Cut six identical trapezoid shapes from double-wall cardboard. Make sure the flutes run parallel to the non-parallel sides for strength.
- Glue the angled edges together to form a hexagon. Use painter’s tape to hold the joints tight while the wood glue dries.
- Create several modules and arrange them on your wall for a custom honeycomb display.
Paint: Best for a bold, opaque color statement. Use a good quality primer first (a spray-on shellac-based primer like Zinsser B-I-N is excellent) to prevent the cardboard from getting soggy and to create a uniform base. Then, apply your color with acrylic or latex paint.
Varnish: Ideal for celebrating the natural color and texture of the cardboard. A clear, matte polyurethane varnish will protect the piece without adding a high-gloss, plastic-like shine, keeping the aesthetic raw and authentic.
The sound of a room changes with cardboard furniture. Its fibrous, air-filled structure has natural acoustic-dampening properties, subtly absorbing echoes and creating a calmer, quieter atmosphere. It’s a sensory bonus that goes beyond the visual and functional aspects of your creation.

To achieve those perfectly smooth, professional-looking exposed edges on a laminated piece, your secret weapon is sandpaper. After gluing and clamping your stack of cardboard profiles, treat the entire block as if it were a piece of soft wood. Use a sanding block with 80-grit paper to shape and level the edges, then move to a 150-grit to get them impressively smooth to the touch.
- It can be easily repaired with a bit of glue and a patch.
- Minor dents add to its character over time.
- It’s completely recyclable at the end of its long life.
The key to its longevity? A good seal. A few coats of clear, matte varnish not only protect it from spills but also harden the surface, making it much more resistant to daily wear and tear.
The next time you unbox an expensive electronic device, stop and study the packaging. The complex, folded inserts designed to protect fragile items are masterpieces of structural engineering. They use folds, tabs, and interlocking sections to create incredible rigidity from a single piece of board. This is a free masterclass in smart, glue-free cardboard design.
Important: The true cost of cardboard furniture isn’t the material, it’s your time. Cutting dozens of identical profiles for a laminated chair can take hours. Embrace the process as a form of meditative craft. Put on some music, take your time, and focus on accuracy—the stunning result will be well worth the patient effort.
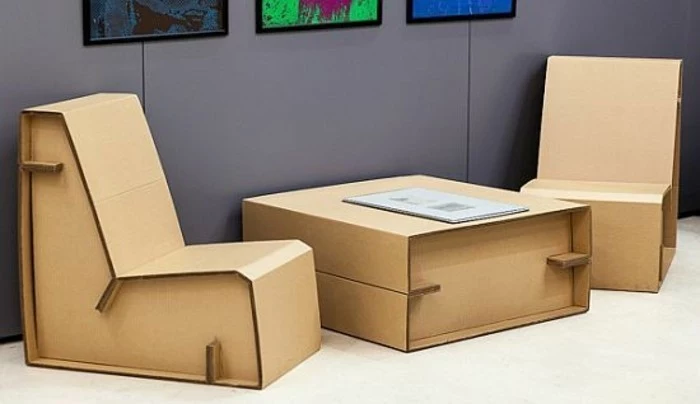
Ever notice how pop-up shops and trade show booths look so creative? Many are built almost entirely from cardboard.
Brands like The Cardboard Guys and Chairigami specialize in creating temporary, yet incredibly sturdy, retail environments. This trend highlights cardboard’s greatest strengths: it’s lightweight, easy to transport, fully customizable, and makes a powerful statement about sustainability.
Can you design it to be taken apart?
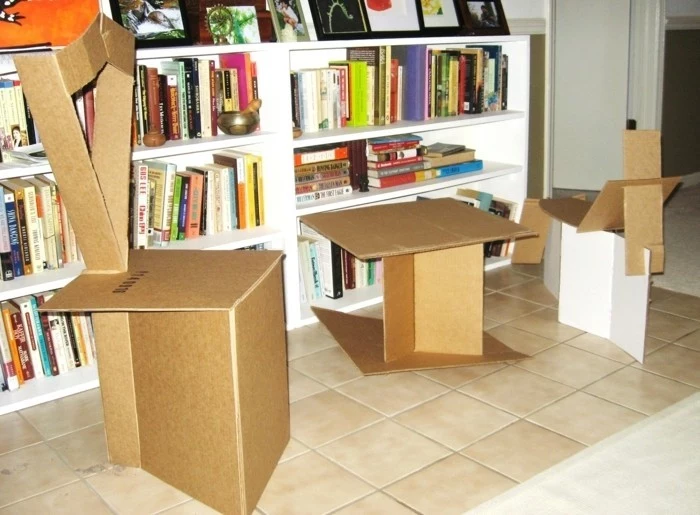
Yes, and it’s a brilliant approach for larger pieces or for people who move frequently. Instead of gluing everything, design your furniture with interlocking slots, tabs, and wedges, much like classic flat-pack furniture. This requires more precise planning and cutting but results in a piece that can be assembled and disassembled without any tools. Think of it as life-sized 3D puzzling.

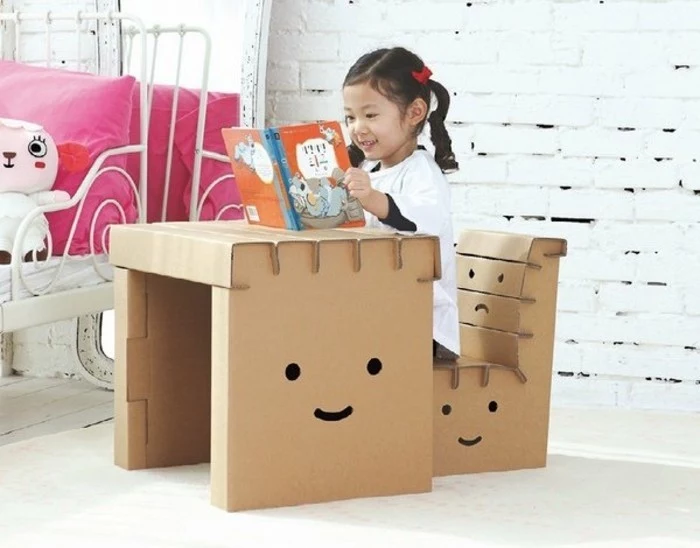
To make a child’s bedroom truly magical and safe, there’s no better material. Imagine a custom-built castle bed or a rocket ship toy box. You can create these fantastic structures knowing they are lightweight, have no sharp corners (once sanded), and can be finished with non-toxic, child-safe paints and varnishes. It’s a playground you build yourself.
The best cardboard is often hiding in plain sight. Keep an eye out for boxes used for heavy, uniform items. The boxes that hold reams of office paper, for example, are often made from high-quality, single-wall board that is perfect for smaller projects and detailed work. They are uniform, clean, and easy to break down.
- Always cut away from your body.
- Use a fresh, sharp blade. A dull blade requires more force, which is when slips and accidents happen. Brands like Olfa offer snap-off blades so you always have a sharp tip ready.
- Keep your free hand far away from the cutting path, preferably holding down the ruler.
“The potential of a material is defined not by its conventional use, but by the imagination of the person holding it.”