Thinking About a Murano Chandelier? An Expert’s Unfiltered Advice
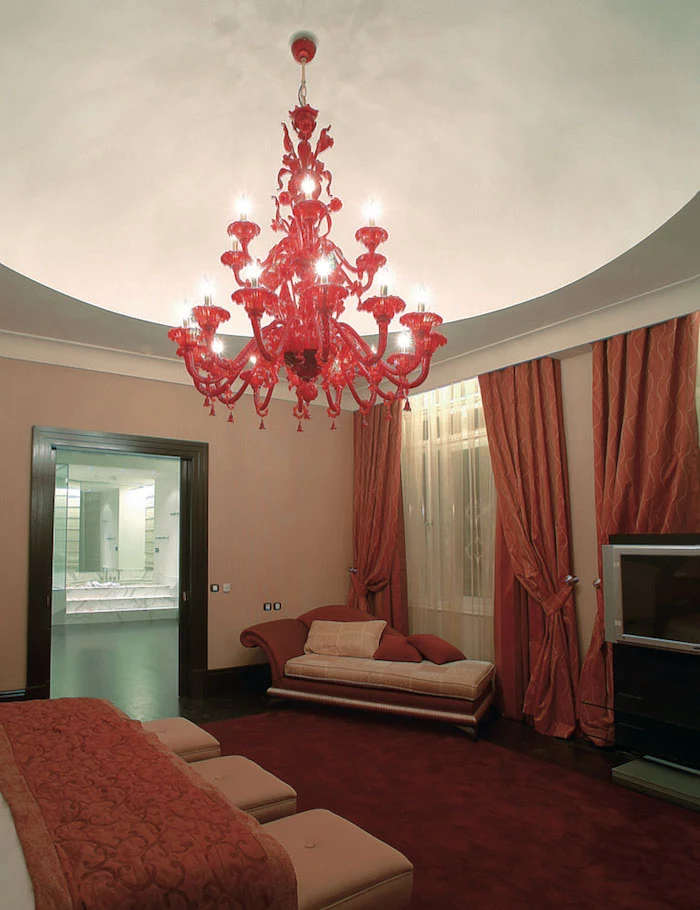
I’ve spent a good chunk of my life working with high-end lighting, and let me tell you, nothing quite compares to a genuine Murano glass chandelier. I still remember the first time I handled one. My boss at the time told me, “Don’t just look at it. Feel its weight. Notice how the light doesn’t just bounce off; it gets trapped inside the glass.” That idea really stuck with me. This isn’t just a light fixture; it’s a breathtaking piece of art and science hanging from your ceiling.
In this article
You can find a ton of information online, but most of it comes from people trying to sell you something. My goal is different. I want to pass along the real, hands-on knowledge I’ve picked up over the years. We’ll cover what makes this glass so incredible, how to spot a real one from a convincing fake, and—most importantly—how to install and care for it without making a costly mistake.

The Soul of the Glass
To really get why these chandeliers are special, you have to understand the glass itself. It’s not just melted sand. The recipe, which has been perfected over generations, is what gives the glass its famous clarity and workability. The main ingredient is silica, but it melts at a crazy high temperature. So, the original glassmakers added a special flux (a type of soda ash) to lower the melting point to a more manageable level, around 2500°F.
Then, they add a stabilizer, like limestone, to make sure the final product is durable and won’t, you know, dissolve in water. This specific formula creates a type of crystal that is incredibly clear and stays soft and workable for longer, allowing artisans to pull off the elaborate shapes these pieces are known for. And the colors? They aren’t painted on. They’re created by adding different metal oxides right into the molten glass. It’s pure chemistry.
- Deep, rich blues come from adding cobalt oxide.
- That famous ruby red is actually made with a tiny bit of real gold.
- Shades of violet and amethyst are produced with manganese.
- Copper can create beautiful greens or, in a low-oxygen environment, a fiery red.
But the real magic happens during the cooling process, known as annealing. After a piece is shaped, it has to cool down very slowly in a special oven. If it cools too fast, massive stress builds up inside the glass. The outside shrinks while the inside is still hot and expanded. The result? The piece can literally shatter from a slight touch or a change in room temperature. I once saw a gorgeous new chandelier arm crack clean in half on a client’s table simply because it was moved from a cold truck into a warm house. Proper annealing is an invisible but absolutely essential step.

Appreciating the Artisan’s Touch
When you look at one of these chandeliers, you’re seeing a collection of traditional techniques, sometimes several in one piece. Knowing what to look for helps you see the incredible skill involved.
For instance, some techniques involve creating thin, striped glass canes that are picked up by molten glass and twisted into beautiful spirals. An even more complex version involves fusing two spiraled pieces together, trapping a tiny, perfect air bubble at every intersection. It’s an absolute sign of mastery.
Another famous style, often described as “a thousand flowers,” is incredibly labor-intensive. It involves layering different colors of glass to create a long cane with a pattern, like a flower, running through its entire length. This thick cane is then heated and stretched out thin, shrinking the pattern perfectly. The cane is sliced like a tiny loaf of bread, and these little patterned discs are arranged in a mold and fused together. It takes ages to do right.
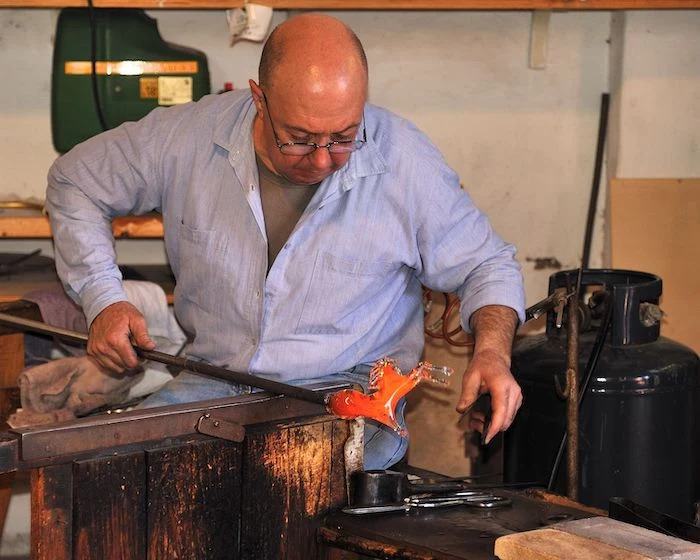
Other techniques involve dipping a colored glass object into different molten colors to create layers, which gives the glass a suspended, liquid-like depth. Some artisans also use special molds to create a cross-hatched, diamond-like texture on the surface that plays beautifully with the light.
How to Tell a Real One from a Fake
Let’s be honest, the market is flooded with fakes that can look pretty convincing online. But in person, the difference is night and day if you know what you’re looking for. Here’s your mental checklist.
First, look for imperfections. Seriously. Handmade glass is never 100% perfect. A genuine piece will have slight variations in the shape of the arms or the thickness of the leaves. You might even see a few tiny air bubbles trapped in the glass. That’s not a flaw; it’s a fingerprint of the handmade process. A chandelier where every single arm is a flawless, identical clone is almost certainly machine-made.

Next, check for the pontil mark. Hand-blown glass is worked on a long metal rod. When the piece is finished, it’s broken off the rod, leaving a rough or unpolished mark. You’ll usually find it on the base of individual glass elements. Mass-produced molded glass, on the other hand, will be perfectly smooth or have a tell-tale seam from the mold. Some fakers try to grind a mark on, but a real one looks like an organic break, not a perfect circle.
And then there’s the weight. Real Murano glass has a certain heft and density. It feels substantial in your hand. Fakes often use cheap soda-lime glass, which feels light and flimsy in comparison. The colors are also a dead giveaway—on a real piece, the color is in the glass, not a painted-on film that can chip or fade.
The All-Important Price Test
I have to be direct here: a real Murano chandelier is an investment. The materials, the time, and the generations of skill all come at a cost. If you see a large, multi-armed chandelier advertised for a few hundred dollars, it’s not genuine. It’s just not possible.
To give you a real-world idea, a new, modest 6-arm chandelier from a certified furnace might start around $3,000 to $5,000. A large, ornate vintage piece from a top-tier workshop? That could easily be $15,000, $25,000, or much, much more. So when you see a “12-arm Italian-style glass chandelier” online for $600, you know exactly what it is… and what it isn’t.
So, Where Do You Actually Buy One?
This is a big question! For brand-new pieces, your best bet is to find a reputable, specialized lighting dealer, either online or in a major city, that works directly with the Italian furnaces. They can provide certificates of authenticity. For vintage or antique pieces, look at established auction houses and high-end vintage stores that have a good reputation. Always ask about the piece’s history and be wary of anyone who can’t provide clear details.
Choosing the Right Chandelier for Your Space
A common mistake I see is getting the scale wrong. A chandelier that’s too small looks lost, while one that’s too big is just overwhelming.
- For sizing a room: A great rule of thumb is to add the room’s length and width in feet. That number, in inches, is a good starting diameter for your chandelier. So, for a 15-foot by 20-foot room, you’d start looking at chandeliers around 35 inches in diameter (15 + 20 = 35).
- For a dining table: The chandelier’s diameter should be about one-half to two-thirds the width of your table. This keeps it from overpowering the space and ensures nobody bumps their head when they stand up.
Hanging Height is Everything
This is so critical. The right height makes the room, and the wrong height breaks it.
- Over a dining table: The bottom of the fixture should hang 30 to 36 inches above the tabletop. This lights the table perfectly without blocking anyone’s view.
- In a living room or entryway: The bottom must be at least 7 feet off the floor. If you have a two-story foyer, a good trick is to hang it so the bottom is about level with the second floor.
- For ceilings over 8 feet: Add about 3 inches of hanging height for each extra foot of ceiling height.
Oh, and by the way, you absolutely MUST install a dimmer switch. It’s essential for controlling the mood. For bulbs, I always suggest warm white LEDs (around 2700K). They give you that classic, warm glow but are way more energy-efficient and last forever—a huge plus when changing bulbs involves a very tall ladder.
Installation: Please, Don’t Do This Yourself
I cannot stress this enough. Unless you are a licensed electrician who has experience with heavy, fragile fixtures, do not try to install one of these yourself. I once got a call from a homeowner who tried to hang a 90-pound chandelier from a standard plastic electrical box rated for 50 pounds. The box ripped out of the ceiling, and the chandelier smashed their antique dining table below. A heartbreaking and very expensive lesson.
Your ceiling needs to be properly reinforced. The fixture must be secured to a ceiling joist with a heavy-duty mounting bracket. If there’s no joist right where you want it, a pro has to install a fan brace or wood blocking between the joists. This is non-negotiable for safety.
Heads up on the cost: Budget for this! Hiring a qualified, insured electrician to hang a heavy fixture can run anywhere from $400 to over $1,000, especially if they need to add that ceiling support. If you bought a vintage piece from Europe, factor in another $200 to $500 for potential rewiring to meet local safety codes.
Assembly is also a beast. These chandeliers arrive in dozens of pieces. The frame is hung first, then each glass arm, leaf, and flower has to be attached one by one. It’s a slow, careful job that can take a two-person professional team several hours. Rushing it is how things get broken.
Long-Term Care and Cleaning
With the right care, your chandelier will look amazing for generations. Routine dusting every couple of weeks with a good feather duster is plenty. Just avoid microfiber cloths, as their fibers can snag on the delicate glass edges.
Every year or two, it’ll need a deep clean. It’s a job you can do yourself, but you have to be patient.
Don’t start this an hour before guests arrive! Set aside a full afternoon, probably 3 to 5 hours for a medium-sized chandelier. It’s a slow, careful job.
Here’s your shopping list for the job:
- Thick blankets or padded drop cloths for the floor
- Soft, white cotton gloves (not latex or nitrile)
- Two plastic wash basins (not metal!)
- Mild, ammonia-free dish soap
- A few gallons of distilled water (Trust me, it prevents mineral spots!)
- SAFETY FIRST: Kill the power at the circuit breaker. Put a piece of tape over the switch so nobody turns it on by accident.
- Prep your space: Spread the blankets on the floor. Before you touch anything, take detailed photos of the chandelier from all angles. This will be your bible for reassembly.
- Disassemble carefully: Wearing the cotton gloves, remove each piece of glass. Lay them out on a towel-lined tray, keeping parts from each section grouped together.
- Wash gently: Fill one basin with lukewarm water and a tiny bit of soap, and the other with clean, distilled rinse water. Wash each piece gently with a soft cloth, then rinse.
- Air dry completely: Place the rinsed pieces on a dry towel to air dry. Don’t rub them dry; that causes streaks.
- Reassemble with care: Once every single piece is bone-dry, use your photos to put it all back together. You’ll be so glad you took them.
A Murano chandelier is so much more than a light. It’s the product of a specific place and an unbroken artistic tradition. When you understand the hands and the history behind it, you’re not just lighting a room—you’re preserving a story.