The Real Reason Your Half-Up Hairstyle Fails (And How to Fix It for Good)
So, you’ve seen it everywhere—on Pinterest, at weddings, on your favorite influencer. The perfect half-up, half-down hairstyle. It looks so effortlessly chic, right? It promises the best of both worlds: hair out of your face, but still soft and flowy. But when you try it at home… it’s a different story. Within an hour, it’s either slipping, drooping, or has developed a weird, lumpy bump at the crown.
In this article
I get it. After more than a decade as a stylist, working on everything from chaotic salon floors to high-stakes photoshoots, I can tell you this: a great half-up style has almost nothing to do with “good hair” and everything to do with good architecture. It’s a structure you build from the ground up.
Forget just copying a picture. I’m going to walk you through the why behind the techniques the pros use. We’ll cover everything from building a solid foundation to the little finishing tricks that make all the difference. My goal is for you to finally understand the method behind the magic, so you can nail this look with confidence.
The Foundation: Why Prep is Everything
Let’s be real: the single biggest mistake people make is starting with squeaky-clean, silky hair. It’s a recipe for disaster. Freshly washed hair is way too slippery. Your pins will slide right out, and any volume you create will vanish before you even leave the house. That’s why stylists often talk about “day-two hair” being the sweet spot—the natural oils provide some much-needed grip.
But you don’t have to wait. You can fake that perfect texture with the right products. Here’s the prep routine I swear by:
- Heat Protectant: This is non-negotiable. Before any hot tool touches your hair, you need a barrier. A lightweight spray is perfect.
- Volumizing Mousse: On damp hair, work a golf-ball-sized amount from roots to ends. As it dries, it creates space between the strands, making your hair feel thicker. A classic like TRESemmé Extra Hold Mousse works wonders and won’t break the bank.
- Texture Spray or Powder: This is your hero product for grip. On dry hair, a few spritzes of a texture spray create friction, making hair much easier to work with. If you want a drugstore find, the Kristin Ess Dry Finish Working Texture Spray (around $15 at Target) is fantastic. For a pro-level splurge, Oribe’s Dry Texturizing Spray is legendary for a reason.
Quick Tip: Go feel a section of your clean hair. Now, spray some texture spray on it and work it in with your fingers. Feel that difference? That slight tackiness and grit? That’s the feeling you’re aiming for before you even start.

The Blueprint: Sectioning and Securing Your Style
Once your hair is prepped, it’s time to build. And a heads-up: expect to spend around 15-20 minutes on prep and styling a basic half-up once you get the hang of it. Rushing this part is what leads to messy results.
Nailing the Perfect Section
How you divide your hair is the blueprint for the final look. A clean section makes everything easier. Your best friend here is a rat-tail comb (you can find one for like, $3 at Sally Beauty).
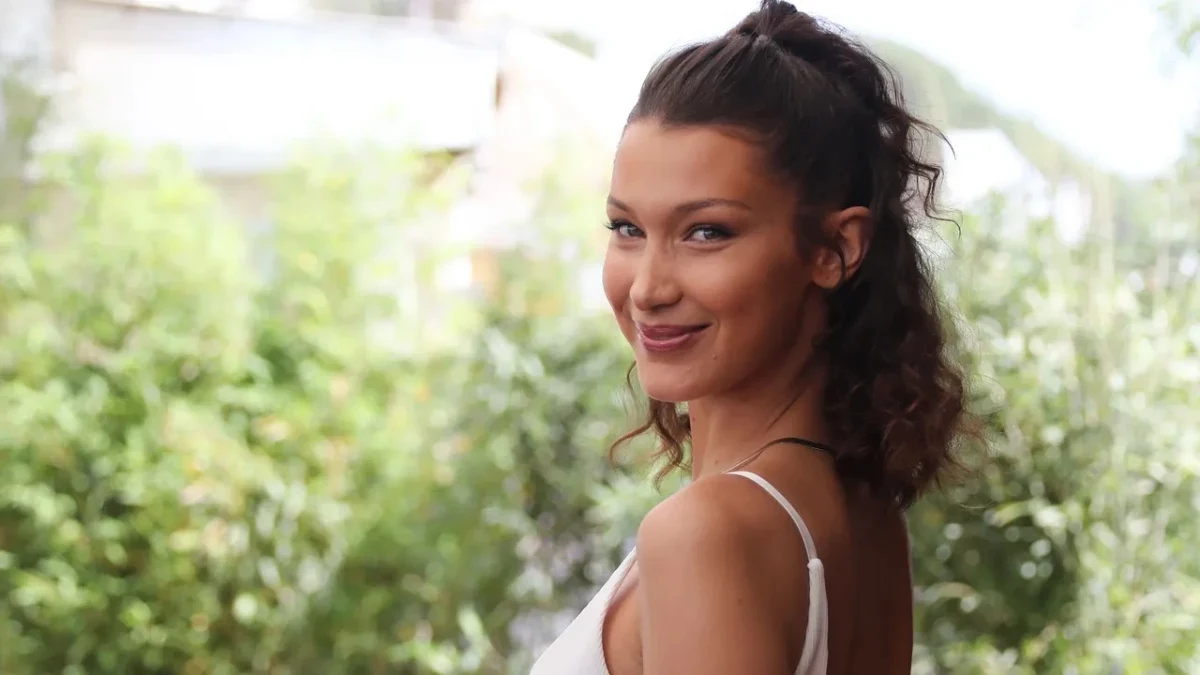
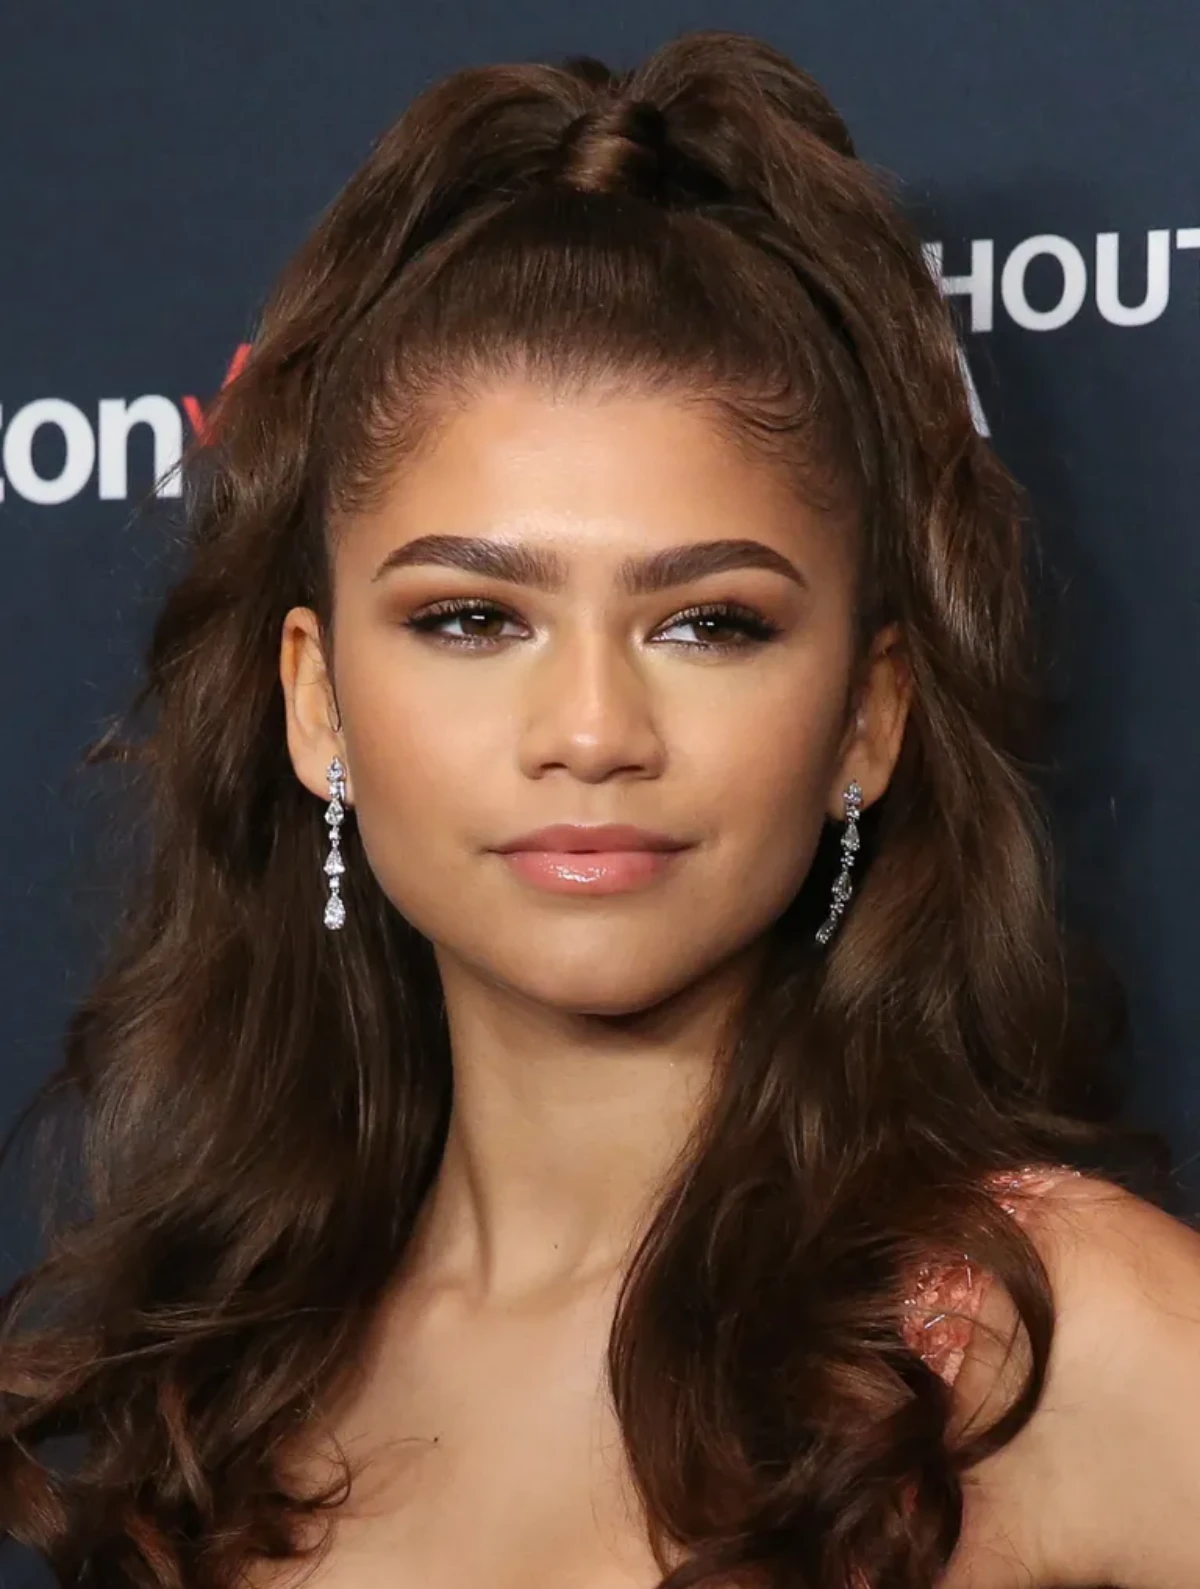
The most universally flattering section is the classic horseshoe. It sounds complicated, but it’s not. Let’s make it super simple:
- Place your index fingers on the arch of each of your eyebrows.
- Trace a line straight back over the top of your head until your fingers meet below the crown.
That gentle U-shape you’ve just outlined? That’s your perfect section. It pulls hair from the most flattering points and leaves plenty of softness around your face. Once you have it, clip that top section up and out of the way.
Building Volume and a Rock-Solid Anchor
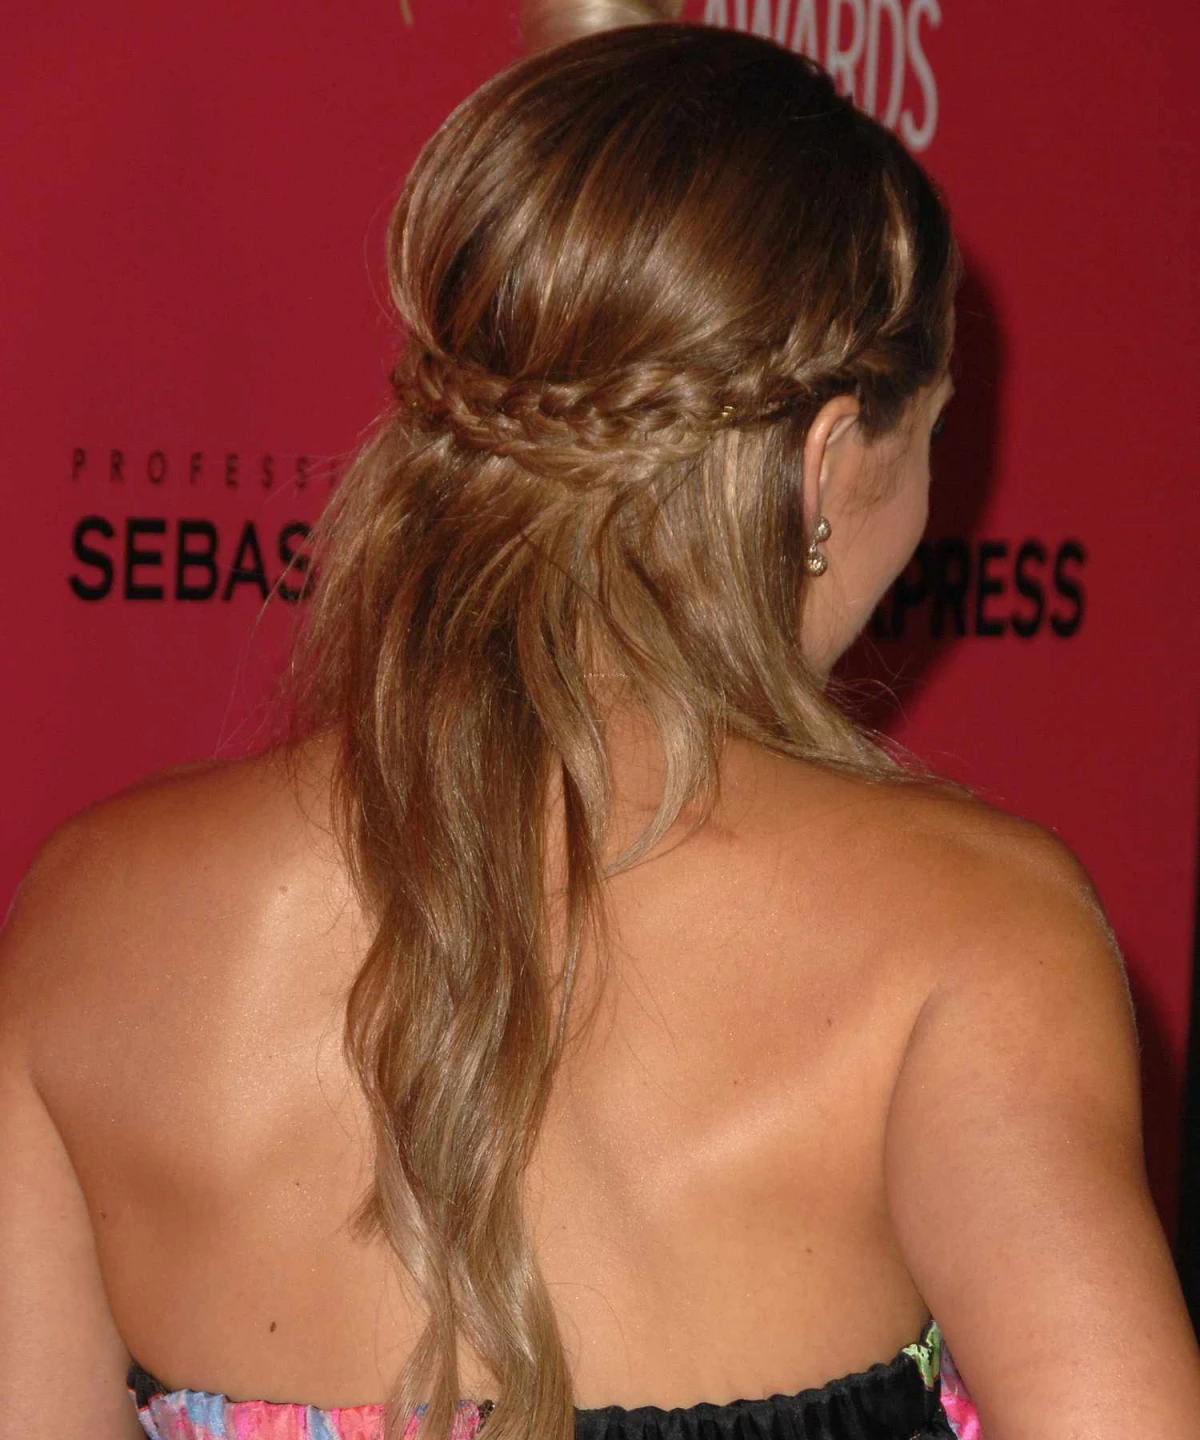
To get that gorgeous, lasting volume, you need to build a small “cushion” at the roots. This is where strategic backcombing comes in. Forget the frantic, damaging teasing of the past. Hold a small subsection of hair up, and with a teasing brush, gently push down toward the scalp in a few smooth motions. This creates a dense little pad that provides lift and, more importantly, gives your bobby pins something to cling to.
Now, let’s talk about securing your style. This is where the magic happens.
Stylist Hack: The interlocking bobby pin. This one trick will change your life. Instead of just shoving pins in and hoping for the best, you create a lock.
- Step 1: Push the first bobby pin in, making sure the wavy side is against your scalp (yes, really! The ridges are designed to grip).
- Step 2: Open a second pin and slide it in the opposite direction, weaving it through the end of the first pin to create a locked ‘X’ shape. I promise you, that section is not going anywhere.
For a ponytail-style half-up, a clear elastic is great because it’s practically invisible. Just be careful when removing it—always snip it with small scissors to avoid breakage. For really heavy hair, a bungee elastic (the kind with hooks on the ends) is the ultimate tool for a secure, slip-proof hold.

Finishing Touches That Make a Difference
A good style becomes a great style in the final few steps.
- Hide Your Elastic: Please, never leave an elastic exposed. Take a tiny strand of hair from the bottom of your ponytail, spritz it with a strong-hold hairspray, and wrap it around the elastic to conceal it. Tuck the end into the elastic or secure it underneath with a small bobby pin.
- Choose the Right Hairspray: Not all hairsprays are the same. Pros use different types for different jobs. Think of it this way:
- A Working Spray is flexible. You use this during the styling process because it allows you to keep shaping and moving the hair without getting stiff or crunchy.
- A Finishing Spray is like a top coat for your hair. It’s strong and meant to be the very last step to lock everything in place for hours. L’Oréal Elnett is a timeless, affordable option.
- Soften the Hairline: To avoid a severe, scraped-back look, use the tail of your comb to gently pull out a few soft, face-framing pieces around your temples and ears. Less is more here!
- Problem: “My style fell flat in 30 minutes!”
Cause & Solution: Your foundation was weak. Your hair was likely too clean or you didn’t use enough prep product to create grit. You’ll have to start over, but next time, be more aggressive with your texture spray until you can really feel that grip. Also, double-check your anchor—it should feel snug, not loose. - Problem: “I have a weird bump at the crown.”
Cause & Solution: You probably pulled the hair straight back instead of gathering it smoothly along the curve of your head. To fix it, loosen your elastic slightly, use the smooth side of your comb to flatten the bump toward the elastic, and then re-tighten. - Problem: “My bobby pins keep slipping out!”
Cause & Solution: They have nothing to hold onto. First, spray your pins with a little dry shampoo or strong hairspray before you use them. This gives them a matte, non-slip finish. Second, make sure you’re using the interlocking ‘X’ technique I mentioned earlier. They won’t budge. - Rat-tail comb: For precise sectioning. (Cost: $2-$5)
- Teasing brush: A good one with boar bristles shouldn’t cost more than $15.
- Good bobby pins: Get the kind that feel sturdy, not the flimsy ones that bend easily.
- Clear elastics or bungee cords: A pack is usually under $10.
- A quality heat protectant, texture spray, and hairspray: Budget between $8 and $20 per product for good quality options.
How to Adapt the Style for Your Hair Type
One size never fits all in hairstyling. Here’s how to tweak your approach based on what you’re working with.

For Fine or Straight Hair: The challenge here is slipperiness and a lack of volume. Prep is your best friend. Don’t even think about skipping the mousse and texture spray. Oh yeah, and I have a secret weapon for my fine-haired clients: a micro-crimper. It looks like a small flat iron but with tiny zig-zag plates. You can grab one at a beauty supply store for about $30. By stamping it just once at the roots of sections that will be hidden under the top layer, you create an incredible scaffold of invisible volume and grip. It’s a total game-changer.
For Thick, Heavy Hair: Your challenge is weight. The sheer heaviness can pull the style down. The key is to not grab too much hair for the top section. A smaller half-up section will be much easier to secure and look more balanced. For extra insurance, you can create a small, tight horizontal braid underneath where your main elastic will go. Then, you can anchor your bobby pins right into that braid for rebar-like stability.
For Curly and Coily Hair: The goal here is to work with your beautiful curl pattern, not against it. Ditch the brush, which will only create frizz. Use your fingers or a hair pick to gently gather the hair. Instead of a tight elastic that will crush your curls, try securing the style with a series of strategically placed bobby pins or U-shaped hair pins. And always, always prep with moisturizing curl products to keep things defined and hydrated.
Troubleshooting Common Fails
Even pros have to make adjustments. If your style isn’t working, one of these is likely the culprit.

Your Toolkit and a Final Word of Caution
You don’t need a massive pro kit, but investing in a few quality basics will make a world of difference. Here’s a quick shopping list:
And finally, a serious note. I have to say this. Any hairstyle that constantly pulls on your scalp, especially tight, high ponytails, can lead to a type of permanent hair loss called traction alopecia. Please, be kind to your hair. Vary your styles and don’t wear super-tight looks every single day. If a style ever feels painful, take it down. That’s your body sending a clear signal.
Honestly, mastering this style just takes a bit of practice. Your first try might be a little wobbly, and that’s okay! But now you have the professional roadmap. Focus on building that strong foundation, and the beautiful, lasting style will follow.


