School Hairstyles That Actually Last All Day (A Pro’s Guide)
I’ve been doing hair for a long, long time—over two decades, if you’re counting. I’ve gone from sweeping floors in a salon to teaching the next generation of stylists, and I still love working with my clients. In all that time, I’ve seen countless trends come and go, but one thing has never changed: a good hairstyle for a long day needs to be tough.
In this article
- First Things First: It All Starts with Healthy Hair
- The Right Tools for the Job (and Where to Get Them)
- The 2-Minute “I’m Running Late” Hairstyle
- Mastering the Ponytail (So It Doesn’t Sag by Noon)
- The Art of Braiding: It’s All About Tension
- Buns and Updos That Actually Survive the Day
- Working with Natural Curls and Short Hair
- A Final Word on Hair Safety
- Inspirational Gallery
I’m talking about more than just looking cute for a morning picture. A real-deal school hairstyle has to survive eight hours of classes, a chaotic gym period, and maybe even soccer practice after that. It needs to be comfortable, durable, and most importantly, it has to be good for the hair itself. So forget those flimsy styles that fall out by lunchtime. We’re going to build styles that last.
This is all about technique. I want to show you the ‘why’ behind what we do in the salon, so you can build beautiful, reliable hairstyles at home. Let’s get into it.

First Things First: It All Starts with Healthy Hair
Before we even dream of a perfect braid or bun, we have to talk about your canvas: the hair itself. Honestly, even the best style will look limp and fall apart on damaged hair. Healthy hair is just more resilient and holds its shape way better.
Getting to Know Your Hair
In the salon, we quickly size up a few key things. First is texture, which is just how thick each individual strand is. Is it fine, medium, or coarse? Fine hair gets weighed down easily, while coarse hair can be stubborn. Then there’s density—how many strands are packed onto your head. You can have fine hair but a ton of it, which totally changes how you’d section it for styling.
But the factor most people miss is porosity. This is your hair’s ability to soak up and hold onto moisture. It all comes down to the condition of the hair’s outer layer, the cuticle.

- Low Porosity: The cuticles are sealed tight. Hair takes forever to get wet and even longer to dry. Products tend to just sit on top. For this hair type, you need lightweight sprays and stylers that won’t cause greasy buildup.
- High Porosity: The cuticles are wide open. Hair sucks up water in a second but loses it just as fast, often leading to frizz and dryness. This hair desperately needs richer creams and oils to help seal that cuticle and lock moisture in. A cream like SheaMoisture’s Curl Smoothie is a great example of the kind of product that works well here.
Good to know: You can do a quick porosity test at home. Just drop a clean, dry strand of hair into a glass of water. If it floats, you’ve probably got low porosity. If it sinks like a stone, it’s high porosity. And if it just sort of hangs out in the middle for a bit before sinking? You’ve hit the jackpot with normal porosity. For you, a good middle-of-the-road leave-in conditioner is perfect—not too heavy, not too light.
Your Pre-Styling Game Plan
A great style really does start in the shower. Use a shampoo and conditioner for your hair type, but here’s a pro tip I drill into all my apprentices: detangle your hair with the conditioner in. Use a wide-tooth comb and start gently from the ends, working your way up to the roots. This prevents the stretching and snapping that causes so much damage. Please, never, ever rip a brush through tangled wet hair.
After rinsing, squeeze the water out with a microfiber towel if you have one—they cause way less friction and frizz than regular bath towels. Before you do anything else, apply a leave-in product. This is non-negotiable! It evens out the porosity and gives you a smooth, protected surface to work on.
The Right Tools for the Job (and Where to Get Them)
Using the right tools isn’t just a suggestion; it’s the secret to a clean, professional-looking result. You don’t need a huge collection, but you need the right players on your team.
- Rat-Tail Comb: That long, skinny handle is your secret weapon for creating perfectly straight parts. It’s a must for styles like French braids or sleek ponytails. You can grab one for under $5 at Target or a beauty supply store like Sally Beauty.
- Wide-Tooth Comb: Its one and only job is to detangle wet, conditioned hair. That’s it!
- Boar Bristle Brush: This is a finishing tool, not a detangler. It smooths down flyaways and gives ponytails a polished, glossy look. A decent one will run you about $15-$25. Don’t cheap out too much here; a good one will last for years.
- Seamless Hair Elastics: Always look for the fabric-covered elastics that are a continuous loop. The ones with a little metal connector are notorious for snagging and ripping hair.
- Bobby Pins: Pro secret: the wavy side goes DOWN, against your scalp. Those little ridges are there for grip! Use them to anchor a style, not just to tuck in a stray hair.
- U-Shaped Hair Pins: These are amazing for securing buns and twists. They hold a lot of hair with a softer grip than a bobby pin, which prevents tension headaches.
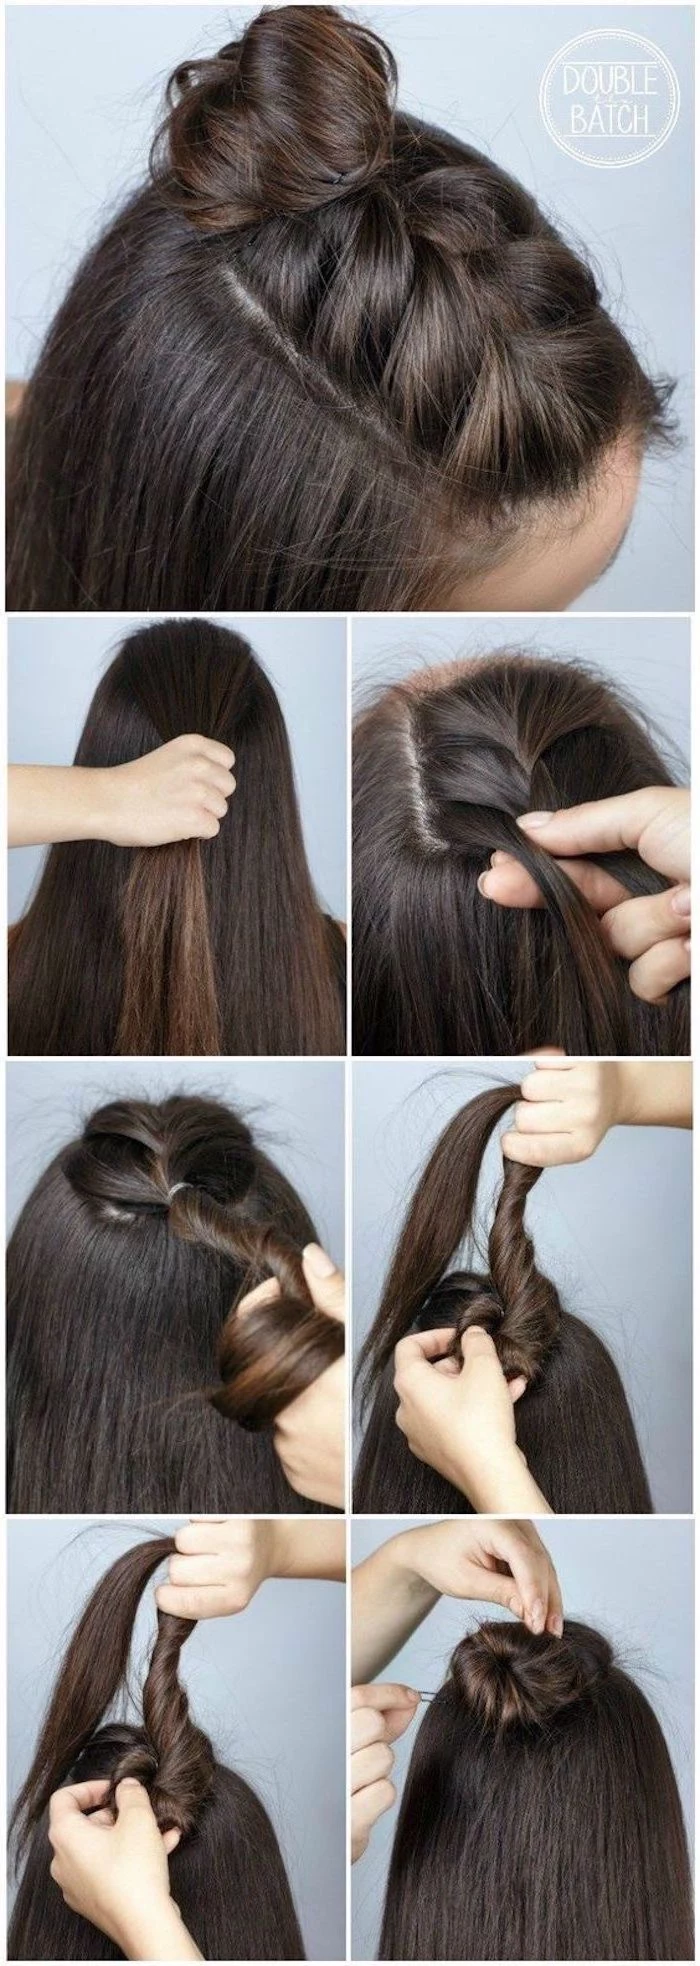
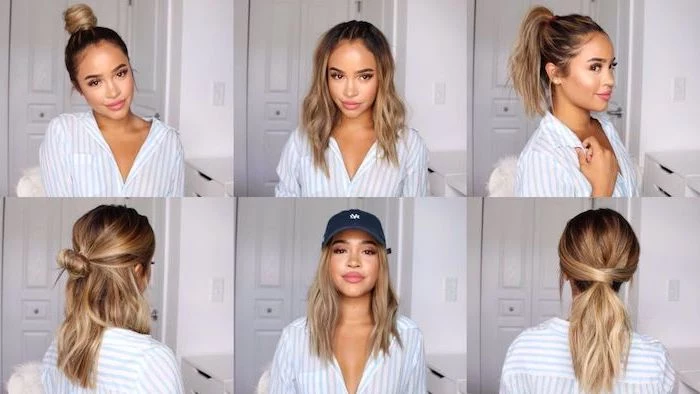
The 2-Minute “I’m Running Late” Hairstyle
We’ve all been there. The alarm didn’t go off and you have literally two minutes. What do you do? Here’s a quick win that looks way more put-together than it is.
Just create a deep side part. On the side with more hair, take a two-inch section right at your hairline, from the part down to your temple. Twist it back away from your face until it’s a tight rope. Pin it securely just behind your ear with a couple of bobby pins in an ‘X’ shape for extra hold. It takes less than two minutes, gets hair out of your face, and looks incredibly chic.
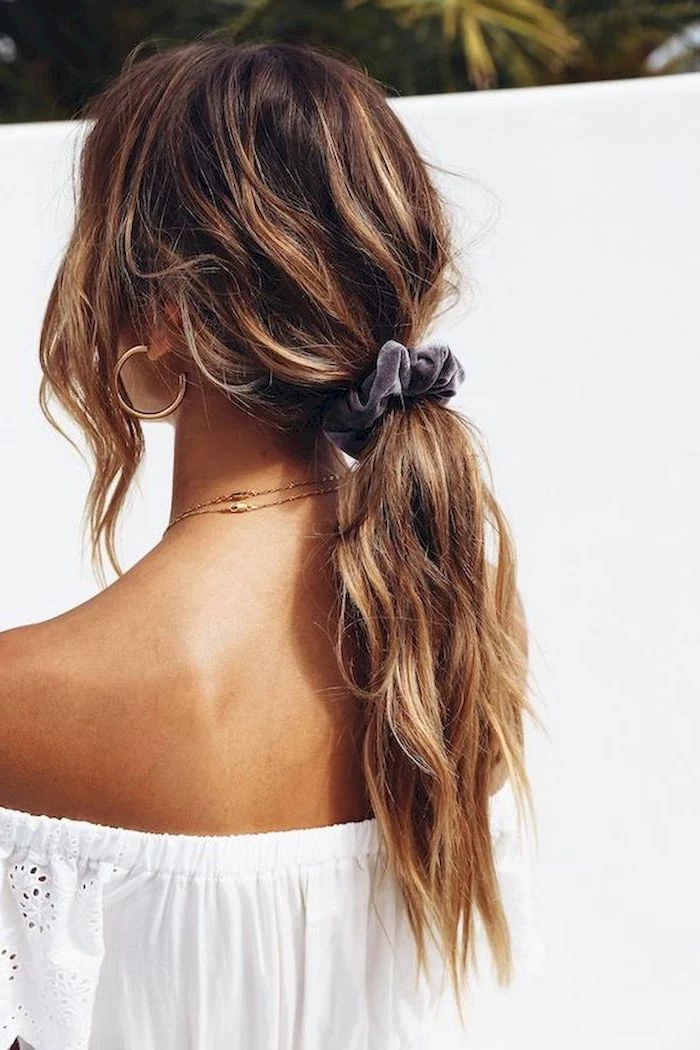
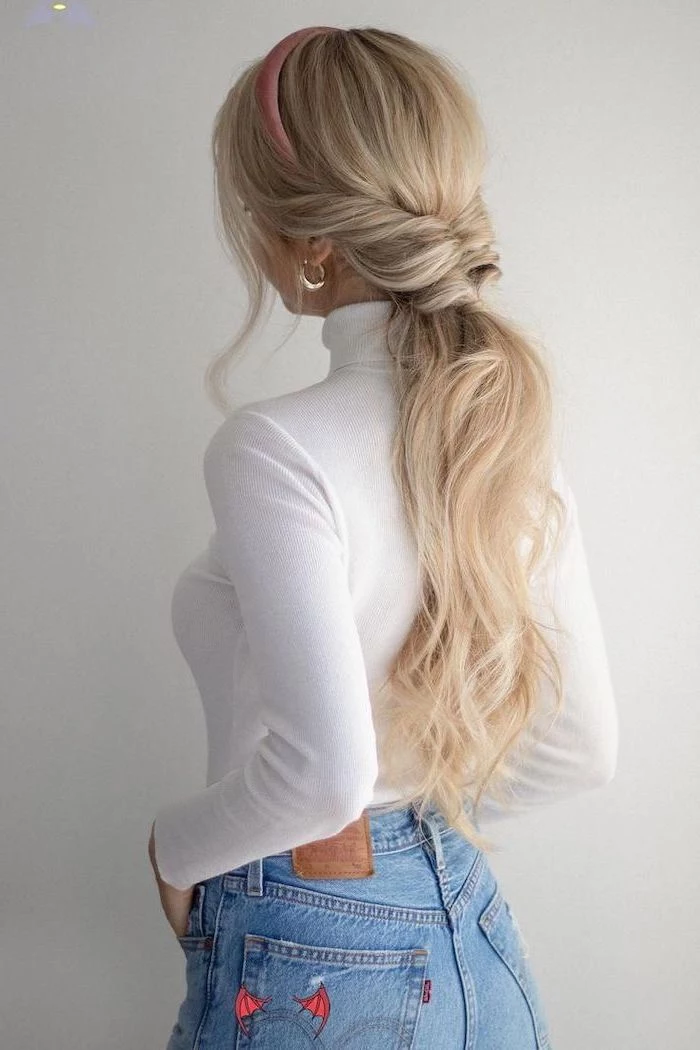
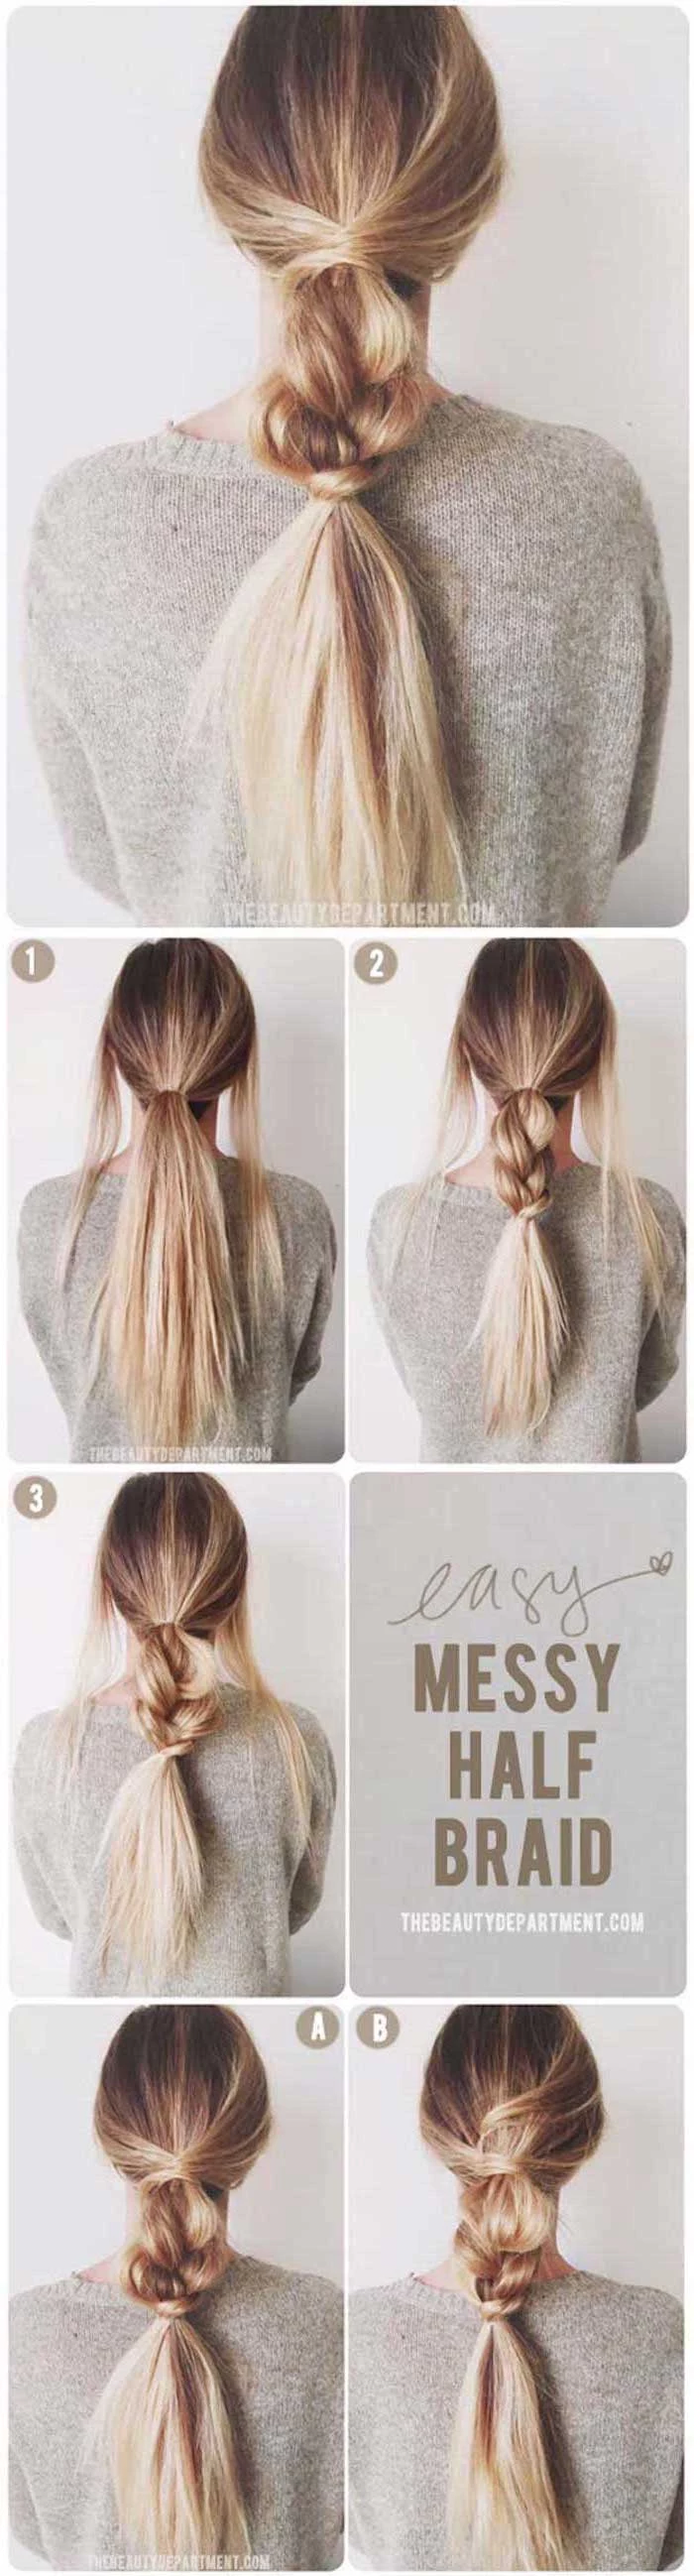
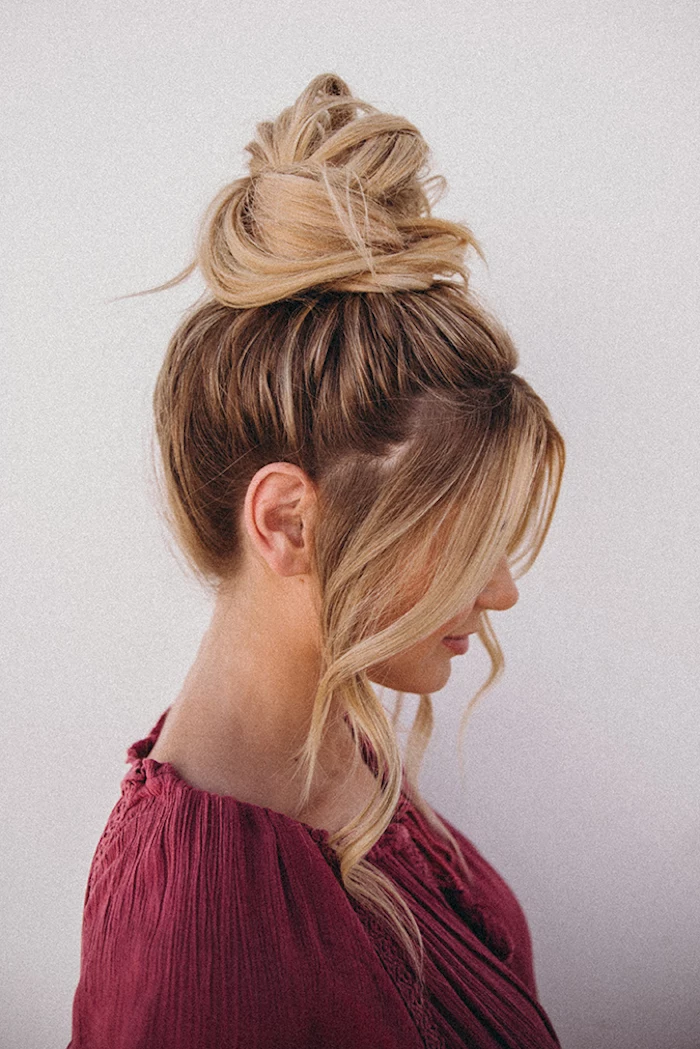
Mastering the Ponytail (So It Doesn’t Sag by Noon)
The ponytail is a classic, but a weak, droopy ponytail is a recipe for a failed bun or braid later on. The goal is a comfortable, secure base. This technique should take you about 3 minutes once you have it down.
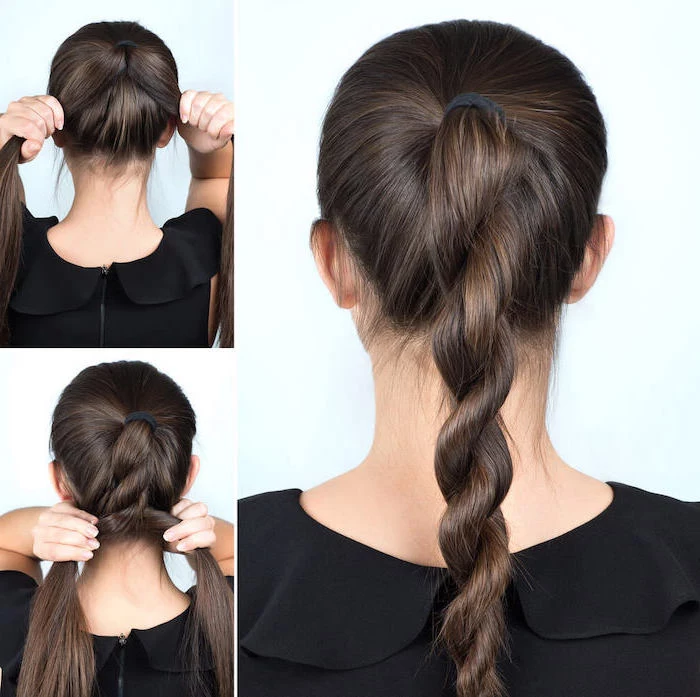
The No-Sag Anchor Trick
I see people fighting with this all the time. They try to scoop all their hair up at once, and the bottom immediately starts to sag. Here’s how we do it in the salon:
- Create Your Anchor: Lean forward and gather just the top section of your hair—from your temples to the crown. Secure this mini ponytail with a thin elastic. This little guy is your anchor.
- Gather the Rest: Flip your head back up. Now, brush the sides and the hair from the nape of your neck smoothly up toward that anchor ponytail.
- Combine and Secure: Join all the hair together and wrap a second elastic around the entire ponytail. This two-step method guarantees the hair at the nape is pulled up tight, preventing the dreaded droop.
To finish it off, you can take a small strand from the underside of the ponytail, wrap it around the elastic to hide it, and tuck the end in with a bobby pin. So chic!
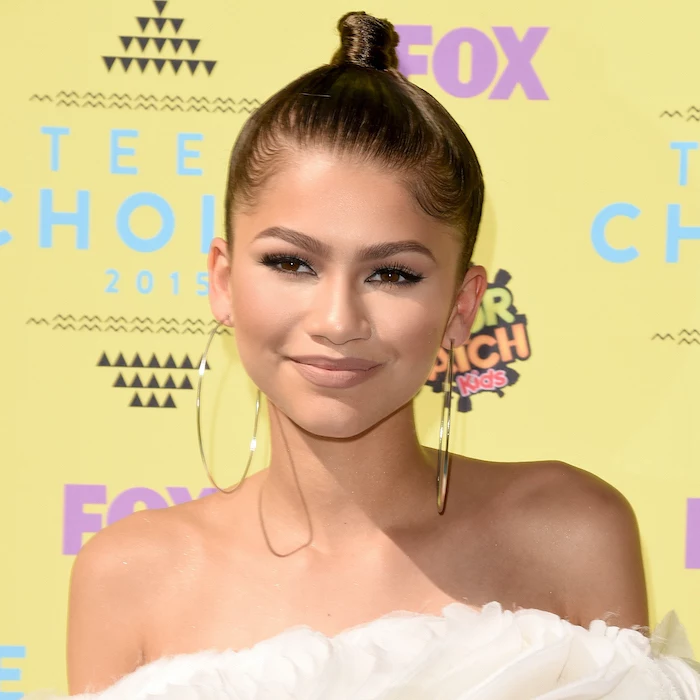
Heads up! A super-tight, high ponytail looks sharp, but it’s not an everyday style. Constant tension on your hairline can cause a type of hair loss called traction alopecia. I’ll never forget a young dancer I worked with whose hairline was visibly thinning simply from her daily, pulled-back bun. We had to switch her to looser styles immediately to give her follicles a chance to recover. Your hairstyle should NEVER be painful.
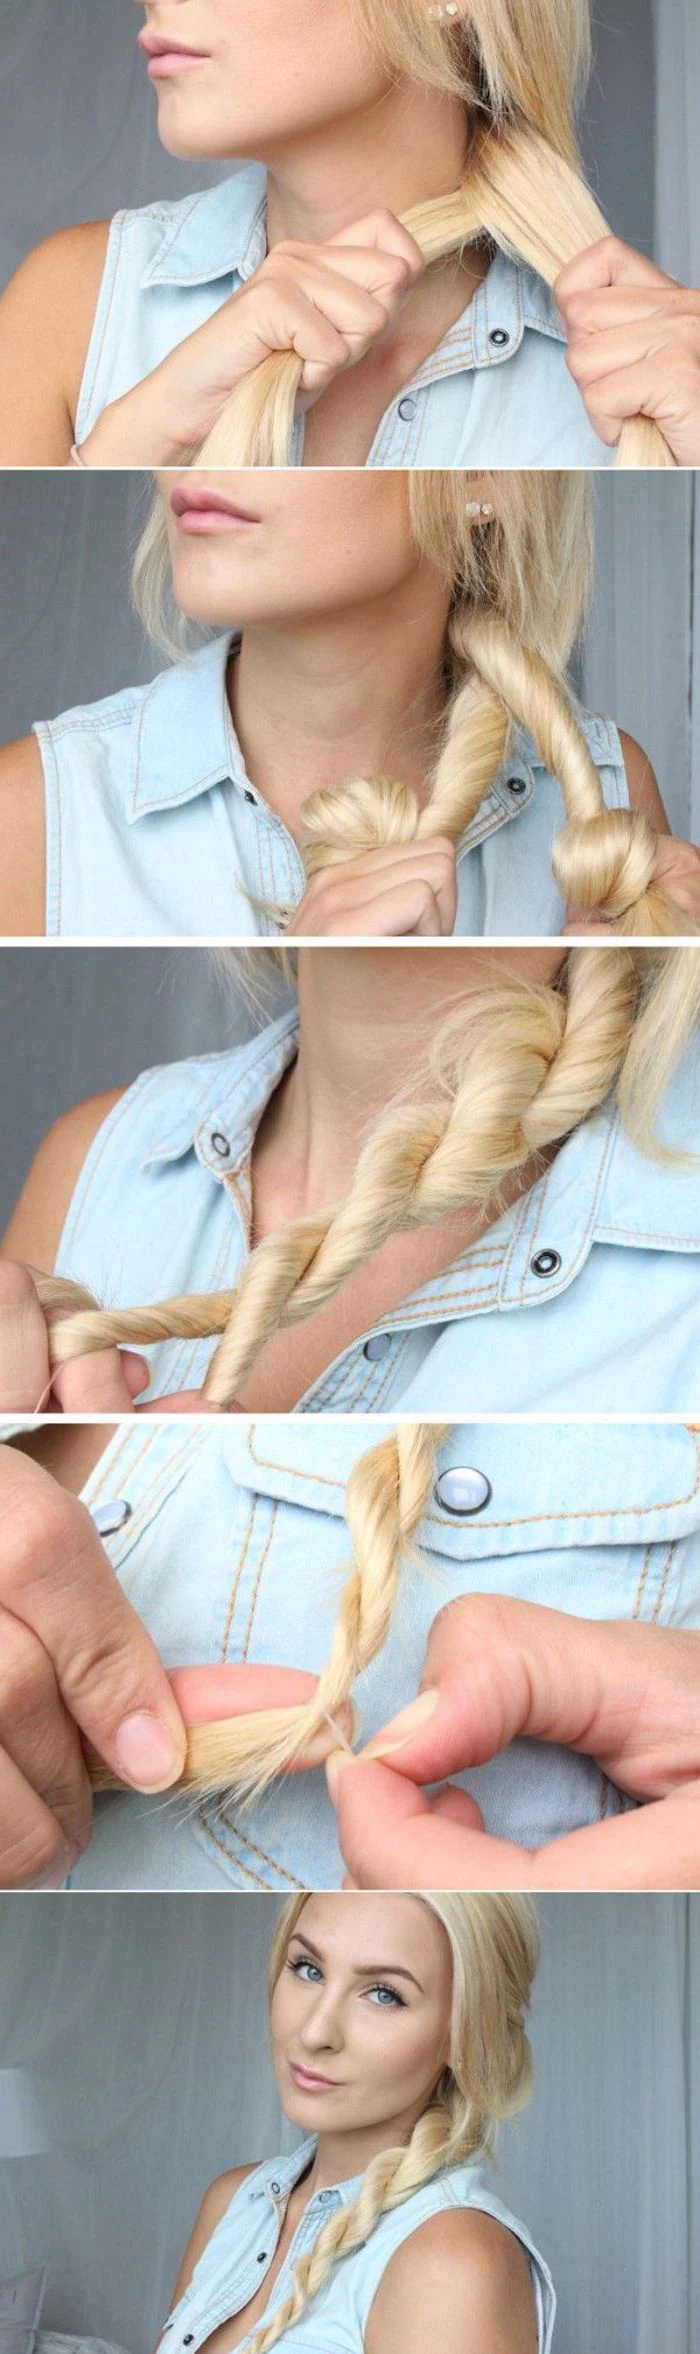
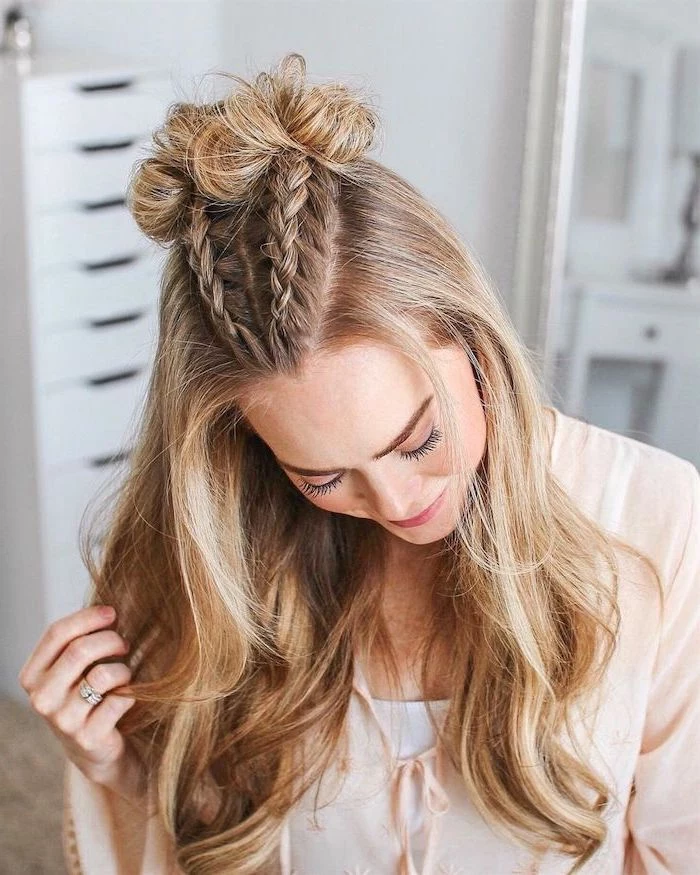
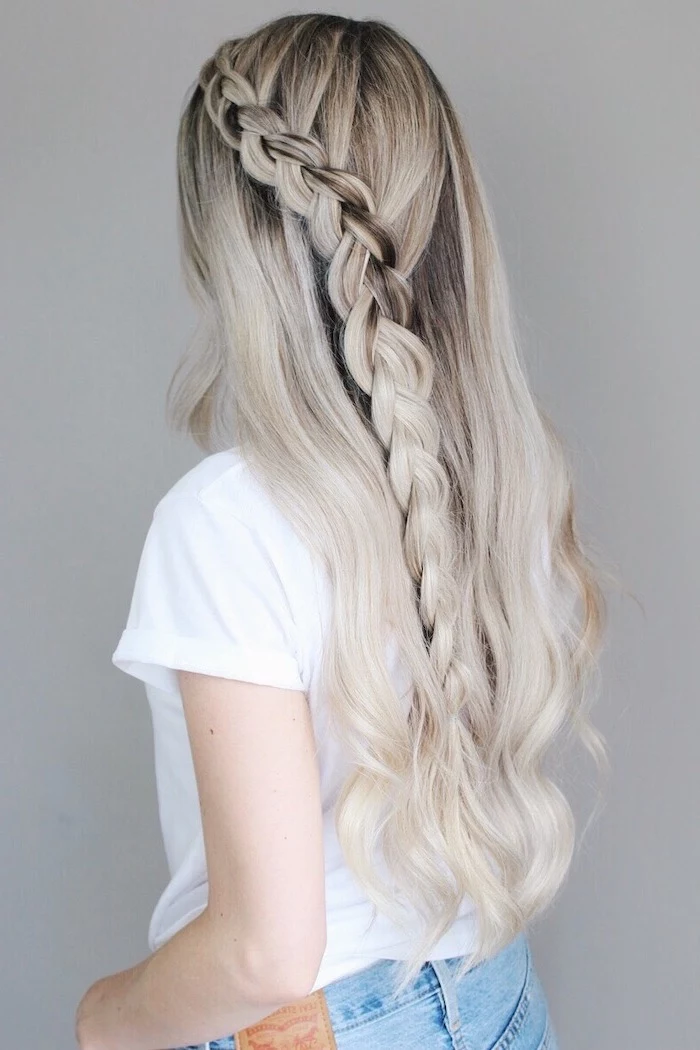
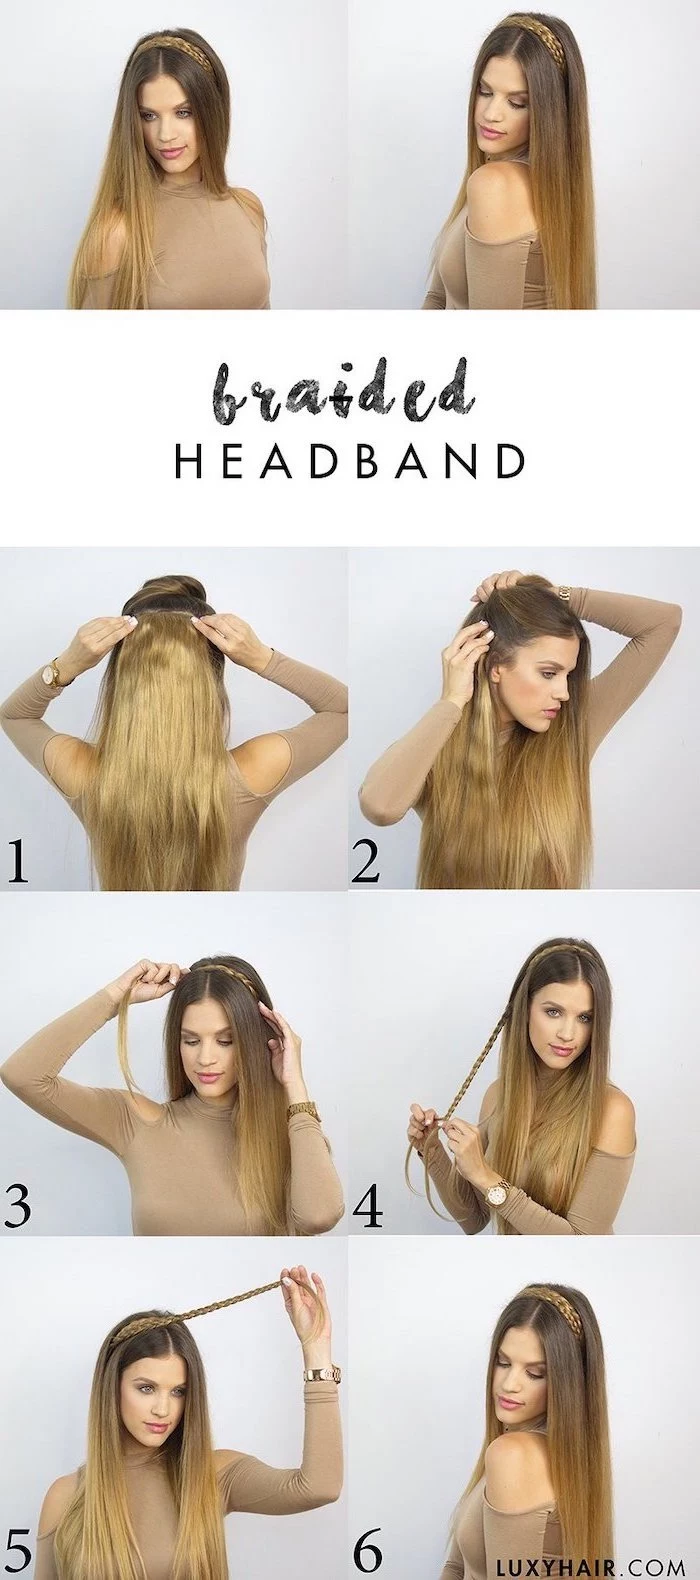
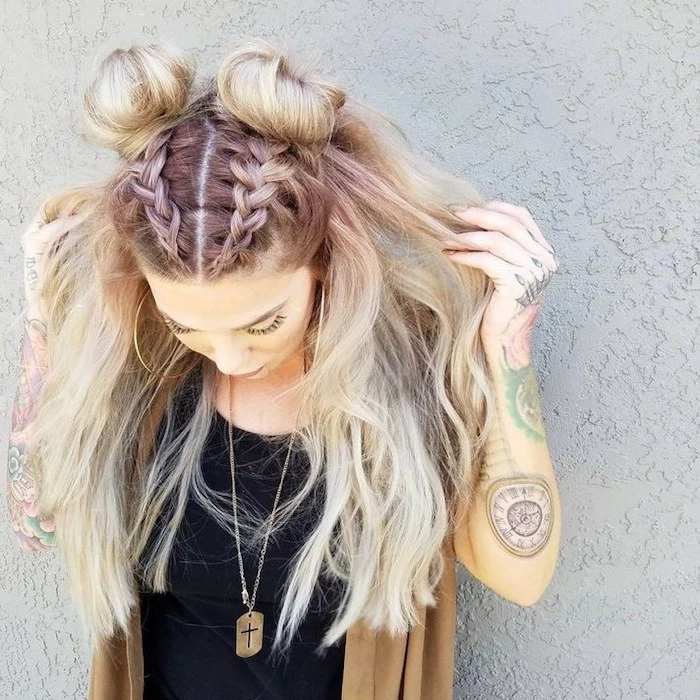
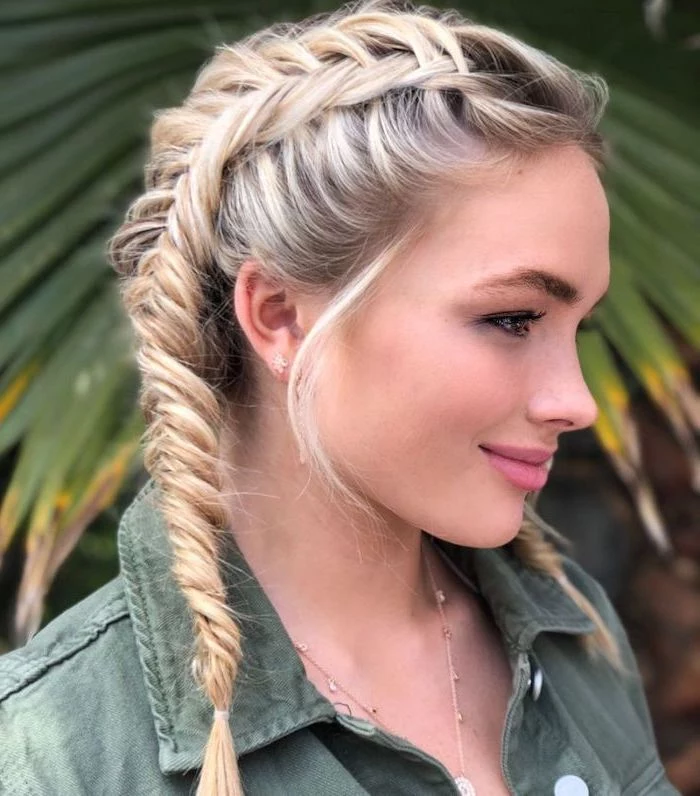
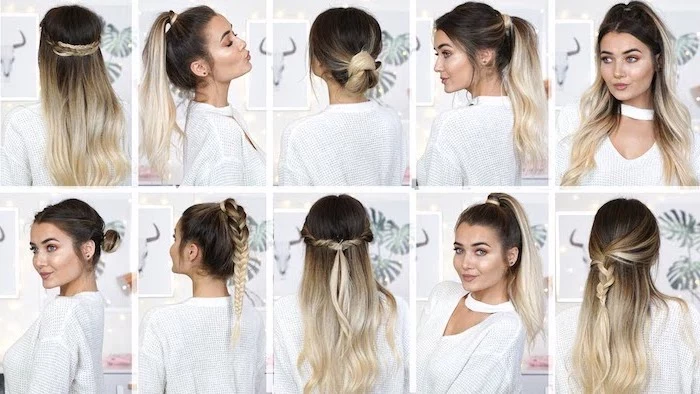
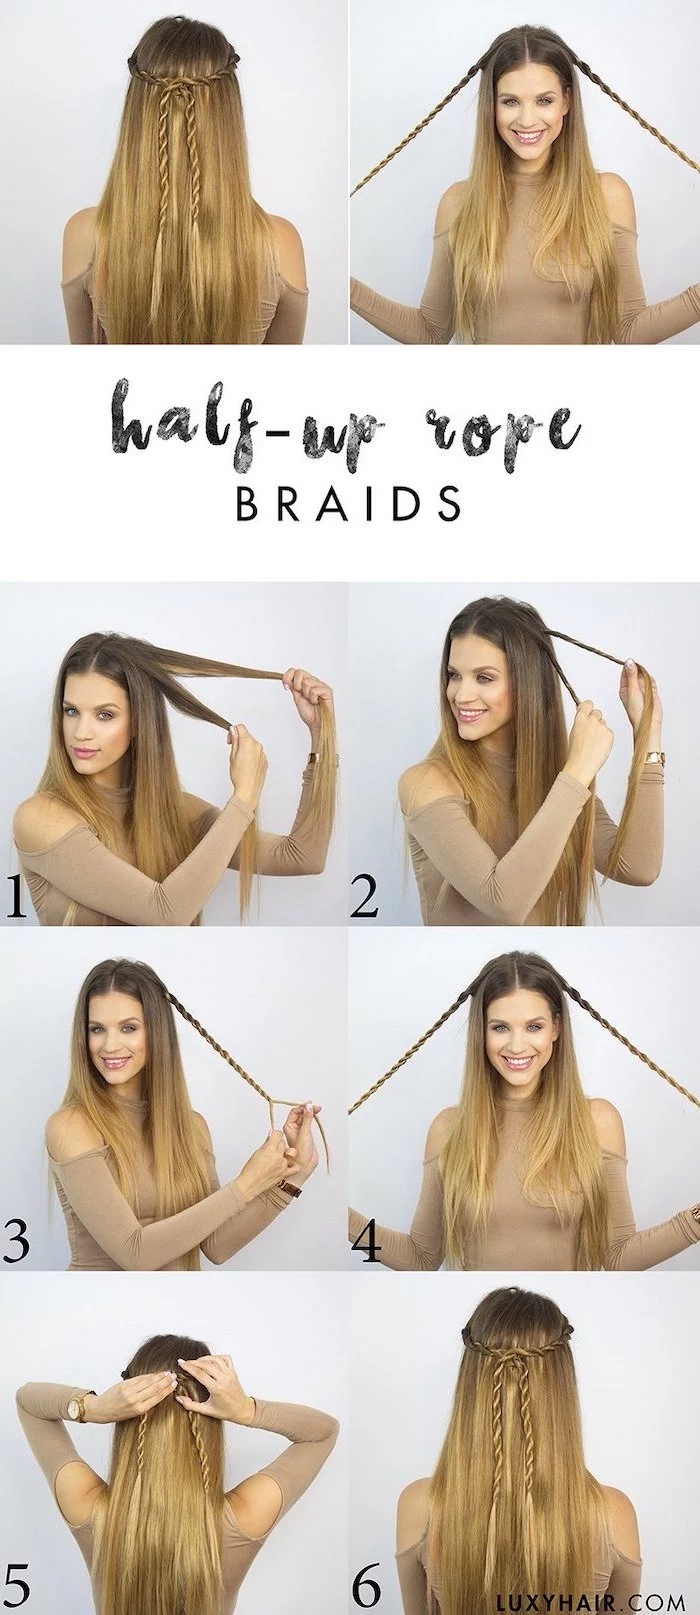
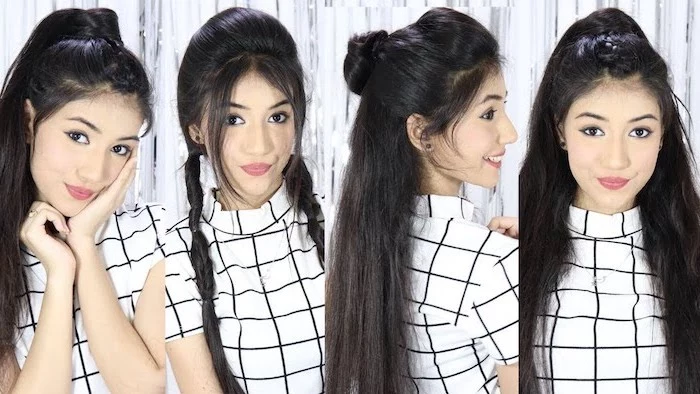
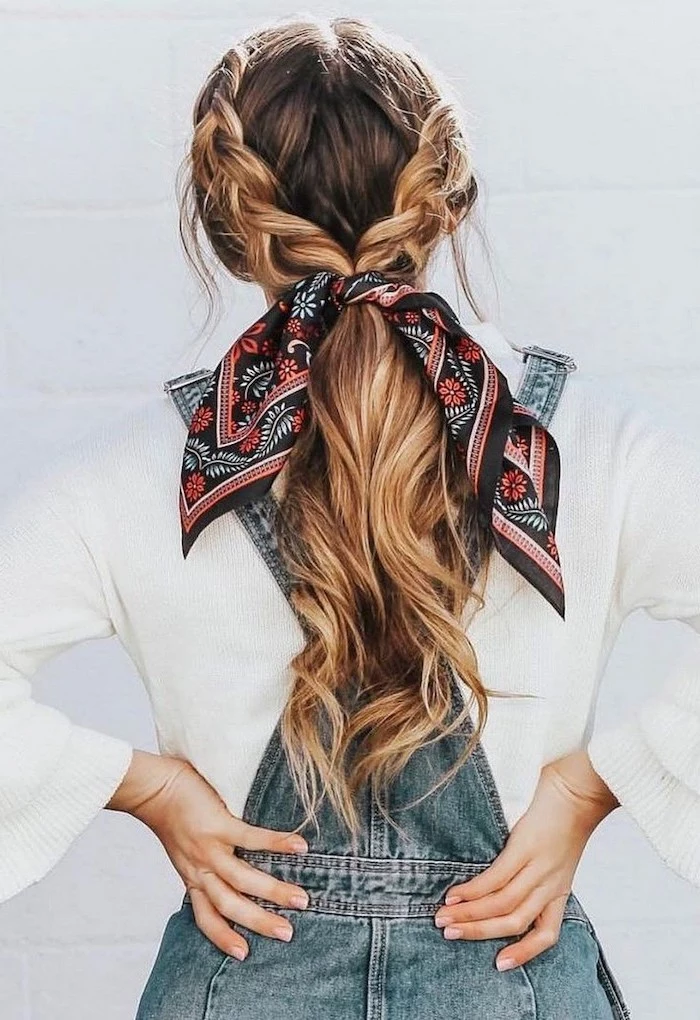
The Art of Braiding: It’s All About Tension
Braiding is a skill, and like any skill, it takes practice. The most important thing to master is consistent tension. Too loose, and the braid is sloppy. Too tight, and it hurts your scalp and looks stiff. You’re aiming for firm and even with every single pass.
French Braid vs. Dutch Braid: What’s the Difference?
People often get these two mixed up, but the difference is simple and creates two totally different looks. Think of it this way:
- A French Braid is an “over” braid. You cross the side strands over the middle strand. This creates a classic, smooth braid that lies flat against the head. It’s great for all hair types and is perfect for a sleek, controlled look.
- A Dutch Braid is an “under” braid. You cross the side strands under the middle strand. This simple change makes the braid pop up and sit on top of the hair, creating a bold, 3D effect. By the way, this is a fantastic trick for making fine hair look much thicker and more voluminous.
\p>Learning either of these can take about 20-30 minutes of practice to get the hang of it, but once you do, you can whip one out in 5-10 minutes.
Braiding Troubleshooting
- Lumps and Bumps? This is almost always from messy sectioning. Use the tail of your rat-tail comb to draw clean, straight lines as you add new hair.
- Layers Sticking Out? The eternal struggle! Before you start, warm up a pea-sized amount of pomade or styling wax between your palms and run it through your hair. This gives those shorter layers a bit of grip to help them stay tucked in.
- Want More Volume? This is called “pancaking.” After the braid is secured, gently pull on the outermost loops of each stitch, starting from the bottom and working your way up. It adds instant fullness.
- Time-Saving Hack: Braid your hair when it’s damp the night before. Not only does it save you a ton of time in the morning rush, but when you take it out the next day, you’ll have gorgeous, heatless waves. It’s a two-for-one style!
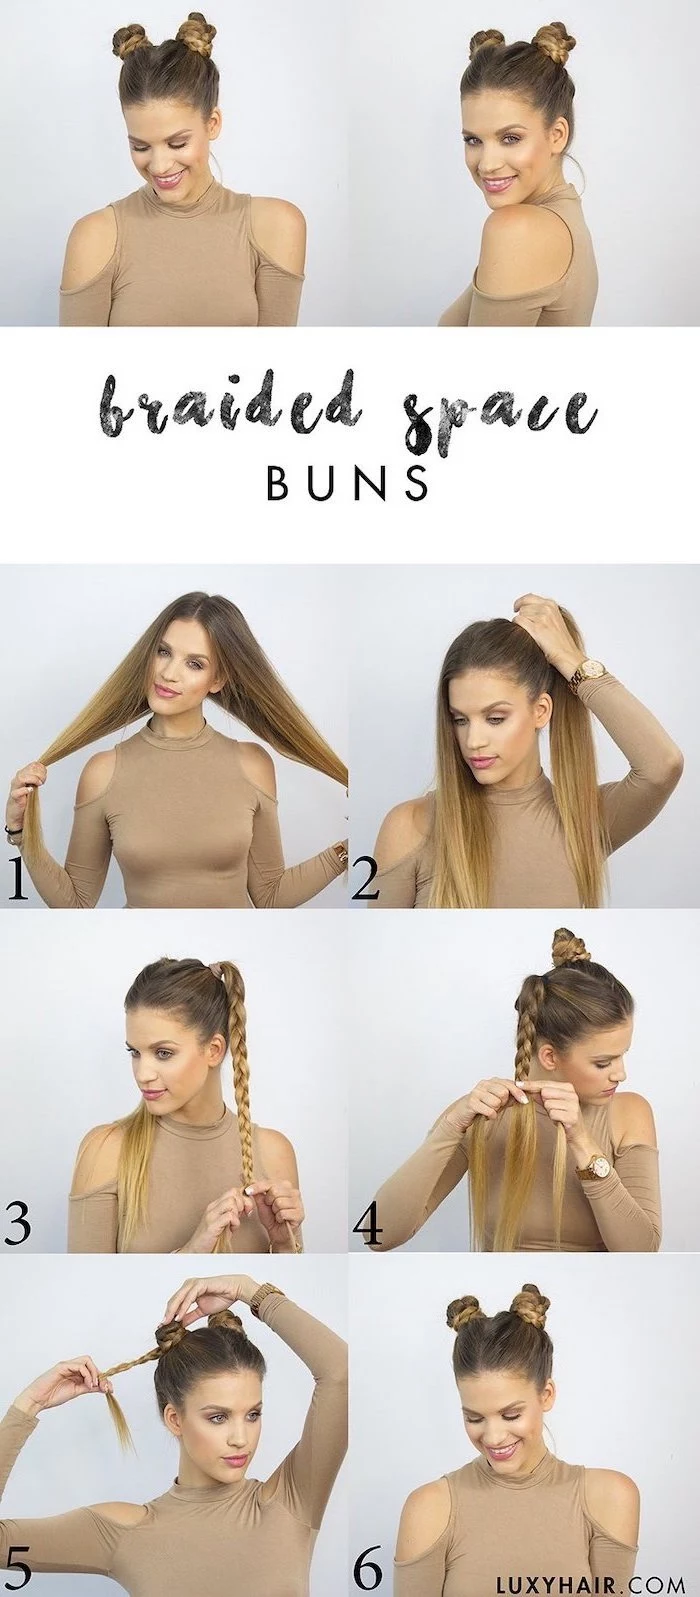
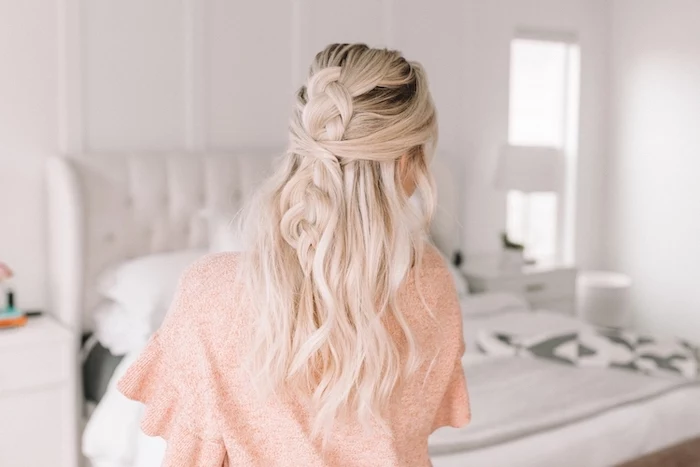
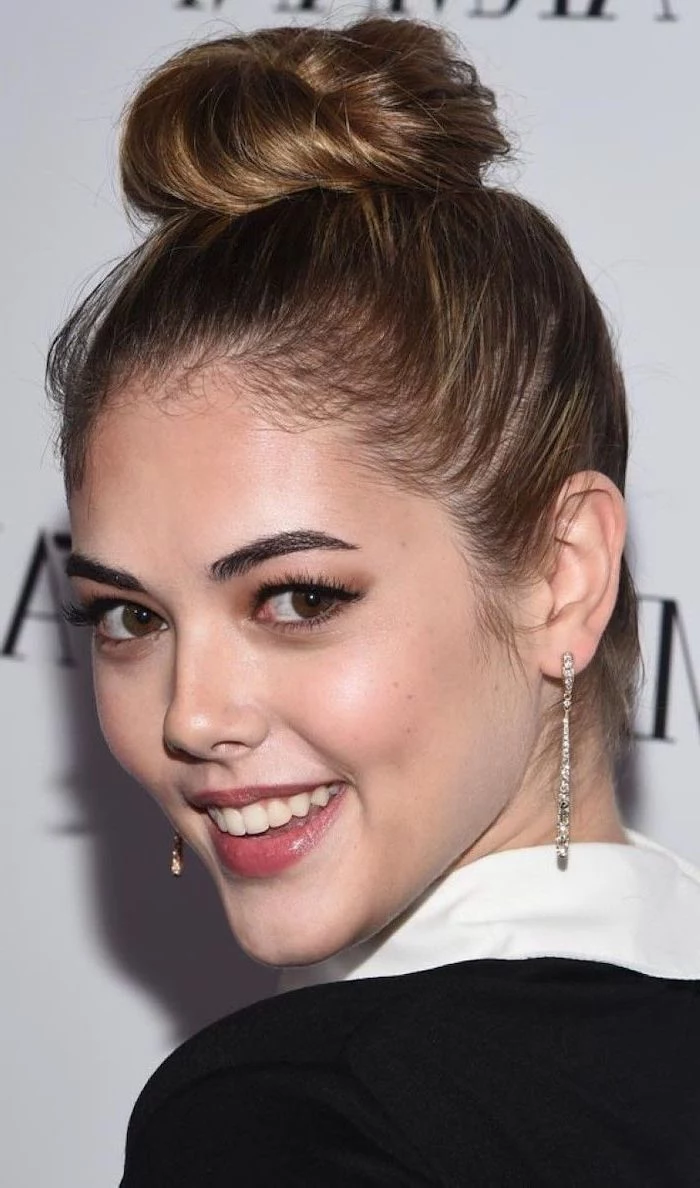
Buns and Updos That Actually Survive the Day
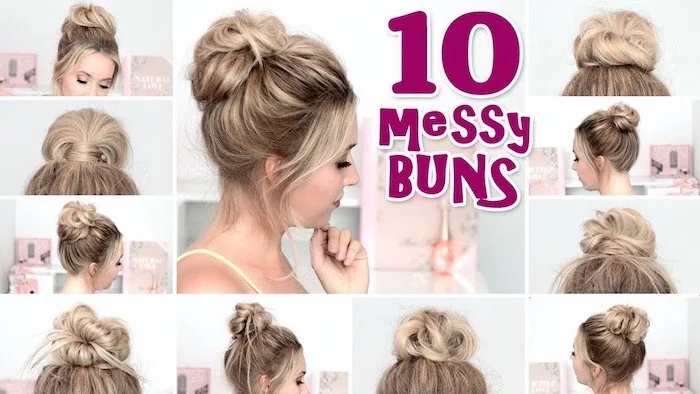
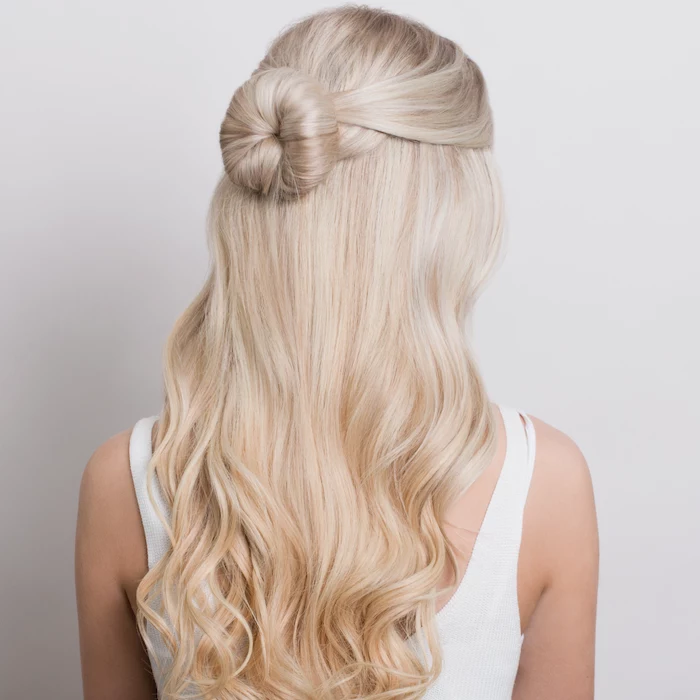
A good bun is built, not just twisted up. It needs a solid foundation to last through any real activity. The so-called “messy bun” that stays put all day is an illusion—it’s actually carefully constructed to look effortless. Start with the secure anchor ponytail I described earlier. Twist and coil the ponytail around its base, pinning it to your scalp (not just to the bun itself!) with bobby pins. Once it’s locked in place, then you can gently pull out little pieces to create that “messy” texture.
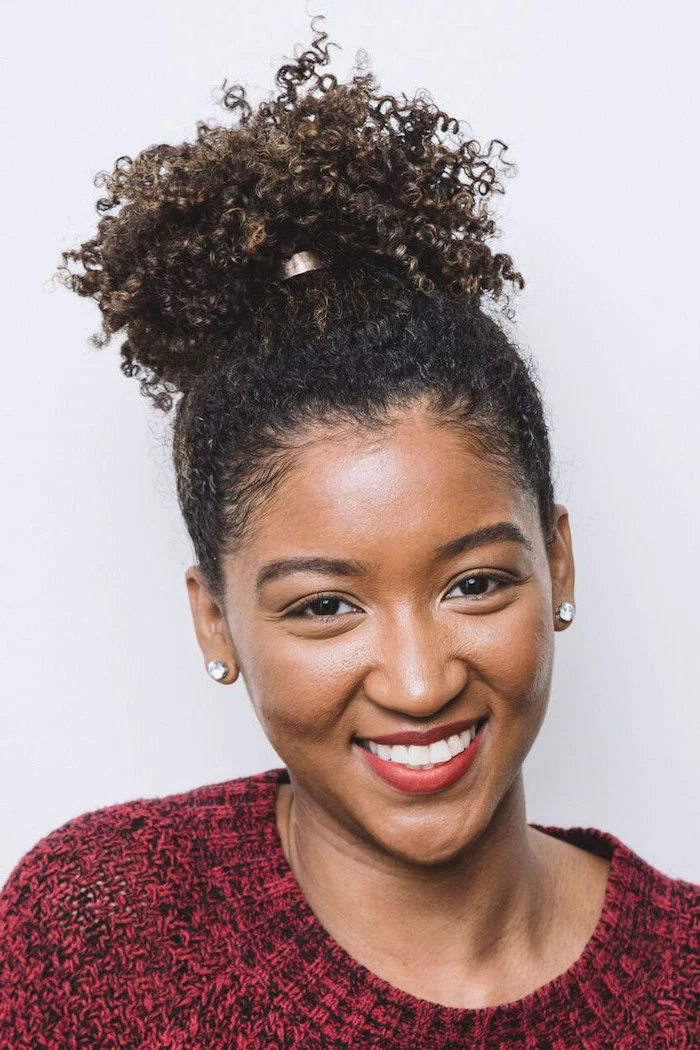
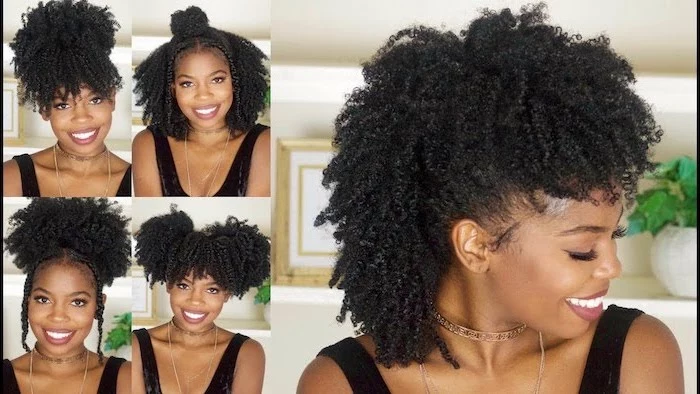
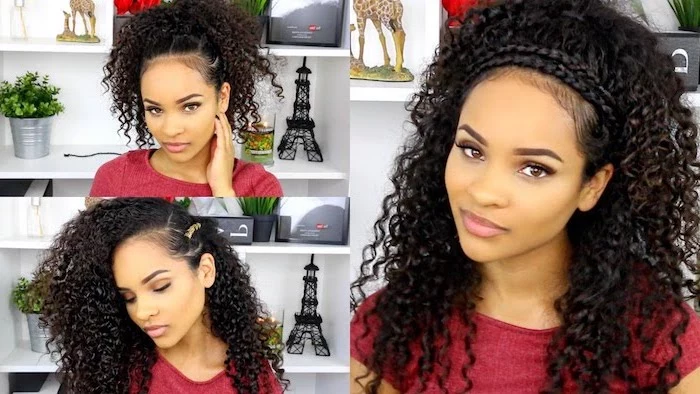
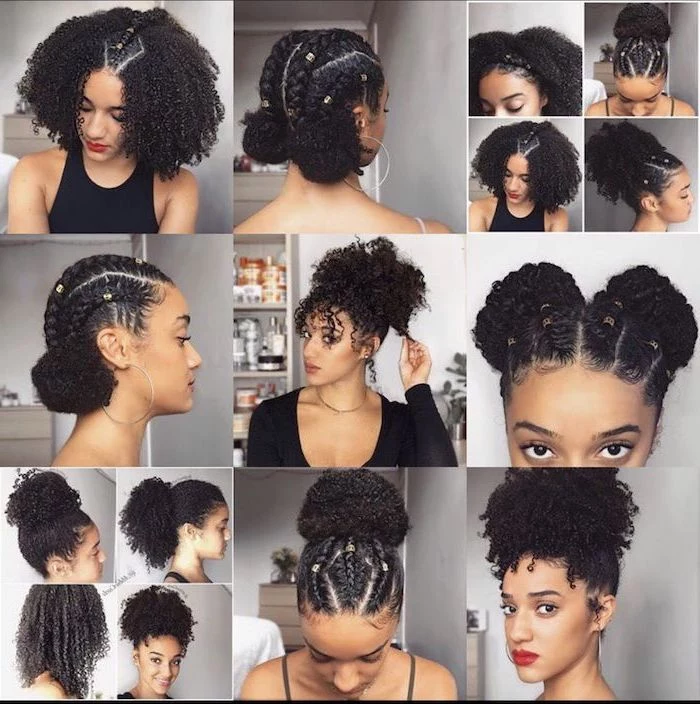
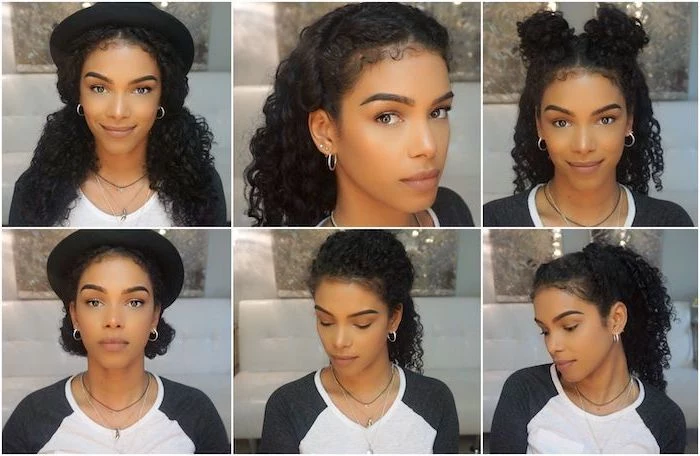
Working with Natural Curls and Short Hair
The goal is always to work with your hair’s natural texture, not fight against it. For my clients with curly and coily hair, the number one rule is MOISTURE. Curls are naturally drier, so never try to style them dry. Keep a spray bottle of water nearby to keep the hair damp as you work. Use gentle tension, especially around the delicate hairline. Protective styles like two-strand twists, flat twists, and high puffs are amazing because they tuck away fragile ends and reduce daily breakage.
And for my short-haired friends, you have so many options! A small Dutch braid along the hairline is a beautiful way to keep bangs back. Twisting and pinning sections, or using stylish headbands and clips, adds flair and control without needing a lot of length.
A Final Word on Hair Safety
Listen, some things are just bad for your hair, period. High-heat tools without a heat protectant cause permanent damage. You can’t fix burnt hair. Keep temps below 400°F (200°C) and don’t go over the same section more than once.
Also, please don’t sleep in a tight hairstyle. The friction and tension all night long is a recipe for breakage. A loose braid or a satin bonnet is the way to go.
And if you ever notice a sudden increase in shedding, significant thinning, or bald patches, it’s time to see a pro. We’re trained to spot scalp issues and can tell you if it’s time to see a dermatologist or a hair-and-scalp specialist. Don’t self-diagnose on the internet—get an expert opinion.
At the end of the day, learning to do your hair is a journey. Your first Dutch braid might be a lumpy mess. Mine sure was! But if you focus on keeping your hair healthy and are patient with yourself, you’ll build a skill that will make you feel confident and ready to take on anything. You’ve got this.
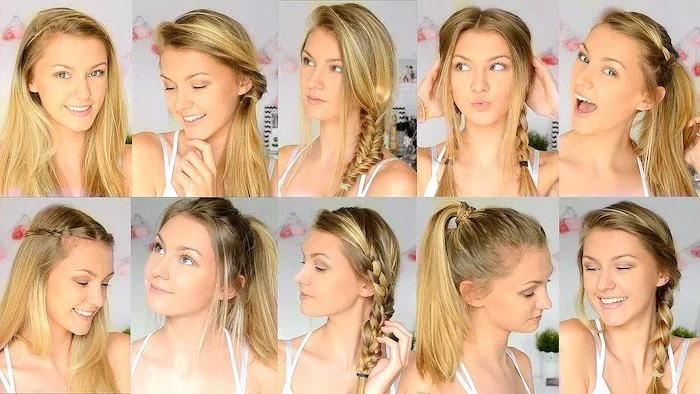
Inspirational Gallery
The Night-Before Trick: For styles that need extra grip and volume, like braids or buns, try using dry shampoo the night before. Apply a product like Batiste Original to the roots before bed. It will absorb oils overnight, leaving you with a perfect texture for styling in the morning rush.
- They won’t leave a dent or crease in the hair.
- They reduce tension, minimizing the risk of a hairstyle-induced headache.
- They glide out without snagging or pulling strands.
The secret? Spiral hair ties, like the popular Invisibobble or Kitsch spiral collections. Their unique shape distributes pressure evenly, making them a game-changer for all-day ponytails.

Why do my bobby pins always slip out by lunchtime?
You might be inserting them upside down! The ridged, wavy side is designed to grip the hair and should always face the scalp. The flat side stays on top. For an even stronger hold, try crisscrossing two pins to lock a section in place.
The average human hair can stretch up to 30% when wet. This natural elasticity is what allows us to braid and twist it without constant breakage.
Understanding this helps explain why slightly damp hair (not soaking wet) is often easier to braid tightly. However, be gentle, as wet hair is also in its most fragile state. A light mist from a spray bottle is all you need.
The Bobby Pin Upgrade: Before sliding a bobby pin into place, give it a quick spritz of strong-hold hairspray or texturizing spray. This adds a layer of grit that dramatically increases its gripping power, keeping updos and flyaways secure from the first bell to the last.
For curly hair, styling success begins with moisture. Instead of brushing curls out dry (which leads to frizz), revive them before styling. Lightly mist the hair with water mixed with a small amount of leave-in conditioner, like SheaMoisture’s Jamaican Black Castor Oil formula. Gently scrunch to redefine the curls, then proceed with your ponytail or braid.
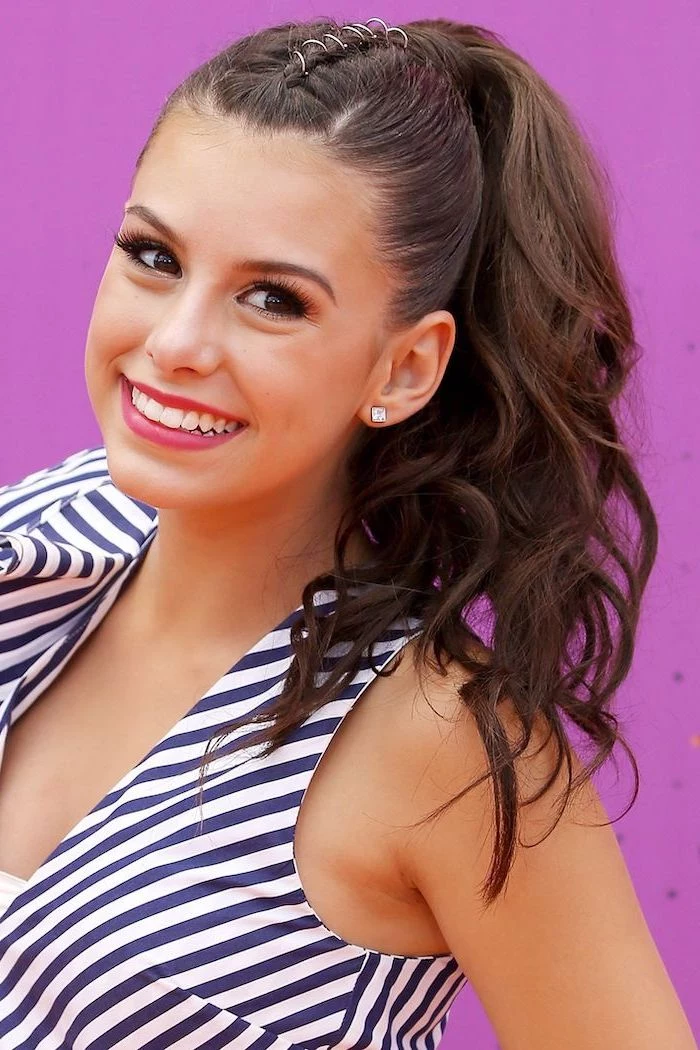
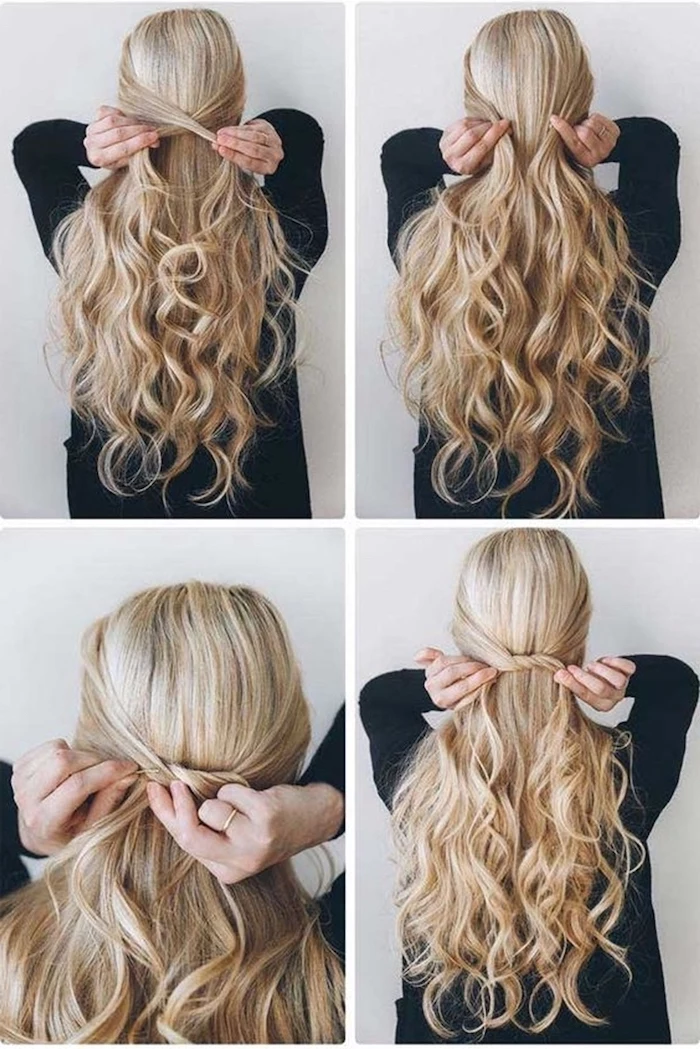
The Polished Ponytail Finish
Elevate a simple ponytail from the playground to picture day in 30 seconds. Here’s how:
- Create your ponytail as usual.
- Separate a small, thin section of hair from the underside.
- Wrap this section around the hair elastic until it’s completely hidden.
- Secure the end of the wrap underneath the ponytail with a single bobby pin.

Don’t get too close! A common mistake is spraying hairspray just inches from the head. This creates wet, crunchy spots and doesn’t provide an even hold. Hold the can at least 10-12 inches away (about the length of a ruler) and mist continuously for a fine, even veil that works.

French Braid: Sections are crossed *over* the middle strand, creating a smooth, flat braid that sits flush against the head. It’s a classic, sleek look.
Dutch Braid: Sections are crossed *under* the middle strand. This technique makes the braid pop up from the scalp for a bold, 3D effect.
The Dutch braid is often easier for beginners to master on their own hair as the weaving motion can feel more natural.
According to the American Academy of Dermatology, it’s normal to lose 50 to 100 hairs a day. Aggressive detangling or tight hairstyles can significantly increase this number.

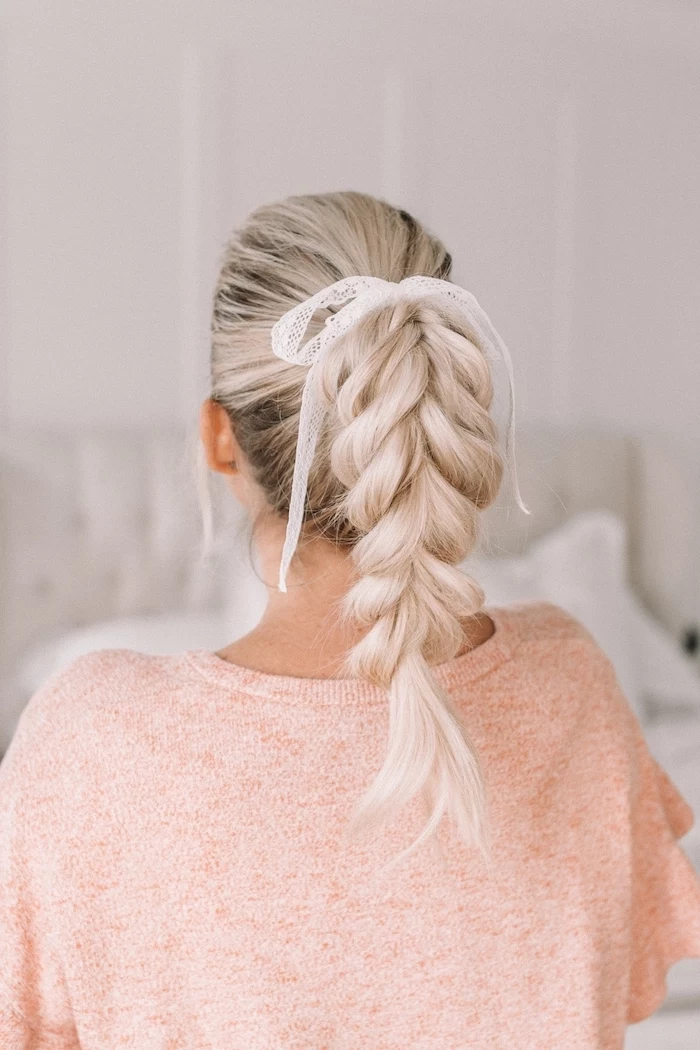
The ‘Bubble Braid’ is a fun and surprisingly durable alternative to a classic plait. Simply create a ponytail, then place elastics every two inches down the length. Gently pull apart each section to create rounded ‘bubbles’. It’s fast, modern, and holds up brilliantly during sports.
Is it really necessary to clean hairbrushes?
Absolutely. A dirty brush is full of shed hair, styling product buildup, and oils. When you brush, you’re redepositing all of that back onto your clean hair, which can make it look greasy and weigh down your style. A quick clean once a week makes a noticeable difference.
- Detangle from the ends up to the roots to gently work through knots.
- Use a brush specifically designed for detangling, like a Tangle Teezer or a Wet Brush, whose flexible bristles reduce breakage.
- Never, ever try to style hair that still has knots in it.


Important: Watch out for ‘traction alopecia,’ a type of hair loss caused by constant, repetitive pulling on the hair follicles. If a ponytail or braid feels uncomfortably tight or causes a headache, it’s too tight. Vary hairstyles daily and give the hairline a break with looser styles to keep the scalp healthy.
Give a simple braid a high-fashion makeover by ‘pancaking’ it. Once the braid is secured, gently pull on the outer loops of each plait, starting from the top and working your way down. This flattens and widens the braid, making the hair appear thicker and creating a softer, more romantic look that still holds securely.

For a sleek, flyaway-free finish around the hairline, skip the spray. Instead, take a clean mascara wand (a spoolie) or a toothbrush, mist it with a flexible hairspray like L’Oréal Elnett, and then gently brush down any stray baby hairs. It gives you precise control without making the rest of the hair stiff.
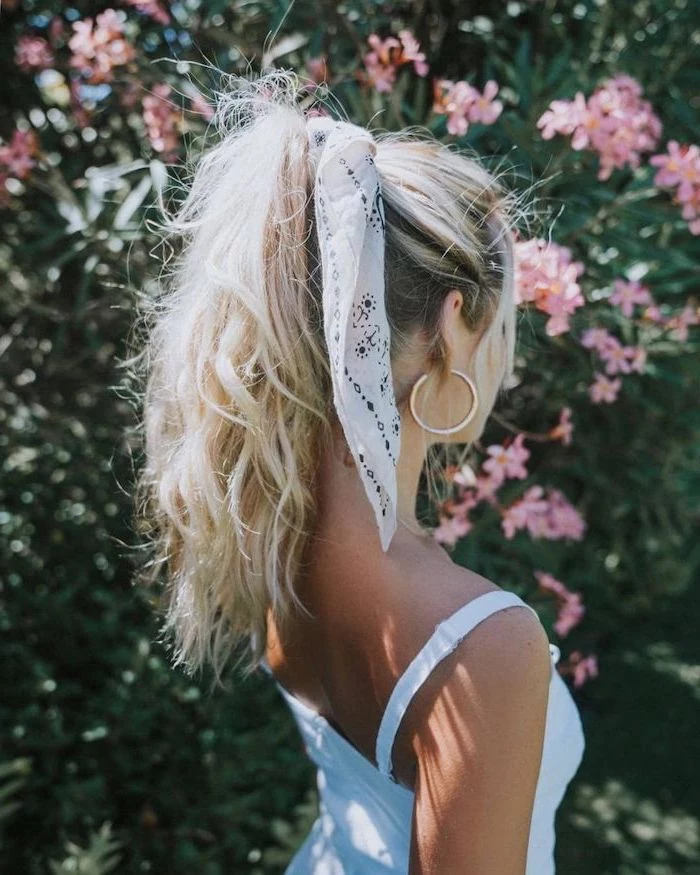
Ribbons and scarves are back in a big way. Weaving a thin silk ribbon into a braid or simply using it to tie off a ponytail adds a pop of color and personality. It’s an inexpensive way to customize a look to match an outfit or show school spirit.
- A more secure hold for buns and updos.
- Less visible than traditional pins.
- Reduced scalp-poking.
The tool pros use? U-shaped hair pins. Unlike bobby pins that clamp hair down, U-pins anchor the style by grabbing hair from the bun and the base simultaneously.
How do I make a bun stay put without a million pins?
The secret is a solid foundation. Start with a very secure ponytail first. Then, twist or braid the ponytail before wrapping it into a bun. This creates a much denser, more stable shape to pin into, requiring fewer pins for an all-day hold.
A single strand of hair can support a weight of about 3.5 ounces (100 grams). A whole head of hair could theoretically support several tons.
While we don’t recommend testing that, it shows just how resilient hair is! The key to a lasting style is harnessing that collective strength through techniques like braiding and twisting, which distribute tension across thousands of strands.
The humble claw clip has made a major comeback for good reason. It’s the perfect ‘quick change’ accessory for after-school activities. A braid or ponytail can be instantly twisted up and secured with a durable clip from a brand like Kitsch or Goody, keeping hair off the neck during sports practice without fuss.
To prevent damage when the day is done, never rip an elastic out. If it’s too tight, use a seam ripper or a pair of small, blunt-nosed scissors to carefully snip the elastic. This small step saves dozens of hairs from being broken or pulled out each day.

The Double Ponytail Illusion: For a ponytail that looks longer and fuller, try this trick. Divide your hair into two horizontal sections (top and bottom). Create a ponytail with the top section. Then, create a second ponytail directly beneath it with the bottom section. The hair from the top pony will fall over the base of the bottom one, hiding it and creating the illusion of major length and volume.
For super-slick styles like a high ballerina bun, a styling gel or edge control product is your best friend. A small amount of a product like ECO Style Gel applied with a brush during the gathering phase ensures every hair stays perfectly in place with a polished, high-shine finish.
Heat-Free Waves for Tomorrow: A great school hairstyle can do double duty. Create two tight Dutch braids on slightly damp hair before school. The style will last all day, and when you take them out before bed or the next morning, you’ll have perfect, heatless waves for day two. It’s the ultimate time-saver!


