The Real Deal on Color Blocking Your Hair (From a Pro)
I’ve been a professional stylist for a long, long time. Long enough to see trends cycle through more times than I can count. But you know, some techniques aren’t just trends—they’re a true measure of a colorist’s skill. And color blocking is definitely one of them.
In this article
It’s so much more than just slapping two different colors in your hair. It’s about the deliberate, precise placement of contrasting shades to create shapes and stunning effects. To get it right, you need a solid grasp of color theory, respect for the chemical process, and an almost surgical precision.
When I was just starting out, my mentor made me practice sectioning on a mannequin head for weeks. I wasn’t even allowed to touch a bowl of lightener. He always said, “Your result will only ever be as clean as your partings.” That’s stuck with me my entire career. Great color blocking isn’t luck; it’s a solid plan, razor-sharp sections, and careful application. This is not a style you can rush.
So, this isn’t just going to be a gallery of pretty pictures. This is the real breakdown of the craft. We’ll get into the science, the tools you actually need, and the techniques we use in the salon. And I’ll be totally honest about the risks and when a project is better left to the pros. Think of this as the consultation I give my clients, so they know exactly what goes into these beautiful, bold looks.
The Foundation: It’s All About a Good Canvas
You can’t build a sturdy house on a shaky foundation, right? Same thing with hair color. A killer result comes down to understanding three key things: the color wheel, your hair’s condition, and the chemicals you’re about to use. Getting this part right is the difference between a sharp, head-turning design and a blotchy, muddy mess.
The Color Wheel Isn’t Just for Art Class
We lean on the color wheel every single day in the salon. For color blocking, it’s our main playbook for planning. The whole point of blocking is to create impact, and that usually comes from contrast.
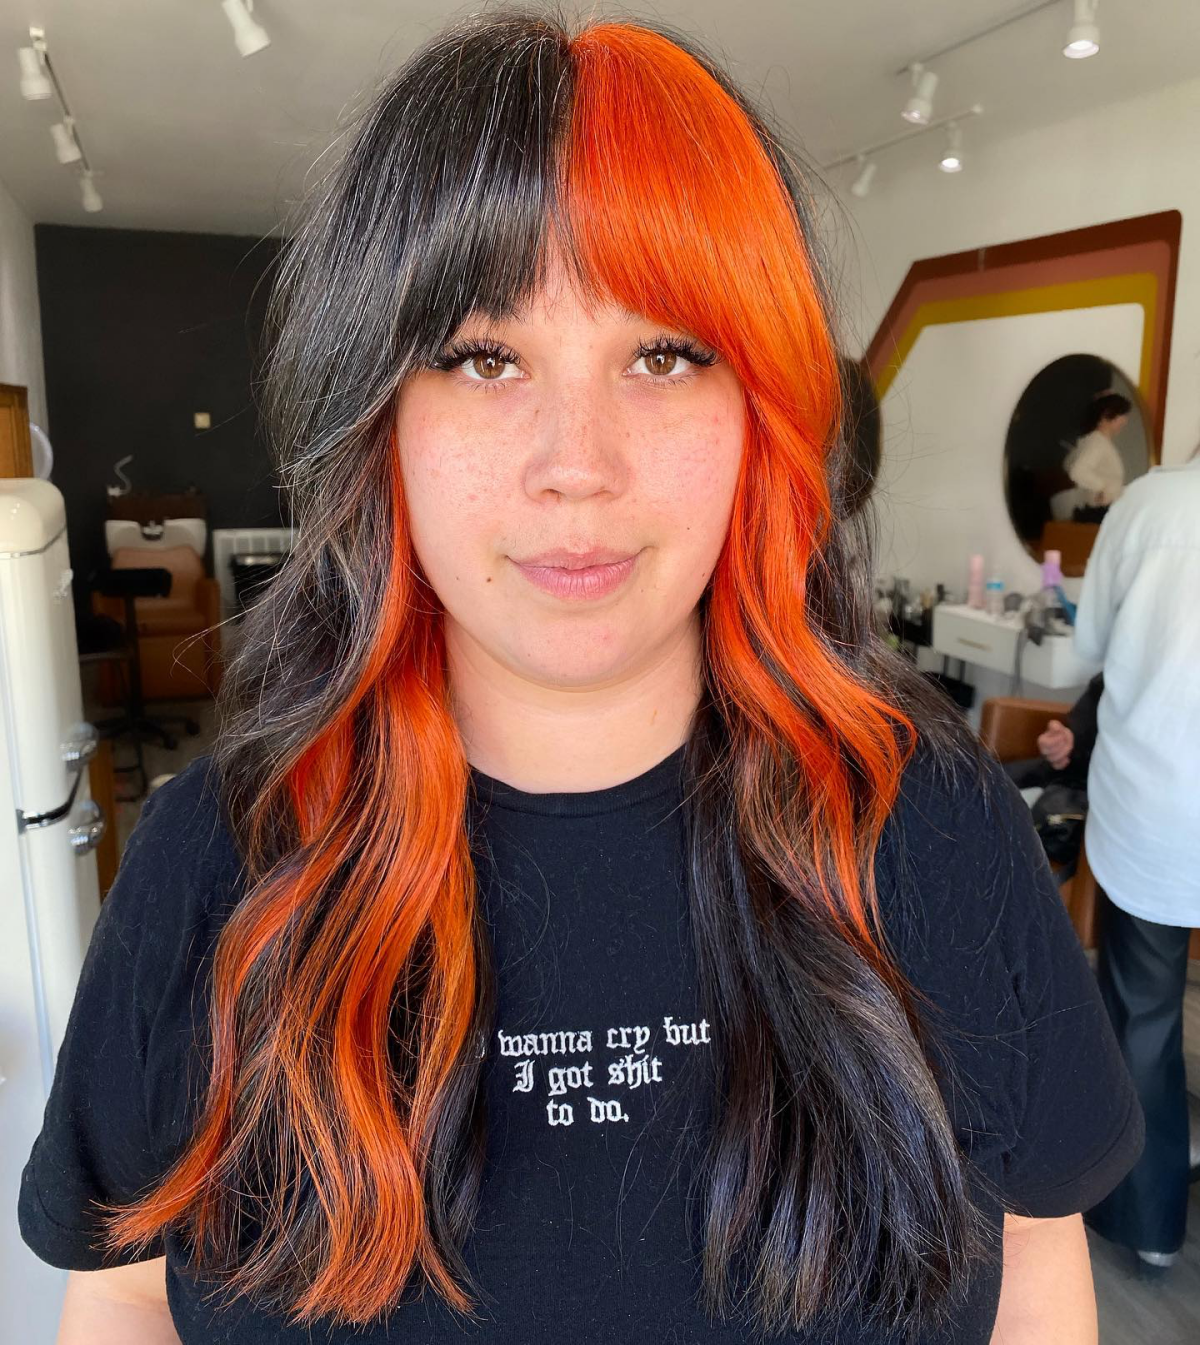
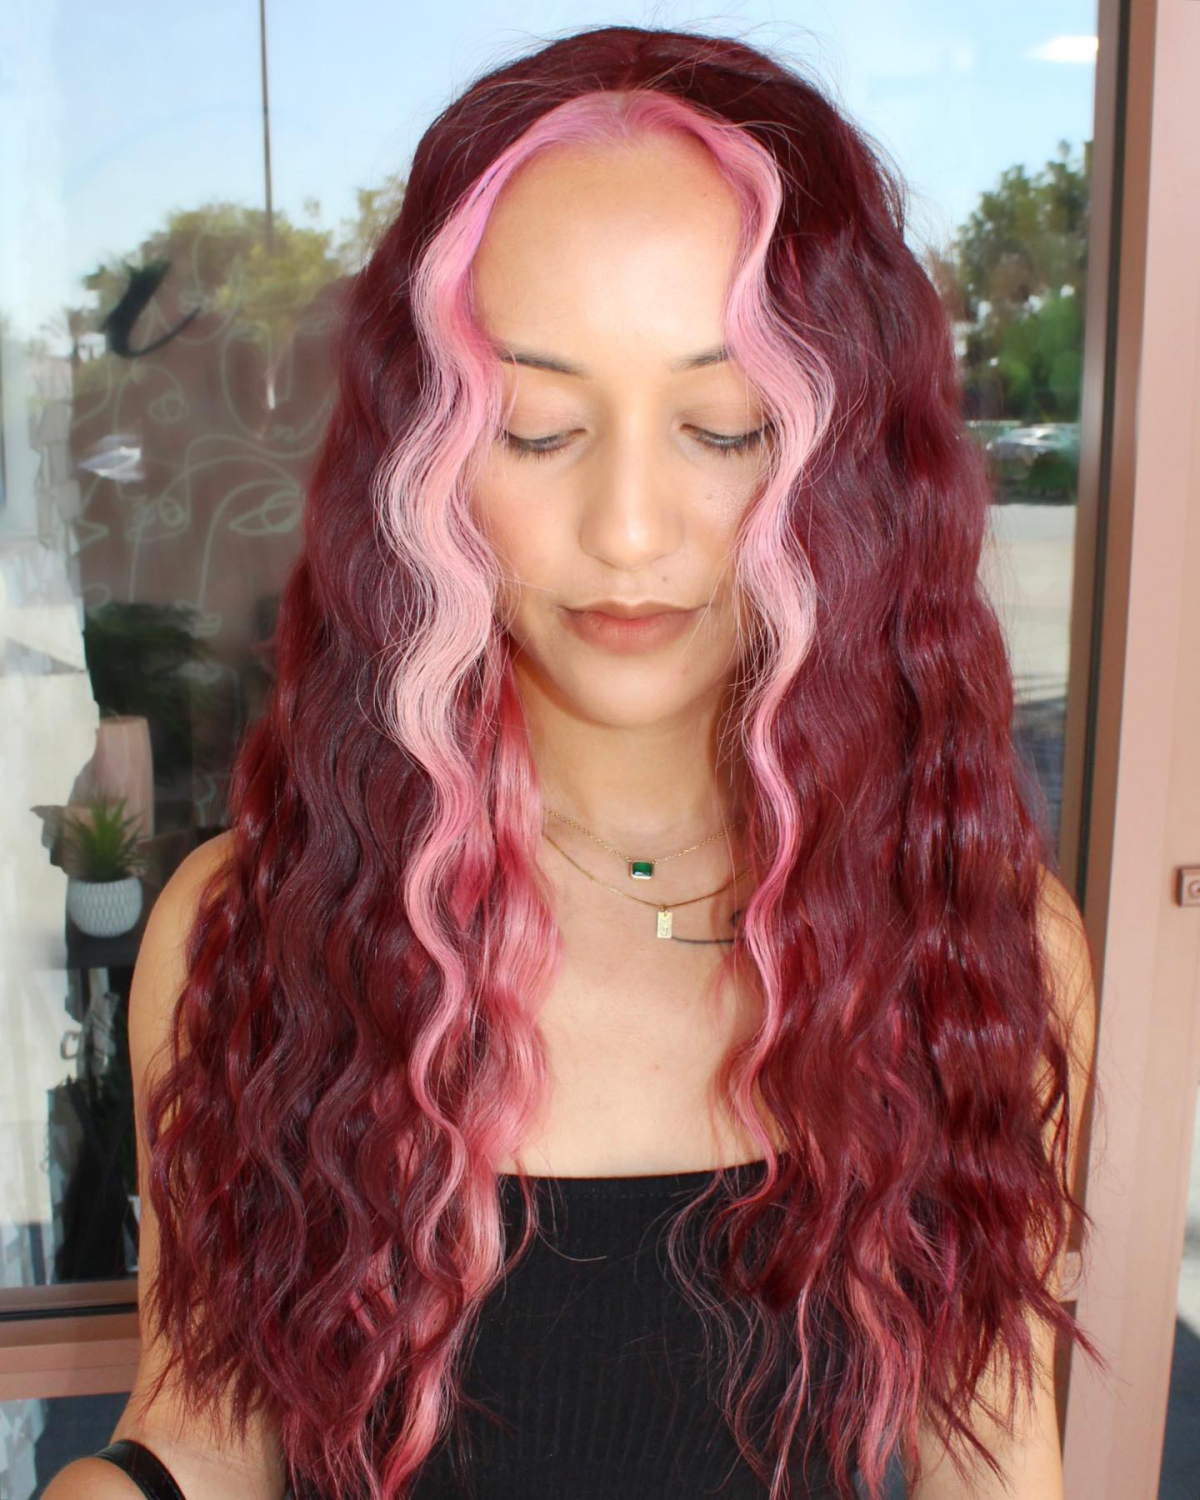
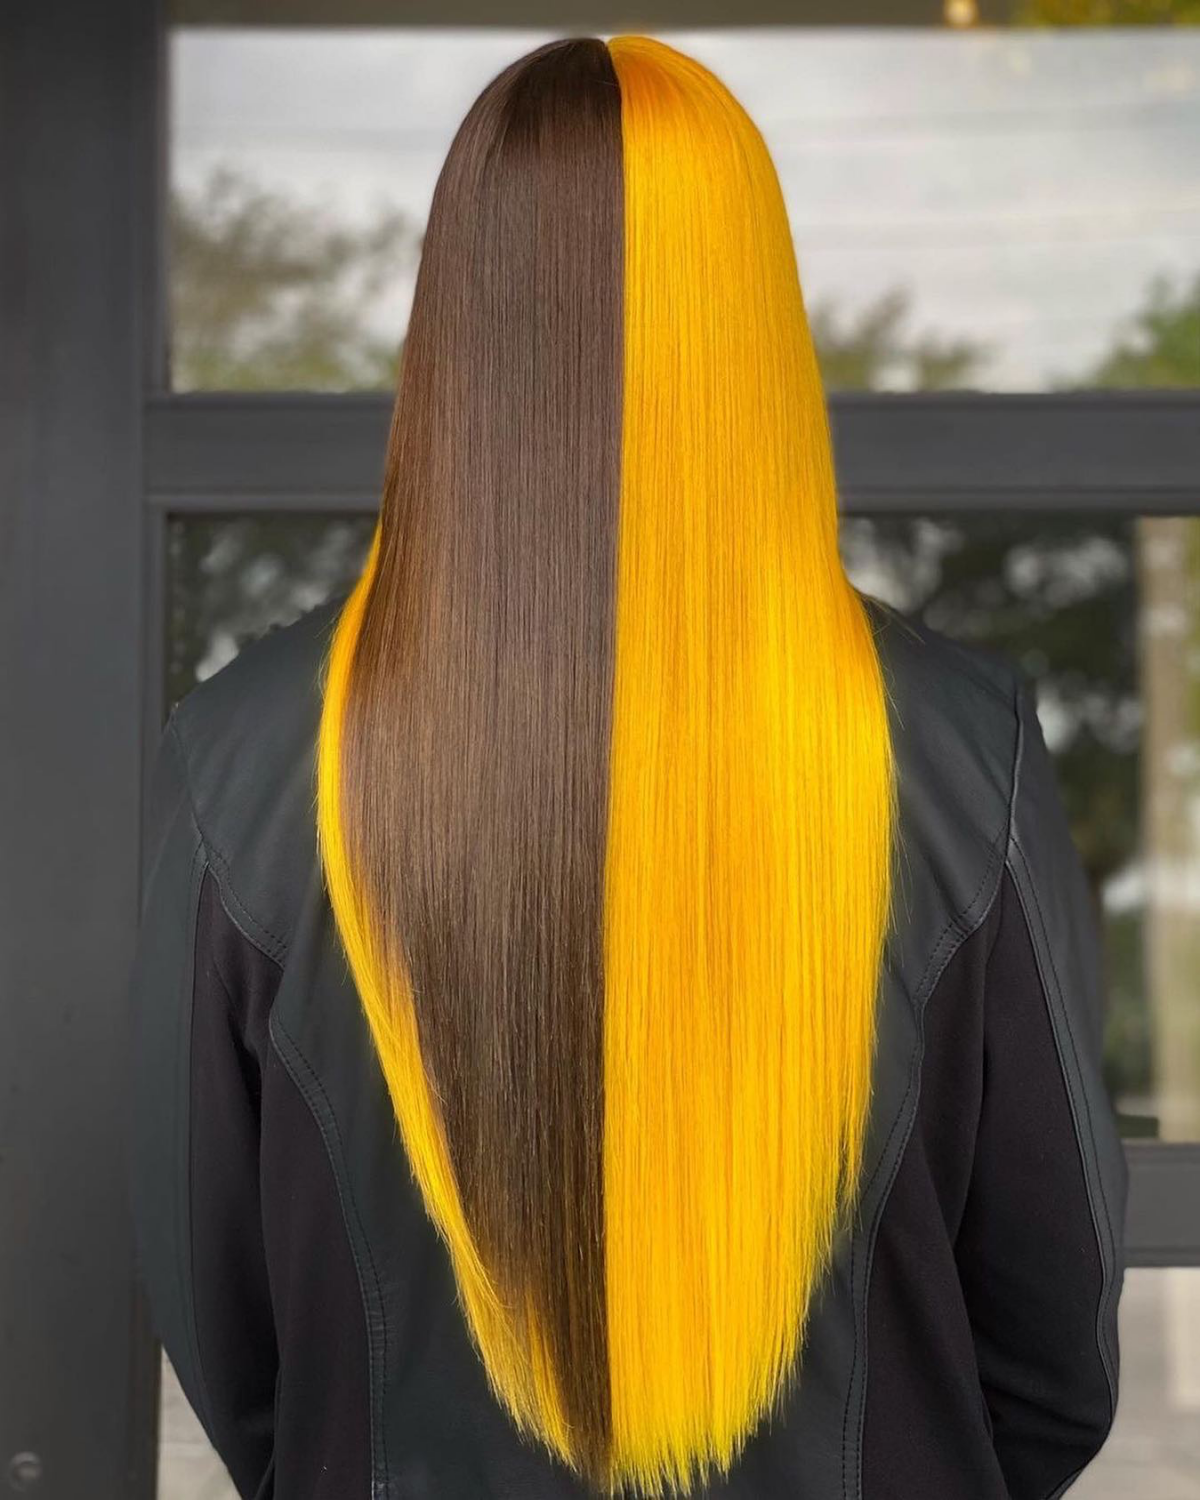
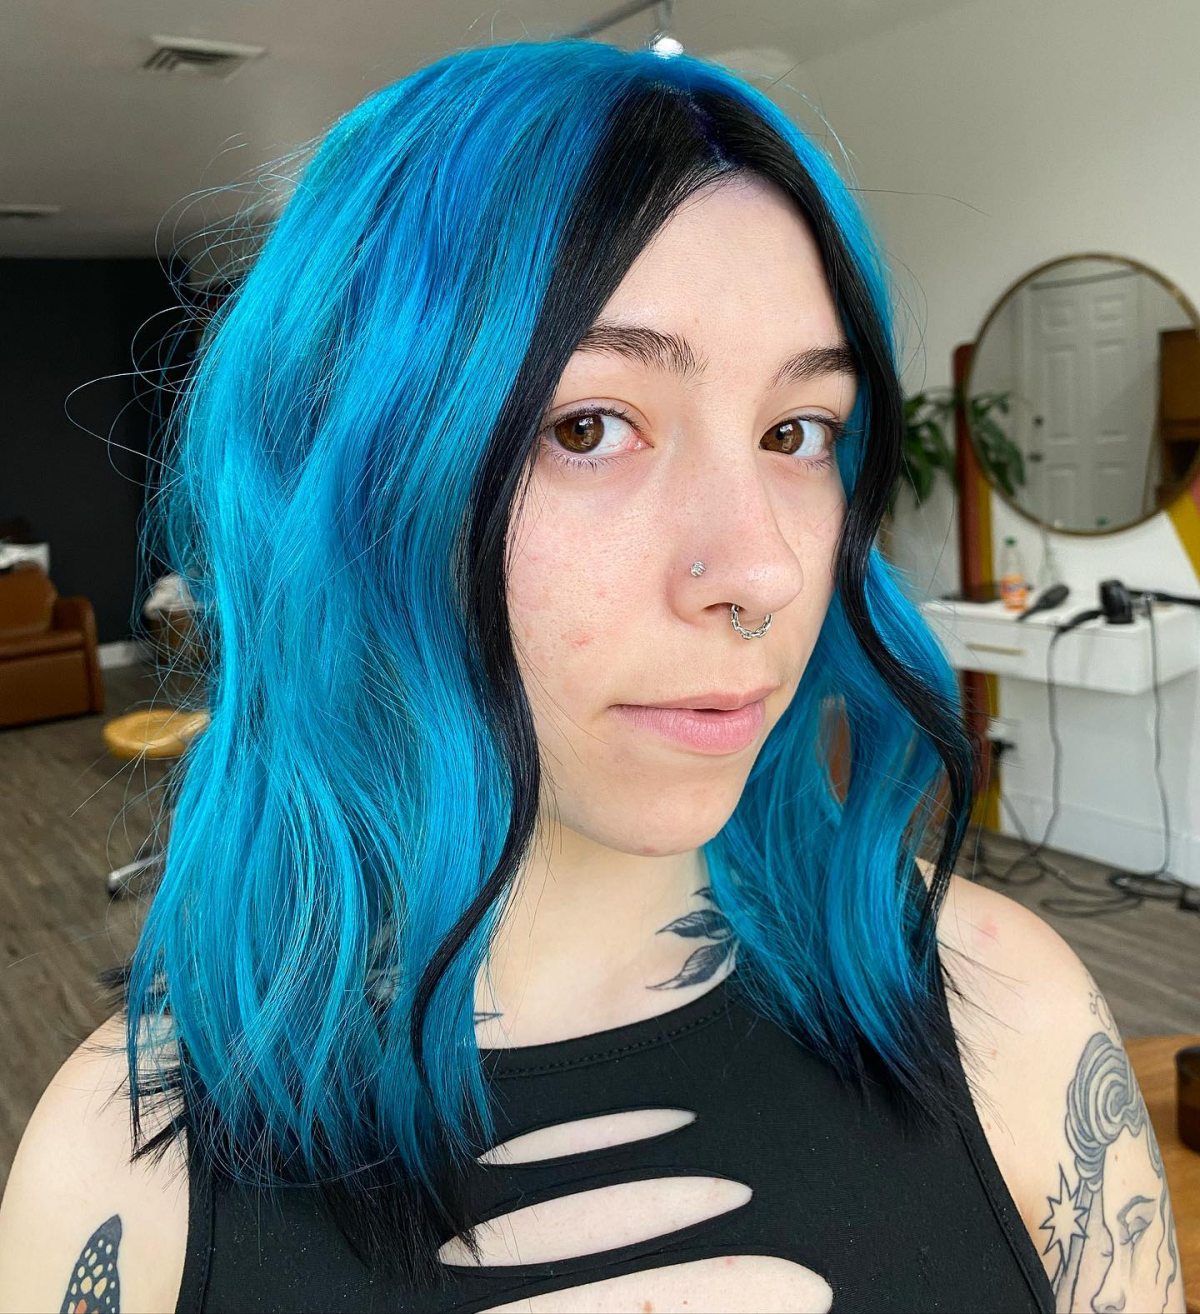
- High-Contrast Looks: These are colors on opposite sides of the wheel, like a deep blue and a fiery orange, or a royal purple and a bright yellow. They scream confidence and create the strongest visual pop. A classic black-and-blonde split dye is the ultimate example.
- Harmonious Blends: These colors are neighbors on the wheel, like blue and green, or pink and purple. This approach still counts as color blocking, but the vibe is softer and more blended.
By the way, we also have to think about temperature. A cool, silvery-white next to a warm, honey-blonde can look… well, a little weird. As a general rule, we stick to tones in the same family (all cool or all warm) unless the goal is a deliberately chaotic, punk-rock kind of clash. It’s all about making it look intentional.
Let’s Talk About Porosity (It’s a Big Deal)
Hair isn’t just a flat surface. Every strand has a protective outer layer, the cuticle. When we lighten hair, we’re prying that cuticle open to remove the natural pigment inside. This changes the hair’s structure and makes it more porous.
Porosity is basically how well your hair can soak up and hold onto moisture—or in our case, color. Healthy, untouched hair has a tight cuticle and low porosity. Lightened hair, on the other hand, is like a sponge—it has high porosity. This is probably the single most important factor in color blocking.
Why? Because that highly porous, lightened hair will grab color incredibly fast and dark. It’s also what causes colors to “bleed” into each other when you rinse. I’ll never forget the time I was training a new stylist, and she rinsed a navy blue and platinum split dye together… we spent the next 3 hours trying to fix the resulting baby blue splotches that bled onto the platinum. A total nightmare! It’s why professional rinsing technique is so critical.
The Chemistry of Going Lighter
You simply can’t get a vibrant, true-to-tone fashion color without creating a light, even base first. Putting a bright pink dye on brown hair will just give you a murky, reddish tint at best. For a true pink, you have to lift that natural color out.
We do this with lightener (bleach) and developer. The lightener is a powder that opens the hair’s cuticle and dissolves the pigment, and the developer (hydrogen peroxide) is the activator. Developer comes in different strengths, or “volumes.” A heads up for any DIY-ers: we almost never use anything higher than 20 volume on the scalp. The risk of chemical burns is very, very real.
The goal isn’t just to make hair blonde; it’s to lift it to the right level. For pastels like lavender or baby pink, you have to get the hair to a level 10—think the color of the inside of a banana peel, with virtually no yellow. For a rich red, a coppery orange base is actually perfect. Knowing when to stop is a skill that takes years to master.
The Pro’s Toolkit: What You Actually Need
Using the right equipment is non-negotiable. This isn’t the place to cut corners, as the wrong tools can lead to a botched job or, even worse, damaged hair. If you’re thinking of trying this at home, here’s a realistic shopping list.
Your Essential Supplies
- Foils or Meche: Foils are great for conducting a little heat to help the lightener process and are super secure. Meche are see-through strips that are awesome for checking the lift visually. I’m a fan of foils for their precision.
- Non-Metallic Bowls & Whisk: NEVER let lightener touch metal. It can cause a nasty chemical reaction, making the mixture heat up and swell, which can wreck hair. Always use plastic or glass.
- Multiple Tint Brushes: I use at least three for any blocking job—a wide one for fast application, a smaller one for detailed root work, and a separate, clean brush for each color you’re applying.
- Nitrile Gloves: Protect your hands! Seriously.
- Good Quality Lightener and Developer: This is where you don’t want to skimp. Salon-grade lighteners like Schwarzkopf BlondMe or Wella Blondor have a much more predictable and gentle lift. You can find these at places like Sally Beauty Supply.
- A Bond Builder: Products like Olaplex (or the dozens of similar systems from other brands) are what we call “hair insurance.” We add it directly into the lightener to protect the hair’s internal bonds during the lifting process. It’s not an upsell; it’s essential for keeping hair healthy.
- Sectioning Clips: You’ll need at least 4-8 strong clips. Clean sections are impossible without them.
To be frank: To build a solid starter kit from scratch with good quality products, you’re probably looking at a budget of around $70 to $100. It’s an investment, but worth it to protect your hair.
The Blueprint: Sectioning Patterns & What They’ll Cost You
Sectioning is the architecture of your new look. This is where you draw the map for where each color will go. Before you even think about mixing color, your hair should be bone dry and combed out completely.
Here are a few classic patterns and the real-world scoop on each:
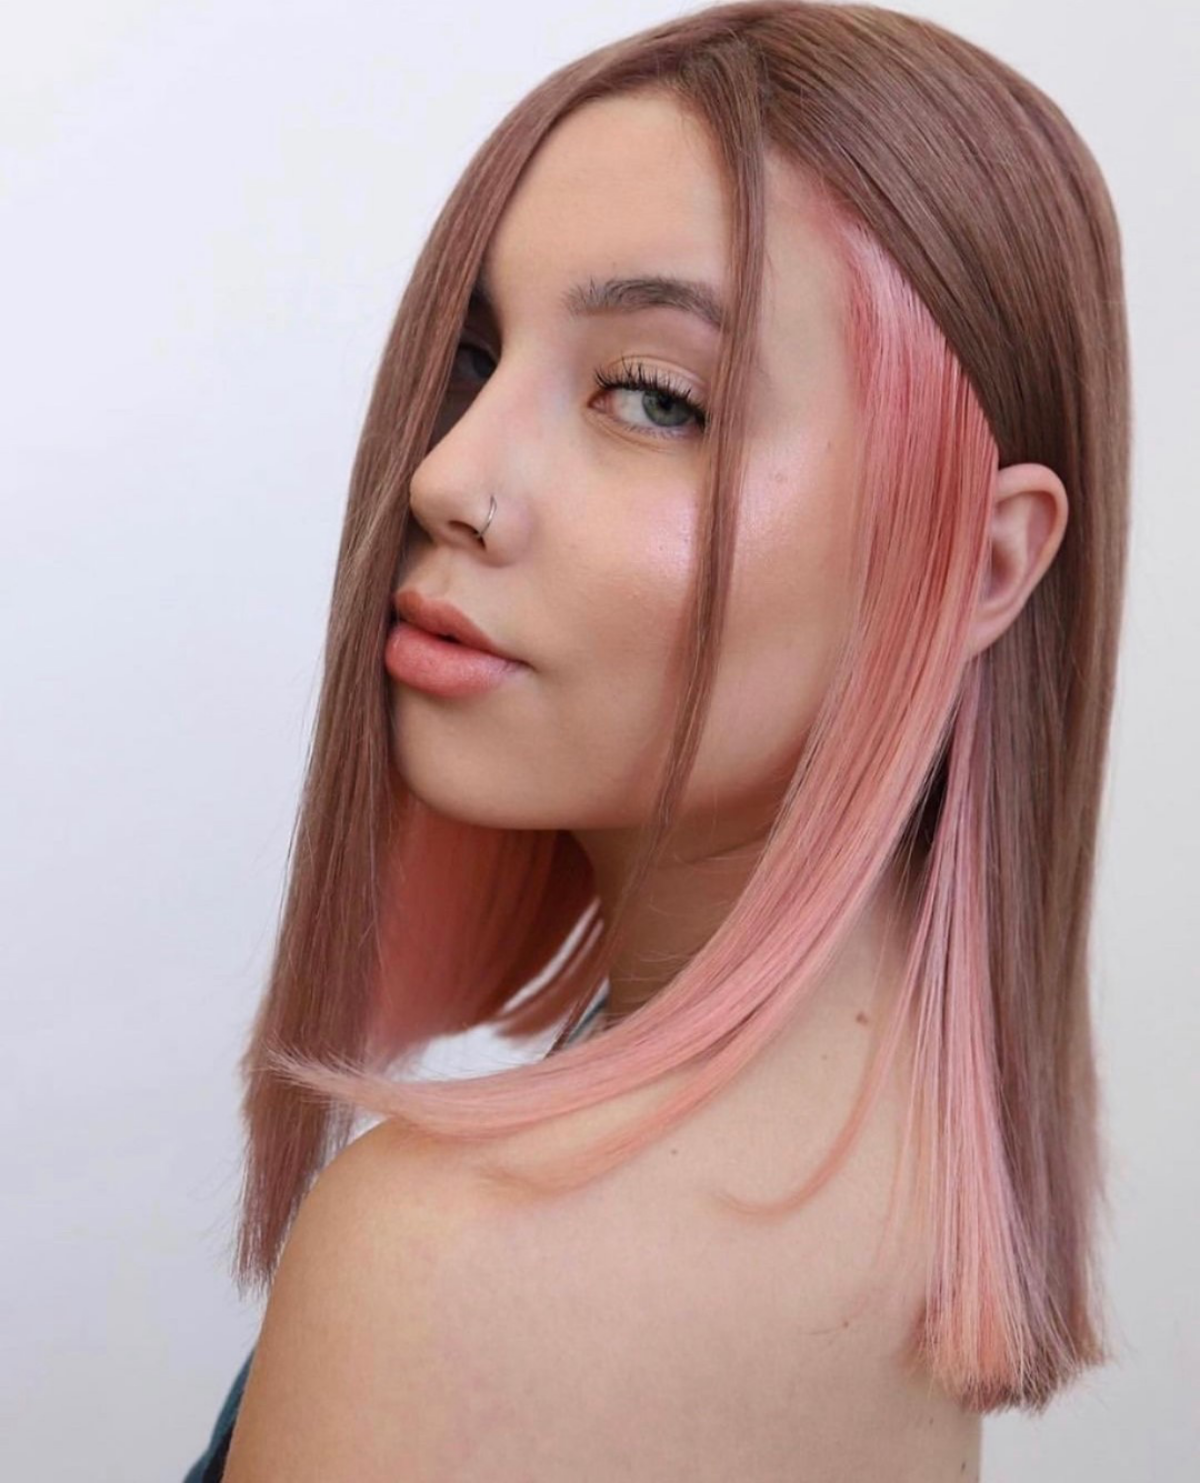
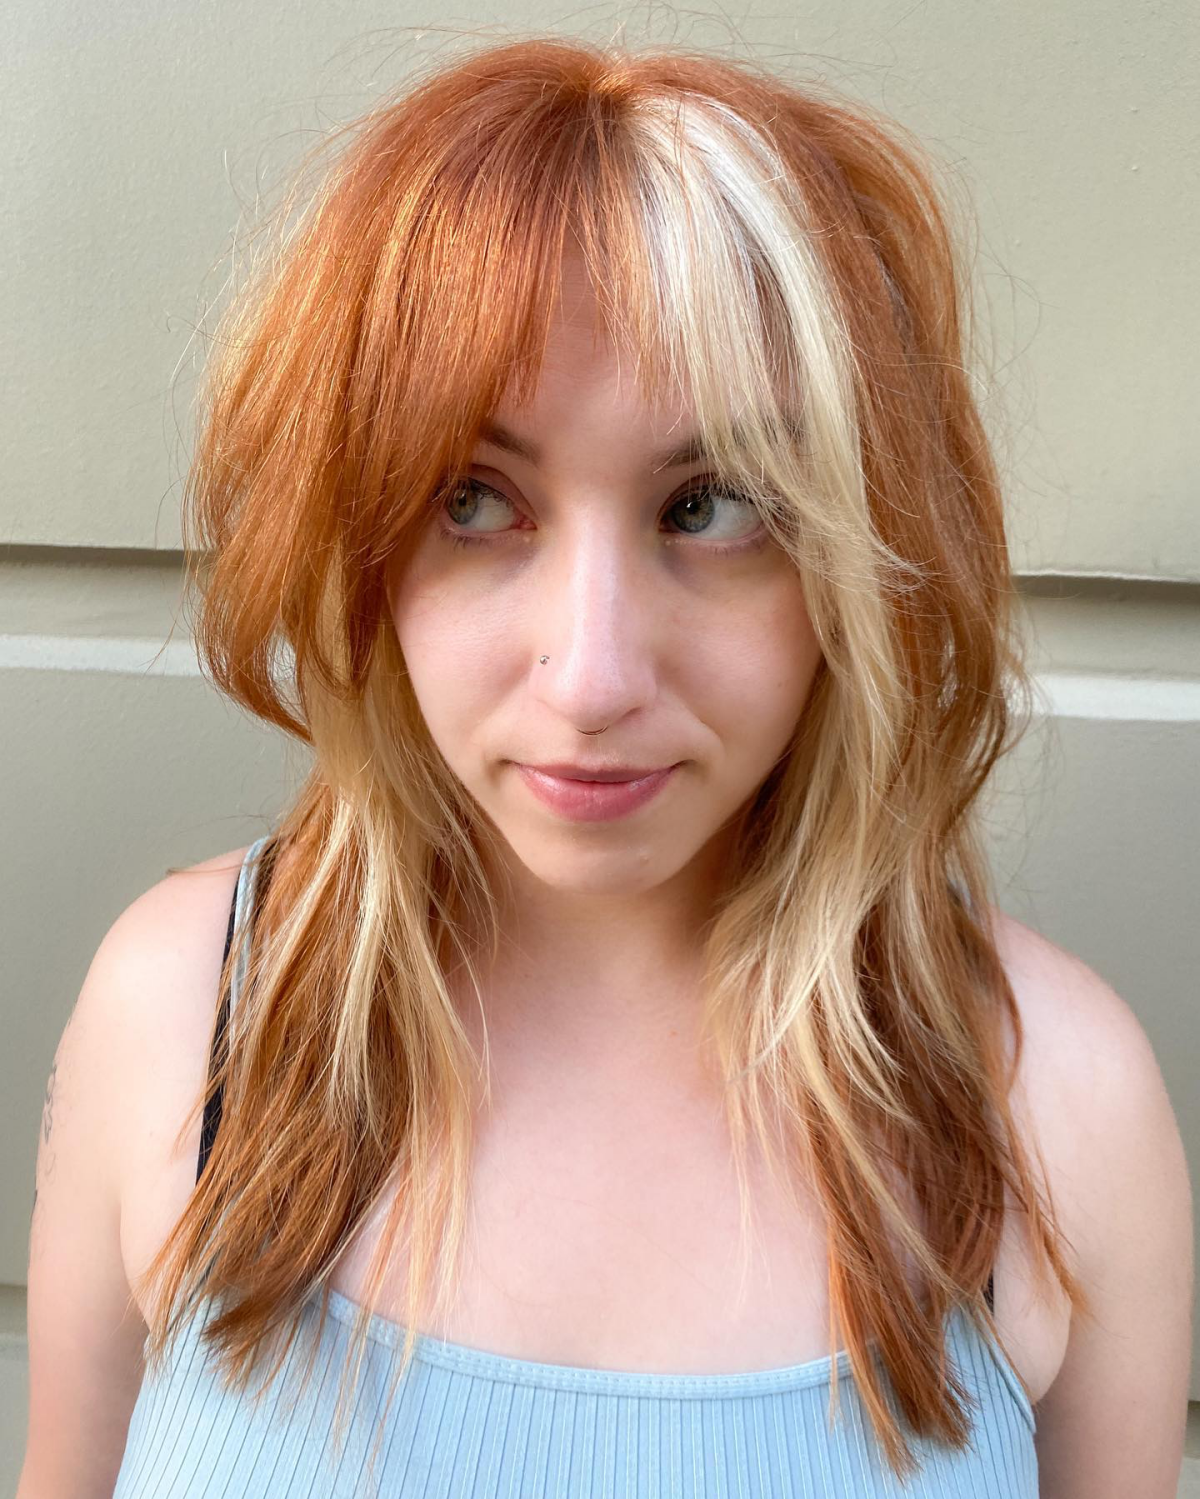
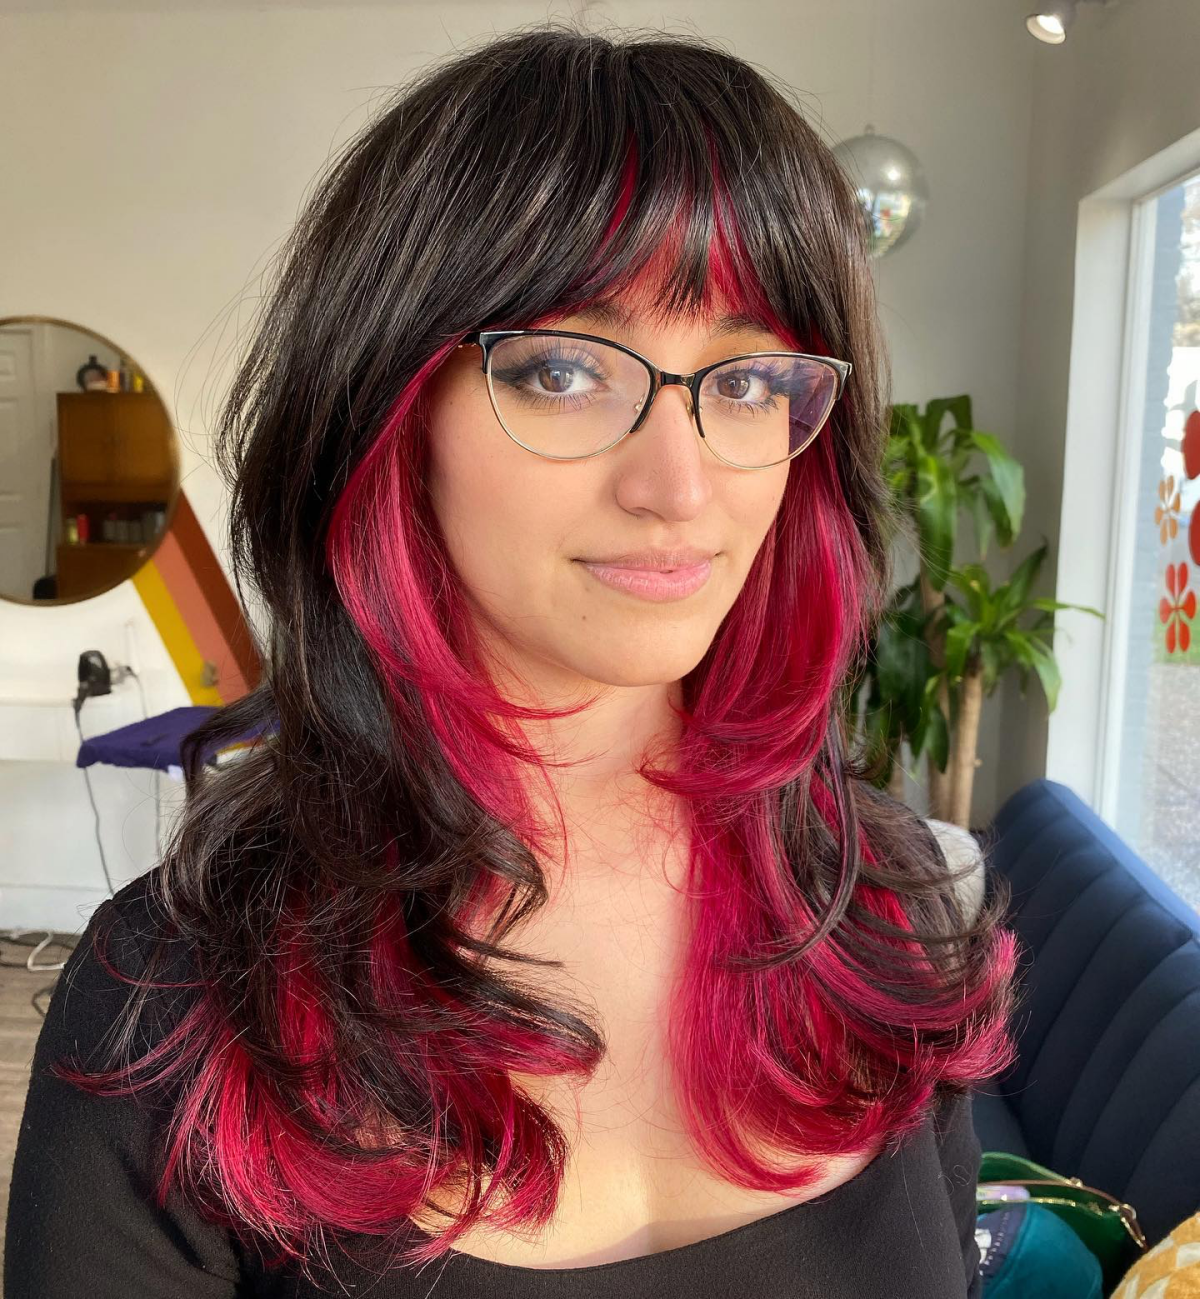
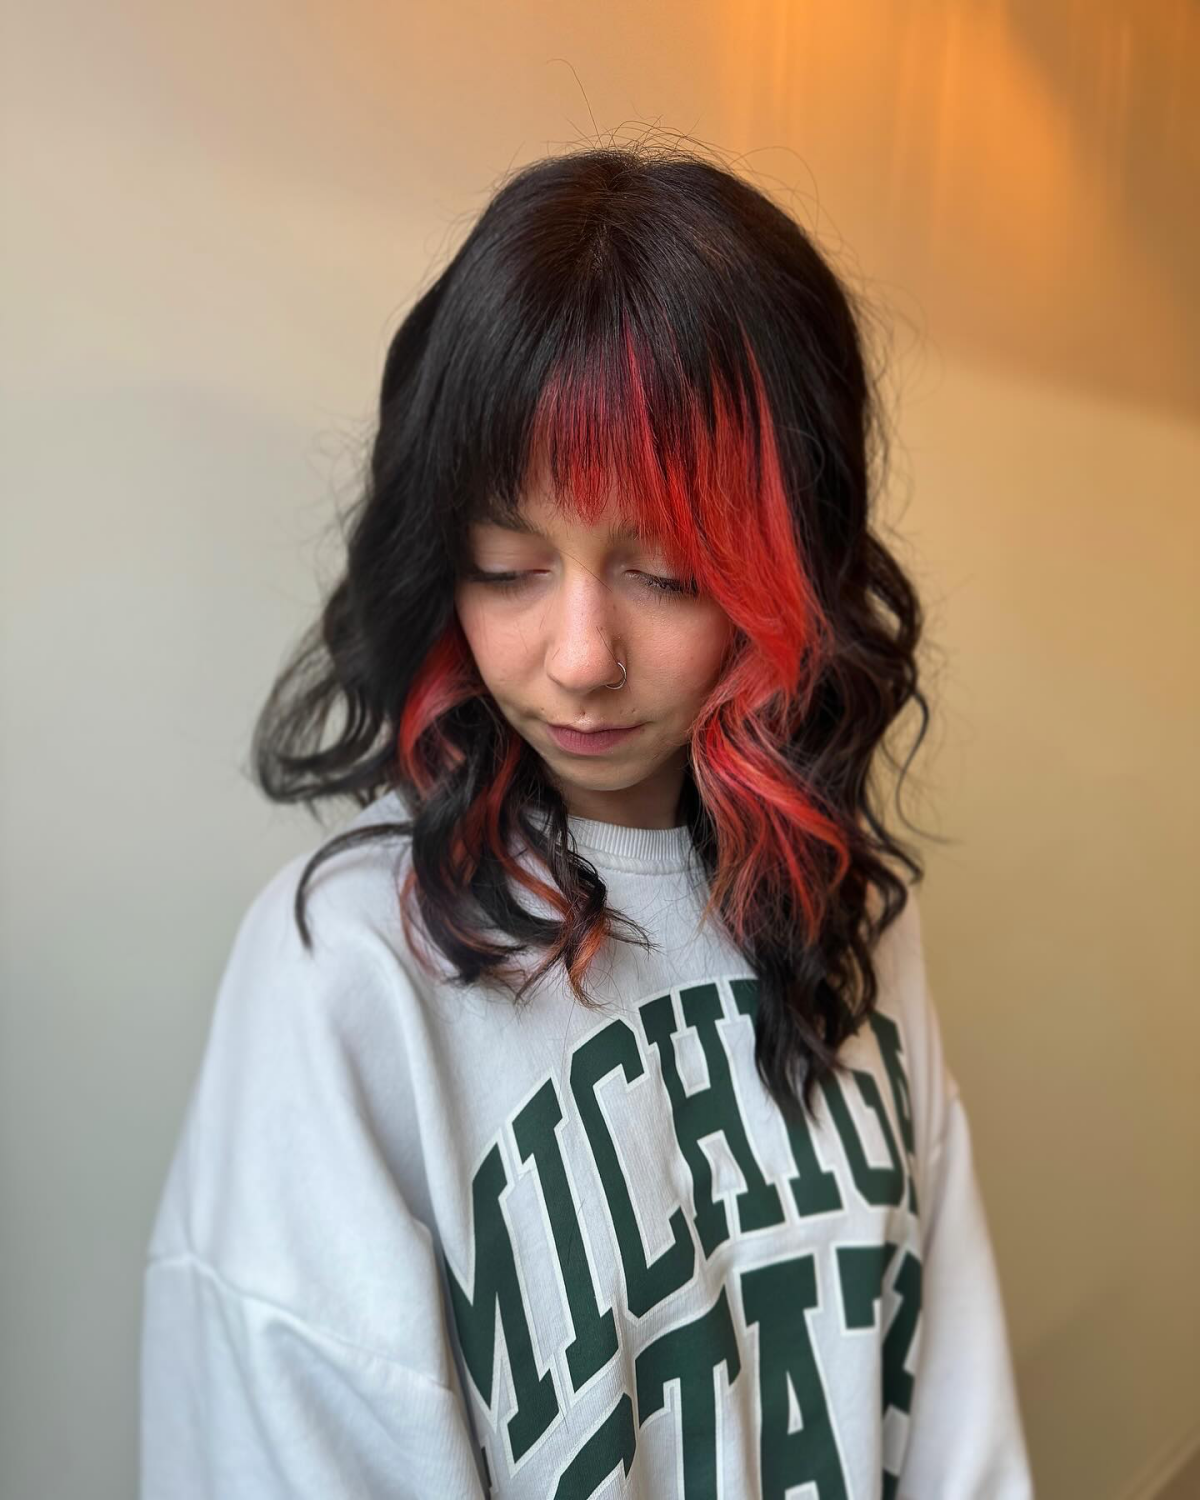
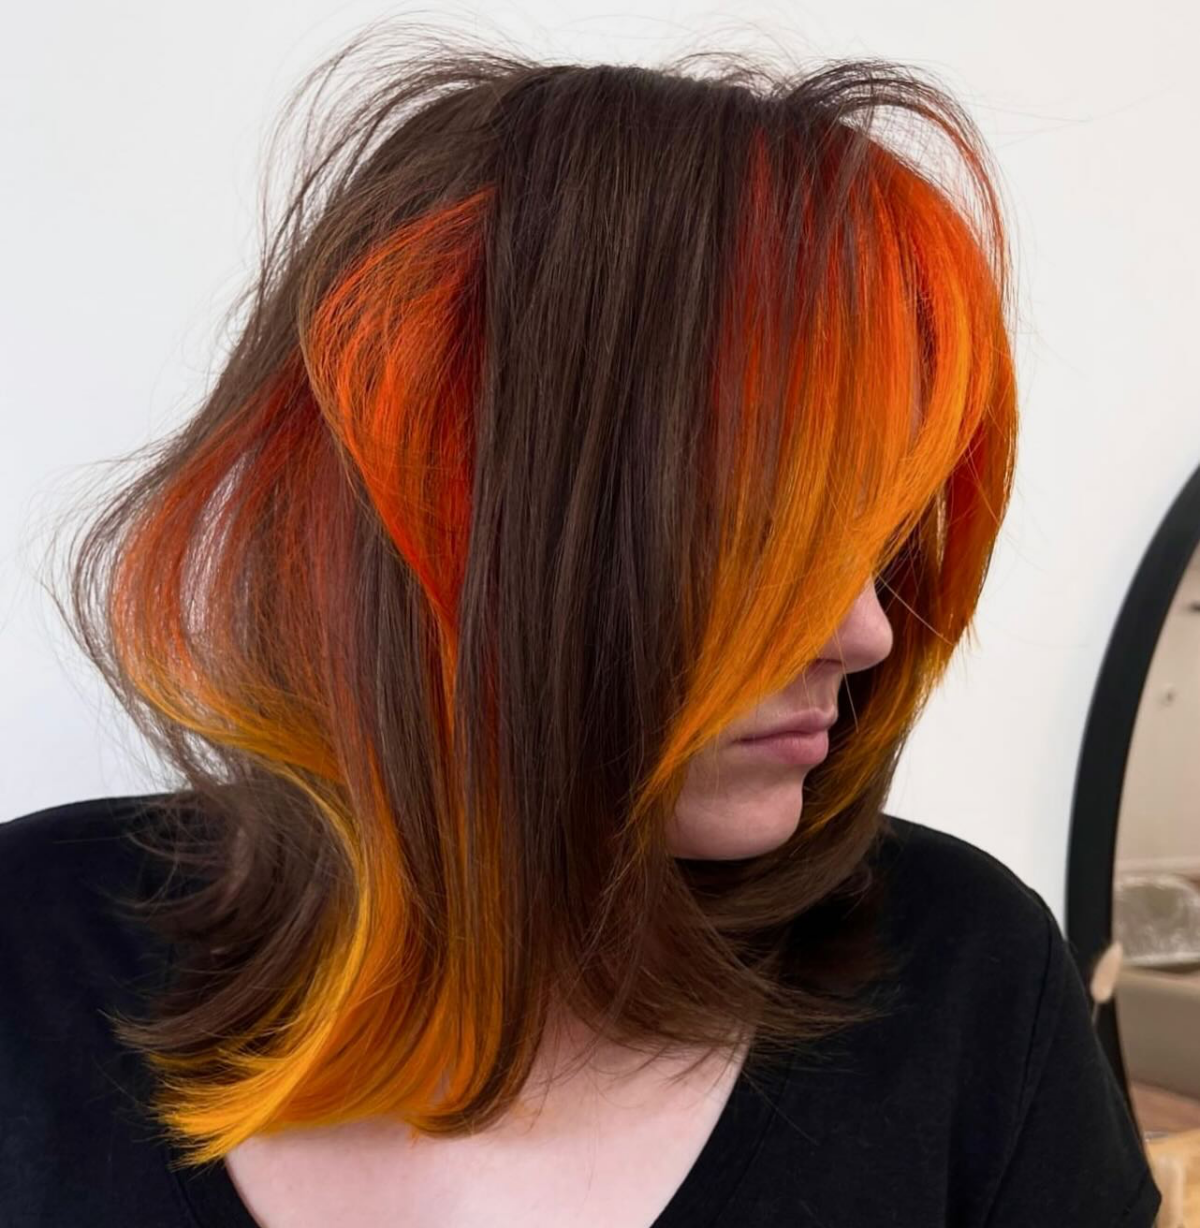
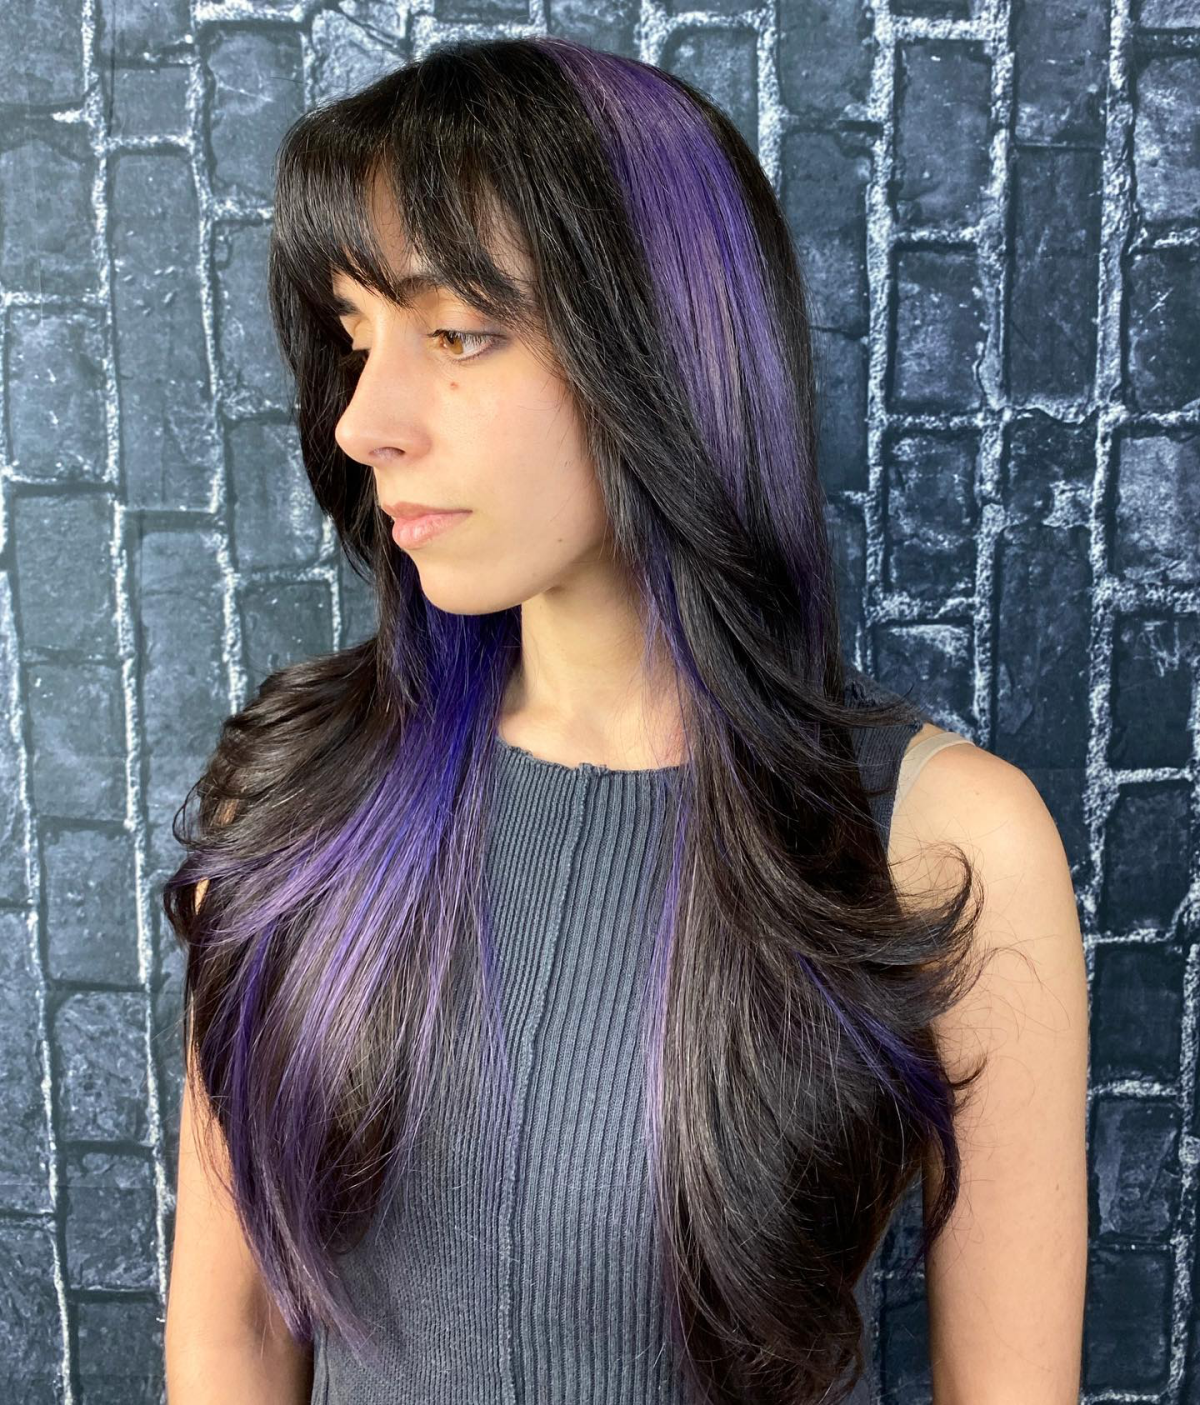
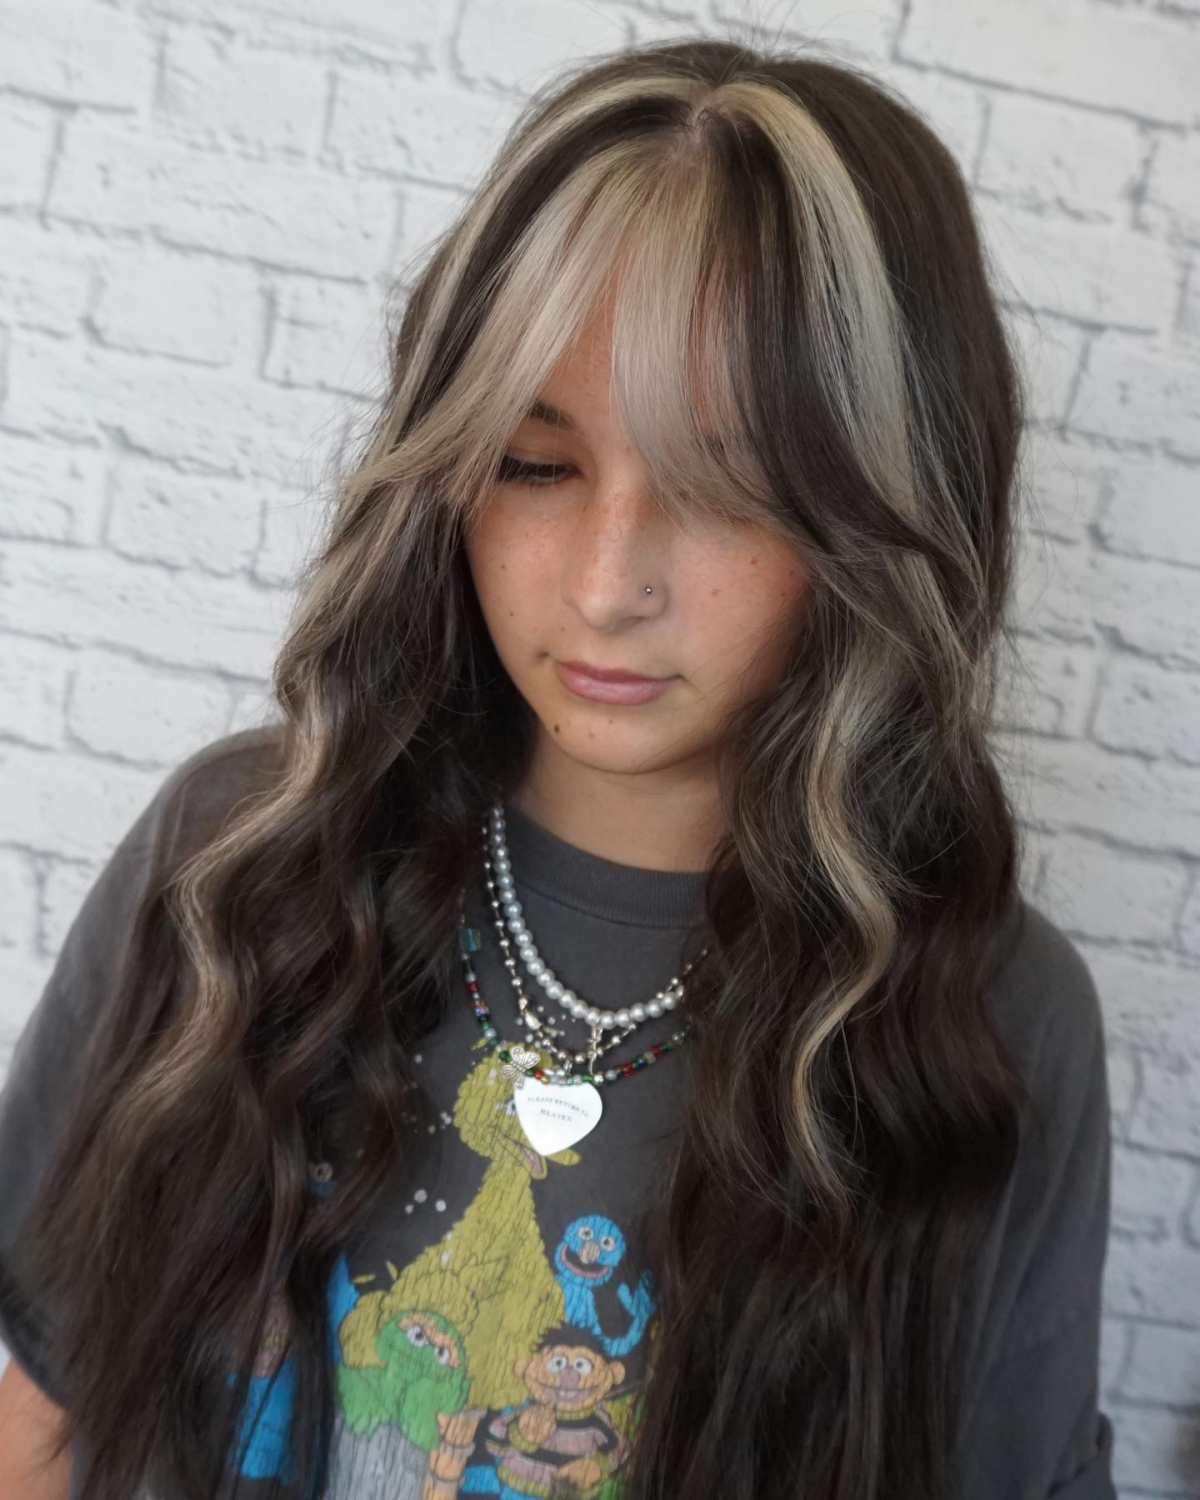
- The Money Piece / Face Frame: This is a bold strip of color right at the front hairline. It can be a subtle sliver or a dramatic chunk.
DIY Difficulty: 2 out of 5. It’s probably the most beginner-friendly option.
Best For: Anyone wanting a high-impact look with lower commitment and maintenance.
Average Salon Cost: Expect this to run anywhere from $75 to $200+ as an add-on to a base color service, depending on the thickness. - The Hidden Panel / Peekaboo: This is where you color a section underneath the top layer of your hair. It’s a surprise flash of color that’s easy to hide.
DIY Difficulty: 3 out of 5. Keeping the top section perfectly clean takes a steady hand.
Best For: People who want to experiment with bold color but need a professional, conservative look for work.
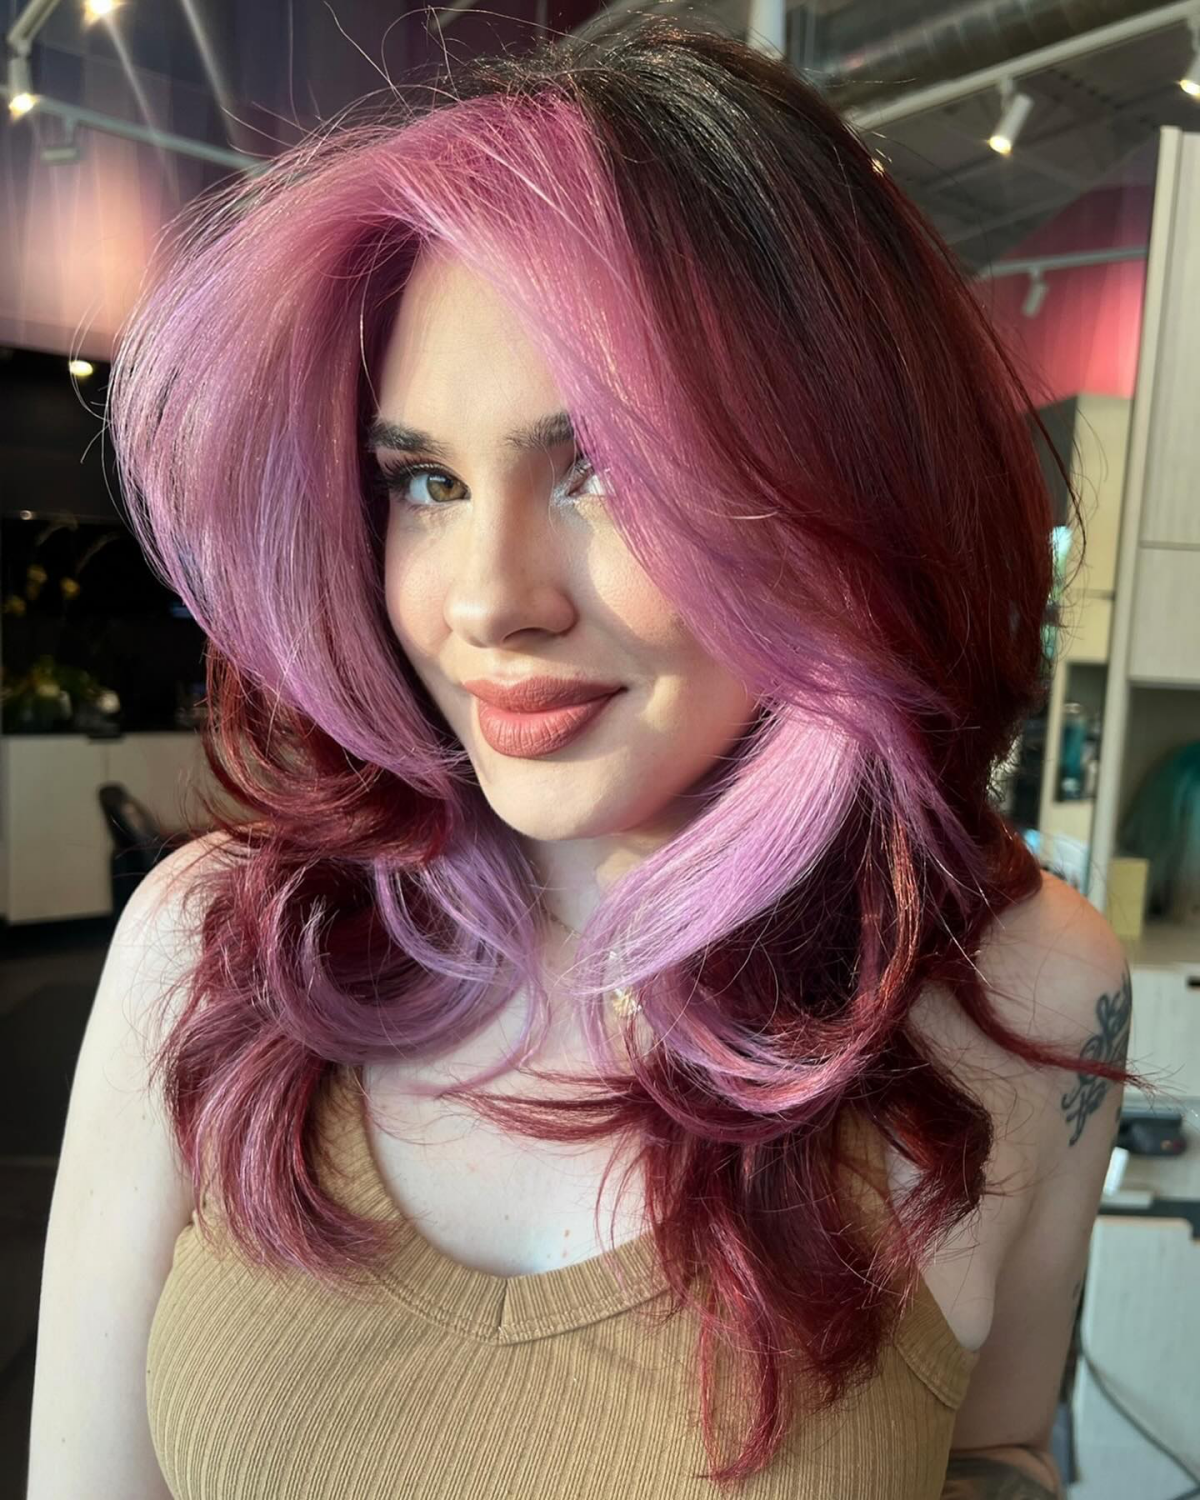
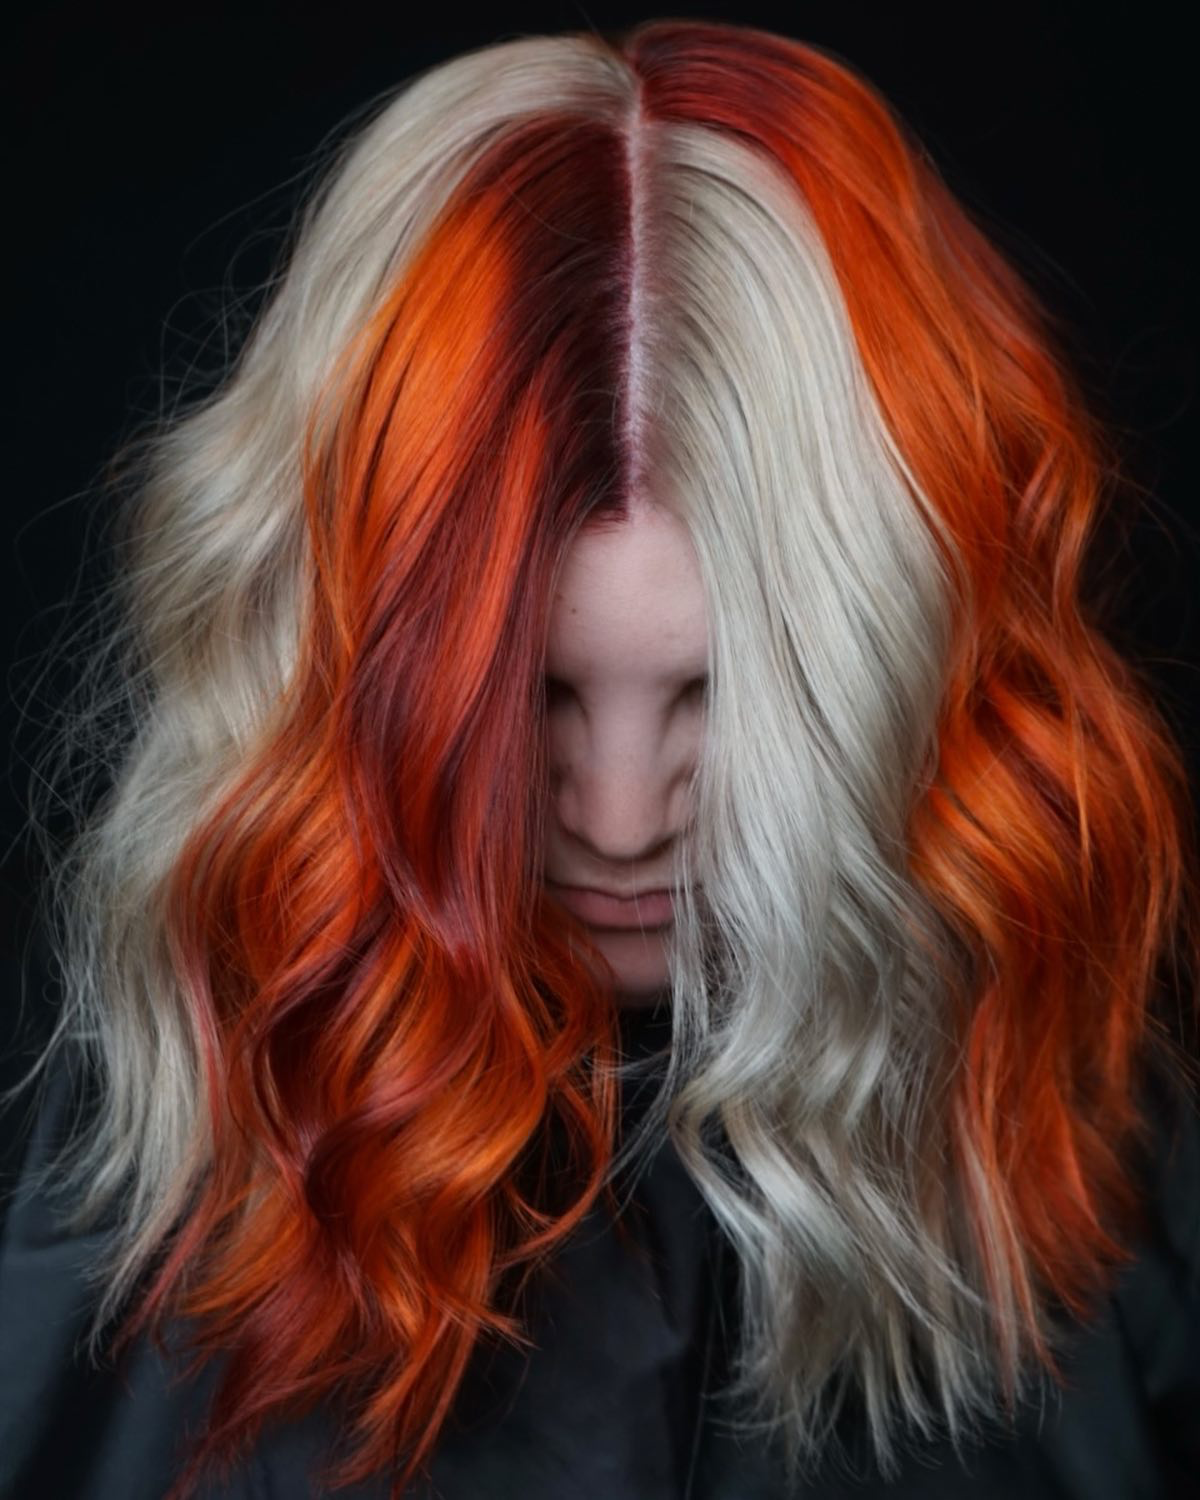
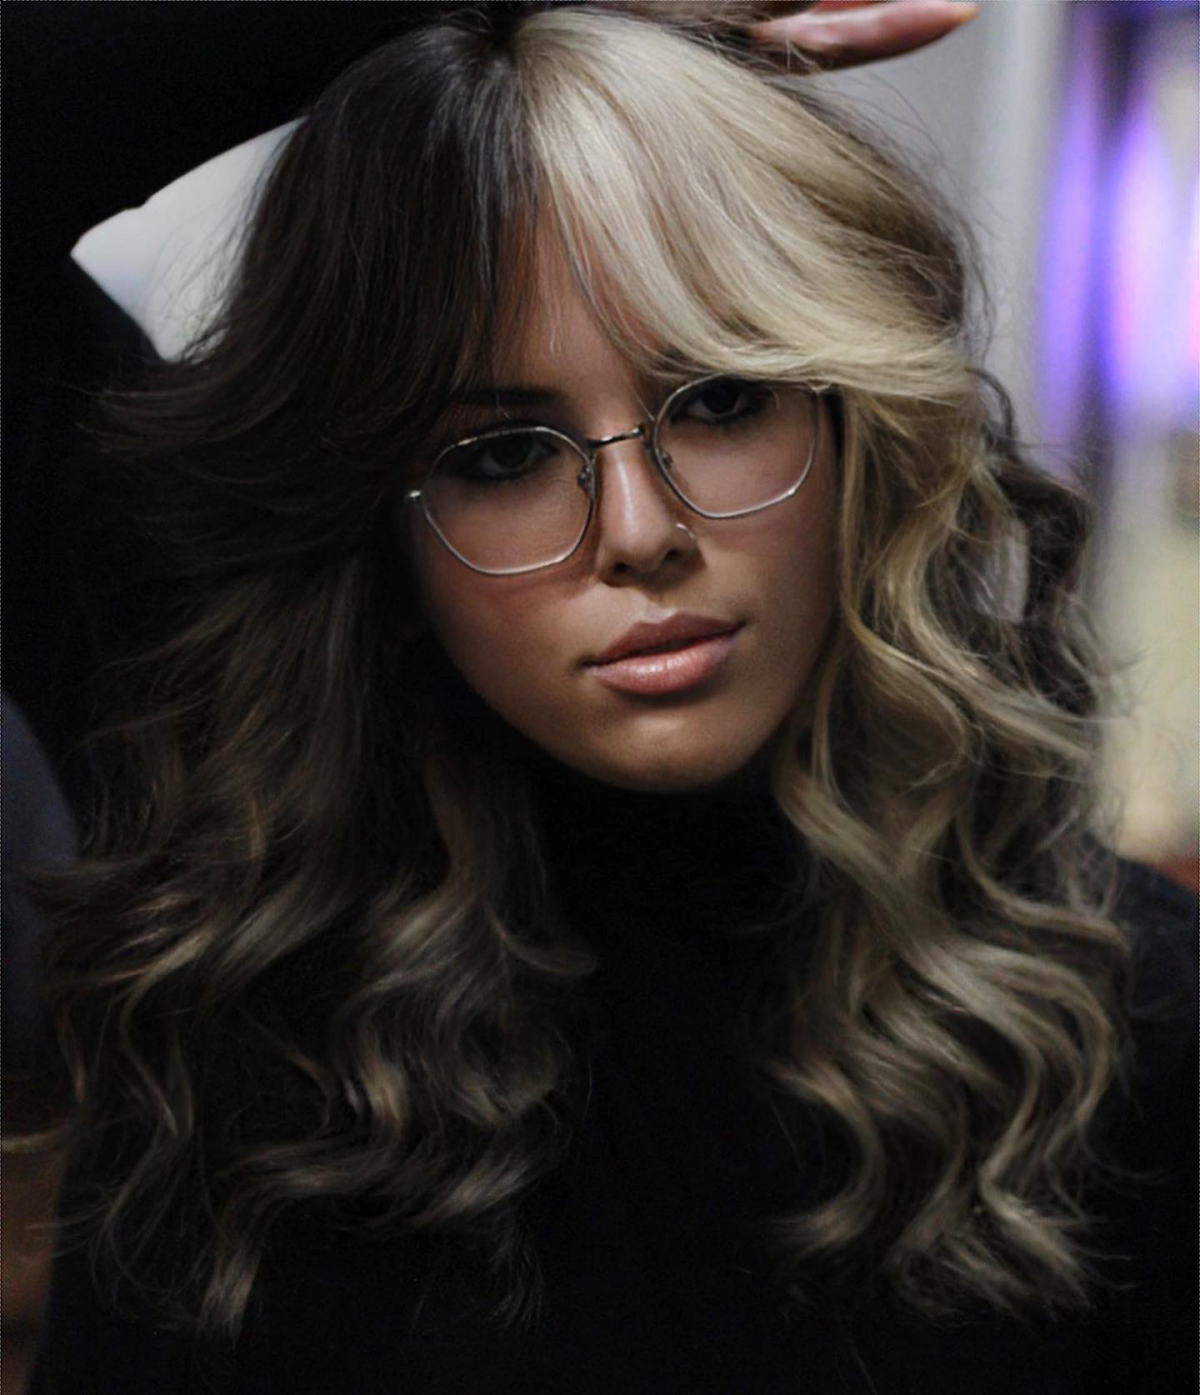
Average Salon Cost: Typically falls in the $150 to $300 range, as it involves a significant amount of detailed work. - The Split Dye: The classic half-and-half look, divided by a sharp center or side part. This requires extreme precision.
DIY Difficulty: 5 out of 5. This is expert-level stuff. Getting the center line perfectly clean and rinsing without bleeding is incredibly difficult. I strongly recommend leaving this to a pro.
Best For: Making the ultimate bold statement. There’s nothing subtle about it!
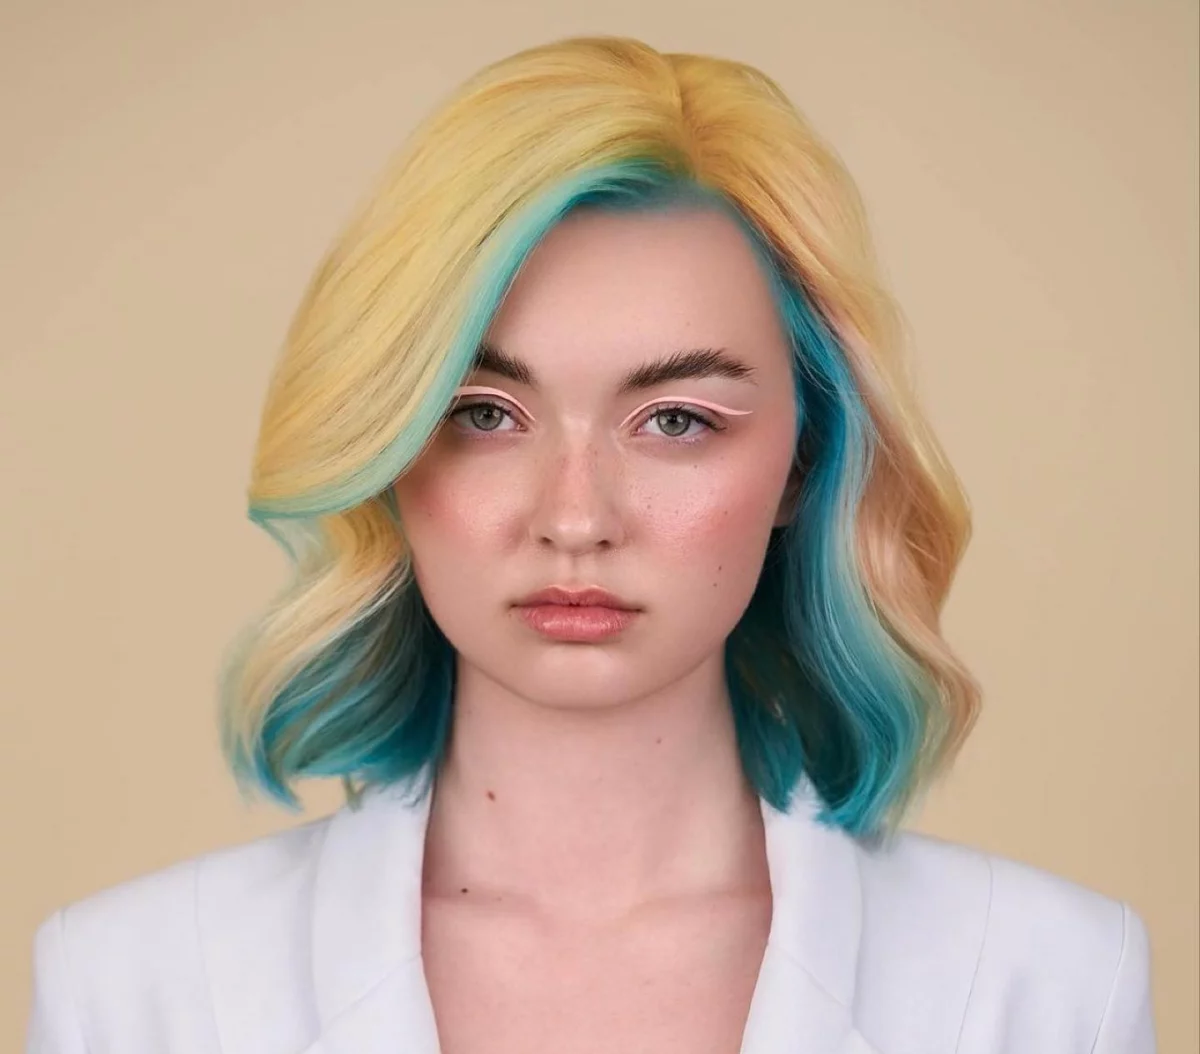
Average Salon Cost: This is a major service. Expect it to take 4+ hours and cost anywhere from $300 to $600+, depending on your hair’s length and density. - Geometric Blocking: Think triangles, diamonds, and other custom shapes. This is advanced, creative work where the stylist has to visualize how the shapes will fall as the hair moves.
DIY Difficulty: 5+ out of 5. Don’t even think about it. This is true professional artistry.
Best For: A one-of-a-kind, artistic look that is completely customized to you.
Average Salon Cost: This is a specialty service. Pricing usually starts around $400 and can go way up from there, often billed at an hourly rate.
The Nitty-Gritty: Application to Rinsing
Okay, you have your plan and your tools. Now it’s time for the methodical part. Focus is key here.
Mixing and Saturation
Always follow the manufacturer’s mixing ratio. You’re looking for a smooth, creamy consistency, kind of like cake batter. Lumpy lightener means patchy results. When you apply it, you have to completely coat every single strand in the section, front and back. Thinly painted lightener leads to spotty, “cheetah print” lift.
The Waiting Game
There’s no magic number for processing time. The box might say 50 minutes, but I’m checking my foils every 10-15 minutes. Fine hair lifts way faster than coarse hair. Room temperature matters. You have to watch it. You check by gently opening a foil and wiping a bit of the product away. Once it hits that perfect pale yellow, it’s time to rinse that section, even if the others aren’t ready.
The Rinse-Out: Where It All Goes Right (or Wrong)
This is the step that separates the pros from the amateurs. You can’t just stick your whole head under the faucet. Remember that bleeding nightmare? Here’s how to avoid it.
In the salon, we rinse each colored section separately. For a split dye, the client literally leans their head to one side while we rinse, then leans to the other. For you at home? It’s going to be awkward, but it’s the secret.
A lesser-known trick for DIY rinsing: Lean your head sideways in the shower so only the section you want to rinse is under the water stream. Use your free hand as a shield to protect the rest of your hair from getting wet. You’ll probably get water everywhere, but it’s the only way to prevent a black dye from turning your pretty blonde panel into a murky grey mess. Always use cold water—it helps seal the hair cuticle and lock in the color.
After rinsing the lightener, we often apply a toner to cancel out any leftover yellow tones before applying the final fashion colors (the pinks, blues, etc.). These are direct dyes, so they don’t need developer. We paint them on carefully and let them sit for 20-30 minutes before one last, cold-water rinse.
Keeping It Fresh: Maintenance & Troubleshooting
Getting the look is only half the job. I always have a very frank conversation with my clients about aftercare. High-maintenance hair requires high-maintenance habits.
- Wash Less, In Cold Water. Hot water is the enemy of vivid colors. Wash in the coldest water you can stand.
- Sulfate-Free Shampoo is a Must. Sulfates are harsh detergents that will strip your color out fast.
- Color-Depositing Conditioners are Your Best Friend. These are a total game-changer. For a client with a pink panel, I’ll suggest a product like Keracolor Clenditioner or oVertone to use once a week. It deposits a little pigment back into the hair and keeps the color looking fresh.
- Use a Heat Protectant. High heat from styling tools will fade your color in a heartbeat.
Safety First: Know Your Limits
As a professional, safety is everything. These aren’t suggestions; they are the rules that protect you and your hair.
The Two Tests You MUST Do
- Patch Test: 48 hours before any on-scalp color, you need to test for allergies. Put a dab of the mixed color behind your ear. A bad reaction is no joke. Don’t risk it.
- Strand Test: This is the most important step for any big color change. It tells you exactly how your hair will lift and, most importantly, if it can even survive the process. If the strand test goes badly (gummy, breaking hair), the service is a no-go. Period.
How to Actually Do a Strand Test at Home:
- Snip a small, hidden piece of hair from the back of your head.
- Tape one end of the snippet to a piece of cardboard.
- Mix a tiny amount of your lightener and developer.
- Apply it to the hair strand, fully saturating it.
- Set a timer and check it every 10 minutes until it reaches the desired lightness or for up to 50 minutes.
- Rinse it off, let it dry, and check the condition. Is it still strong? Or is it stretchy and weak? This little strand tells you the future.
When to Just Go to the Salon
I get the DIY spirit, but honestly, you should see a professional if:
- Your hair is already damaged or heavily colored.
- You’re trying to remove old box dye. (This can react horribly with professional lightener—I’ve seen it smoke.)
- You want a complex, precise design.
- You’re going from very dark to very light.
Look, a complex color blocking service is a luxury. It can take anywhere from 4 to 8 hours and cost between $300 and $800+. You’re paying for hours of focused time, hundreds of dollars in high-quality products and bond builders, and years of expertise. It’s an investment in wearable art that’s done safely and beautifully.
Galerie d’inspiration
The Peekaboo Panel: A block of color hidden in the underlayer of your hair. It’s subtle when your hair is down, offering a surprising flash of color with movement. Ideal for a professional setting or if you’re trying a bold shade for the first time.
The Money Piece: Bold, face-framing sections of color. This placement draws immediate attention to your face and eyes. It’s a high-impact look that requires more frequent touch-ups as your roots grow out.
Ultimately, the choice depends on visibility. Do you want a secret style statement or one that’s front and center?

Did you know? Most vibrant semi-permanent dyes, like those used for color blocking, are direct dyes. They don’t chemically alter the hair’s cortex with a developer; instead, their positively charged color molecules adhere to the negatively charged, pre-lightened hair shaft, essentially staining it from the outside.
This is why hair porosity and condition are so crucial. Damaged, more porous hair will grab the color more intensely but may also fade unevenly. A smooth, healthy hair cuticle provides the best canvas for a uniform, radiant result.
Once you leave the salon, the care routine is everything. To prevent a crisp black and blonde from turning into a muddy grey, follow these rules for the first few washes:
- Wash each color block separately. It’s a bit of work, but clipping the light section up while you wash the dark section (and vice versa) is the best way to prevent bleeding.
- Always use cold water. Hot water opens the hair cuticle and allows color molecules to escape much faster.
- Use a sulfate-free, color-protecting shampoo. Products like Redken’s Color Extend Magnetics are formulated to be gentle and seal in color.
Can I refresh the color myself between salon visits?
Yes, but with caution. Reviving a faded pink or blue is one thing; re-bleaching your roots for a block is another. For a simple refresh, a color-depositing conditioner like Keracolor Clenditioner or a semi-permanent dye from a brand like Manic Panic can be carefully applied to the pre-lightened section. Always wear gloves and use clips to isolate the block. Never attempt to lighten the regrowth yourself—that precise application is exactly what you pay your stylist for.
A critical detail: Preventing “hot roots.” When applying lightener, a pro will never use the same formula on the entire hair shaft. The heat from your scalp acts as a natural accelerator, causing the lightener to process much faster near the roots. An experienced colorist will use a lower-volume developer for the first half-inch of hair to ensure the lift is perfectly even from root to tip, avoiding that dreaded band of unintentionally bright color at the scalp.

- It creates a built-in accessory that complements any haircut.
- It allows you to wear an edgy, unconventional color without a full-head commitment.
- It can strategically add the illusion of volume or shape to your style.
The secret to achieving this? It’s not just the color, but the cut. A great color block is designed to work with the movement and lines of your haircut, like a vibrant purple fringe on a sharp bob or a sliver of green accentuating the layers of a shag.
The biggest investment in a high-contrast color block isn’t the dye; it’s the protection. When lifting dark hair to a pale blonde to create the “canvas,” the risk of damage is high. That’s why in-salon bond-building treatments are non-negotiable. Systems like Olaplex or K18 work on a molecular level to repair the disulfide bonds that are broken during the chemical process, preserving the hair’s strength and elasticity. Think of it as insurance for your hair’s integrity.
“Color placement is the new haircut.” – Celebrity Colorist Jenna Perry


