Forget the Box: How to Color Eggs with Dyes from Your Kitchen
I’ve been playing with natural dyes for what feels like a lifetime. It all started in my own kitchen, just messing around with leftover vegetable scraps, and it blossomed into a full-blown passion. There’s something genuinely magical about watching a pot of onion skins turn a plain white egg into a piece of terracotta art. It’s a slow, quiet process that really connects you to your food and the old ways of doing things, way before those synthetic dye kits took over the seasonal aisle.
In this article
- So, How Does This Even Work?
- Setting Yourself Up for Success
- Your Kitchen-Scrap Color Palette
- What’s This Going to Cost Me?
- The Two Main Ways to Dye: Hot vs. Cold
- The Secret to a Perfect Green: Double-Dyeing
- Taking It to the Next Level: Creative Finishes
- Troubleshooting & Common Questions
- A Quick Word on Safety & Eating Your Eggs
- Inspirational Gallery with Photos
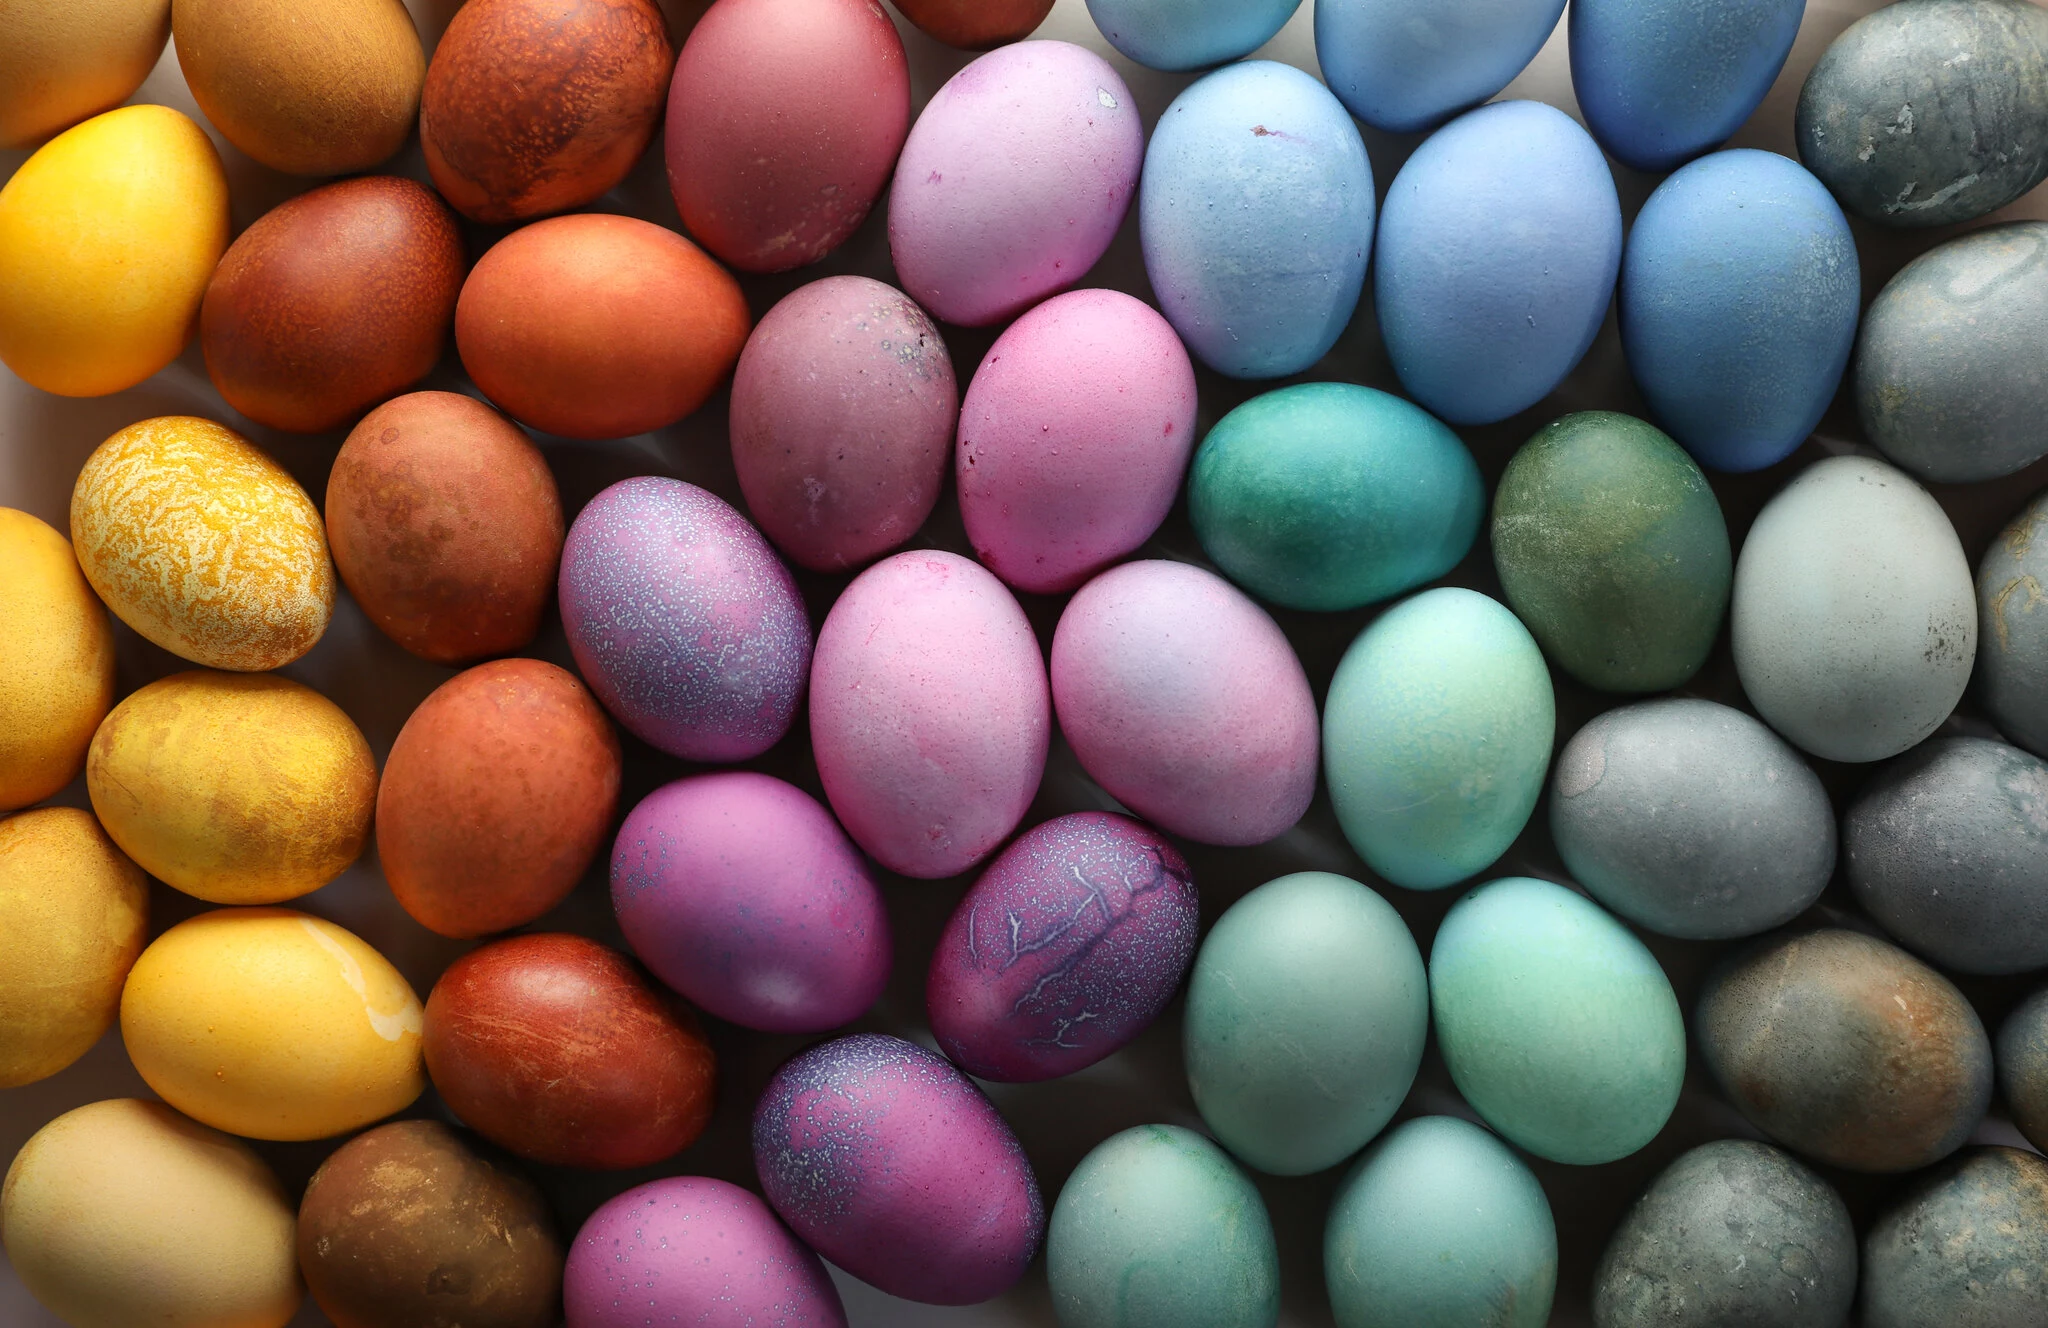
A lot of people are getting into natural dyes because they want a safer, more eco-friendly way to celebrate. And that’s a fantastic reason to start! But honestly, the real joy is in the process itself. Unlike the flat, predictable colors you get from a box, natural dyes give you this incredible spectrum of earthy, complex shades. No two eggs ever look the same. Each one is a little surprise.
This guide is basically the result of all my trials and errors over the years. I’m going to walk you through the techniques that actually work, explain the simple science behind it all, and help you dodge the common problems I’ve already figured out. So, let’s ditch the idea of perfection and just focus on making something genuinely beautiful.
So, How Does This Even Work?
Understanding a little of the ‘why’ will make you so much better at the ‘how.’ At its core, dyeing is just moving color from a plant to an eggshell. An eggshell looks solid, right? But it’s actually covered in thousands of tiny pores, which is perfect for us because it allows the dye to sink in and stain the surface.
The two main things you need to know about are pigments and mordants. Pigments are just the natural compounds in plants that have color—like the deep purple in red cabbage or the vibrant yellow in turmeric. But pigment alone is often a bit weak; it needs help to really stick to the eggshell for good. That’s where a mordant comes in. A mordant is just a fancy word for something that helps the dye bind. For our purposes, the easiest and most food-safe mordant is plain old white vinegar. The vinegar’s acid ever-so-gently roughens up the eggshell, opening those pores and helping the pigment grab on tight.
Oh, and a quick answer to a question I get all the time: No, the small amount of vinegar we use won’t make your eggs taste weird at all. Promise!
Setting Yourself Up for Success
A great result starts with getting your space ready. Don’t skip this part! It’s the foundation for getting those vibrant, even colors you’re hoping for.
Your Canvas: The Eggs
You can use either white or brown eggs, and they give you different results. White eggs are a blank canvas, so the colors will be brighter and truer to the dye. Brown eggs have a built-in base coat that will give you deeper, richer tones. For example, a turmeric dye on a brown egg gives you a stunning golden ochre. I’d suggest trying a few of each to see what you like!
Quick Tip: If you plan on eating the eggs, use ones that are a week or two old. They are way easier to peel because the membrane inside the shell has started to pull away.
Prep Work is Key
Eggs come with a natural protective coating called a “bloom.” It’s great for keeping bacteria out, but it also repels dye. You have to wash it off. Just use a little soap and warm water, or make a simple paste with baking soda and water. Rub the eggs gently with your fingers—don’t scrub with anything harsh, or you’ll get scratches that show up as dark lines in your final dye.
Protect Your Stuff!
Heads up! Natural dyes are powerful. Turmeric, beets, and especially walnut hulls will stain countertops, cutting boards, and your hands in a heartbeat. I learned this the hard way after a splash of beet dye left a permanent pink polka dot on my favorite wooden cutting board. Cover your surfaces with newspaper or an old vinyl tablecloth. Wear an apron and, trust me on this, wear gloves. Especially with turmeric.
Picking Your Pots
The pot you use actually matters. You need to use a non-reactive pot, like stainless steel or enamel. Pots made from aluminum, copper, or un-coated cast iron can react with the dye, often creating a sludgy, unpredictable color. To keep your results consistent, just stick with stainless steel.
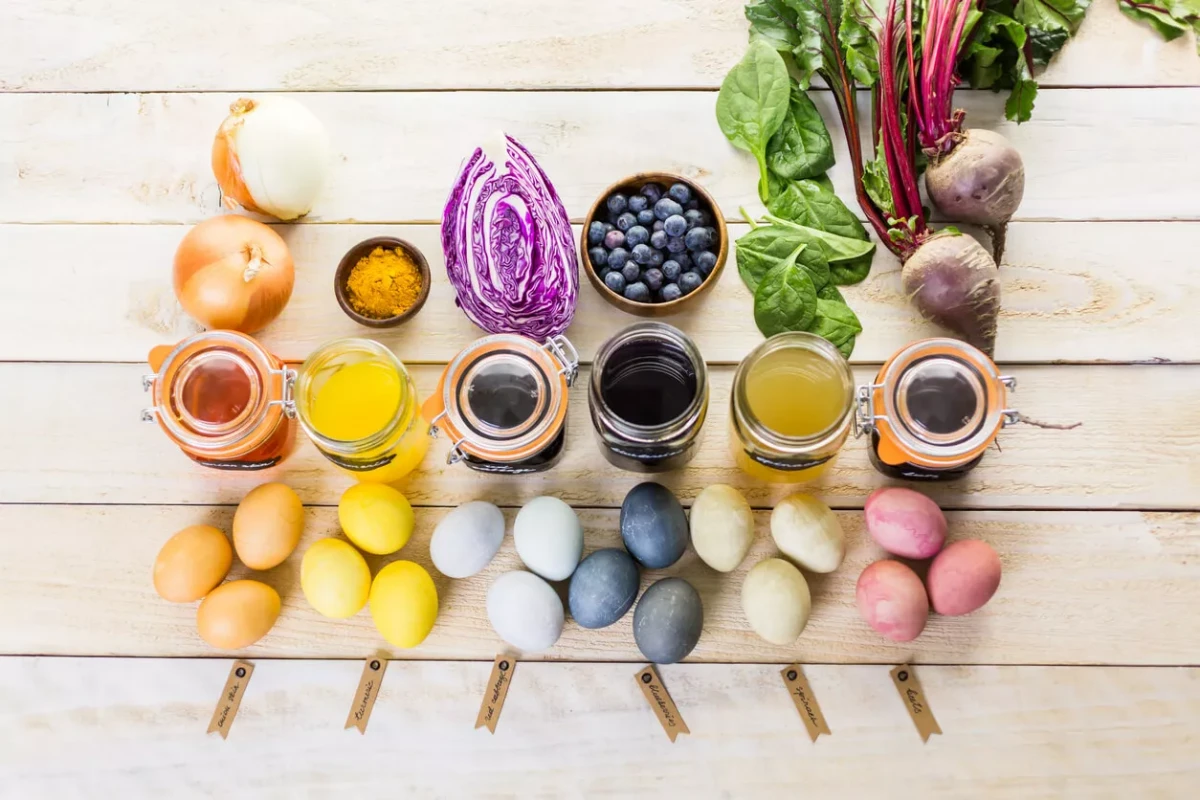
Your Kitchen-Scrap Color Palette
Alright, this is the fun part. The measurements I’m giving you are solid starting points, but feel free to experiment. I highly recommend keeping a little notebook to jot down your ingredients, how long you soaked the eggs, and what color you got. It’ll become your personal dye recipe book.
For every dye, a good rule of thumb is to use about four cups of water and two tablespoons of white vinegar. This is usually enough to dye 4-6 eggs at a time.
-
Deep Orange & Rusty Red (Yellow Onion Skins)
This is the one I tell all beginners to start with. It’s almost impossible to mess up and the results are gorgeous.
What you need: The dry, papery skins from 5 to 6 large yellow onions. Just the skins!
The lowdown: Collect skins over a few weeks and keep them in a paper bag. The more skins, the deeper the color.
Reliability: Foolproof! The color is always rich and often has a beautiful mottled pattern. -
Vibrant Sunny Yellow (Ground Turmeric)
Turmeric is a powerhouse dye. A little goes a long way.
What you need: 3 tablespoons of ground turmeric powder.
The lowdown: Turmeric powder can leave a bit of sludge. You can strain the dye before adding your eggs for an even color, or leave it for a more speckled look.
Reliability: Very reliable. But be warned: this stuff stains EVERYTHING instantly. Wear those gloves! -
Soft Pink to Magenta (Beets)
Beets give a lovely range of pinks, though the color can sometimes be a bit less permanent.
What you need: 2 large chopped beets or 4 cups of 100% beet juice.
The lowdown: Using fresh, chopped beets with the hot-dye method seems to give a more lasting color than juice. A short soak gives you pale pink; an overnight soak can get you a deep magenta.
Reliability: Good, but can fade a little after drying. -
Dusty Rose & Gray-Pink (Avocado Pits & Skins)
This is the biggest surprise! Who knew avocados made pink?
What you need: The pits and skins from 2 to 3 ripe avocados.
The lowdown: Wash the pits and skins well to get all the green flesh off. Chop the pits (carefully!) and simmer for at least an hour to extract the color. The dye bath will look brown, but it magically colors the eggs pink.
Reliability: Surprisingly reliable. A fun experiment!
Quick Tip: You can collect the pits and skins over time. Just wash and dry them completely, then store them in a bag in your freezer to prevent mold. -
The Magical Blue (Red Cabbage)
This is the coolest dye, hands down. It contains pigments that act like a natural pH indicator, turning blue on the alkaline eggshell.
What you need: About 3-4 cups of chopped red cabbage.
The lowdown: The secret to getting a true blue is using the cold-dye method (more on that below). If you use heat, you’ll get lavender or purple instead. The longer it soaks, the deeper the blue.
Reliability: Very reliable for blue, as long as you use the cold method. -
Pale Green (Spinach & Parsley)
To be frank, getting a strong green from a single plant is tough. Expect a very delicate, pale chartreuse.
What you need: At least 4 packed cups of fresh spinach or a big bunch of parsley.
The lowdown: You need a LOT of greens for a noticeable color. The better way to get green is to double-dye (I’ll explain how below!).
Reliability: Tricky. Results are very pale. -
Rich, Earthy Brown (Coffee & Black Tea)
Simple, classic, and produces a lovely warm brown.
What you need: 1 quart of strongly brewed coffee or 4-5 black tea bags.
The lowdown: Use the cold-dye method. A longer soak gives a deeper color. Tea tends to produce a slightly redder brown.
Reliability: Very reliable and easy.

What’s This Going to Cost Me?
One of the best parts of natural dyeing is that it can be incredibly cheap, especially if you use scraps. But if you need to buy ingredients, here’s a rough idea of what to expect at a typical grocery store:
- Red Cabbage: One head is more than enough and usually costs around $3-$4.
- Yellow Onions: A 3-lb bag is about $3, and you’ll have plenty for cooking, too.
- Turmeric: A standard container of ground turmeric is around $4 and will last you for ages.
- Beets: A bunch of fresh beets will run you about $3.
For under $10, you can easily get enough materials to try three or four different, vibrant colors.
The Two Main Ways to Dye: Hot vs. Cold
There are two basic ways to get the color onto the egg. The method you pick affects the final shade and texture.
Method 1: The Hot Dye
This is where you cook the raw eggs right in the dye. It’s efficient and usually produces deeper, more saturated colors.
- Place your clean, raw eggs in a single layer in your non-reactive pot.
- Add your dye stuff (like onion skins or chopped beets).
- Cover with cool water by about an inch.
- Add 2 tablespoons of white vinegar.
- Slowly bring the water to a gentle simmer. Don’t let it boil rapidly, or the eggs might crack.
- Simmer for 20-30 minutes.
- For the most intense color, turn off the heat and let the eggs cool down right in the dye, even overnight in the fridge.
Best for: Onion skins, beets, turmeric.
Method 2: The Cold Dye
Here, you dye eggs that are already hard-boiled and cooled. This method gives you more control and is essential for getting blue from red cabbage.
- First, make the dye. Simmer your dye ingredients, water, and vinegar for at least 30-60 minutes.
- Let the dye cool completely to room temperature. This is the most important step!
- Strain the dye through a sieve to remove all the plant bits. This gives you a cleaner, more even color.
- Submerge your cooled, hard-boiled eggs in the strained dye.
- Pop the container in the fridge and let them soak. Check after a few hours, but for deep colors, leave them overnight.
Best for: Red cabbage (for blue), coffee, tea, and achieving lighter, pastel shades.
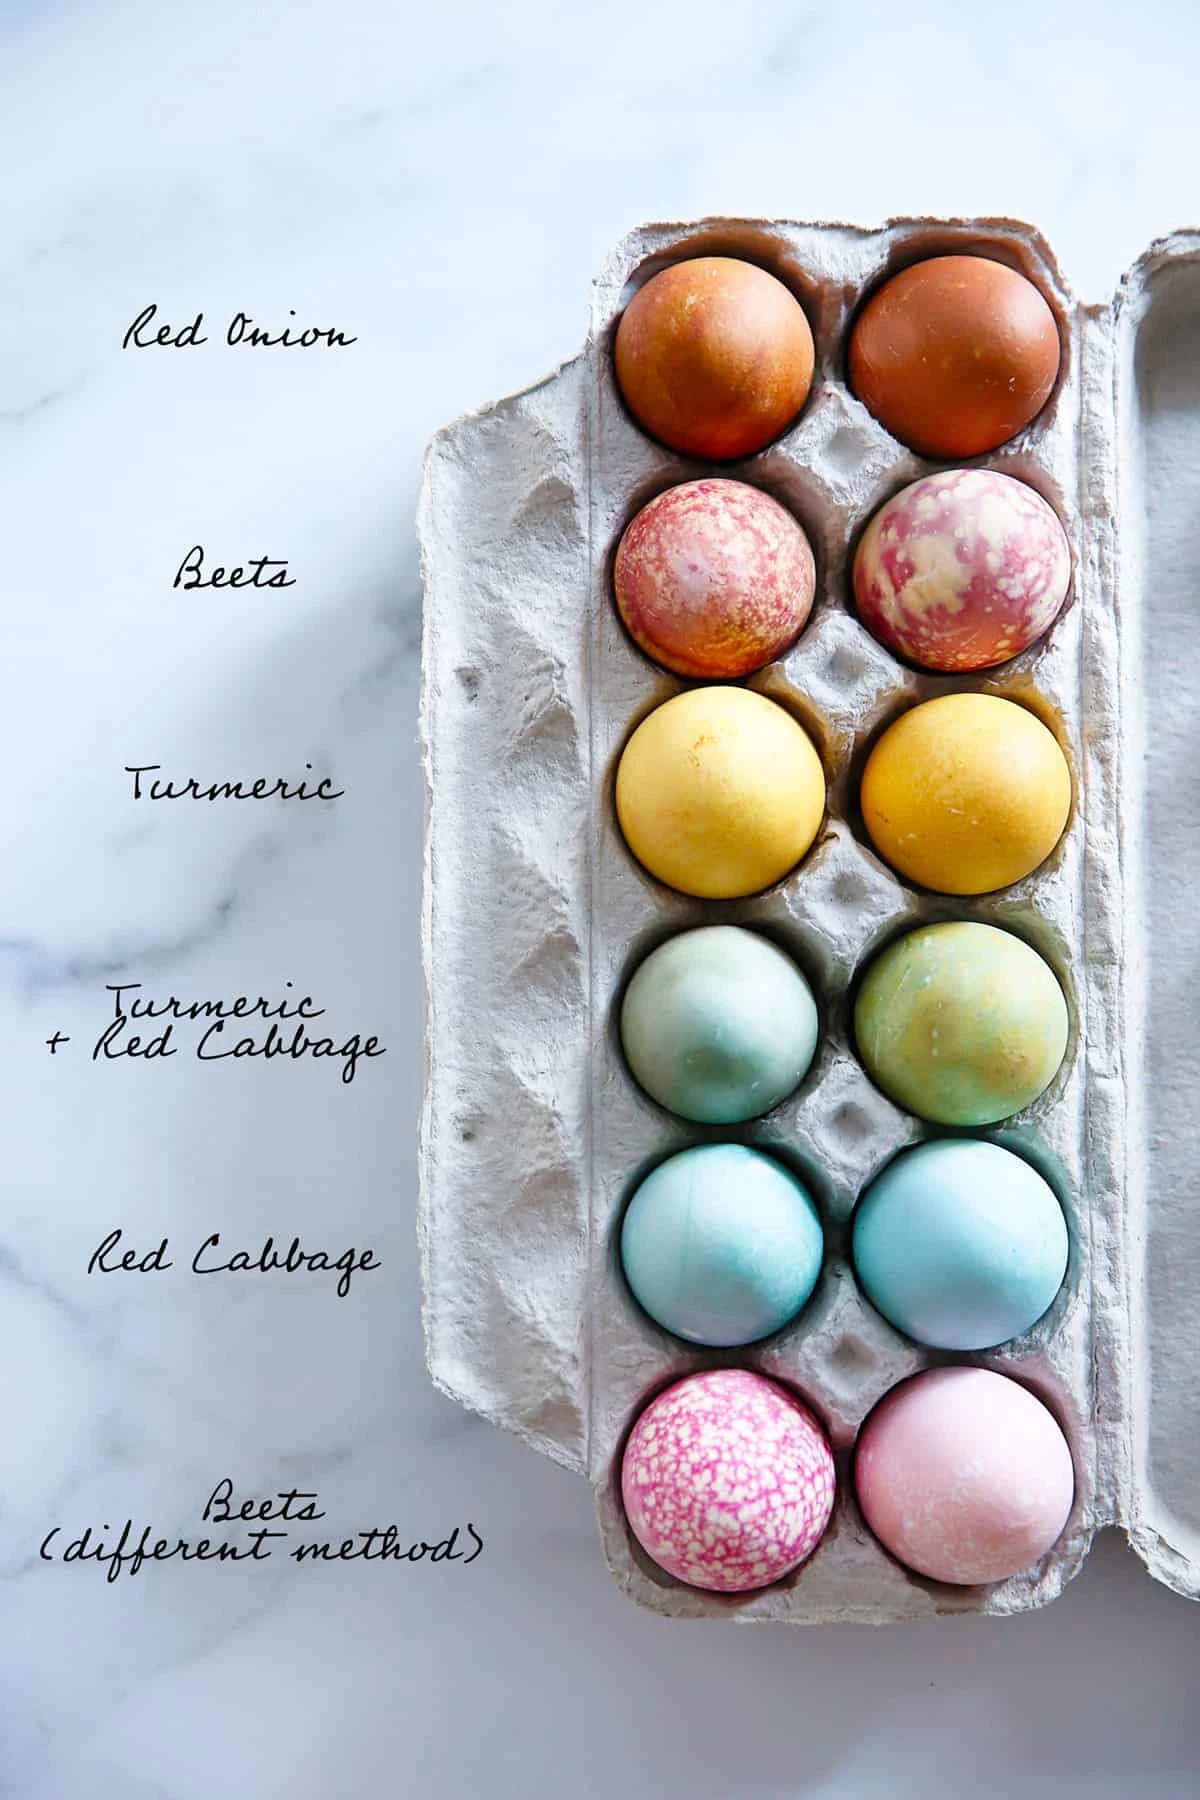
The Secret to a Perfect Green: Double-Dyeing
Since getting a good green from one dye is tricky, the pros cheat! We double-dye. It’s easy.
- Step 1: Get Your Yellow. Dye your egg a nice, bright yellow using turmeric. The hot method works well here. Let it soak for at least an hour to get a solid base color.
- Step 2: Dry Completely. Take the yellow egg out and let it air dry. It needs to be totally dry to the touch, which might take 30 minutes or so.
- Step 3: The Blue Dip. Now, give your dry yellow egg a quick dip in the cold blue cabbage dye. I mean quick—check it after 5 minutes. The blue dye on top of the yellow base creates a brilliant green. Leave it in longer for a deeper forest green.
Taking It to the Next Level: Creative Finishes
Once you’ve got the basics down, you can start adding patterns. This is where you can get really creative.
- Wax Resist: Draw on your egg with a white crayon or a birthday candle before dyeing. The wax blocks the dye, leaving your pattern behind.
- Leaf & Flower Prints: This is a beautiful, traditional technique. Place a small, flat leaf (like parsley or a fern) on a raw egg. Stretch a piece of an old nylon stocking over it tightly and secure it with a rubber band. Then, dye it using the hot method. The area under the leaf will be protected, leaving a perfect silhouette.
- Rubber Band Stripes: For easy geometric patterns, just wrap rubber bands around your eggs before dyeing. You can even dye it once, let it dry, remove the bands, and dye it again in a different color for a cool layered effect.
- The Final Polish: After your eggs are totally dry, put a tiny drop of cooking oil (vegetable or coconut oil works well) on a paper towel and gently rub the egg. It deepens the color and gives it a beautiful, subtle sheen. It’s that final touch that makes them look professional.
Troubleshooting & Common Questions
Don’t worry if things don’t go perfectly the first time. Here are some common issues and how to fix them.
- My color is too pale! This almost always means you need more. More dye material, more simmering time to extract the color, or more soaking time for the eggs. And make sure you didn’t forget the vinegar!
- My eggs are splotchy. This could be from an egg that wasn’t perfectly clean or from bits of plant material resting against the shell. Honestly, I usually just embrace this as part of the rustic, handmade charm.
- My red cabbage made purple, not blue! You used the hot method. Heat plus acid equals purple. For that lovely robin’s egg blue, you absolutely must use the cold, strained dye method.
- My eggs cracked in the pot. This happens from a sudden temperature change. Always start with cool water and bring it to a simmer slowly. Never drop a cold egg into hot water.
- Can I reuse the dye? Yes, you can! You can often get a second, paler batch of eggs from the same dye bath. Just be aware the colors will be much lighter.
- What do I do with the leftover veggie mush? Compost it! It’s just cooked vegetable matter, perfect for your compost bin.
A Quick Word on Safety & Eating Your Eggs
The number one question is always: can we eat these? If you use only edible, food-safe ingredients (onions, cabbage, etc.), the eggs themselves are perfectly safe. The real issue is food safety. My personal rule, based on standard guidelines, is simple: any egg that has been out of the refrigerator for more than two hours total should be for decoration only.
If you want to eat your creations, stick to the cold-dye method and keep the eggs in the fridge for the entire process. Once they’re dyed and dry, get them back into the refrigerator immediately. Treat them like any other hard-boiled egg and eat them within a week.
Diving into natural dyes is about so much more than coloring eggs. It’s about slowing down, watching a little kitchen chemistry unfold, and making something unique. The little variations and imperfections aren’t mistakes—they’re the signature of something real and handmade. Have fun with it!
Inspirational Gallery with Photos
A quick tip on cookware: Avoid aluminum, copper, or cast-iron pots. These metals can react with your natural dyes, sometimes creating muddy, unpredictable colors. Your best bet is a non-reactive pot, like stainless steel or enamel, to ensure the color you see in the pot is the color you get on your egg.
Ready to play with patterns? It’s easier than you think.
- Wrap rubber bands around the egg for clean, modern stripes.
- Press a small leaf (parsley and cilantro work beautifully) against the egg, wrap it tightly in a piece of nylon stocking, and secure it before dyeing for a delicate botanical print.
- Use a white wax crayon to draw secret messages or designs before the egg takes its dip. The wax will resist the dye, revealing your art.
Are they safe to eat? Absolutely. As long as you use food-grade ingredients like red cabbage, onions, or turmeric, the eggs are perfectly edible.
Craving more intensity from your colors?
Patience is your secret ingredient. For deep, saturated jewel tones, don’t rush the process. After the initial simmering, turn off the heat and let the eggs cool completely in the dye bath. For the richest colors, transfer the whole container to the refrigerator and let them soak overnight. The longer they sit, the more pigment they’ll absorb.
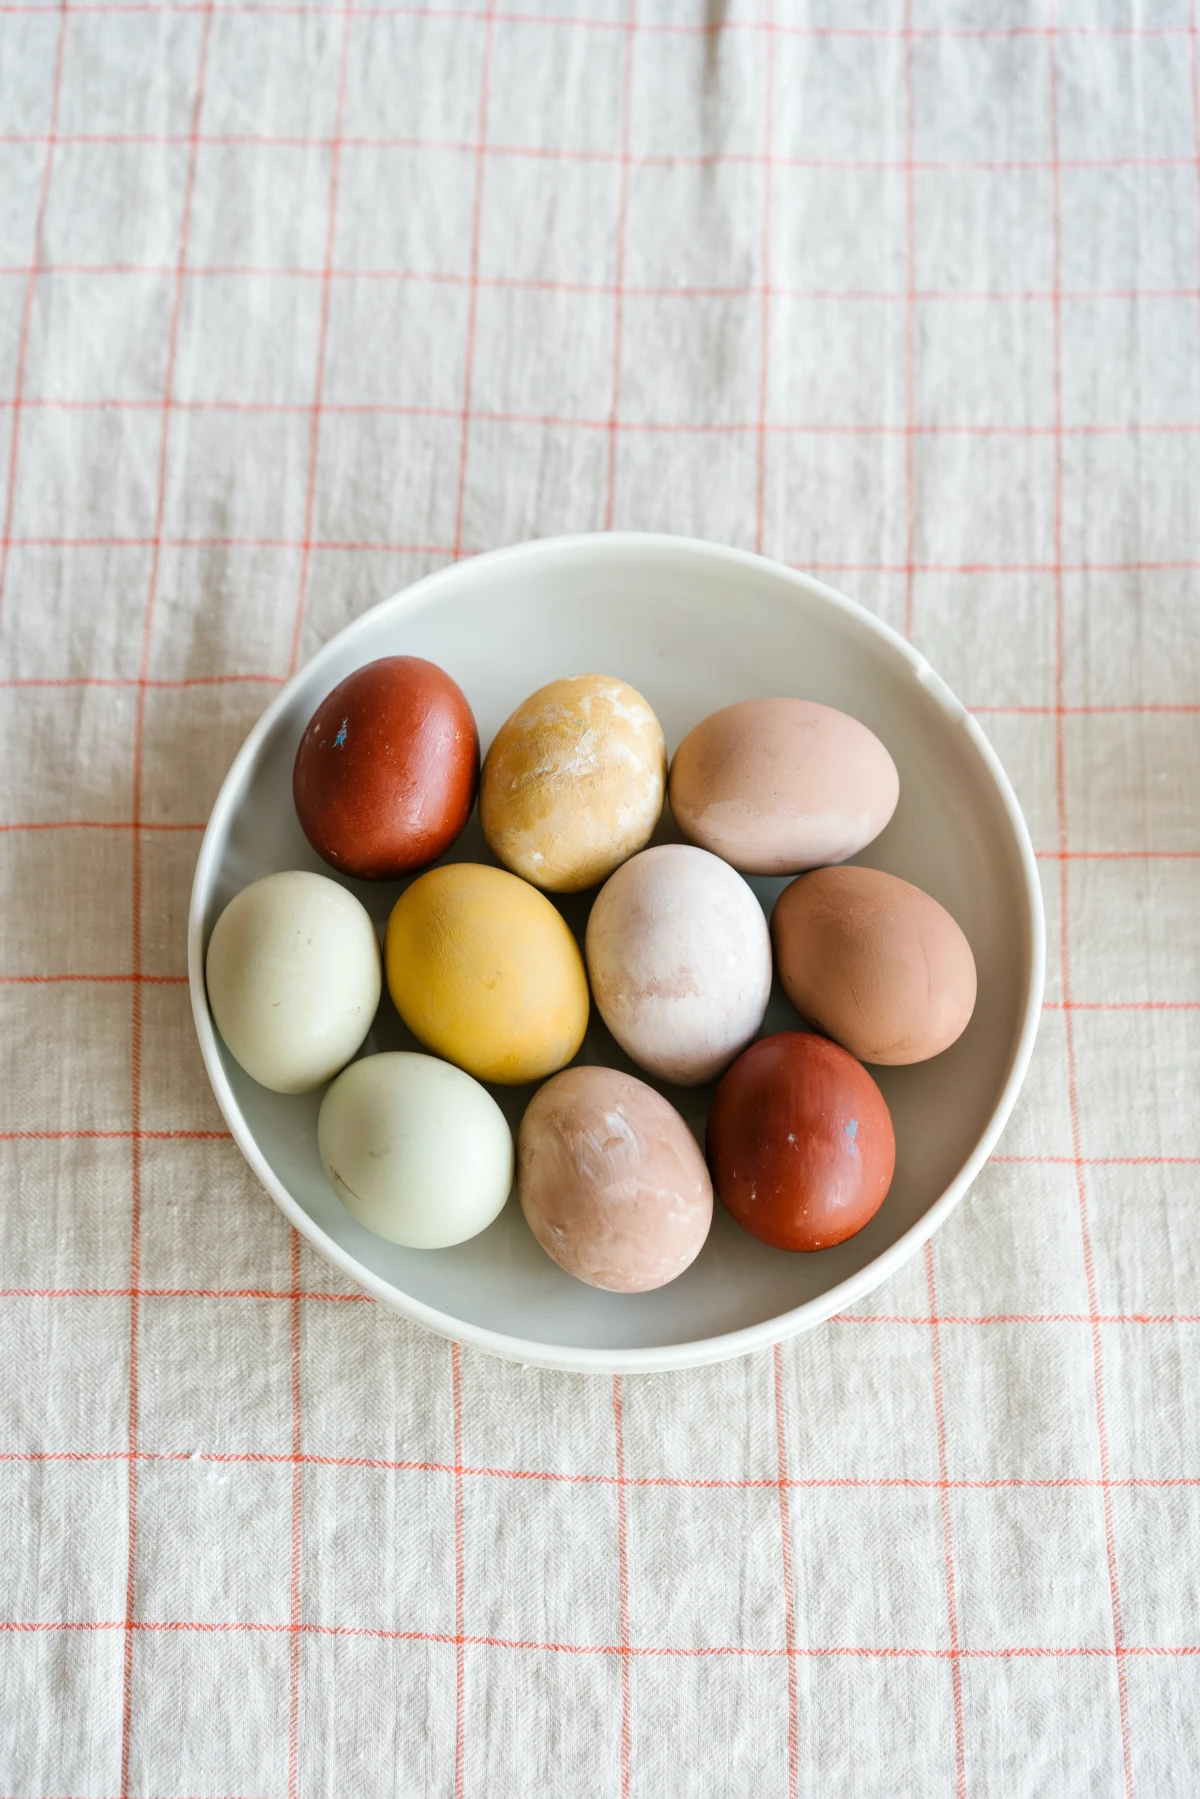
White Eggs: They are a blank canvas, perfect for achieving bright, true colors. That sunny turmeric yellow or vibrant beet pink will really pop.
Brown Eggs: Don’t overlook them! Their natural tint adds a wonderful depth and earthiness. Turmeric will yield a warm mustard, and onion skins will create a rich, terracotta red. They’re ideal for a rustic, moody palette.
The practice of decorating eggs is ancient, with decorated ostrich eggs dating back 60,000 years found in Africa.
While we may not be using ostrich eggs, our modern-day kitchen dyeing connects us to this incredibly long history of celebrating spring and new life. Every time you pull a beautifully colored egg from a pot of simmering botanicals, you’re not just making a pretty object; you’re participating in a ritual that spans millennia and cultures, from the Persian Nowruz to the Ukrainian Pysanky.
Once your eggs are dyed and completely dry, give them a final touch of polish. Pour a tiny drop of a neutral cooking oil, like vegetable or sunflower oil, onto a paper towel and gently buff each egg. This simple step not only protects the color but also gives them a beautiful, subtle sheen that makes the natural hues truly glow.
Your pantry is a treasure trove of potential dyes. Before you buy anything new, check your spice rack and tea selection. You’ll be surprised by the results:
- Ground Turmeric: A teaspoon of a common brand like McCormick is enough to produce an astonishingly bright, sunny yellow.
- Hibiscus Tea: Bags of herbal tea, such as Tazo Passion or Celestial Seasonings Red Zinger, will yield gorgeous lavender-gray and deep red hues.
- Smoked Paprika: This will give you a lovely light-orange, brick-colored stain.
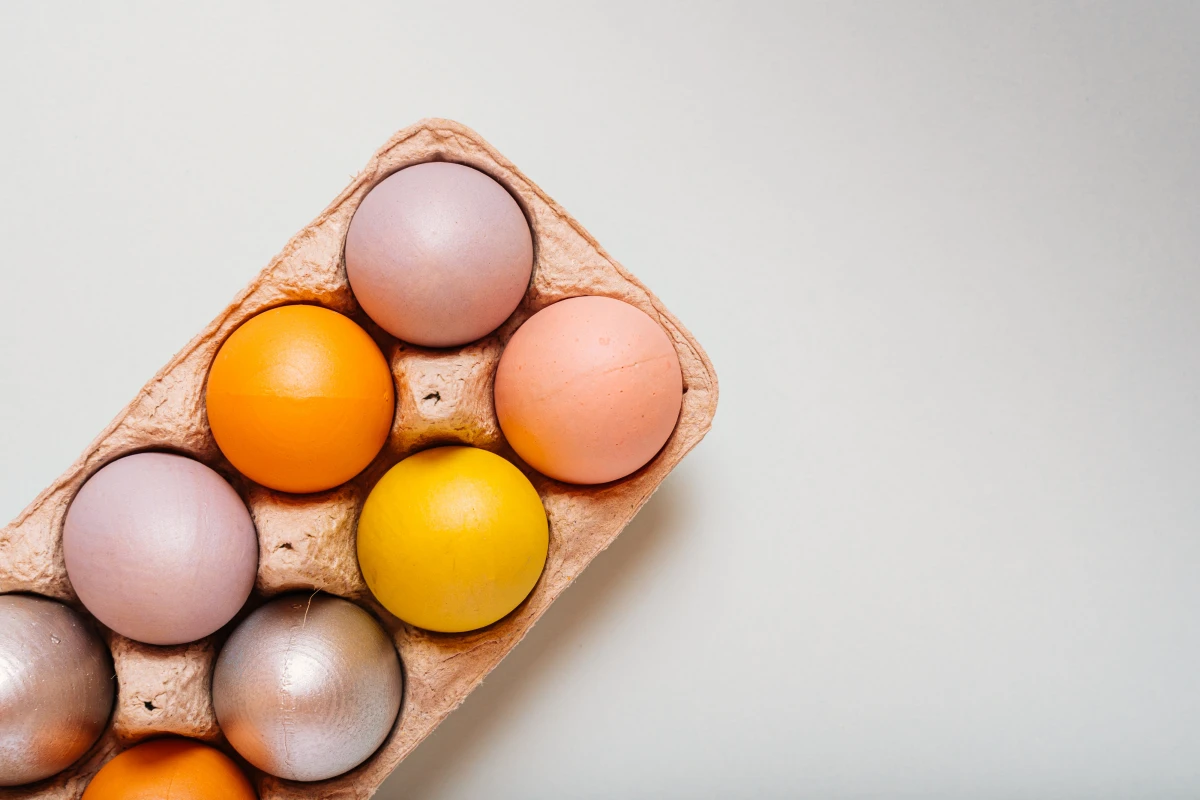
- Achieve delicate, on-trend pastel shades.
- Spend less time waiting for your colors to develop.
- Create a soft, uniform look across your collection.
The secret to these lighter hues? It’s all in the timing. Simply shorten the soaking period to about 15-30 minutes in the warm dye bath instead of letting them sit for hours. You’ll get beautiful, subtle colors every time.
What about the cleanup? It’s part of the eco-friendly process. Simply strain your cooled dye bath through a sieve. The solid plant matter—like onion skins or cabbage leaves—can go directly into your compost bin. The remaining liquid is just colored water and can be safely poured down the drain.