The Real Secrets to Red, White, and Blue Desserts That Won’t Let You Down
I’ve spent a lot of time in professional kitchens, especially during the wild ride of holiday catering. And let me tell you, summer holidays bring a unique challenge: everyone wants those gorgeous red, white, and blue desserts. But here’s the kicker—they also have to taste incredible and, most importantly, not melt into a sad puddle in the summer heat. It’s a much bigger ask than you’d think.
In this article
Believe me, I’ve made all the mistakes so you don’t have to. I’ve baked red velvet cakes that came out looking more like a muddy brown. Oh, and I’ll never forget the time I watched a beautifully piped whipped cream border turn into a puddle of sweet soup at an outdoor party. It’s moments like those that teach you the real science behind baking, the stuff that separates a decent home bake from a dessert that gets rave reviews.
So, this isn’t just a list of recipes. It’s my playbook, filled with the ‘why’ behind every step. We’re going to dive into getting colors that pop, textures that hold up, and flavors that make people ask for the recipe. My goal is to give you the confidence to whip up some seriously impressive treats that work every single time.

Your Foundation: Nailing the Patriotic Palette
Making a dessert that looks as good as it tastes starts with the colors. Getting those bright, clean reds, whites, and blues isn’t magic; it’s a little bit of food science. It’s all about knowing your ingredients and how they react to things like heat, acid, and air.
The Challenge of a Perfect Red
Red is a fantastic, energetic color, but in baking, it can be a real diva. You’re basically choosing between a reliable food coloring or the natural beauty of fruit.
For a Bold, Baked-In Red: Think classic red velvet cake. The secret isn’t just dumping in food coloring. A traditional recipe uses the mild acidity from buttermilk and vinegar to make that red color truly vibrant. Without it, the cocoa powder in the recipe can turn the whole thing a bit dull and brownish. My pro tip? Always use a gel-based food coloring, like from brands such as Americolor or Wilton. You can find them at craft stores like Michaels, many grocery stores, or online for about $3-$5. A little bottle goes a long way because it’s super concentrated, so you won’t water down your batter and mess up the texture. Heads up: some folks can be sensitive to red dye, so it’s a nice gesture to mention it if you’re baking for a crowd.
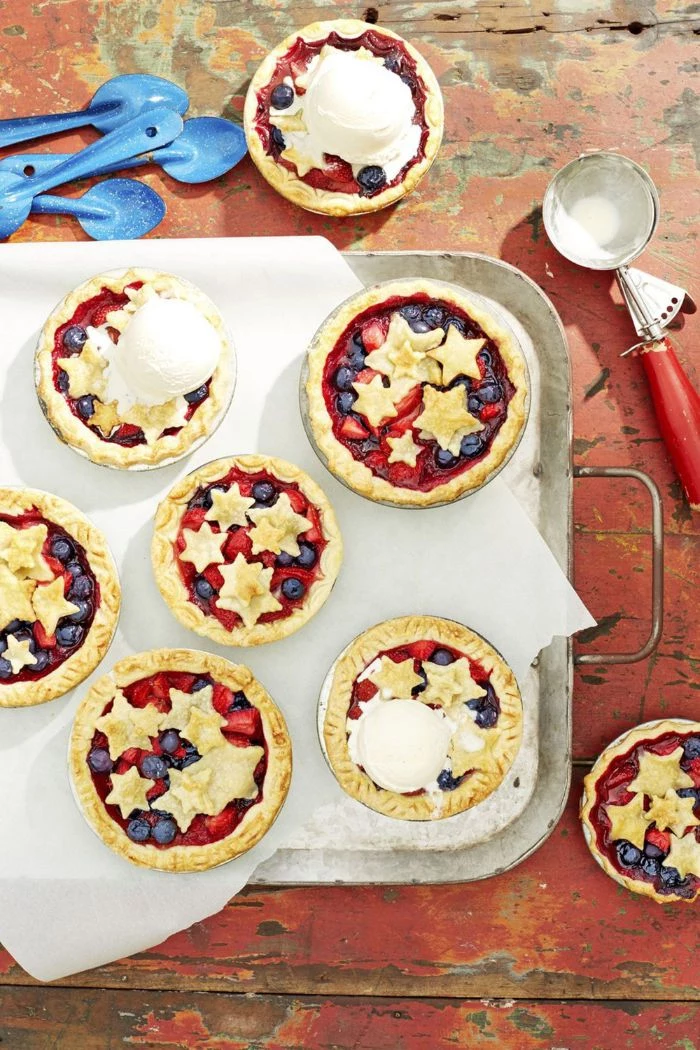
For a Fresh, Natural Red: Strawberries, raspberries, and cherries are your best friends here. Their color is stunning when fresh, but can get a little dull once baked. To keep that vibrant look, use a simple technique called maceration. Just toss your sliced berries with a bit of sugar (a tablespoon or two per pound of fruit is plenty) and let them sit for about 30 minutes. The sugar draws out the juices, creating a gorgeous, naturally red syrup that’s perfect for spooning over cheesecake or layering in a trifle.
Getting a Pure, Stable White
White is the clean backdrop that makes your red and blue pop. But not all whites are created equal, especially when heat and humidity enter the picture. Here’s how to choose your white wisely.
- Classic Whipped Cream: It’s light and delicious, but honestly, it’s a ticking time bomb at a party. It weeps and deflates so easily.
- Cream Cheese Frosting: This is way more stable and brings a delicious tangy flavor that cuts through sweetness. The biggest mistake people make is using butter and cream cheese that are too warm. You want them softened, but still cool. If your frosting gets soupy, don’t panic! Just pop the whole bowl in the fridge for 20-30 minutes and try whipping it again. It usually bounces right back.
- The Pro’s Secret: Stabilized Whipped Cream. This is the best of both worlds. The easiest way to do it at home is with a little instant vanilla pudding mix. Yes, really! Just whisk a tablespoon or two of the dry mix into your heavy cream before you start whipping. The starches in the pudding mix work like magic, keeping the cream thick and pipeable for hours, even out of the fridge. For a super sturdy trifle filling, you might use even more, but for general piping, that’s the golden ratio.
By the way, if you’re working with white chocolate, read the label. Real white chocolate contains cocoa butter, has a creamy off-white color, and costs a bit more—think $5-7 for a good quality bar. The cheaper ‘white baking chips’ are often candy melts made with palm oil. For drizzling and quick-setting decorations, the candy melts (around $3-4 a bag) are actually easier to handle. But for pure flavor, real white chocolate wins every time.
The Quest for a True Blue
Okay, let’s be real: blue is the hardest color to get right in the food world. Even the pros struggle with this one.
Using Fruit: Blueberries and blackberries are the obvious choice. The issue is that their natural pigments are super sensitive to pH. When you bake them, they often lean more purple or even reddish. To counter this, you can try adding a tiny pinch of baking soda (an alkali) to your blueberries, maybe 1/8 of a teaspoon per cup of berries. It can help preserve the blue hue, but be careful—too much will give it a soapy taste. Honestly, the best way to get a true blue from fruit is to use them fresh as a garnish.
Using Food Coloring: Just like with red, a high-quality blue gel coloring is your friend. A little goes a very long way. When you’re coloring frosting or a white cake batter, add the gel with a toothpick, mix, and then see if you need more. You can always add, but you can’t take it away. The goal is a lovely sky or navy blue, not a spooky, teeth-staining blue.
Let’s Bake: Pro Methods for Holiday Classics
Now, let’s put all this theory into practice. These aren’t just recipes; they’re my battle-tested methods for getting reliable, delicious results.
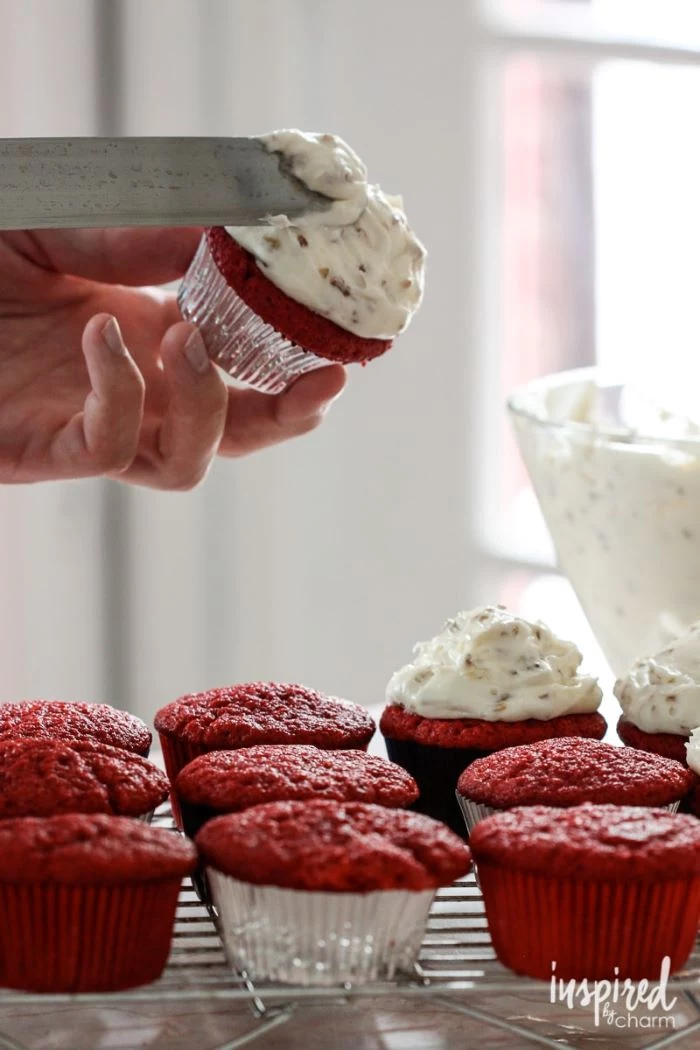
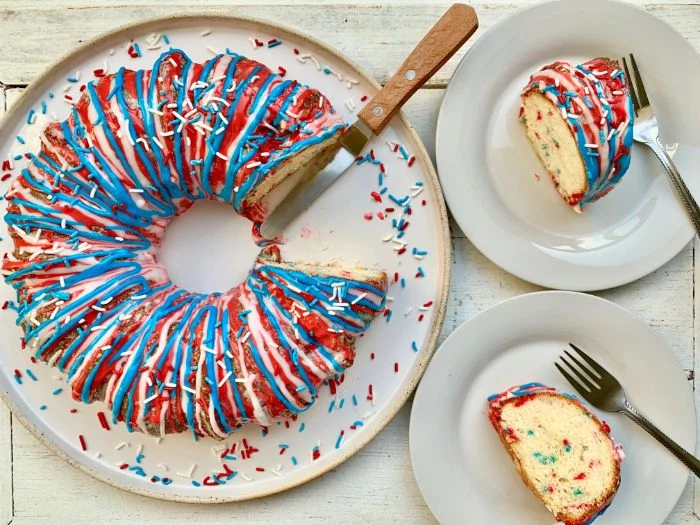
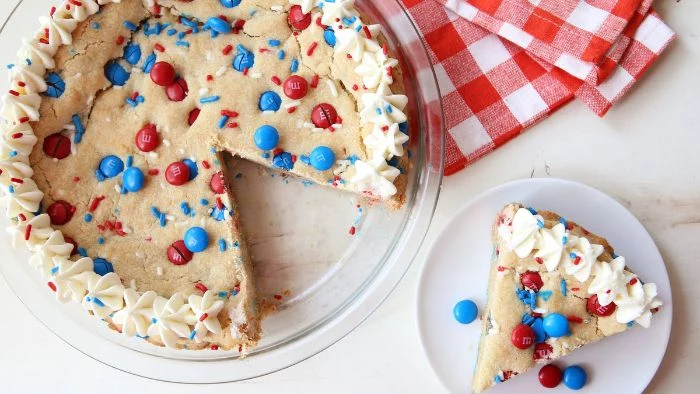
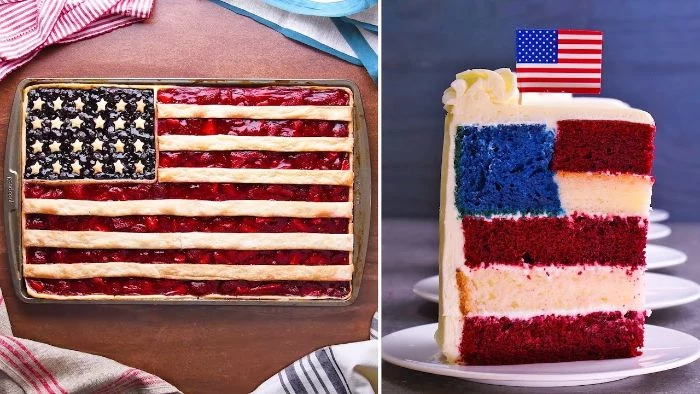
1. Dependable Red Velvet Cupcakes
The success of red velvet is all about chemistry. This recipe is balanced to deliver that signature mild chocolate flavor, vibrant color, and tender texture.
Ingredients:
- For the Cupcakes:
- 2 1/2 cups (300g) all-purpose flour
- 1 1/2 cups (300g) granulated sugar
- 1 tsp baking soda & 1 tbsp white vinegar (the power couple for lift!)
- 1 tbsp unsweetened cocoa powder
- 1/2 tsp salt
- 2 large eggs, at room temp
- 1 1/2 cups (360ml) vegetable oil
- 1 cup (240ml) buttermilk, at room temp
- 1 tsp vanilla extract
- 2 tbsp (1 oz) red gel food coloring
- For the Frosting:
- 16 oz (2 blocks) full-fat block cream cheese, cool but softened
- 1/2 cup (1 stick) unsalted butter, cool but softened
- 4 cups (480g) powdered sugar, sifted
- 1 1/2 tsp vanilla extract
- Pinch of salt
The Method and Why It Works:
- Prep First: Preheat your oven to 350°F (175°C) and line your muffin tins. Getting everything ready first (what chefs call ‘mise en place’) is the number one way to prevent mistakes.
- Dry Mix: Whisk the flour, sugar, baking soda, cocoa, and salt. This is like a quick sift, breaking up lumps.
- Wet Mix: In another bowl, beat the eggs lightly, then whisk in the oil, buttermilk, vinegar, vanilla, and red gel color. Using room temperature ingredients is non-negotiable! Cold dairy and eggs won’t mix properly with the oil, leading to a heavy, greasy cupcake.
- Combine Gently: Pour the wet into the dry and mix with a spatula just until you don’t see any more dry flour. A few lumps are fine! Overmixing is the cardinal sin of cupcakes; it develops gluten and makes them tough.
- Fill & Bake: Use a 2-ounce ice cream scoop for perfectly even portions, filling liners about two-thirds full. Bake for 18-22 minutes. The tops should spring back when you touch them lightly.
- Cool Completely: Let them cool in the pan for 5 minutes, then move to a wire rack. Don’t even think about frosting a warm cupcake unless you want a melted mess.

Frosting and Troubleshooting:
In a stand mixer with the paddle attachment (or a large bowl with a hand mixer), beat the cool cream cheese and butter on medium until smooth, about a minute. Scrape down the bowl. On low speed, gradually add the sifted powdered sugar, then the vanilla and salt. Once it’s all in, crank the speed to medium-high and beat for 2 minutes until it’s light and holds its shape. If it’s too thin, your ingredients were too warm. Refrigerate the bowl for 30 minutes and whip it again briefly. Problem solved.
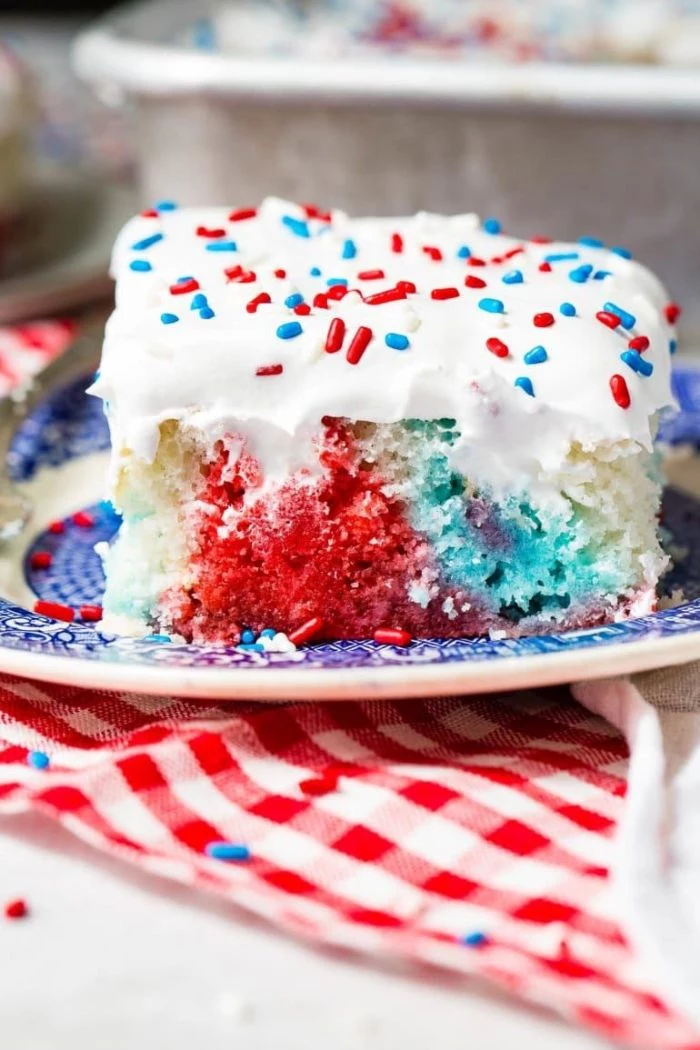
Short on time? You can totally use a box of white cake mix. To make it way better, use buttermilk instead of the water called for on the box, oil instead of butter, and add an extra egg and a teaspoon of vanilla.
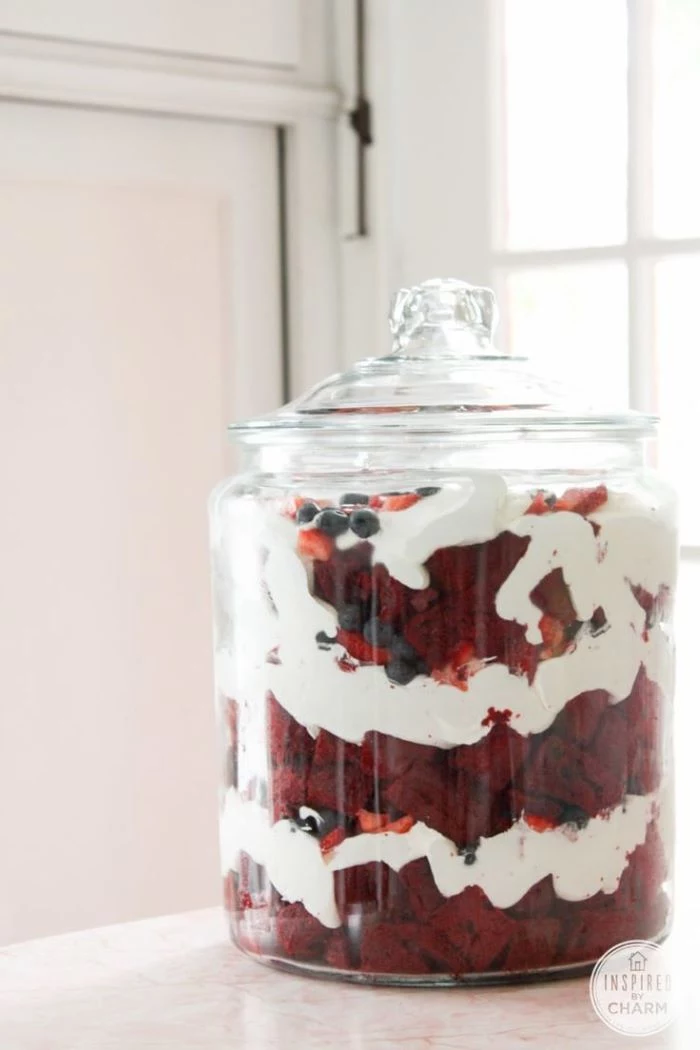
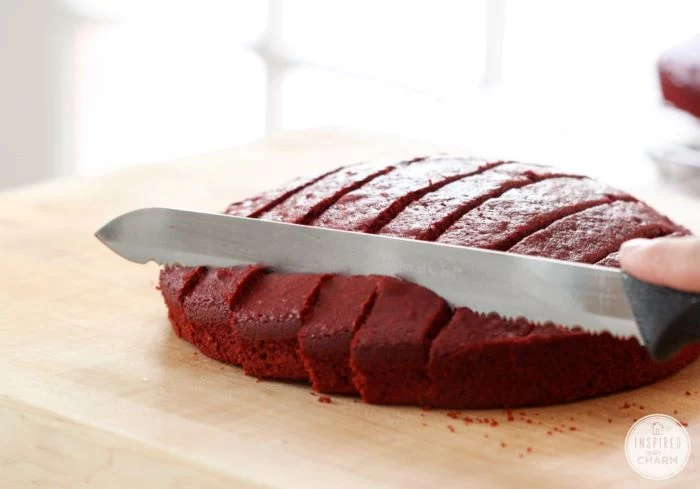
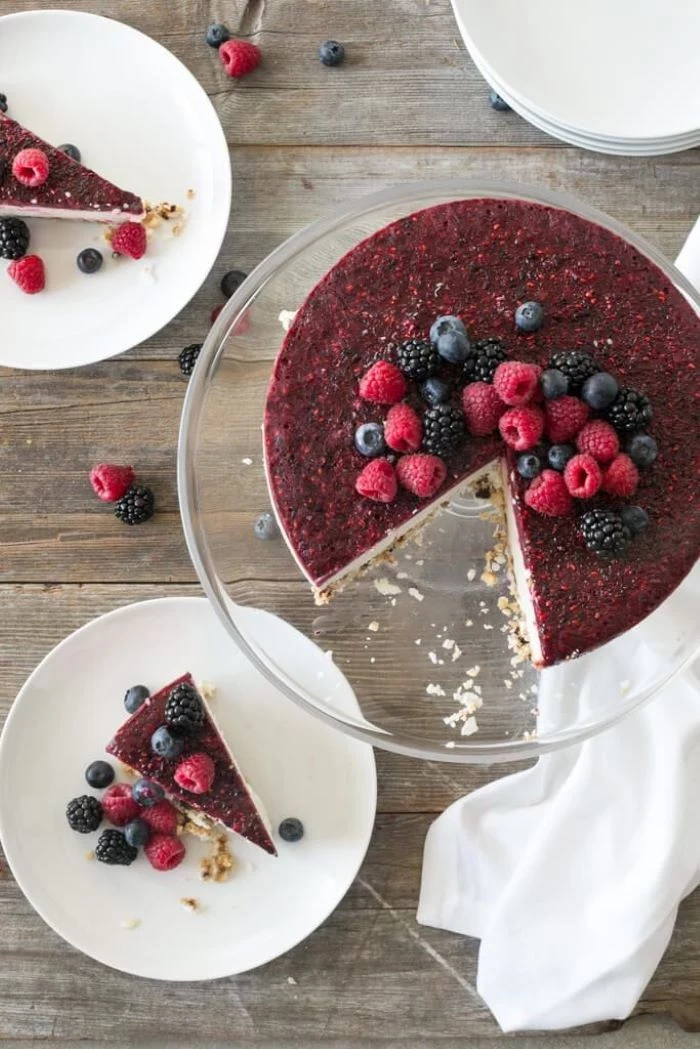
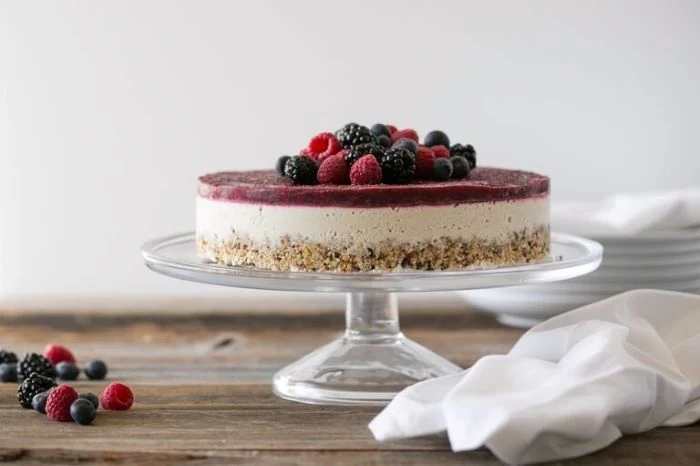
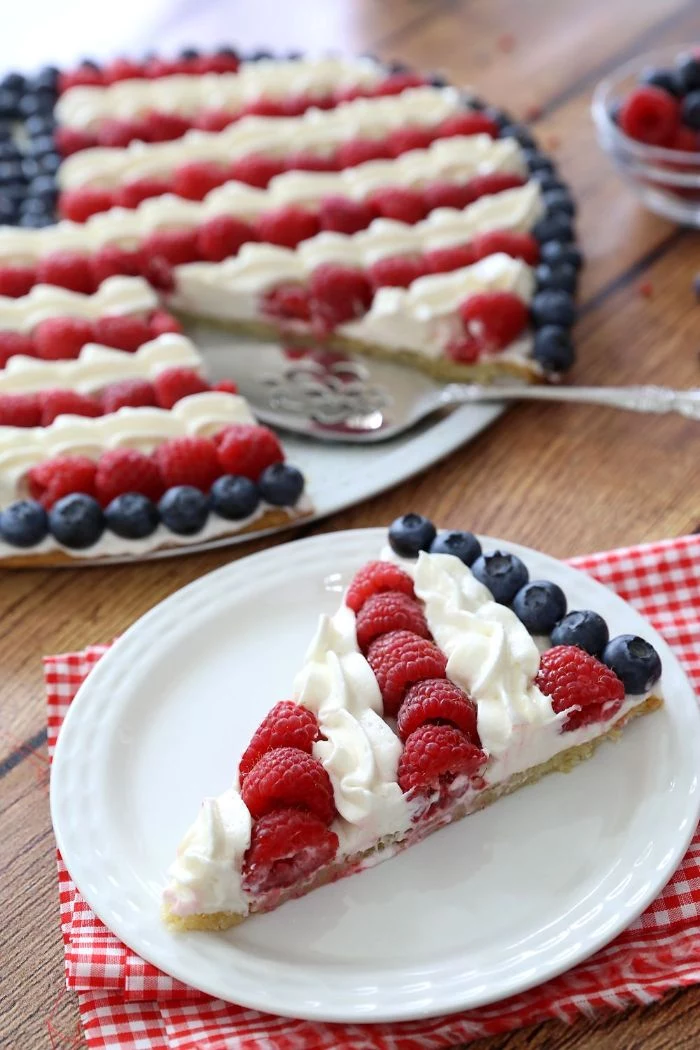
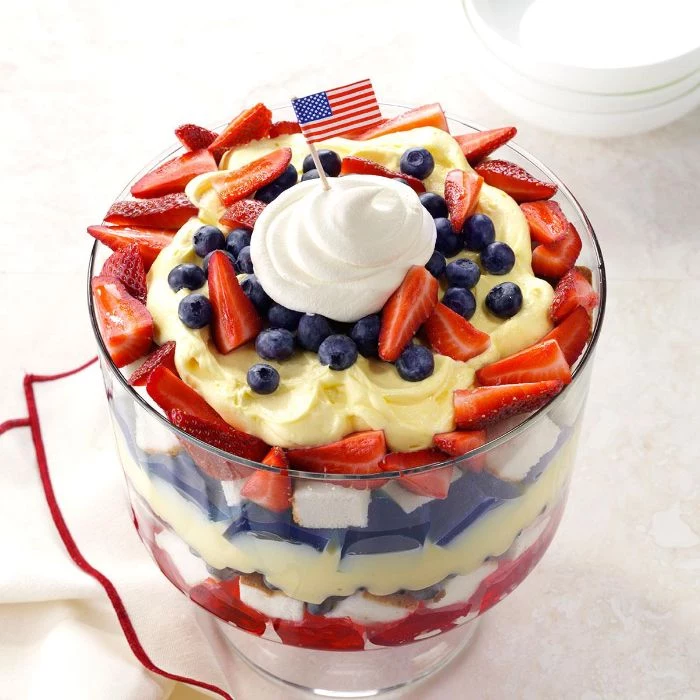
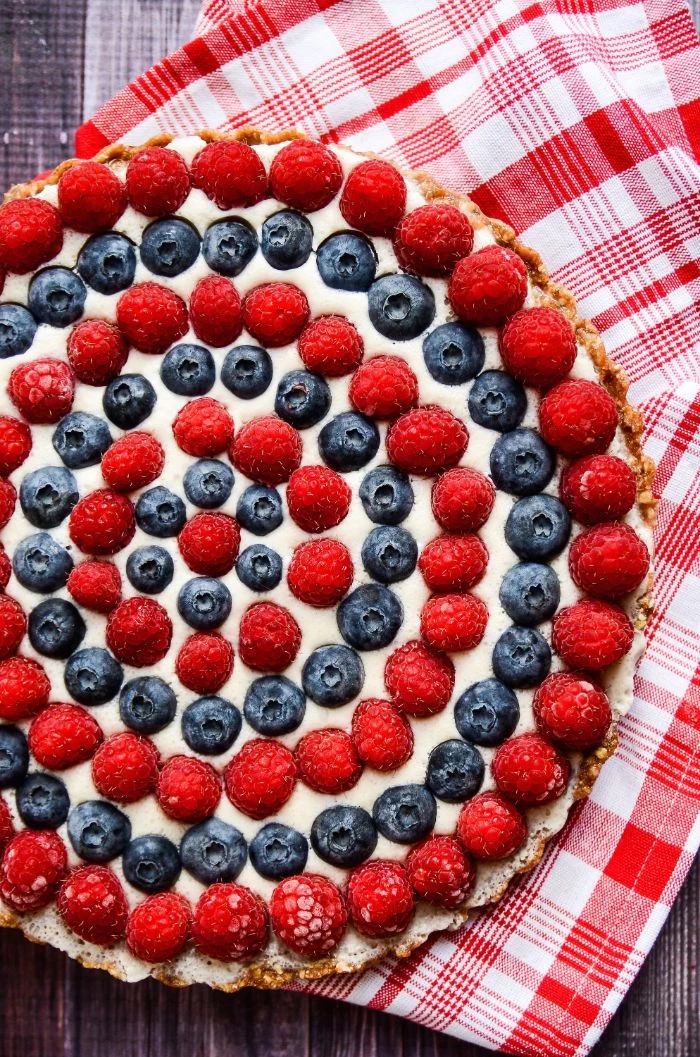
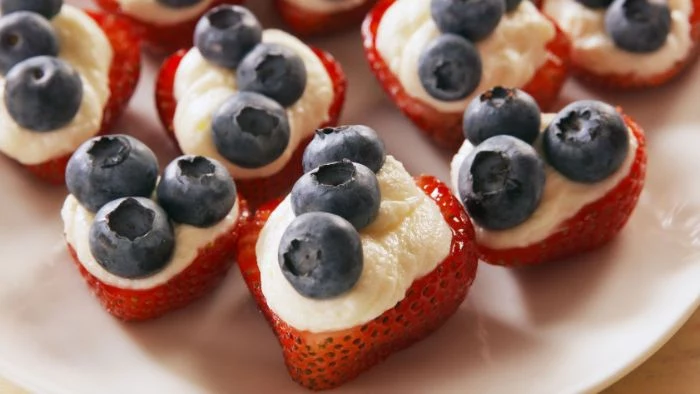
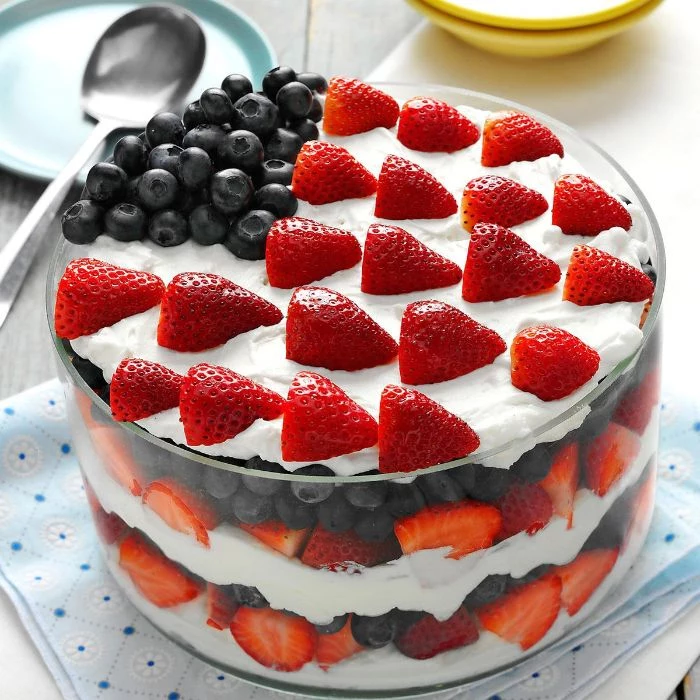
2. Crowd-Pleasing Patriotic Berry Trifle
A trifle is my secret weapon for parties. It looks like you slaved for hours, serves a ton of people, and is actually better when made ahead.
Ingredients:
- 1 store-bought angel food or pound cake (about 16 oz), cut into 1-inch cubes
- 2 lbs fresh strawberries, sliced
- 2 pints fresh blueberries
- 1/4 cup granulated sugar
- For the Super-Stable Cream Layer:
- 2 cups (480ml) cold heavy whipping cream
- 1 package (3.4 oz) instant vanilla pudding mix
- 1 cup (240ml) cold milk
- 1/2 cup powdered sugar
Assembly Insights:
- Prep the Berries: In a big bowl, toss the sliced strawberries with the sugar. Let them sit for 30 minutes to get all juicy and create that amazing syrup. Keep the blueberries separate so they don’t stain everything.
- Make the Magic Cream: This is the heart of a no-fail trifle. In a large bowl, whisk the cold cream, pudding mix, cold milk, and powdered sugar until it’s super thick and holds stiff peaks. This stuff is sturdy and will not let you down.
- Layer It Up: In a big glass trifle bowl (so everyone can see your work!), start layering: one-third of the cake, half the strawberries with their juice, one-third of the cream, half the blueberries. Repeat the layers, then top with the last of the cake and cream. Garnish with a pretty pattern of the leftover berries.
- Let It Chill: Cover and refrigerate for at least 4 hours, but honestly, it’s even better if you let it sit overnight. This gives the cake time to soak up all those delicious juices.
Quickest Win: In a real rush? Grab a store-bought angel food cake, whip up a batch of this stabilized cream, and macerate some berries. You’ll have an incredible-looking dessert in 20 minutes flat, and the stabilized cream is what makes it feel homemade.
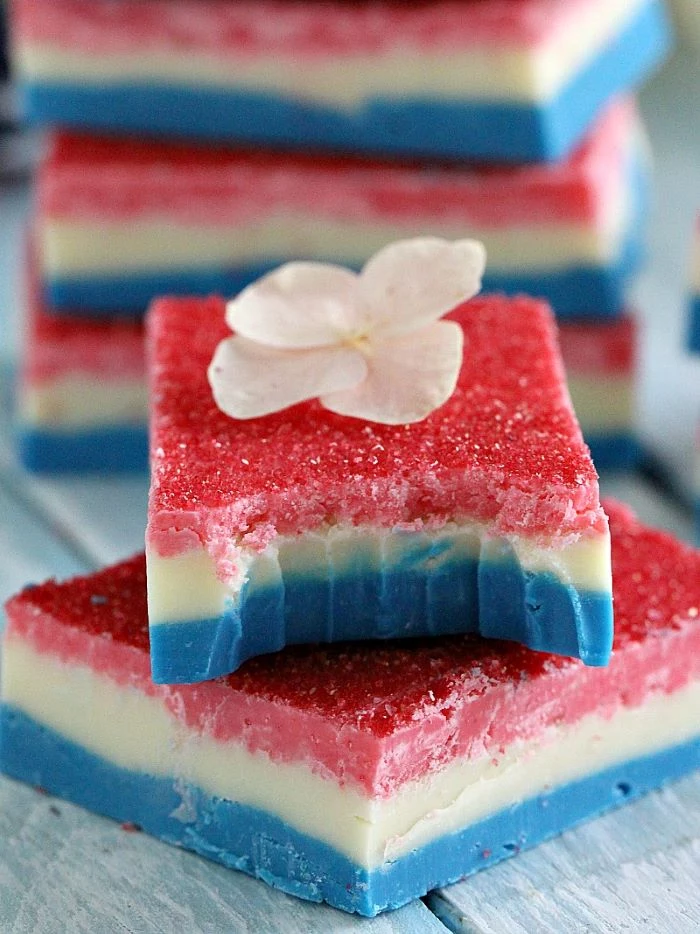
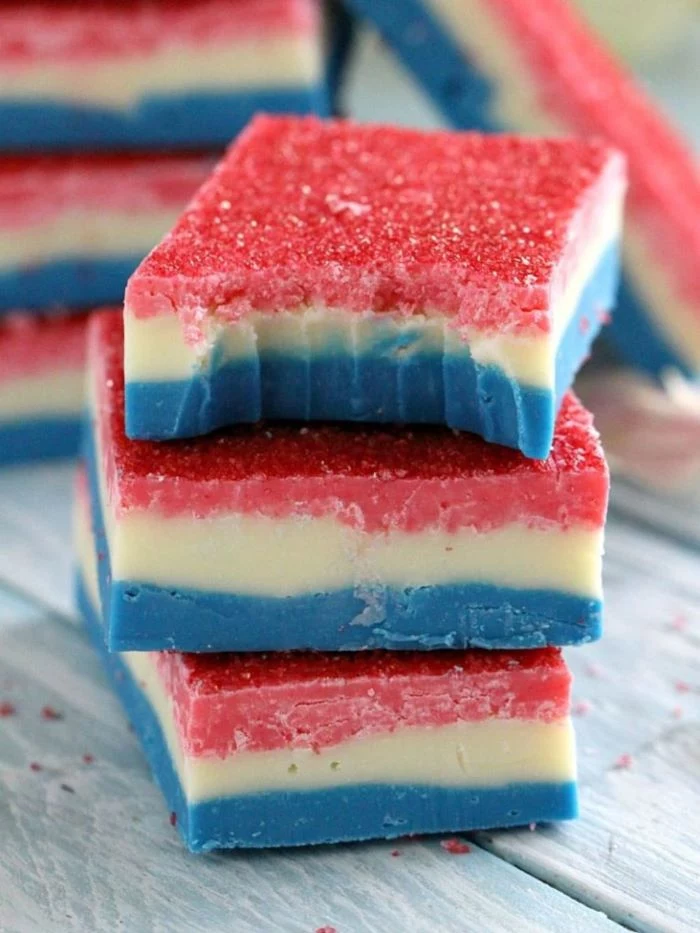
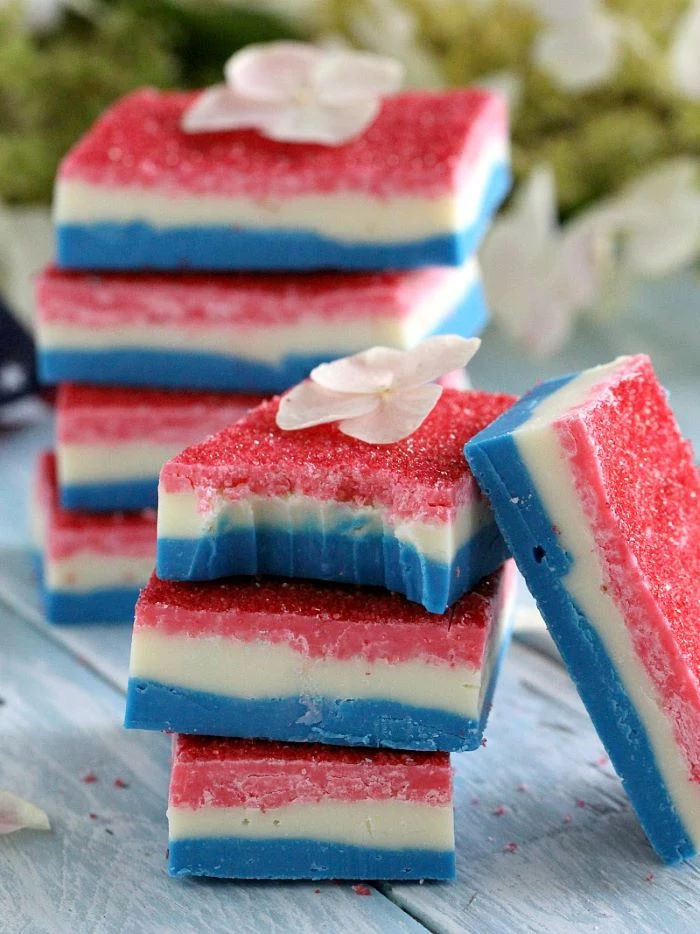
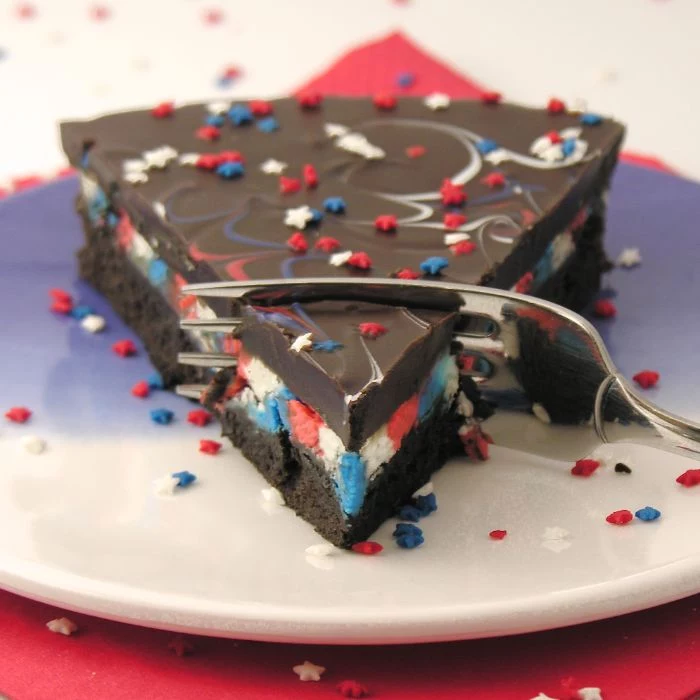
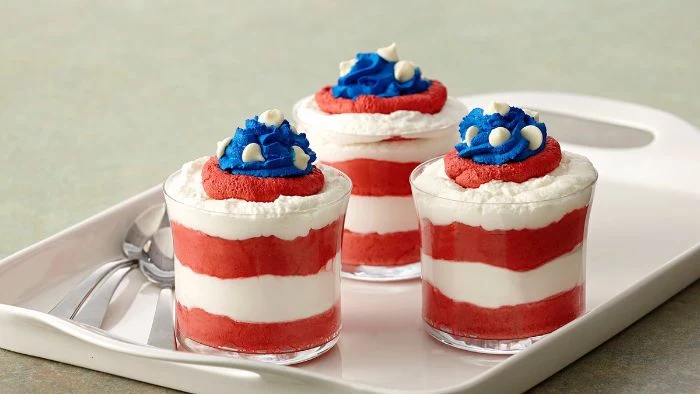
3. No-Bake Red, White, and Blue Fudge
When it’s too hot to turn on the oven, this layered fudge is a lifesaver. The trick is to work quickly and have everything ready to go.
Ingredients:
- 12 oz quality white chocolate chips
- 12 oz white candy melts
- 1 can (14 oz) sweetened condensed milk, divided into three
- Red and blue gel food coloring
- Pinch of salt
The Method:
- Get Set Up: Line an 8×8-inch pan with parchment paper, leaving some hanging over the sides to use as handles later. Divide the chocolate chips, candy melts, and condensed milk equally among three microwave-safe bowls. A kitchen scale makes this super accurate.
- Melt with Care: One bowl at a time, microwave on 50% power for 30 seconds, then stir. Repeat in 15-second bursts until it’s all melted and smooth. Full power will scorch your chocolate! Stir in your coloring. (No microwave? No problem. Use a double boiler on the stove over low heat, stirring constantly).
- Layer and Chill: Pour the blue layer in, spread it out, and chill for 15-20 minutes until just firm. Gently pour the white layer on top, spread, and chill again. Finish with the red layer.
- Final Set: Refrigerate the whole pan for at least 4 hours until it’s very firm. Use a large, sharp knife to cut it. A good tip is to run the knife under hot water and wipe it dry between each cut for super clean slices.
Heads up! The bowls get really hot from the microwave. Use oven mitts, and please watch kids closely if they’re helping.
Final Pro Tips
Here are a few more things to keep in your back pocket.
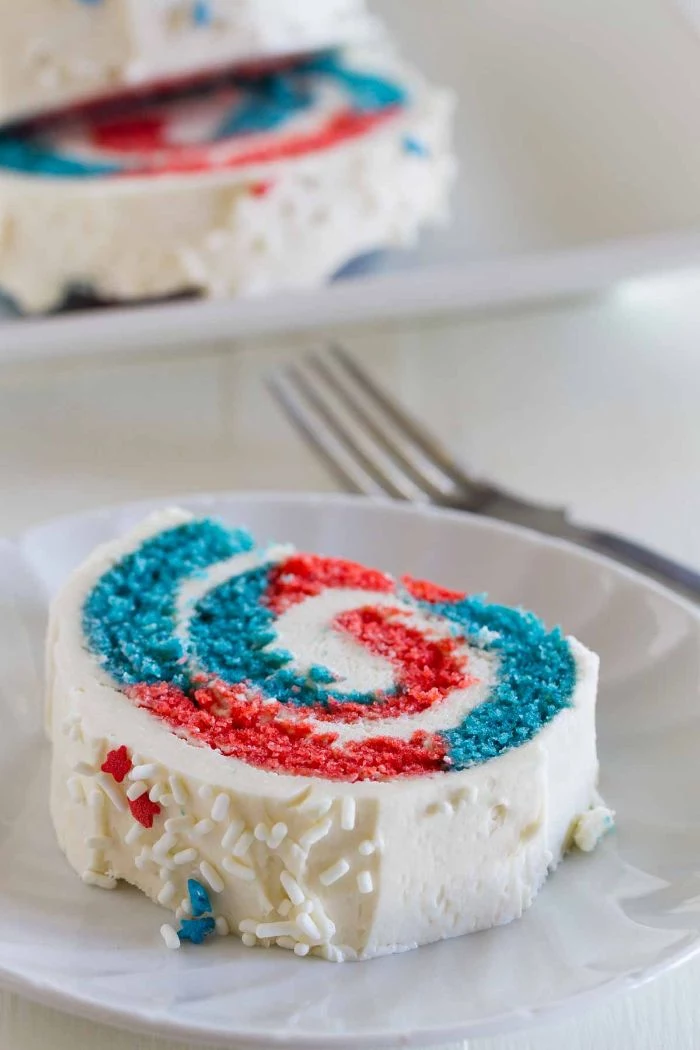
- My colors are bleeding! This means a layer wasn’t set enough before you added the next one. For frozen desserts, each layer needs to be frozen solid. For trifles, make sure that cream is extra thick.
- My cake is dry! Easy fix. Make a ‘simple syrup’ by boiling equal parts water and sugar until the sugar dissolves. Let it cool, then brush it over your cake layers before frosting. It adds moisture without making things soggy.
- For the advanced baker: If you’re not a fan of pudding mix, you can stabilize whipped cream with a little bit of bloomed gelatin. It’s an old-school pastry chef technique that adds zero flavor but provides incredible stability.
A Quick Word on Safety and Planning
When you’re serving food to people you care about, safety is priority number one. The ‘temperature danger zone’ for food is between 40°F and 140°F. Dairy-heavy desserts should not sit in this zone for more than two hours (or just one hour on a really hot day). My rule is simple: keep cold food cold. Serve it straight from the fridge or a cooler right before people eat.
You can also totally prep ahead to save your sanity. Cakes can be baked and wrapped tightly 2-3 days in advance. Fudge can be made a few days ahead, too. The trifle needs to be made the day before. On the day of the party, all you have to do is whip the frosting, decorate, and take all the credit.
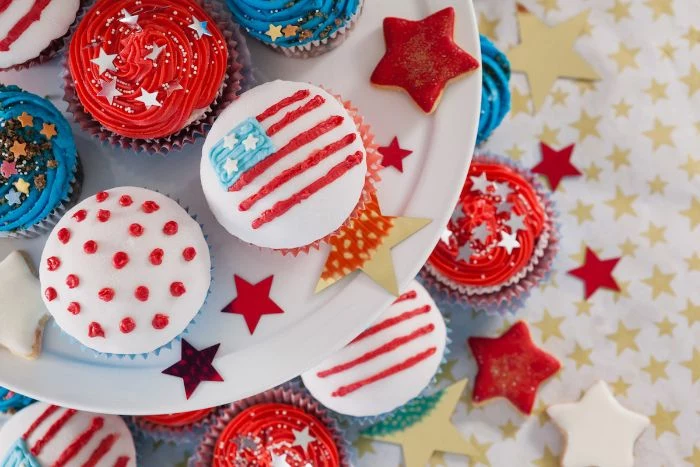
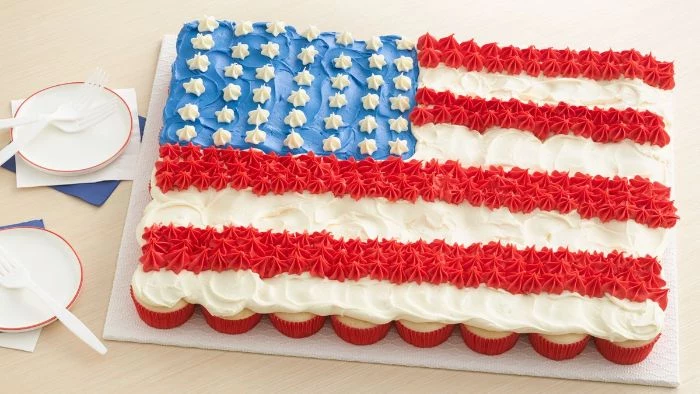
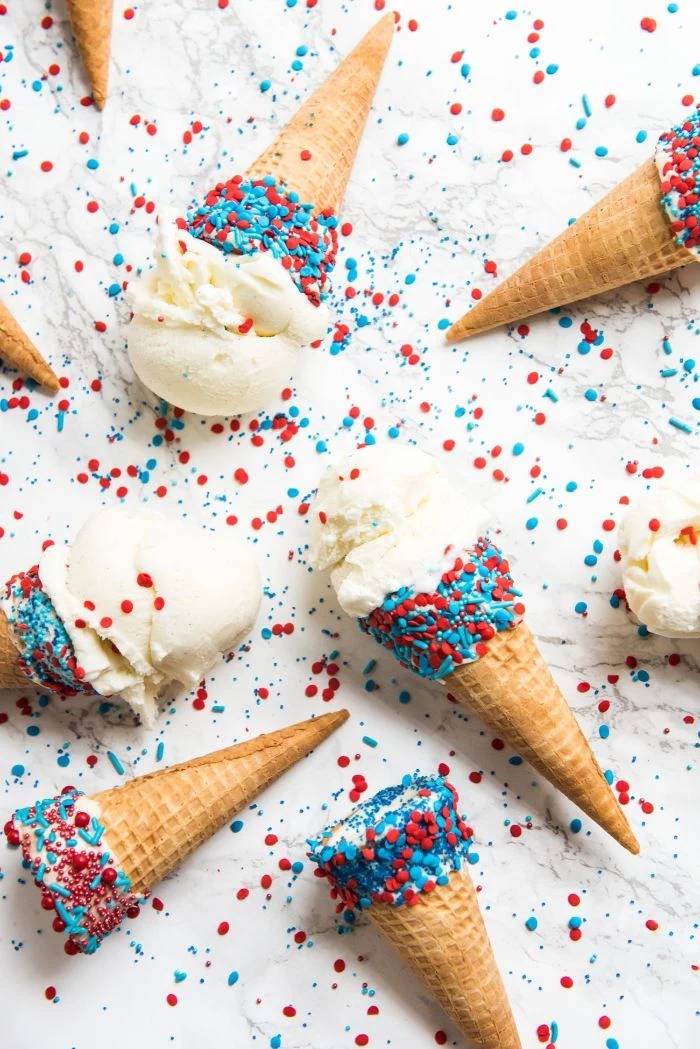
Inspirational Gallery
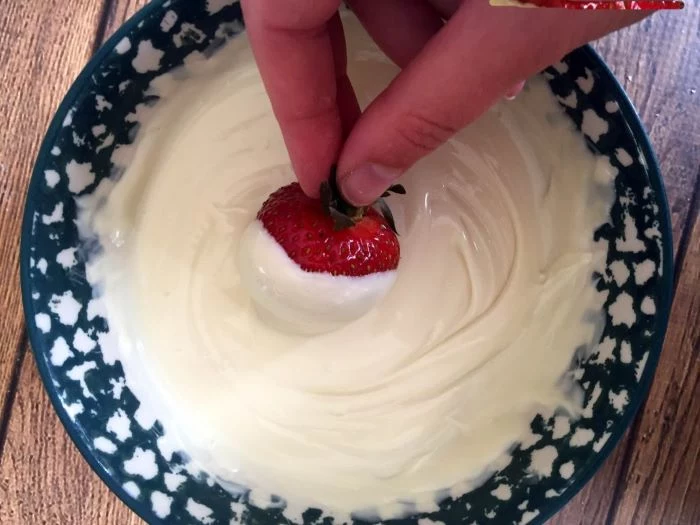
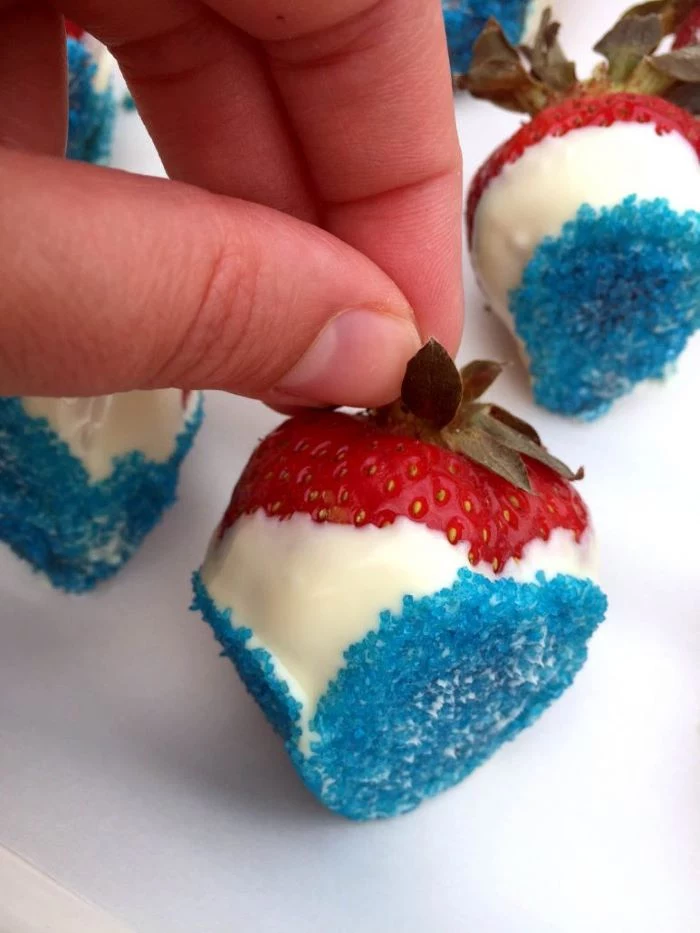
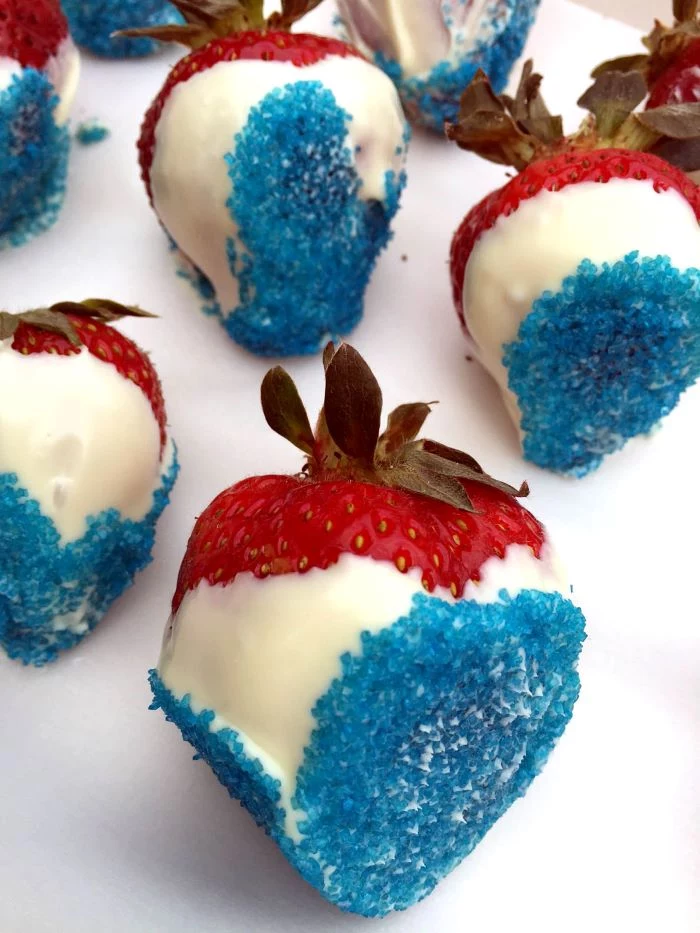
Not all white chocolate is created equal for dipping. For that flawless, smooth coat on your strawberries or pretzels, skip the standard baking chips, which contain stabilizers that prevent smooth melting. Instead, opt for high-quality white chocolate bars or wafers (also called callets) from brands like Ghirardelli or Callebaut. They have a higher cocoa butter content, ensuring a silky, liquid consistency perfect for enrobing.
The natural pigments in blueberries, called anthocyanins, are sensitive to pH. In an acidic batter, they stay blue, but in an alkaline environment (like one with too much baking soda), they can turn a murky green!
Planning to transport your masterpiece? A few pro tricks make all the difference:
- Pre-chill everything. A cold dessert travels much better than one at room temperature.
- Use a cooler with frozen ice packs, but place a kitchen towel between the packs and your dessert container to prevent freezer burn.
- For cupcakes or cakes, a sprinkle of cornstarch on the bottom of the box can absorb any minor condensation.
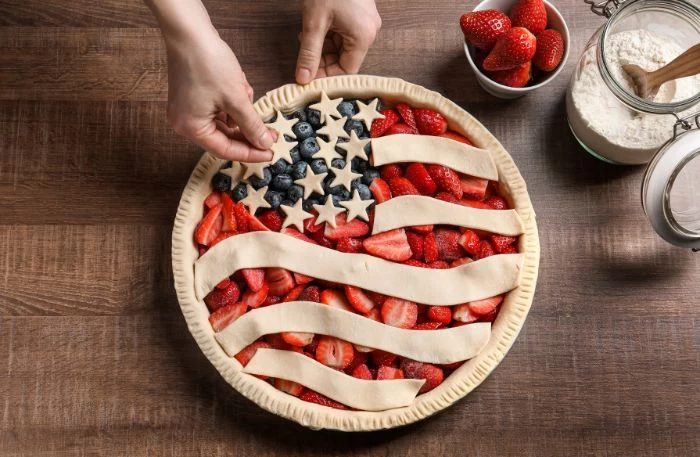
How do you prevent fruit toppings from making your cake soggy overnight?
Create a moisture barrier. Before adding fresh fruit like sliced strawberries to a cake or tart, brush the surface with a thin layer of melted white chocolate or a simple apricot glaze (just strained apricot jam warmed with a teaspoon of water). This invisible shield will keep the cake base perfectly tender and the fruit topping vibrant.
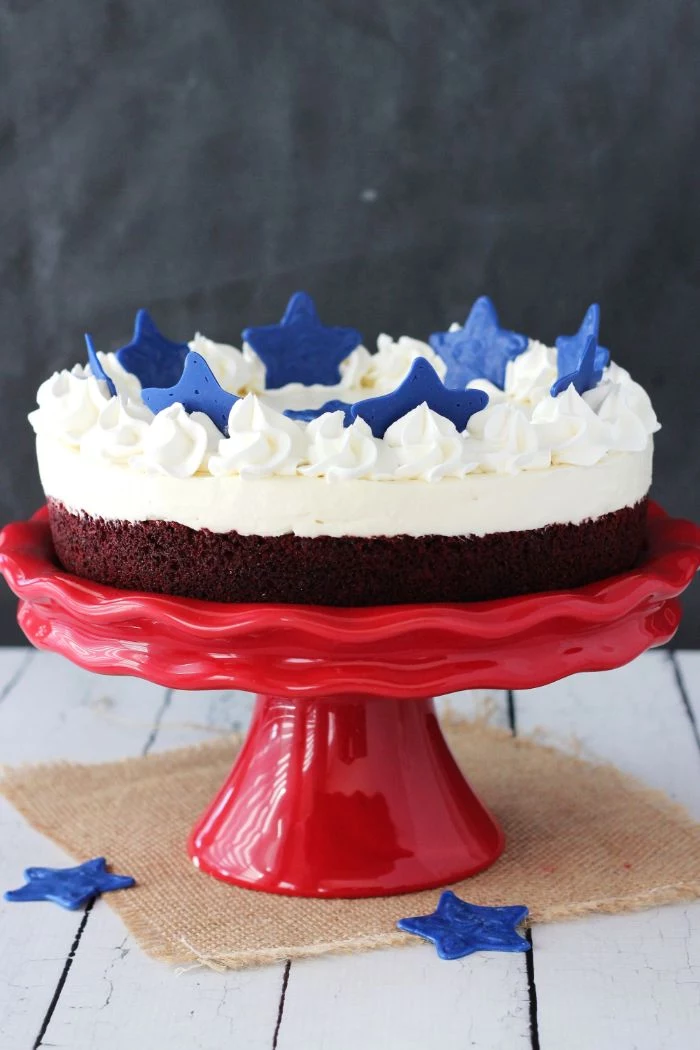
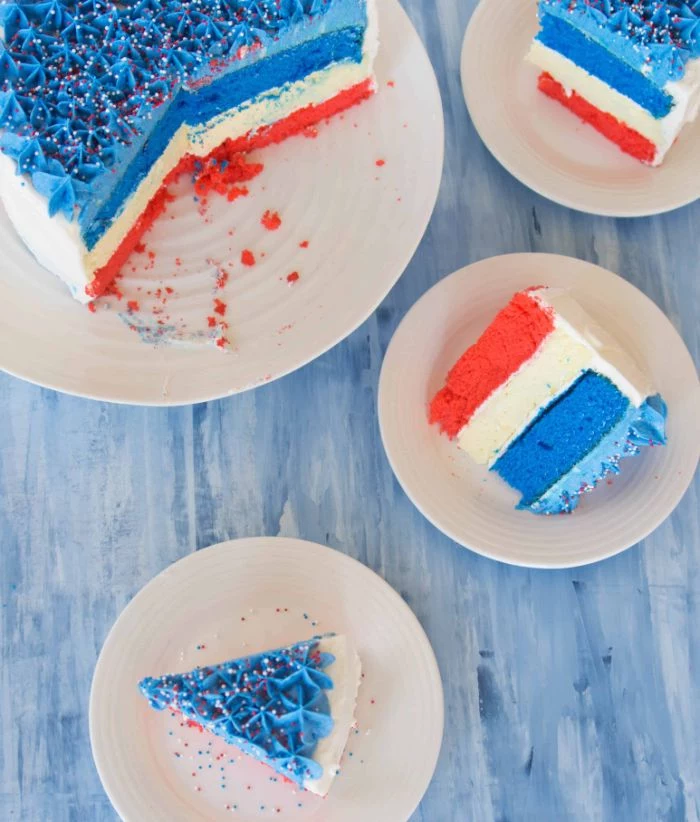
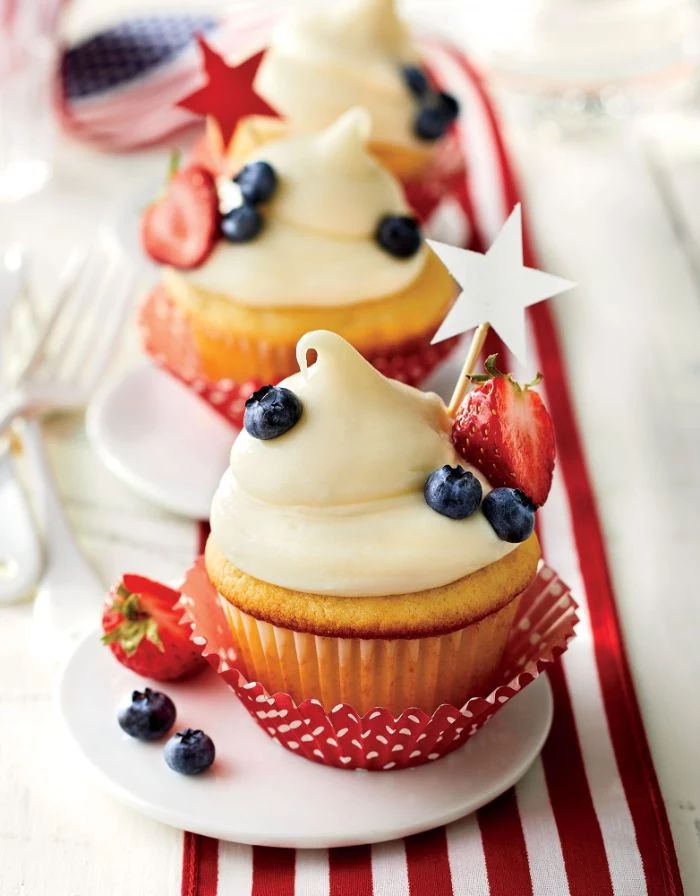
American Buttercream: Sweet, simple, and fast. Made with butter and powdered sugar. It’s delicious but can get soft and weepy in high humidity or direct sun.
Swiss Meringue Buttercream: Involves heating egg whites and sugar before whipping. It’s incredibly silky, less sweet, and significantly more stable in the heat, making it the professional’s choice for outdoor events.
- It pipes into sharp, stable peaks that won’t melt.
- It holds its form for hours, even at warm outdoor parties.
- It has a rich, creamy texture, not a greasy one.
The secret? Stabilized whipped cream. Simply beat a teaspoon of unflavored gelatin (bloomed in a tablespoon of cold water) or cornstarch into every cup of heavy cream before whipping.
Did you know? Around 80% of what we perceive as taste is actually derived from our sense of smell. This is why using fresh, aromatic fruits like peak-season raspberries and strawberries provides a flavor punch that artificial flavorings can’t replicate.
When you place a dessert topped with fragrant, sun-ripened berries on the table, you’re creating a multi-sensory experience before anyone even takes a bite. The aroma promises a fresh, vibrant flavor that perfectly complements the visual appeal.
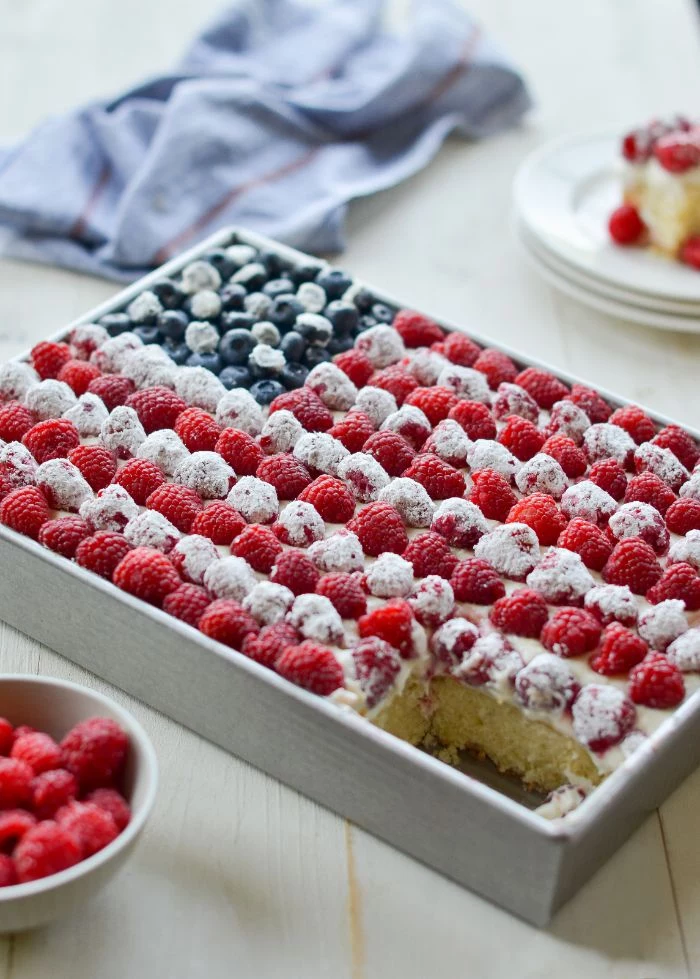
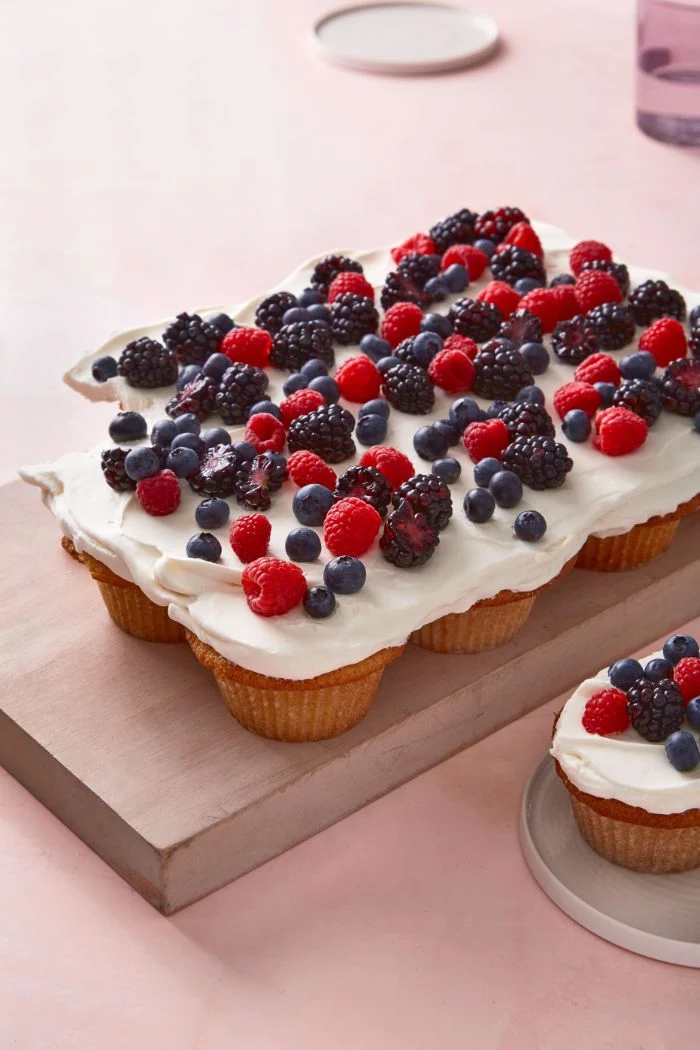
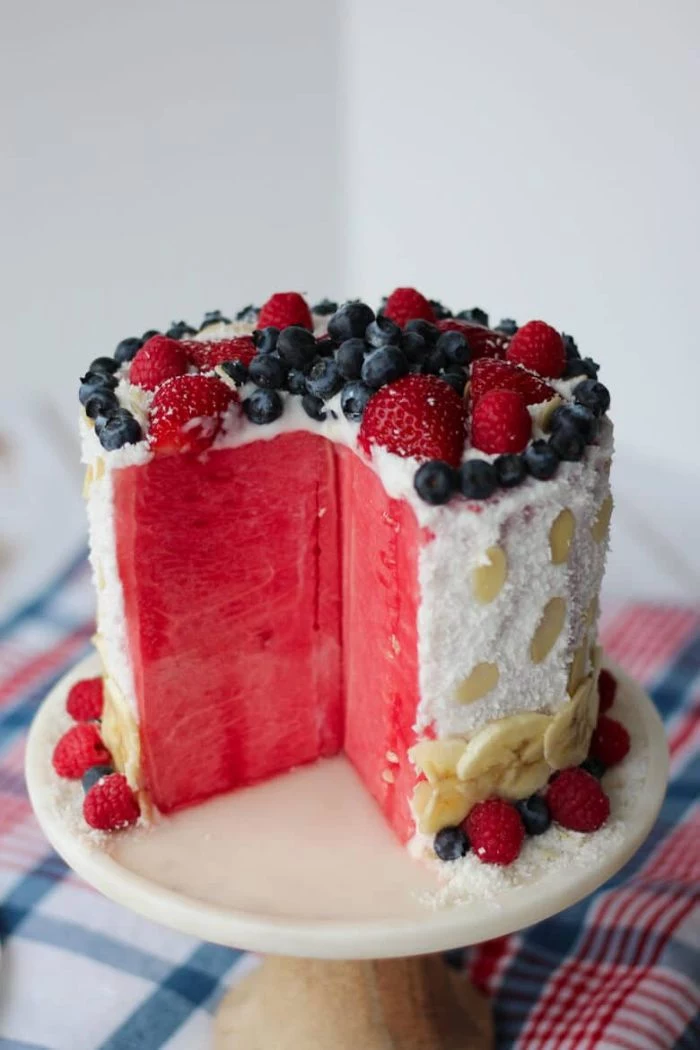
For an effortlessly chic dessert, lean into a minimalist white canvas. An elegant angel food cake, a wobbly panna cotta, or a simple vanilla bean cheesecake needs only a scattering of fresh blueberries and sliced raspberries to become a patriotic showstopper. The contrast makes the fruit colors pop even more intensely.
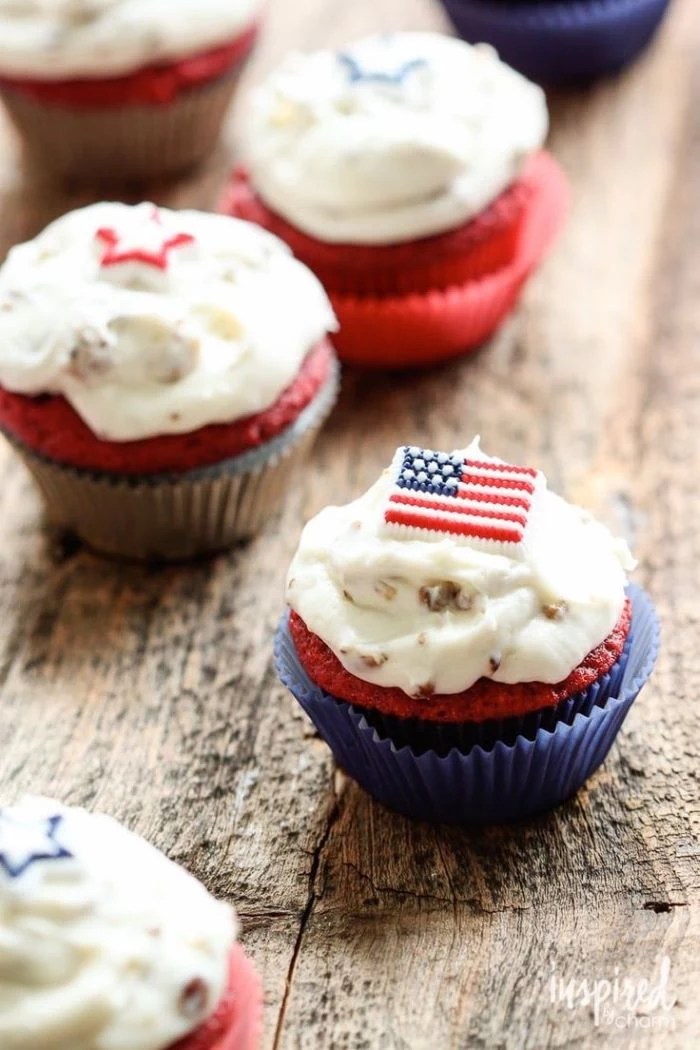
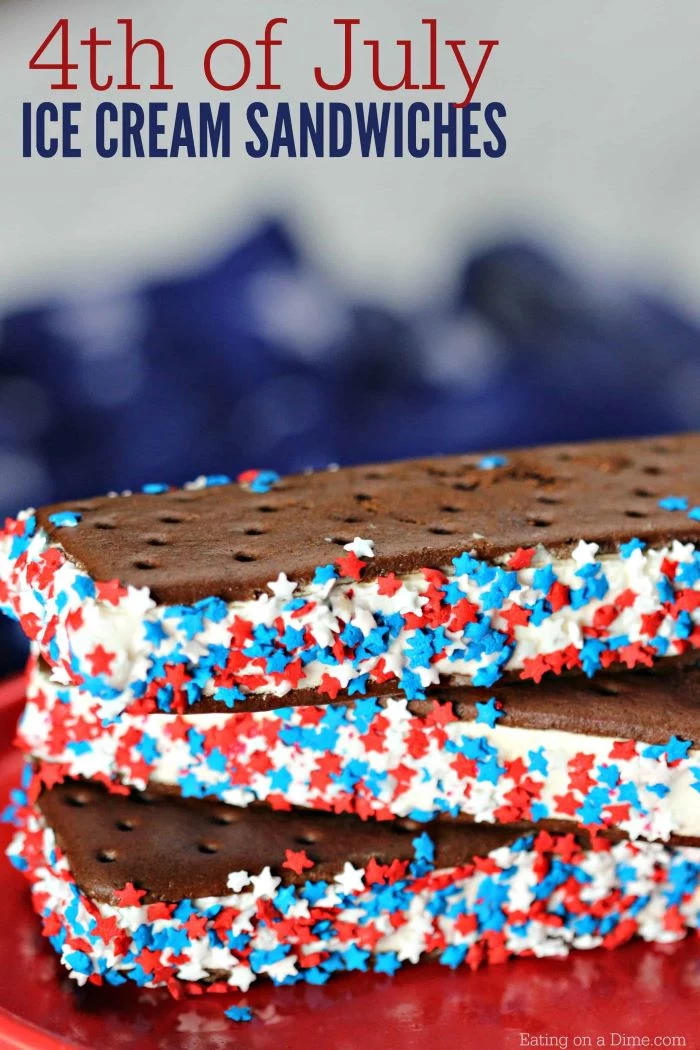
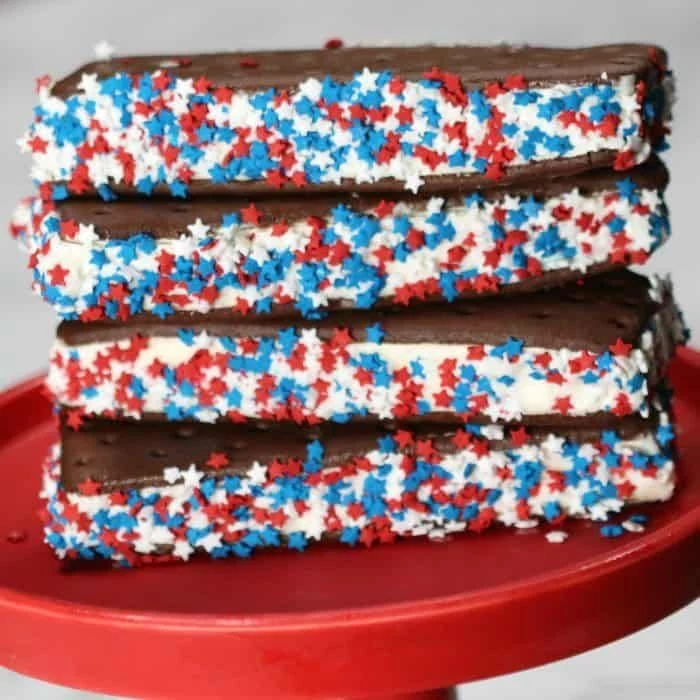
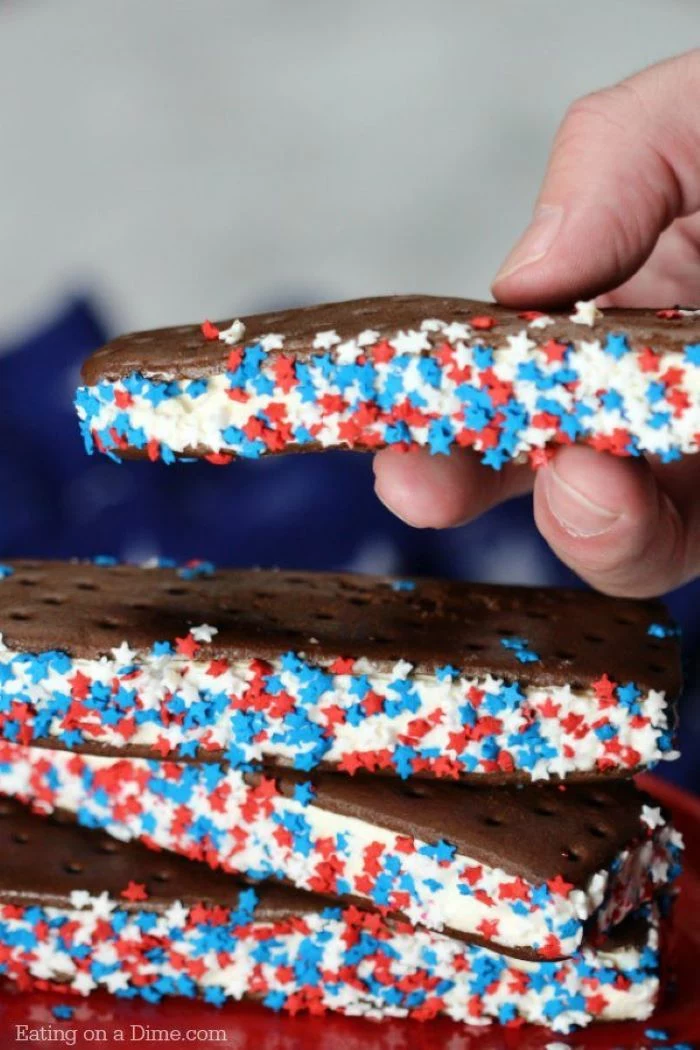
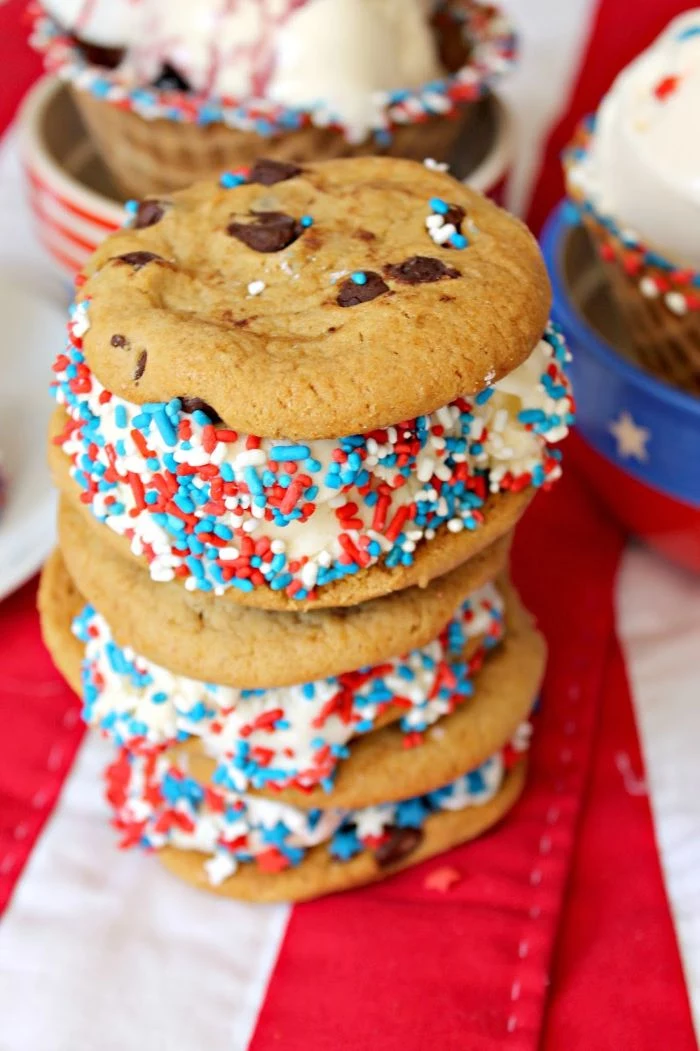
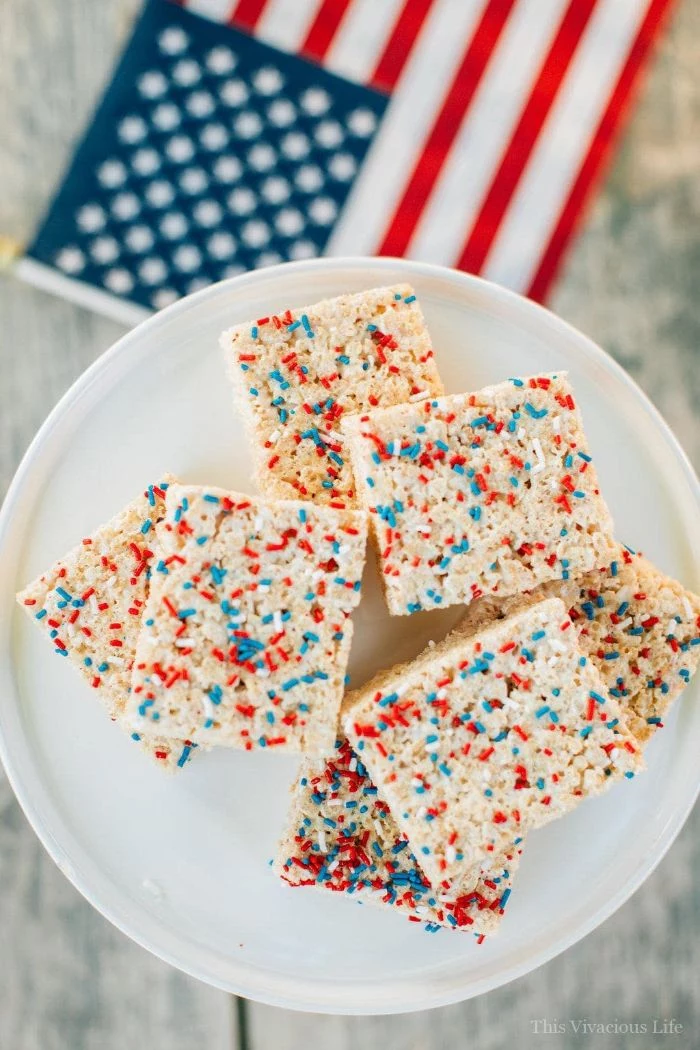
Don’t overlook the power of sprinkles, but choose wisely. For coating ice cream sandwiches, chunkier ‘jimmies’ or decorative star-shaped quins are fantastic. For a more delicate shimmer on chocolate bark or frosting, use fine sanding sugar. The brand Sprinkle King offers a huge variety of colors and shapes perfect for getting specific with your design.
My blue food coloring turned my cake batter a weird teal color! What happened?
You’re likely seeing the yellow tones of your butter and egg yolks interacting with the blue dye. To counteract this and achieve a true, deep blue, add a minuscule—and I mean toothpick-tip tiny—amount of violet gel coloring, like AmeriColor’s Regal Purple. It will neutralize the yellow and give you the royal blue you’re looking for.
The dreaded color bleed: To keep your red, white, and blue layers in a trifle or layered cake sharp and distinct, a ‘crumb coat’ is your best friend. After chilling your first colored layer, apply a very thin layer of plain white frosting to seal it before adding the next color. This acts as a buffer and prevents the colors from smearing into each other.
Get the kids involved with a no-fuss decorating station. Set out store-bought angel food cake slices, bowls of whipped cream, and small dishes of blueberries, sliced strawberries, and patriotic sprinkles. It’s a fun activity that takes all the baking pressure off you and results in personalized, festive treats.
- Use store-bought pound cake or angel food cake as a base.
- Offer fresh blueberries and sliced strawberries or raspberries.
- Provide bowls of sprinkles, whipped cream, or yogurt.
For a truly intense red flavor that goes beyond just color, consider making a quick raspberry or cherry compote. Simply simmer one cup of fruit (fresh or frozen) with two tablespoons of sugar and a squeeze of lemon juice until it thickens. Let it cool completely. It’s a phenomenal filling for cupcakes or a topping for cheesecake, providing a tartness that beautifully cuts through the sweetness.
Frozen Fruit: Excellent for baked-in applications like muffins, cobblers, or compotes. It’s budget-friendly and available year-round. Thaw and drain well to avoid adding excess water to your batter.
Fresh Fruit: Unbeatable for toppings and decorations where appearance and firm texture are key. Best used for garnishing tarts, cakes, and fruit salads just before serving.
- It provides a beautiful, professional-looking gloss.
- It prevents fresh fruit from drying out or browning.
- It adds a subtle, complementary flavor.
The trick is a simple apricot glaze. Gently heat 1/4 cup of smooth apricot jam with one teaspoon of water until liquid, then brush it lightly over your finished fruit toppings. It’s the oldest trick in the patisserie playbook.
When using blueberries, embrace their deep, moody color. Instead of trying to make them a bright, artificial blue, let their natural color shine. A handful of fresh blueberries tossed in a tiny bit of sugar to make them glisten is often more elegant and appetizing than a swirl of blue food coloring. For a pop of brightness, pair them with the brilliant red of a raspberry.
Thinking beyond the USA? The French celebrate Bastille Day with the same color palette. Draw inspiration from their patisseries with a tower of red, white, and blue macarons, or a simple clafoutis (a baked custard-like dessert) filled with a mix of red cherries and dark blueberries for a rustic, yet elegant, ‘bleu, blanc, rouge’ treat.
A 2018 study published in the journal ‘Food Quality and Preference’ confirmed that frosting texture dramatically impacts enjoyment. Testers consistently rated smoother frostings as tasting higher quality, even when the flavor was identical to grittier versions.
This is why sifting your powdered sugar is a non-negotiable step for American buttercream! It removes clumps and ensures that ultra-smooth, professional mouthfeel that elevates a simple cupcake to a gourmet treat.
Can I prep my desserts ahead of time to save stress on the day of the party?
Absolutely! Cake layers can be baked, cooled, and frozen up to a week in advance. Frostings and compotes can be made and refrigerated for three days. The key is assembly: for the freshest result, frost cakes, build trifles, and top desserts with fresh fruit on the day you plan to serve them.
The Freezer is your best friend: A quick 10-15 minute chill in the freezer is the secret to clean, sharp slices on layered cakes or cheesecakes. It firms up the frosting and fillings just enough to prevent smearing when your knife goes through. This also works wonders for setting the chocolate on dipped strawberries or pretzels in a hurry.
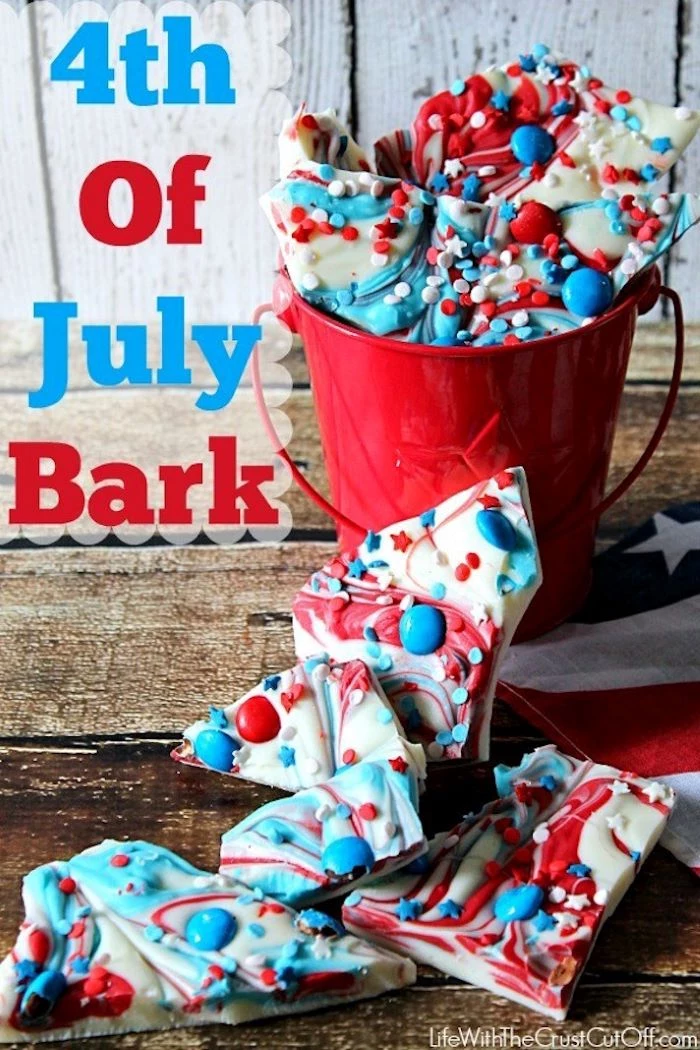
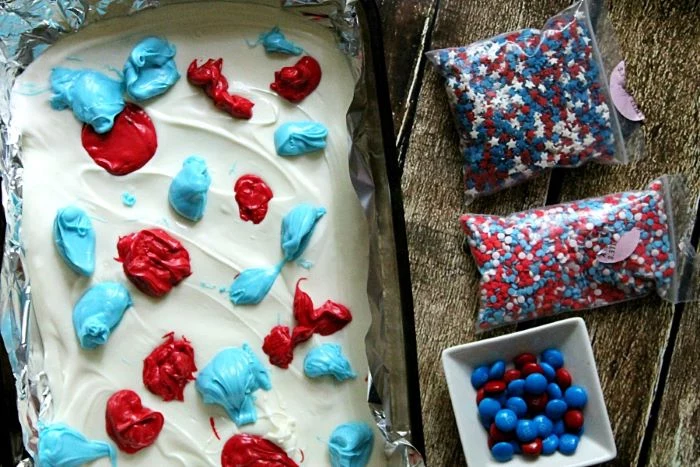
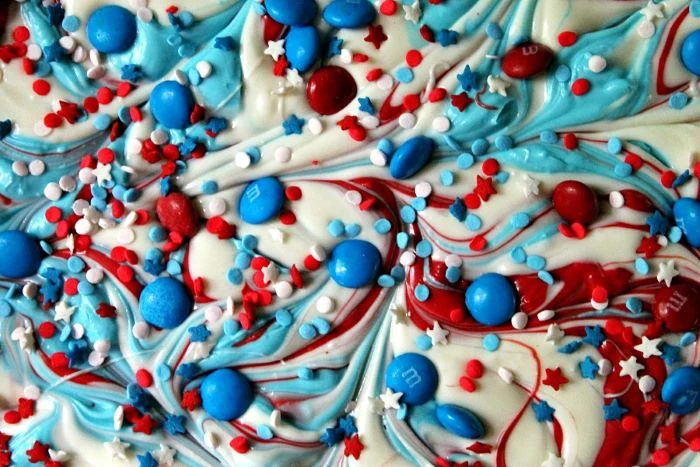
For an easy win that always wows, make a patriotic swirled bark. Melt high-quality white chocolate (like Guittard’s Choc-Au-Lait wafers) and pour it onto a parchment-lined baking sheet. Then, drizzle melted red and blue candy melts (Wilton makes vibrant ones) over the top and use a skewer to gently swirl the colors. Toss on some festive sprinkles before it sets. Break into shards when firm. It’s ready in 20 minutes and looks spectacular.

For a perfectly white, fluffy frosting that holds up to heat, skip the butter and make a marshmallow frosting instead. Gently melt a bag of mini marshmallows with a few tablespoons of milk, let it cool slightly, then whip it with powdered sugar until it forms stiff peaks. It’s essentially an edible, stable cloud—perfect for topping cupcakes that will sit outdoors.
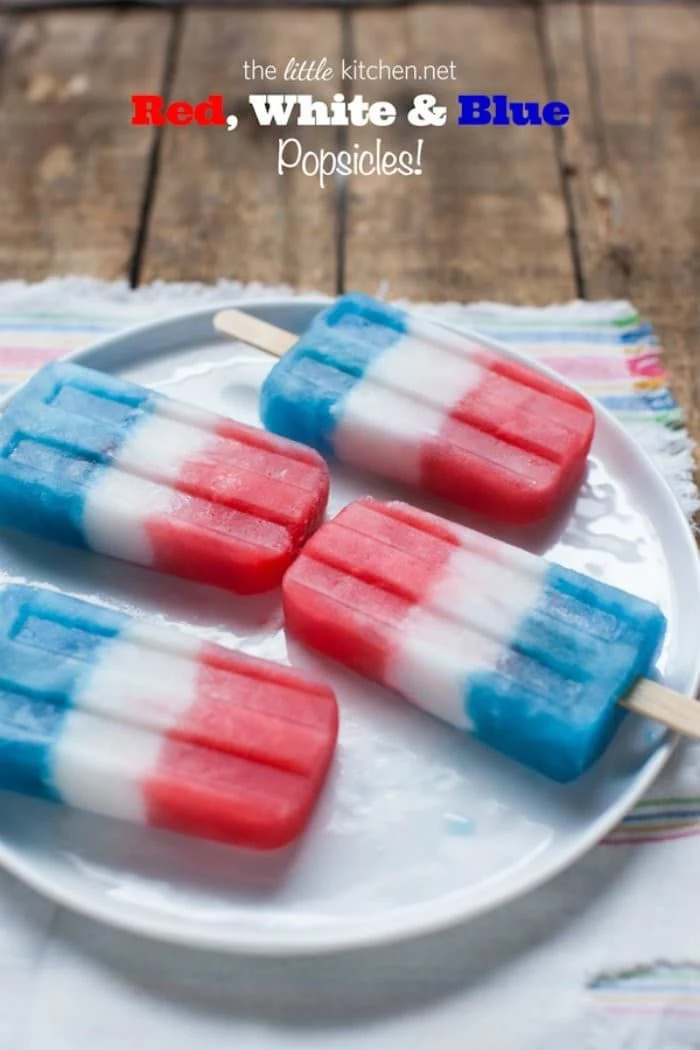
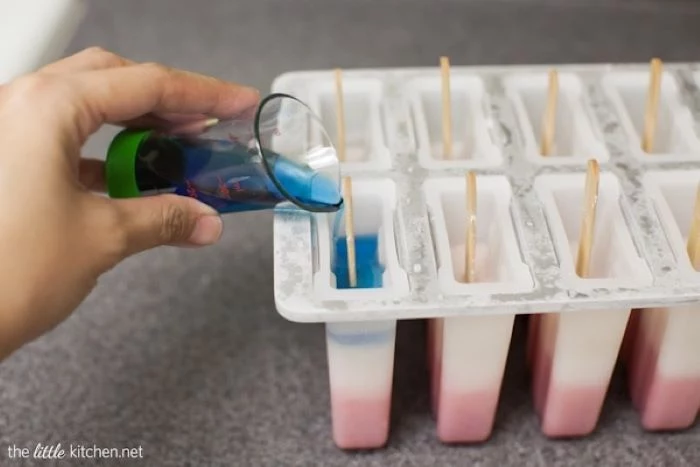
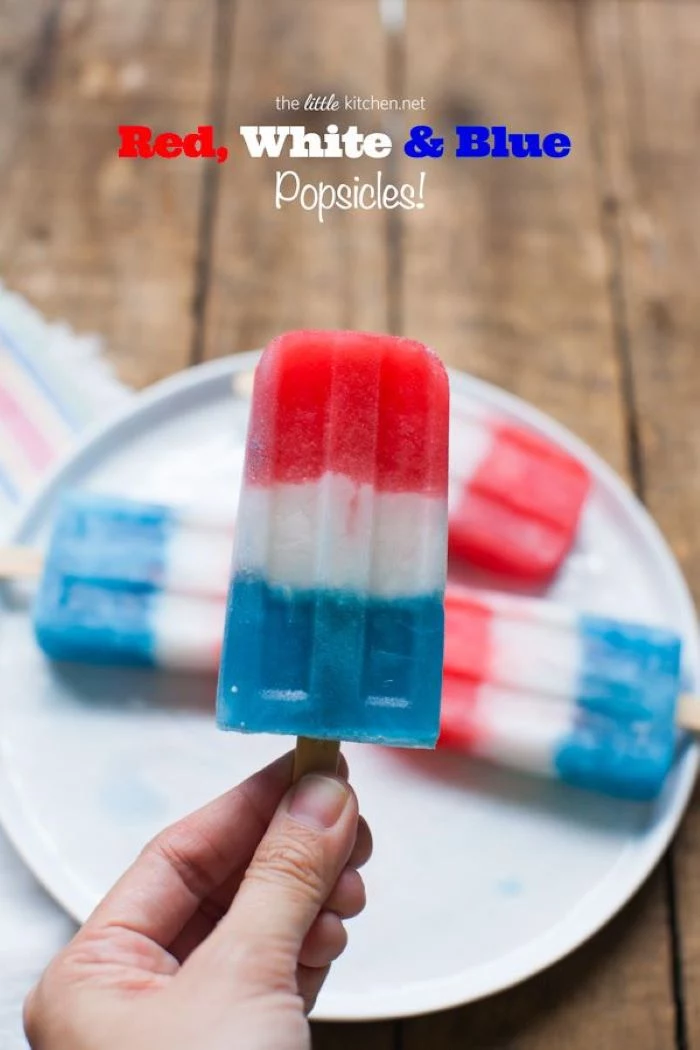
If you’re making popsicles, use a simple syrup (equal parts sugar and water, boiled and cooled) as your base instead of just juice or water. The sugar lowers the freezing point, which prevents the formation of large ice crystals. This results in a popsicle with a smoother, less icy texture that’s much more pleasant to eat.
Layering a no-bake trifle is all about texture and color contrast. Here’s a can’t-fail formula:
- Bottom Layer (White): Crumbled shortbread cookies or cubes of angel food cake.
- Middle Layer (Red): Macerated strawberries or a layer of raspberry jam.
- Top Layer (White): A generous dollop of vanilla pudding or whipped cream cheese filling.
- Garnish (Blue): A careful arrangement of fresh blueberries on top.