I’ve spent countless hours in professional kitchens, and if there’s one thing I’ve learned, it’s this: killer appetizers are the soul of a great party. They’re the first thing your guests taste and the perfect excuse to start a conversation. Honestly, they set the whole mood.
But here’s the secret the pros know: it’s not about slaving over complicated recipes. Success comes from smart planning and solid techniques. It’s about making food that’s a breeze to eat while juggling a drink and a good story. This is my playbook, filled with the methods and mindset I wish I had when I was starting out. Let’s get into it.
First Things First: Your Appetizer Game Plan
Before you even think about chopping a single onion, we need to talk strategy. A truly memorable appetizer spread isn’t just a random assortment of snacks; it’s a carefully balanced experience.
How Much Food Do I Actually Need?
This is the number one question every host asks, so let’s clear it up. My go-to rule is pretty simple:
For a shorter cocktail party (around 2 hours): Plan on serving about 4 to 6 different bites per person.
If the appetizers are the meal: You’ll want to ramp that up significantly. Aim for 10 to 12 bites per person to make sure everyone leaves full and happy.
Balancing Flavors and Textures
Your guests’ taste buds crave variety. Think of it like putting together a band—you need different instruments to make a great song. Aim for a mix:
Rich & Savory: This is your comfort zone—think creamy cheeses, flaky pastries, or perfectly fried bites.
Fresh & Bright: Things with crisp veggies, fresh herbs, or a zip of citrus. These act like a reset button for the palate.
Sweet & Salty: This combo is a classic for a reason. Think glazed meatballs or fruit paired with cured meats. It always works.
And don’t forget texture! You want a mix of creamy, crunchy, crisp, and soft. The pop of a cherry tomato next to a smooth dip… that’s the good stuff.
The Caterer’s Secret: Managing Temperature
Okay, this is how you stay sane and actually enjoy your own party. You absolutely cannot make everything at the last minute. A smart menu pulls from three different temperature categories:
Hot Stuff: These need to be served fresh from the oven or pan. Think warm meatballs, baked dips, or fritters.
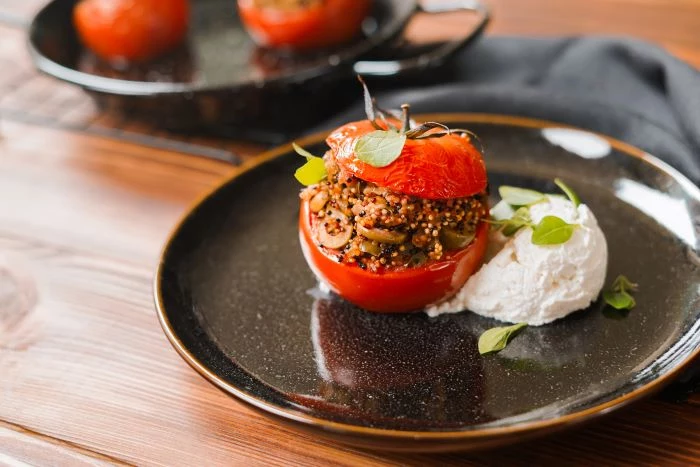
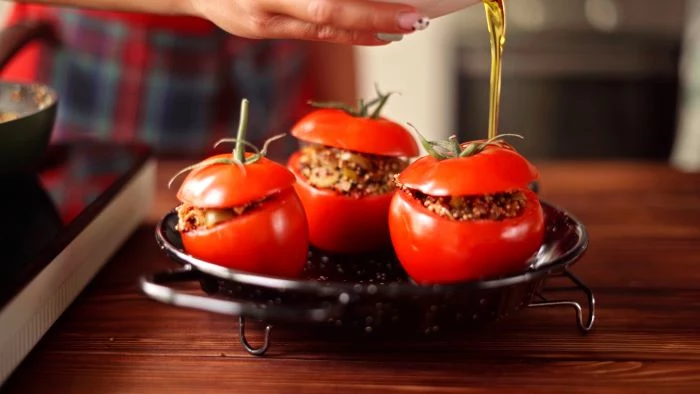
Room Temp Heroes: These are your best friends. Dips, marinated bites, and stuffed veggies can be made ahead and sit out safely for a bit.
Chilled & Ready: These come straight from the fridge. Think shrimp cocktail, fresh spring rolls, or a tartare.
Heads up on safety! This is non-negotiable. The ‘temperature danger zone’ for food is between 40°F and 140°F. In this range, bacteria can have a field day. Hot food needs to stay hot (above 140°F) and cold food cold (below 40°F). As a rule, never let food sit in that danger zone for more than two hours. It’s a core principle for any food pro, and it’s just as important at home.
Warm and Hearty Appetizers
These are the cozy, welcoming bites that often become the star of the show. The trick is choosing recipes you can prep ahead and then cook right before showtime.
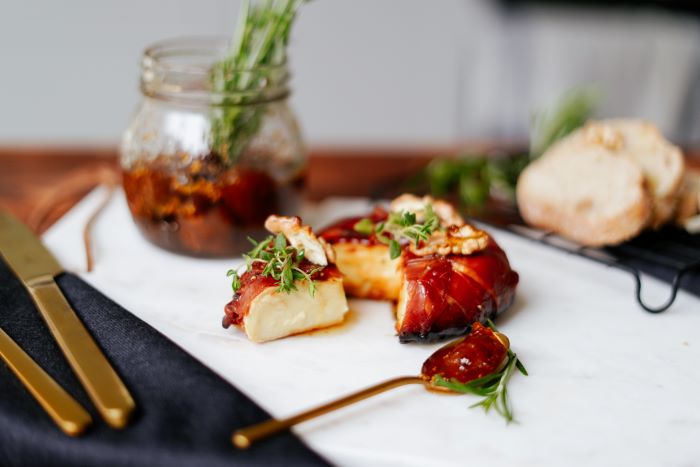
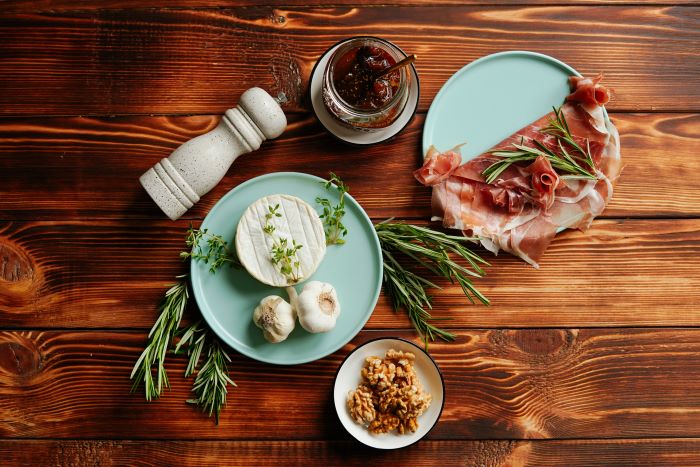
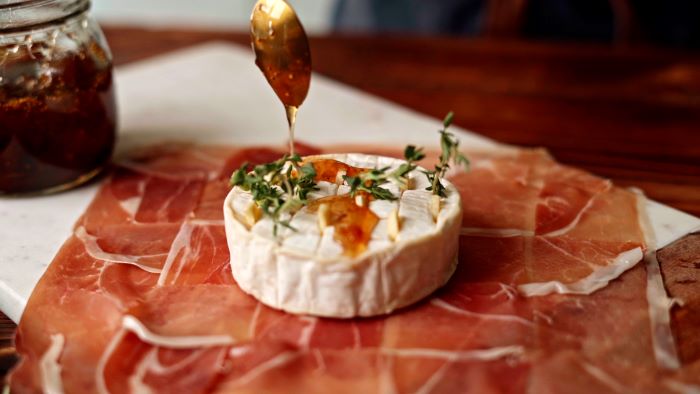
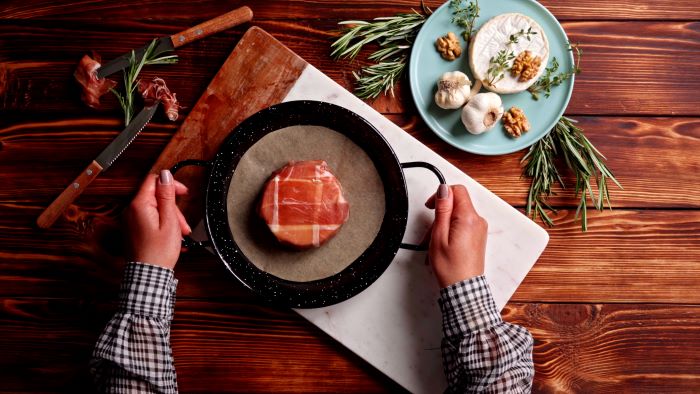
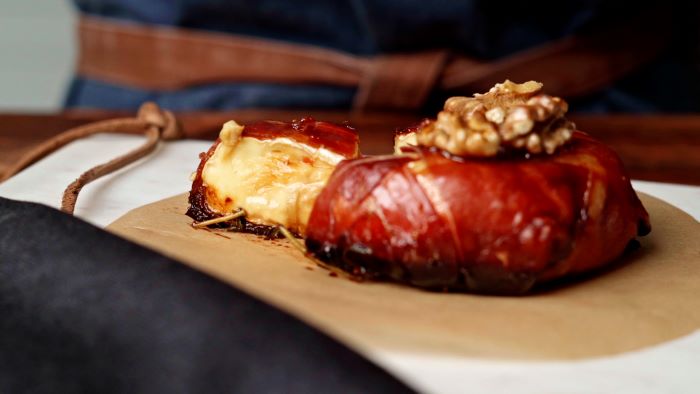
1. Prosciutto-Wrapped Baked Brie with Fig Jam
This is a classic for a reason—it looks stunning and tastes incredible. But getting it right is all about the details.
The Ingredients:
1 (8-ounce) wheel of Brie cheese, kept cold
4-5 thin slices of prosciutto
2 tablespoons fig jam, plus more for serving
1 clove garlic, thinly sliced (optional, but recommended!)
1 sprig fresh thyme or rosemary (also optional, but adds a lovely aroma)
1/4 cup walnuts or pecans, toasted
Crackers or a sliced baguette for serving
The Pro Technique:
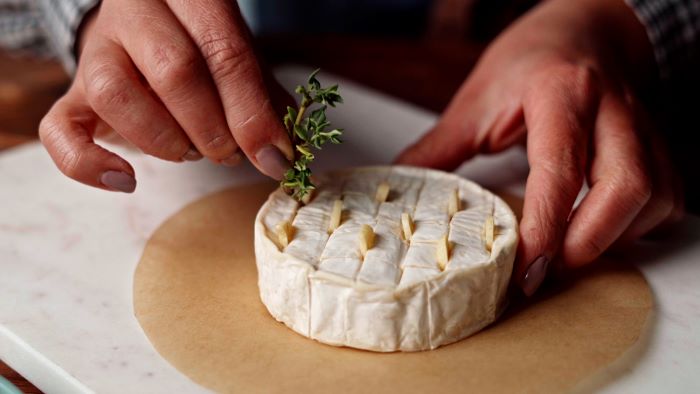
Prep the Cheese: Start with a cold wheel of Brie so it’s easy to handle. If you’re using garlic and herbs, make a few small, shallow slits in the top rind and tuck them in. Don’t go too deep—you’re infusing flavor, not creating an escape route for the cheese.
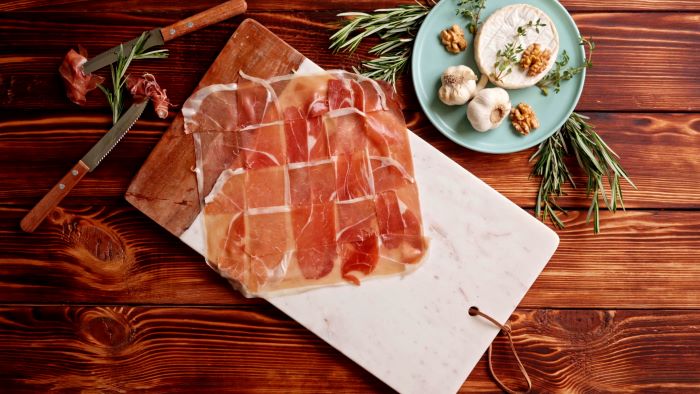
The Prosciutto Weave: On a piece of parchment paper, lay the prosciutto slices out in a star or cross shape, overlapping them a bit in the middle. This ensures the entire wheel of Brie gets covered.
Wrap It Tight: Place the Brie in the center, spread the fig jam over the top, and then fold the prosciutto slices up and over the cheese, pressing gently to seal it all in.
Bake with Confidence: Pop it onto a parchment-lined baking sheet. Bake in a preheated 400°F oven for 15-20 minutes. You’ll know it’s done when the prosciutto is crisp and golden and the cheese feels very soft to the touch.
Let It Rest: This is important! Let it sit for 5 minutes before moving it to a platter. This helps the cheese set up just enough so it doesn’t turn into a lava flow when cut. Top with more jam and those toasted nuts. And please, toast the nuts—it makes a world of difference.
Troubleshooting & Pro Tips:
Budget-Friendly Swap: Let’s be real, prosciutto can be pricey, sometimes running you $8 a pack. For a great alternative, use a sheet of puff pastry! It’ll only set you back about $4 and gives you that same impressive, wrapped look. Just brush with an egg wash before baking.
Make-Ahead Magic: You can assemble the wrapped Brie up to a day ahead. Just wrap it tightly in plastic and keep it in the fridge. Bake it straight from cold, adding a few extra minutes to the bake time.
Leaky Cheese Fix: If your cheese leaks everywhere, your oven was probably too hot or you left it in too long. A tight wrap is your best defense.
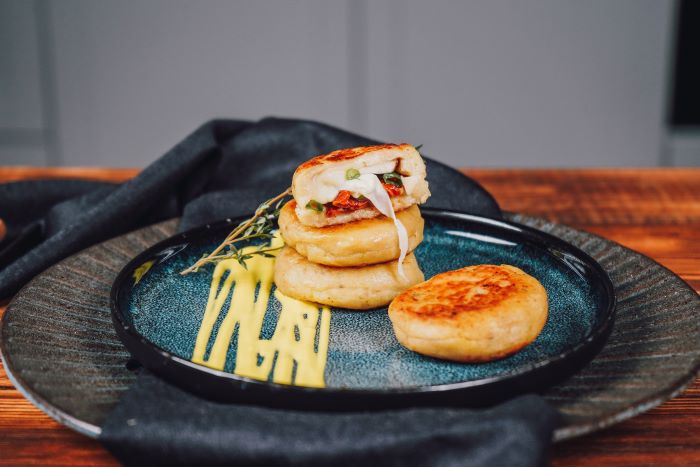
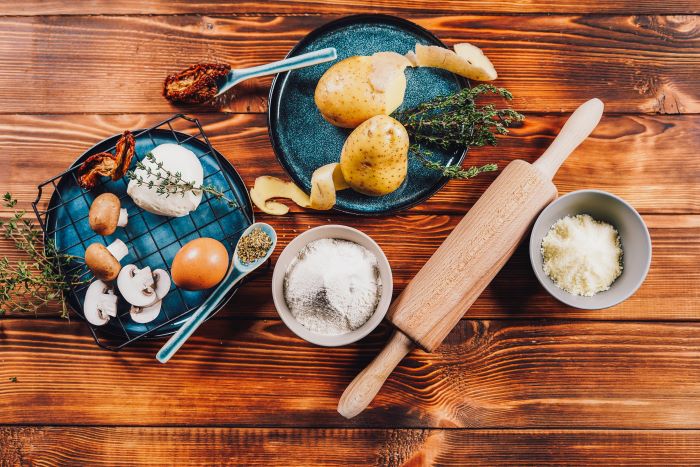
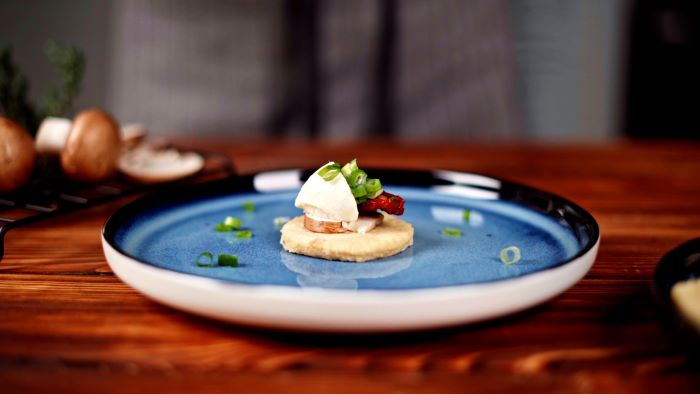
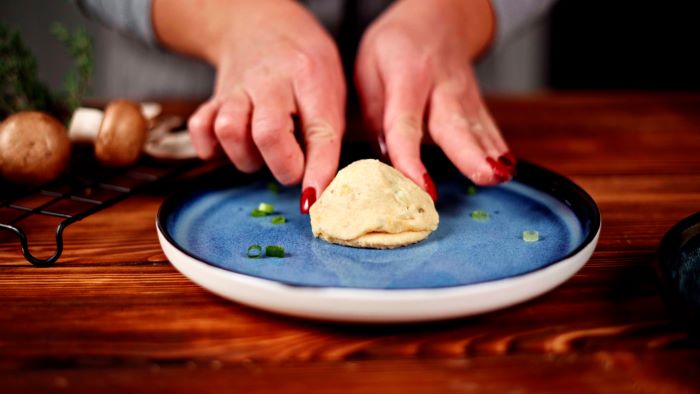
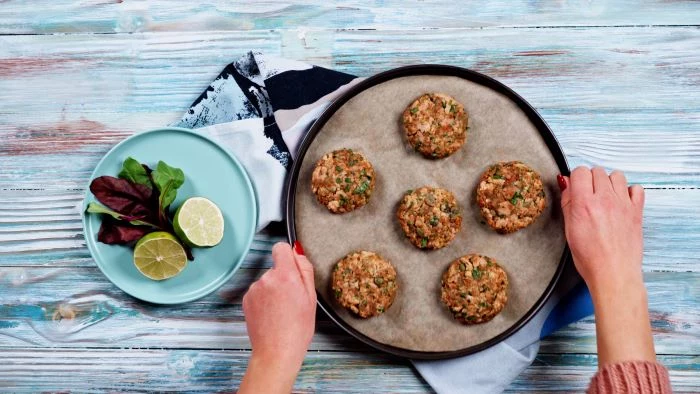
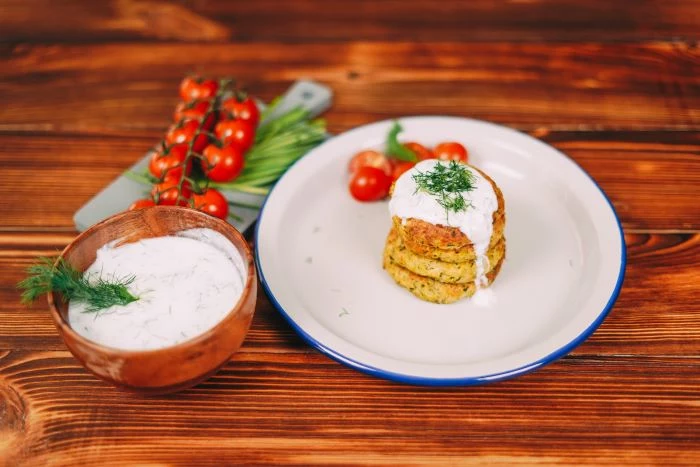
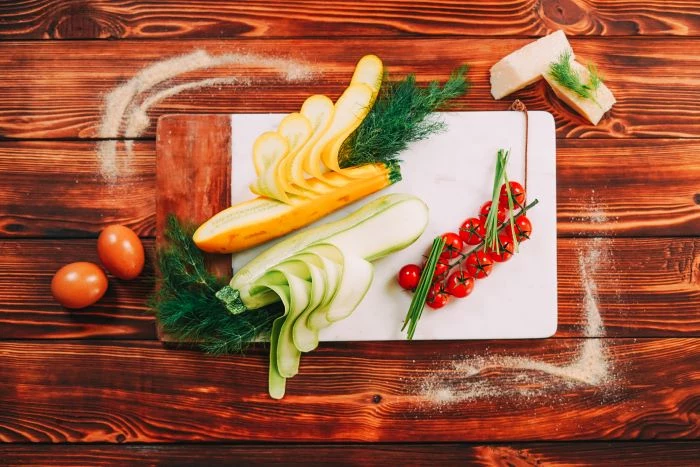
2. Zucchini and Squash Fritters with Tzatziki
Fritters are a catering workhorse. You can make them with almost any veggie, but the absolute enemy of a good fritter is water. Get rid of the water, and you get a perfectly crisp bite every time.
The Ingredients:
1 medium zucchini
1 medium yellow squash
1 teaspoon salt
2 large eggs, lightly beaten
1/2 cup all-purpose flour (or rice flour for a gluten-free option)
1/4 cup grated Parmesan cheese
1/2 cup shredded sharp cheddar or mozzarella
2 scallions, finely chopped
Black pepper to taste
Olive oil for cooking
Tzatziki sauce for serving (store-bought is fine!)
The Pro Technique:
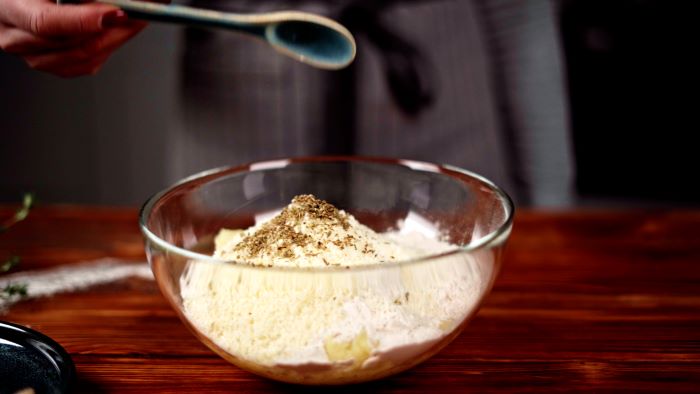
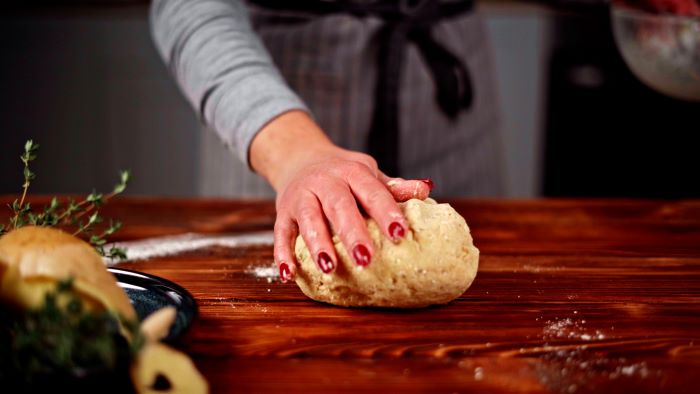
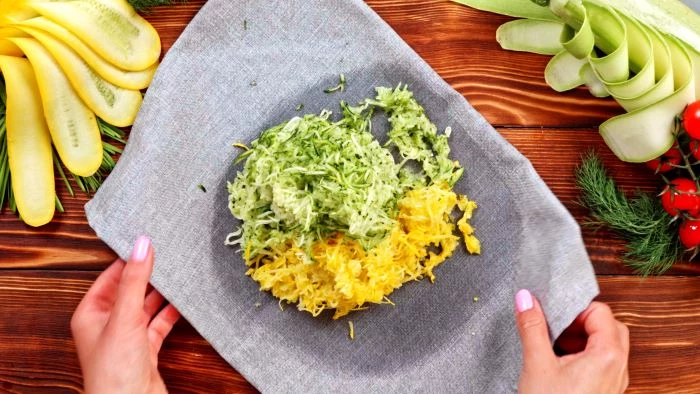
The Most Important Step: Shred the zucchini and squash on a box grater. Put the shreds in a colander, toss with the salt, and let it sit for about 30 minutes.
Squeeze, Squeeze, Squeeze: Pile the salted shreds onto a clean kitchen towel (one you don’t mind getting messy) or cheesecloth. Now, wring it out like your life depends on it. You will not believe how much water comes out—from one medium zucchini, you should easily get half a cup of liquid! This is the key to crispy, not soggy.
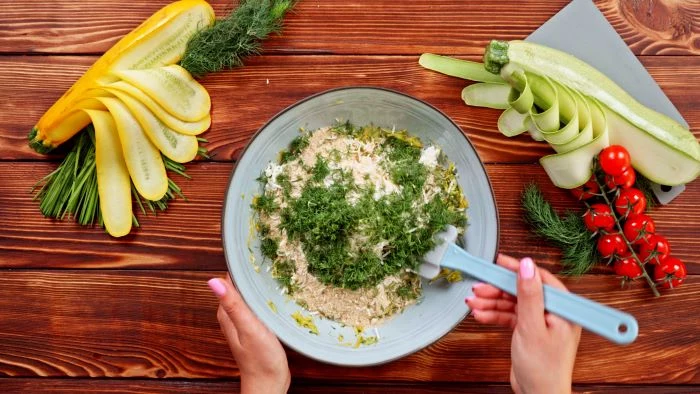
Mix Gently: In a bowl, combine the super-dry zucchini, eggs, flour, cheeses, scallions, and pepper. Mix until just combined; overmixing can make them tough.
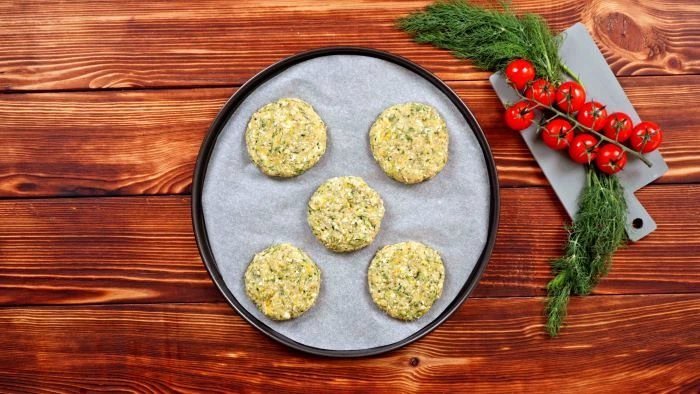
Cook Your Way: You’ve got two great options here. For classic, pan-fried fritters, heat a quarter-inch of olive oil in a skillet over medium-high heat. Drop in spoonfuls of the batter, flatten them slightly, and fry for 3-4 minutes per side until golden brown. For a lighter, less hands-on method, you can bake them. Form small patties, place them on a parchment-lined sheet, brush with oil, and bake at 400°F for 20-25 minutes, flipping halfway through. The fried version is definitely crispier, but the baked one is easier and healthier.
Troubleshooting & Pro Tips:
Make-Ahead Pro Tip: You can freeze the cooked fritters! Let them cool completely, lay them on a baking sheet to freeze solid, then toss them into a freezer bag. Reheat them straight from the freezer in a 400°F oven until crisp again. A total game-changer for party prep.
Prepping the Batter: You can make the mixture a few hours ahead, but you’ll probably need to give it one more good squeeze right before you cook, as the salt will keep pulling out moisture.
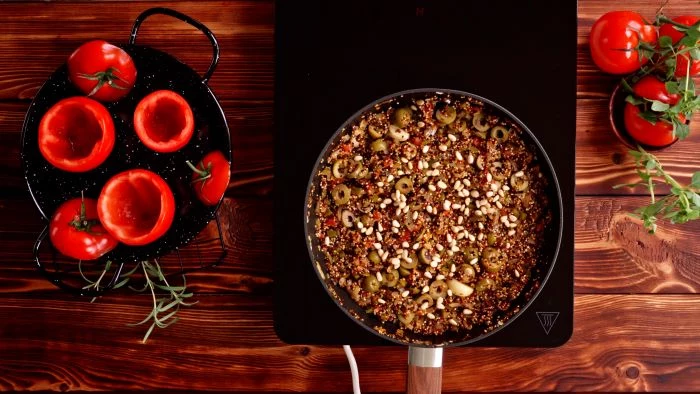
Fresh and Cold Selections
These dishes bring a clean, bright contrast to the richer stuff. They can usually be fully assembled ahead of time, which is a massive win on party day.
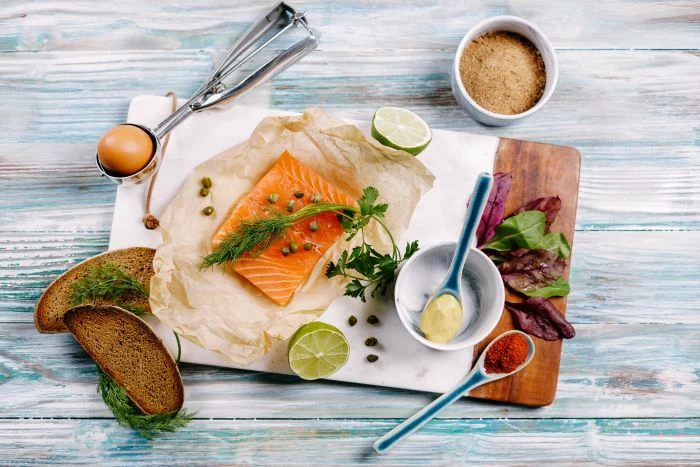
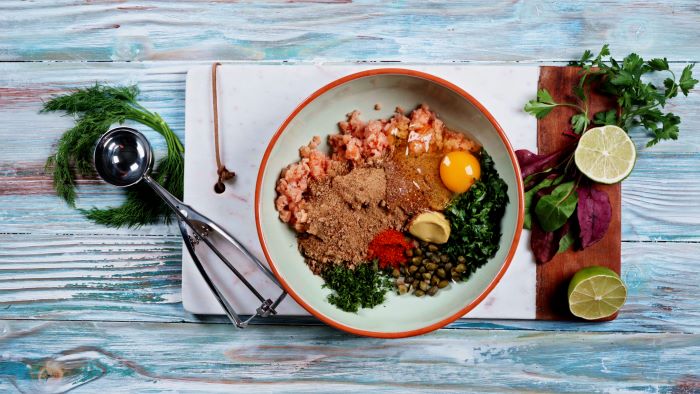
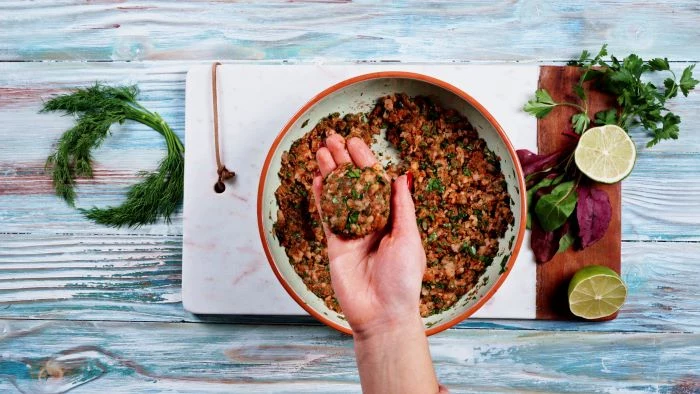
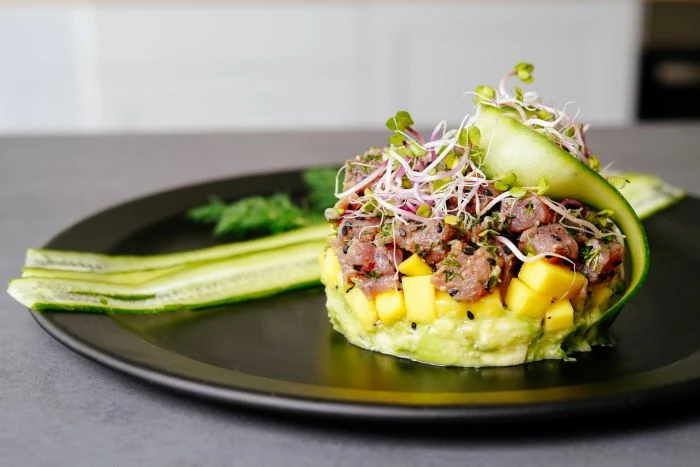
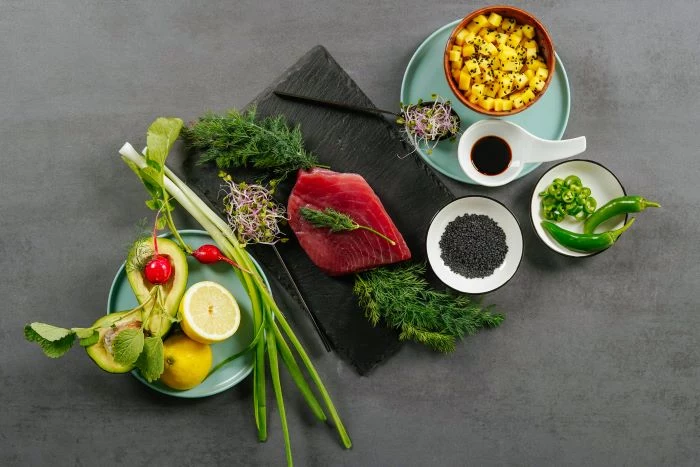
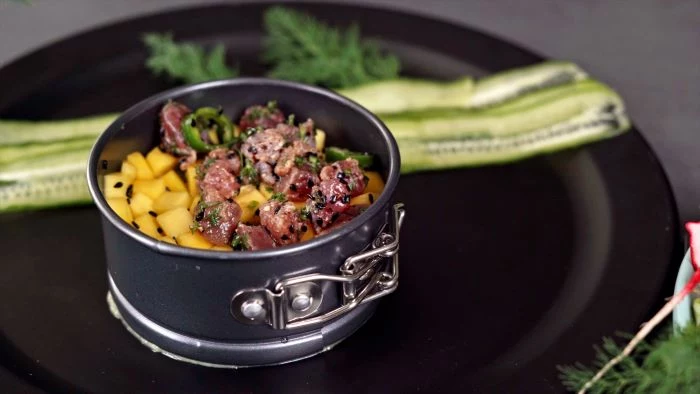
3. Sushi-Grade Tuna Tartare on Avocado Mousse
This is a showstopper. It looks incredibly elegant and tastes even better, but it requires the absolute freshest fish. No exceptions.
A Serious Note on Sourcing
When a recipe calls for ‘sushi-grade’ tuna, it means the fish is safe for raw consumption, often because it’s been flash-frozen at extremely low temperatures to kill any parasites. Let’s be real, this is a splurge. Expect to pay $20-$30 per pound for the real deal. If that’s not in the budget, I’d suggest making the shrimp spring rolls instead. Please don’t try to find a cheap substitute for raw fish—it’s just not worth the risk. Only buy from a fishmonger you trust completely.
The Ingredients:
8 ounces sushi-grade ahi tuna steak, chilled
1 tablespoon soy sauce or tamari
1 teaspoon sesame oil
1 scallion, very thinly sliced
1 teaspoon black sesame seeds
For the Avocado Mousse:
1 large ripe avocado
Juice of 1 lime
1/4 teaspoon salt
Cucumber slices or wonton crisps for serving
The Pro Technique:
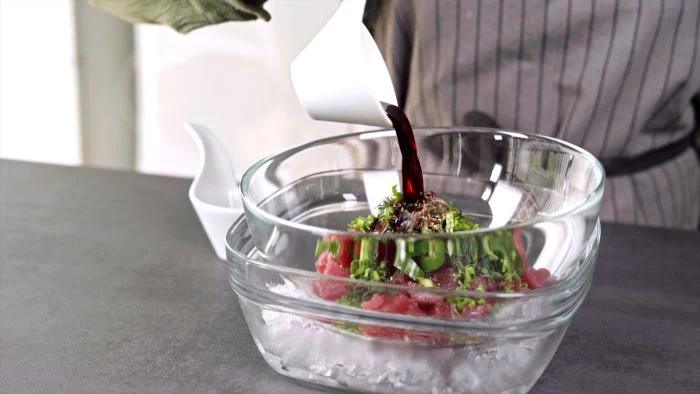
Keep It Clean & Cold: Your knife, cutting board, and hands must be impeccably clean. I always use a separate board just for raw fish. Keep the tuna in the fridge until the second you’re ready to cut it.
The Perfect Dice: Use your sharpest knife to slice the tuna into clean, 1/4-inch cubes. A dull knife will just mash the fish.
Mix at the Last Minute: In a bowl set over ice, gently mix the tuna, soy sauce, sesame oil, and scallions. Do this no more than 15 minutes before serving. Any earlier, and the acid from the soy sauce will start to ‘cook’ the fish, changing its texture.
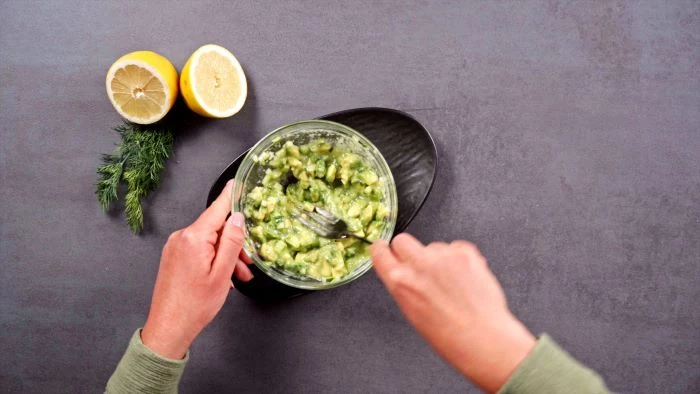
The Mousse: Mash the avocado with lime juice and salt. The lime is for flavor and to keep the avocado from turning brown.
Plating Trick: To get that pro look, use a small ring mold. Spoon in a layer of avocado mousse, top with the tuna, press gently, and lift the ring. Garnish with sesame seeds.
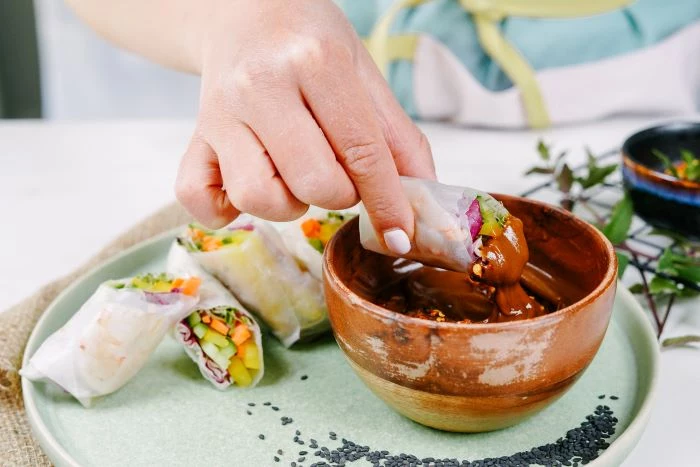
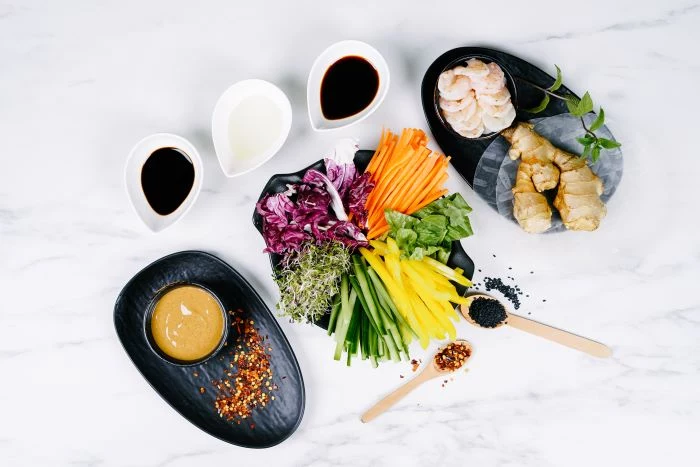
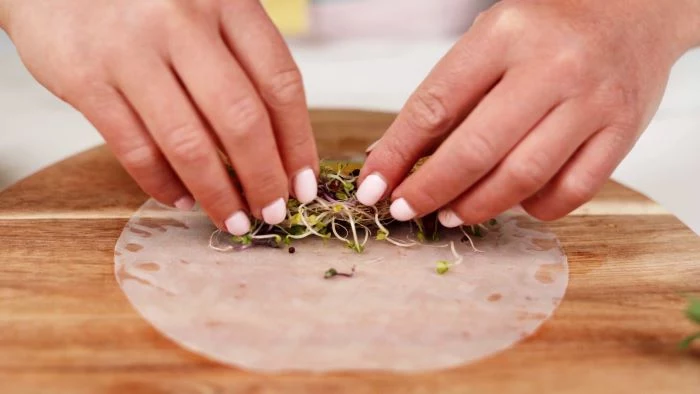
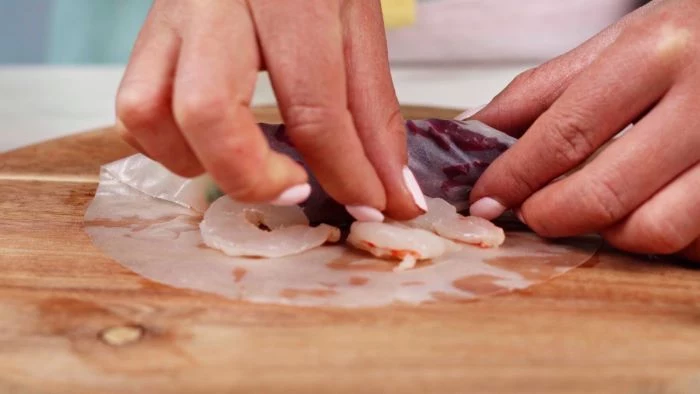
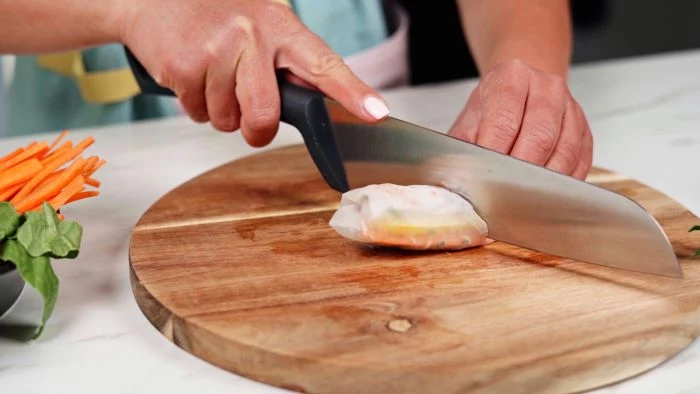
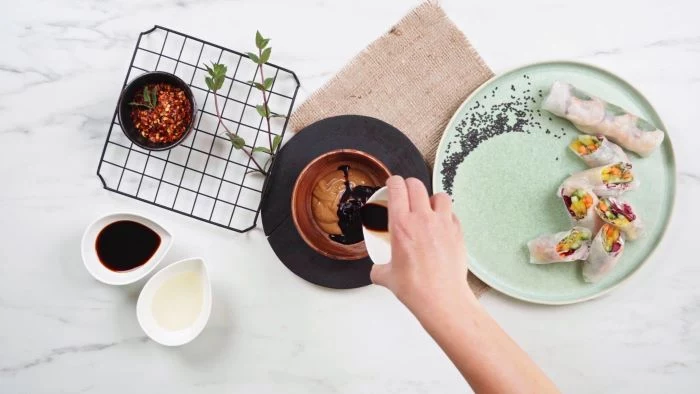
4. Fresh Shrimp Spring Rolls with Peanut Sauce
These look way more complicated than they are. It’s all about the setup. Once you get the hang of the rice paper, you’ll be rolling like a pro.
The Ingredients:
12 large shrimp, cooked, peeled, and sliced in half lengthwise
1 package of round rice paper wrappers
1 cup bean sprouts
1 carrot, julienned
1 cucumber, julienned
A handful of fresh mint and cilantro leaves
For the Peanut Sauce:
1/2 cup creamy peanut butter
2 tablespoons soy sauce
1 tablespoon honey or maple syrup
1 tablespoon lime juice
1 teaspoon sesame oil
2-4 tablespoons hot water, to thin
The Pro Technique:
Set Up Your Station: This is the key. Have all your fillings prepped and arranged in bowls, assembly-line style. Have a shallow dish of cool water for the wrappers. You can find rice paper wrappers in the international aisle of most big supermarkets, usually for just a few bucks a pack.
Hydrate the Wrapper: Dip one rice paper wrapper in the cool water for just 15-20 seconds. It should still feel a little firm. Lay it on a clean, damp surface.
Layer with Purpose: On the bottom third of the wrapper, place a small bundle of carrots, cucumber, and sprouts, topped with a few herbs. Don’t overfill!
The Roll: Fold the bottom edge up over the filling tightly. Midway up, place three shrimp halves with the pink side facing down—this is what makes them look so pretty. Fold in the sides, then roll it up snugly like a burrito.
The Sauce: Whisk all the sauce ingredients together, adding the hot water one tablespoon at a time until it’s smooth and pourable.
Troubleshooting & Pro Tips:
Torn Wrappers: It happens! If a wrapper tears, just double up and wrap the whole roll in a second one. No one will know.
Make-Ahead: You can make these a few hours in advance. Store them on a plate under a damp paper towel, but make sure they aren’t touching, or they’ll stick together. They’re best the day they’re made.
Your Party Day Timeline
The goal is to enjoy your own party, not be stuck in the kitchen. Here’s how you can prep like a pro.
2-3 Days Before: Finalize the menu and write your shopping list.
1-2 Days Before: Do all your shopping. Make the peanut sauce. Toast your nuts.
The Day Before (Prep Day!): Chop all your veggies. Make the zucchini fritter batter (store it in the fridge). Assemble the wrapped Brie. Cook and prep the shrimp.
Party Day Morning: Assemble the spring rolls. Form the fritter patties. Lay out your platters and serving utensils.
1-2 Hours Before: Set out any room-temp items. Mix up the tuna tartare.
30 Minutes Before: Bake the Brie. Start cooking the fritters in batches so they’re served hot and fresh as guests arrive.
Final Touches: Plating and Guests
A little thought in presentation goes a long way. Don’t crowd your platters—give the food some breathing room. A sprinkle of fresh parsley or a few scallions can make everything look finished. And don’t be afraid to use different shapes and sizes of platters to create interest.
Oh, and one last thing: always ask about allergies and dietary needs ahead of time. It’s a simple, thoughtful gesture. It’s easy to make swaps, like using puff pastry for a vegetarian Brie or baked tofu in the spring rolls. Labeling the dishes on the buffet with what they are (and major allergens like nuts or dairy) is a pro move that your guests will really appreciate.
Finally, be realistic. If you’re hosting more than 15 people, consider simplifying the menu or asking a friend to bring a dish. Food is supposed to be about connection, not exhaustion. Have fun with it!
Inspirational Gallery
Your best friend for party prep isn’t a recipe—it’s your calendar. Aim to do 90% of your chopping, dip-making, and meatball-rolling the day before. On party day, your only jobs should be heating, assembling, and garnishing. This single shift in timing is the difference between a stressed host and one who’s actually enjoying the party.
More than a trend, the grazing table is a mindset. Pinterest reported a 163% spike in searches for
The secret to appetizers that feel truly special?
They are effortless to eat while holding a drink.
They offer a surprising pop of flavor or texture.
They look as good as they taste, thanks to a thoughtful garnish.
The One-Hand Rule: If a guest needs to put their drink down and use two hands (or worse, a knife and fork) to eat your appetizer, it’s a party foul. Think skewers, filled pastry cups, crostini, or anything that can be picked up and eaten in one or two graceful bites. The goal is to facilitate conversation, not interrupt it.
Don’t underestimate the power of a single, amazing dip. Instead of five so-so options, focus on one signature creation. A homemade whipped feta with lemon and dill, or even a store-bought base like Boursin elevated with toasted nuts and a drizzle of hot honey, can become the centerpiece of your spread, surrounded by simple crackers, pita, and fresh-cut vegetables.
Take a cue from Spanish bodegas and think in terms of tapas—small plates with big personality. It’s a fantastic way to structure your menu:
Gambas al Ajillo: Shrimp sizzled in garlic-infused olive oil.
Patatas Bravas: Crispy fried potatoes with a spicy tomato sauce.
Pan con Tomate: Toasted bread rubbed with garlic and fresh tomato.
How do I keep hot appetizers hot without them drying out?
Your slow cooker is your secret weapon. Set it to the ‘Warm’ setting for things like meatballs, cocktail sausages, or artichoke dip. This provides gentle, consistent heat. For fried items that need to stay crisp, it’s best to cook them in batches throughout the party rather than trying to hold them for hours.
Puff Pastry: All-Butter vs. Standard: The box in the freezer aisle is a savior, but which one? All-butter puff pastry, like the one from Dufour Pastry Kitchens, delivers an incredibly rich flavor and a shatteringly crisp texture. Standard versions using vegetable shortening are still good and flaky, but lack that deep, savory taste. For an appetizer where the pastry is the star, it’s worth the splurge.
Think beyond the cracker. Crisp Belgian endive leaves are a naturally boat-shaped, gluten-free alternative perfect for scooping. They add a fresh, slightly bitter note that beautifully cuts through the richness of creamy dips or cheese spreads. Plus, they look incredibly elegant on a platter.
Light, crisp, and refreshing.
A perfect counterpoint to rich cheeses.
Gluten-free and effortlessly elegant.
The secret? Using Belgian endive leaves instead of crackers for your dips. Their natural curve makes them the perfect vessel.
Garnish isn’t just for looks; it’s a final layer of flavor. A sprinkle of flaky sea salt (like Maldon), a scattering of fresh microgreens, a drizzle of high-quality balsamic glaze, or some vibrant lemon zest can completely transform a simple bite from good to unforgettable. Choose a garnish that complements the dish’s flavor profile.
For the perfect dip, consider your base:
Greek Yogurt Base: Offers a tangy, fresh profile that’s lighter in calories. It’s fantastic for herb-heavy dips like tzatziki or as a lighter base for a caramelized onion dip. Works best when served chilled.
Cream Cheese Base: Provides a rich, decadent, and super-stable foundation. It’s the go-to for baked dips or any spread that needs to hold its shape. Best softened to room temperature before mixing.
Studies in food psychology reveal that we often
Your appetizer spread should have a ‘Welcome Bite’—the first thing guests see and taste upon arrival. Position it near the entrance. This should be something universally appealing and easy to grab, like a perfect olive, a small cheese straw, or a simple prosciutto-wrapped melon ball. It immediately puts a delicious bite in hand and signals that the party has begun.
Can I really make my dips a day or two ahead?
Absolutely, and you should! Most cheese- or bean-based dips actually improve in flavor as they sit overnight in the fridge, allowing the garlic, herbs, and spices to meld. The only exceptions are avocado-based dips like guacamole, which should be made just a few hours before serving, or dips with fresh, delicate greens that might wilt.
Create a DIY Bruschetta Bar for an interactive and low-effort showstopper. All you need to do is grill or toast slices of baguette, rub them with a garlic clove, and set out bowls of toppings:
Classic chopped tomatoes with basil
Olive tapenade
Whipped ricotta with lemon zest
Sautéed mushrooms with thyme
Splurge vs. Save: Build your cheese board strategically. Splurge on one spectacular cheese, like a real Parmigiano-Reggiano or a creamy, imported Brie. Then, fill out the rest of the board with more budget-friendly (but still delicious) options like a good sharp cheddar, goat cheese logs, and a variety of interesting, inexpensive crackers and breads.
The ‘it’ ingredient of the modern appetizer tray? Spicy honey. Brands like Mike’s Hot Honey have made this sweet-and-spicy condiment a staple.
A drizzle over baked brie, goat cheese crostini, or even fried chicken bites adds a complex flavor layer that is instantly addictive. It’s a simple, high-impact way to make classic recipes feel completely new.
The Temperature Mistake: Serving food at the wrong temperature can ruin even the best recipe. Cheese that’s too cold has muted flavor; let it sit out for 30-60 minutes before serving. Conversely, a hot dip that has cooled to a lukewarm, congealed state is deeply unappetizing. Time your heating so hot items are served, well, hot.
Don’t forget the drinks! The right beverage can elevate your appetizers. A crisp, bubbly Prosecco or Cava cuts through the richness of fried foods and creamy cheeses beautifully. For heartier bites like meatballs, a light-bodied red wine like a Beaujolais is a perfect match. Offering one signature cocktail and one type of wine simplifies your hosting duties.
What’s the one affordable tool that will elevate my appetizer game?
A Microplane grater. It’s not just for cheese. Use it to create clouds of parmesan over flatbreads, to zest lemons and limes for an instant burst of brightness in dips and marinades, or to finely grate garlic and ginger without the hassle of a press. Its versatility and the professional finish it provides are unmatched.
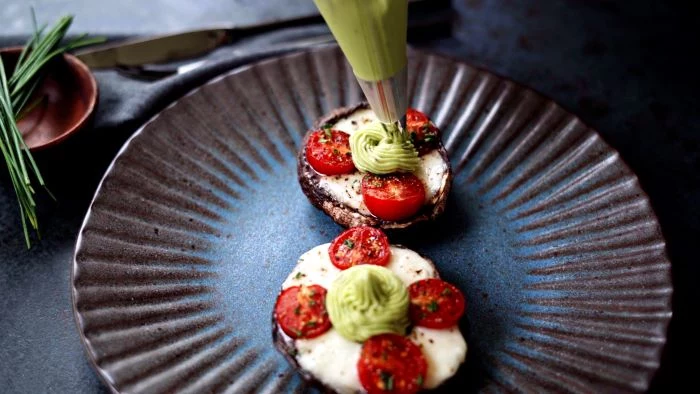
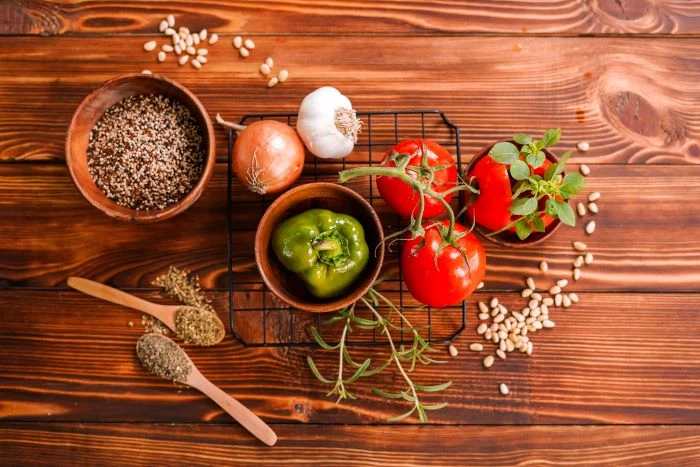
Embrace seasonal ingredients for the most flavorful and cost-effective appetizers. In autumn, think roasted squash crostini with sage, or mushroom and gruyère tartlets. In summer, focus on fresh tomatoes, basil, and zucchini. Eating with the seasons guarantees your ingredients will be at their peak performance.
Party’s over, but the food isn’t? Get creative with leftovers. Extra crostini toppings can be tossed with pasta for a quick meal. Leftover cheese and charcuterie can be chopped up for a fantastic chef’s salad or omelet filling. Dips can be thinned out with a little milk or stock to become a sauce for chicken or fish. No delicious bite should go to waste.
Emily Thompson is a Culinary Institute of America graduate who has worked in Michelin-starred restaurants before transitioning to food writing and education. Author of three cookbooks, she specializes in seasonal cooking and making gourmet techniques accessible to home cooks. Emily's recipes have been featured in Food & Wine and Bon Appétit.
To provide the best experiences, we use technologies like cookies to store and/or access device information. Consenting to these technologies will allow us to process data such as browsing behavior or unique IDs on this site. Not consenting or withdrawing consent, may adversely affect certain features and functions.
Functional
Always active
The technical storage or access is strictly necessary for the legitimate purpose of enabling the use of a specific service explicitly requested by the subscriber or user, or for the sole purpose of carrying out the transmission of a communication over an electronic communications network.
Preferences
The technical storage or access is necessary for the legitimate purpose of storing preferences that are not requested by the subscriber or user.
Statistics
The technical storage or access that is used exclusively for statistical purposes.The technical storage or access that is used exclusively for anonymous statistical purposes. Without a subpoena, voluntary compliance on the part of your Internet Service Provider, or additional records from a third party, information stored or retrieved for this purpose alone cannot usually be used to identify you.
Marketing
The technical storage or access is required to create user profiles to send advertising, or to track the user on a website or across several websites for similar marketing purposes.