Beyond the Fir: Your Guide to Building a Seriously Cool Alternative Christmas Tree
I’ve spent years in design and fabrication, building everything from massive commercial holiday displays to cozy setups for family homes. And while I’ll always have a soft spot for the classic pine tree smell, I’ve learned something important: the “perfect” tree isn’t always a real one. Sometimes your space is too small, allergies are a pain, or you just want something that screams you. That’s where building an alternative tree comes in, and trust me, it’s a game-changer.
In this article
- First, Which Tree Is Right for You?
- The Core Principles: Don’t Skip This Part!
- Project 1: The Rustic Twig Tree
- Project 2: The Wall-Mounted Dowel Tree
- Project 3: The Literary Book Tree
- Project 4: The Industrial Ladder Tree
- Project 5: The Slotted Cardboard Tree
- Go Create Something Awesome!
- Inspirational Gallery with Photos
This isn’t about settling for a substitute. It’s about creating a festive centerpiece with purpose and style. But let’s be real, a good idea can fall apart (sometimes literally) without a solid plan. So I’m going to walk you through how the pros build these things, sharing the hard-won lessons from my workshop so you can create something amazing.
First, Which Tree Is Right for You?
Before you start digging through your garage, let’s figure out what you’re getting into. Each of these projects has a different vibe, cost, and effort level.

- The Quickest Win: The Ladder Tree. Seriously, if you have 15 minutes and a ladder, you can have a cool, industrial-style tree. It’s super low-effort, kid-safe (as long as they don’t climb it!), and costs next to nothing if you already own a ladder.
- The Budget-Friendly & Chic: The Slotted Cardboard Tree. This one is surprisingly stylish, eco-friendly, and great for small spaces. The main cost is your time and a few sharp blades for your utility knife. Great for crafty folks.
- The Small-Space Savior: The Wall-Mounted Dowel Tree. Perfect for apartments or homes with curious toddlers and pets since it’s up off the floor. It’s got a clean, minimalist look and costs under $40 to build.
- The Rustic Charmer: The Twig Tree. This project brings a beautiful, natural texture indoors. It takes a bit of time to gather and prepare the materials, but the sculptural result is totally worth it.
- The Statement Piece: The Literary Book Tree. A dream for book lovers, but heads up: this one is the heaviest and requires the most care to build safely. It’s a showstopper, but not the best choice for homes with small kids or rambunctious pets.
The Core Principles: Don’t Skip This Part!
Before we get into the fun stuff, we need to talk fundamentals. The difference between a wobbly disaster and a stable work of art comes down to a few key ideas.
First, structural stability. Every freestanding tree has a center of gravity, and your goal is to keep it low and centered over the base. A wider base is always more stable. Think of it like a pyramid. For a book tree, that means your biggest, heaviest hardcovers go on the bottom. For a ladder, it means opening it to its full, locked position.
For wall-mounted trees, you’re dealing with different forces—mainly gravity trying to pull your masterpiece down the wall. This is why you can’t just use tape or a single tiny nail. You have to anchor it properly. We’ll get into that.
Second, material selection is about more than just looks. Is this for one season, or do you want to reuse it? Untreated twigs can get brittle, and cardboard can warp if you store it in a damp basement. And the big one: fire safety. This is non-negotiable. I only use and recommend modern LED lights. They produce almost no heat and are the only safe choice for flammable materials like paper, cardboard, or dry wood. Old-school incandescent bulbs get hot enough to start a fire. Please, check every string of lights for a UL certification tag—it means they’ve been safety tested.

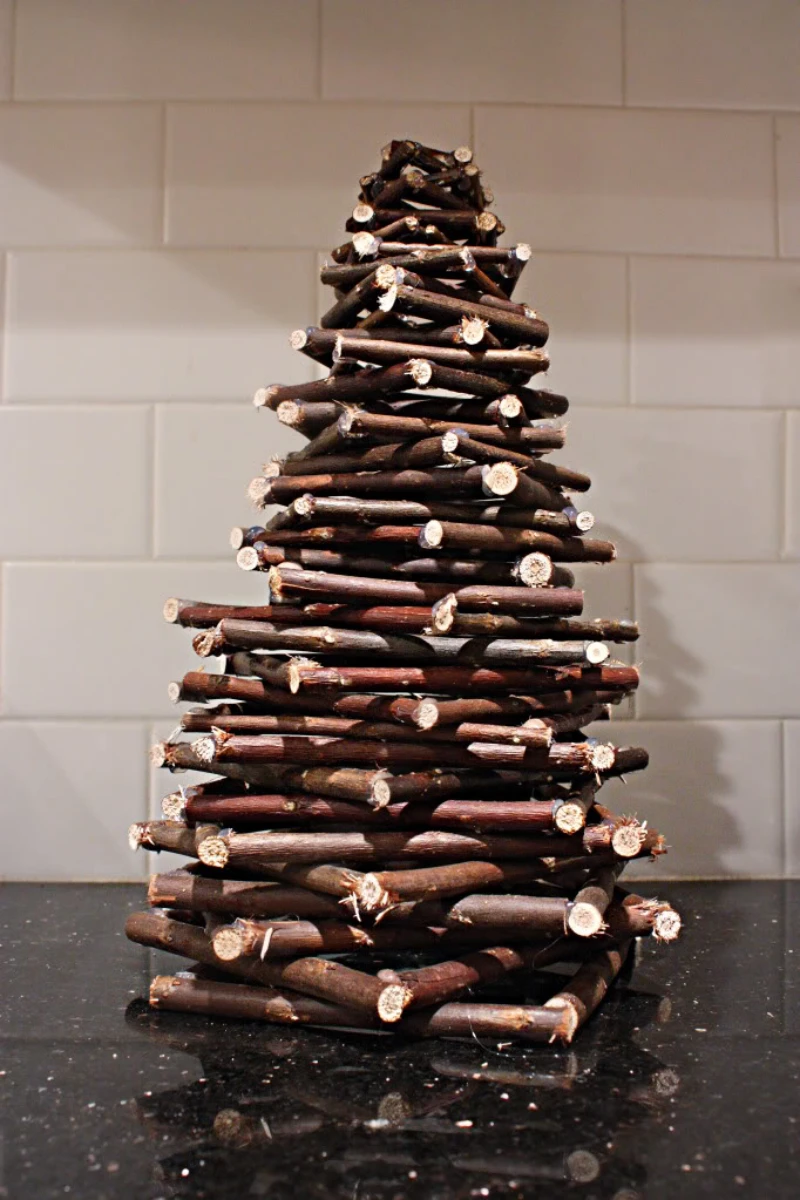
Project 1: The Rustic Twig Tree
Done right, this looks like a piece of sculpture. Done poorly… it looks like a pile of sticks. The secret is all in the prep work and how you join it all together.
• Time Commitment: 3-4 hours
• Estimated Cost: $0 – $30 (free if you gather twigs, or about $30 for birch branches, wire, and glue)
• Skill Level: Intermediate
What You’ll Need:
- A big bundle of straight-ish twigs or branches (for a 4-foot tree, gather a bundle about two feet wide when held together)
- Thin, dark annealed wire (also called florist wire)
- High-temp hot glue gun and glue sticks
- Pruning shears or small saw
- (Optional) A central wooden dowel and a heavy base
Building Your Twig Tree
First, prep your twigs. If you gather them from outside, let them dry out on a tarp in a dry spot for at least a week to get rid of moisture and any little critters. In a rush? A few hours in the oven on its lowest setting (around 170°F) works, but watch them like a hawk.
My favorite method for a freestanding tree is the A-Frame Technique. You’re basically making two flat triangle panels and then connecting them. Lay your twigs on the floor in a tree shape, with a strong central “trunk” and branches going from longest at the bottom to shortest at the top. Here’s the pro tip: don’t just glue them. First, wrap the main joints tightly with your florist wire. Then add a dab of hot glue. The wire provides the real strength; the glue just stops things from wiggling. Make two of these panels, then stand them up and connect them at the top and with a few cross-braces to form a sturdy 3D frame.
A lesson I learned the hard way: hot glue alone is not a structural adhesive. It can get brittle in the cold or soft if the tree is near a heat vent. The wire does the work, the glue just makes it look tidy.
Project 2: The Wall-Mounted Dowel Tree
This is a fantastic solution for small spaces and keeping things out of reach of curious paws and hands. Its minimalist vibe is super popular, but its safety is 100% about the mount.
• Time Commitment: 1-2 hours
• Estimated Cost: $25 – $40
• Skill Level: Beginner
What You’ll Need:
- Wooden dowels (I like 1/2-inch to 3/4-inch poplar dowels, which will run you about $15)
- Rope (Jute or a cotton sash cord works great—you want something with minimal stretch. About $10)
- A drill
- Heavy-duty wall anchors (Get the good threaded, self-drilling kind rated for at least 25 pounds. It’s overkill, but worth the peace of mind. About $8 for a pack.)
- A stud finder (optional but highly recommended)
- Staple gun or green floral wire
- Garland, lights, and ornaments
Putting It Together
I can’t say this enough: anchor this thing correctly. Your best bet is to use a stud finder to locate the wooden beams in your wall and drive your screws straight into those. If a stud isn’t in the right spot, you must use good drywall anchors.

First, cut your dowels. A nice look is a 2:3 width-to-height ratio (so, 3 feet wide at the bottom for a 4.5-foot tall tree). Drill small holes near the ends of each dowel. Thread your rope through, tying a secure knot under each dowel to hold it in place. Try to keep your knots consistent so the dowels hang level.
Mount your screws or anchors to the wall, create loops at the top of your ropes, and hang the structure. A quick tip: let it hang for an hour before decorating to let the ropes settle. Then, attach your garland with a staple gun or floral wire and add your lights and ornaments.
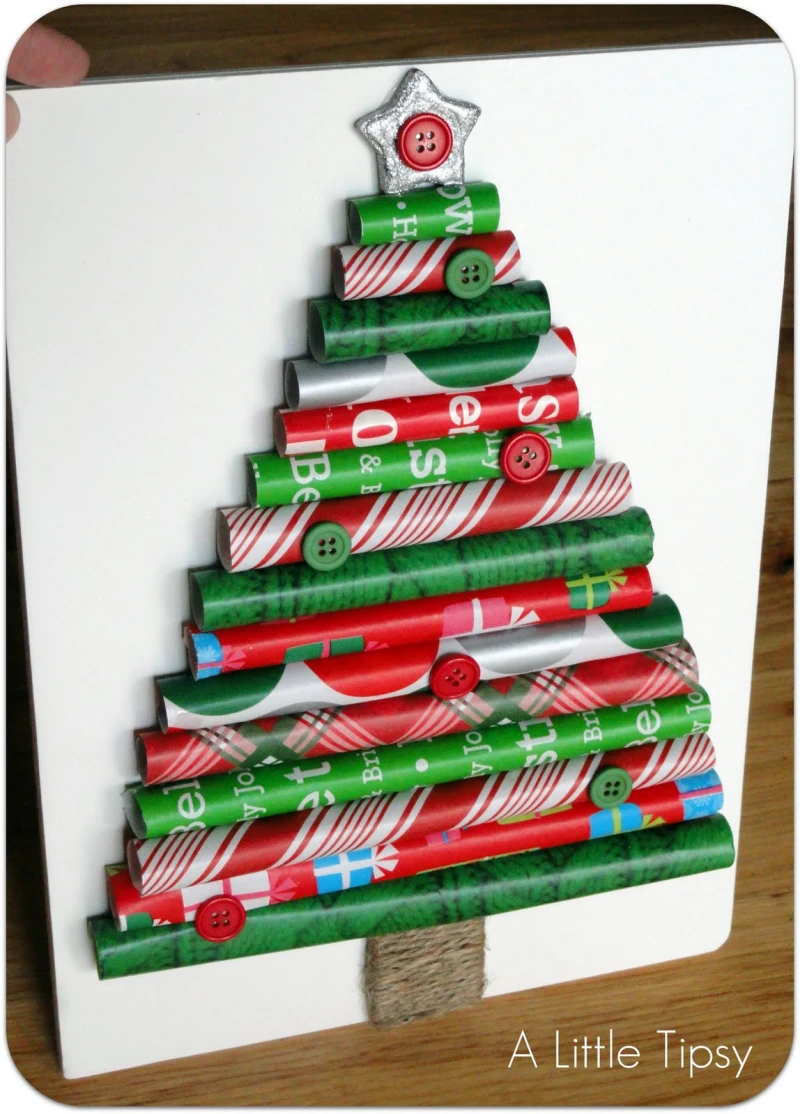
Project 3: The Literary Book Tree
A personal favorite! But this is basically temporary masonry, so think like a bricklayer: wide base, careful stacking, and respect the weight.
• Time Commitment: 1-3 hours, depending on size
• Estimated Cost: $0 – $50 (free if you use your own books, or hit up a thrift store)
• Skill Level: Beginner (but requires attention to safety)

What You’ll Need:
- Lots of books! (For a 4-foot tree, you’ll probably need 80-100 books, depending on thickness)
- A level spot on the floor
- Patience
How to Build a Safe Stack
First off, protect your books. I have a stash of cheap thrift-store hardcovers I use for this. I wouldn’t use treasured first editions, especially at the bottom where the pressure can be immense. If you do use nice books, opening them to the middle helps distribute the weight but can still strain the binding over time.
The foundation is everything. Start with your absolute largest, heaviest books to create a solid, wide base. Then, as you build up, use the Spiral Stack Method. Place each book so it slightly overlaps the one below it, creating an interlocking spiral. This adds a ton of stability.
A SERIOUS SAFETY WARNING: A five-foot book tree can weigh over 200 pounds. It is not a toy. If it falls, it can cause serious injury. If you have small children or big, energetic pets, I strongly advise you to stick to a small tabletop version or build a half-tree against a wall. When it’s time to take it down, unstack from the top. Don’t just Jenga a book out of the bottom—I’ve seen it happen, and it’s not pretty.

Project 4: The Industrial Ladder Tree
This is probably the easiest tree on the list to set up, and it has a fantastic modern farmhouse or industrial vibe. The beauty is in the details.
• Time Commitment: 15-60 minutes
• Estimated Cost: $0 – $50 (free if you own a ladder, or you can often find cool old ones at flea markets)
• Skill Level: Easiest
What You’ll Need:
- An A-frame ladder (wood, fiberglass, or aluminum)
- Lights, ornaments
- Clear zip ties or floral wire
- A power strip with a surge protector
Decorating Like a Pro
Don’t just randomly drape the lights. Start by tightly wrapping each of the four vertical legs with a string of lights to define the shape. Then, use separate strings to create even swags between the rungs, securing them with zip ties for a clean look. Hang your heavier ornaments on the lower rungs and lighter ones on top to help with stability.
One last thing: once it’s decorated, it’s a decoration, not a ladder. Make sure everyone in the house knows it’s off-limits for climbing!
Project 5: The Slotted Cardboard Tree
This is my go-to for an eco-friendly, lightweight, and surprisingly chic option. The magic is in the precise cutting.
• Time Commitment: 2-3 hours
• Estimated Cost: $5 – $15
• Skill Level: Intermediate (requires precision)
What You’ll Need:
- Large sheets of cardboard (double-wall is best for trees over 3 feet. Ask at an appliance or bike store!)
- A very sharp utility knife (with extra blades!)
- A metal straightedge or ruler
- A cutting mat
The Interlocking Technique
This design is brilliant because it needs no glue. First, draw half of a simple tree silhouette on some paper to use as a template. Trace that template onto two identical pieces of cardboard and cut them out slowly with a fresh, sharp blade. A dull blade will just tear the cardboard.
Now for the critical part: the slots. On one panel, cut a slot from the very top down to the exact middle. On the second panel, cut a matching slot from the bottom up to the middle. The width of these slots should be the exact thickness of your cardboard so they fit snugly. Slide them together, and you have a tree!
Want to make it 3D? Cut four panels instead of two. Make two of the slotted trees as described above. Then, lay them down and cut a new horizontal slot across the middle of both. You can then slide them together to form a “+” shape when viewed from the top. It’s a neat trick used in retail displays.
Go Create Something Awesome!
Building your own tree is such a rewarding way to bring your own style into the holidays. Mix these techniques, invent your own, and have fun with it. Just remember to always build with a little planning and a lot of focus on safety.
Now, go for it! Pick a design and give it a try. I’d love to see what you come up with.
Inspirational Gallery with Photos
Don’t just reuse your old string lights. Alternative trees have different needs!
- Fairy Lights: Ultra-thin copper or silver wire lights are perfect for wrapping around dowels or ladder rungs. They are lightweight and the wire practically disappears.
- LED Strip Lights: For a modern, graphic glow, run a self-adhesive LED strip light (like those from Govee) up the back of a wall-mounted tree or along the central support of a cardboard one.
- Micro Dot LEDs: These tiny, intense lights are ideal for tucking inside a literary tree, casting a magical glow from between the book pages.
A single artificial tree must be used for at least 7-10 years to have a lower carbon footprint than buying a real tree annually, according to most life-cycle assessments.
By building your tree from reclaimed wood, foraged branches, or upcycled cardboard, you’re not just creating a unique piece—you’re stepping outside the commercial cycle entirely. It’s a festive statement that’s as kind to the planet as it is stylish.
How do I bring that classic Christmas scent into my home without a real tree?
Create an olfactory illusion! A simmer pot on the stove with water, cinnamon sticks, orange peel, and a few pine sprigs works wonders. For a set-and-forget solution, an essential oil diffuser with fir balsam or Siberian fir oil creates an authentic forest aroma. Or, invest in a high-quality candle; Diptyque’s ‘Sapin’ (Fir Tree) or ‘Le Redouté’ by Cire Trudon are iconic for their rich, room-filling pine scents.
Hot Glue Gun: Your best friend for speed and temporary holds. Perfect for attaching lightweight items like felt ornaments, ribbons, or wiring for fairy lights. It’s low-cost and forgiving.
E6000 Craft Adhesive: The heavy-hitter. Use this for structural elements, like permanently bonding dowels into a base or securing the support structure of a twig tree. It creates a powerful, flexible, and waterproof bond but requires ventilation and a longer curing time.
A minimalist tree demands minimalist ornaments. Overloading a spare, sculptural form will ruin the effect. Think in terms of texture and shape rather than bulk. Consider lightweight paper honeycomb balls, laser-cut wooden snowflakes, delicate brass geometric shapes from a brand like Ferm Living, or simple garlands made of felted wool balls. The goal is to complement the tree’s structure, not conceal it.
- A flawless, uniform color that looks professionally finished.
- A touch of metallic sheen that catches the light beautifully.
- No messy glitter shedding all over your floor.
The secret? High-quality spray paint. For a project like the cardboard tree, start with a coat of primer, then apply a paint like Krylon FUSION ALL-IN-ONE in Matte White for a modern Scandinavian look, or Rust-Oleum Universal Metallic in Pure Gold for a touch of glamour.
“Less is more.” – Ludwig Mies van der Rohe
The architect’s famous principle is the golden rule for decorating an alternative tree. The tree itself—whether it’s the raw rungs of a ladder or the stark lines of dowel rods—is the main event. A few carefully chosen, well-placed ornaments will highlight its unique form. Overcrowding it will just create visual noise.
A note on stability: For any freestanding design, especially the book or twig tree, the center of gravity is everything. Your base must be significantly wider and heavier than the rest of the structure. For a book tree, use your largest, heaviest coffee table books for the first few layers. For a twig tree, consider building it into a sturdy pot filled with sand or concrete for a solid, immovable foundation.
If you’re foraging twigs and branches for a rustic tree, don’t bring unwanted guests inside with them. To debug your haul, first give the branches a good shake and brush-off outside. Then, bake them on a foil-lined sheet in your oven at a low temperature—around 200°F (95°C)—for at least 30-45 minutes. This will kill any insects or eggs hiding in the bark without creating a fire hazard.


