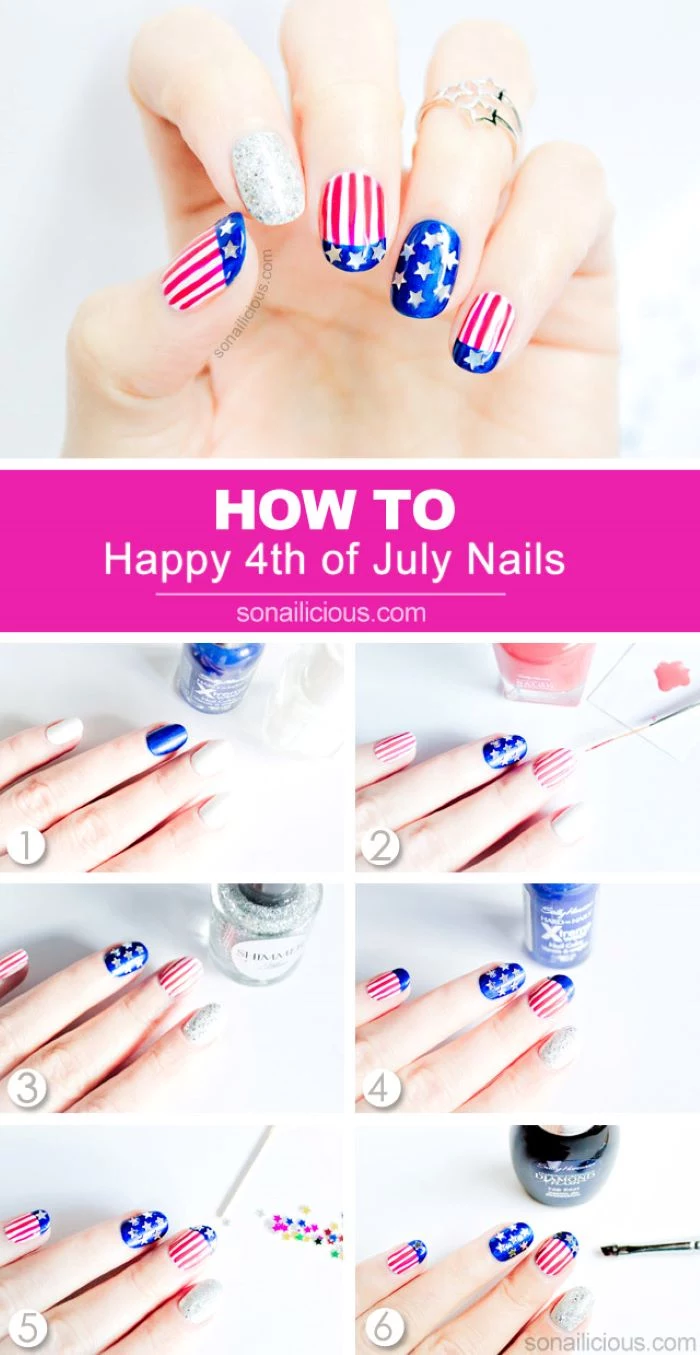
Pro Secrets for Flawless Red, White, and Blue Nail Art at Home
You know that feeling? The excitement for a summer holiday weekend is building, and you get the sudden urge for festive nails. Red, white, and blue designs are a blast—it’s like a mini party right on your fingertips. But I’ve been in the nail game for a long time, and I’ve seen it all. I’ve seen those perfect stripes and stars that get tons of compliments, and I’ve seen the… less fortunate results. You know, the ones that chip before the burgers are even off the grill, or the stars that look more like sad little blobs.
In this article
Honestly, the difference between a stunning patriotic manicure and a frustrating mess comes down to a few key secrets. It’s not just about the colors you pick; it’s about how you build a design that can handle real life.
So, I want to pull back the curtain and share the professional methods I use every day. These are the tricks of the trade that make all the difference. Whether you’re a seasoned DIYer or just curious, this guide will help you get clean, durable, and seriously beautiful results.
The Foundation: Why Prep Work is Everything
Before you even think about unscrewing a bottle of polish, the most important work needs to happen. A great manicure is built on a solid foundation, and skipping this part is like building a house on sand. It just won’t hold up.
First, let’s talk about the nail itself. Your nail plate has natural oils, and those oils are the number one enemy of long-lasting polish. They create a barrier that stops your base coat from really grabbing on. That’s why a thorough prep is non-negotiable. Start by gently pushing back the cuticle. Heads up! I always advise against cutting your own cuticles. They’re there for a reason—to protect you from bacteria. A gentle push with an orangewood stick is much safer and avoids any risk of infection.
After shaping your nails, the next step is critical: cleansing the nail plate. In the salon, we use a lint-free wipe with a special nail dehydrator. At home, a great substitute is plain old rubbing alcohol. Just swipe it over each nail and make sure it’s completely evaporated before you move on. This simple step removes all the oils and moisture, giving you the perfect canvas.
Understanding Your Coats (They Aren’t Optional!)
So many people think base and top coats are just an upsell. From my experience, skipping them is the most common mistake people make. Each layer has a very specific job to do.
- Base Coat: Your Double-Sided Tape. A quality base coat is designed to do two things: stick to your natural nail and create a surface that colored polish loves to stick to. Think of it as powerful double-sided tape. By the way, it also stops those deep reds and blues from staining your natural nail. A good one from a brand like OPI or Orly is a worthy investment.
- Top Coat: The Protective Shield. This isn’t just about shine; a top coat is your armor. It creates a hard, resilient surface that protects your beautiful art from chips and dings. Many also have UV inhibitors, which stop sunlight from turning your crisp white polish yellow. For a top coat, you can’t go wrong with a quick-dry formula like Seche Vite. Pro tip: Always “cap the free edge” by running the brush along the very tip of your nail. This seals everything in and can easily give you a few extra days of wear.
Pro Techniques for Crisp, Clean Designs
Alright, let’s get to the fun part. Creating sharp lines and perfect little shapes is what really elevates your nail art. It just takes a little patience and the right tools.
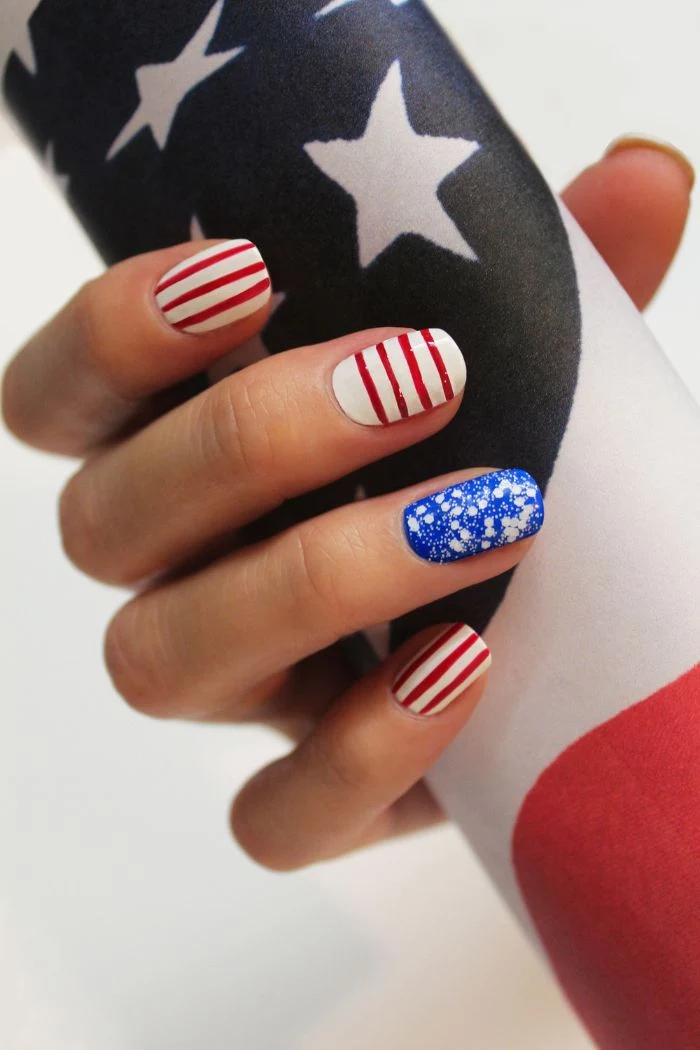
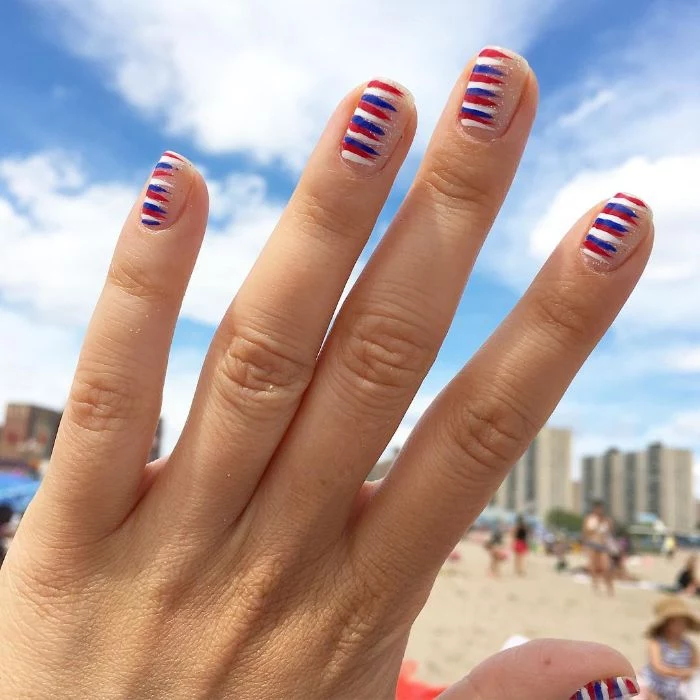
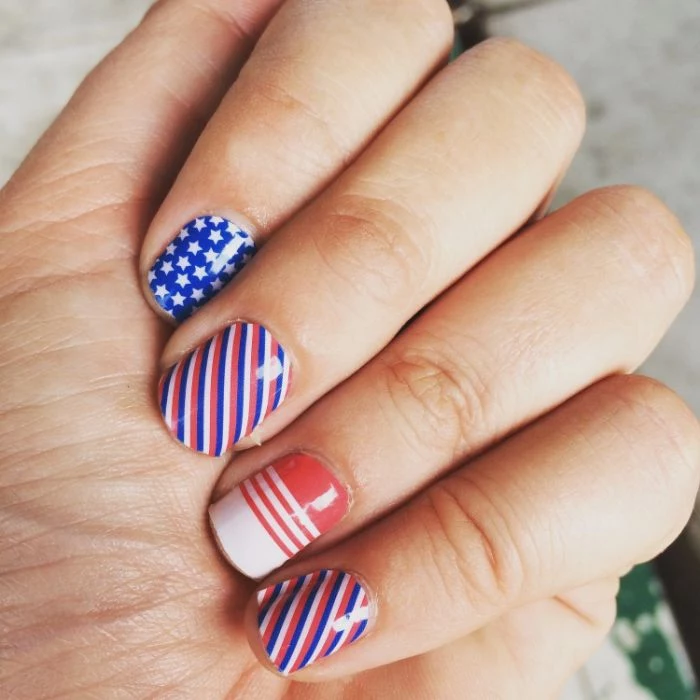
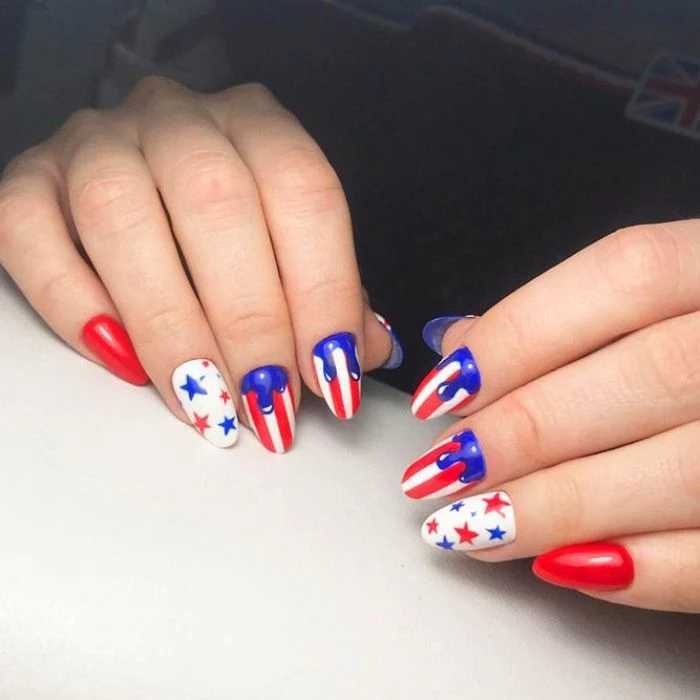
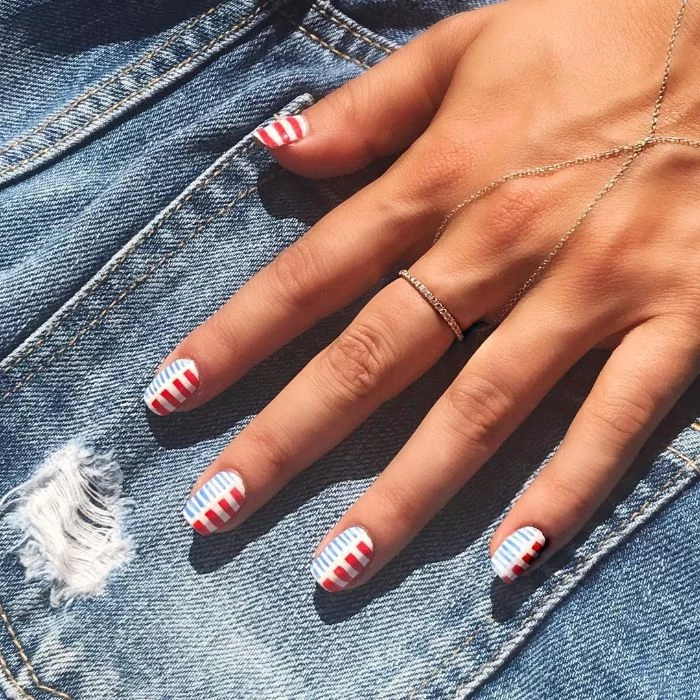
Mastering Stripes: Tape vs. Freehand
Stripes are a holiday staple. When you’re deciding between using striping tape or painting them freehand, it really comes down to your comfort level. Both can give you amazing results.
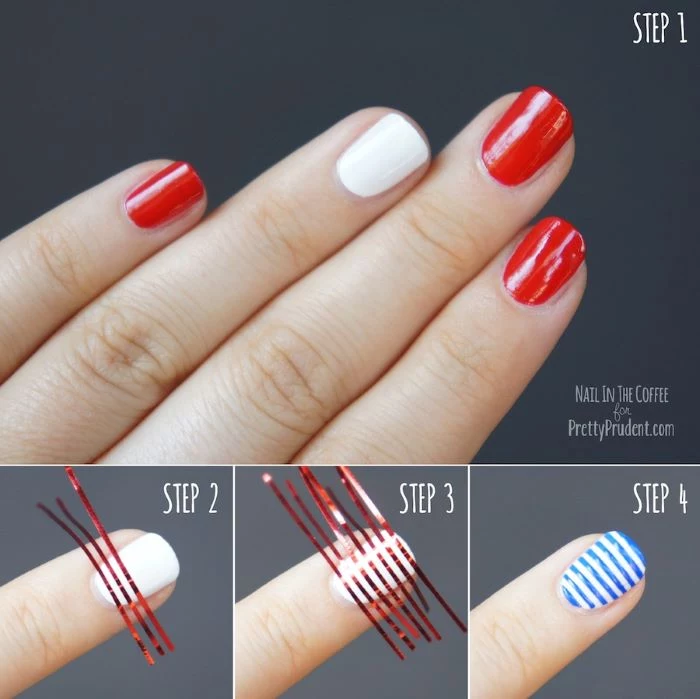
Using striping tape seems easy, but there’s a trick to it. The most common mistake is applying it before your base color is 100% dry. I mean, completely dry. Give it a solid 20 minutes. If it’s even a little soft, the tape will either leave an imprint or, worse, pull up the polish when you remove it. Once you’re sure it’s dry, press the tape down firmly, especially along the edges. This creates a seal to prevent bleeding.
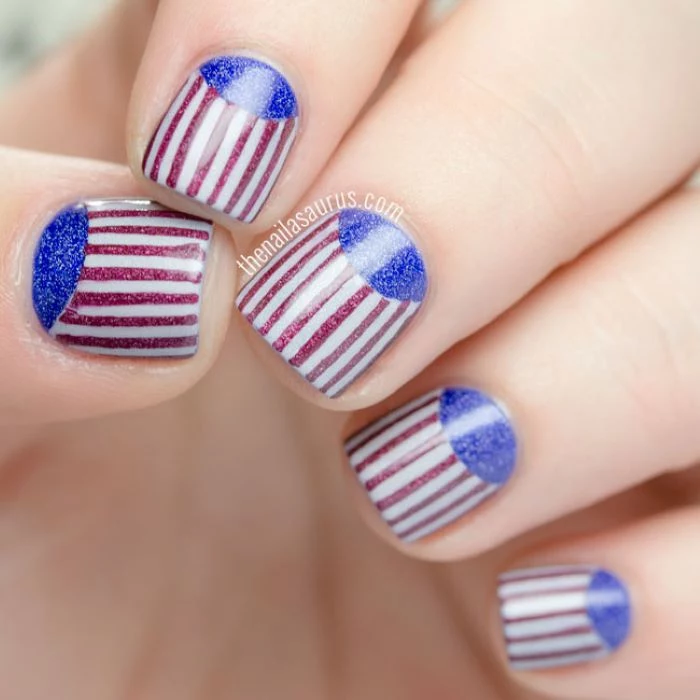
Paint your stripe in a thin, even coat. Then comes the most important part: pull the tape off while the stripe polish is still wet. If you wait for it to dry, you’ll crack the line when you pull the tape. For the cleanest edge, pull the tape back against itself at a sharp angle. Pulling straight up can lift the edge of your otherwise perfect line.
Freehand stripes, on the other hand, require a steady hand and a good striper brush—that’s the one with the super long, thin bristles. To minimize shaking, brace your painting hand against the table or your other hand. The key is to use a fluid motion and just the right amount of polish. This takes some practice on a piece of paper first, but once you get the hang of it, it’s often much faster.
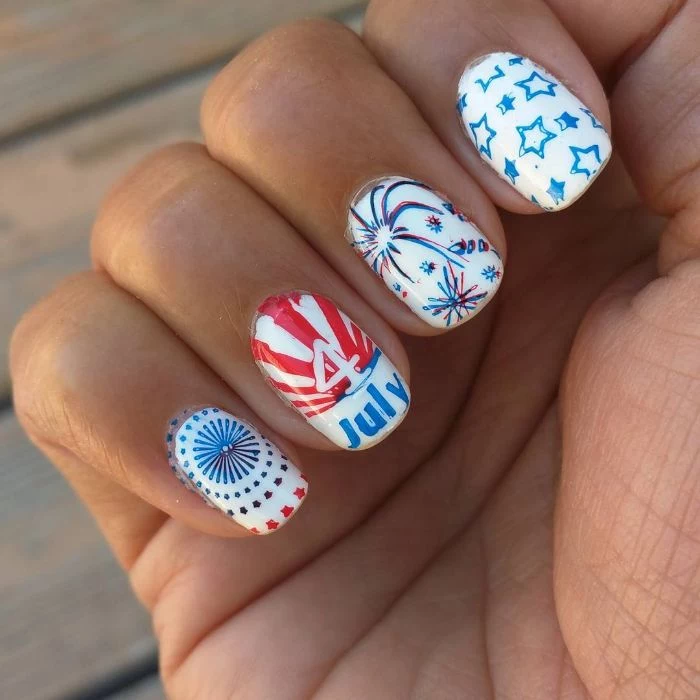
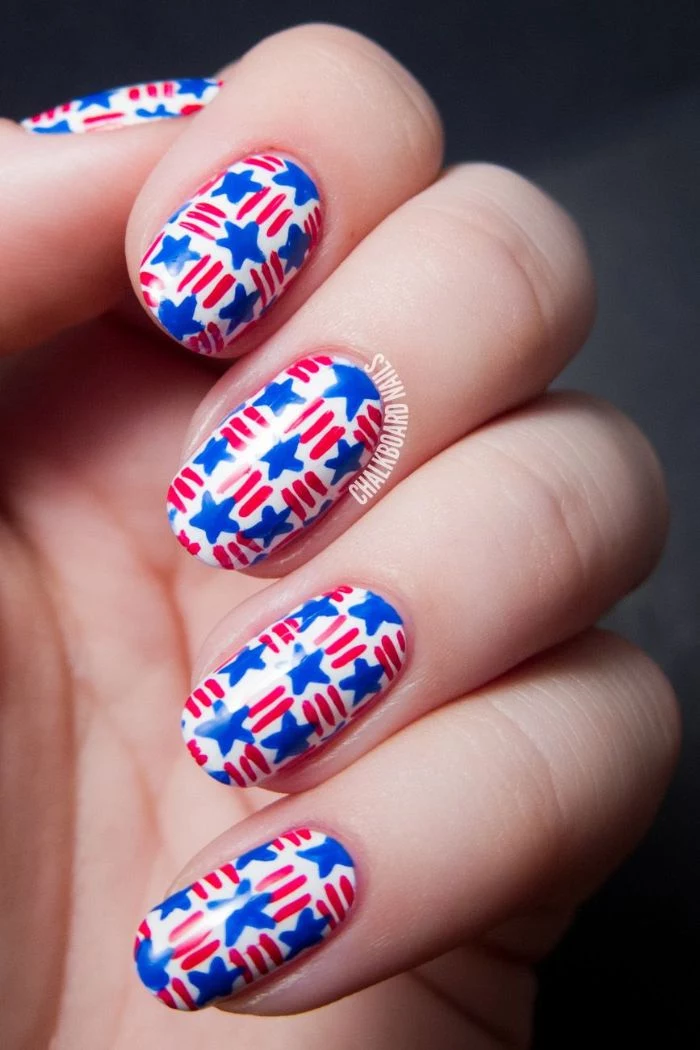
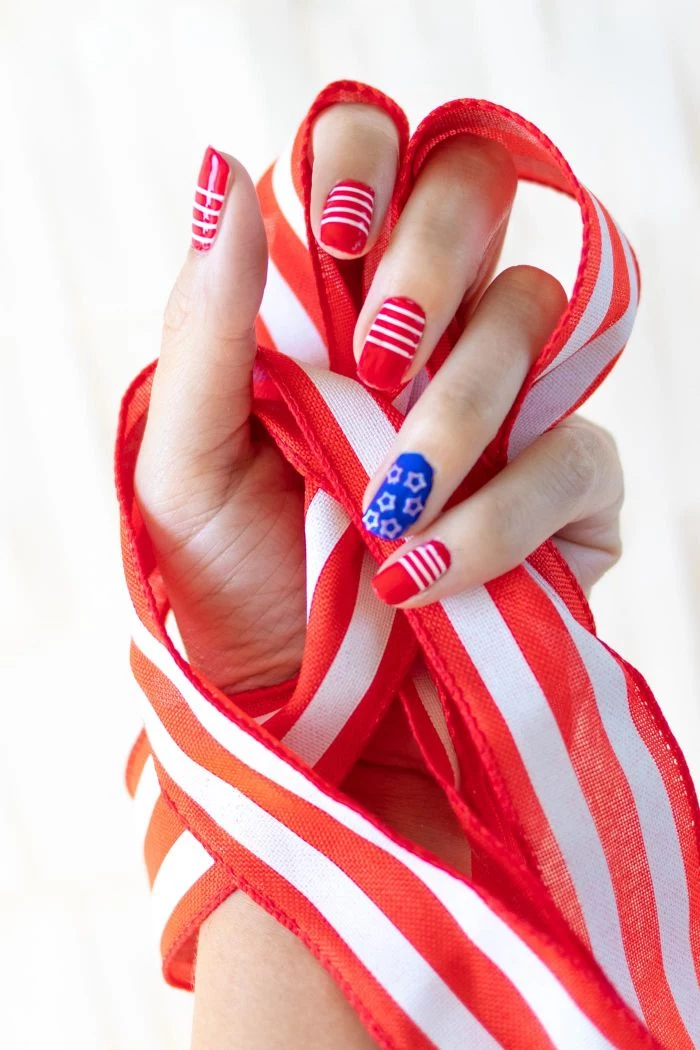
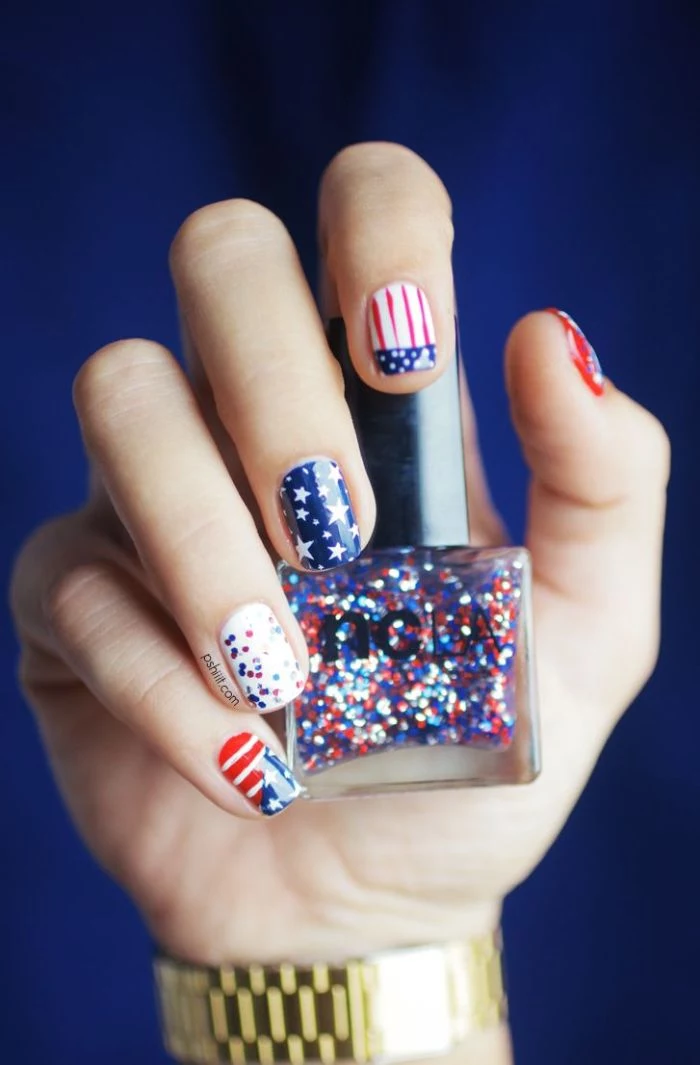
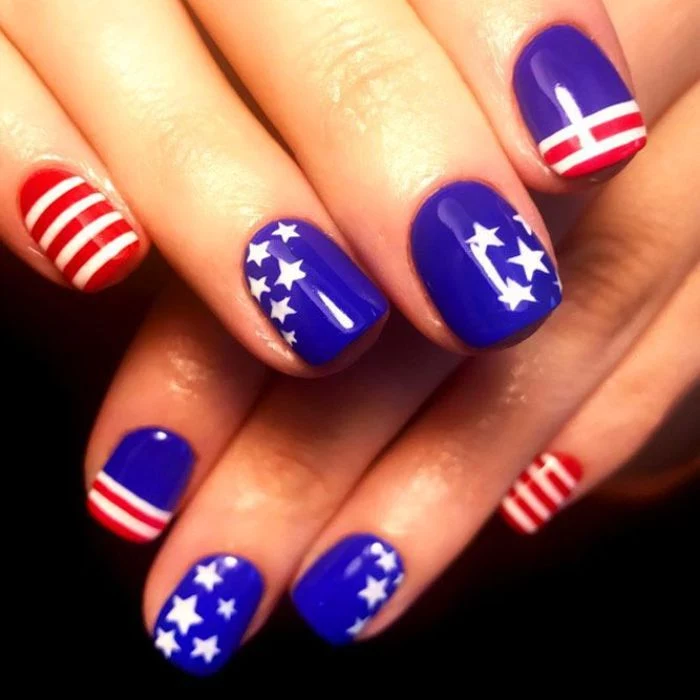
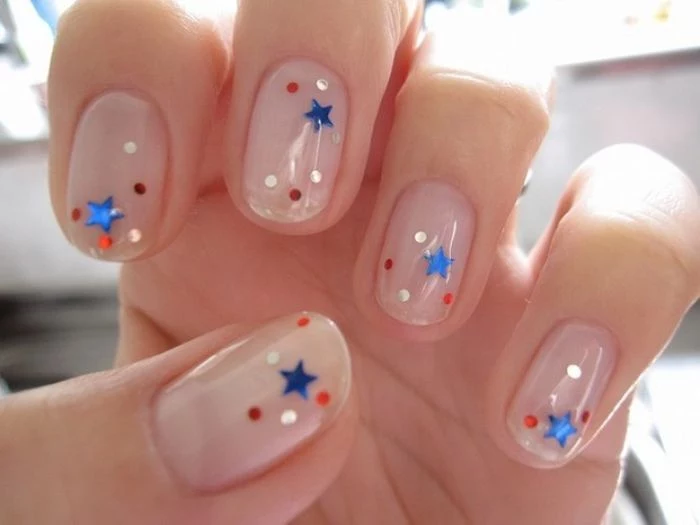
Creating Perfect Stars for Any Skill Level
A wonky star can really throw off a whole look. Luckily, there are a few ways to nail it.

- For Beginners: The Dotting Tool Method. This is my favorite trick. Use a small dotting tool to make five tiny dots in a pentagon shape. Then, with a fine detail brush or even a toothpick, gently drag each dot toward a central point. The polish flows together to create a surprisingly perfect little star.
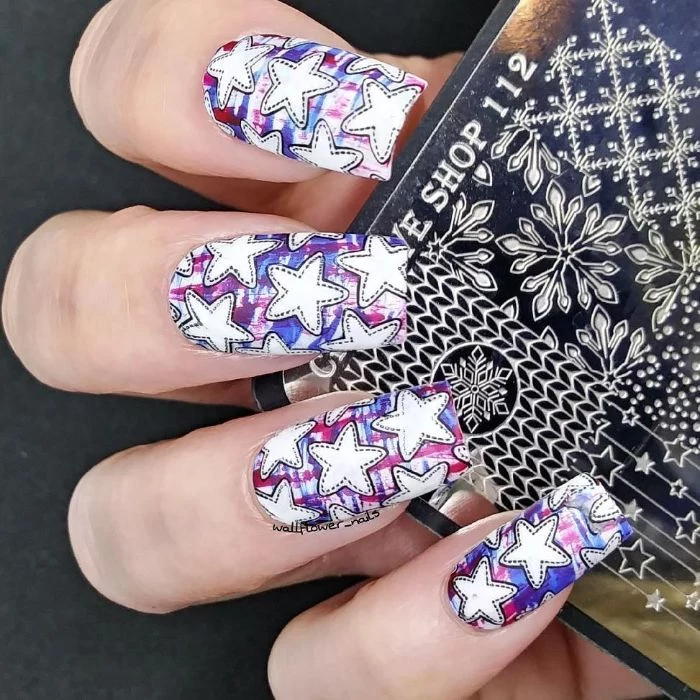
- For Consistency: The Stamping Method. Nail stamping gives you incredibly uniform results every single time. You’ll need a stamping plate with a star design, a scraper, and a silicone stamper. You can find starter kits on sites like Maniology or Amazon for around $20-$30. It takes a little practice to get the pressure right, but it’s a game-changer for complex designs.
- For a Quick Fix: The Freehand Method. Using a tiny detail brush, just paint a small ‘X’, then draw a single horizontal line through the center. Boom. A simple, effective star.
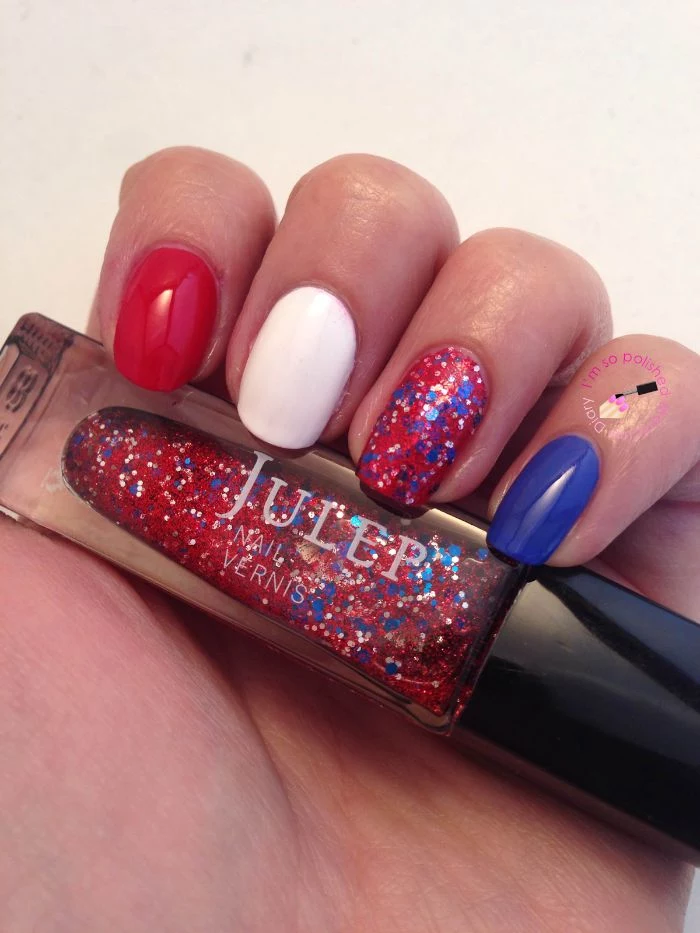
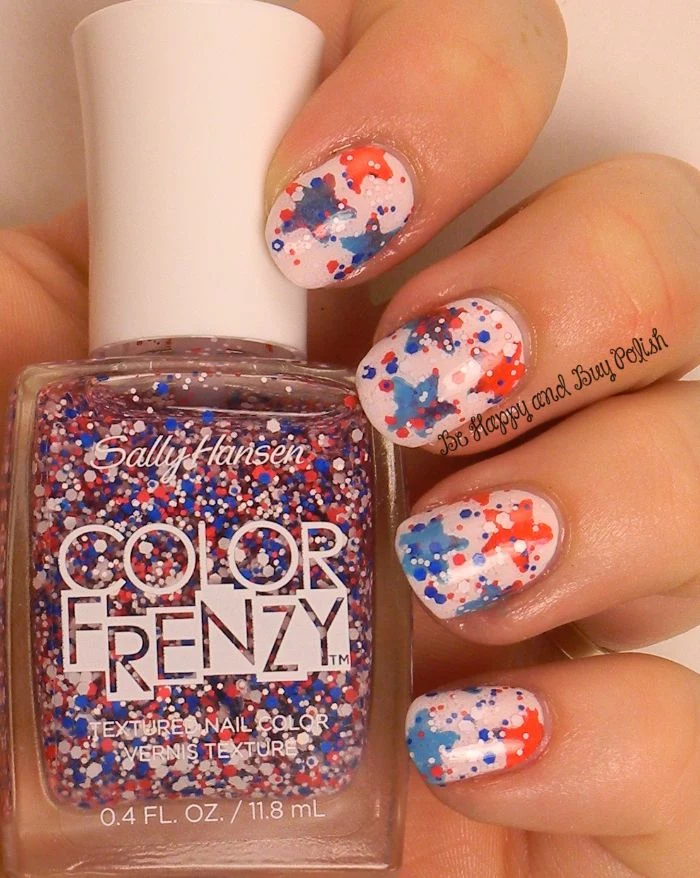
Working with Glitter: The Secret to Full Coverage
Ever tried to brush on glitter polish only to have it look sparse and patchy? The trick is to stop brushing it on. Instead, paint the glitter polish onto a makeup sponge. Good to know: use one of those cheap, dense, white wedge-shaped cosmetic sponges. The sponge absorbs the clear base, leaving the glitter concentrated on the surface. Then, just dab the sponge directly onto your nail.
This method can be messy, so it’s a good idea to protect the skin around your nail. Liquid latex is great for this, but if you don’t have any, here’s a quick hack: paint a layer of Elmer’s school glue around your cuticle, let it dry completely, and then peel it off after you’re done sponging. Instant easy cleanup!
Your At-Home Toolkit & A Realistic Plan
If you’re going to tackle these designs, having everything ready before you start will make the whole process way more fun. Think of it as your creative command center.
You’ll want your basic nail care stuff, of course. But for the art, I’d suggest grabbing a few key items. A decent set of detail brushes (including a striper) is essential, and you can find them for $5 to $15 online or even in the acrylic paint section at a craft store like Michael’s. A set of dotting tools is another must-have, and they’re super cheap, maybe $5 on Amazon. Add in some striping tape and cosmetic sponges, and you’re set.
Now for a reality check on time. Please, don’t rush your manicure! For a relatively simple design with one accent nail, set aside at least an hour. For something more complex on all ten fingers, you should plan for two to three hours. That includes drying time, which is crucial. As a general rule, wait at least 5-10 minutes between regular coats of polish.
Troubleshooting Common Fails
Even pros run into issues. The difference is knowing how to fix them. Here are a few common problems and their solutions.
- Problem: My white polish is streaky! Ah, the classic struggle. White polish is notoriously tricky. A lesser-known trick is to apply a very thin coat of a light grey or a sheer nude polish first. It acts as a primer and gives the white pigment something to grip onto evenly. Game-changer.
- Problem: There are tiny bubbles in my polish. This usually happens from shaking the bottle, which traps air. Always roll the bottle between your palms instead. It can also be caused by applying coats that are too thick, so keep them thin!
- Problem: My freehand lines are wobbly. It all comes down to stability and practice. Brace your painting hand, don’t overload your brush, and don’t be afraid to practice on paper first. It’s a skill that builds with every line you paint.
And a final word of caution: while playing with regular lacquer is fun and forgiving, I strongly recommend leaving systems like gel and dip powder to trained professionals. The chemistry is complex, and improper removal is the number one cause of nail damage I see. Prying or peeling off those products rips layers off your natural nail, leaving them thin and weak. It’s just not worth it.
Have fun with it, be patient with yourself, and enjoy showing off your beautiful creations!
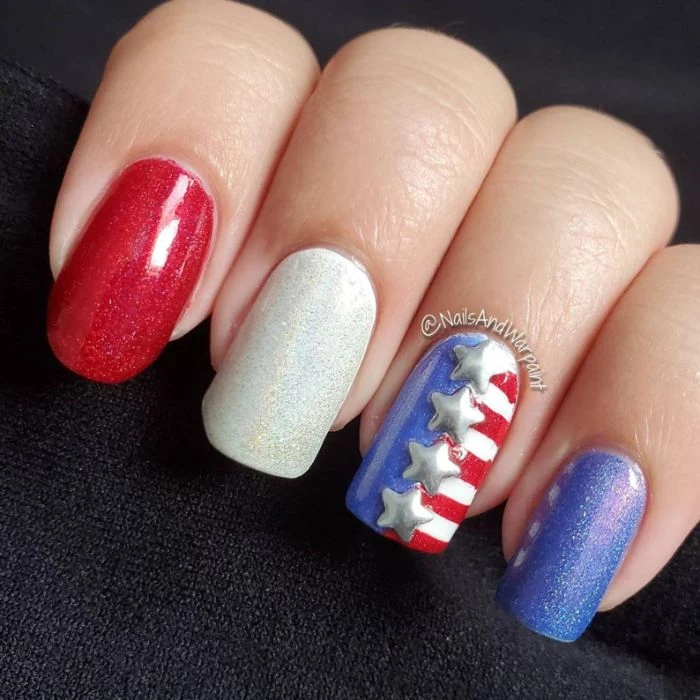
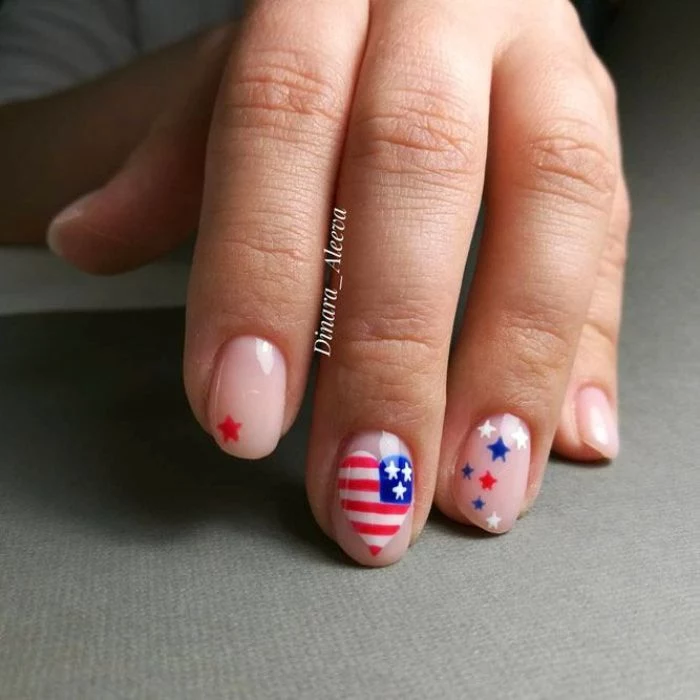
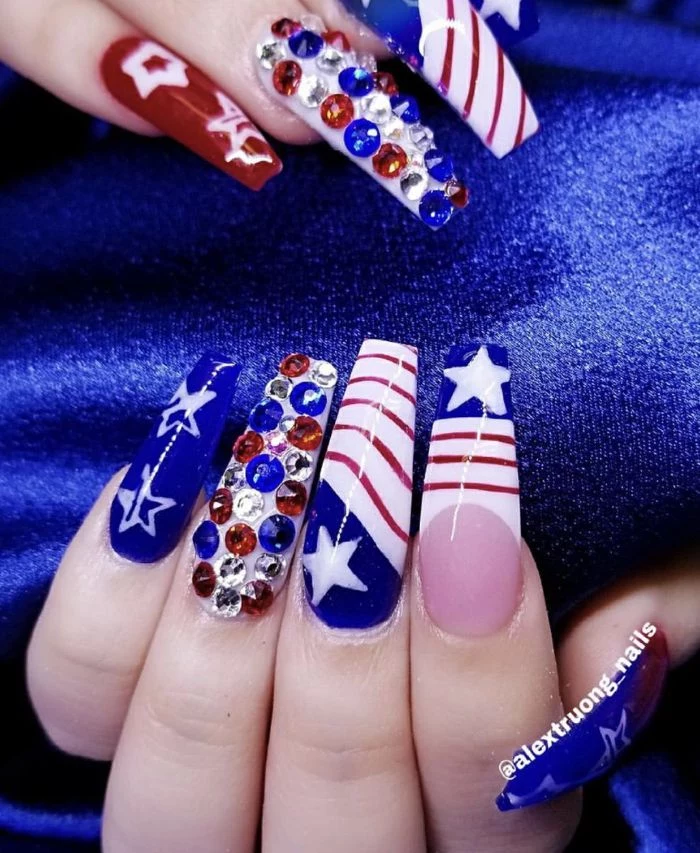
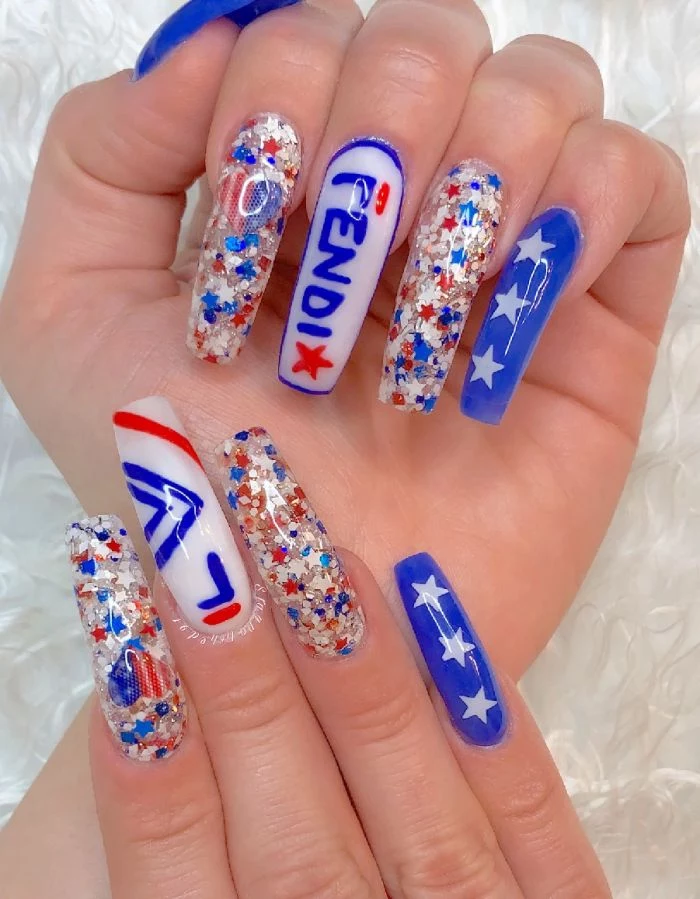
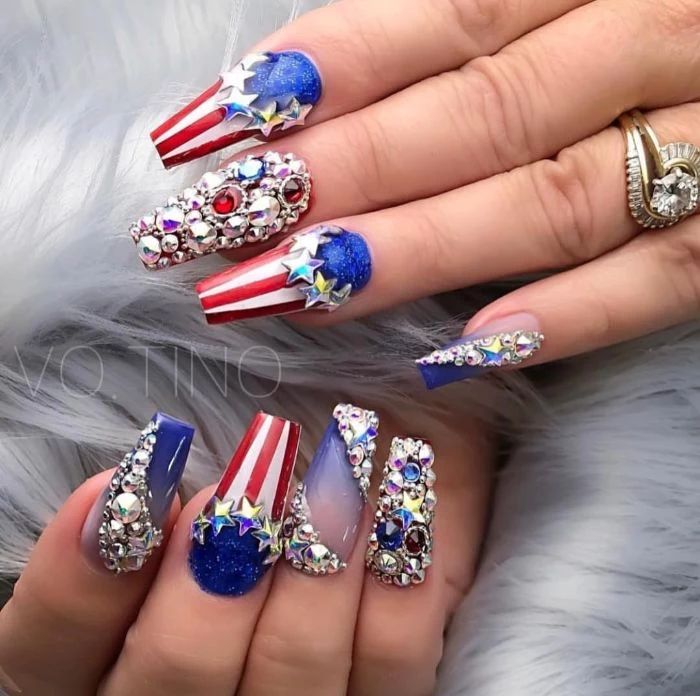
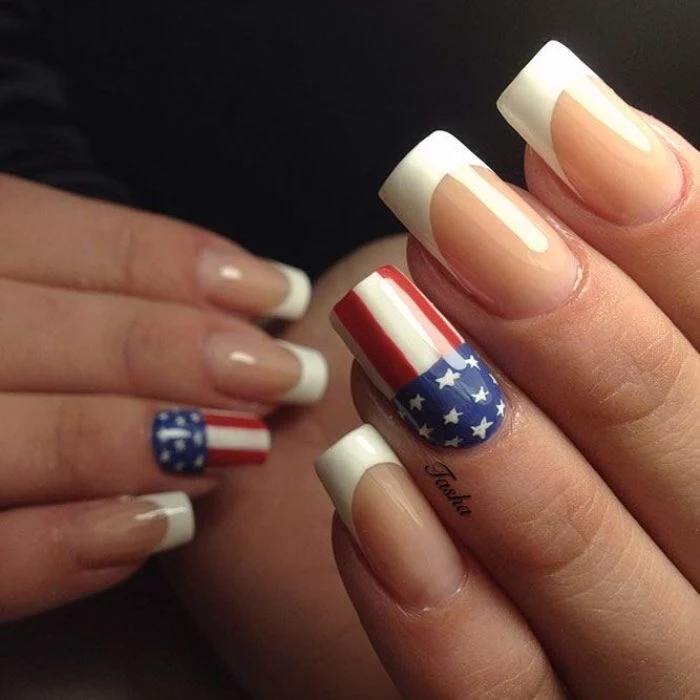
Inspirational Gallery
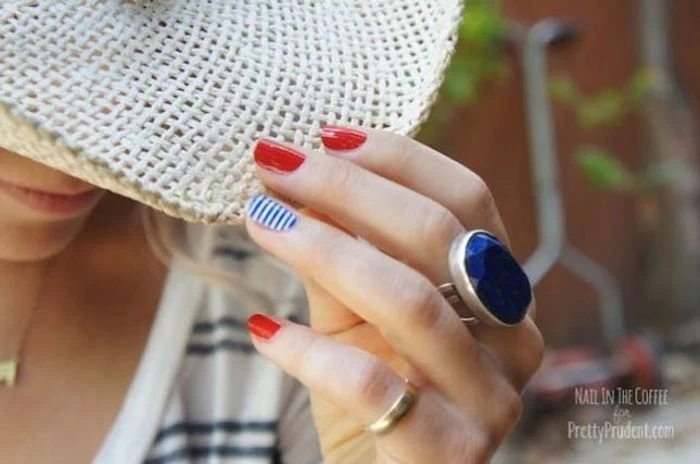
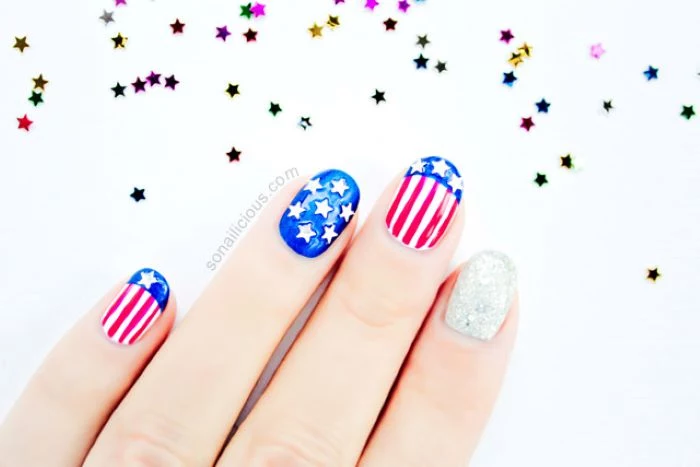
When choosing your palette, don’t just grab any red, white, and blue. Think about the mood. For a classic, bold look, pair a true cherry red like OPI’s ‘Big Apple Red’ with a crisp, opaque white like Essie’s ‘Blanc’. For a more vintage or nautical vibe, try a deeper crimson and an off-white or cream, complemented by a rich navy blue.
- Prevents chips and tip wear like nothing else.
- Creates a smooth, professional-looking edge.
- Seals the entire nail structure for durability.
The secret? ‘Wrapping the tips.’ After your final color coat and your top coat, take the brush and swipe it lightly along the free edge of your nail. This simple pro move is a game-changer for holiday weekend longevity.
Fact: A full manicure can take up to 24 hours to fully cure and harden, even if it feels dry to the touch in an hour.
This is why manicures often get smudges or sheet marks hours later. Be extra gentle with your hands for the rest of the day after painting. Avoid hot water, which can soften the polish, and any heavy-duty tasks until the next morning.
My white polish is always streaky and uneven. How can I get a smooth, opaque finish?
This is a common frustration! The key is patience and thin coats. Instead of one or two thick, goopy layers, apply three very thin coats. Let each layer dry for at least two to three minutes before applying the next. Look for a formula known for good coverage, like Sally Hansen’s Color Therapy in ‘Well, Well, Well’. And a good base coat gives the white something to grip onto, reducing streaks from the start.
Nail Art Brushes: Offer ultimate control for freehand designs. A super-fine detailer brush is essential for delicate stripes or star outlines.
Nail Art Pens: Great for beginners or those with a less steady hand. They work like markers, making it easier to draw simple shapes. However, they can offer less control over line thickness.
For intricate flag designs, a brush is superior. For quick stars and dots, a pen can be a fantastic shortcut.
The essential secret to crisp lines: Nail striping tape. But the trick is in the removal. Apply the tape only after your base color is completely, 100% bone dry. Paint your stripe color over it, and here’s the crucial part: pull the tape off *while the stripe polish is still wet*. If you wait for it to dry, it will peel up the edge of your perfect line.
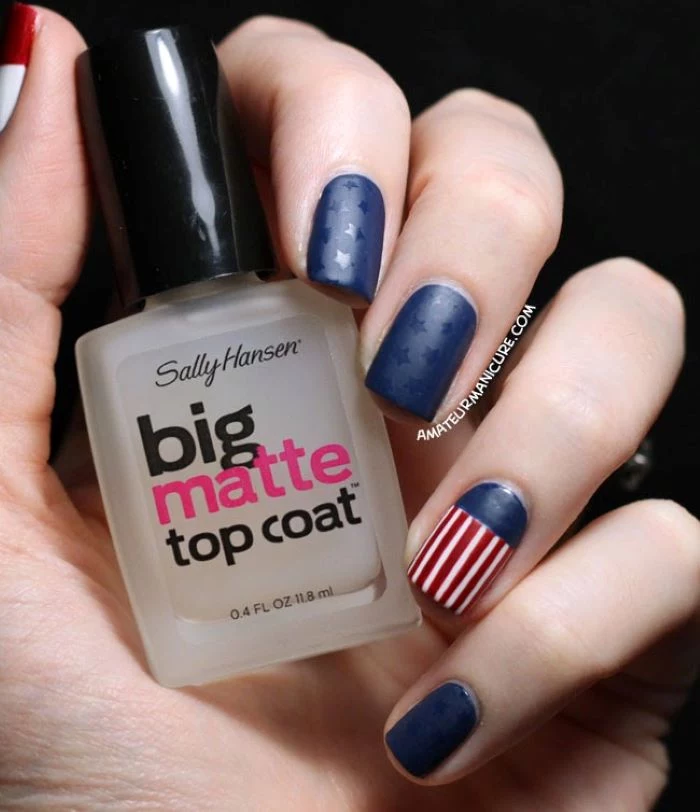
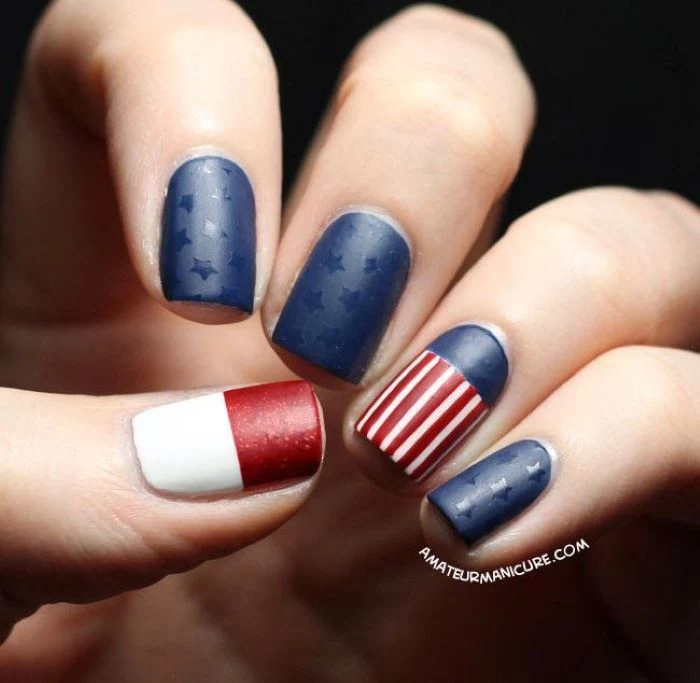
Want to elevate your patriotic manicure instantly? Try a matte finish. Applying a matte top coat, like Zoya’s ‘Matte Velvet Topcoat’, over your finished red, white, and blue design creates a modern, sophisticated look. It makes colors appear deeper and gives glitter a subtle, frosted effect. It’s an unexpected twist that feels incredibly chic.
- A toothpick for tiny dots or dragging polish into a firework shape.
- The rounded end of a bobby pin as a perfect dotting tool for polka dots or star centers.
- A wedge-shaped makeup sponge for creating a red, white, and blue gradient or ombré effect.
- Scotch tape, cut with craft scissors, to create your own chevron or stripe stencils.
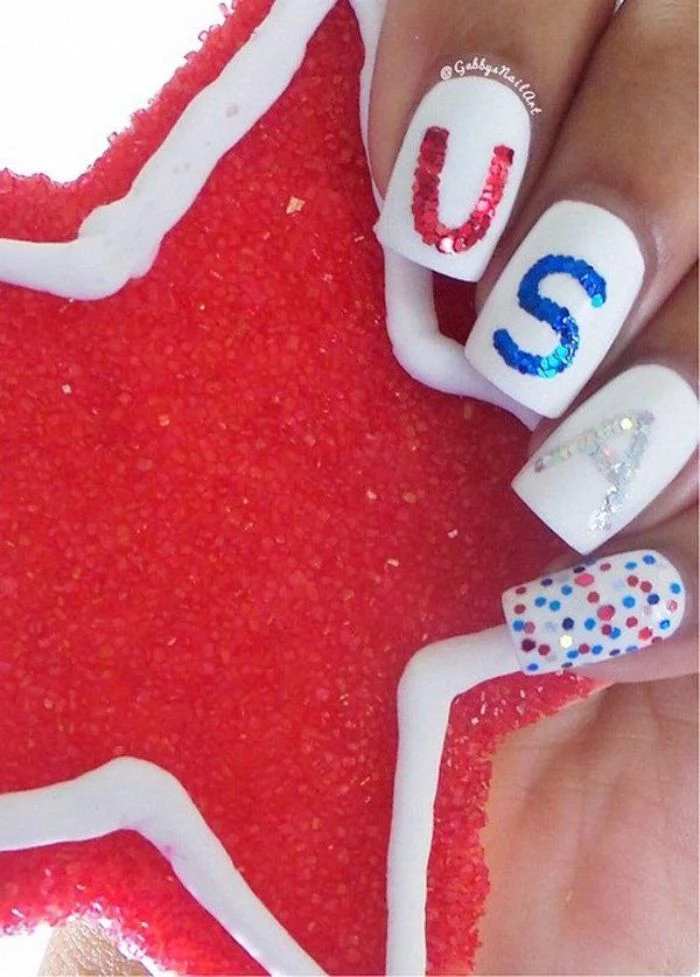
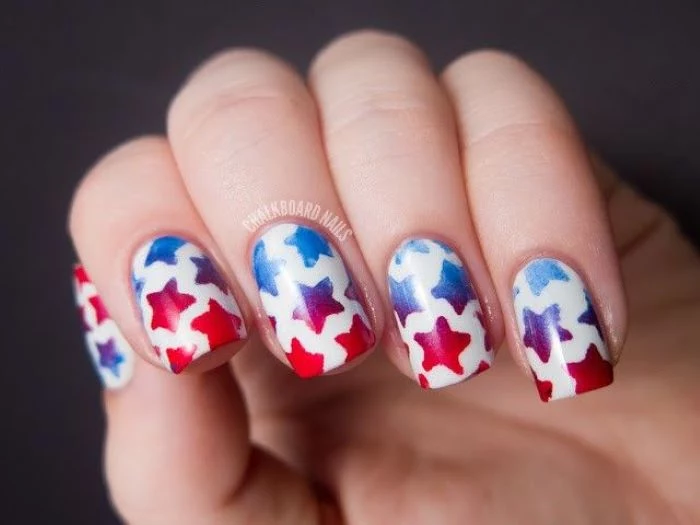
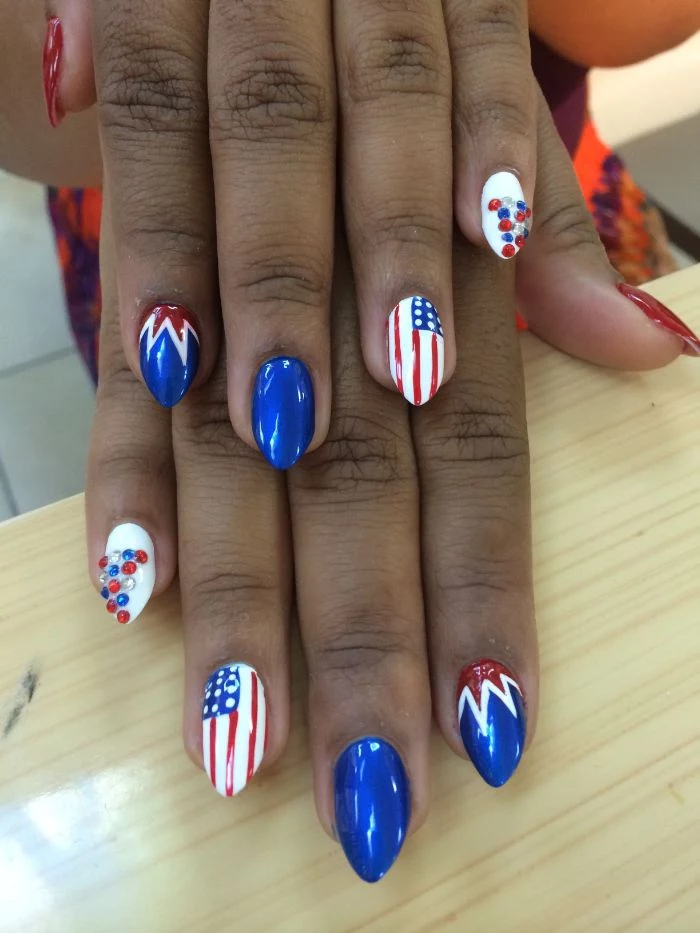
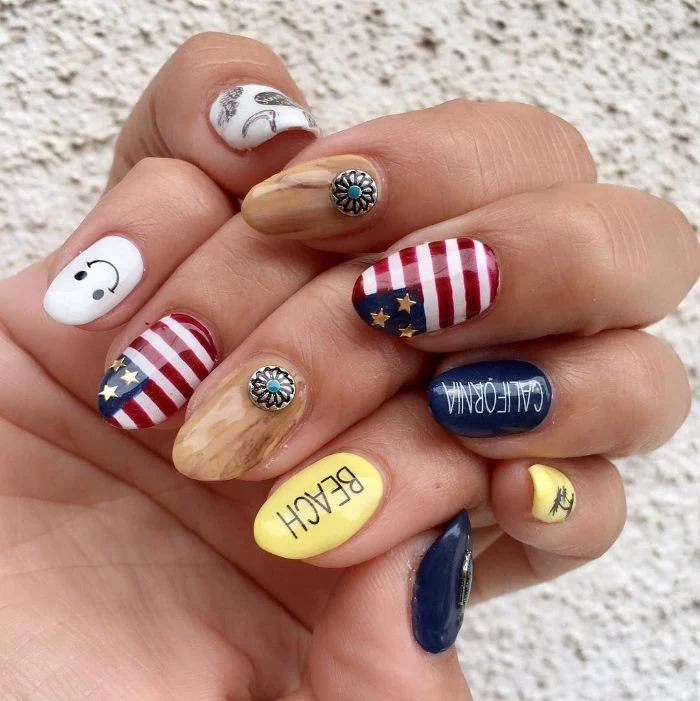
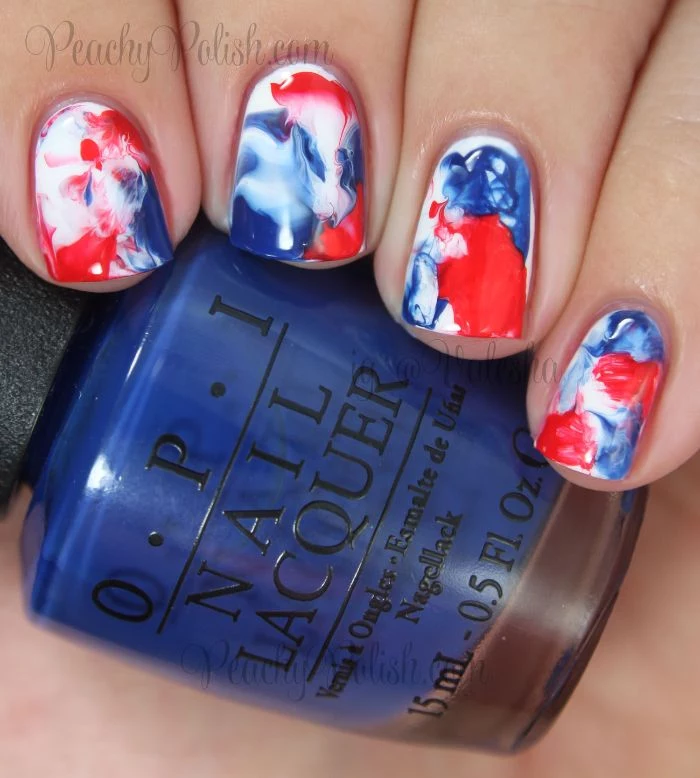
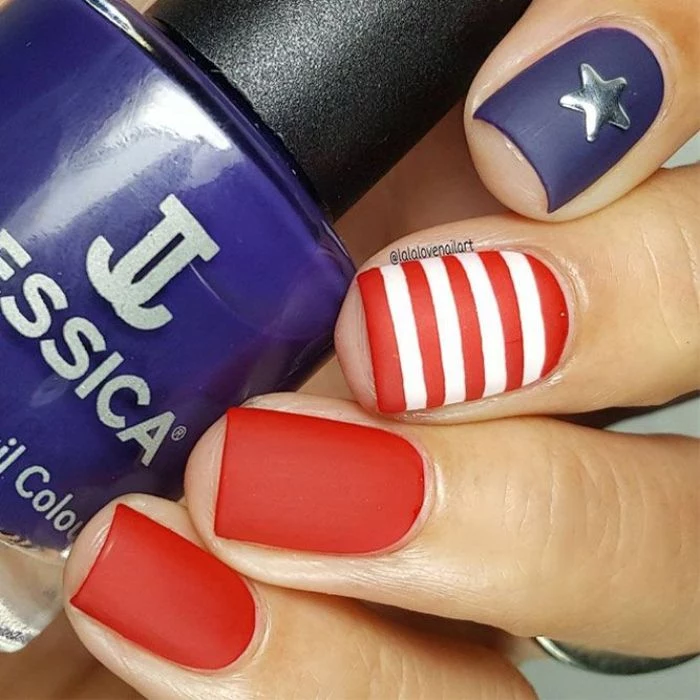
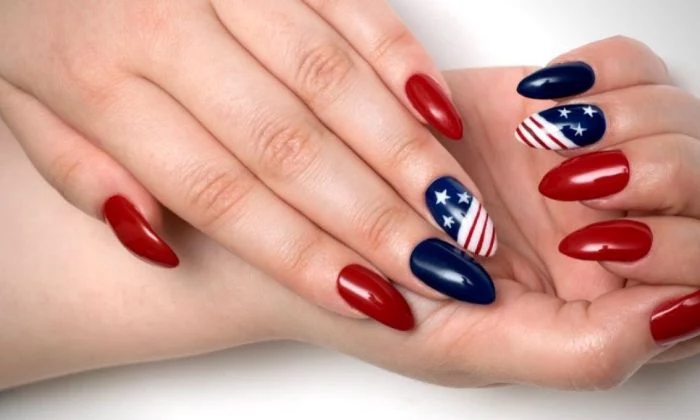
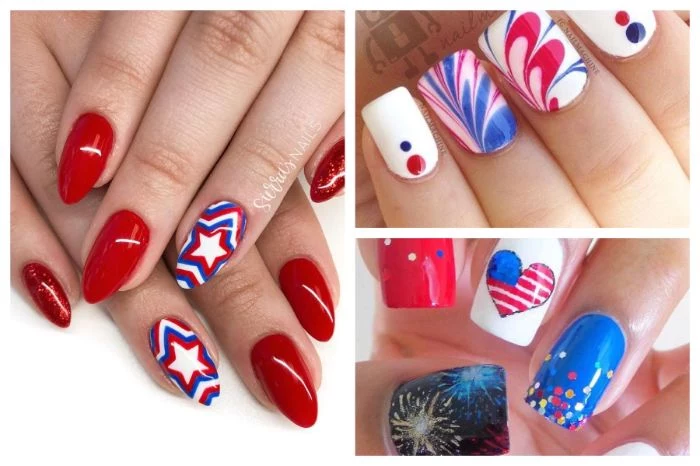
Don’t be afraid to go abstract. Instead of a literal flag, try a ‘Skittles’ manicure with each nail painted a different solid: one cherry red, one navy, one crisp white, one with silver glitter, and maybe one with a touch of gold. It’s festive, modern, and incredibly easy to achieve, yet it still captures that patriotic spirit perfectly.
Glitter polish is notoriously difficult to remove because the glitter particles act like tiny anchors, clinging to the nail plate.
To avoid damaging your nails by scrubbing, use the foil method. Soak a piece of a cotton ball in acetone remover, place it on your nail, and wrap your fingertip tightly in a small square of aluminum foil. Wait 5-10 minutes, then press down and slide the foil and cotton off. The glitter will come right with it.
How do I place rhinestones so they don’t fall off before the party’s over?
Forget using just a top coat as glue. For real staying power, use a tiny dab of nail resin glue (like IBD 5 Second Brush-On Nail Glue). Pick up the rhinestone with a wax pencil or a dampened toothpick, place it on the glue, and gently press. Once it’s set, seal the entire nail—carefully painting *around* the gem, not over it—with a good top coat to lock it in.
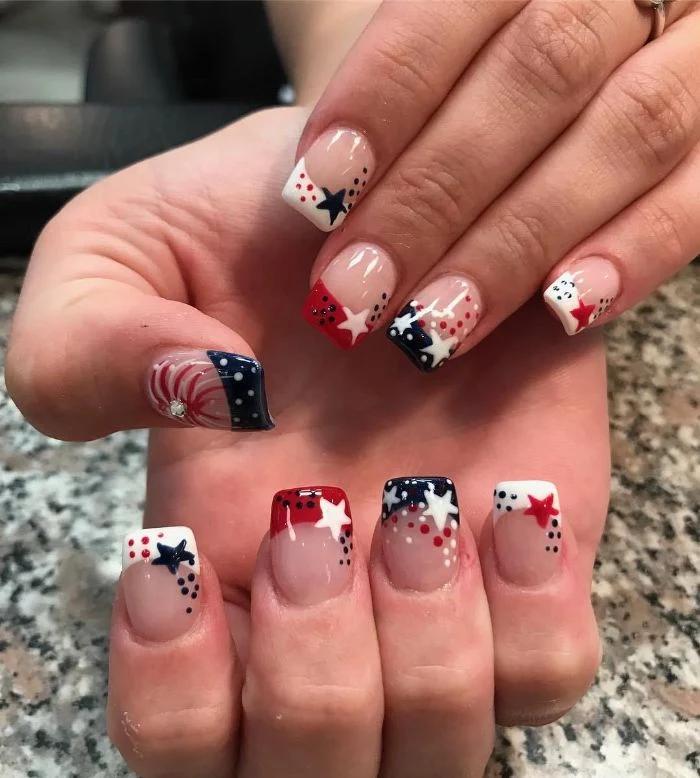
For stars that look sharp, not blob-like, the ‘dot and drag’ method is your best friend.
- Use a dotting tool or a toothpick to place five small dots in a star pattern.
- Take a super fine-tipped nail art brush and, starting from the center of the pattern, lightly drag each dot inwards to create the points.
- This gives you much more control than trying to draw five perfect, tiny lines.
Important: A quick-dry top coat, like the cult-favorite Seche Vite, is a lifesaver, but it must be applied correctly. It’s designed to be used over slightly wet nail polish. It penetrates all layers and dries them together. If you wait until your color is fully dry, the top coat can shrink as it dries, pulling the polish away from the edges of your nail.
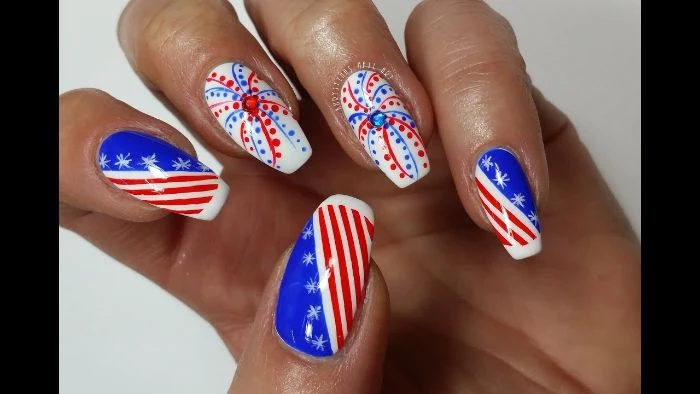
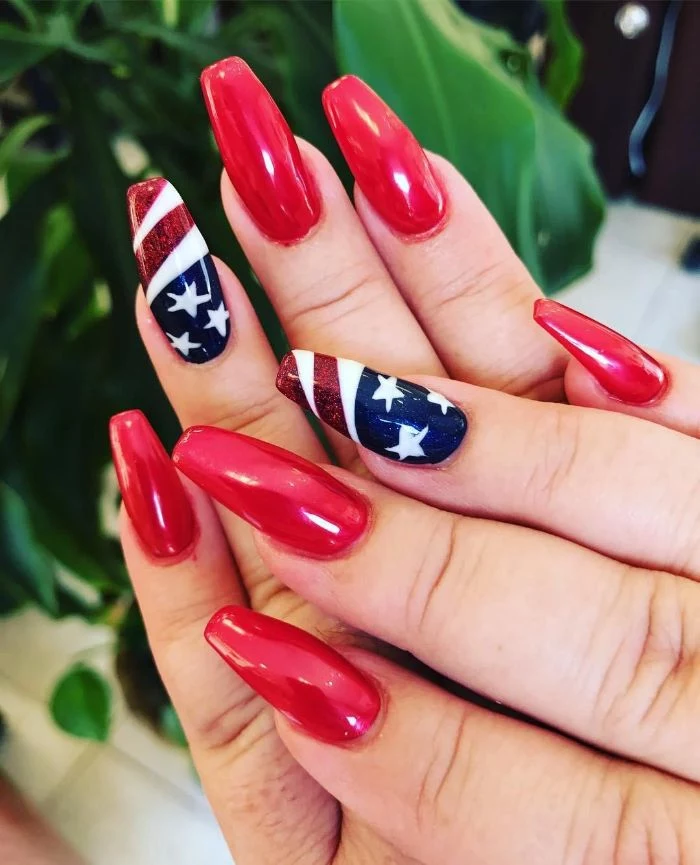
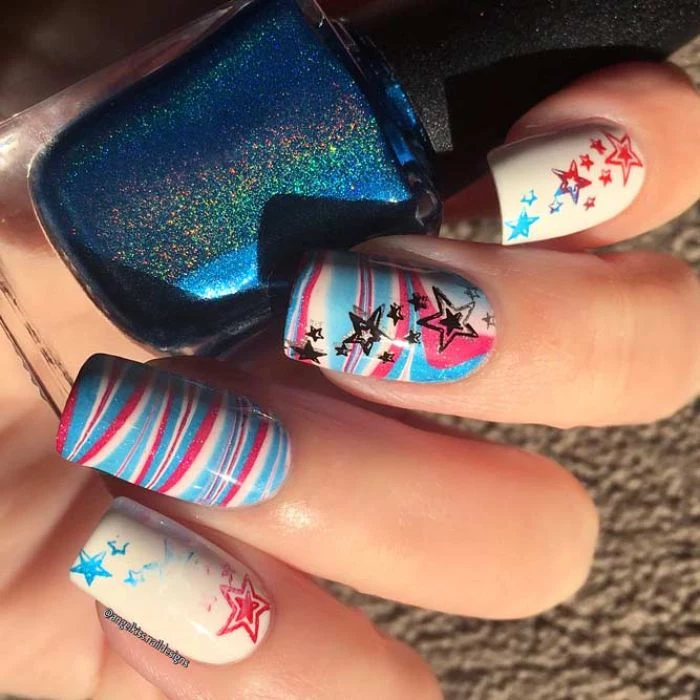
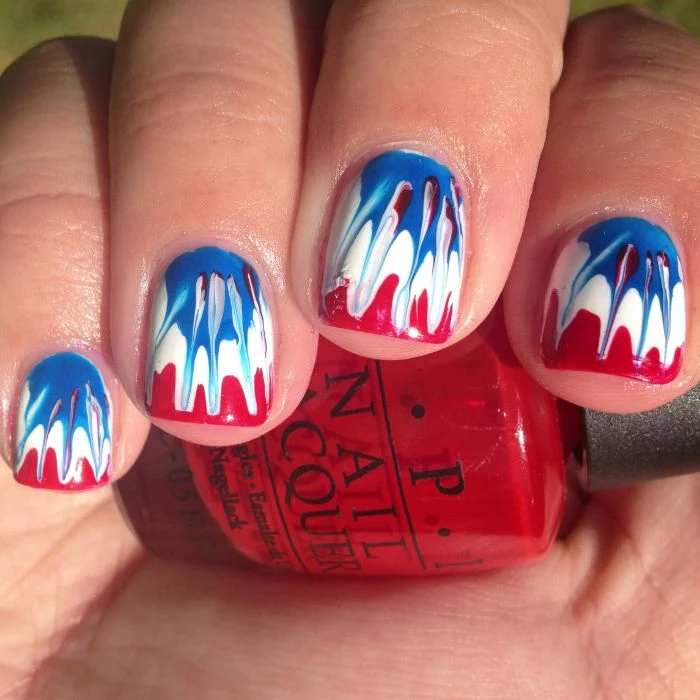
Create a stunning firework effect on a navy blue or black accent nail. Start with your dark base color. Then, dip a very fine, stiff brush or a toothpick into silver, red, or white polish. Place the tip in the center of your desired firework and ‘flick’ it outwards in short, quick strokes. Repeat in a circle to build the burst. Add a touch of fine glitter polish in the center for an extra pop!
“The top coat is the armor of the manicure. It’s not just for shine; it’s for protection. Skimping on it is like leaving the house in the rain without an umbrella.” – Jin Soon Choi, celebrity manicurist
Traditional Polish: The classic choice, offering endless colors. Requires careful drying time between coats for a durable finish. Lasts 3-5 days typically.
Gel-Effect Polish: A hybrid system like Essie’s ‘Gel Couture’ or Sally Hansen’s ‘Miracle Gel’. These are two-step polishes (color + special top coat) that cure in natural light, no lamp needed. They offer a plumper, high-shine finish and can last up to a week without chipping.
For a holiday weekend, a gel-effect system provides extra peace of mind.
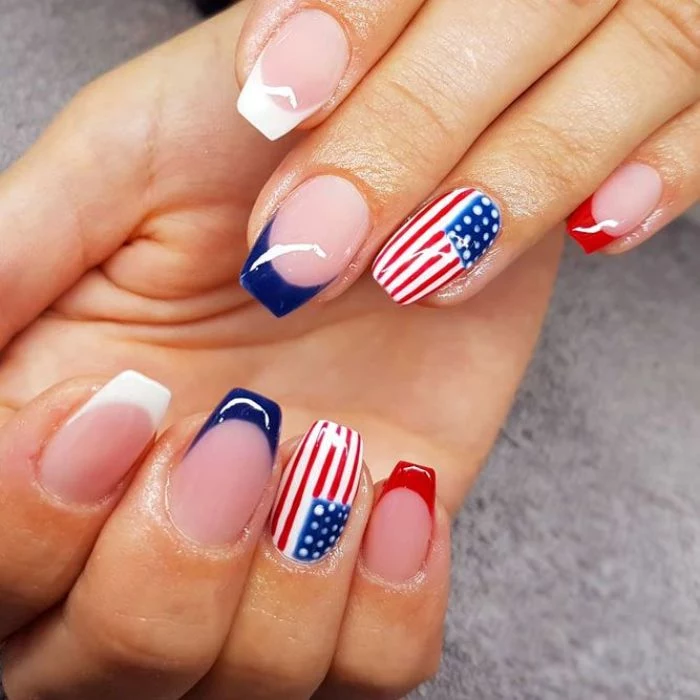
Feeling festive but need a more subtle look for the office? Try a ‘micro-French’ manicure. Use a sheer, natural base. Then, instead of a classic white tip, paint a razor-thin line of navy blue. Add a single, tiny red dot using a toothpick at the base of one accent nail. It’s a chic, minimalist nod to the holiday.

- A perfectly uniform star on every nail.
- Flawless stripes and chevrons.
- Intricate designs achieved in seconds.
The secret? Nail stamping. Using an etched metal plate, a stamper, and special stamping polish, you can transfer complex designs to your nail with ease. Brands like Maniology and Moyou London offer tons of patriotic-themed plates that make pro-level art accessible to everyone.
Help! My vibrant red polish stained my natural nails yellow.
Prevention is key: always use one, or even two, layers of a quality base coat before applying highly pigmented colors like red. This creates a barrier. If the damage is done, you can gently buff the surface of your nail to lessen the stain. Alternatively, create a paste of lemon juice and baking soda, scrub it onto your nails with a soft brush, and let it sit for a few minutes before rinsing. It can help lift surface discoloration.
Got a smudge on a nearly-dry nail? Don’t wipe it off! Wait a few more minutes, then put a tiny drop of nail polish remover on your fingertip and very gently smooth over the smudge. The remover will slightly dissolve the surface to even it out. Let it dry, then cover your tracks with another thin layer of color and a top coat.
Orly ‘Bonder’ Base Coat: Famous for its rubberized formula that makes polish grip to the nail, significantly extending wear time.
CND ‘Stickey’ Anchoring Base Coat: Another cult classic that creates a sticky surface for polish to adhere to, helping to prevent staining from deep reds and blues while prolonging the life of your manicure.
Using one of these is like double-sided tape for your nail polish.
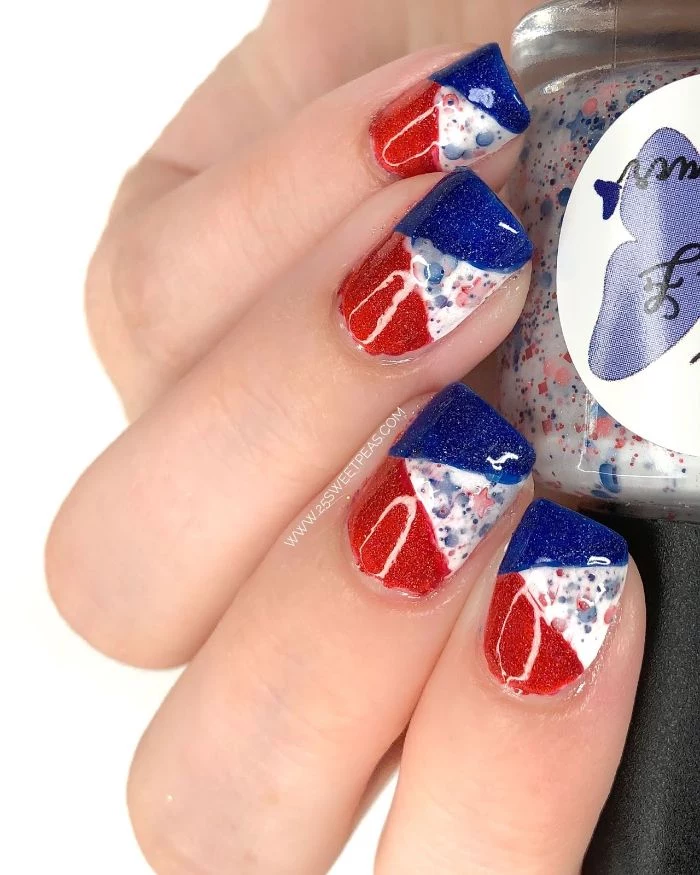
For a truly modern and easy patriotic look, try negative space. After your base coat, use striping tape to block off sections of your bare nail. Paint one section red, another blue, and leave the taped-off sections bare. Remove the tape while the polish is wet. The result is a graphic, edgy design that feels light and contemporary.
The global nail care market was valued at over $19 billion in 2021. This boom is driven largely by the rise of social media and the popularity of DIY nail art.
You’re not just painting your nails; you’re part of a massive creative movement! Platforms like Instagram and Pinterest have turned fingertips into tiny canvases, empowering everyone to experiment with designs that were once only possible in a salon.
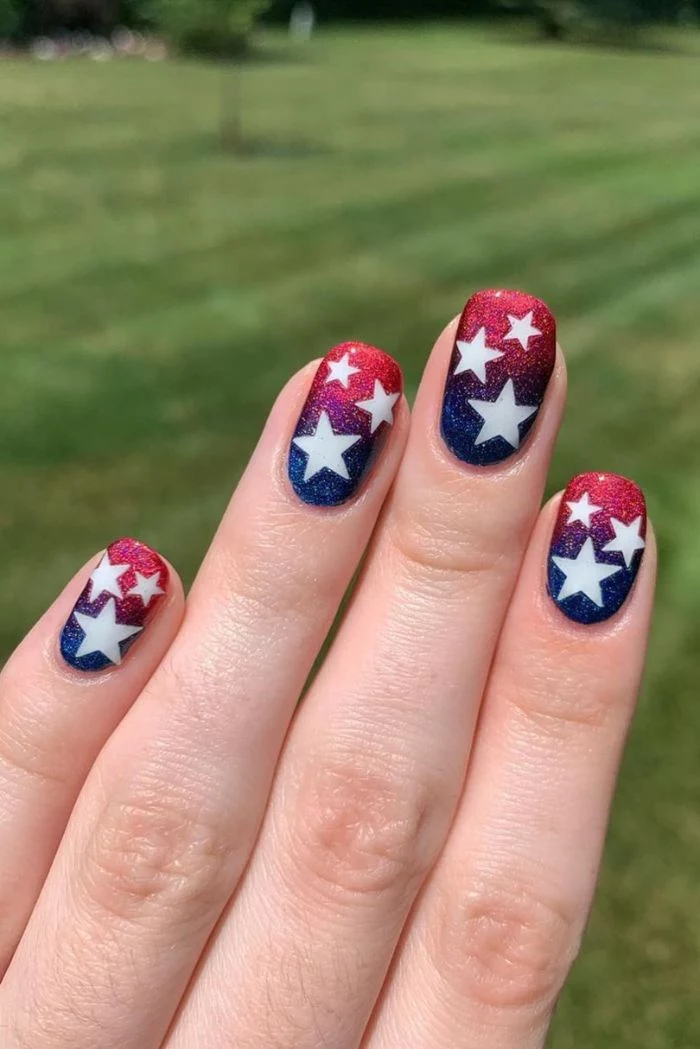
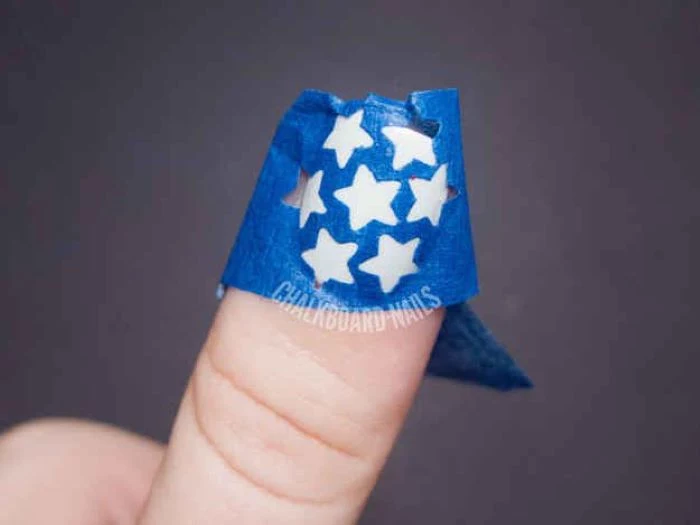
Star Stencils: These adhesive vinyls are great for ensuring uniformity. They are best for creating one or two perfect accent nails, as applying them to all ten fingers can be time-consuming. Make sure the base color is 100% dry before applying the stencil.
Freehand Stars: Offers more creative freedom in placement and size, but requires a steady hand. The ‘dot and drag’ method with a toothpick can make this much easier.
For a quick, flawless look, stencils are your friend. For a more organic, artistic style, go freehand.
The biggest mistake: Applying polish too thickly. It feels like a shortcut, but thick coats trap solvents, take forever to dry, and are far more prone to smudging, bubbling, and chipping. The professional standard is always multiple, super-thin coats. This builds strength and flexibility, ensuring your design lasts through the entire holiday celebration.


