Epoxy Resin for Beginners: Your Guide to Avoiding a Sticky Mess
I’ll never forget my first epoxy resin project. It was a total, unmitigated disaster. I was in my garage, trying to make a cool little paperweight by embedding some old gears. I thought I did everything right, but the resin just… never… cured. It remained a sticky, yellowish tomb for my ambition, attracting every speck of dust in a ten-foot radius. But honestly, that failure taught me way more than a perfect first try ever could have. It taught me that resin demands respect; it’s a chemical reaction, not just goo you pour out of a bottle.
In this article
So, this is the guide I wish I’d had back then. It’s not about those insane, clickbait projects you see online. It’s about building a rock-solid foundation so you can actually enjoy the process. We’ll get into the projects you can really tackle, the basic science of why it works (and why it sometimes doesn’t), and most importantly, how to stay safe. Because making cool stuff should never, ever compromise your health.
First Things First: Safety Isn’t a Suggestion
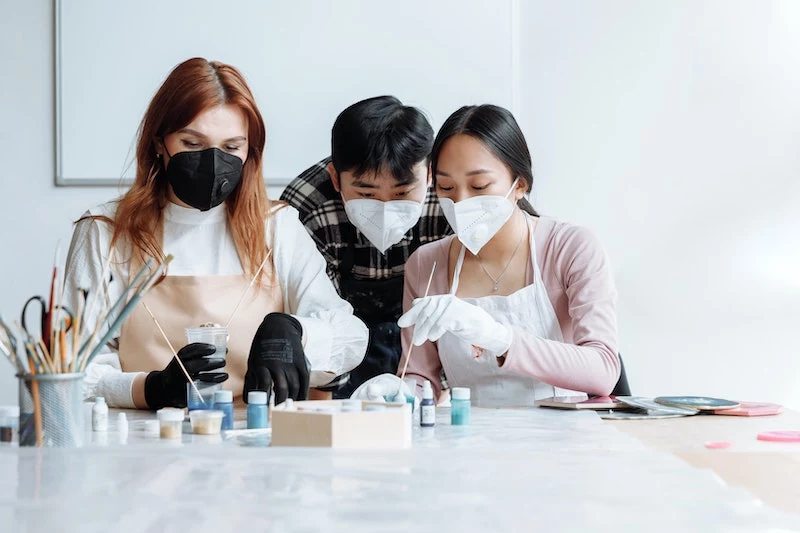
Okay, before we even think about sparkly colors or cool molds, we need to have a serious talk about safety. I can’t stress this enough. Uncured epoxy is a sensitizing agent, which means your body can develop a nasty allergic reaction to it over time with repeated exposure. I’ve seen it happen. A guy I knew got lazy with his gloves and ended up with a painful rash so bad he can never work with epoxy again. Don’t be that person. These are the non-negotiable rules for anyone who wants to work with this stuff.
1. Get Some Fresh Air
Epoxy lets off fumes called Volatile Organic Compounds (VOCs) while it cures. You don’t want to be breathing that stuff in. At a bare minimum, work in a garage with the big door open or in a room with a good cross-breeze from open windows. If you think this is going to become a regular hobby, investing in a proper ventilation fan or an air purifier with a carbon filter is a smart move. Whatever you do, never, EVER work in a small, closed-off room like a bathroom. That’s just asking for trouble.

2. Protect Your Lungs (Seriously)
A simple paper dust mask does nothing here. You need a real respirator rated for organic vapors. Look for a half-face respirator—you can find them at any big box hardware store like Home Depot or online for around $30-$40. A common and reliable choice is a 3M respirator that uses organic vapor cartridges (like the 60921 or 60923 models). It should create a tight seal on your face. A quick test: cover the filters with your palms and breathe in. The mask should suck tight against your face. Wear it from the second you open the resin bottles until your project is solid and done curing.
Heads up! You might see those little all-in-one craft kits that don’t include a respirator. They’re usually meant for a tiny, one-time project. But trust me, if you plan on doing this more than once, buying a proper respirator from the get-go is the single best investment you can make for your long-term health.

3. Keep It Off Your Skin
Nitrile gloves are your best friend. Don’t use latex or vinyl; some chemicals in resin can break them down over time. Nitrile offers much better protection. A box of 100 will cost you about $10-$15 and is well worth it. If you do get some resin on your skin, don’t grab the acetone! It can actually make the chemicals absorb faster. Just use a specialized resin-removing soap or plain old soap and water and scrub it off immediately.
4. Don’t Forget Your Eyes
A single splash of hardener in your eye can cause permanent damage. It’s a scary thought, but it’s real. Always wear wrap-around style safety glasses or goggles. This is not the step to skip.
Getting to Know Your Materials
When people say “resin,” they’re usually talking about epoxy resin, which is the most common and versatile type for crafting. Understanding what it is separates the people who get consistent results from those who are constantly troubleshooting.
Epoxy is a two-part system: Part A (the resin) and Part B (the hardener). On their own, they’re pretty useless. But when you mix them, a chemical chain reaction called polymerization starts. This reaction creates heat—it’s called an exothermic reaction. A small cup might just feel warm, but a big bucket can get hot enough to melt the plastic or even start smoking. Knowing this helps you understand why some things go wrong.
Not all epoxy is created equal. Here are the key terms you’ll see on the bottle:
- Viscosity: This is just a fancy word for thickness. Low-viscosity resin is thin and watery, perfect for pouring into detailed molds because it releases bubbles easily. High-viscosity resin is thick like honey and is better for coating surfaces (called a “flood coat”) because it self-levels without running off the edges too fast.
- Pot Life: This is your working time—how long you have after mixing before it starts to get thick and unworkable. This can be anywhere from 20 minutes to over an hour. And remember, a warm room will speed this up significantly!
- Cure Time: This is how long it takes to get hard. It might be 24 hours to be hard to the touch, but it can take a week or even longer to reach its maximum hardness and durability.
- Food Safety: Some resins are marketed as “food safe” once cured. This is only true if you measure and mix perfectly and let it cure completely. Any sticky spot is NOT food safe. I always tell people to think of it as “food contact safe” for things like serving trays, not as a cutting board. Knives will scratch the surface, trapping bacteria and potentially releasing tiny bits of plastic.
Your First Project: The Humble Coaster
Coasters are the perfect first project. They’re small, so a mistake won’t cost you a fortune in wasted materials. They teach you all the fundamentals: measuring, mixing, pouring, and dealing with bubbles. Nail this, and you’ll have the confidence to try bigger things.
Beginner’s Shopping List (The Bare Minimum)
So, what’s this actually going to cost to get started? Here’s a realistic breakdown:
- 16oz Casting Resin Kit: Look for a brand with a simple 1:1 mix ratio by volume; they are the most forgiving. Brands like TotalBoat or ArtResin are popular with beginners. Expect to pay between $25 and $35.
- Silicone Coaster Molds: A basic set of four round or square molds will run you $10 to $15 online. Pro tip: Molds with a shiny interior will give you a glossy finish right out of the mold!
- The Gear: A good respirator ($30-$40), nitrile gloves ($10), and safety glasses ($5-$10).
- Extras: Mixing cups, popsicle sticks, and a small pack of mica powder or alcohol inks for color ($10-$20).
All in, you’re looking at around $80-$100 to get set up properly and safely, with enough resin to make several batches of coasters.
Let’s Pour Some Coasters!
- Prep Your Space. Cover your table with a plastic sheet. Most importantly, make sure your surface is perfectly level! I use a little bubble level to check every single time. If it’s not level, your resin will cure in a slant.
- Measure It Out. This is where most beginners go wrong. Be precise. If the ratio is 1:1 by volume, measure exactly 50ml of Part A and 50ml of Part B. A quick trick to figure out how much you need: fill your molds with water, then pour that water into a measuring cup. Now you know the total volume you need to mix!
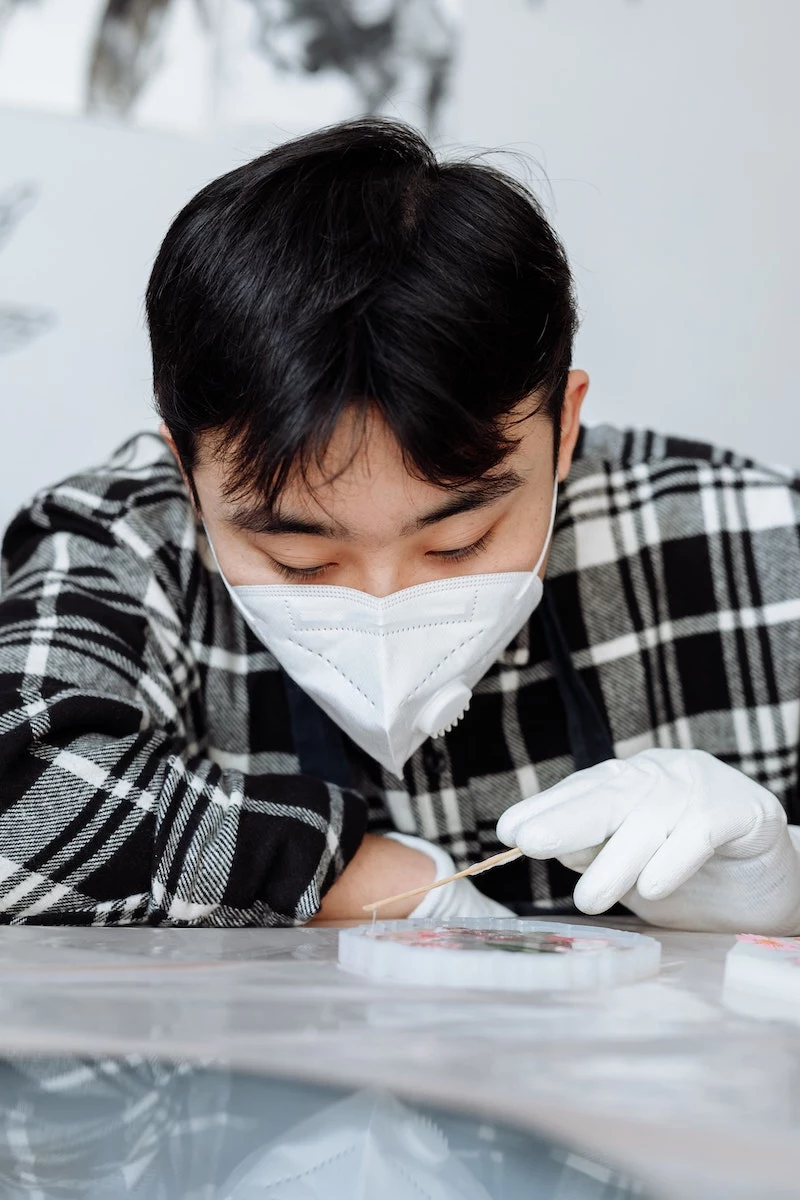
- Mix, Mix, and Mix Some More. Pour your two parts into a single cup and mix slowly but deliberately for at least 3 to 5 minutes. Scrape the sides. Scrape the bottom. Scrape your mixing stick. Any unmixed resin will leave a permanent soft spot. A great habit to get into is to pour the mix into a second, clean cup and mix for another minute to ensure everything is incorporated.
- Add Your Color. Now’s the fun part. Add your mica powder or ink. A little goes a very long way, so start with less than you think you need.
- Pour and Pop. Pour the resin slowly into your mold to avoid trapping air. After a few minutes, you’ll see tiny bubbles rise to the surface. Use a heat gun (or a propane torch, held far away and waved quickly) to pop them. The heat thins the resin for a second, letting the air escape.
- Cover and Wait. Cover your molds with a cardboard box or plastic tub to protect them from dust. Now comes the hard part: patience. Let them cure for the full time recommended by the manufacturer, usually 24 hours. Don’t poke it!
- Demold! After 24 hours, it should be hard enough to pop out of the mold. Gently peel the silicone away. It might still have a tiny bit of flex, but it will continue to harden over the next week.
Oh yeah, a good tip: always have a small, extra mold handy—like for a little charm or keychain. If you mix up a little too much resin, you can pour the excess in there. Never waste a drop!
Help! Troubleshooting Your First Pour
What happens when things don’t go according to plan? Don’t panic. Let’s walk through the most common issues.
- Problem: The whole thing is sticky or bendy after 24 hours.
Likely Cause: This is almost always due to the mix ratio being off or not mixing thoroughly enough. The chemical reaction just didn’t happen correctly.
How to Fix It: To be frank, this one’s usually a do-over. There isn’t a great way to save a piece that’s fundamentally uncured. Chalk it up to a learning experience and be more precise next time. - Problem: There are just a few sticky or wet spots on an otherwise hard piece.
Likely Cause: This happens when you didn’t scrape the sides and bottom of your mixing cup, and a little unmixed resin or hardener got into your pour.
How to Fix It: You might be able to save this! You can try to scrape off the gooey spots with a popsicle stick, sand the area lightly, and then pour a very thin, fresh top coat of resin over the entire piece. - Problem: The finish is cloudy or dull, not glassy.
Likely Cause: This could be because your silicone mold had a matte finish inside, or it’s from sanding the edges.
How to Fix It: You have two options. The professional way is to sand and polish it. The easier way (the cheat method!) is to apply a very thin, glossy top coat of resin, which will fill in the imperfections and give you that perfect shine.

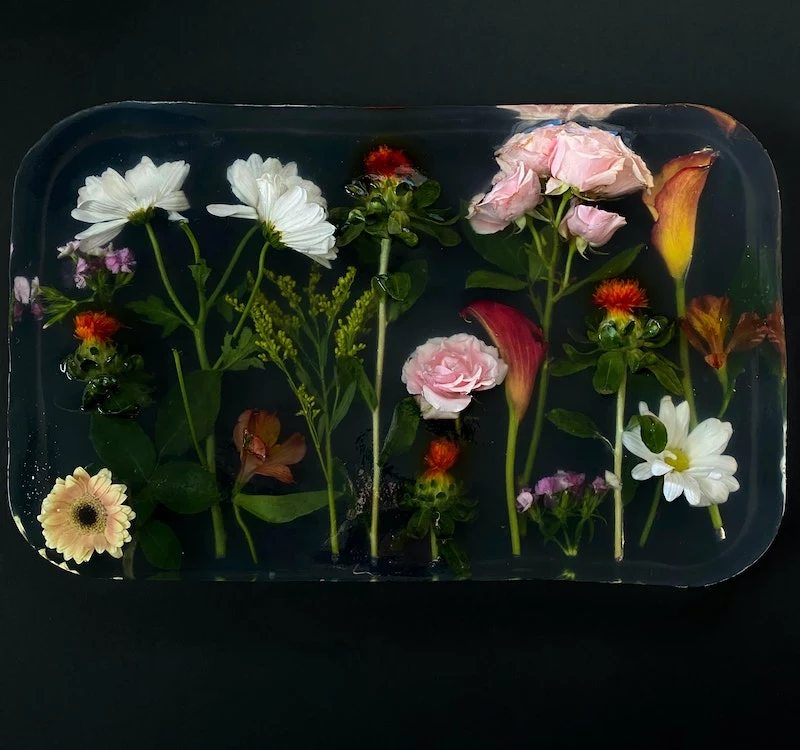
Next Steps: Flowers and Jewelry
Once you’ve mastered coasters, you can move on to other fun projects.
Preserving flowers is a popular one, but it introduces a new enemy: moisture. Flowers must be bone dry, or they will rot and turn brown inside the resin. Air-drying them upside down for a few weeks works for sturdy flowers, but for delicate ones, burying them in silica gel (you can find it at craft stores) for a week is the best way to preserve their color and shape.
For jewelry, you have a choice. You can use the same two-part epoxy, which is strong and great for filling bezels. The downside is waiting a day for it to cure. Or, you can try UV resin. It’s a single-part resin that cures in just a few minutes under a special UV lamp (like the ones for gel nails). It’s more expensive per ounce, so it’s best for small things like charms or putting a clear, domed top on a piece. It’s a real game-changer for impatient crafters!

Finishing Touches Make All the Difference
A piece straight from the mold often has sharp edges. The difference between a craft project and a professional piece is the finishing. You can wet-sand the edges, starting with a rougher sandpaper (like 220 grit) and moving up through finer and finer grits (400, 800, 1200, 2000+) until it’s smooth. It’ll look cloudy, but then you can bring the shine back with a plastic polishing compound and a microfiber cloth.
Or, you can just apply a final, thin flood coat of resin over the top to get a perfect, glossy finish without all the sanding. It’s a fantastic shortcut.
Working with resin is an incredibly rewarding skill that blends art and science. Start small, take the safety stuff seriously, and be patient with yourself. Your first piece might not be perfect, but just like my sticky gear disaster, it’ll be your best teacher. Embrace the process, and you’ll be creating things you’re truly proud of in no time.
Inspirational Gallery
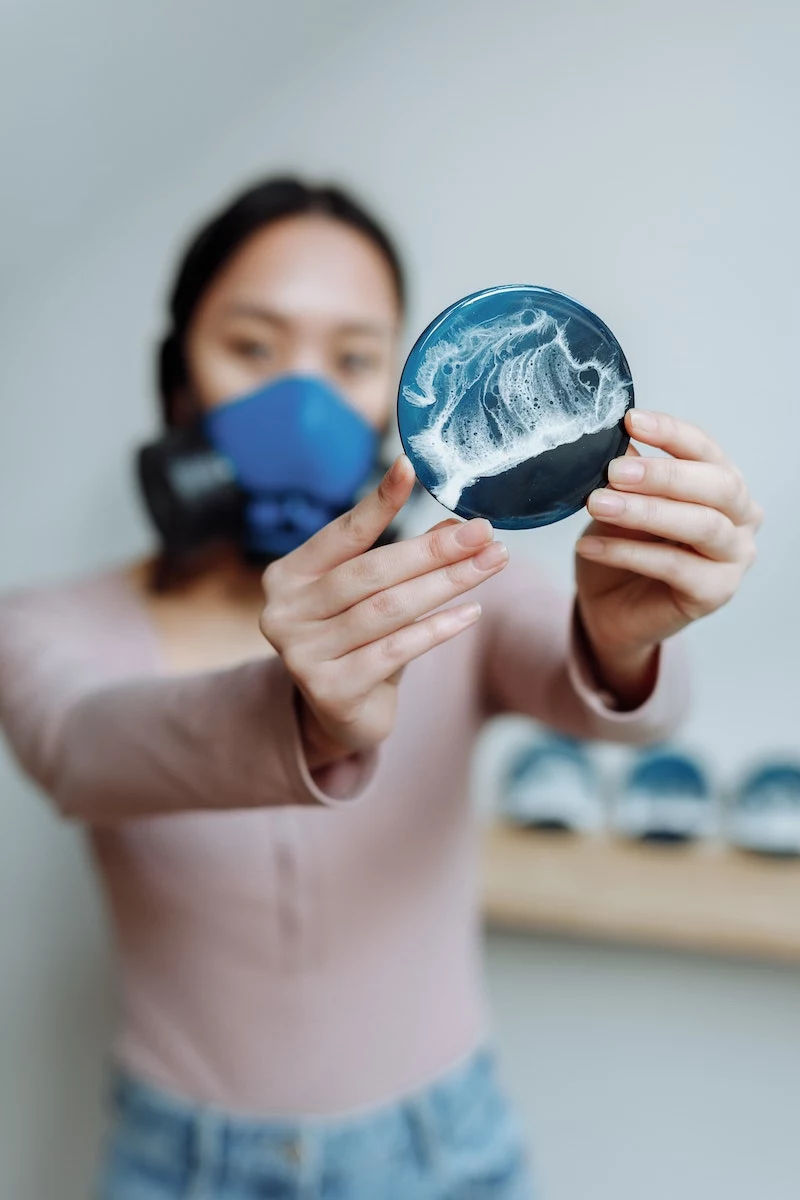
Casting Resin: This type, like TotalBoat ThickSet, is watery thin. It’s designed for deep pours (think embedding objects in molds) and releases bubbles easily, but it takes much longer to cure—sometimes 24-72 hours.
Coating Resin: This is a thicker, honey-like consistency. Brands like ArtResin are perfect for top-coating artwork or creating a domed effect on coasters. It cures faster and harder, but isn’t suitable for pours deeper than 1/8 inch.
For your first mold projects like keychains or small trays, a good all-purpose casting resin is your most versatile starting point.
What are some genuinely easy first projects?
Forget river tables for now. Start small to build confidence. Simple geometric coaster molds are fantastic because they teach you about leveling and demolding. Keychain or jewelry pendant molds let you experiment with colors and inclusions on a tiny scale. You can even embed glitter, dried flowers, or colored paper. The goal is a quick win that teaches you the core steps: measure, mix, pour, and wait.
- Crystal-clear results without a cloudy haze.
- A professional, glass-like finish free of imperfections.
The secret? Banishing bubbles before they ruin your piece. Mix your resin slowly and deliberately for at least 3 minutes, scraping the sides and bottom. After pouring, let it sit for 10 minutes for bubbles to rise, then quickly pass the flame from a heat gun or a long-arm lighter a few inches above the surface. You’ll see them pop like magic.
Did you know? The curing of epoxy is an exothermic reaction, meaning it generates its own heat.
You can actually feel this happening! If you mix a larger batch, the cup will become noticeably warm. This is a good sign that the chemical process is working. However, be cautious: mixing too much resin in a small, contained cup can create a
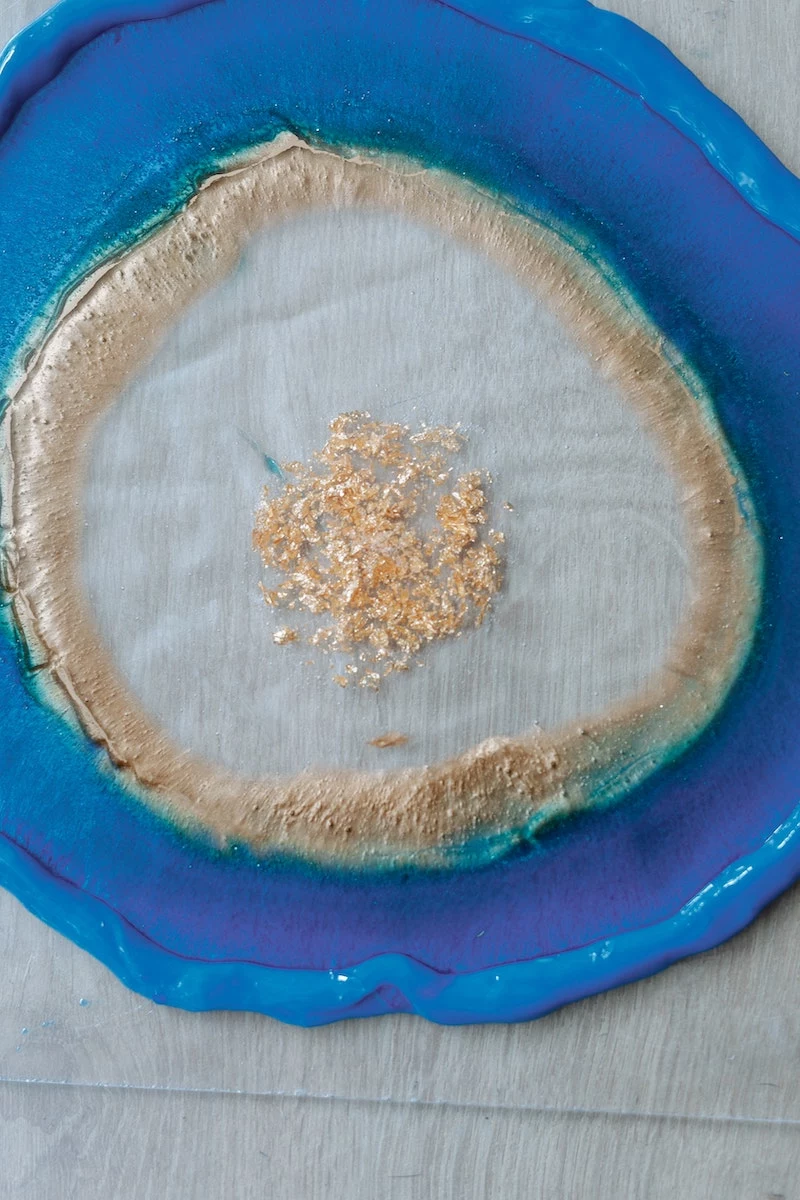
Look to the Japanese art of Kintsugi for inspiration. This centuries-old technique celebrates imperfection by repairing broken pottery with lacquer dusted with powdered gold. Modern crafters have adapted this philosophy using colored epoxy resin to mend broken ceramics, turning a flaw into a beautiful, unique feature. It’s a powerful reminder that not every
The single biggest variable you can control is temperature. Resin chemistry loves warmth. A cold garage is a recipe for disaster, leading to cloudy cures or a perpetually sticky finish. Aim for a workspace between 72-78°F (22-25°C). If your resin bottles feel cool, give them a gentle warm water bath before measuring to ensure a smooth, predictable reaction.
Once mixed, there’s no saving leftover epoxy. To avoid wasting this precious liquid gold, always keep a small
While you can get creative with budget-friendly tools, some items are non-negotiable investments. Here’s where to put your money:
- Splurge: A high-quality, low-VOC resin like those from Stone Coat Countertops or ArtResin. Cheap resins are notorious for yellowing. Your respirator and nitrile gloves are also must-splurge items.
- Save: Use silicone kitchen measuring cups and spatulas (dedicate them to resin work only!). Popsicle sticks are perfect for stirring, and you can find great, inexpensive silicone molds in the baking aisle of craft stores.
- Nitrile gloves (vinyl can degrade; always buy nitrile).
- Silicone measuring and mixing cups (they’re reusable—cured resin peels right off!).
- Popsicle sticks or silicone stirrers.
- A basic set of mica powders or alcohol inks for color.
- A level surface and a plastic sheet to protect it.
Your first few pieces won’t be perfect. They will be learning experiences disguised as coasters and keychains. Embrace the process.


