How to Make a Stunning Advent Wreath That Actually Lasts
I’ve been making Advent wreaths for a long, long time—for families, local churches, you name it. The whole process for me kicks off in late autumn, right when the air gets that perfect crispness and the smell of pine feels like a preview of good things to come. I still think about the very first one I ever struggled to make. My hands felt so clumsy with the wire, and honestly, I was way more worried about making it look flawless than understanding what it was all about.
In this article
My mentor, a wonderfully wise old florist, saw me getting frustrated. He stopped me and said something that stuck with me forever: “The wreath isn’t about being perfect. It’s about patient waiting. Every branch you add is like a little prayer.”
And he was so right. An Advent wreath is so much more than just another holiday decoration. It’s a quiet clock, counting down the four weeks of anticipation. It’s a tradition packed with meaning, and putting one together should feel thoughtful, not rushed. This guide is my way of passing on the real-deal techniques and safety know-how I’ve picked up over the years. We’ll get into the symbolism that gives the wreath its soul and the pro methods for building one that won’t fall apart by the second week.

First, Let’s Decide: A Fresh Wreath or a Faux One?
Before you even think about buying supplies, you have a choice to make. Both fresh and faux wreaths are great options, but they offer totally different experiences. There’s no right or wrong answer, just what’s right for you.
A fresh wreath is all about the authentic experience. You get that incredible evergreen scent filling the room, and the process of building it feels very traditional and connected to nature. It’s a bit more work, probably taking you 2-3 hours, and it requires some upkeep (like watering!) to keep it from drying out. The cost can be pretty reasonable if you’re smart about it, landing somewhere between $30 and $50 for all the supplies. The downside? It’s a one-and-done deal for the season.
On the other hand, an enhanced faux wreath is your champion of convenience and reusability. You can knock out this project in under an hour, and once it’s done, you can store it away and use it year after year. This is the best route if you have allergies, pets, or small kids where real greens might be an issue. The initial investment might be slightly higher, say $40 to $60 to get a decent base and some nice extras, but it pays for itself over time. The only thing you miss is that classic pine scent.

The Meaning Behind It All
Okay, before you snip a single branch, let’s talk about the “why.” Knowing the story behind the wreath turns this from a simple craft project into something way more meaningful. Every single piece has a purpose.
The Circle Shape: Pretty straightforward, right? A circle has no beginning and no end. It’s a beautiful, simple symbol of eternity and the unending nature of faith.
The Evergreen Foliage: In the dead of winter, when everything else seems to be gone, evergreens stay vibrant and green. They’re a powerful symbol of hope and continuous life, even when things feel dark. They’re a little reminder that spring is always on its way.
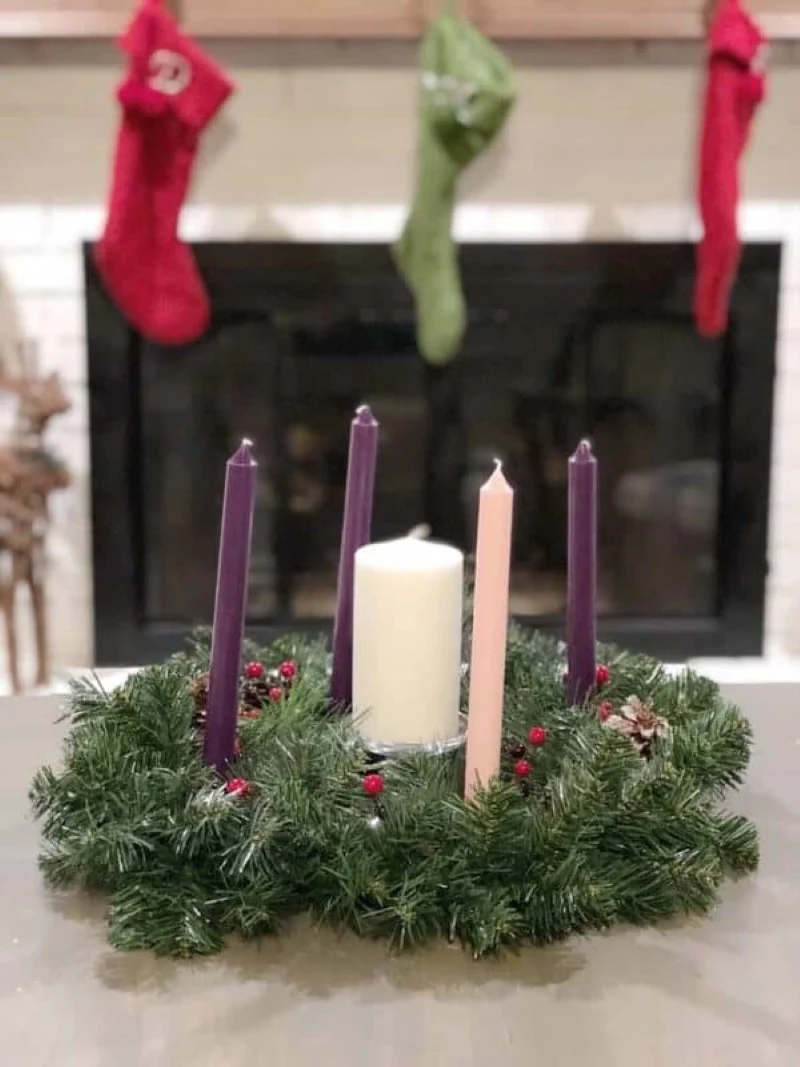
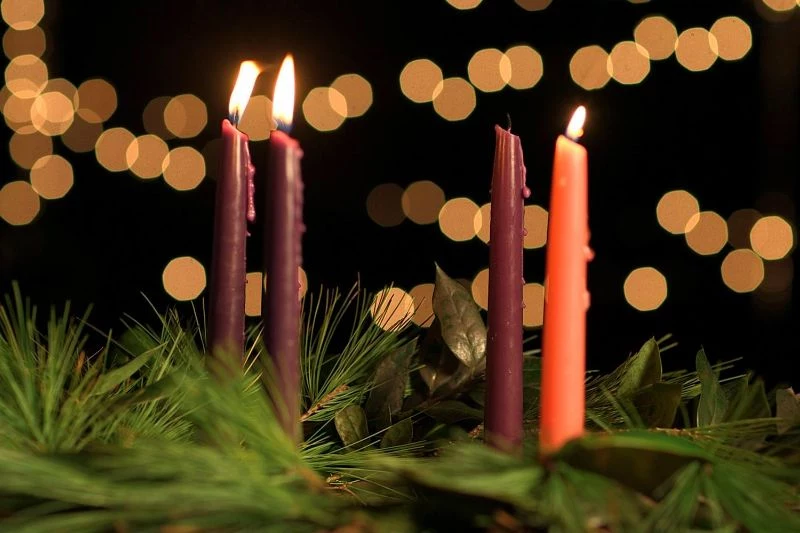
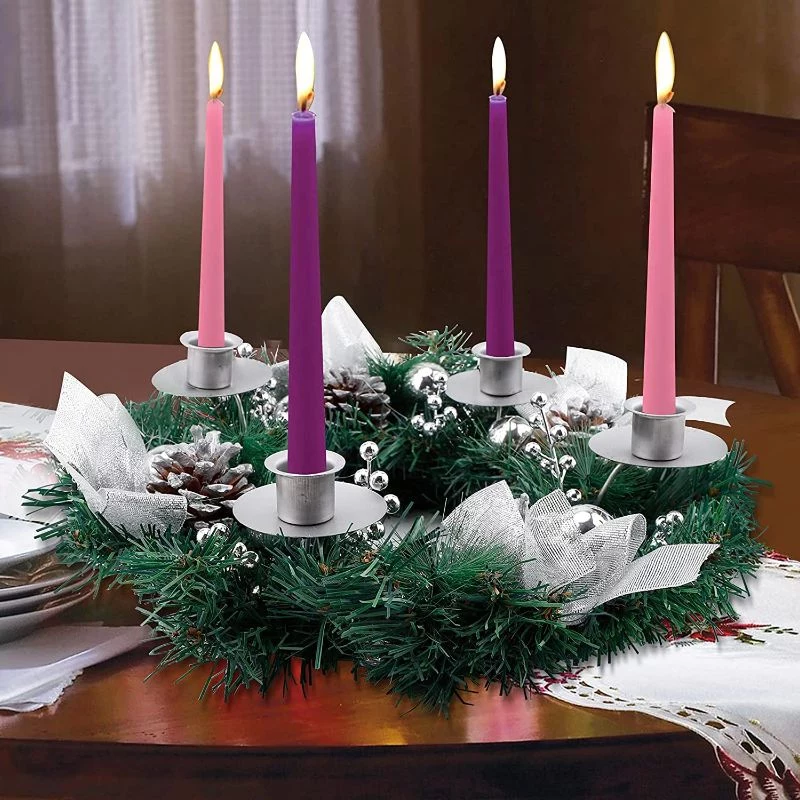
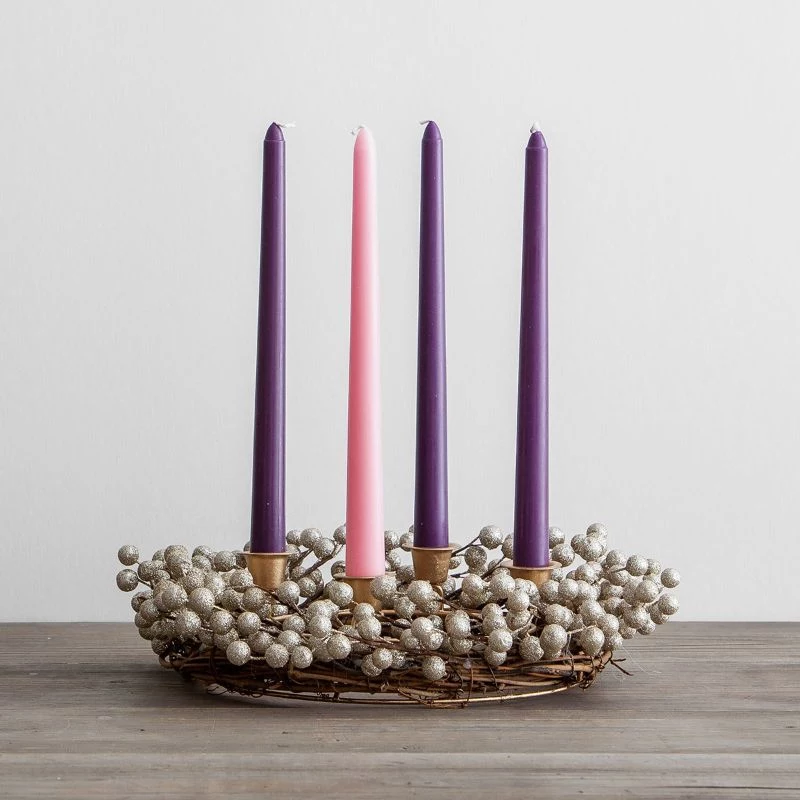
The Four Candles: These are the weekly countdown markers. Traditionally, you’ll see three purple candles and one pink one, each with its own theme.
- Week One (Purple): This is the Candle of Hope, reminding us of the anticipation for something wonderful to come.
- Week Two (Purple): The Candle of Peace, symbolizing the calm and peace that faith can bring into the world.
- Week Three (Pink): My favorite! This is the Candle of Joy. It’s lit on a Sunday known as Gaudete Sunday, a moment to celebrate that the waiting is more than halfway over.
- Week Four (Purple): And finally, the Candle of Love, representing the core message of the season.
The Optional Fifth Candle (White): Lots of wreaths add a fifth white candle right in the center. This is the Christ Candle, and it’s lit on Christmas Eve or Christmas Day to celebrate the end of the waiting. White, of course, symbolizes purity and light.
Your Shopping List: Greens, Candles, and Gear
The final quality of your wreath comes down to the materials you choose. Trust me, I’ve learned the hard way that some greens look gorgeous for three days and then promptly explode into a pile of needles.
Picking Your Evergreens
For a fresh wreath, you want greens that are both pretty and tough. My go-to strategy is to use a mix of at least two or three different types to get great texture and fragrance. Here are my favorites:
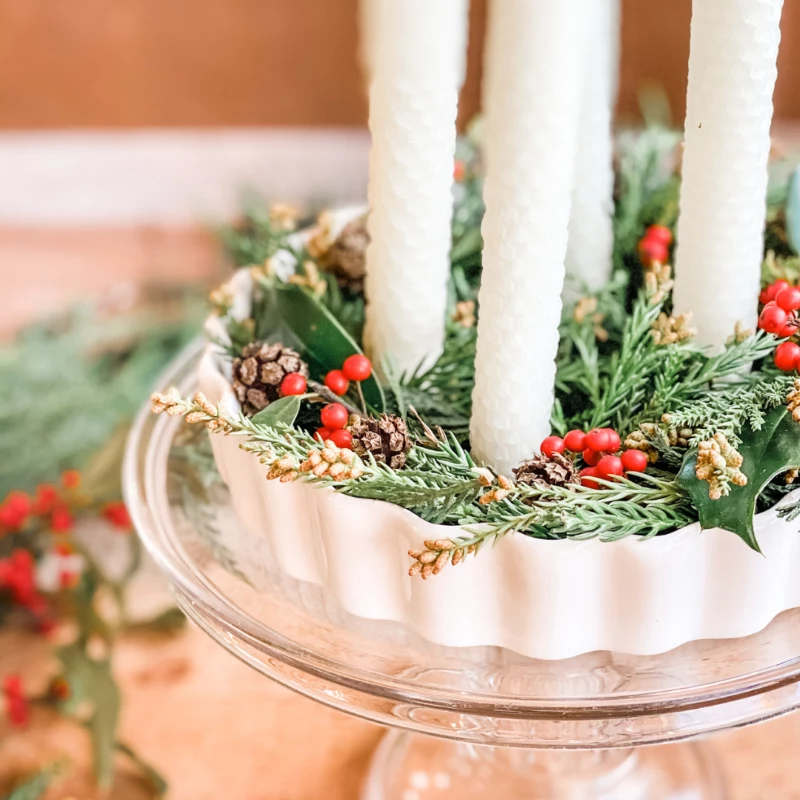
- Noble or Fraser Fir: This is what the pros use, and for good reason. They have amazing needle retention, which means way less mess on your table. Their branches are sturdy and layered, making it easy to build a full, lush wreath. If you can only get one type of green, make it one of these.
- Incense Cedar: I love cedar. It lays in these beautiful, flat sprays and has a clean, amazing scent. It can get a little brittle as it dries, so I use it as a supporting actor, weaving it in with the fir for texture. Heads up: some people find the pollen a bit irritating.
- Boxwood: If you want a more formal, classic look, boxwood is fantastic. Its tiny leaves create a really dense, rich surface. Just one warning: its scent is… polarizing. Some people love it, others think it smells a bit like a cat. Seriously. Snip a tiny piece at the store and give it a whiff before you buy a bunch.
- Pine (White or Scotch): Pine gives you that classic holiday look and nostalgic smell. It’s a lot sappier than fir, so I’d definitely recommend wearing gloves. It also tends to drop more needles. I use it when someone specifically asks for that “Christmas tree” smell.
Where to get them: You don’t need a secret password to a floral wholesaler! Head to your local Christmas tree lot and ask if you can have or buy some of the branches they trim off the bottoms of trees. They usually have a huge pile and are happy to help. You’ll want about 5-7 large branches to have plenty to work with. Your local garden center or even Home Depot might also sell fresh bundles of greens.
A Quick Word on Candles
Choosing candles isn’t just about the color; it’s about safety. Cheap candles can drip like crazy, which is messy and a serious fire risk.
- Paraffin: This is the most common and affordable type. You can find a set of four for around $8 at any craft store. Look for ones labeled “drip-less” to be on the safe side.
- Beeswax: My personal favorite. They have a subtle honey scent and a beautiful, warm glow. They’re naturally drip-less and burn cleaner and longer. They are pricier—expect to pay $20 or more for a set—but for a centerpiece like this, I think it’s worth it.
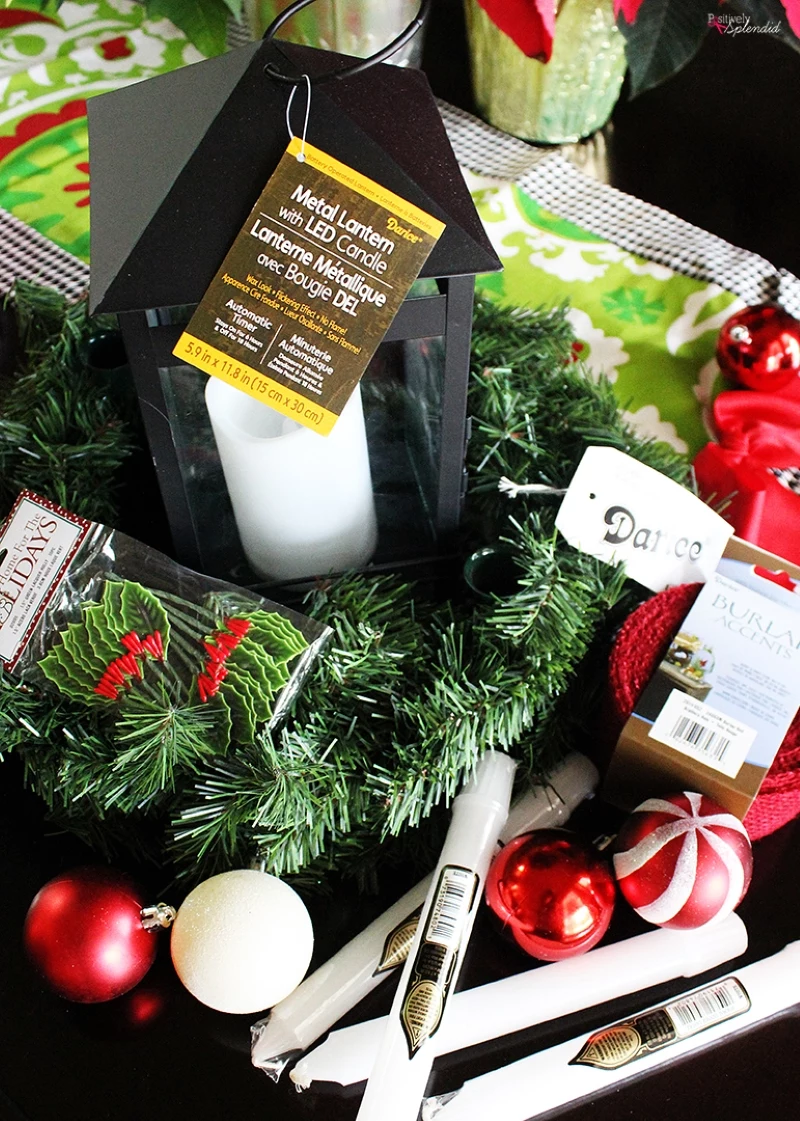
- LED Candles: Let’s be real: if you have little kids, curious pets, or live in a dorm or hospital, LEDs are the only truly safe choice. The technology is so much better now; you can find some with a realistic flicker. It’s a break from tradition, but peace of mind is everything.

How to Actually Build the Wreath
The difference between a wreath that looks homemade and one that looks professional is the foundation. A solid, well-made base is everything. Here are two methods to get you started.
Method 1: The Traditional Fresh Wreath
This is how you build a wreath that’s designed to last. It takes more effort, but the result is a professional-grade piece you can actually water. Set aside 2-3 hours for this.
Your Shopping List & Budget:
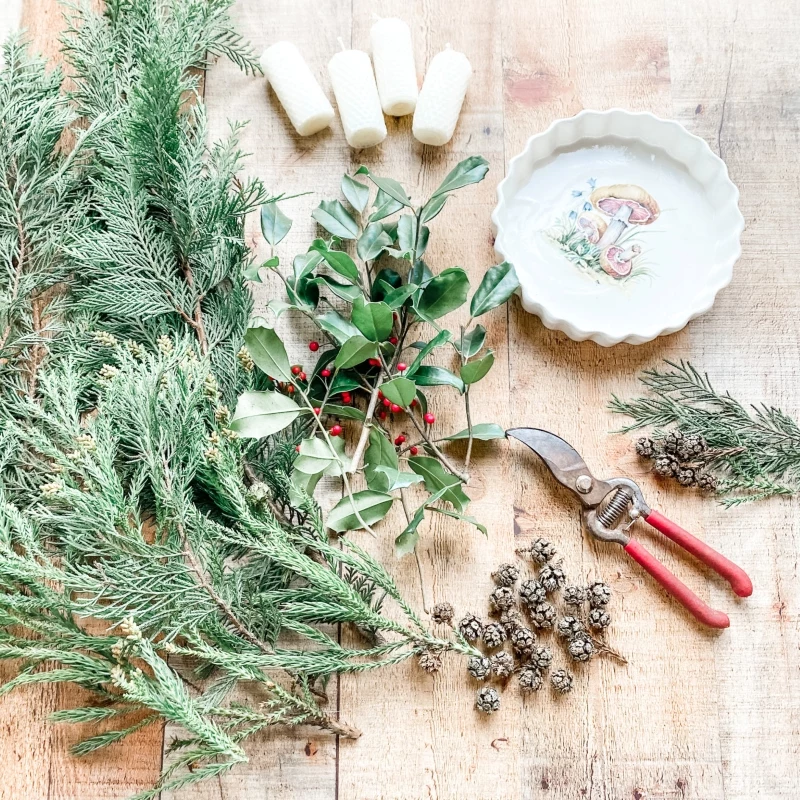
- 12-inch Double-Wire Wreath Frame: About $3-$5 at a craft store like Michael’s or JOANN.
- Dried Sphagnum Moss: Around $7 for a bag. Make sure it’s not peat moss!
- Bucket of Water: Free!
- 22-Gauge Paddle Wire: A spool costs about $4 and will last you for ages.
- Floral Clippers & Work Gloves: Essential tools.
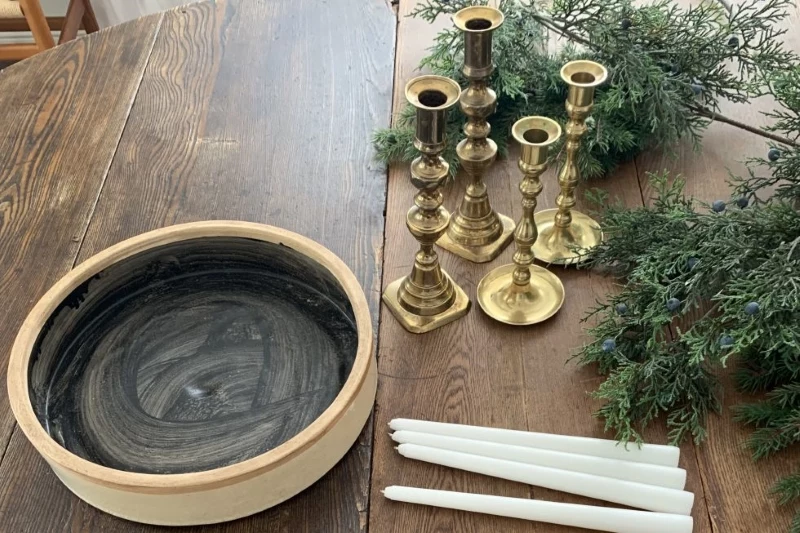
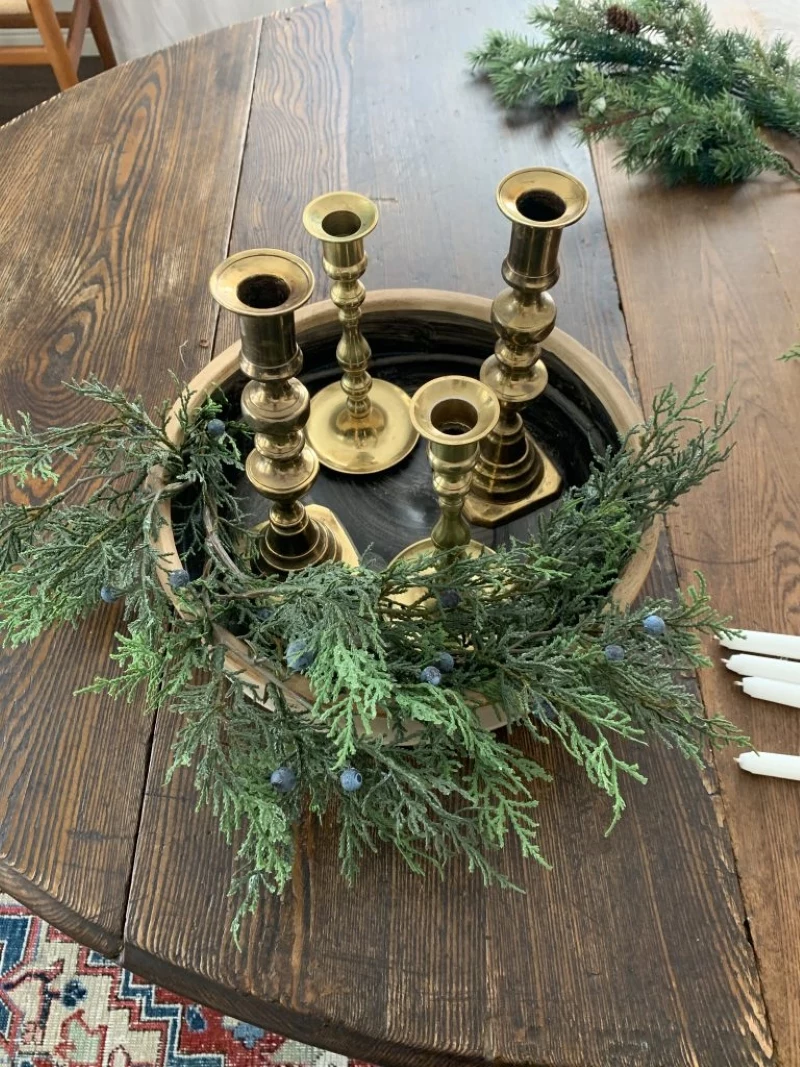
- 4 Metal Candle Holder Spikes: About $5 for a set of four. Don’t skip these!
- A big pile of mixed evergreens: Free to $20, depending on your source.
Step-by-Step Guide:
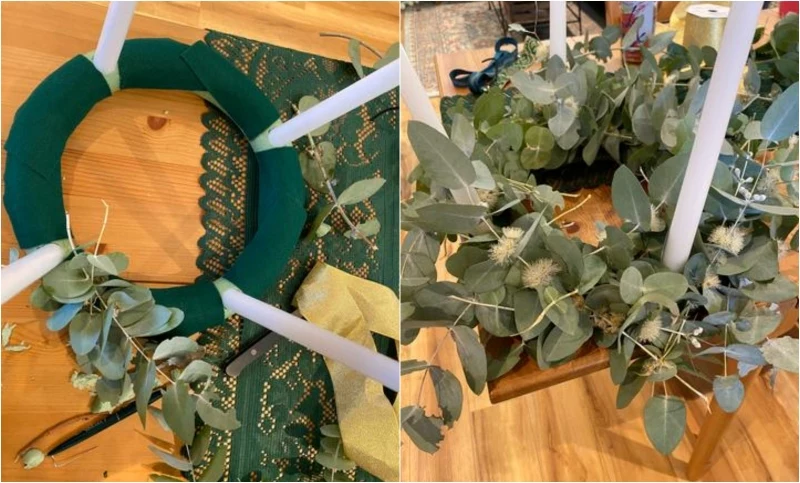
- Prep the Moss Base: Soak your sphagnum moss in a bucket of water for 20 minutes. Squeeze out the excess so it’s damp, not sopping wet. Now, pack that damp moss tightly into the channel of your wire frame. This moss is your secret weapon—it’s a water source that will keep your greens fresh for weeks.
- Secure the Wire: Twist the end of your paddle wire onto the frame to anchor it. Don’t cut the wire from the paddle; you’ll be working with the whole spool.
- Install Candle Holders: This is the most important safety step. Figure out where you want your four candles and space them evenly. Force the spike of each metal holder through the moss and frame. Using needle-nose pliers, bend the metal tabs on the bottom flat and tight against the underside of the frame. Give it a good wiggle. If it moves at all, tighten it more. Never, ever just stick a candle into foam or moss.
- Prep Your Greens: Cut your evergreen branches into smaller, 6 to 8-inch pieces. Create little bundles, or “picks,” by combining a piece of fir with a sprig of cedar, for example. Each bundle should be about as thick as your thumb.
- Start Greening: Lay your first bundle on the frame and wrap the wire tightly around the stems 3-4 times. Don’t cut the wire. Place your next bundle so its leafy tips cover the stems of the first one. Wrap it tightly. Keep doing this—overlapping each bundle and pointing the stems in the same direction. The key is to pull that wire TIGHT every single time.
- Finish It Up: When you get back to the beginning, it’s time for the trickiest part. Pro Tip: I use a flathead screwdriver to gently lift the needles of the very first bundle I placed. This creates a little pocket where you can tuck the stems of your last bundle underneath for a seamless finish. Wrap the wire tightly one last time, cut it from the paddle (leaving a 6-inch tail), and twist that tail around the frame to secure it.
- Add the Candles: Place your taper candles onto the spikes. They should fit snugly. If a candle feels a bit loose, wrap a small piece of foil around its base to make it thicker.
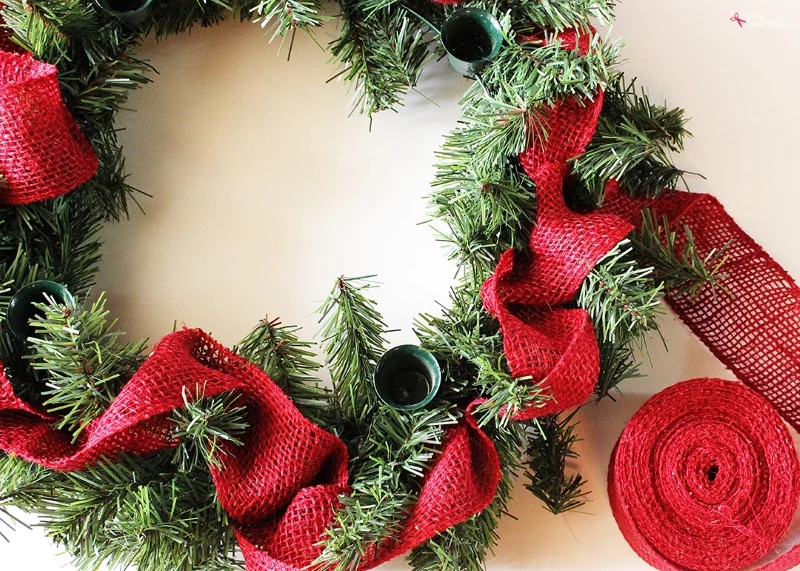
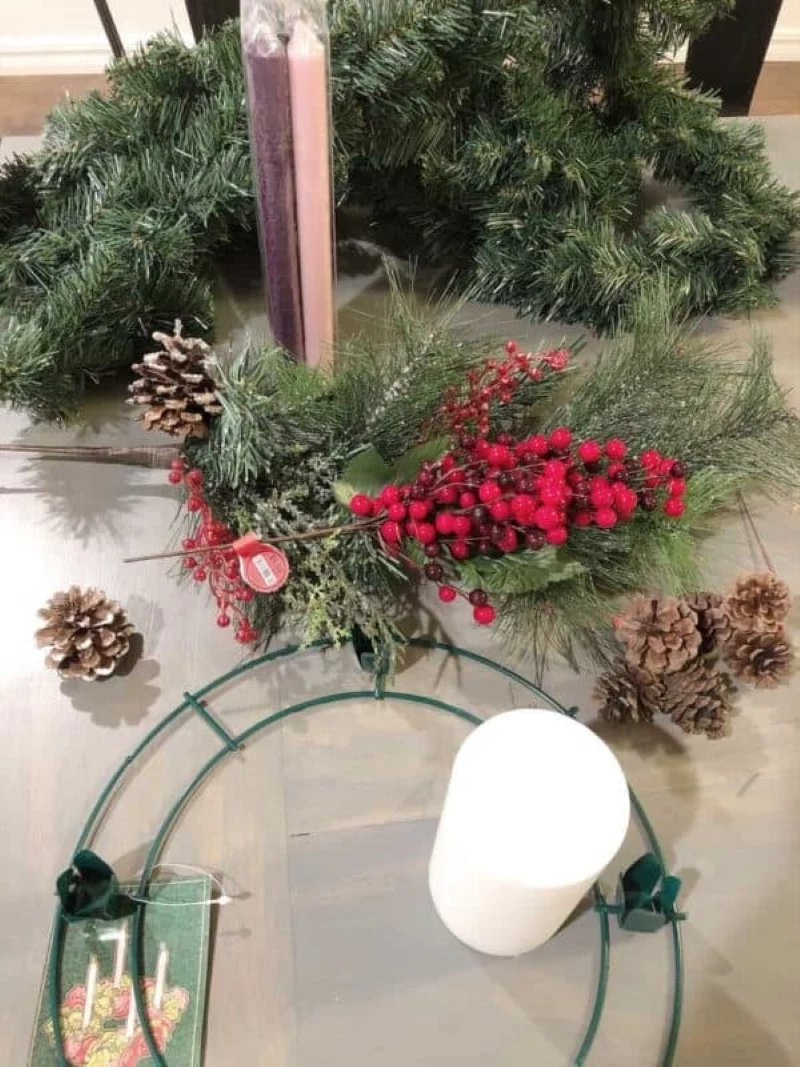
Method 2: Upgrading a Store-Bought Faux Wreath
This is a fantastic option for a reusable wreath. You can take a sad, sparse-looking wreath and make it look like a million bucks. This should take you less than an hour.
What You’ll Need:
- A plain faux pine wreath (a 16-inch one is a good start, usually around $15)
- Extra high-quality faux picks (e.g., cedar, eucalyptus, berries) from a craft store. Plan on spending $10-$20 here.
- Floral wire or a hot glue gun.
- 4 LED taper candles and 4 clip-on candle holders.
Step-by-Step Guide:
- Fluff It!: First things first, take time to separate and shape all the branches on the base wreath. Bending them in different directions to create space is half the battle and makes a huge difference.
- Add Depth & Texture: This is where the magic happens. Cut your extra faux picks into smaller pieces. Weave them into the base wreath, following the natural flow of the branches. You can secure them by twisting their wire stems around the frame or using a dab of hot glue. The goal is to break up that uniform, plasticky look and make it look much more expensive.
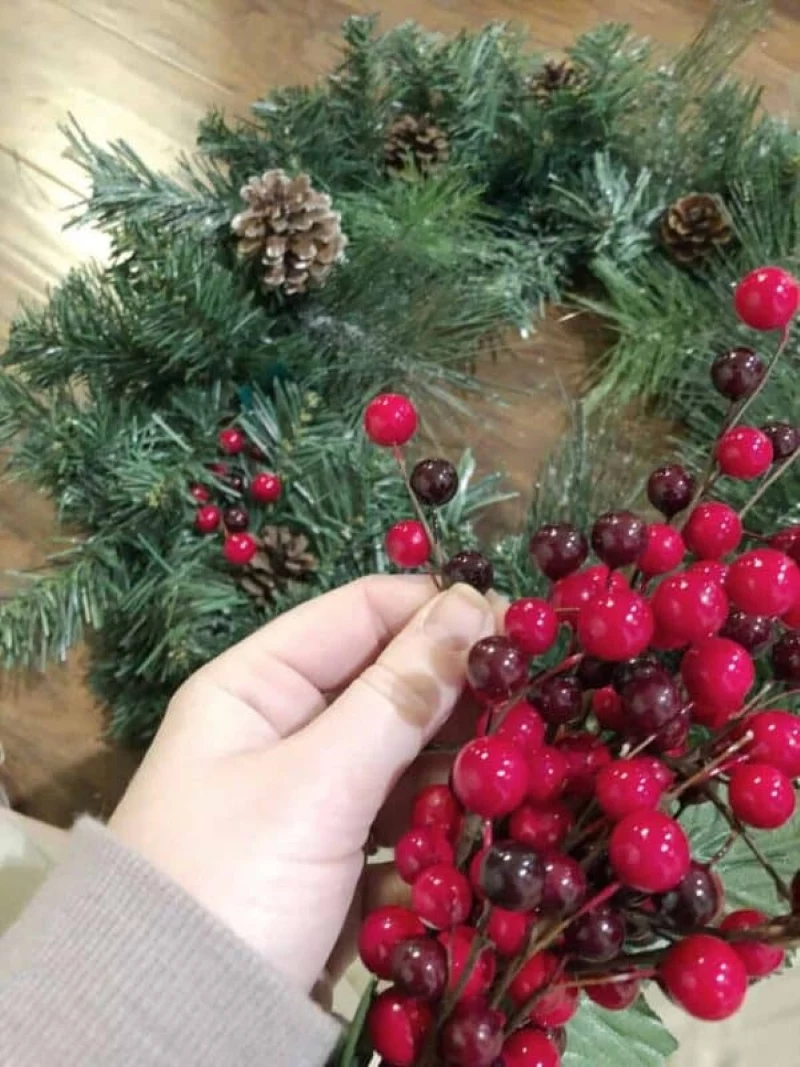
- Add the Bling: Now you can add things like faux berry sprigs or small pinecones. Attach them with hot glue, trying to cluster them in odd numbers (like groups of three) for a more natural look.
- Position the Candles: Securely clip your LED candle holders onto the sturdiest branches you can find, spacing them out evenly. Make sure they’re standing up straight before you pop the LED candles in.
Troubleshooting Common Problems
Problem: My fresh wreath is drying out way too fast!
Solution: It’s probably too close to a heat source. Move it away from radiators, heat vents, and sunny windows. And remember that moss base? You can water it! Once a week, take the wreath to the sink and slowly pour a cup of cool water into the moss. Misting the leaves every day or two also works wonders.
Problem: My wreath looks lopsided or has bald spots.
Solution: This usually means your bundles were a little too small or you didn’t overlap them enough. No worries! Just make a few new, small bundles and tuck them into the gaps. You can use a piece of wire to secure them deep inside the existing foliage so no one will ever know.
Okay, Let’s Talk Seriously About Safety
I cannot stress this enough: putting an Advent wreath with real candles in your home means you have an open flame surrounded by highly flammable material. It is beautiful, but it demands your full attention.
Here are the unbreakable rules:
- NEVER, EVER leave lit candles unattended. Not for a second. If you leave the room, blow them out. Simple as that.
- Keep a Clear Zone. Make sure the flame is at least an inch away from any greenery. As the candles burn down, they get closer, so you have to stop using them before they get too low.
- Use a Protective Base. Always place your wreath on something that won’t catch fire, like a ceramic platter or a metal tray. This will protect your furniture and catch any drips.
- Watch for Drafts. A breeze from a window or a vent can make a flame dance and catch the greens on fire.
- Light with Intention. A great practice is to light the candles only during a meal or evening prayer, and then extinguish them right after. This dramatically minimizes the risk.
While you might see fire-retardant sprays for fresh greens at the store, I don’t trust them. They can have a chemical smell and give you a false sense of security. The best safety tool you have is your own vigilance.
What Do I Do When Advent is Over?
Good question! Don’t just toss the whole thing. If you made a fresh wreath, you can easily disassemble it. The greens can be composted. Then, you can save the wire frame, metal candle holders, and paddle wire for next year. It makes the project even more affordable the second time around!
Inspirational Gallery
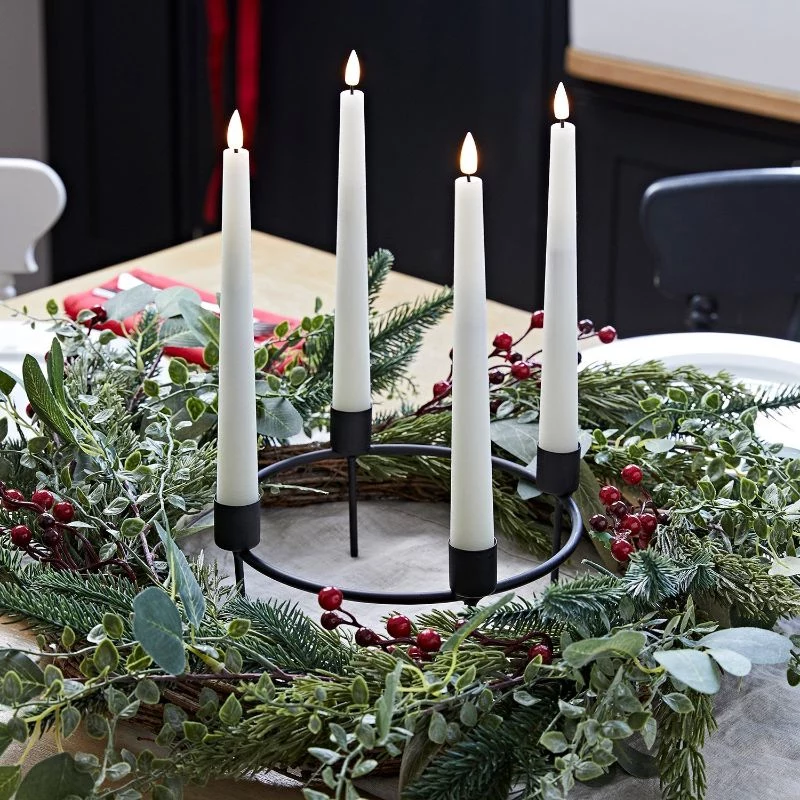
- Choose long-burning, drip-less candles to avoid wax puddles on your greenery and table.
- Always secure candles in sturdy metal spike holders (florist’s pins) that pierce the wreath base, preventing them from tipping.
- Never leave a lit Advent wreath unattended, especially around children or pets.
- Keep the wreath away from drafts, curtains, or other flammable materials.
What’s the story behind the candle colors?
It’s a beautiful piece of symbolism. The three purple or violet candles represent prayer, penance, and royalty, marking the solemn anticipation of the first, second, and fourth weeks of Advent. The single rose or pink candle, lit on the Third Sunday (Gaudete Sunday), signifies joy and rejoicing, as the celebration of Christmas is near.
More than 40% of fires caused by candles occur during December.
This sobering statistic from the National Fire Protection Association underscores the need for vigilance. To keep your tradition safe, maintain at least one inch of space between the flame and any greenery. As the candles burn down each week, trim any nearby branches to maintain this safe distance. A small spray bottle of water to lightly mist your fresh greens every couple of days also reduces flammability.
Noble Fir: Its sturdy, tiered branches are perfect for supporting ornaments, and its needles have excellent retention, meaning less mess.
Incense Cedar: Known for its wonderfully fragrant, lacy foliage that drapes beautifully. It adds a different texture and a heavenly scent.
For a truly professional look and feel, don’t just choose one. Combine the structure of Fir with the delicate aroma and texture of Cedar.
A common mistake is using the wrong wire. For securing thick, woody branches to a metal frame, you need something stronger than craft wire. Ask for 22-gauge paddle wire at your local florist or craft store, like the green-coated variety from Panacea Products. It’s the perfect balance of strength and flexibility, holding everything securely without being too difficult to twist.
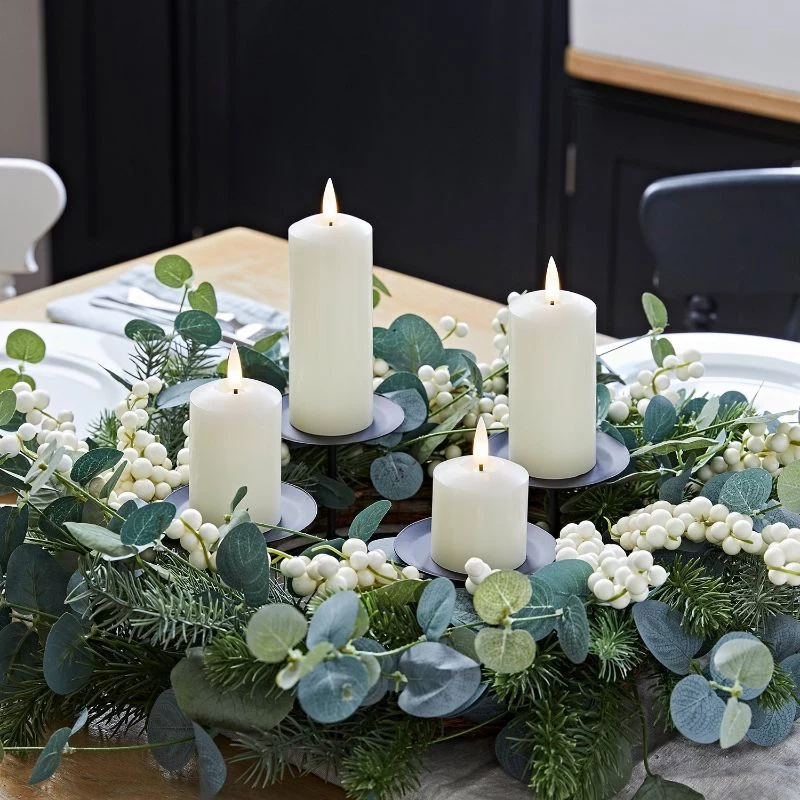
- A clean, uncluttered aesthetic that suits modern interiors.
- Takes only minutes to assemble and display.
- Perfectly safe, with no risk of dry greens catching fire.
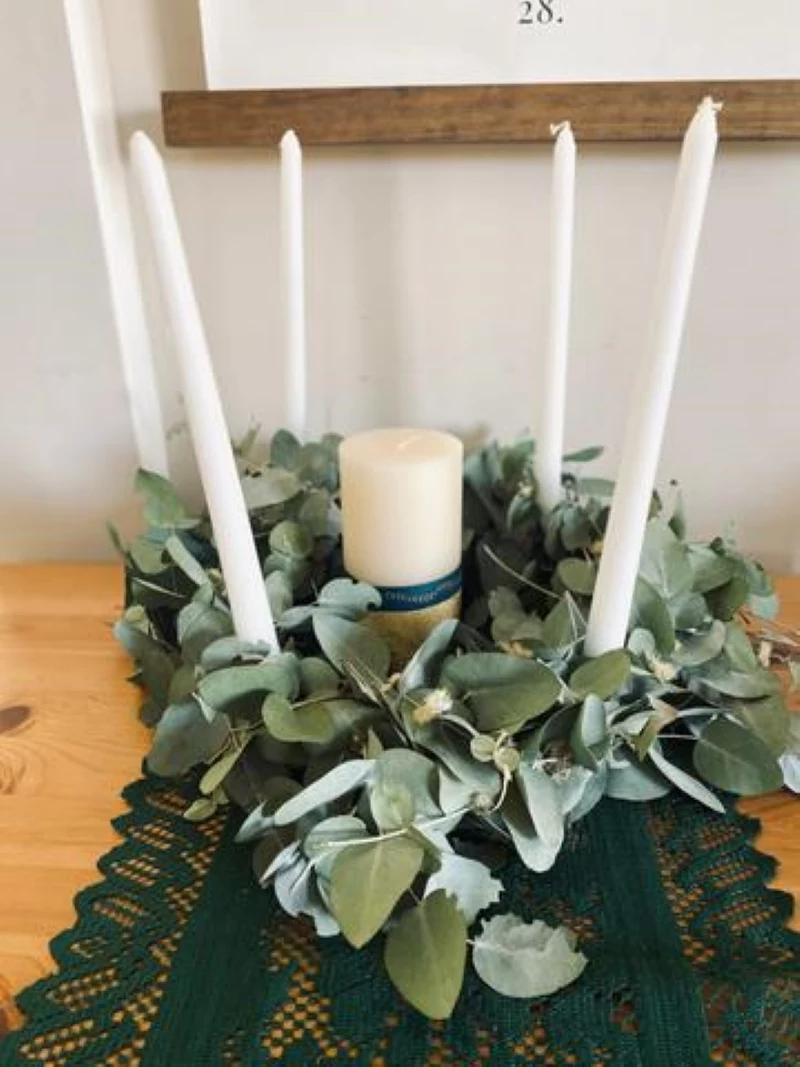
The secret? Deconstruction. Arrange four simple pillar candles of varying heights on a beautiful wooden tray or slate platter. Instead of a full wreath, lay a single, perfect branch of eucalyptus or a sprig of silver fir next to them. It’s a minimalist nod to the tradition that’s effortlessly chic.
Don’t forget the fifth candle! Many traditions include a larger, central white candle. This is the Christ Candle, and it’s placed in the center of the wreath on Christmas Eve or Christmas Day. Its lighting represents the arrival of Jesus, the Light of the World, bringing an end to the waiting period of Advent. It’s a powerful culmination of the four-week journey.
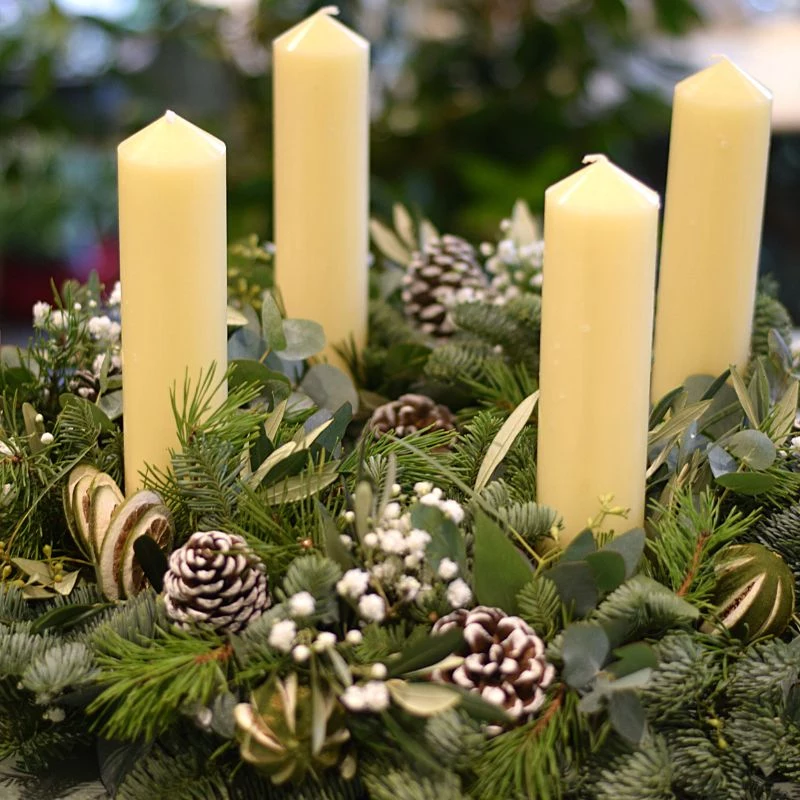
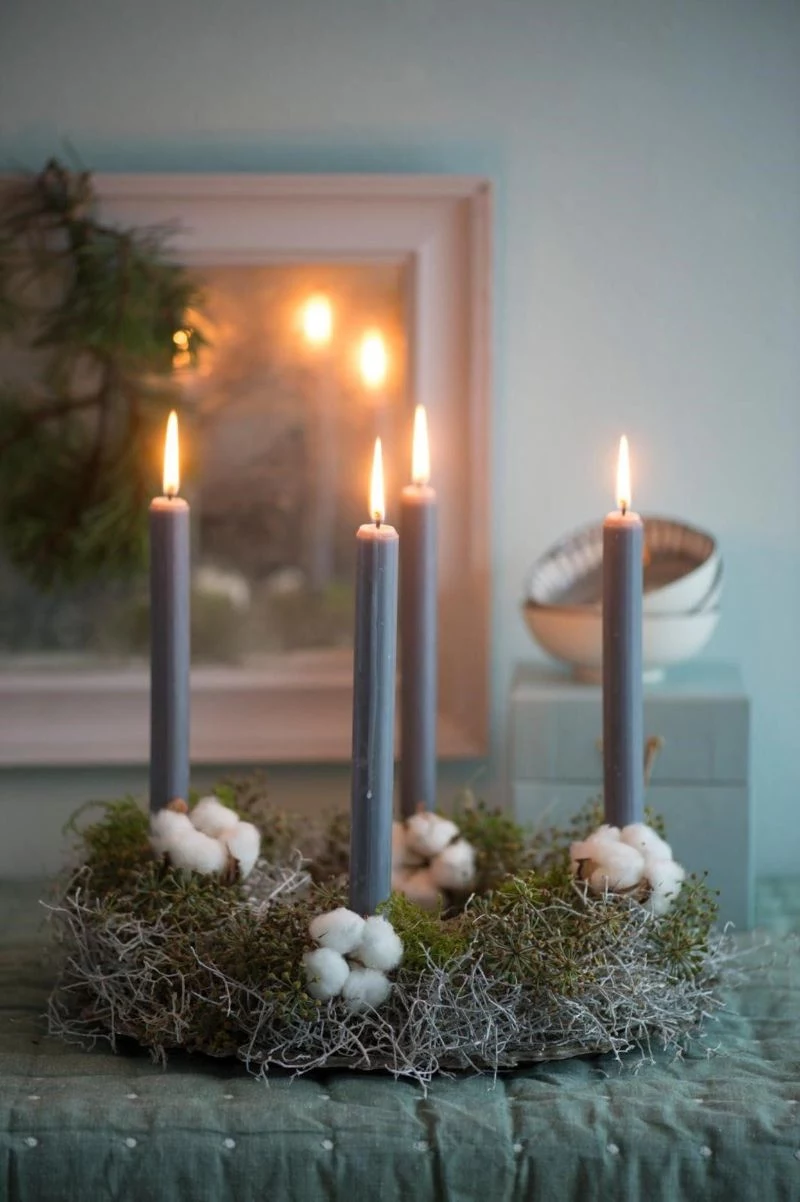
To elevate the sensory experience beyond just the visual, weave in natural aromatics. Tuck cinnamon sticks and star anise pods between the branches, or wire on some dried orange slices. Not only do they add a warm, spicy fragrance, but their earthy tones also complement the deep green of the foliage. For a longer-lasting scent, apply a few drops of frankincense or cedarwood essential oil directly onto a few pinecones before adding them to your wreath.
A key sustainability tip: When foraging for your own greens, practice the ‘selective pruning’ method. Never cut the top leader of a young tree, and only take a few small branches from any single plant. This ensures the health of the tree and the forest ecosystem. On private land, always ask permission first!
Creating a beautiful wreath doesn’t require a big budget. Many elements can be found or cleverly substituted:
- Many Christmas tree lots will give you their discarded branch trimmings for free.
- A sturdy wire coat hanger, untwisted and reshaped into a circle, makes a surprisingly effective frame.
- Look for fallen pinecones and shapely twigs in your own backyard or a local park.
- Skip the floral foam and wire; simple jute twine can be used to tie your bundles of greens to the frame for a rustic look.


