Paper Airplanes That Actually Fly: Your Hands-On Guide to Perfect Flight
I’ve been obsessed with folding paper airplanes for what feels like a lifetime. It all started in the backyard, locked in an epic distance battle with my brother. That childhood rivalry turned into a real fascination with how a simple piece of paper can master the air. It’s the perfect, hands-on lesson in engineering, and honestly, it’s just plain fun.
In this article
There’s a special kind of magic in watching something you made with your own hands catch the wind and just… soar. I’ve seen that look of surprise and pride on hundreds of faces, from kids to adults, in workshops I’ve run over the years.
So, this guide isn’t about making a crumpled wad that tumbles to the ground. It’s about sharing the real techniques that make a difference. We’re going to explore why each fold matters and how a tiny tweak can turn a nosedive into a long, graceful glide. And the best part? You don’t need a bunch of fancy supplies.

What you’ll need to start right now:
- One sheet of standard printer paper (cost: about 2 cents).
- One small paperclip (optional, but super helpful).
- Your hands (free!).
See? You’re already set. Let’s get folding.
The Secret Physics of a Great Flight
Before you make a single crease, it helps to know why a plane flies. It’s not magic, it’s physics. A friend who’s an engineer broke it down for me once, and it completely changed how I build my planes. Four forces are constantly battling it out, and your job as the designer is to find the right balance.
- Thrust: This is the push you give the plane. A good, smooth launch is key.
- Gravity: The force that’s always trying to pull your plane back to Earth.
- Drag: Think of this as air resistance. It’s the force slowing your plane down. A sleek, sharp design slices through the air with less drag.
- Lift: This is the hero of the story. As air moves faster over the top of the wings than underneath, it creates a pressure difference that pushes the plane up.
A successful flight is simple: lift needs to be strong enough to beat gravity, and thrust needs to be strong enough to overcome drag. Understanding this makes troubleshooting a breeze. If your plane dives instantly, it probably needs more lift. If it just stops mid-air, it likely has too much drag.
The All-Important Balancing Act
Two other ideas are absolutely critical: the Center of Gravity (CG) and stability. The CG is just the plane’s balance point—you can find it by trying to balance the finished plane on your fingertip. For a stable flight, the CG needs to be slightly in front of the center of all that lift from the wings.
Here’s what that looks like in the real world:
- Nose-Heavy: If the CG is too far forward, the plane will dive straight into the ground. No drama, just a fast trip down.
- Tail-Heavy: If the CG is too far back, the plane will climb up really steeply, lose all its speed (this is called a stall), and then just flutter or fall backward.
Heads up! A stalling plane is one of the most common problems for beginners. And the fix is incredibly simple: add a little weight to the nose. A small paperclip is the perfect tool for this. It shifts the CG forward just enough to create a stable, gliding flight. It’s the first trick I teach everyone.
The Art of a Good Fold
The quality of your plane comes down to the quality of your work. The pros in any craft obsess over materials and technique, and we should, too. Getting these fundamentals right from the start makes all the difference.
Choosing the Right Paper
Not all paper is the same. The standard 8.5 x 11-inch copy paper you find in most offices is a fantastic starting point. It’s usually a 20 lb bond weight (about 75 gsm), which gives it a great balance of sturdiness and foldability. A ream of 500 sheets is usually under $10 at any office supply store, so you’ll have plenty for experiments.
But for different results, you can branch out:
- Lightweight Paper (like 16 lb or 60 gsm): This stuff is thinner and lighter. It’s amazing for gliders designed for maximum hang time indoors. The trade-off? It can be a bit flimsy, so your folds have to be extra precise.
- Heavier Paper (24-28 lb or 90-105 gsm): This paper is stiff and holds a crease like a champ. It’s my go-to for fast, durable darts that can handle outdoor breezes or a few crash landings. It can be a little tough to fold, though, especially on designs with lots of layers.
By the way, A4 paper, which is common outside the US, is a bit longer and narrower. I’ve found that on A4, a classic dart design sometimes needs an extra nose fold to add a bit more weight up front to fly straight.
Tools of the Trade
Your hands are the main event, and your fingernail is the perfect tool for sharpening a crease. But if you really get into it, a couple of simple things can level up your game.
- A Bone Folder: This is a simple, dull-edged tool used in bookbinding to make incredibly sharp folds. You can find them for a few bucks at any craft store. A clean ruler or even a popsicle stick works in a pinch. A sharp crease is everything—it reduces drag and makes the whole structure stronger.
- A Ruler: For more advanced designs, starting with a perfectly symmetrical sheet is non-negotiable. I always check my paper. A tiny difference of a few millimeters can throw off the balance and send your plane into a death spiral.
Your First Fleet: Three Essential Designs
Okay, let’s build three different planes, each with a specific mission. Before you start, here’s a quick rundown to help you choose your first build:
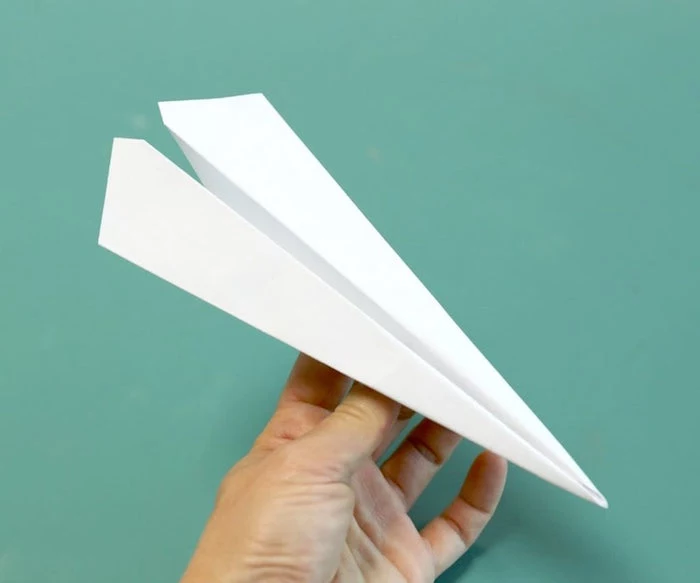
- The Classic Dart: This is your go-to for speed and distance. It’s easy to fold and flies straight and true, but it doesn’t glide much. Think of it as a missile.
- The Stable Glider: This one is all about hang time. It’s a bit more sensitive to build but is designed for slow, graceful flights. It’s perfect for indoors.
- The Interceptor: A cool-looking hybrid I’ve tweaked over the years. It balances speed with a good glide. It’s the most challenging of the three, but the flight is incredibly rewarding.
For every single one of these, the number one rule is SYMMETRY. A plane with one wing that’s even slightly different from the other will always, always turn or spiral. Measure twice, fold once!
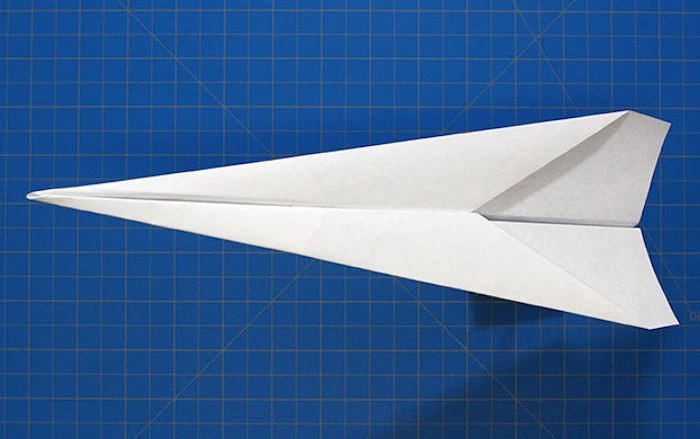
Design 1: The Classic Dart (For Speed and Distance)
(Folding Time: About 2-3 minutes)
This is the design most of us learn as kids. It’s built to cut through the air with power.
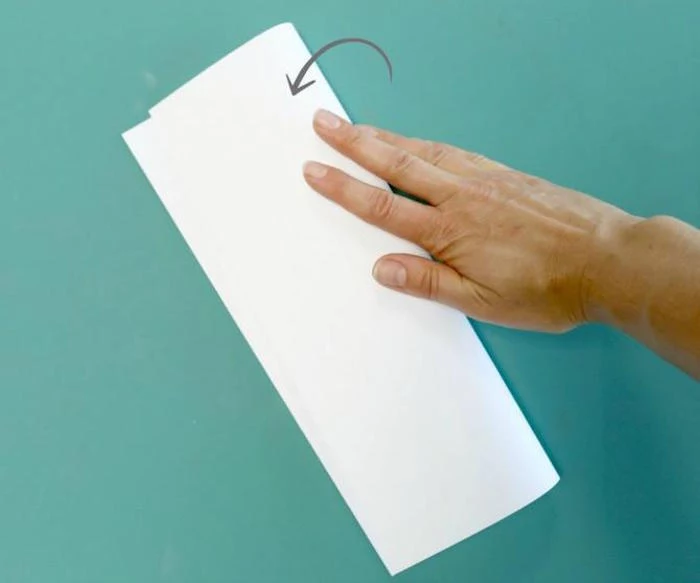
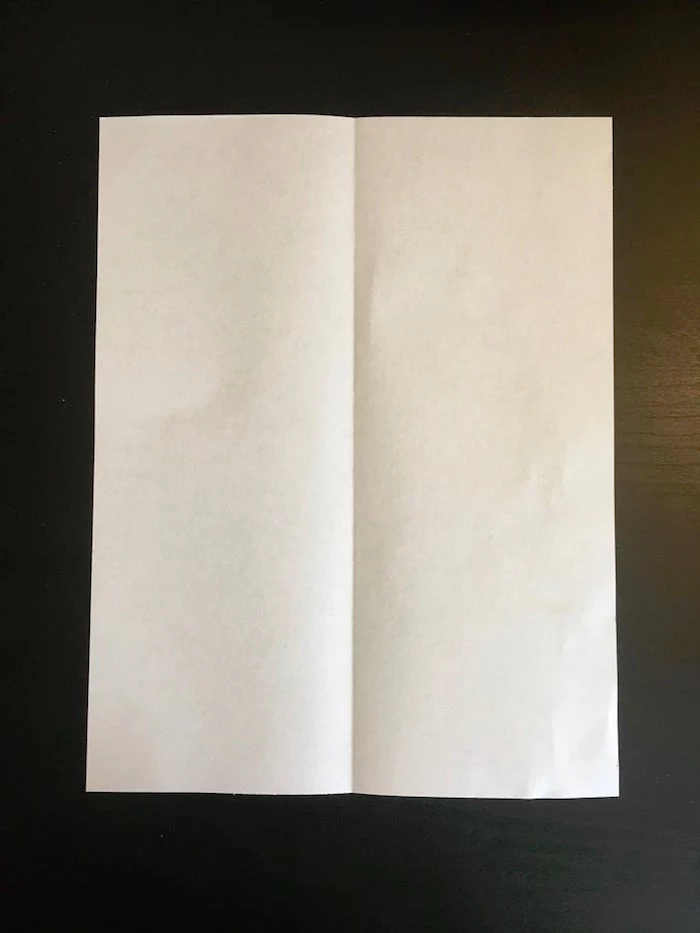
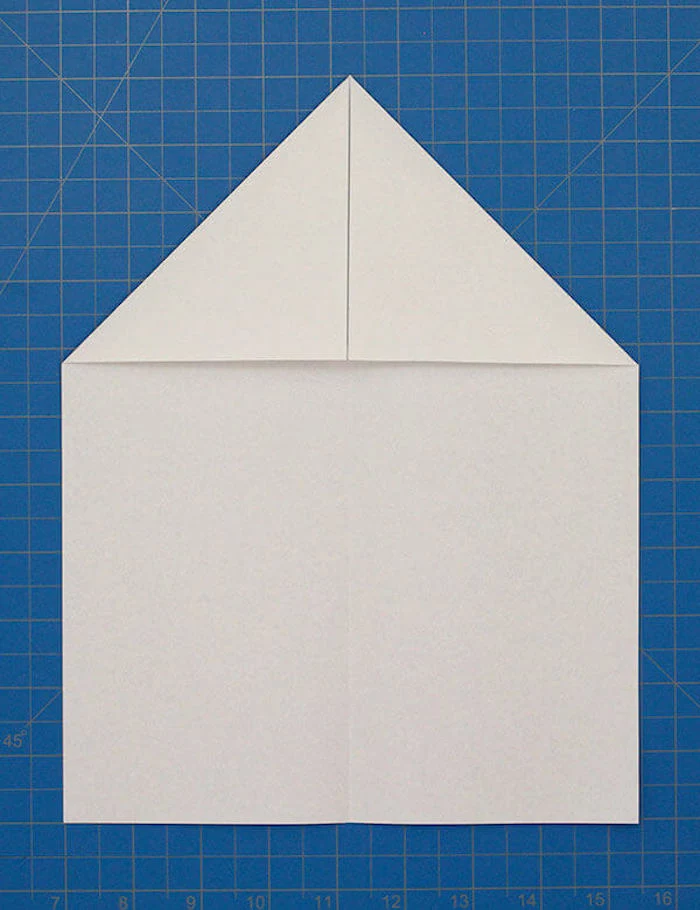
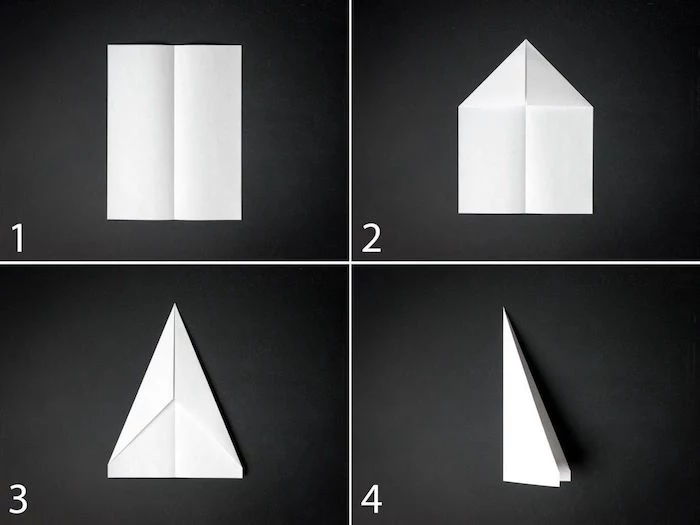
- The Center Crease: Fold an 8.5 x 11-inch sheet of paper in half lengthwise. Make the crease sharp, then unfold it. This line is your guide for everything.
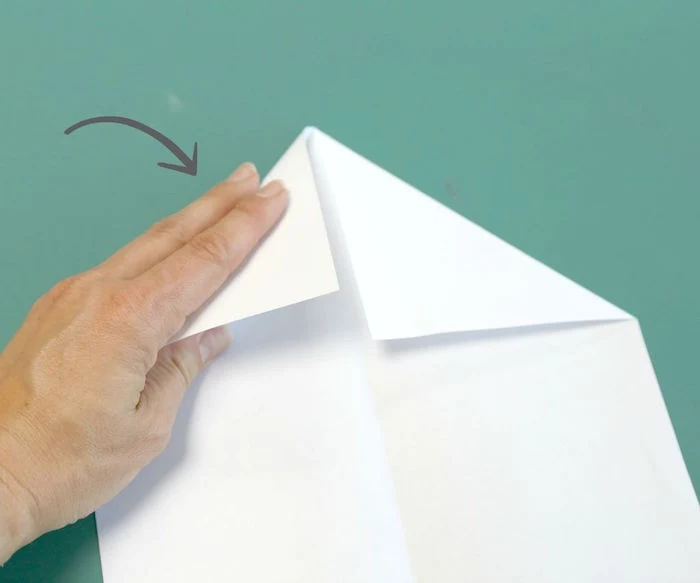
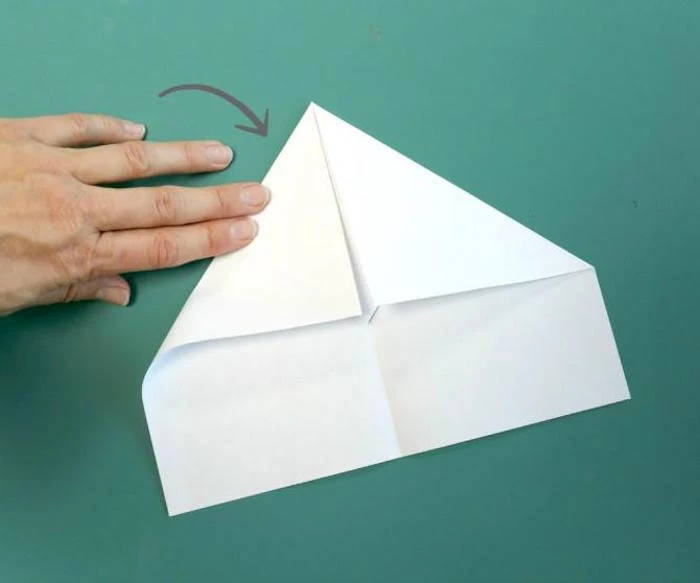
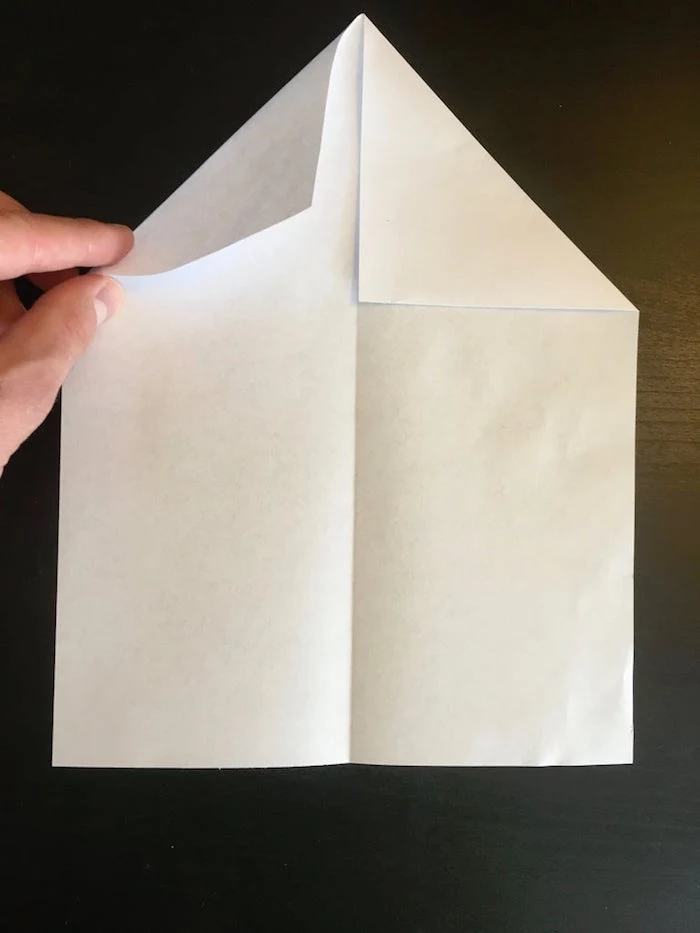
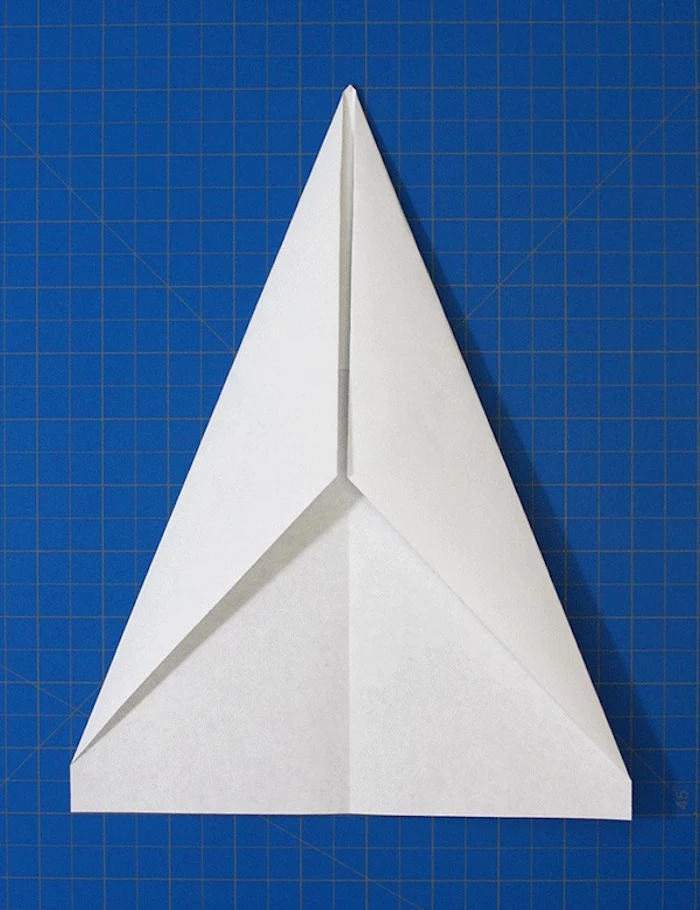
- Form the Nose: Fold the top two corners down to meet at that center crease. You should have a triangle point.
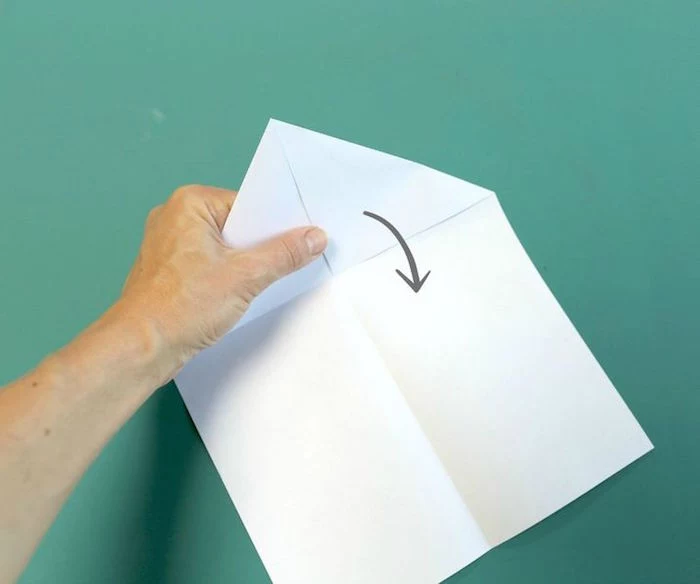
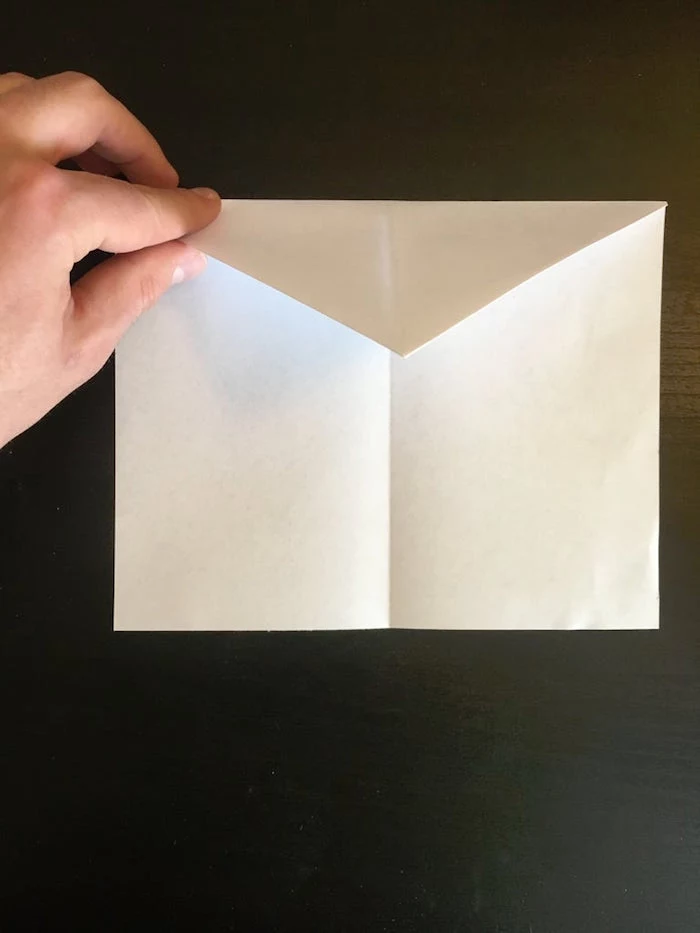
- First Fold-Down: Fold that whole triangle section down. The point of the triangle should hit the center line.
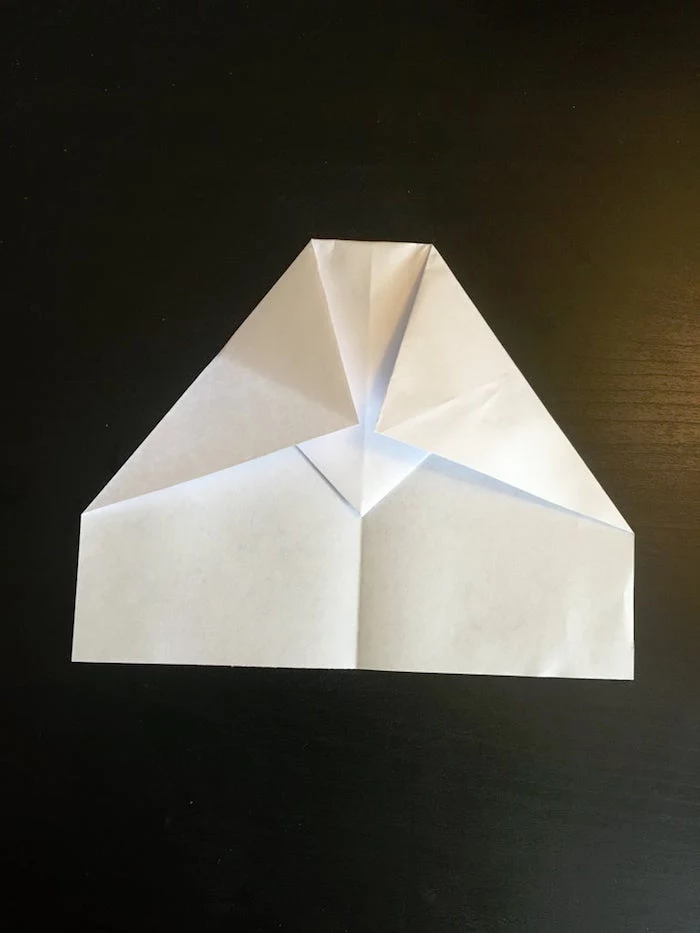
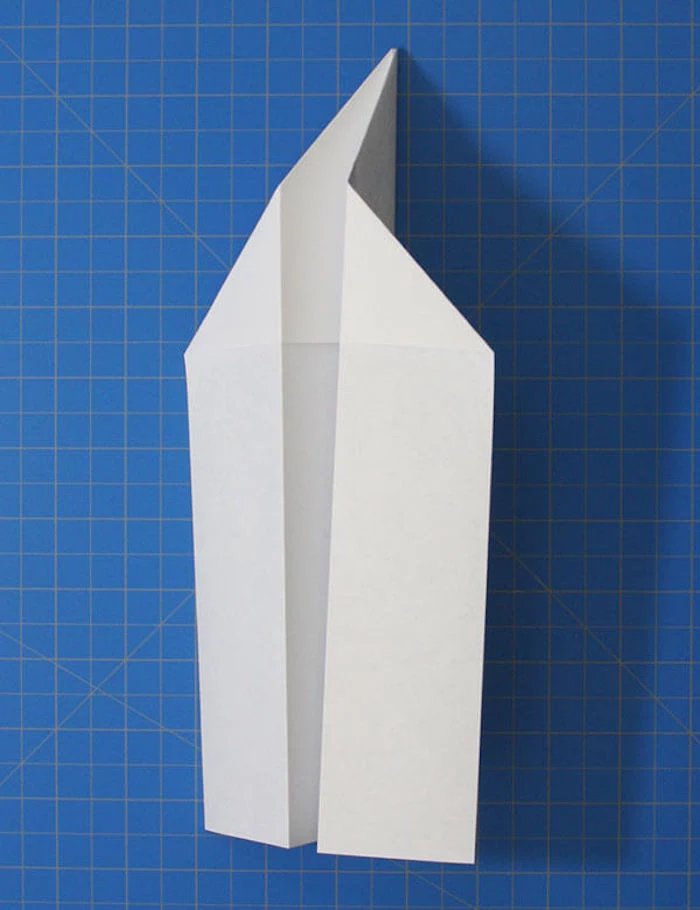
- Second Nose Fold: Now, fold the top two corners in again to meet at the center line. You’re folding over the previous layers, which adds that crucial weight to the nose.
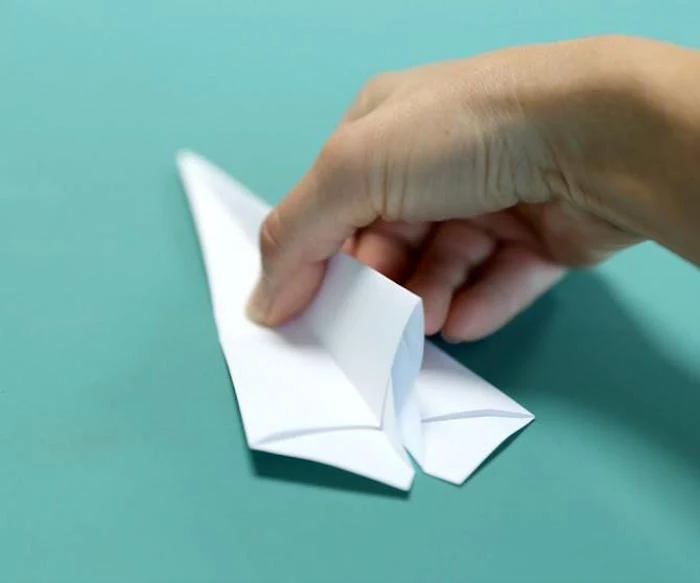
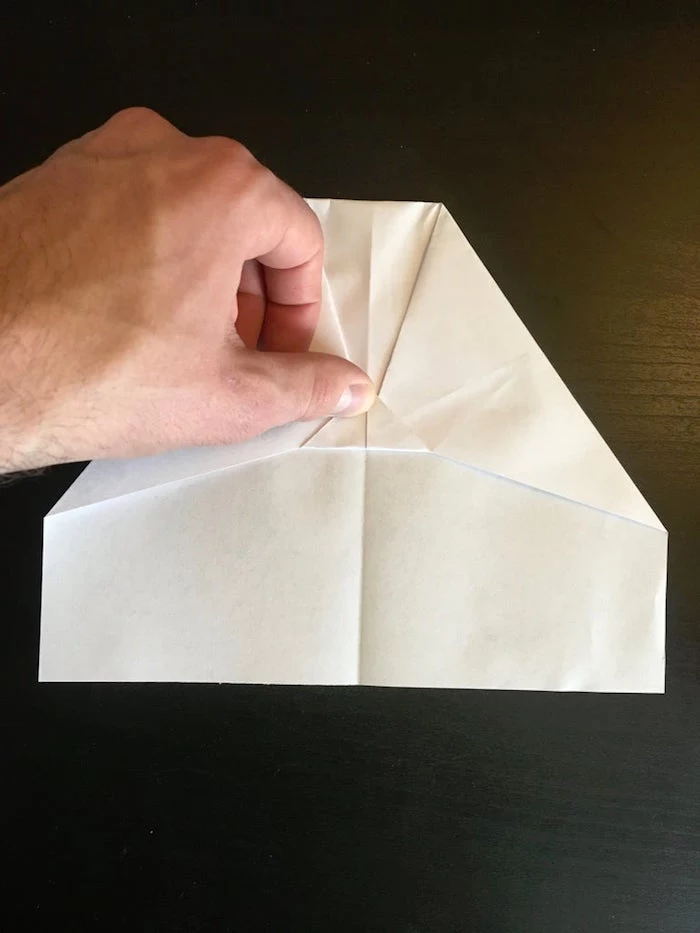
- Lock It In: See that little triangle point sticking out below your last folds? Fold it up and over to lock everything in place. This makes the plane way more durable.
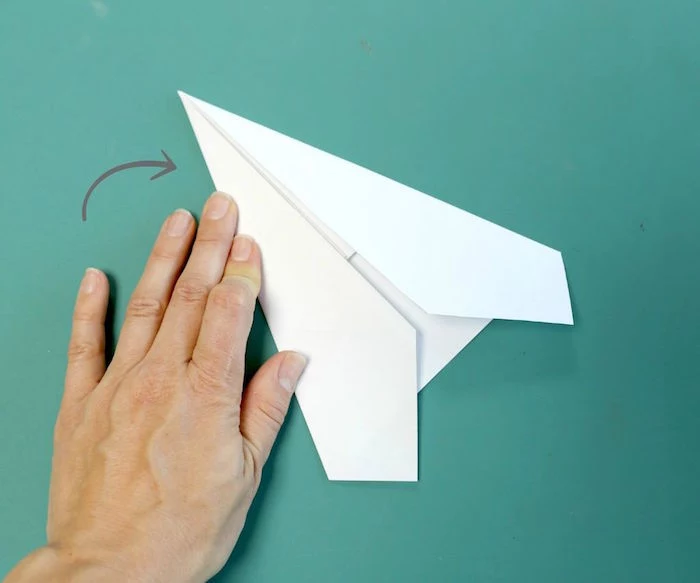
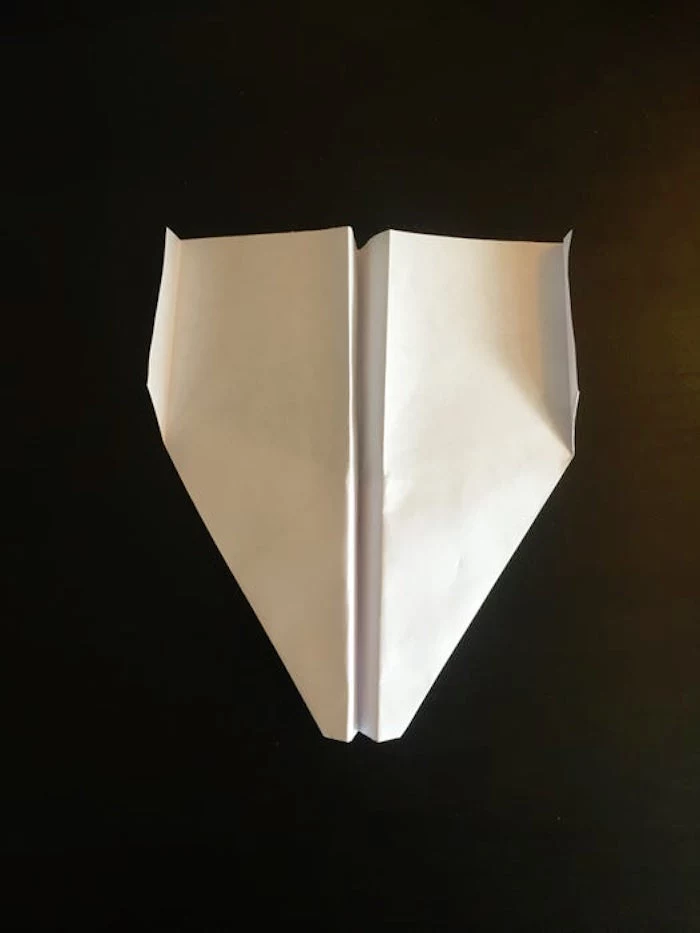
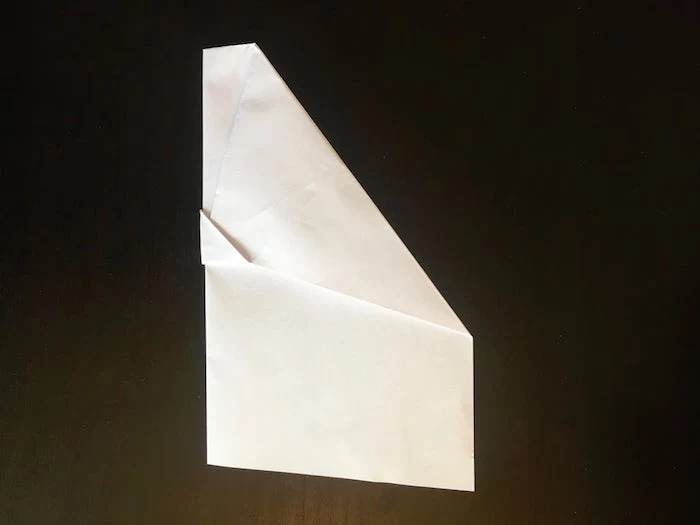
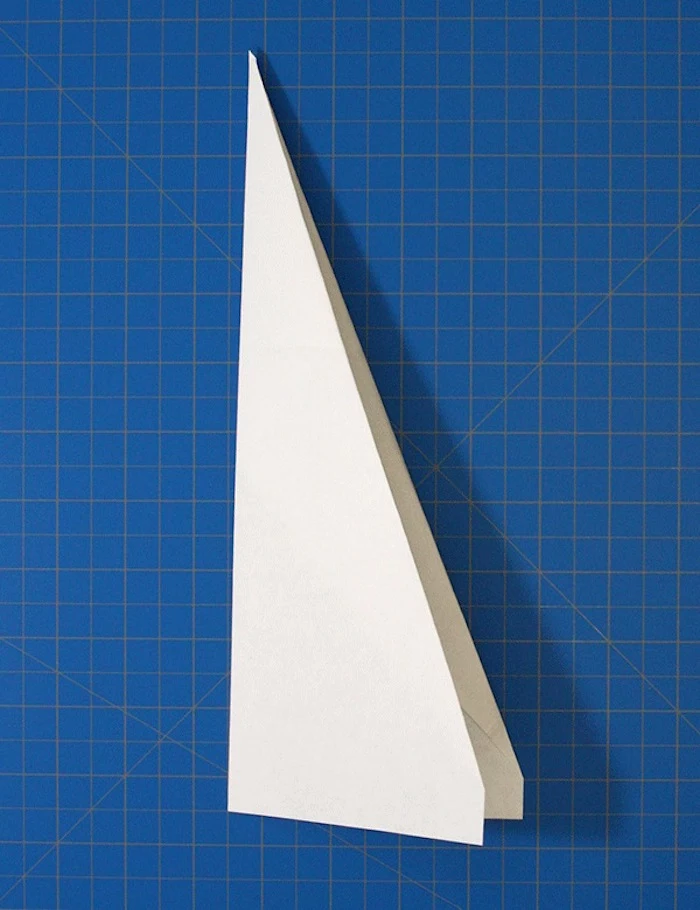
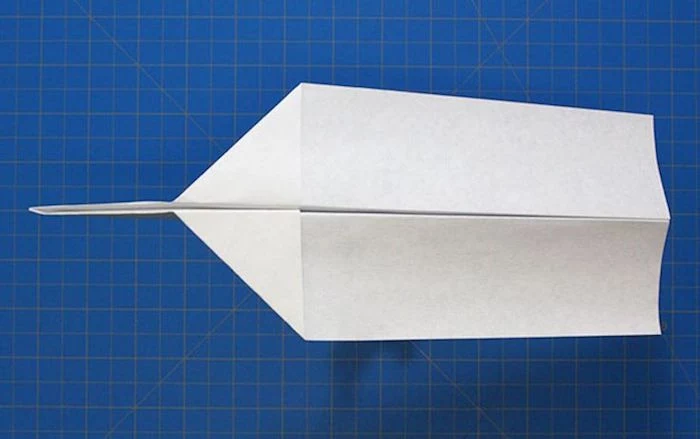
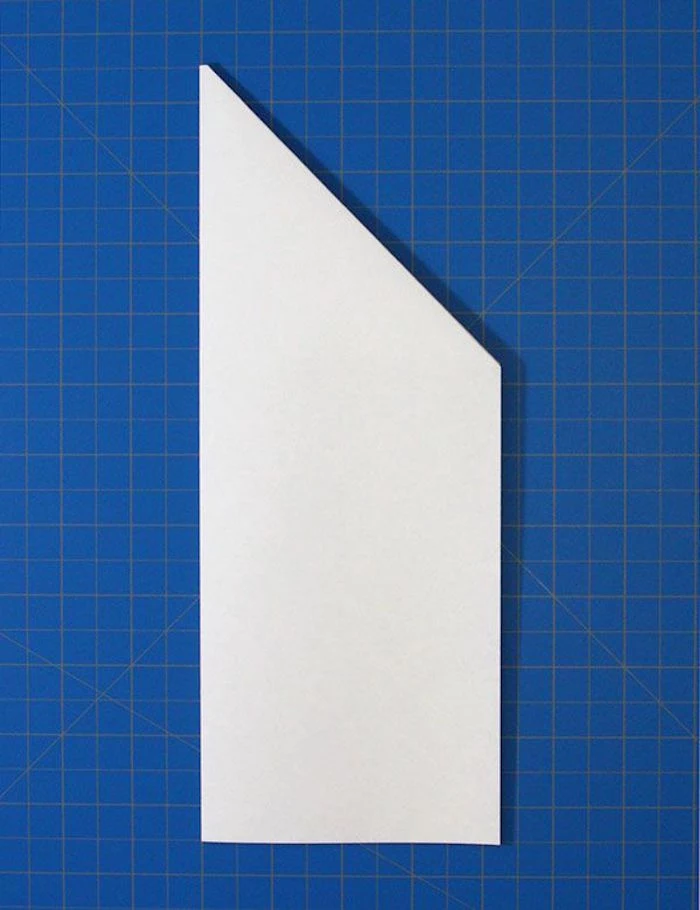
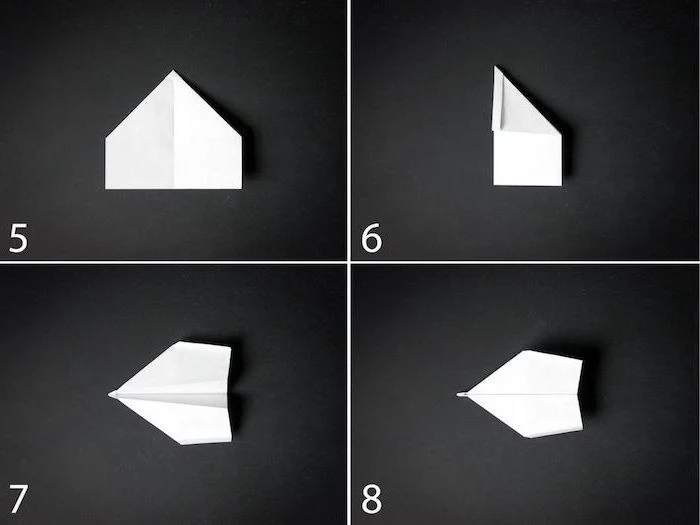
- Final Assembly: Fold the entire plane in half along your original center crease, with the nose folds on the outside.
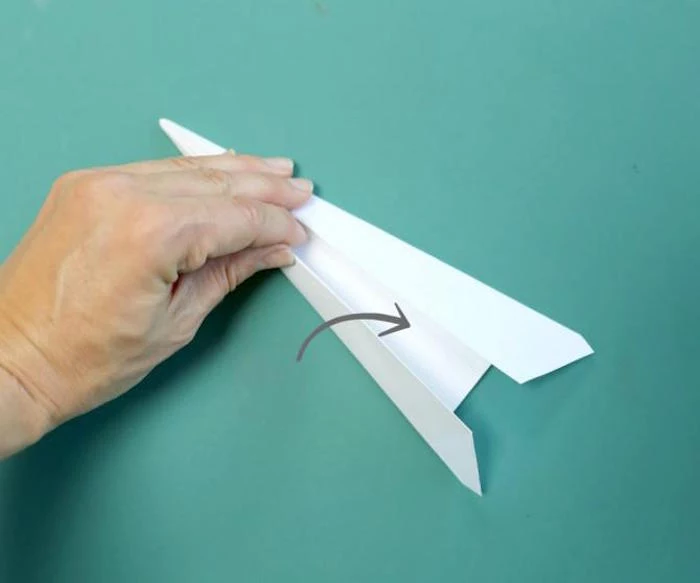
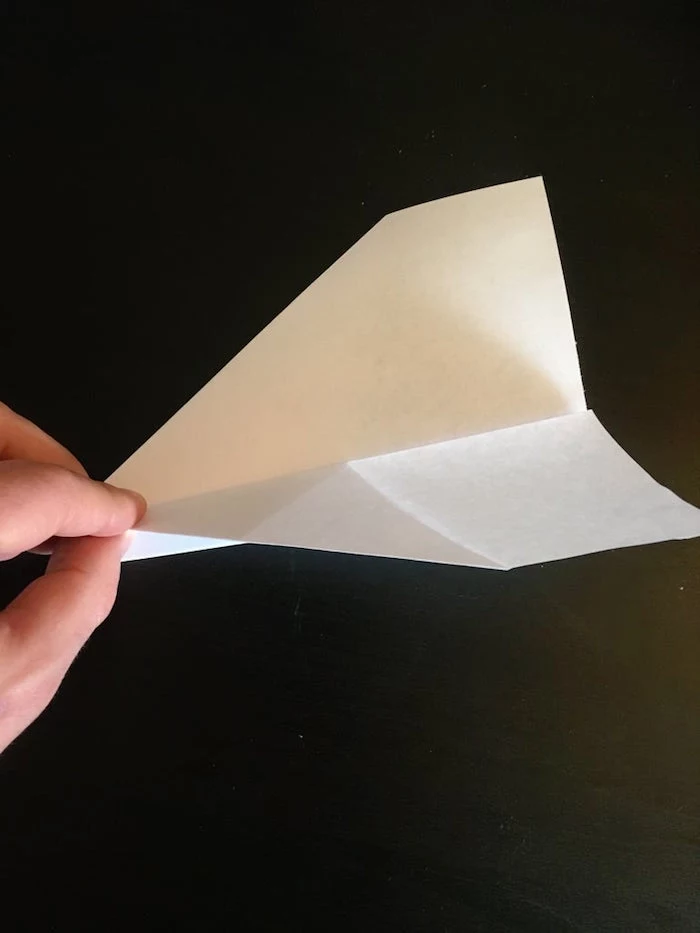
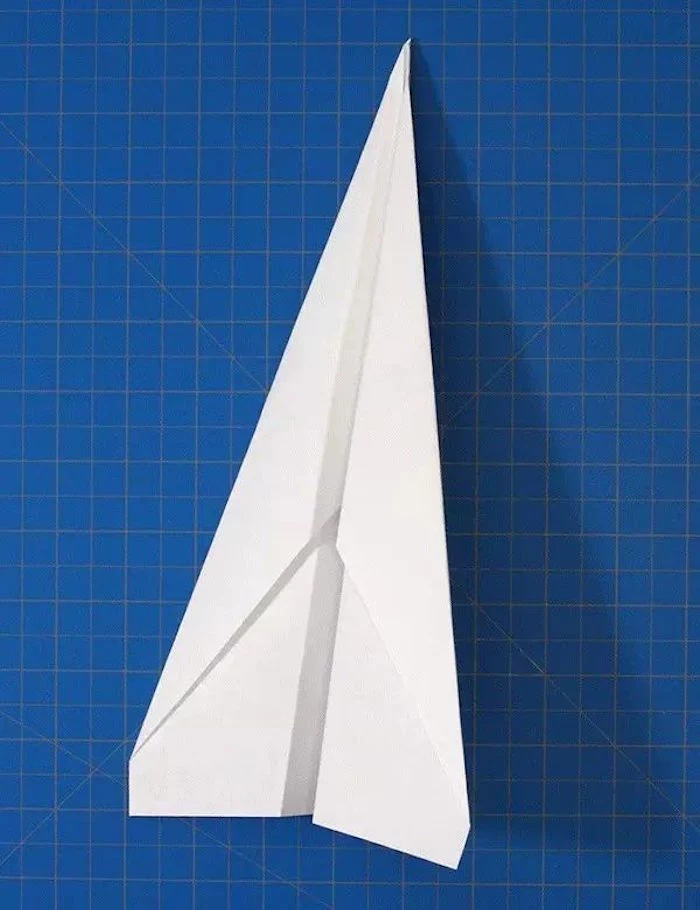
- Create the Wings: Lay the plane on its side and fold one wing down, leaving about an inch of the body at the bottom. Flip it over and fold the other wing to match it perfectly.
Quick Tip: If it dives hard, try bending the back edge of both wings up just a tiny bit. This creates an “elevator” effect that adds some lift.
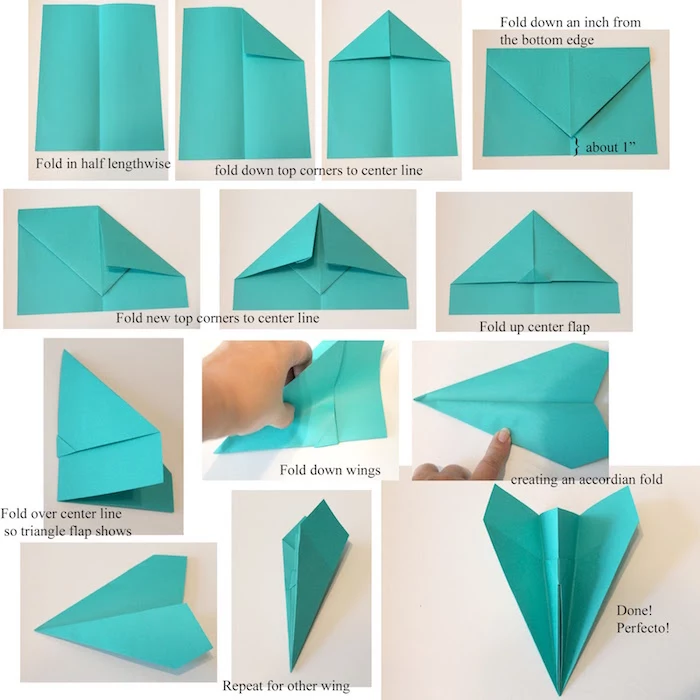
Design 2: The Stable Glider (For Hang Time)
(Folding Time: About 4-5 minutes)
This plane is designed for slow, floating flights. Wide wings are the key here.
- The Center Crease: Again, fold your paper in half lengthwise and unfold.
- Initial Nose Fold: Fold the top two corners to the center line to make a triangle.
- Nose-to-Bottom: Take the point of that triangle and fold it all the way down to the bottom edge of the paper. Crease it well.
- Wing Flaps: Fold the top two corners in again to meet at the center line.
- Locking the Body: Fold the plane in half along that main center crease.
- Creating Glider Wings: This is the most important step. Fold the wings down so the top edge of the wing aligns perfectly with the bottom edge of the plane’s body. This creates huge, wide wings for maximum lift. Do this on both sides.
- Winglets for Stability: On the outer edge of each wing, fold up the last half-inch to create small vertical fins. These are winglets, and they’ll help the plane fly straight instead of rolling over.
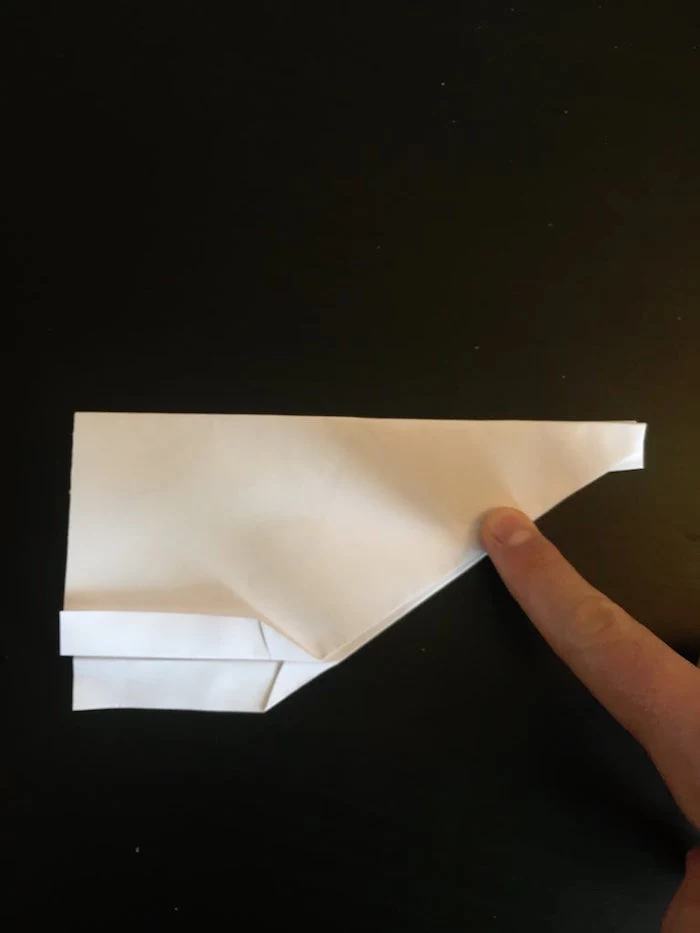
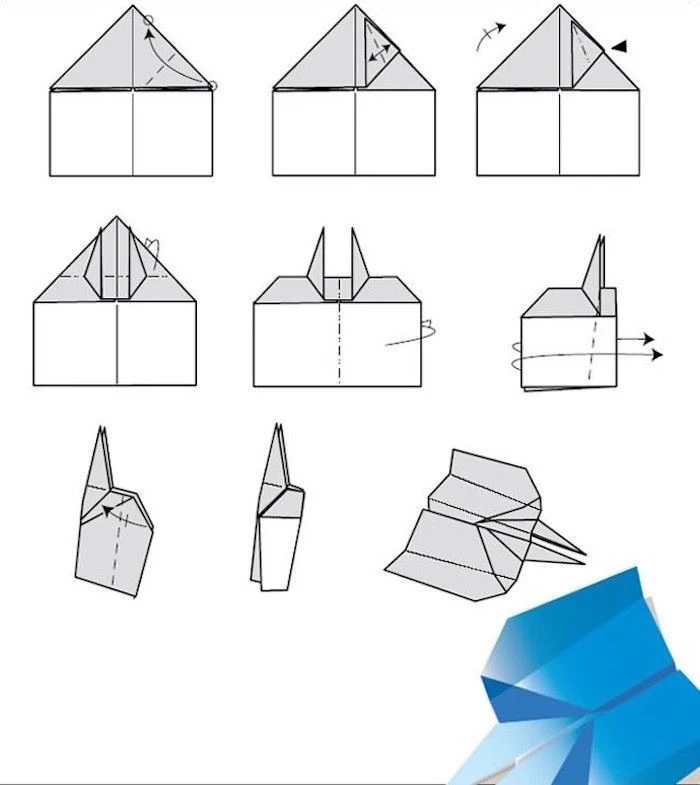
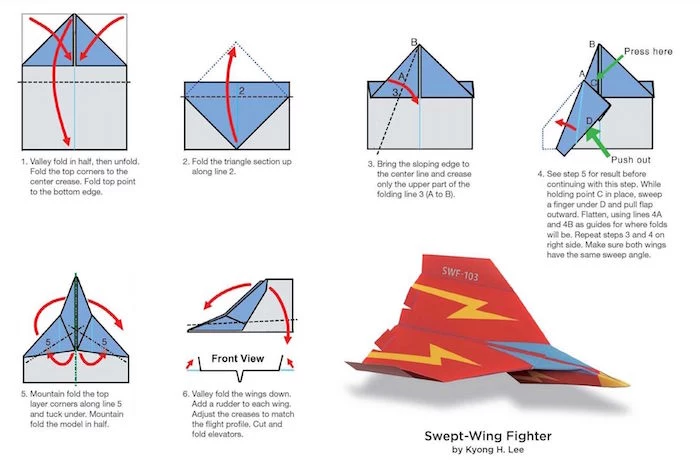
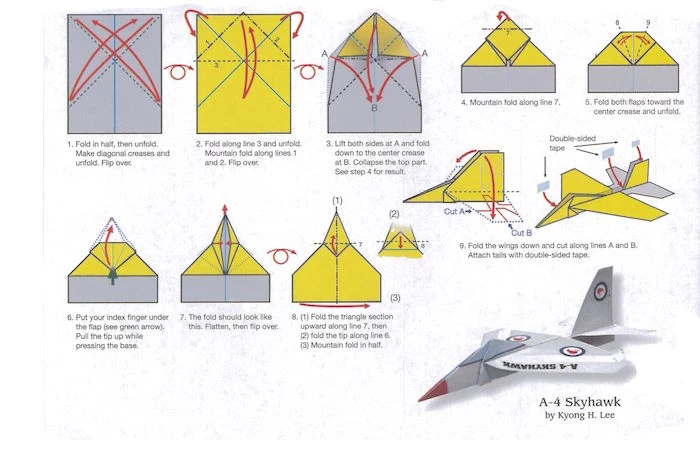
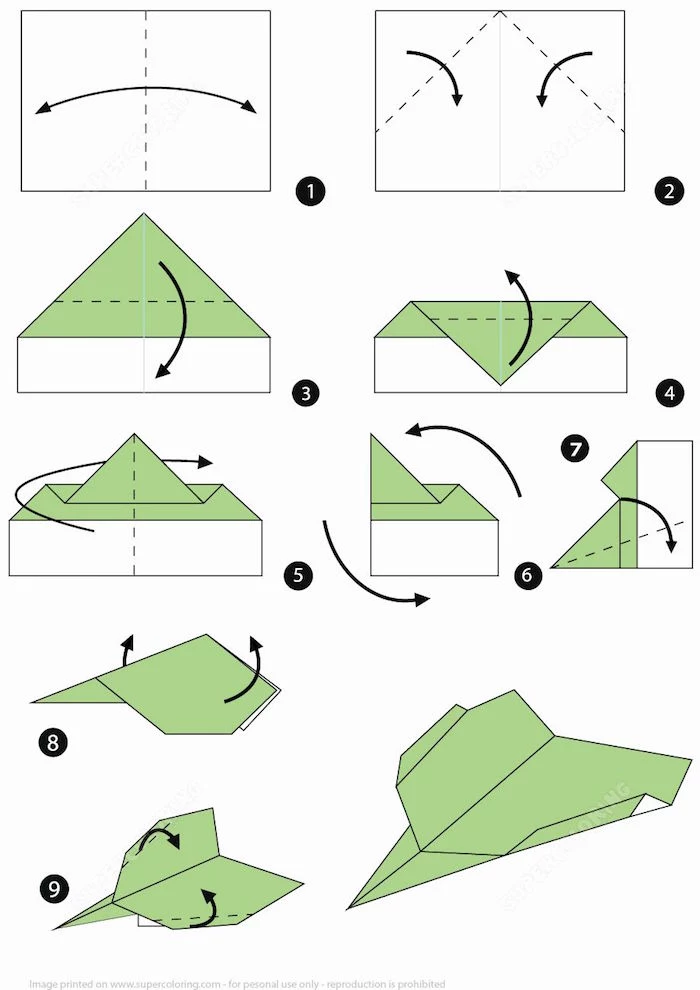
Design 3: The Interceptor (A Hybrid Design)
(Folding Time: About 5-7 minutes)
This one is a bit more complex but flies beautifully. It balances speed with a nice, long glide.
- Initial Folds: Start with the center crease and fold the top corners in to form a triangle, just like the Dart.
- Fold the Point: Fold the triangle’s point down to where the angled edges meet the side of the paper.
- Create the Shoulders: Fold the top angled edges to the center line again, but don’t go all the way. Leave a small gap, maybe a quarter-inch, from the center.
- Form the Canopy: Fold the whole plane in half along the main center crease. It’s going to be thick, so press firmly.
- The Tricky Wing Fold: Now for the unique part. Start your wing crease at the very tip of the nose and angle it down so the crease ends right around the thickest part of the plane’s body. This creates a really cool forward-swept wing. Match it exactly on the other side.
The Launch is Everything
You can fold the most perfect plane in the world, but if you launch it poorly, it’s going nowhere. Different designs need different throwing styles.
- For Darts and Interceptors: These planes have weight and need power. Hold the plane’s body from the bottom, around its center of gravity. Your throw should be firm, level, and straight ahead—more of a push from the shoulder than a flick of the wrist. Think of it like throwing a javelin, not a baseball.
- For Gliders: Don’t throw this plane hard! A hard throw will make it stall and fall. Instead, hold it lightly, point it straight ahead, and give it a gentle, level push forward. Your goal is to let it catch the air and start its own flight, not to force it through the air.
Advanced Tuning: Becoming a Pilot
Once your plane is folded, you can start making tiny adjustments to control its flight. This is where the real fun begins. A little bend goes a long, long way. Seriously, start with a bend of just 2-3 millimeters and see what happens. It’s more sensitive than you think!

- Elevators (for up/down): Gently bend the back edge of both wings up or down. Bend both up slightly, and the plane will climb. Bend them down, and it will dive.
- Rudder (for left/right): To make your plane turn, bend the back of the vertical tail fin (if it has one) to the left or right. If there’s no fin, you can make a tiny vertical cut at the very back of the plane’s body and fold one side out slightly.
- Ailerons (for rolling): For barrel rolls and stunts, bend the back edge of one wing up and the other one down.
Top 3 Beginner Mistakes (And How to Fix Them)
From my experience, most failed flights come down to one of these three things. If you can avoid these, you’re already ahead of the game.
- Asymmetrical Folds: This is the #1 killer of good flights. If one wing is even slightly bigger or bent differently, your plane will bank and turn unexpectedly. Be a perfectionist about symmetry!
- Dull Creases: Mushy, soft folds create a flimsy plane with tons of drag. Use your fingernail or a ruler to make every single crease as sharp and crisp as possible.
- Forgetting the Paperclip Trick: If your glider keeps stalling (climbing then falling), don’t give up on it! 9 times out of 10, a single paperclip on the nose will fix it instantly. It’s the easiest and most effective trick in the book.
A Folder’s Code: Fly Safely
Paper airplanes are incredibly fun, but a little common sense is always a good idea. Here are a few rules I live by:
- Respect the Point: A fast-moving dart has a surprisingly sharp nose. Never, ever throw a plane at a person’s face. Aim for open spaces.
- Mind the Edges: A sharp paper crease can give you a nasty paper cut. I’ve got the scars to prove it. Fold deliberately and be careful.
- Know Your Airspace: Be aware of your surroundings. A plane can knock over a glass or distract someone. I learned this the hard way as a kid when my best dart met my mom’s favorite lamp. Fly responsibly.
By the way, if you get interested in official competitions, know that they have very strict rules. Most require planes to be made from a single, standard sheet of paper with no tape, glue, cuts, or staples. Those constraints are what make the challenge so creative.
Okay, Your Turn!
Folding a paper airplane is so much more than a way to pass the time. It’s an exercise in precision, a lesson in physics, and a source of pure, simple joy. The best design isn’t one you read about in a guide; it’s the one you discover after your hundredth fold.
Your First Challenge: Grab a piece of paper right now, fold the Stable Glider, and try to get a 5-second flight indoors. The secret is a gentle, level push. Experiment with tiny adjustments to the wingtips. Go make something that soars!
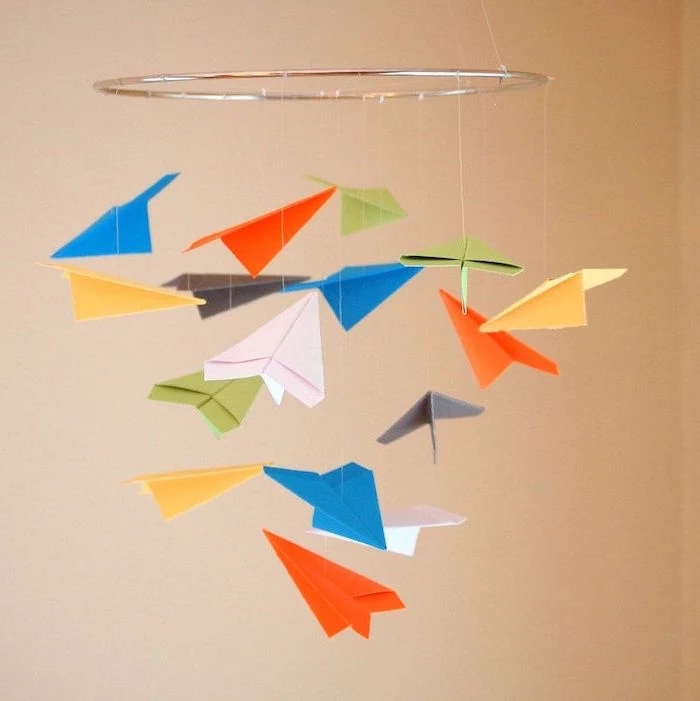
Inspirational Gallery
The paper you choose is your plane’s foundation. While standard 80 g/m² (20 lb) printer paper is a great starting point, don’t be afraid to experiment. A slightly lighter 75 g/m² paper can give a glider more hang time, while a crisp 90 g/m² sheet gives a dart the rigidity it needs for a powerful, straight launch. The key is the balance between weight and stiffness.
- If your plane nosedives: Gently bend the back edge of both wings upward. These are called elevators, and they’ll help lift the nose.
- If it stalls and swoops up, then down: It’s likely too light in the nose. Add a small paperclip or a tiny piece of tape right at the front.
- If it banks sharply to one side: Check for symmetry. One wing might be slightly larger or bent differently. A small downward bend on the wing it’s turning towards can often correct the roll.
The single most important factor for a stable flight is symmetry. Each fold on the left side must be a perfect mirror image of the right. Even a millimeter of difference can create an imbalance that sends your plane into an uncontrollable spiral. Fold slowly, and line up your edges with precision before making a sharp, decisive crease.
The Guinness World Record for the farthest flight by a paper aircraft is 88.318 meters (289 feet, 9 inches), a feat achieved in 2022 with a design by John Collins.
Not all planes are built for the same mission. Think about your goal before you start folding.
- Darts: These are the speed demons. Long, slender, with sharp noses and narrow wings. They are built for high-speed, long-distance throws and require a powerful launch.
- Gliders: Built for endurance. They feature wide wingspans and a more balanced weight distribution to maximize lift and hang time, catching air currents for a long, graceful descent.
Does how you throw really make a difference?
Absolutely. It’s not about raw power. A perfect throw is a smooth, forward push, not a baseball pitch. Hold the plane by its center of gravity (usually about a third of the way from the nose) and launch it straight ahead, parallel to the ground or slightly upward. The goal is to give it enough thrust to start flying on its own, letting the aerodynamics do the rest.

A paperclip for nose weight: Easy to add, remove, and adjust its position to find the perfect balance. It’s the standard for quick tuning.
A dab of glue or tape: A more permanent solution. A small piece of Scotch tape folded over the nose can add weight while also reinforcing it against crash damage.
For testing, the paperclip is king. For a finalized, durable design, tape is your best bet.
The average sheet of A4 paper has a weight of just 5 grams.
This incredibly low weight means that tiny forces have a huge impact. The air displaced by a slight updraft, the turbulence from your own hand, or a minuscule imbalance in the wings—all are magnified during flight. This is why precision folding isn’t just for looks; it’s a fundamental part of controlling your aircraft’s performance.
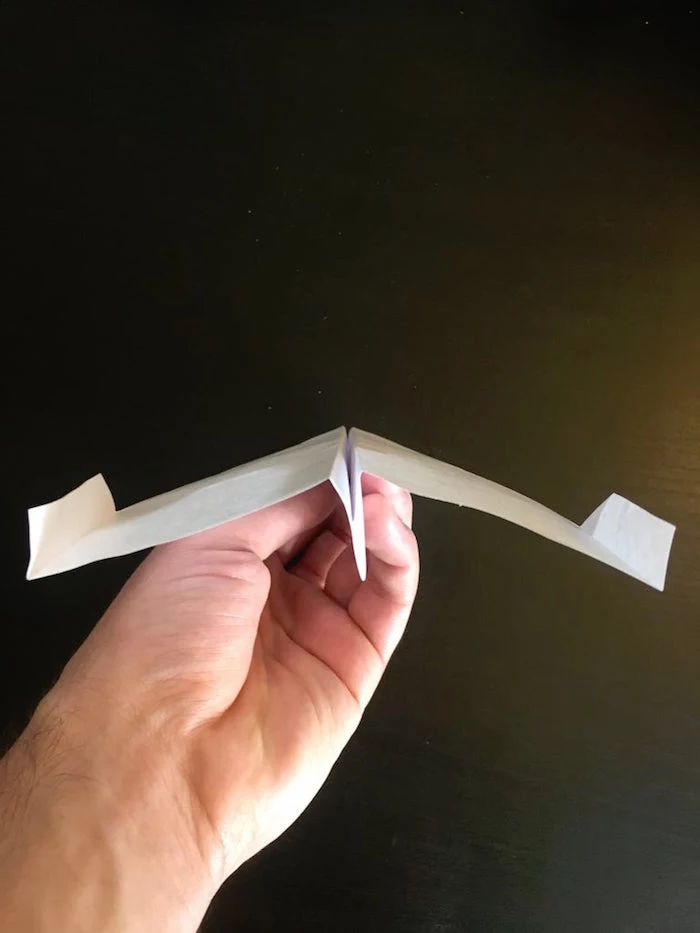
- Creates a more stable, self-correcting flight path.
- Reduces drag at the wingtips, improving efficiency.
The secret? A dihedral angle. This is the slight upward ‘V’ shape of the wings when viewed from the front. Most successful designs naturally incorporate this, but you can enhance it by gently bending the wings up at the root where they meet the fuselage.
For true inspiration, look up John Collins, often called ‘The Paper Airplane Guy.’ He’s not just a hobbyist; he’s a world-record holder who approaches paper aviation with the mind of an engineer. His winning design, ‘Suzanne,’ broke the world distance record by combining the sharp, fast profile of a dart with the stable, high-lift principles of a glider. It proves that innovation in paper folding is still happening.
Don’t just decorate—engineer. Use a dark marker to draw a line down the center crease before you start folding. This visual guide makes it far easier to achieve perfect symmetry on every subsequent fold, dramatically improving your plane’s flight characteristics.
A study by NASA found that winglets—small, upturned fins at the tips of the wings—can reduce drag by up to 20% on real aircraft.
This principle works for paper airplanes, too! Adding small, precise vertical folds at the end of your wings doesn’t just look cool; it adds stability and can help your plane fly farther by making it more aerodynamic.
Can you use glossy magazine paper?
Yes, and it can be surprisingly effective! Magazine paper is often lighter and less porous than standard copy paper. This can result in a plane that is more sensitive to air currents, making it a fantastic choice for indoor gliders designed for hang time rather than pure distance. The slick surface also reduces skin friction drag. Just be warned: it doesn’t hold a crease as crisply, so fold with care.
The most overlooked tool in paper airplane construction: a ruler. Not for measuring, but for creasing. After making a fold with your fingers, run the edge of a plastic ruler along the crease. This pressure creates exceptionally flat, sharp folds that significantly reduce drag and make your plane more rigid and predictable in the air.
Turn your folding session into a family airshow. Create a few simple categories to get everyone involved:
- Longest Distance: The classic challenge.
- Longest Hang Time: Launch from a high point and time the flight.
- Best Acrobatics: Who can make a plane that does a perfect loop?
- Most Creative Design: Award points for color, shape, and pure imagination.
Indoor Flights: Your enemy is furniture; your friend is still air. Opt for lightweight gliders with a large wingspan to maximize hang time in a controlled environment.
Outdoor Flights: You’re battling wind and unpredictable currents. You need a heavier, more stable ‘dart’ design that can cut through a breeze and maintain its trajectory.
Adjust your fleet to the forecast!
- It survives repeated crash landings without crumpling.
- It provides concentrated weight at the front for better stability.
The trick? Create a blunt nose. Instead of leaving a sharp point, fold the very tip of the nose back on itself once or twice. This reinforces the front end and acts as a built-in weight, often eliminating the need for a paperclip.
Don’t throw away a plane after a bad crash. Most damage is fixable. Gently un-crumple the nose and re-press the original creases. Run your fingernail along the leading edges of the wings to smooth out any dents. Think of it as post-flight maintenance. A well-cared-for plane will fly consistently for dozens of launches.
Important point: a test flight is not a failure, it’s data collection. Your first throw is about observation. Does it bank left? Dive? Stall? Each flight tells you what to adjust. Tweak one small thing—a slight bend on a wing, a small adjustment to the nose weight—and throw again. This iterative process of tweaking and testing is the real secret to a perfect flight.
Are US Letter and A4 paper interchangeable?
Mostly, but not perfectly. A4 paper (used worldwide) is slightly longer and narrower than US Letter. For most basic designs, the difference is negligible. But for complex, high-performance models where every fold is precise, the different proportions can affect the plane’s center of gravity and wing area. For record-breaking designs, always use the paper size specified by the creator.
The art of paper folding, or Origami, is often associated with Japan, but its roots are believed to be in China, where paper was invented around 105 A.D. The first paper models were likely ceremonial objects, not aircraft.
- Superior stability in windy conditions.
- Longer, straighter flight paths.
- A satisfying feeling of heft and power.
The secret? Use a sheet of light cardstock (around 120-160 g/m²). It’s too heavy for a delicate glider, but it’s perfect for creating a powerful javelin-style dart. You’ll need to throw it with more force, but its momentum will carry it a surprising distance.
Find the Center of Gravity (CG): A perfectly balanced plane is a joy to fly. To find the CG, try to balance the finished plane on your fingertip. For most designs, it should balance about one-third of the way back from the nose. If it tips backward, it’s tail-heavy and needs nose weight. If it tips forward easily, it may be too nose-heavy for a good glide.
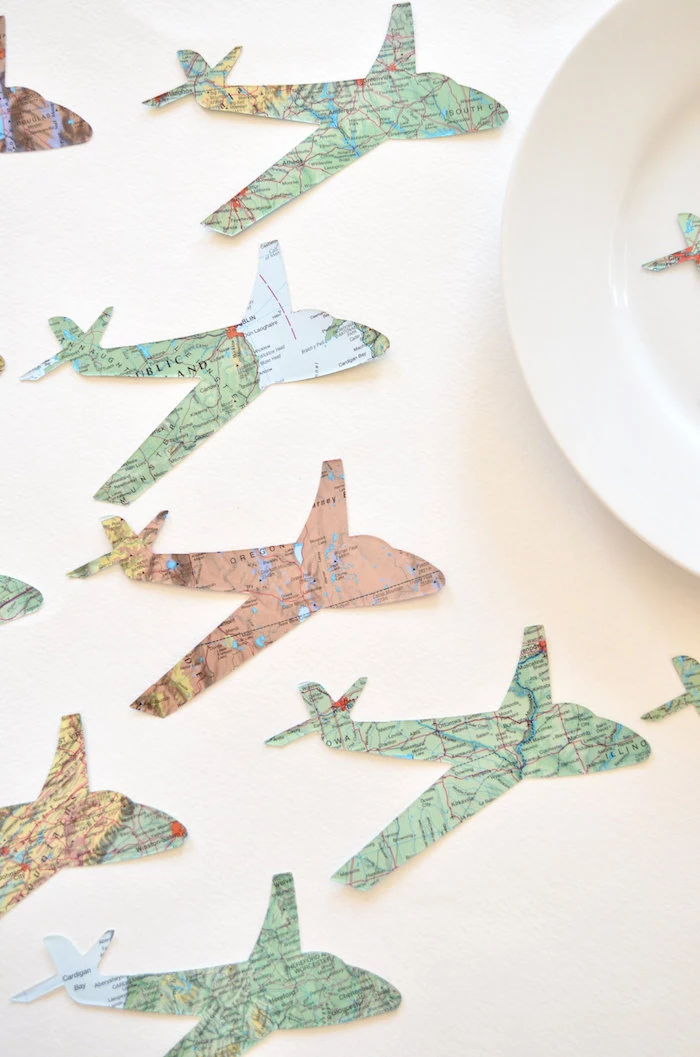
Think beyond plain white paper. Your recycling bin is a hangar full of potential aircraft. Old wrapping paper creates colorful, lightweight gliders. Brown paper from a grocery bag makes for a sturdy, rustic-looking flyer. Even junk mail can be repurposed for test flights. It’s sustainable, free, and adds a unique story to every plane you fold.
The Final Crease: Once your plane is fully folded, go back over every single crease one last time, pressing firmly. This process, called ‘burnishing’, compresses the paper fibers and makes the entire structure more rigid. A rigid plane holds its aerodynamic shape better during flight, converting more of your throw’s energy into distance and glide time.


