Epoxy Resin for Jewelry: The No-Nonsense Guide to Flawless Results
I’ve been tangled up with epoxy resin for a long, long time. And I’ll be honest, my first attempt was a total disaster. I tried to immortalize a beautiful little flower from my garden in a pendant. I followed the kit’s instructions, or so I thought. What I got was a cloudy, bendy little hockey puck with a giant air bubble staring back at me. A perfect failure. But it taught me the most important lesson of all: resin is a science first and an art second. It demands respect.
In this article
- First Things First: Understanding Your Materials
- Your Workspace: Safety Isn’t a Suggestion
- The Core Technique: A Perfect Mix, Every Time
- Adding Color and Inclusions: The Fun Part
- Pouring and Curing: The Art of Waiting
- Finishing: What Separates Craft from Jewelry
- Cleanup & Troubleshooting
- A Final Word from the Workshop
- Inspirational Gallery
Since that humbling start, I’ve poured thousands of pieces, from tiny earrings to massive tabletops. And every beginner I’ve ever taught asks the same questions and makes the same early mistakes. So, this guide is everything I wish I knew back then. We’re going to skip the fluffy craft-blog stuff and get right to the good part: the chemistry, the pro techniques for that glass-like finish, and the safety rules that are absolutely non-negotiable.
First Things First: Understanding Your Materials
Before you even think about popping open a bottle, you gotta know what you’re working with. Choosing the right resin is your first real decision, and it sets the stage for everything else. For jewelry, we’re almost always talking about epoxy.
Epoxy, UV, or Polyester? Here’s the Real Scoop
You’ll see a few options at the craft store or online, and they are definitely not interchangeable. Here’s the breakdown from a jeweler’s point of view:
- Epoxy Resin: This is our champion. It’s a two-part system (Part A: Resin, Part B: Hardener) that, when mixed, creates a chemical reaction, heats up, and hardens into a super durable, clear plastic. It’s strong, it’s beautiful, and it’s what the pros use for high-quality pieces. We’ll be focusing almost entirely on epoxy here.
- UV Resin: This is a different beast entirely. It’s a single-part resin that cures in minutes under a UV lamp. It’s fantastic for thin coats, like sealing a photo in a bezel, or for quick little projects. But it’s not great for deep molds because the light can’t penetrate all the way through to cure it. Oh yeah, and it’s way more expensive per ounce, so it’s not practical for larger batches.
- Polyester Resin: Honestly? Just walk away. This stuff is more for industrial projects like boat building. It has an incredibly strong, toxic smell and requires a separate catalyst to cure. The fumes are seriously hazardous for an indoor home studio. For your health and sanity, stick with epoxy.
So, we’re sticking with a good quality epoxy. Look for brands that are specifically marketed for artists or jewelers, like ArtResin (great for beginners) or Counter Culture DIY. Some are labeled for “doming” (thicker, for creating that beautiful curved top) and others for “casting” (thinner, for filling deep molds without overheating).
The Science in the Bottle (The Part You Can’t Skip)
A little bit of chemistry knowledge saves a world of heartache. The two parts in your kit are formulated to work in a very precise ratio. Mix them, and you kick off an “exothermic reaction,” which just means it generates its own heat to cure. This is mission-critical. If your ratio is off, even by a little, the chemical bonds won’t form correctly. You’ll be left with a piece that’s forever sticky, soft, or cloudy. Nine times out of ten, a failed piece is a measurement problem.
Heads up! You also need to know two key timings, which should be on the box:
- Pot Life (or Working Time): This is your window of opportunity. It’s how long you have after mixing before the resin starts to thicken and become unworkable. For most jewelry resins, you’re looking at about 25 to 45 minutes.
- Cure Time: This is the total time to full hardness. A piece might feel solid in 24 hours, but it hasn’t reached its final strength and durability. A full cure can take 72 hours or more, depending on the brand and the temperature. Don’t rush it!
Your Workspace: Safety Isn’t a Suggestion
Okay, let’s be very clear. Resin is a chemical, not a toy. Repeated exposure without protection can lead to some nasty stuff, like permanent skin allergies and respiratory issues. I’ve known talented artists who had to quit because they got sensitized. It’s no joke. My setup is non-negotiable, and yours should be too.
Your Starter Gear (PPE)
- Respirator: A flimsy paper dust mask does nothing. You need a half-face respirator with organic vapor cartridges. A 3M 6000 series with the 6001 cartridges is a fantastic, reliable choice you can find at any big box hardware store for about $30-$40. If you can smell the resin fumes through your mask, it’s not sealed to your face properly.
- Nitrile Gloves: Don’t use latex! The chemicals in resin can eat right through them. Nitrile is the way to go. Buy a box of 100. If you get even a drop of resin on your glove, carefully take it off, throw it away, and grab a new pair.
- Safety Glasses: Splashes happen. Getting resin in your eye is a trip to the emergency room, period. Wear goggles or safety glasses from the moment you open the bottles until after you’re done cleaning up.
I know this sounds like a lot of gear for a craft project, but trust me, once you have your safety station set up, it becomes a 30-second habit that protects you for life.
Prepping Your Zone
Your work area is just as important for getting clean results.
- Ventilation: An open window is good; two open windows for a cross-breeze are better. A fan can help circulate air, but point it away from your workspace so it doesn’t blow dust right onto your curing pieces.
- Temperature: Resin is a diva. It likes it between 70-75°F (21-24°C). Too cold, and it might never cure properly. Too hot, and it can cure too fast, leading to cracks or yellowing.
- A Level Surface: Resin is self-leveling, which means if your table is crooked, your pieces will be too. I use a cheap little bubble level from the hardware store to check my table before every single pour.
- Protect Your Table: Cover your workspace with a silicone mat or some plastic sheeting. Cured resin drips are basically permanent. A silicone mat is a great investment (around $15-$25 online) because cured resin just peels right off it. So satisfying.
- Dust-Free Zone: Dust is the arch-nemesis of a glassy finish. Wipe everything down before you start. And once your pieces are poured, you MUST cover them. A clean plastic storage bin flipped upside down is perfect.
The Core Technique: A Perfect Mix, Every Time
This is it. The single most important stage. A perfect piece can only come from a perfect mix. Be methodical. Be patient. Think like a chemist.
Measure by Weight, Not Volume. Period.
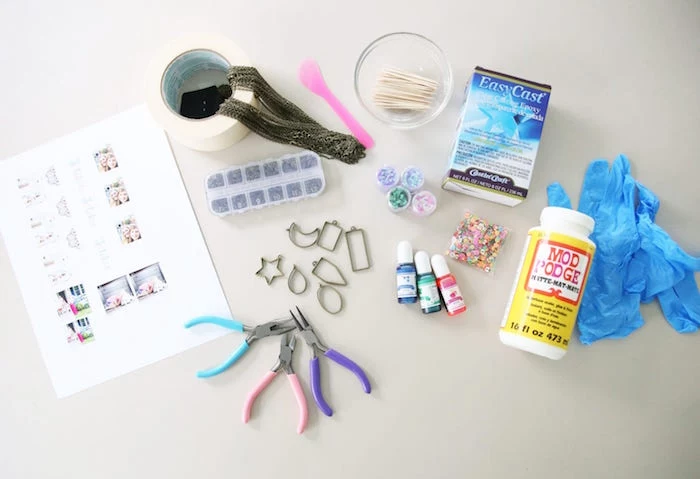
Many beginner kits push those little cups with volume markings. To be frank, they’re not very accurate. It’s hard to read the lines perfectly, and a tiny mistake can kill your whole batch. Invest in a small digital kitchen scale ($15-$25 on Amazon or at Target). Measuring by weight is infinitely more precise and repeatable. It’s what the pros do.
The Pro Secret: The Double-Cup Method
Unmixed resin loves to cling to the sides and bottom of a mixing cup. If you pour straight from that cup, that sneaky, unmixed goo will end up in your mold, creating a sticky spot that will never, ever cure. This method stops that from happening.
Here’s how you do it. It’s simple:
- Place your first empty mixing cup on the scale and hit the TARE/ZERO button to zero it out.
- Carefully pour in your Part A (resin) until you hit the target weight.
- Press TARE/ZERO again. This is key! Now your scale reads zero, and you can pour in the exact weight of Part B (hardener) without doing any math.
- Using a clean stir stick (I prefer silicone ones over wooden craft sticks, which can shed splinters and introduce moisture), mix slowly and deliberately. Scrape the sides. Scrape the bottom. Be thorough.
- Set a timer for at least 3 minutes. Most beginners stop way too soon. The resin will look cloudy and swirly at first. Keep mixing until it is absolutely, perfectly clear.
- Now, grab a second, clean cup. Pour the entire contents of the first cup into this second cup, scraping the sides to get every last drop.
- With a new, clean stir stick, mix again for another full minute. This guarantees any sneaky unmixed resin from the first cup gets fully incorporated.
Yes, it’s an extra step. And yes, it is the single best habit you can possibly form. It will save you from countless failures.
Quick Tip: On colder days, I give my resin bottles a warm water bath for about 10-15 minutes before mixing. This thins them out a bit, making them easier to pour and reducing the number of micro-bubbles. Just be sure the bottles are completely dry on the outside before you open them!
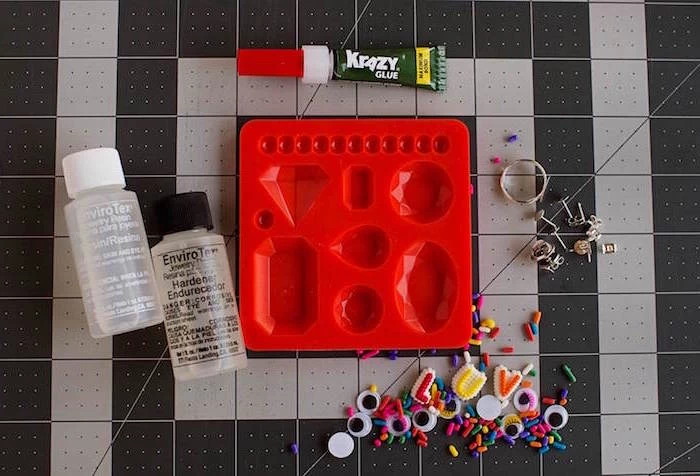
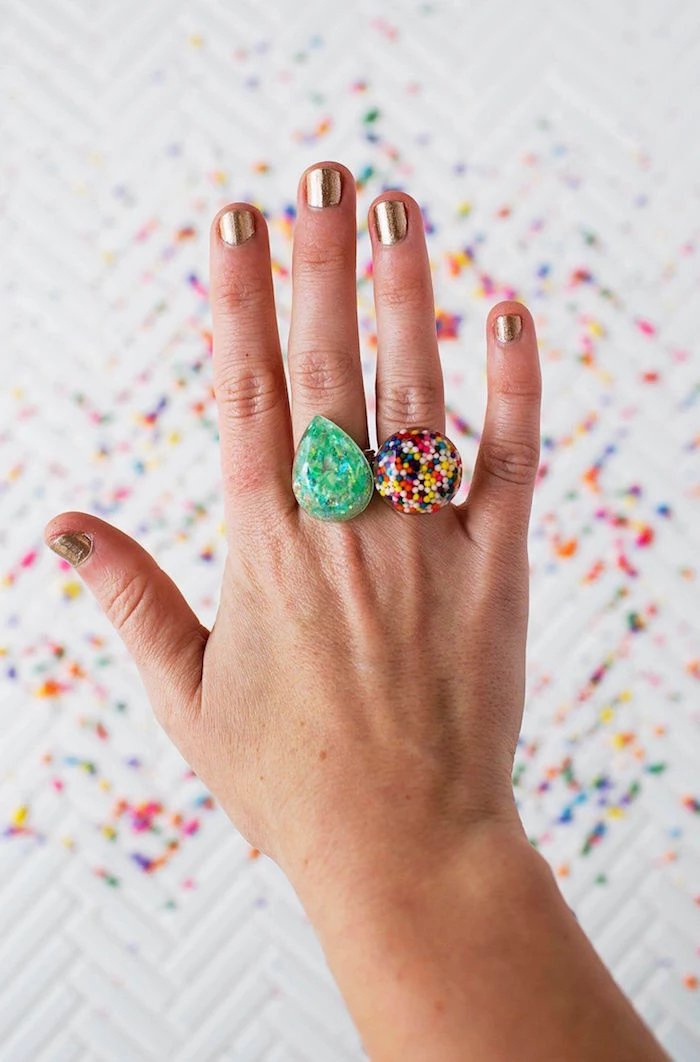
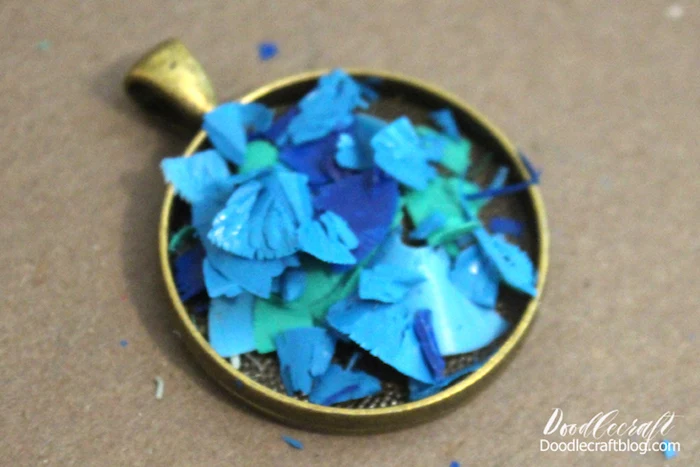
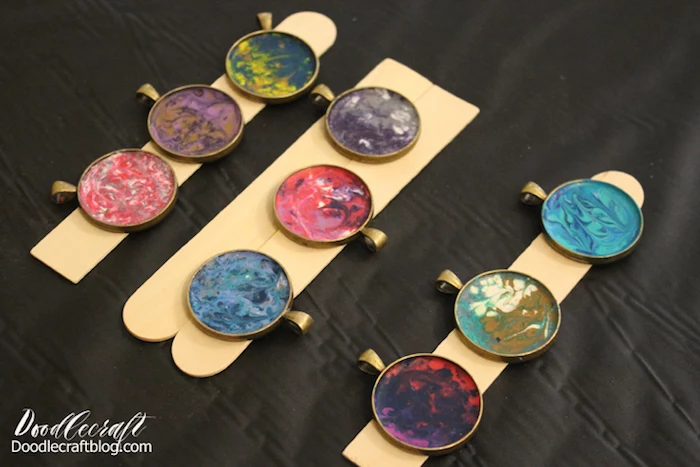
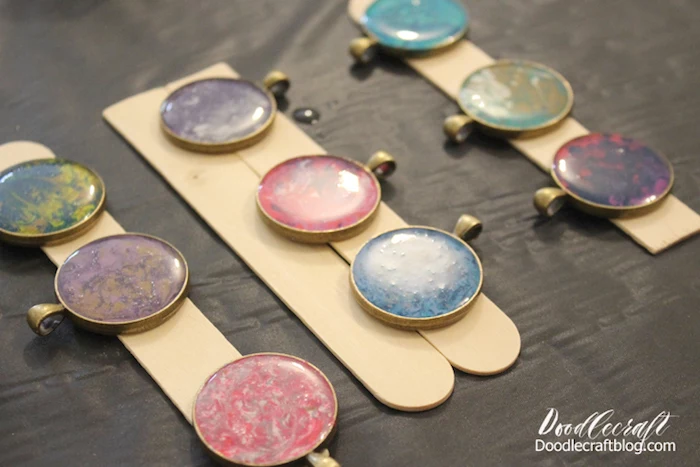
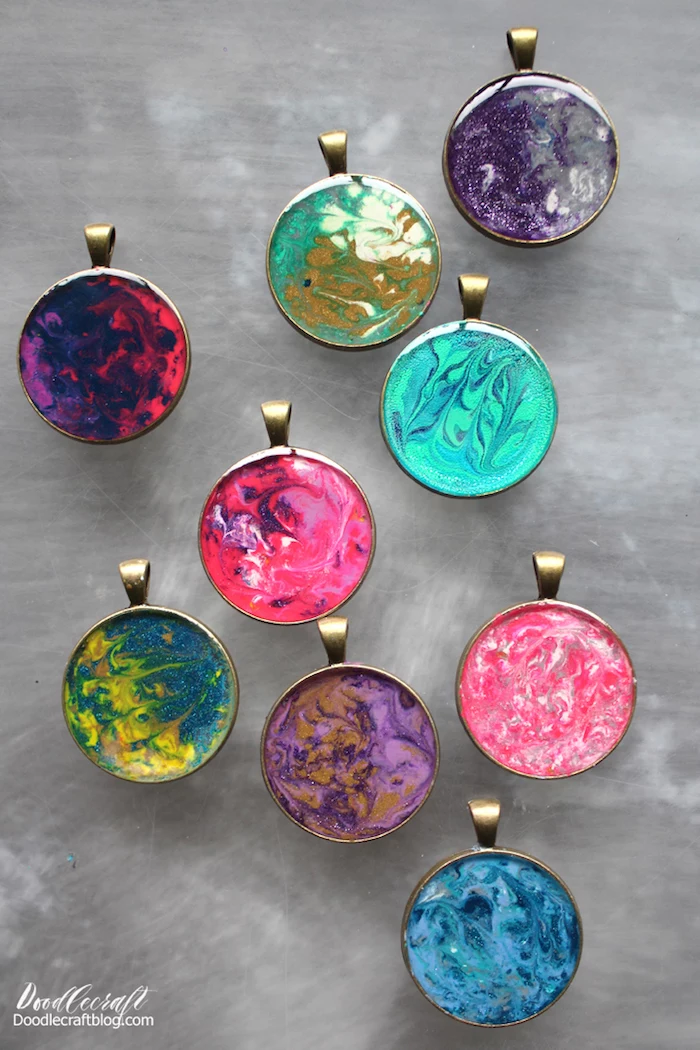
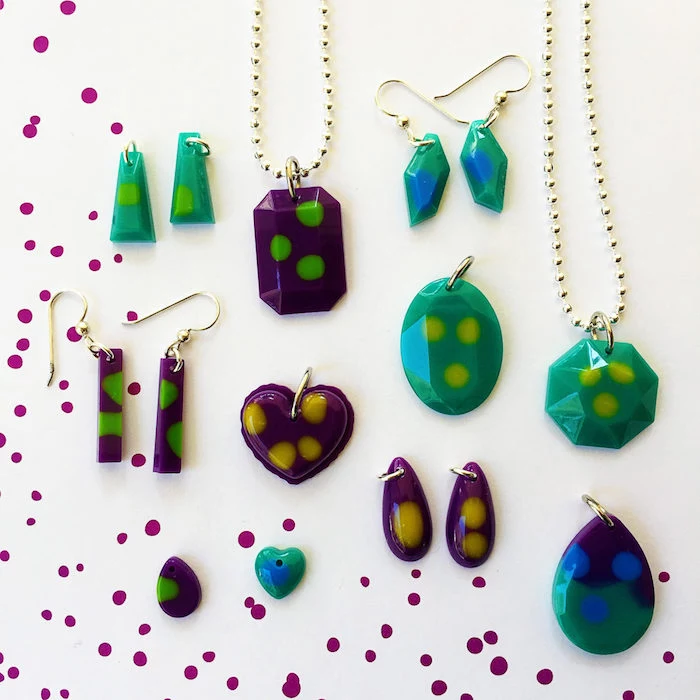
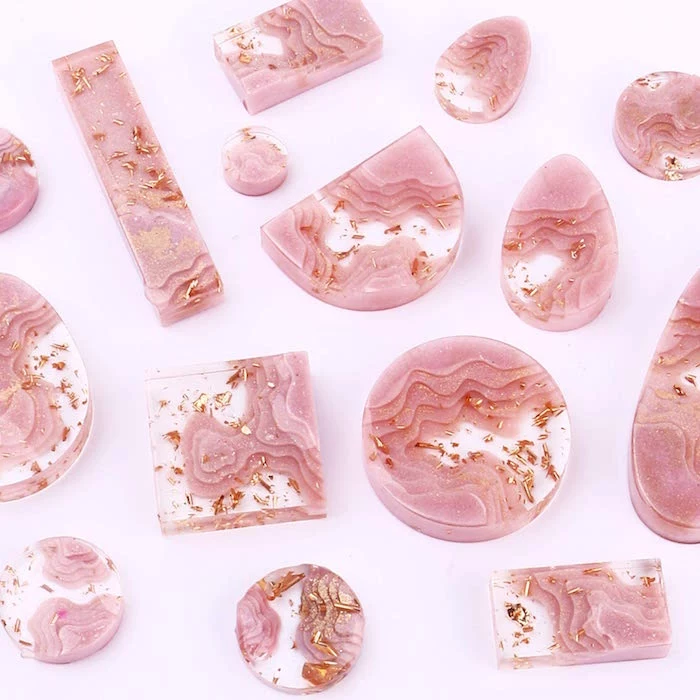
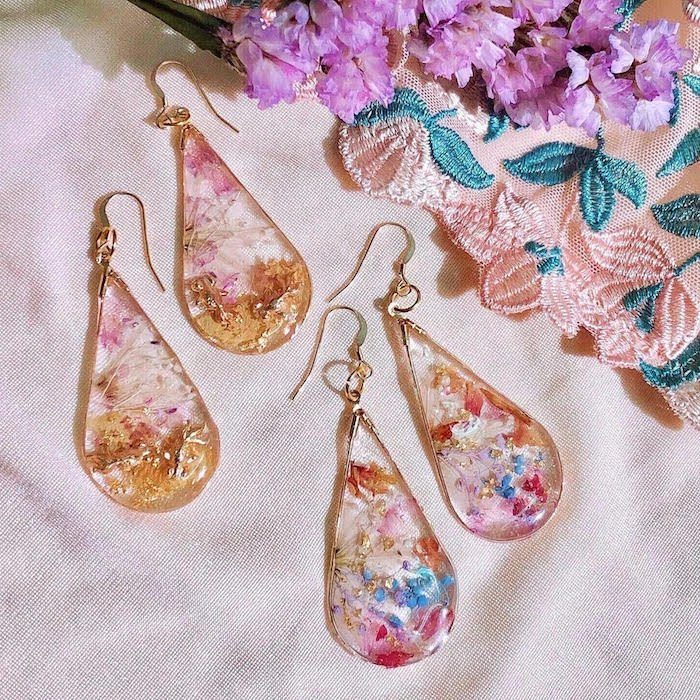
Adding Color and Inclusions: The Fun Part
This is where your creativity takes over. But, like everything else with resin, there are rules. A little bit of colorant goes a very long way. As a rule of thumb, never let your additives be more than about 5% of the total resin volume, or you risk messing with the cure.
- Mica Powders: These are shimmery, fine powders that create pearlescent or metallic effects. They are super easy to use and a great place to start.
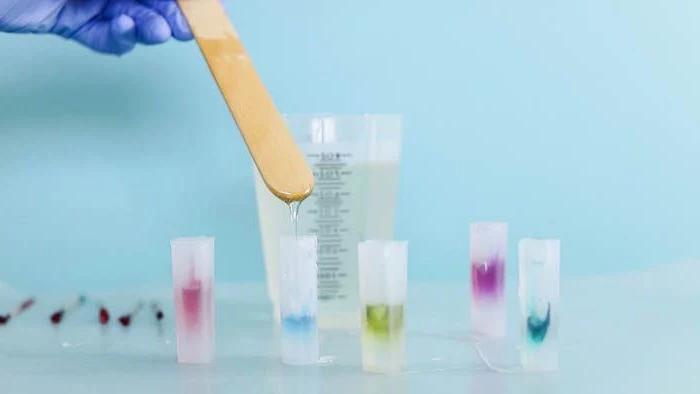
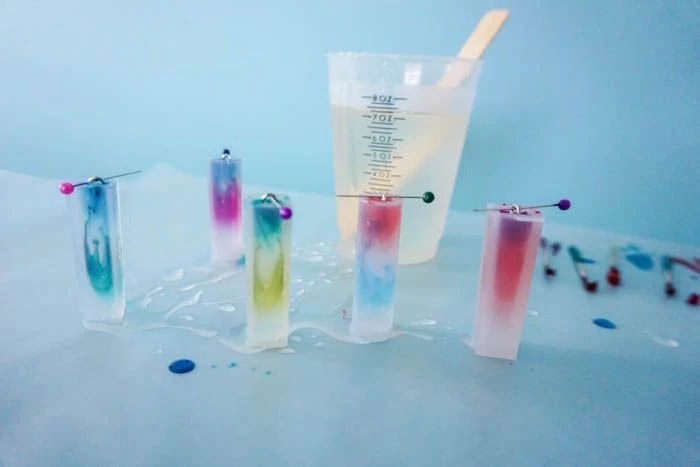
- Resin Dyes: These are highly concentrated liquids made for resin. They come in transparent (like stained glass) and opaque. You literally need one or two drops.
- Alcohol Inks: These create amazing cellular and petri dish effects. But use them sparingly—they are a solvent and too much can impact the cure.
A CRITICAL WARNING: Never, ever use anything water-based to color your resin. That means no acrylic craft paint, no watercolors. Water is the mortal enemy of epoxy and will cause a cloudy, bendy mess. I learned that the hard way on a custom order and had to remake everything. A very expensive lesson.
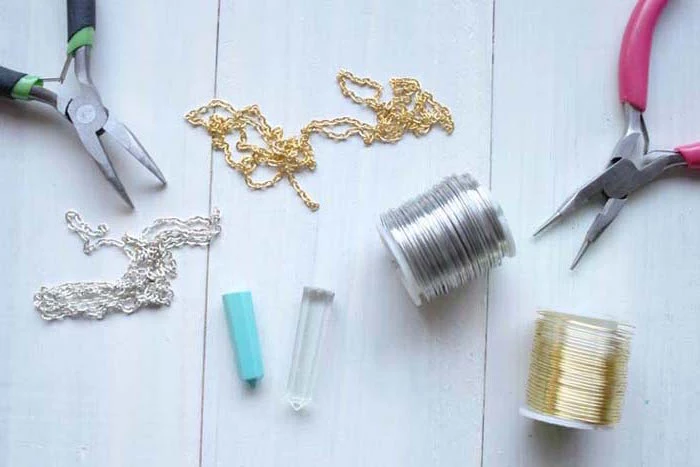
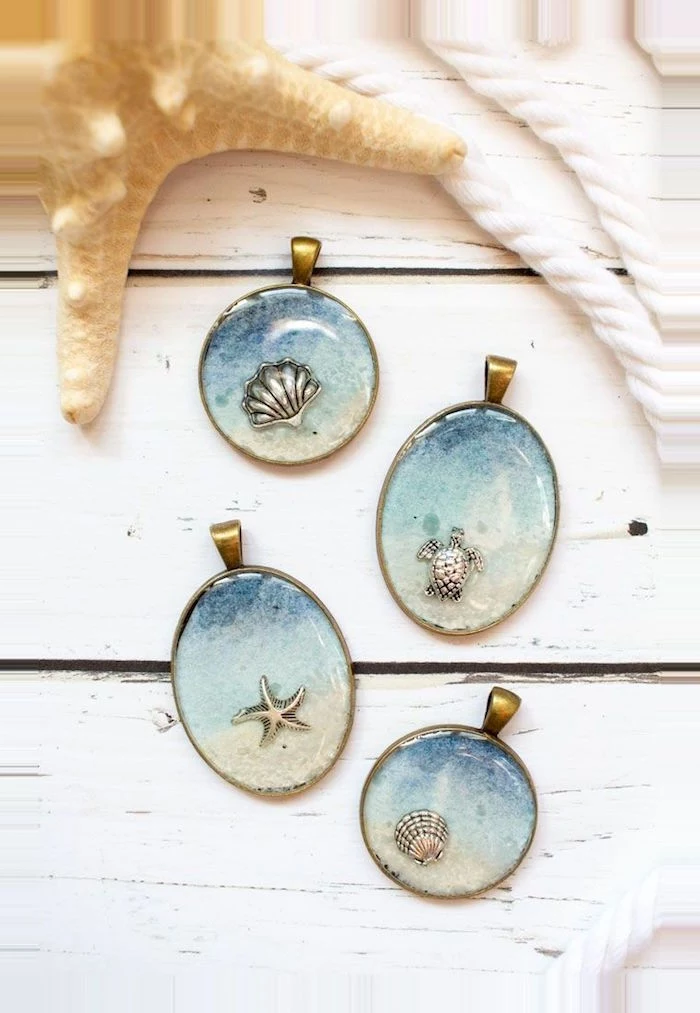
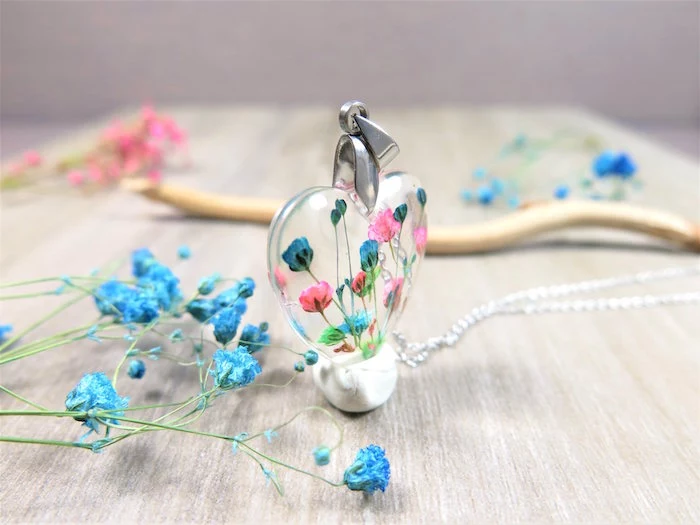
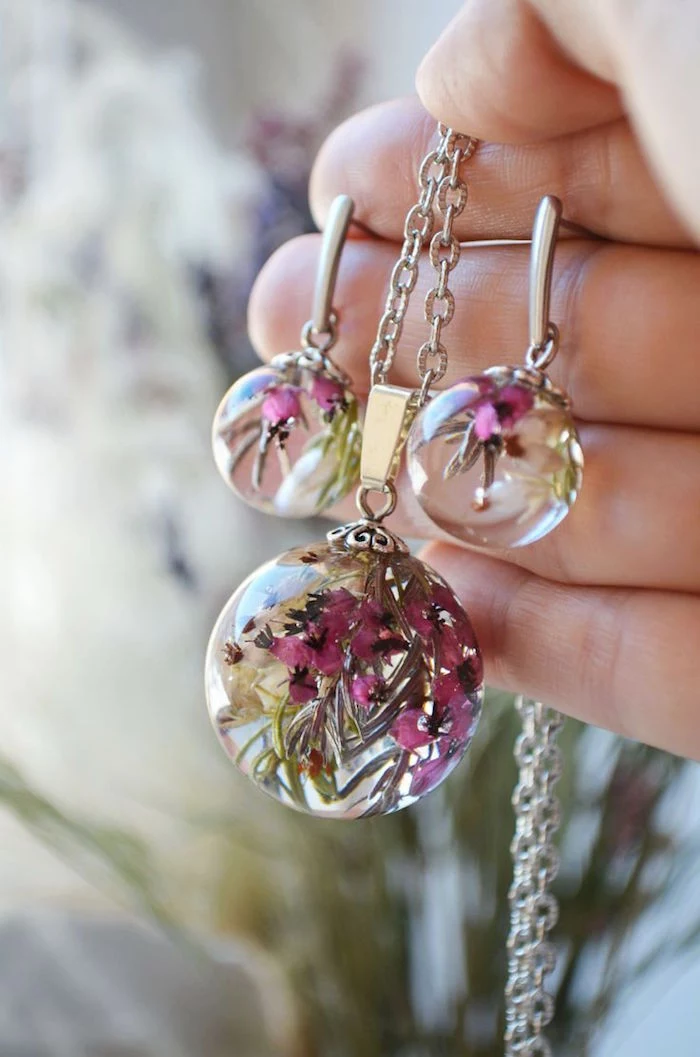
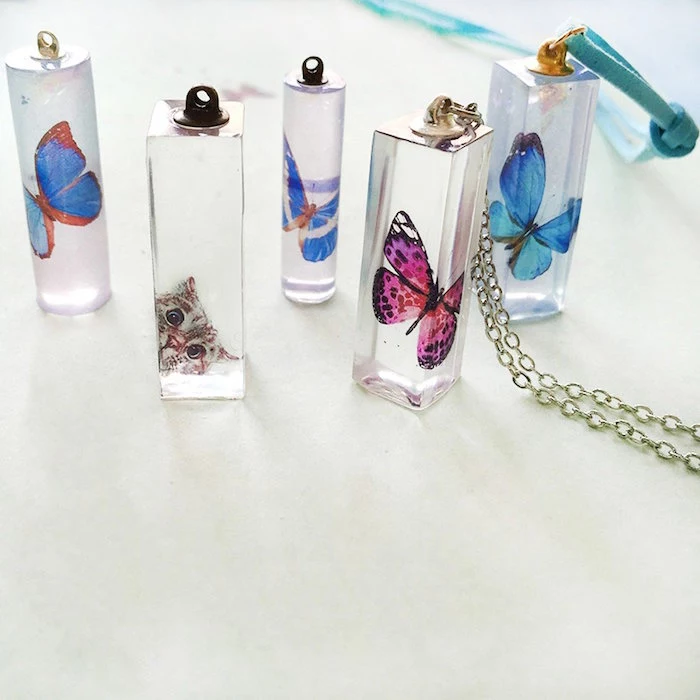
Embedding Objects (Inclusions)
Anything you put in resin has to be 100% bone dry. Any moisture will cause bubbles and discoloration.
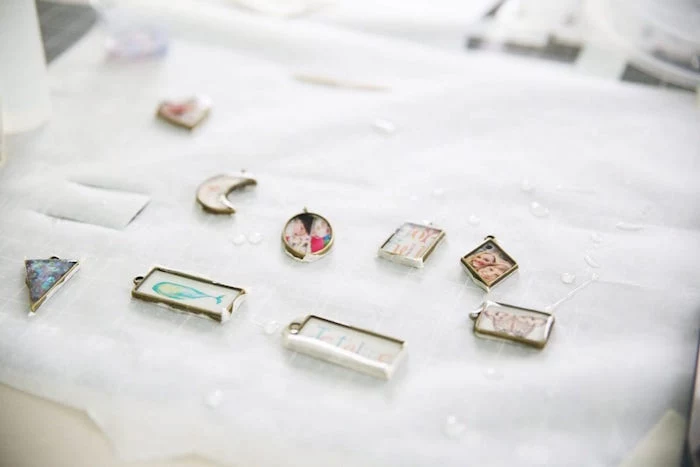
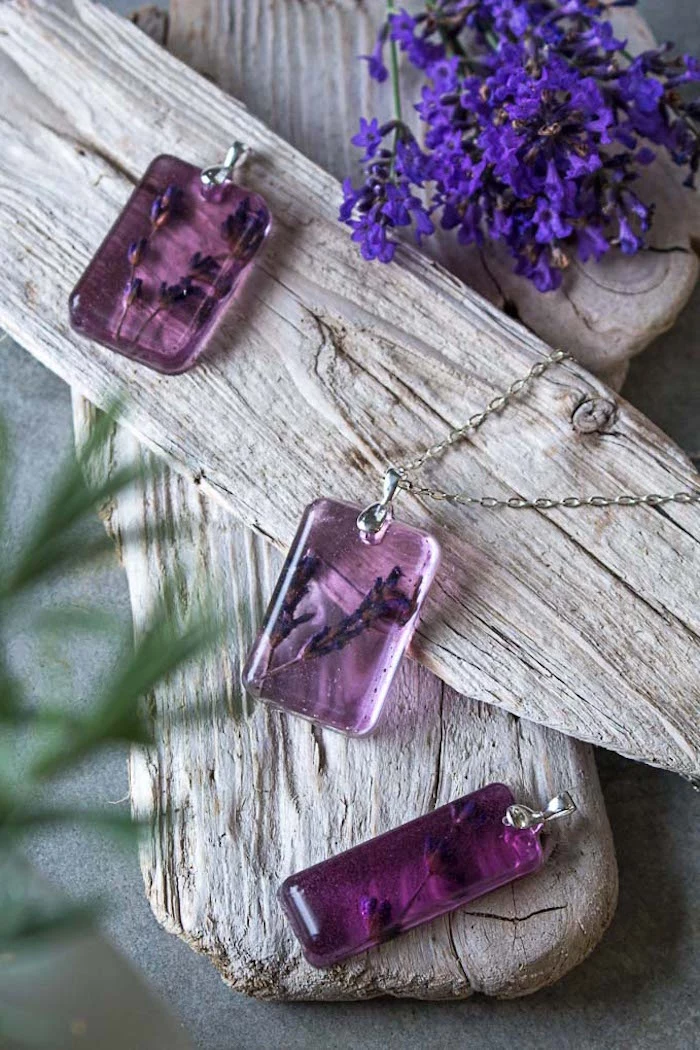
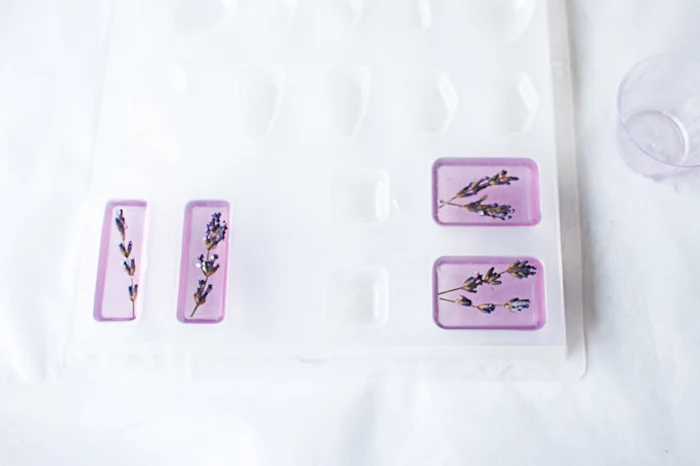
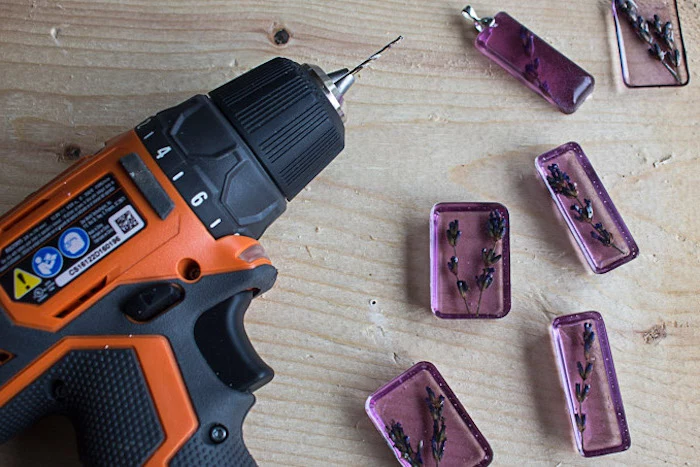
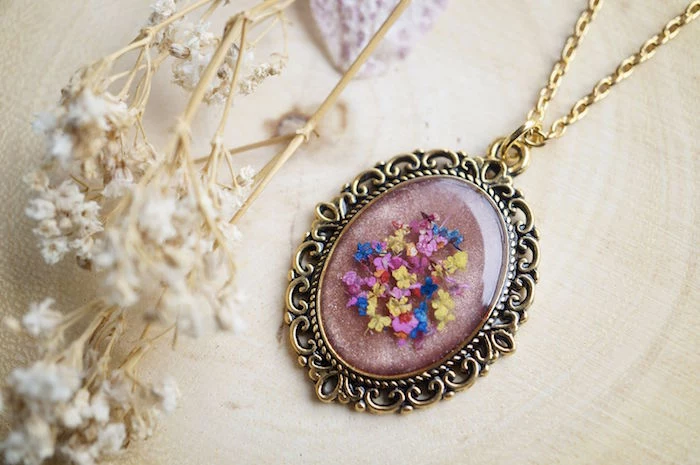
- Flowers, Leaves, etc: Dry them completely, either by pressing them or using silica gel to preserve their 3D shape. Even then, you need to seal them. A thin coat of Mod Podge or a quick dip in some already-mixed resin (let it cure first!) will seal the pores and prevent them from releasing air bubbles.
- Paper and Photos: Resin makes unsealed paper look translucent and oily. You must seal it completely—front, back, and all edges—with a few coats of a decoupage glue. Let it dry fully before embedding.
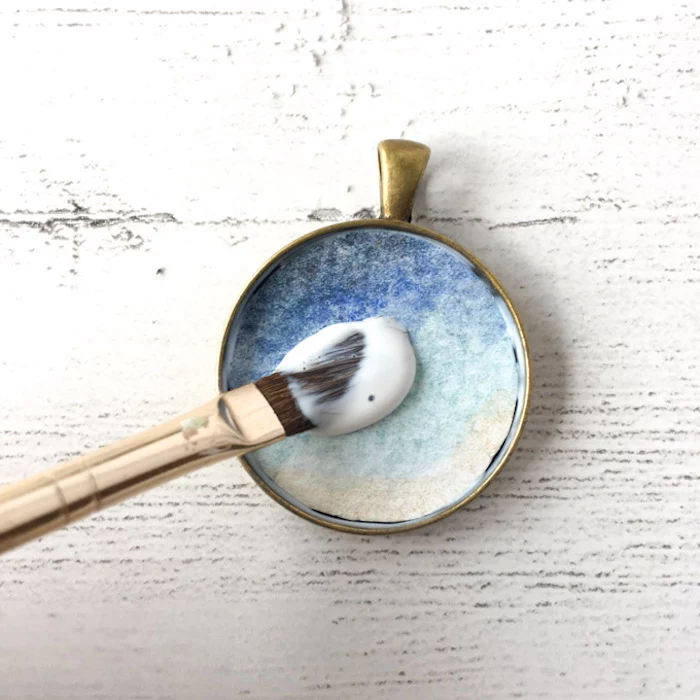
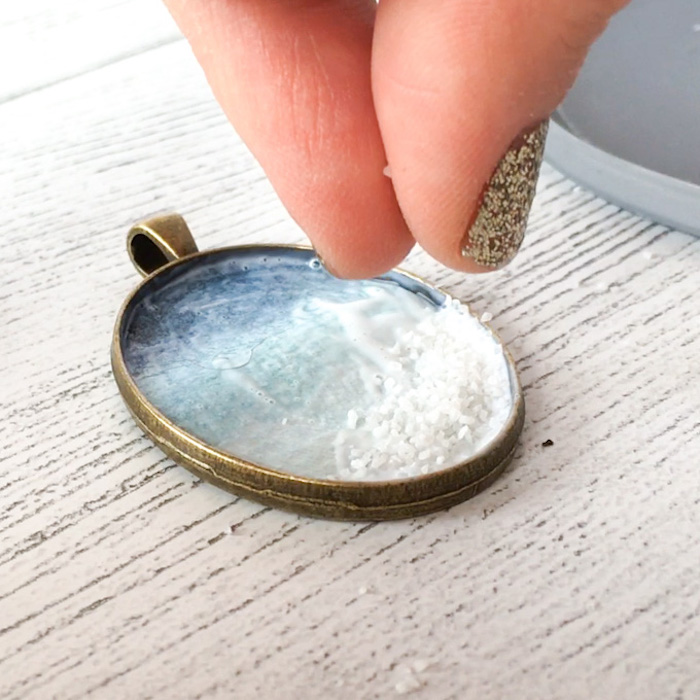
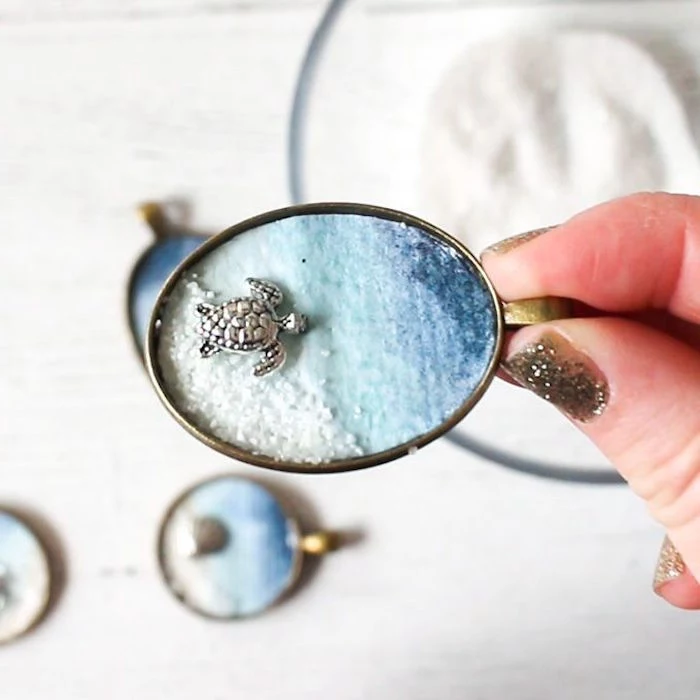
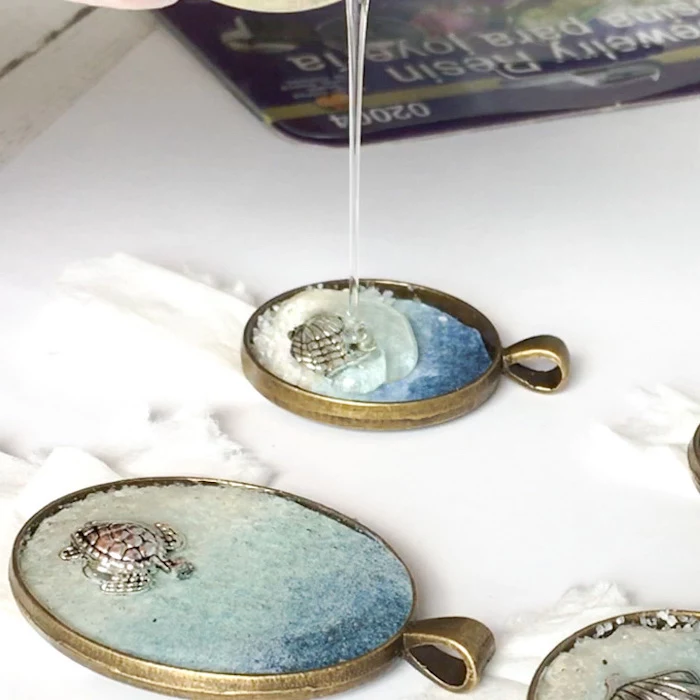
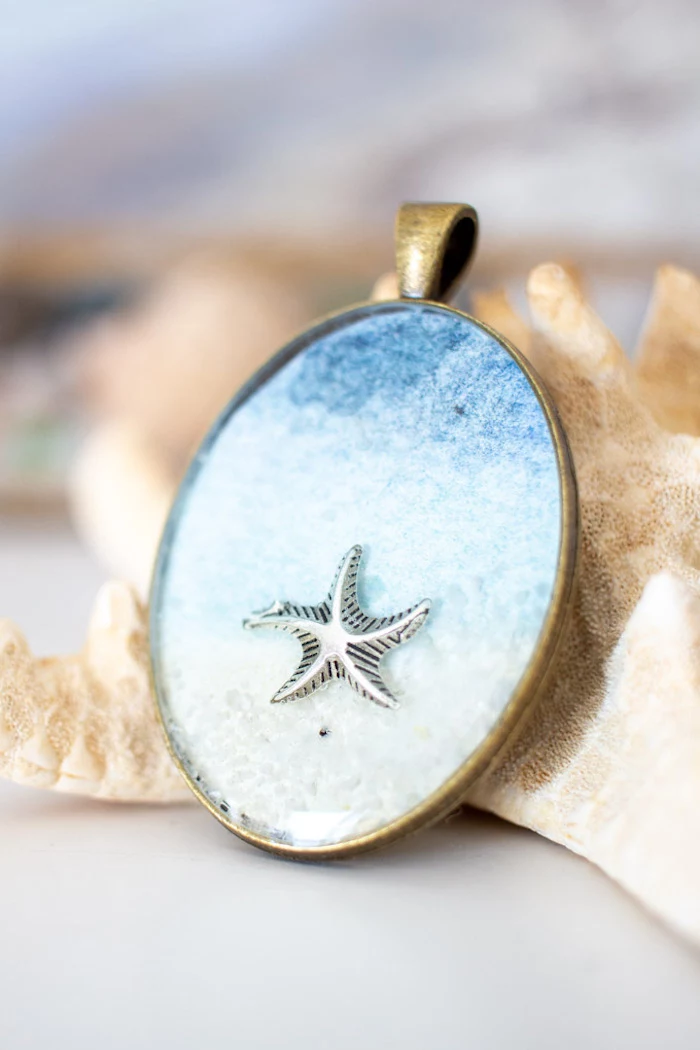
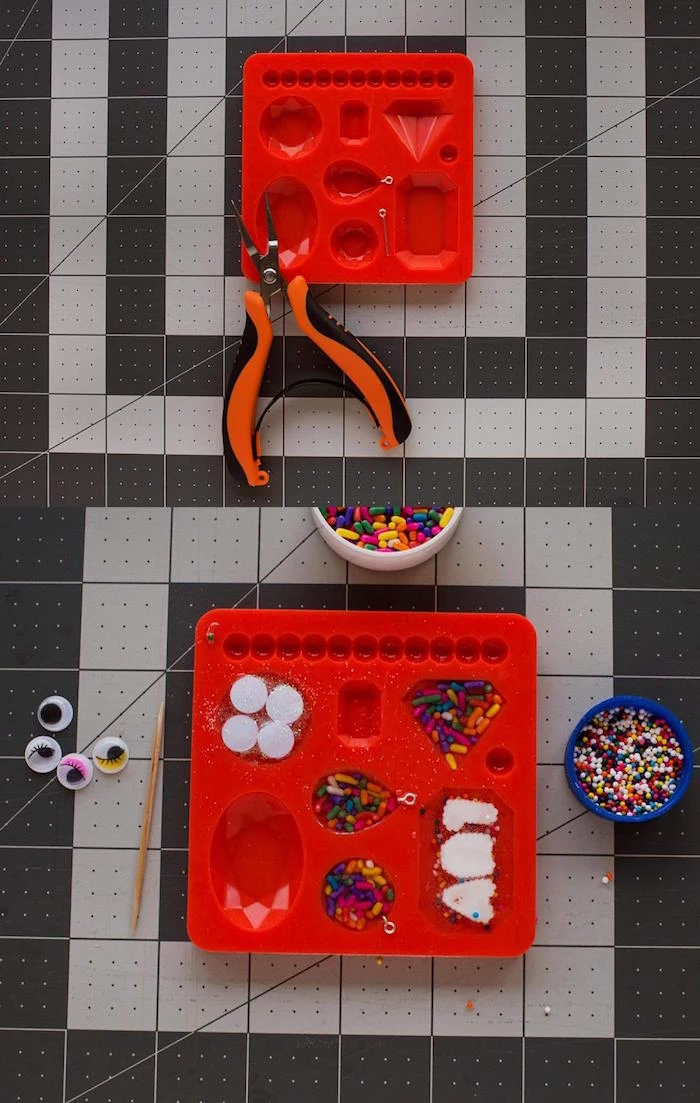
- Glitter and Charms: These are generally easy. Just know that heavy glitters and metal charms will sink, while fine glitters might float. To control placement, pour in layers. Pour a thin layer, wait an hour or two until it’s thick like honey, place your items, and then pour the next layer on top.
Pouring and Curing: The Art of Waiting
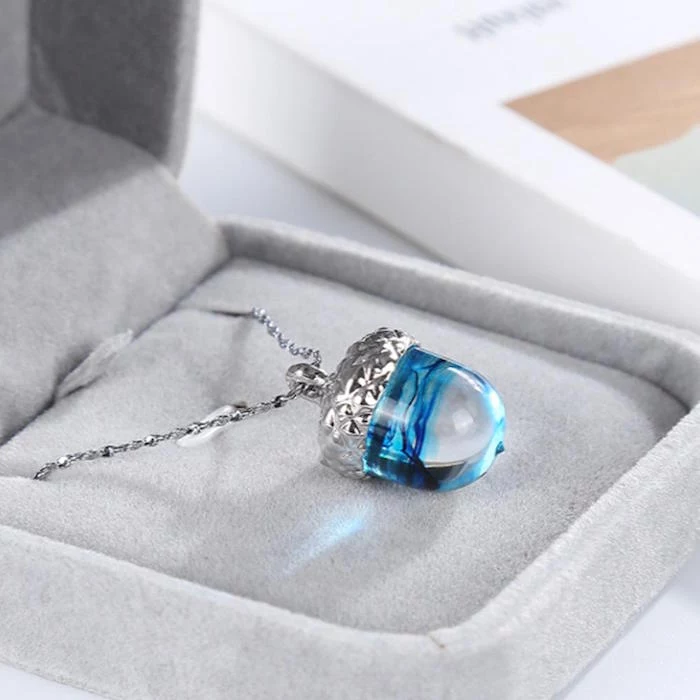
Your resin is mixed, your inclusions are ready. Time to pour. Pour slowly, in a thin stream, and from a low height to minimize bubbles. For bezels, creating that perfect, glossy dome takes practice. Fill the bezel almost to the top, then add a few more drops right in the center. The resin’s surface tension will create a beautiful curve that sits just above the rim.
Banishing Bubbles for Good
Bubbles happen. Here’s how to get rid of them.
- Let it rest: After mixing, let your cup of resin sit for 5-10 minutes. Many bubbles will rise and pop on their own.
- Use targeted heat: A long-arm lighter or a heat gun is your best friend. Hold it several inches away and sweep it quickly across the surface. The heat thins the resin for a moment, allowing trapped air to escape. Be quick! Don’t linger, or you can scorch the resin or even warp your silicone mold. A heat gun is generally safer for beginners than an open flame.
By the way, if you ever get really serious and want absolutely zero bubbles, the pros use a pressure pot. It’s an expensive piece of equipment that uses air pressure to shrink bubbles down to a microscopic size, but it’s the ultimate tool for a flawless finish.

Once you’ve poured and popped the bubbles, cover your pieces immediately with that upside-down tub. Now… walk away. Don’t touch them for at least 24 hours.
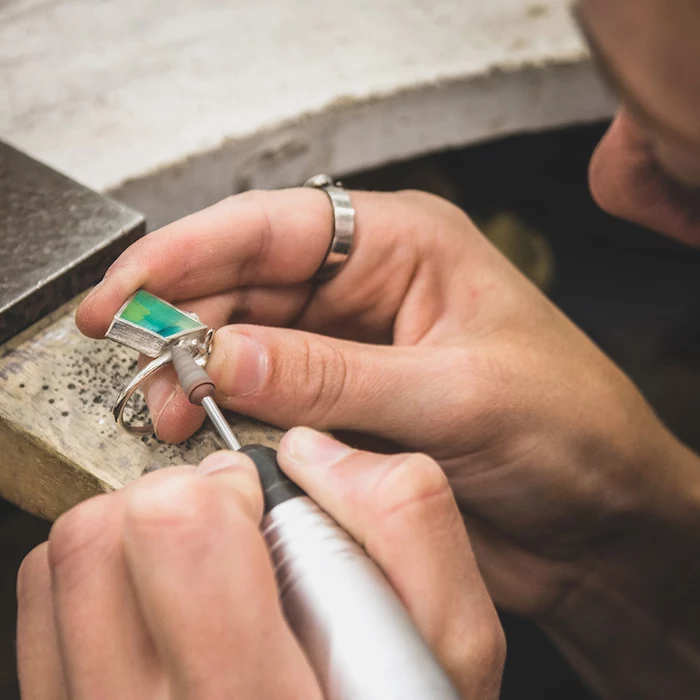
Finishing: What Separates Craft from Jewelry
After your piece is fully cured (I always wait 48-72 hours), it’s time for the final touches that make all the difference.
Often, the back edge of a piece from a mold is a little sharp. You’ll want to sand this down for a comfortable, professional feel. The best way is wet sanding. You’ll need waterproof sandpaper in several grits (like 400, 800, 1200, 2000), which you can get at an auto parts store, and a little dish of water. Wet the sandpaper and sand the edges in a circular motion. This prevents dust and gives a smoother finish. Work your way up through the grits to get it super smooth.
After sanding, the edge will look dull. To bring back that glass-like shine, use a plastic polishing compound (found in the automotive aisle) and a microfiber cloth. For a truly professional finish, I use a small buffing wheel on a Dremel. It brings the edge to a perfect, clear shine that matches the front.
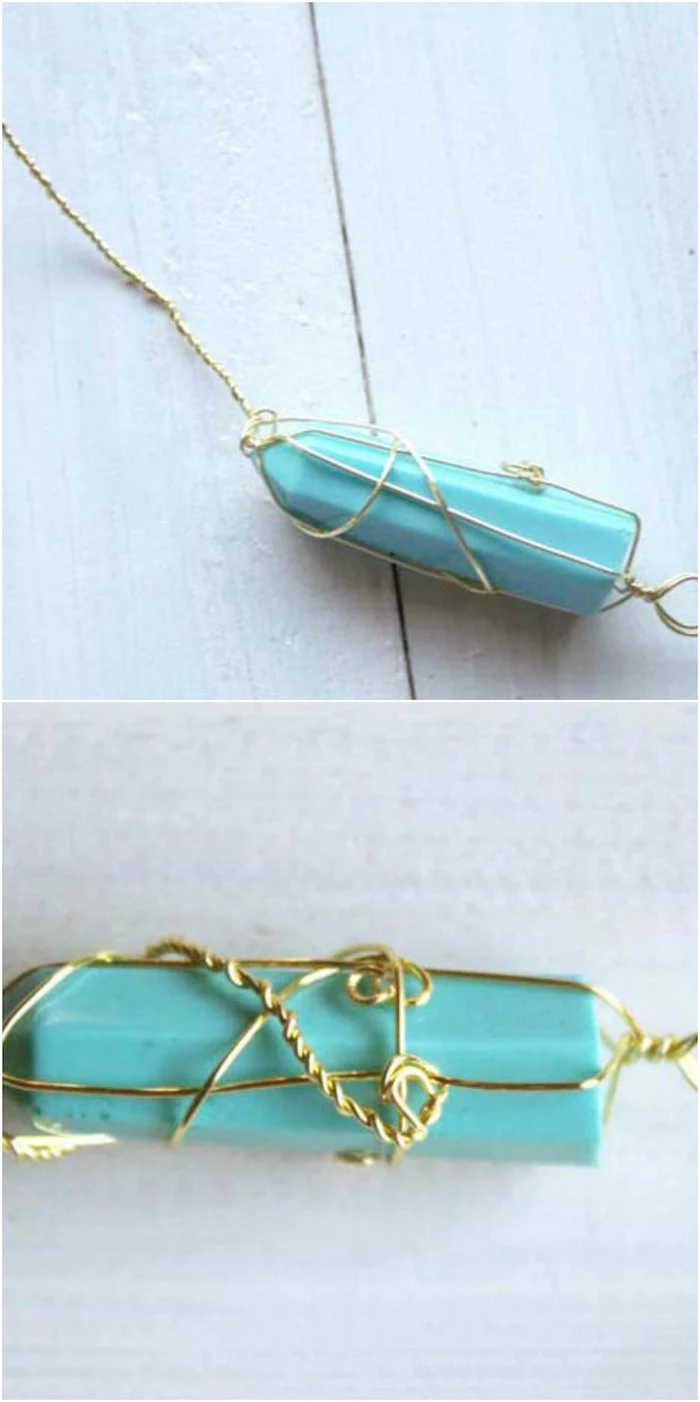
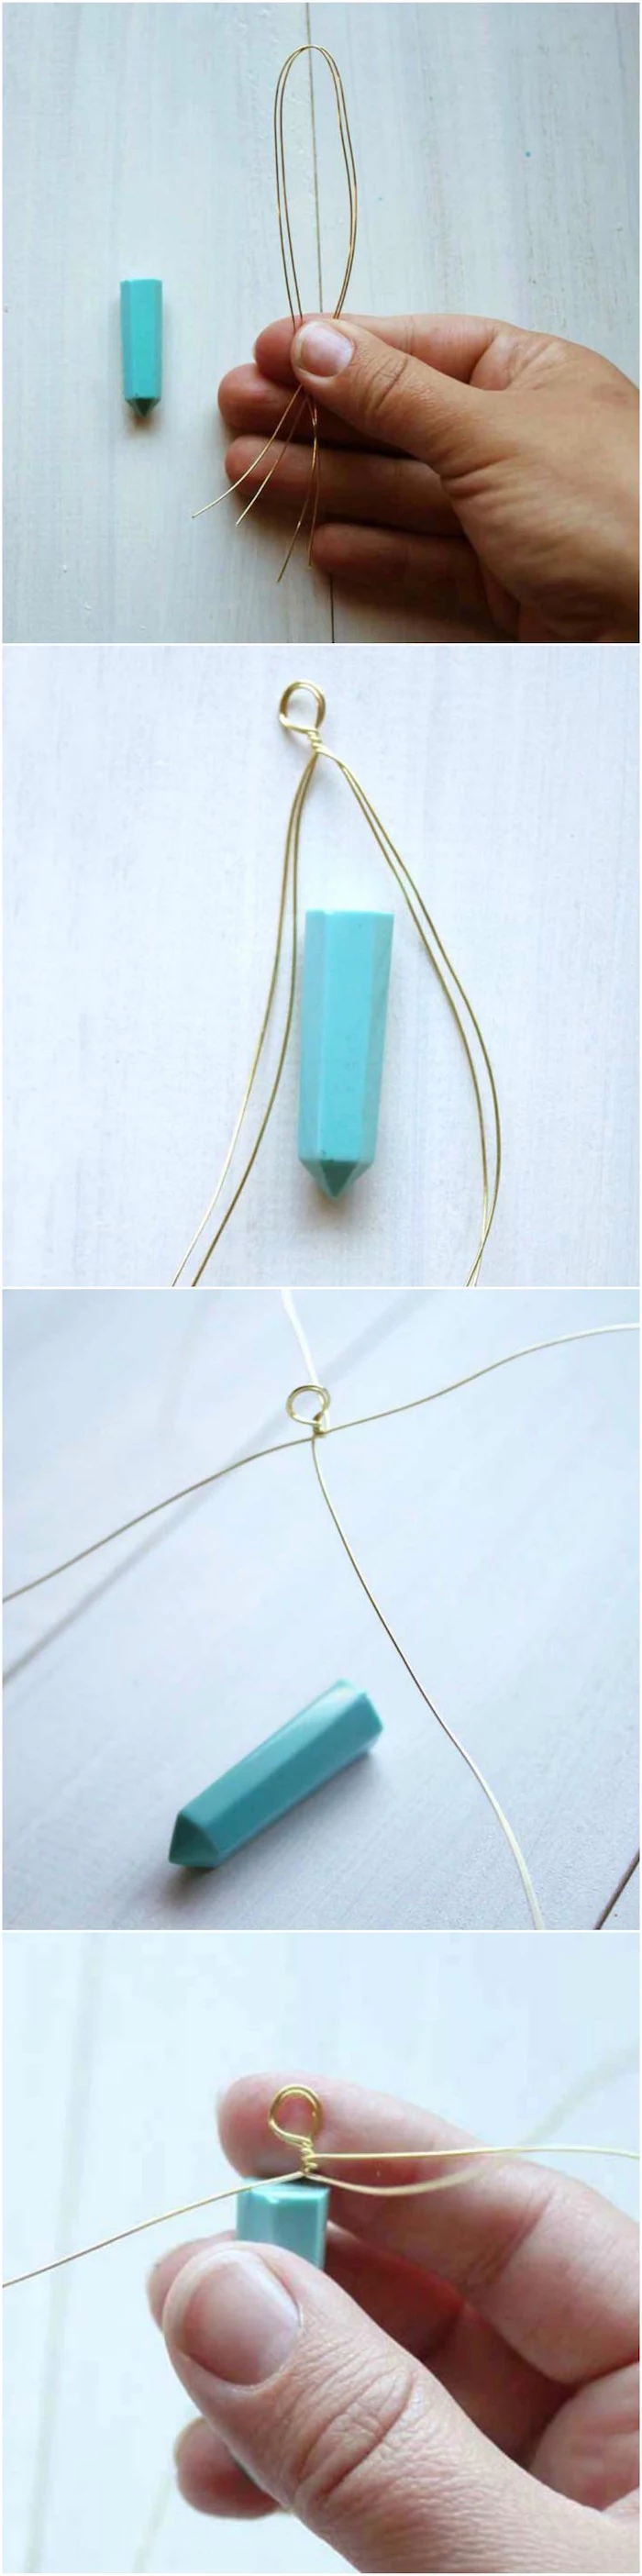
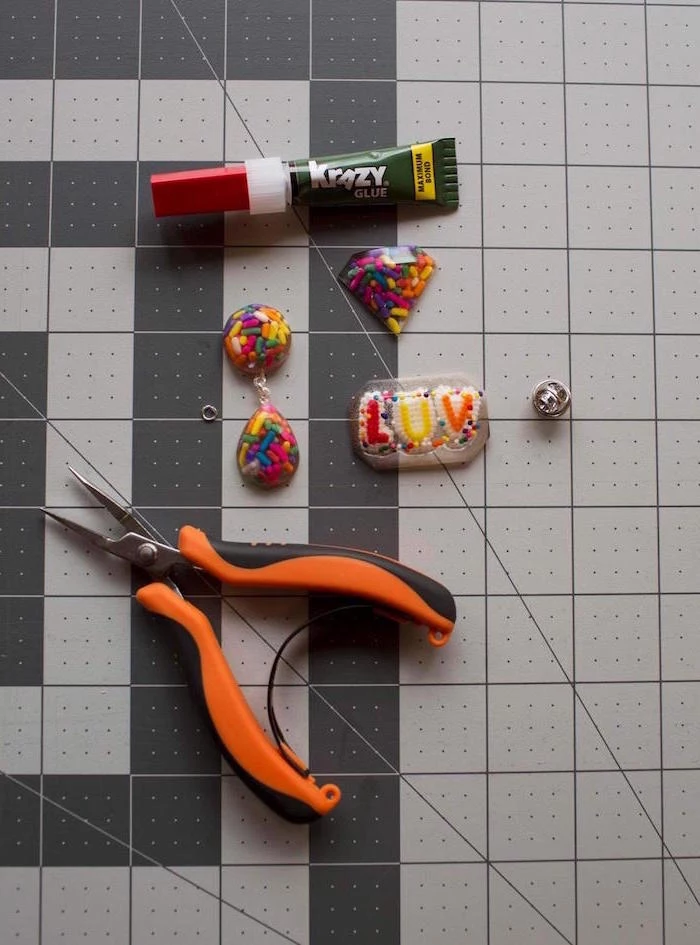
To turn it into jewelry, use a pin vise (a tiny hand drill) to make a hole, then use jewelry pliers to add your jump rings and earring hooks or bails.
Cleanup & Troubleshooting
So, what about the mess? For your silicone cups and stirrers, don’t wash them! Just let the leftover resin cure completely inside them. The next day, you can just peel the hardened resin right out. It’s incredibly satisfying! For any disposable plastic cups, just toss ’em.
When Good Resin Goes Bad
- Problem: It’s sticky or bendy!
Cause: 99% of the time, this is an off-ratio mix, not mixing long enough, or a workspace that was too cold.
Solution: I’m sorry to say, there’s no real fix. You have to scrap it and start over. But now you know! Use a scale, use the double-cup method, and check your room temperature. - Problem: There’s a weird, waxy film on the surface.
Cause: This is called amine blush. It happens when the resin cures in high humidity or cool temps.
Solution: Easy fix! It’s water-soluble. Just wash the piece with warm soapy water and dry it completely. Good as new. - Problem: My flowers turned brown or made a ton of bubbles.
Cause: They weren’t totally dry or weren’t sealed properly. Moisture and air escaped into the resin.
Solution: No fix for this one, I’m afraid. Next time, be absolutely positive your inclusions are bone-dry and sealed. - Problem: The back of my piece has sharp edges.
Cause: This is normal! It’s called a meniscus line from where the resin crept up the side of the mold.
Solution: This is exactly what the wet-sanding and polishing step is for. A few minutes of sanding will make it perfectly smooth.

A Final Word from the Workshop
Making resin jewelry is an amazing blend of precision and creativity. Your first few pieces might not be perfect, and that is completely okay. Mine sure wasn’t. See every piece as a lesson. Keep a small notebook. Jot down the brand of resin, the room temp, how long you mixed for. When a piece turns out amazing, you’ll know exactly how to do it again. When one fails, you’ll have the clues to figure out why.
Respect the materials, work safely, and be patient. You’ve got this.
Disclaimer: This guide is based on professional experience and best practices. But you should always, always read and follow the specific safety and usage instructions provided by your resin’s manufacturer. Your safety is in your hands.
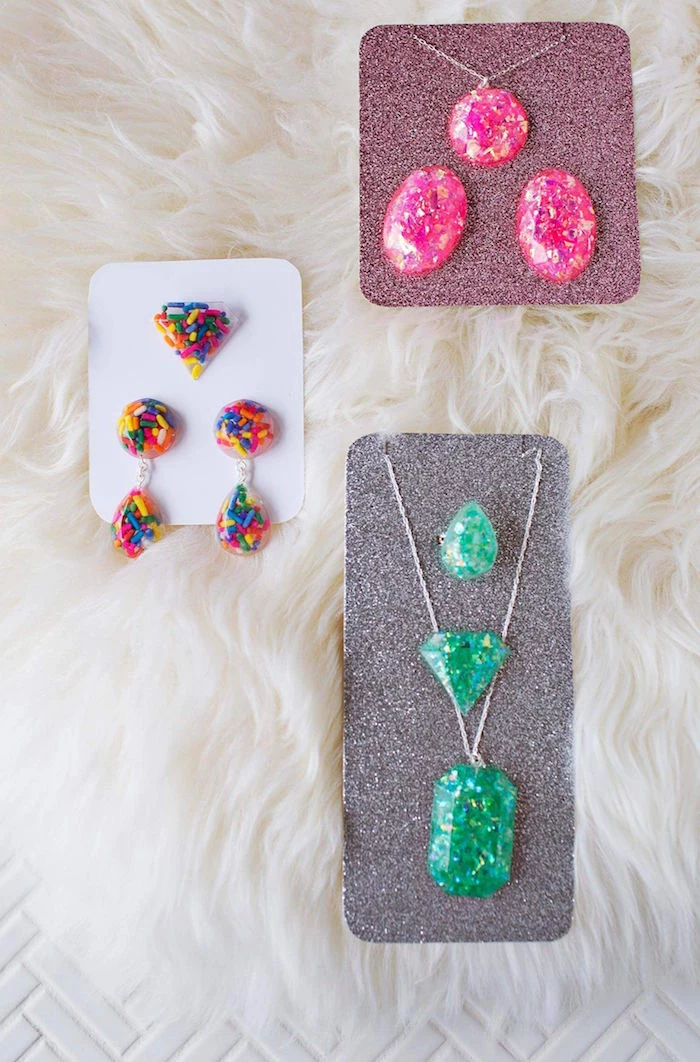
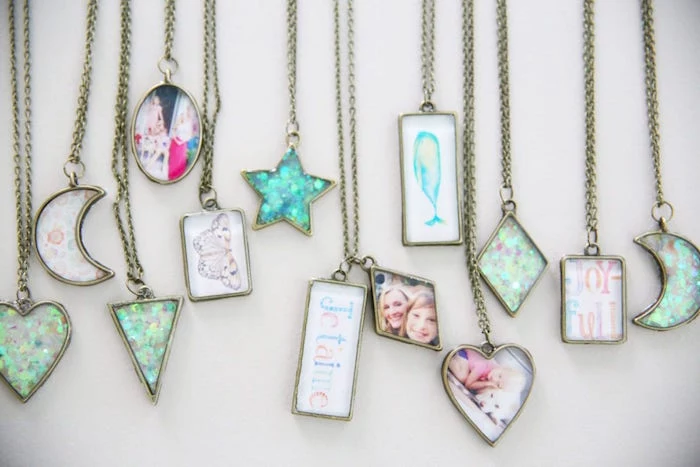
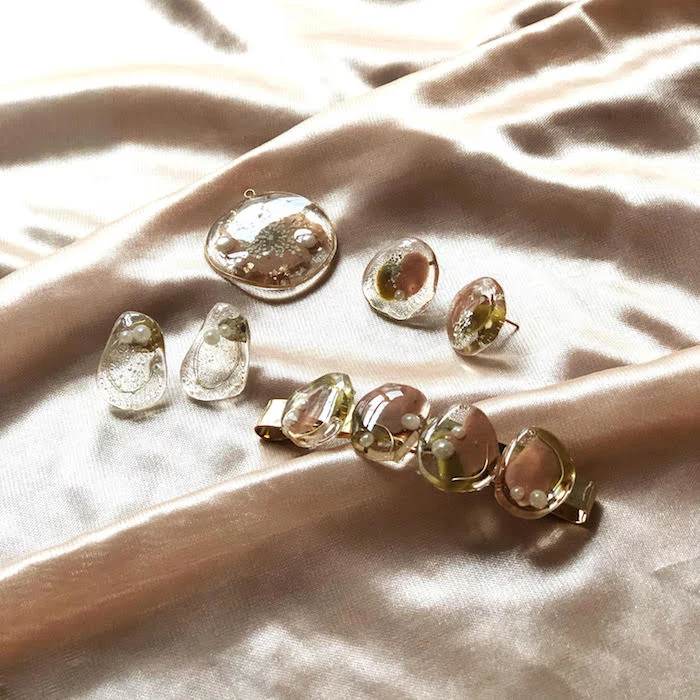
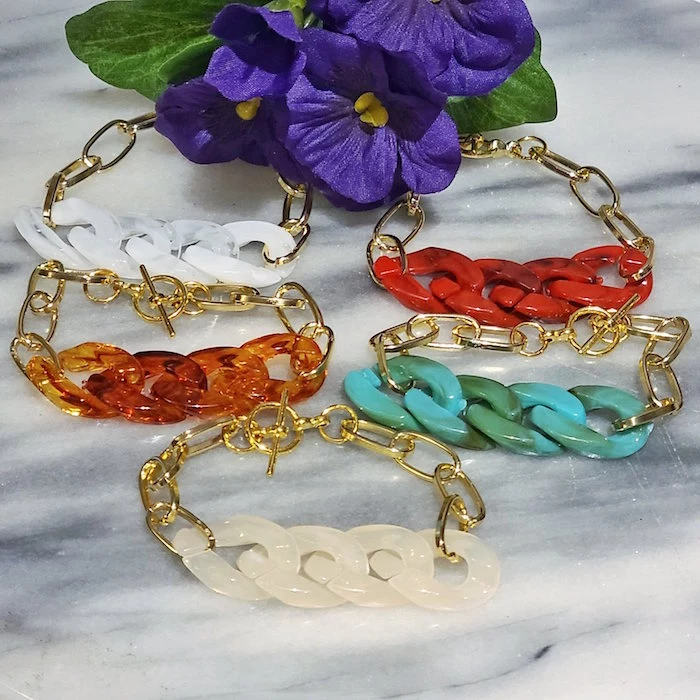
Inspirational Gallery
Don’t underestimate the power of a tiny bubble level. Your curing surface must be perfectly horizontal. Even a slight incline will cause the resin to pool on one side of your mold, resulting in an uneven, amateurish-looking piece. A cheap level from a hardware store is one of the best investments you can make.

Over 90% of initial resin failures are due to incorrect mixing ratios or insufficient mixing time.
This isn’t like baking where you can eyeball a little extra flour. The chemical reaction is precise. Scrape the sides and bottom of your mixing cup thoroughly for at least three minutes. What you think is ‘mixed’ often isn’t, leaving you with dreaded sticky spots that will never cure.
How do I achieve that professional, glassy dome on top of my pieces?
This is called the ‘doming’ technique. After your main piece has fully cured, mix a small, fresh batch of resin. Using a popsicle stick, carefully apply a small amount to the center of the piece. The resin’s surface tension will make it flow towards the edges without spilling over. Let it self-level and cure for that perfect, magnified finish. It takes practice, but it’s a game-changer.
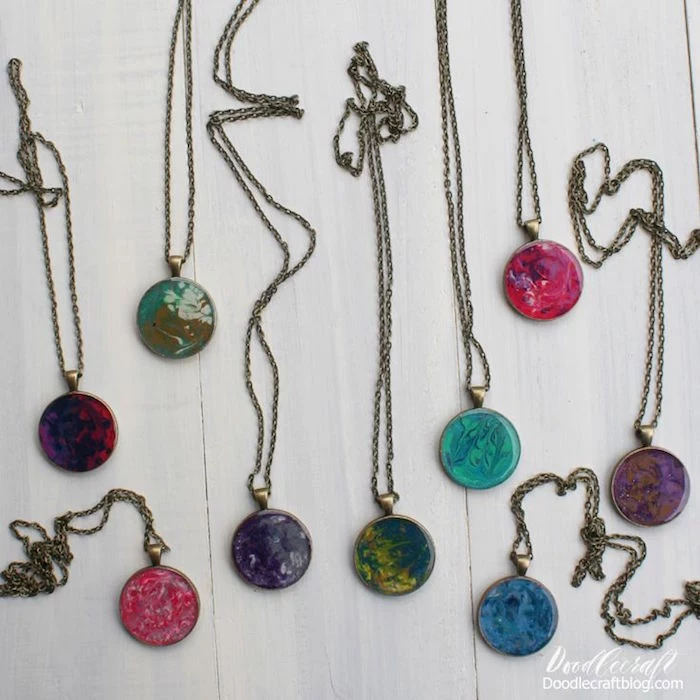
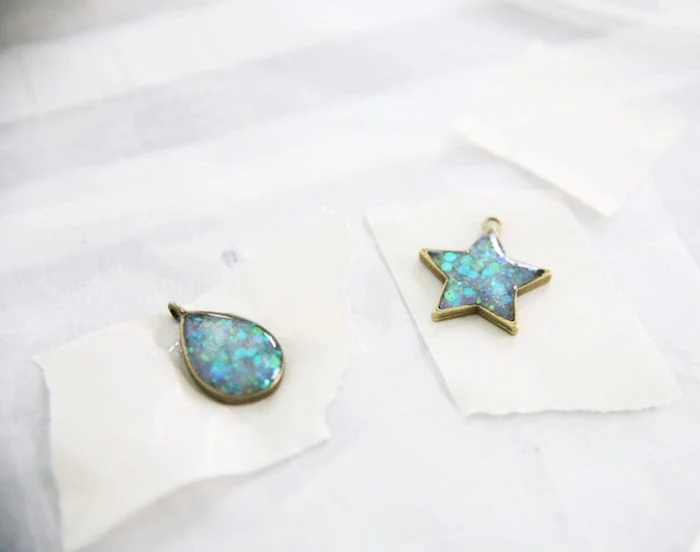
Mica Powder: Offers a pearlescent, shimmery finish. The particles are suspended in the resin, creating depth and sparkle. Perfect for galaxy effects or faux gemstones.
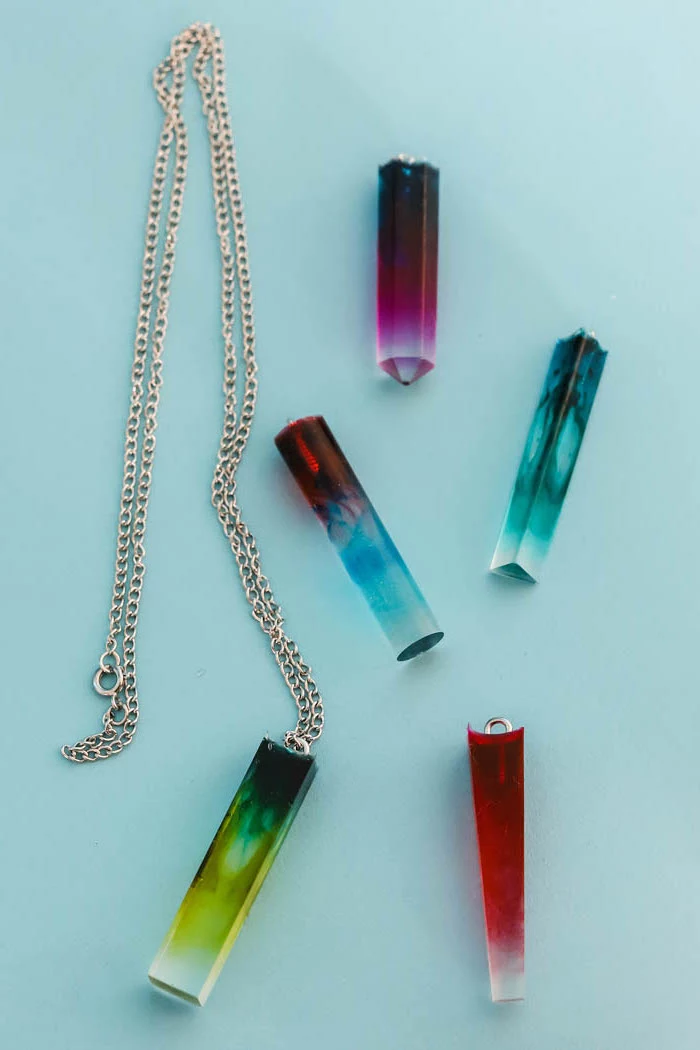
Alcohol Ink: Provides a transparent, vibrant color, similar to stained glass. It’s the key to creating the popular ‘petri dish’ effect where colors bloom and interact.
They are not interchangeable; one gives shimmer, the other gives translucent color. Many artists use both!
- Perfectly embed delicate items like dried flowers or paper.
- Create stunning 3D depth in a single piece.
The secret? Pouring in multiple thin layers. Pour a base layer, let it partially cure for a few hours until it’s ‘tacky’, place your inclusions, and then pour the next layer. This prevents items from sinking to the bottom or floating to the top.
Thinking of including paper or a tiny photo in your pendant? You must seal it first. Unsealed paper will absorb the resin, turning dark and translucent, losing all its detail. A couple of thin coats of Mod Podge (let it dry completely!) is a classic, effective solution to create a barrier and keep your image crisp and clear.
“The VOCs (Volatile Organic Compounds) in many epoxy resins can be harmful without proper ventilation. The reaction is exothermic, meaning it releases heat and fumes.”

Your workspace temperature is crucial. Most epoxies, like those from brands like JDiction or Dr. Crafty, perform best between 72-78°F (22-25°C). Too cold, and the resin will be thick, hard to mix, and prone to micro-bubbles. Too hot, and the cure time can accelerate dramatically, a phenomenon called a ‘flash cure’, leaving you no time to work.

The mortal enemy of a crystal-clear pour: Moisture. It can come from anywhere – humidity in the air, a drop of water in your mold, or, most commonly, from inclusions that haven’t been properly dried. Fresh flowers or leaves will rot and cause cloudiness. Always use completely desiccated botanicals, either store-bought or dried yourself using silica gel.
Let’s talk about the final touch. Even a perfect pour can be elevated with a bit of sanding and polishing.
- Start with a coarse grit sandpaper (around 400) to remove any imperfections or sharp edges.
- Work your way up through progressively finer grits (600, 800, 1200, up to 2000).
- Finish with a plastic polishing compound, like Novus 2, on a microfiber cloth to restore a brilliant, glass-like shine.
My silicone mold is getting cloudy and my pieces aren’t shiny anymore. Why?
Silicone molds have a lifespan. The chemical reaction of the resin slowly breaks down the silicone surface with each use. To prolong their life, avoid using a torch directly on the mold (wave it high above) and never use sharp tools to demold your pieces. Clean them gently with soap and water or a piece of tape to pick up dust.
ArtResin: This brand markets itself heavily on being non-toxic (when used as directed) and having superior non-yellowing properties due to HALS (Hindered Amine Light Stabilizer). It’s a great, albeit pricier, choice for beginners who are concerned about safety and creating archival-quality art.
Let’s Resin: A popular and more budget-friendly option that offers a huge range of kits, pigments, and molds. It’s a solid workhorse resin perfect for experimenting and general crafting, though you’ll still need proper safety gear.
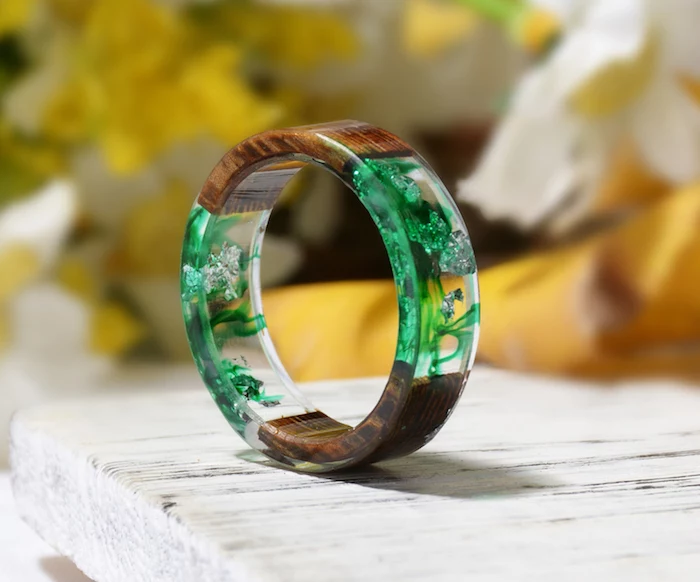
Want to go beyond basic glitter? The world of inclusions is vast. Try incorporating tiny watch gears for a steampunk vibe, crushed glass for a geode effect, or even colorful candy sprinkles (sealed first!) for whimsical, fun pieces. The key is to ensure your chosen items are completely dry and non-reactive.
- A flawless, glass-like surface.
- No tiny, pesky micro-bubbles.
The secret is a simple heat gun or a propane torch. After pouring, wait a few minutes for bubbles to rise. Then, pass the heat source quickly and continuously across the surface, about 6-8 inches away. The heat thins the resin for a moment, allowing trapped air to escape. Don’t linger, or you’ll scorch the resin or damage your mold!

The wood-and-resin trend isn’t just for tables. For jewelry, small pieces of burl wood or interesting offcuts create stunning pendants. Make sure your wood is completely dry and stabilized. It’s a good idea to seal the wood with a thin coat of resin first before the main pour, to prevent it from releasing air bubbles into your piece.
A study on polymer degradation found that UV light is the primary cause of yellowing in most standard epoxies. The energy from the UV rays breaks down the polymer chains.
What does this mean for your jewelry? While some resins have UV inhibitors, it’s wise to store your finished pieces out of direct, prolonged sunlight to maintain their crystal clarity for years to come.
A common mistake: Pouring too deep. Most craft resins, unless specified as a ‘deep pour’ formula, are designed for layers of 1/4 to 1/2 inch at a time. Pouring thicker can trap heat, causing the resin to crack, yellow, or cure improperly. For deeper bezels or molds, work in multiple, thinner layers.
If you’re looking for eco-friendlier options, explore bio-resins. Brands like Ecopoxy offer formulations that replace a portion of the petroleum-based ingredients with bio-based materials like soybeans or cashew nutshells. While not 100% ‘green’, they represent a significant step towards more sustainable crafting.
- Nitrile gloves are a must. Latex can sometimes react with certain resins.
- Safety glasses to protect from accidental splashes.
- A respirator mask with organic vapor cartridges (look for an NIOSH P95 or P100 rating) if you’re working for extended periods or in a poorly ventilated space. Your health is not worth the risk.
I mixed my colors, but they look clumpy and uneven in the final piece. What did I do wrong?
Don’t add your pigment powder directly to the main batch of resin. Here’s the pro-tip: In a separate tiny cup, mix your mica powder or pigment with a very small amount of Part A (the resin) first to create a smooth, clump-free paste. Then, add this concentrated paste to your main mixed batch. This ensures perfect, even color dispersion every time.
The moment of demolding is pure magic. That shift from a liquid concoction to a solid, glossy object you can hold is one of the most satisfying parts of the process. It’s a small act of transformation that connects you directly to the materials and the piece you’ve created.

Open-Back Bezels: These are metal frames without a backing. You use packing tape on one side to create a temporary ‘bottom’, pour the resin, and remove the tape once cured. They’re fantastic for creating transparent, ‘floating’ designs.
Silicone Molds: These are flexible, reusable containers in every shape imaginable. They are ideal for beginners and for creating fully 3D objects like spheres, crystals, or cabochons.
Understand the difference between cure stages. ‘Soft cure’ happens after about 24 hours; the piece is solid but still slightly flexible, making it ideal for trimming or drilling. ‘Full cure’ can take up to 7 days, at which point the resin has reached its maximum hardness and durability. Don’t be impatient!
Inspired by the Japanese art of Kintsugi—the practice of repairing broken pottery with gold-dusted lacquer—you can give new life to a ‘failed’ piece.
If a resin piece cracks or breaks, don’t throw it out. Mix a new batch of resin with gold or silver mica powder and use it to ‘glue’ the pieces back together, celebrating the break instead of hiding it.
For vibrant, cell-like effects, nothing beats alcohol inks. Use a brand like Piñata Colors by Jacquard. Drop different colors into your freshly poured resin. Then, add a drop of white ink on top of the colors. The white is heavier and will sink, pushing the colors out to create stunning, organic patterns. It’s an art form in itself.