Forget Store-Bought: How to Make Fidgets That Actually Help You Focus
I’ve spent years working with people—from kids in classrooms to adults in boardrooms—and one thing has become crystal clear: the way we think about fidgeting has totally changed. What used to get you a stern look is now understood as the brain’s clever way of keeping itself on track. The goal isn’t just to give restless hands something to do; it’s about feeding your brain the right kind of sensory snack so it can zero in on what matters.
In this article
But let’s be honest, most of the fidgets you find in stores are just flashy toys. They’re often loud, clunky, or made from cheap plastic that feels… well, cheap. They can cause more distraction than they solve. This is exactly why I started showing people how to make their own. It’s more than just a craft project. When you build your own tool, you’re really figuring out what your own brain needs. You get to control the weight, the texture, the resistance, and the sound. You get to make something that truly works for you.
What Kind of Fidgeter Are You?
Before you start grabbing materials, it helps to know what you’re trying to achieve. Think about your own habits. Which of these sounds most like you?
- The Tapper: Are you always tapping your foot, clicking a pen, or drumming your fingers? You’re likely looking for proprioceptive input—that feeling of pressure in your muscles and joints. Fidgets you can squeeze, pull, or press will be your best friend.
- The Toucher: Do you find yourself running your hands over different textures, like a soft sweater, a cool tabletop, or the seam on your jeans? You’re craving tactile input. Fidgets with interesting textures—smooth, bumpy, soft, or gritty—are right up your alley.
- The Watcher or Listener: Does your mind wander unless you have something simple to watch or a low, repetitive sound to focus on? A fidget with a gentle, predictable motion or a quiet, rhythmic sound might be what you need to keep your brain engaged.
Figuring this out is the first step to making a tool that’s genuinely supportive, not just another distraction.

The Makings of a Great Fidget (Hint: It’s Not Complicated)
In my experience, the best tools are almost always the simplest ones. They should be something you can use without even looking at them, what some experts call “mindless” fidgeting. This lets your eyes and brain stay focused on the real task, whether that’s a lecture or a spreadsheet.
A truly effective fidget is:
- Discreet: It should be easy to use in your pocket or under a desk without calling attention to yourself.
- Silent: This is a big one. Clicks, whirs, and crinkles are fine when you’re alone, but in an office or classroom, silence is golden.
- Durable: It needs to hold up to a lot of twisting, squeezing, and pulling without breaking and becoming a safety hazard or just another frustration.
- Simply Repetitive: The motion should be easy and repeatable. If you have to think about how to use it, it’s defeating the whole purpose.
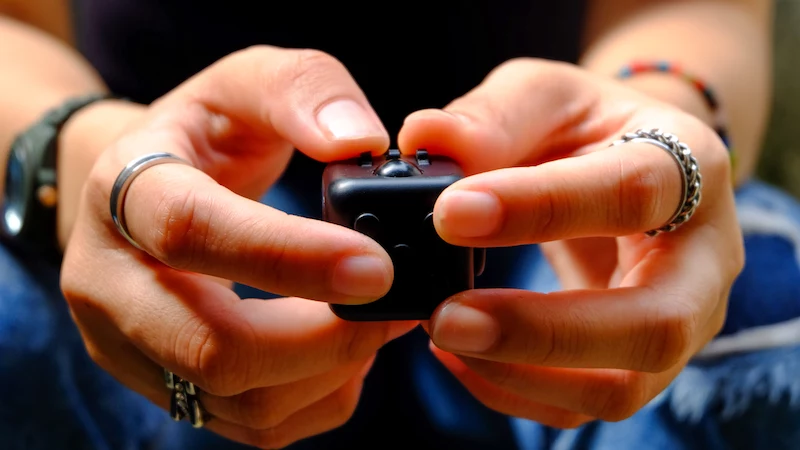
I learned this lesson the hard way. Early on, I gave a very restless student one of those popular, multi-gadget fidget cubes. It was a total disaster. He spent all his energy trying to master its different features instead of listening. We swapped it for a simple, smooth river stone he could roll in his palm. The change was immediate. His restlessness calmed down, and he started participating in class. It was a powerful reminder that more is definitely not better.

DIY Fidgets You Can Actually Make Today
Okay, let’s get to the fun part. Here are some of my favorite DIY fidgets, broken down by the sensory need they meet. These aren’t just crafts; they’re blueprints for tools that work.
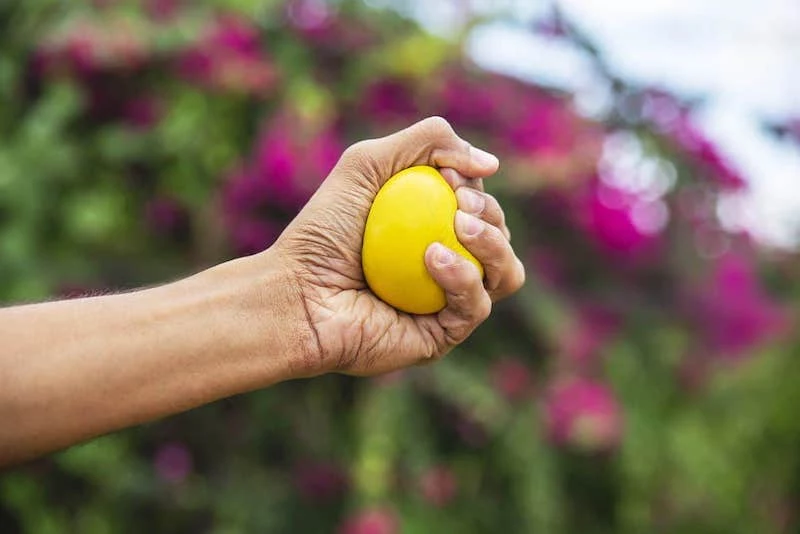
1. For Squeezing and Grounding: The Double-Walled Stress Ball
This is a classic for a reason. It provides that calming, deep pressure that’s perfect for anxiety or restlessness. But a single balloon is just asking for a flour explosion. We always use two.
- What You’ll Need: 2 standard 12-inch balloons (latex-free if you’re concerned about allergies), a small funnel, and about 1/2 cup of filler. For filler, all-purpose flour gives a classic soft squish, fine sand offers a heavier feel, and cornstarch creates a unique, dense resistance.
- Time & Cost: About 5 minutes. The cost is practically zero if you have balloons and flour at home. A pack of balloons is usually $2-$3 at a party or craft store.
- How to Make It:
1. Start by inflating the first balloon a bit and then letting the air out. This stretches it, making it way easier to fill.
2. Fit the balloon’s neck over the funnel and slowly pour in your filler. Tap the funnel to help it settle. Aim for about two-thirds full so it has room to move.
3. Carefully pull the balloon off the funnel, squeeze out all the extra air, and tie a super-tight knot.
4. Now, take your second balloon and snip the neck off, about half an inch from the opening.
5. Stretch this second balloon over the first one, starting on the side opposite the knot. This covers the knot and adds a durable second layer. - Pro Tip: Want a different texture? Try filling it with uncooked lentils, split peas, or even small, smooth plastic beads for a crunchier, more textured feel.
- Heads Up! This is not for young kids (under 5) or anyone who might try to bite it. If a balloon pops, the filler and balloon pieces are a serious choking hazard. Give it a quick inspection before each use and toss it if you see any weak spots.

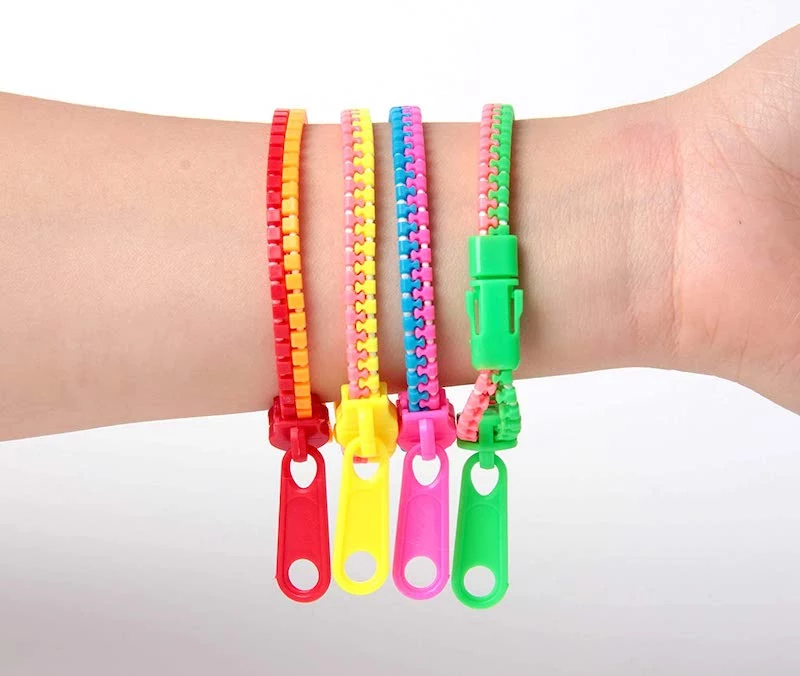
2. For Pulling and Clicking: The Resilient Zipper Bracelet
This one is brilliant because it looks like a normal accessory but provides a satisfying zip and a great pull-and-push motion. It’s super discreet.
- What You’ll Need: One 7- to 9-inch plastic-toothed zipper, heavy-duty embroidery floss, a needle, and some clear nail polish or Fray Check. Plastic zippers are quieter and smoother than metal ones.
- Time & Cost: 15-20 minutes. A zipper costs about $2-$4 at a craft store like Joann or Michaels, and floss is another dollar or two.
- How to Make It:
1. Zippers have extra fabric tape on the sides. Carefully trim it close to the teeth, but don’t snip the threads holding the teeth on!
2. Dab a thin line of clear nail polish or a seam sealant along the cut edges to stop them from fraying. Let it dry completely.
3. Wrap the zipper around your wrist to find the right size. It should be loose enough to slip on but not fall off. Mark where the ends should meet.
4. Overlap the ends and use your needle and floss to sew them together tightly. I recommend a few strong backstitches, then wrapping the floss around the join several times for good measure. Tie it off securely. - Pro Tip: Make two of these! You can link them together with a small keychain carabiner (you can find these at hardware stores for about $2). This creates a longer chain you can fidget with using both hands.
- A Common Mistake: Trimming the fabric too close and cutting the zipper’s main stitching. Be conservative with your first cut; you can always trim more if needed.
3. For Soothing and Touching: The Pocket Worry Stone
This is probably the oldest fidget in the world. It’s simply a smooth, calming object to rub with your thumb.
- What You’ll Need: A small block of soft wood like basswood or pine (available at most craft stores for a few dollars), sandpaper in a few grits (like 80, 150, and 220), and some food-grade mineral oil or beeswax polish.
- Time & Cost: About 30-45 minutes of sanding. The wood block is cheap, maybe $3-$5, and a variety pack of sandpaper is around $5 at Home Depot or Lowe’s.
- How to Make It:
1. Cut the wood to a size that fits nicely in your hand, maybe 1.5 to 2 inches long.
2. Use the coarse 80-grit sandpaper to do the heavy lifting—round off all the corners and edges. You can even use the edge of the sandpaper to carve a little thumb-sized indent.
3. Move to the 150-grit paper to smooth out all the rough marks from the first step.
4. Finish with the super-fine 220-grit paper. Keep going until the wood feels silky smooth. Seriously, you can’t overdo this step.
5. Wipe off the dust and rub in a tiny bit of mineral oil or beeswax. It protects the wood and makes the grain feel amazing. - Budget-Friendly Alternative: Use air-dry clay! Shape it, make your thumbprint, and let it dry for 24-48 hours. You can leave it with its natural matte texture or sand it smooth just like the wood.
- Heads up! Make sure every last splinter is sanded away. The final product should be perfectly smooth. This isn’t a good choice for anyone who might chew on things.
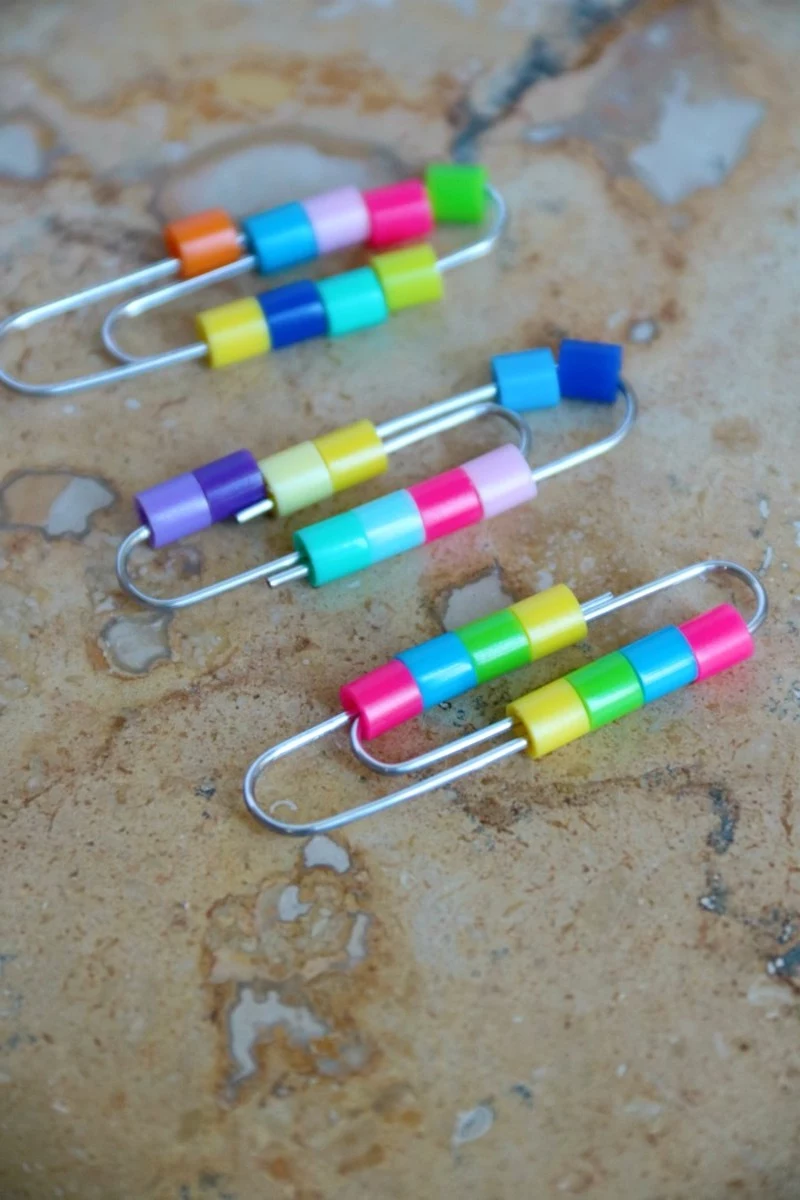
4. The 2-Minute Fidget Fix: Bead & Paperclip Slider
This is my go-to recommendation for anyone who wants to try something right now. It’s unbelievably simple, cheap, and effective.
- What You’ll Need: One large, smooth-coated paperclip (the 2-inch kind is perfect) and 4-6 plastic pony beads or Perler beads.
- Time & Cost: Literally two minutes. Total cost is pennies.
- How to Make It:
1. Gently bend the outer loop of the paperclip open, just enough to get the beads on.
2. Slide four or five beads onto the inner track of the paperclip.
3. Bend the paperclip back into its original shape. That’s it! You can now slide the beads back and forth with your thumb. - Pro Tip: For a different feel, use small metal nuts from the hardware store instead of plastic beads. The weight and coolness of the metal offer a totally different sensory experience. I know people who keep a few different versions in their bags.
- Just a reminder: This contains small parts, so it’s a choking hazard and not for young children.

5. For Visual Focus: The Quiet Infinity Cube
Store-bought infinity cubes are great, but they can be pricey and have a loud, clacky sound. This version uses wood blocks and tape for a silent, fluid motion that’s mesmerizing.
- What You’ll Need: 8 one-inch wooden cubes (around $5-$8 for a pack at a craft store) and some strong, flexible tape. Electrical tape or gaffer’s tape works best.
- Time & Cost: About 20-30 minutes. This one takes some patience! Total cost is around $10-$15, depending on the tape you get.
- How to Make It: Okay, this is all about the taping pattern, and it can be tricky. Don’t get frustrated! I highly recommend searching for a quick video tutorial on a “DIY infinity cube” to see it in action, as words can be confusing.
1. Place two cubes side-by-side. Tape them together along one edge to form a hinge.
2. Make another identical pair. You now have two sets of hinged cubes.
3. Place one pair on top of the other, making a 2×2 stack. Tape the stack together along the top edge.
4. Now, stand the structure on its end and open it like a book. You’re going to tape the inside edges now. Tape the top two cubes together, and then tape the bottom two cubes together.
5. Close it back up. The final piece of tape goes on the outside, perpendicular to the tape you added in step 3. - A Common Pitfall: The cube feels stiff or won’t fold properly. This happens to everyone! It almost always means one of the tape hinges is in the wrong place or isn’t aligned right. Carefully peel it off and try again. Using two colors of tape can help you keep track of the different hinges.
Inspirational Gallery
- A smooth, cool-to-the-touch glide for your thumb.
- A satisfying, solid weight that rests perfectly in your palm.
- A shape you’ve molded to fit the curve of your own hand.
The secret? A custom worry stone. Simply shape a piece of quality polymer clay, like Sculpey Premo or Fimo Professional, creating a gentle indent for your thumb. Bake according to the package directions. For a truly professional, silky feel, finish by wet-sanding with progressively finer grits of sandpaper (from 400 up to 2000).
The Workspace Pitfall: The biggest mistake when creating a fidget for school or the office is making something that clicks, clacks, or squeaks. A truly effective tool should be silent. Its purpose is to help you self-regulate without distracting anyone else. Aim for smooth, quiet movements and materials that absorb sound rather than create it.
Can a fidget tool look elegant and professional?
Absolutely. Think beyond plastic and primary colors. For a discreet desk accessory, consider making a small Möbius strip or a set of interlocking rings from anodized aluminum—you can find kits from chainmaille suppliers like WeaveGotMaille. The cool, smooth metal and repetitive motion are incredibly satisfying. Alternatively, a small, hand-carved wooden object sanded to a buttery finish can feel both organic and sophisticated.
Did you know? The Greek “komboloi,” or worry beads, are a traditional fidget tool that has nothing to do with religion. They are simply used for relaxation, enjoyment, and passing the time, with the rhythmic click and flow of the beads providing sensory comfort.

When crafting a weighted lap pad or a squeeze ball, the filling makes all the difference. Your choice affects the weight, feel, and even the sound.
- Plastic Poly-Pellets: These give a smooth, consistent feel and are completely washable, making them ideal for fidgets used by multiple people or those that might get dirty.
- Natural Fillers: Uncooked rice or flaxseed provides a more organic texture and a gentle rustling sound. Plus, they can be briefly microwaved for a warm, soothing sensory experience.
Look around your home workshop or junk drawer before you buy a single thing. Some of the best fidgets are born from repurposed items. A short, clean piece of bike chain connected into a loop, a few large nuts threaded onto a leather cord, or a keychain ring with several different textured keys can provide endless, silent tactile feedback without costing a penny.


