Why Are My Cucumber Leaves Yellow? A Gardener’s Detective Guide
We’ve all been there. You’re checking on your cucumber plants, feeling pretty good about things, and then you see it: a single, yellowing leaf. Your stomach drops a little. Is it a disease? A bug? Did I do something wrong? It’s a super common sight, and honestly, it can be really discouraging. But a yellow leaf isn’t a death sentence for your plant. Think of it as a signal.
In this article
Your plant is trying to tell you something, and our job as gardeners is to figure out what it’s saying. The biggest mistake you can make is jumping to the first conclusion you find online or hear from a neighbor. Wasting time and money spraying for a fungus when the real problem is in the soil can let the actual issue get much worse. So, let’s stop guessing and start acting like a plant detective.
What’s Actually Happening in a Yellow Leaf?
Before we can fix anything, it helps to know what’s going on. That yellow color has a fancy name: chlorosis. It just means the leaf isn’t making enough chlorophyll, which is the green pigment that lets plants turn sunlight into food. When the green fades, the leaf’s natural yellow pigments (which were there all along) finally get to show themselves. A plant without enough chlorophyll is basically a plant that’s starving.
So, why would it stop making chlorophyll? It almost always boils down to one of three things: a nutrient shortage, environmental stress (like water or soil problems), or an attack from pests or disease. Understanding this helps you see the bigger picture. For instance, nutrients like nitrogen and magnesium are literal building blocks of the chlorophyll molecule. No nitrogen, no green. Simple as that. Other nutrients, like iron, are like the factory workers that help assemble the chlorophyll. No iron, the assembly line grinds to a halt.
My Proven Diagnostic Process: Finding the Real Problem
When I find a yellowing plant, I don’t just start spraying things. I follow a clear process to narrow down the suspects. Let me tell you, this has saved me so much frustration. I once spent weeks convinced my cukes had a nitrogen deficiency. I kept feeding them, but they just got worse. Turns out, it was Fusarium wilt, a nasty soil fungus, clogging the plant’s ‘veins’ internally. No amount of fertilizer could have fixed that. I learned the hard way: if your first fix doesn’t work, you need to dig deeper.
Step 1: Where Is the Yellowing Happening?
The location of the yellow leaves is your single biggest clue. It tells you about how nutrients move around inside the plant.
- Yellowing on Older, Lower Leaves: This almost always points to a ‘mobile’ nutrient deficiency. The plant is smart—it will pull nutrients like Nitrogen, Phosphorus, Potassium, or Magnesium from its old, less important leaves and send them to the new, vital growth at the top. It’s sacrificing the old for the sake of the new.
- Yellowing on Newer, Upper Leaves: This suggests a problem with an ‘immobile’ nutrient. Things like Iron, Sulfur, or Calcium get locked into the plant’s structure. The plant can’t move them from old leaves to new ones. So, if there’s a shortage, the new growth is the first to show it.
See? Just by looking at the top versus the bottom of the plant, you’ve already cut your list of potential problems in half.
Step 2: What Does the Yellowing Pattern Look Like?
Next, get up close and personal with a single leaf. The pattern is another huge clue.
- Uniform Pale Yellow: The whole leaf, veins and all, is turning a sad, pale yellow. If this is happening on the lower leaves, it’s a classic sign of a nitrogen deficiency.
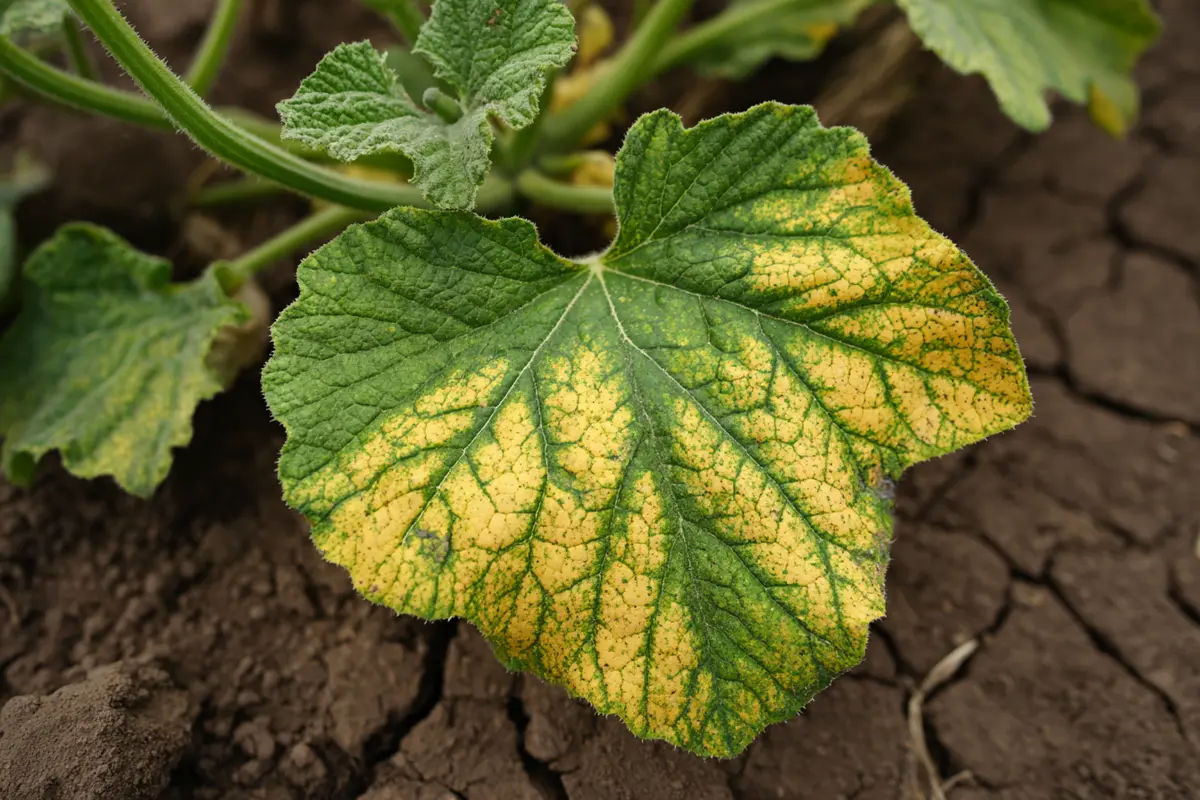
- Yellow Between Green Veins: This creates a really cool, but worrying, striped or mottled look. If it’s on the lower, older leaves, my first guess is always a magnesium deficiency. If you see this pattern on the upper, new leaves, it’s almost certainly an iron deficiency.
- Yellow Edges/Margins: The outer rim of the leaf turns yellow and might even look a little burnt, while the center stays green. On lower leaves, this screams potassium deficiency.
- Spots, Blotches, or Lesions: If the yellowing isn’t a uniform pattern but shows up as distinct spots or angular shapes, you’re probably not dealing with a nutrient issue. It’s time to suspect a disease.
Step 3: Get Your Hands Dirty—Check the Soil and Roots
A plant is only as healthy as its roots. Before you even think about fertilizer, check the soil. Stick your finger a couple of inches down near the base of the plant.
Is it soggy? Overwatering is probably the #1 plant killer for beginners. Soaked soil has no oxygen, and roots need oxygen to function and absorb nutrients. The plant can be swimming in nutrients, but if the roots are drowning, it will starve and its leaves will turn yellow.
Or is it bone dry? Under-watering causes the plant to ditch its lower leaves to conserve water. They’ll turn yellow and drop right off. The key is consistent, deep watering, not a daily shallow sprinkle.
Step 4: Look for Unwanted Guests (Pests & Diseases)
If the clues don’t point to nutrients or water, it’s time to inspect for invaders. A small magnifying glass is a huge help here. ALWAYS check the undersides of the leaves; that’s where the bad guys love to hide.
- Pests: Look for the fine webbing of spider mites (they love hot, dry weather), clusters of tiny pear-shaped aphids on new growth, or the tell-tale chewing damage of cucumber beetles. A heads up on cucumber beetles: they spread a deadly disease called bacterial wilt, which can make an entire vine wilt and die almost overnight.
- Diseases: Look for specific patterns. Downy Mildew creates angular yellow spots on top of the leaves with a purplish fuzz underneath. Powdery Mildew is easy—it looks like someone dusted your leaves with flour. If you see a wilting vine that doesn’t get better with water, cut the stem near the soil. A brown ring inside is a sign of Fusarium Wilt, a soil disease with no cure.
The Gardener’s Action Plan: How to Fix It
Okay, you’ve played detective and have a prime suspect. Here’s how to take action.
For Nutrient Problems: Feed Your Plants Right
First off, the best money you will ever spend in your garden is on a proper soil test. A cheap DIY kit from a hardware store will cost you maybe $15, but it’s not super accurate. For the real scoop, send a sample to your local university extension service. It usually costs between $20 and $50 and gives you a precise roadmap for what your soil actually needs. It takes all the guesswork out of the equation.
But for a quick fix based on your observations:
- For Nitrogen (uniform yellow on lower leaves): A liquid feed with fish emulsion will green things up fast. For a long-term fix, amend your soil with good compost before planting.
- For Magnesium (yellow between veins on lower leaves): The classic trick is an Epsom salt spray. Mix one tablespoon of Epsom salts in a gallon of water and spray the leaves. You should see a noticeable improvement in just 2-3 days! But remember, this is a band-aid; you still need to address the long-term soil health.
- For Iron (yellow between veins on new leaves): This is usually a pH problem. Cucumbers like soil pH between 6.0 and 7.0. If your soil is too alkaline, the iron gets locked up. You can use a foliar spray with chelated iron for a quick green-up while you work on lowering the soil pH with elemental sulfur or acidic compost.
- For Potassium (yellow edges on lower leaves): A liquid kelp or seaweed fertilizer is fantastic for a quick boost. Long-term, amend your soil with greensand.
For Pest & Disease Issues: Your Go-To Toolkit
I believe in using the least toxic controls first. Here’s a simple, effective kit that will handle 90% of the problems you’ll face. You can assemble the whole thing for around $40.
My Beginner’s Pest & Disease Kit:
- A 1-gallon pump sprayer (about $15-$20 at any home improvement store).
- A bottle of 100% Cold-Pressed Neem Oil (around $10-$15 online or at a garden center).
- A bottle of pure Castile soap, like Dr. Bronner’s ($5, and it will last forever).
With this, you can make a few key remedies:
- Simple Insecticidal Soap: For aphids and spider mites. Mix 1 tablespoon of castile soap into a gallon of water. Oh, and by the way, don’t use regular dish soap! Most modern dish soaps are harsh degreasers that can strip the protective waxy coating right off your plant’s leaves, causing more harm than good.
- The All-Purpose Neem Oil Spray: This is my workhorse. It messes with pests and fungi. Mix 2 tablespoons of neem oil and 1 teaspoon of castile soap (this helps the oil and water mix) into a gallon of water. Spray everything, especially the undersides of leaves.
- Effective Powdery Mildew Spray: While a milk spray (1 part milk to 9 parts water) can work, I prefer something a bit stronger. Get some Potassium Bicarbonate (you can find it online or at brewing supply shops). It’s an OMRI-listed organic fungicide that works wonders. Mix about 2 teaspoons per gallon of water with a little soap.
A Quick Word of Warning: For the really bad diseases like Fusarium Wilt or Bacterial Wilt, there is no spray that will save an infected plant. You need to pull it out immediately, bag it for the trash (don’t compost it!), and make a note not to plant cucumbers or squash in that same spot for at least three years. This is called crop rotation, and it’s non-negotiable for preventing soil diseases.
The Single Most Helpful Thing You Can Do Today
Feeling overwhelmed? I get it. If you only have the time and energy to do one thing, do this: add a 3-inch layer of straw or shredded leaf mulch around the base of your plants. Seriously. It helps maintain consistent soil moisture, stops soil-borne diseases from splashing up onto the leaves, and smothers weeds. It’s ten minutes of work for a whole season of benefits.
At the end of the day, being a good gardener is all about learning to listen. Yellowing leaves are just your plants’ way of talking. Once you learn the language—by checking the location, the pattern, the soil, and looking for pests—you can stop worrying and start solving problems like a pro.
Inspirational Gallery
Wondering if your watering habits are the real culprit?
It’s a frequent issue. Cucumbers demand consistent moisture, but soggy feet are a death sentence. Instead of a surface sprinkle daily, water deeply at the base of the plant 2-3 times a week. This encourages strong, deep roots. A soaker hose is your best friend here; it delivers water directly to the soil, keeping the leaves dry and less susceptible to the fungal diseases that thrive on damp foliage.
The Epsom Salt Trick: If your detective work points to a magnesium deficiency (often yellowing between the veins of older, lower leaves), a simple foliar spray can provide a quick fix. Mix one tablespoon of Epsom salt into a gallon of water and spray it directly onto the leaves in the early morning. The plant can absorb the magnesium directly, often showing signs of improvement within a few days.
A single cucumber plant can transpire more than a gallon of water on a hot, sunny day.
This incredible thirst means that even a brief period of drought can stress the plant enough to trigger chlorosis. The plant sacrifices older leaves to conserve water for new growth and fruit production. This is why consistent watering isn’t just a suggestion—it’s essential for maintaining lush, green foliage.
Before you even plant, you can stack the deck in your favor by choosing the right variety. Many modern cucumber cultivars are bred for disease resistance. Check the seed packet or plant tag for codes like these:
- PM – Resistance to Powdery Mildew
- DM – Resistance to Downy Mildew
- CMV – Resistance to Cucumber Mosaic Virus
Varieties like ‘Diva’, ‘Corinto’, or ‘Marketmore 76’ are renowned for their vigor and ability to shrug off common cucumber problems.
Don’t overlook the power of neighbors. Companion planting can create a healthier micro-environment for your cucumbers. Planting fragrant marigolds nearby can help deter nematodes in the soil, while borage is known to attract beneficial predatory insects that feast on pests like aphids. Nasturtiums can act as a ‘trap crop’, luring aphids away from your cucumbers entirely.
- Prevents nutrient deficiencies by improving absorption.
- Boosts drainage in heavy clay soil.
- Increases water retention in sandy soils.
The secret to all these benefits? A simple 1-inch top-dressing of well-rotted compost around the base of your plants mid-season. It’s the single best thing you can do for soil health.
A common saying among master gardeners holds true:
For long-term health: Use an organic liquid fertilizer like Neptune’s Harvest Fish & Seaweed Fertilizer. It provides a slow, steady release of nutrients and feeds the soil’s microbial life, building a resilient foundation.
For an emergency rescue: A water-soluble synthetic fertilizer can provide a rapid dose of nutrients directly to a severely deficient plant. Think of it as plant CPR—effective in a crisis, but not a substitute for a healthy lifestyle.
One of the easiest mistakes to make is ‘killing with kindness.’ If you’ve been applying fertilizer and the yellowing gets worse, you might be dealing with fertilizer burn. An excess of nitrogen salts can damage roots, preventing them from absorbing water and nutrients, ironically causing the same symptoms as a deficiency. If you suspect this, flush the soil thoroughly with plain water to wash away the excess salts.
If spider mites are your problem—look for fine webbing and a stippled, yellowed appearance on leaves—a simple DIY spray can help. Combine one teaspoon of pure, cold-pressed neem oil and a half-teaspoon of a mild liquid soap (like Dr. Bronner’s) in a quart of warm water. Shake well and spray all leaf surfaces, including the undersides, in the evening to avoid harming pollinators.