The Skillet Pancake You’ll Actually Be Proud Of
Honestly, few things feel as impressive as pulling a perfect, glistening, caramelized fruit pancake out of the oven. It’s one of those dishes that looks like it took hours of pastry school to master, but is secretly pretty forgiving. Think of it as a rustic cousin to the classic Tarte Tatin, but way less fussy.
In this article
Over the years in professional kitchens, I’ve seen all the ways this can go wrong. People burn the sugar, use soggy fruit, or hesitate at the last second and mess up the big flip. But I’ve also taught plenty of newcomers how to nail it, and this guide is basically everything I’d tell them. We’re not just following a recipe; we’re learning the why behind the technique so you can make it perfectly every time.
First Things First: Your Gear and Groceries
You can’t build a great dish with iffy ingredients or the wrong tools. For this pancake, a couple of key choices make all the difference between a masterpiece and a mushy mess.
The Star Player: The Cast-Iron Skillet
Let’s be clear: a cast-iron skillet is pretty much non-negotiable here. A regular non-stick pan just won’t give you the same results. Cast iron is a beast—it holds onto heat like nothing else. This is crucial for two reasons.
First, that steady, even heat is what melts your sugar into a perfect, uniform caramel without any scorching hot spots. Second, when you pour the cool batter in, the pan’s intense stored heat gives the bottom an immediate blast, setting it quickly so it doesn’t get soggy from the fruit. It’s the secret to that crisp, caramelized top (which is actually the bottom!).
A 10-inch skillet is the sweet spot for this recipe. But what if you have a different size? No problem. If you’re using a smaller 8-inch pan, you’ll probably have a little batter left over—just make a few regular pancakes with it. For a larger 12-inch skillet, you might want to increase the batter recipe by about 25% to ensure it’s not too thin. Your bake time might also vary by a few minutes, so just keep an eye on it.

Oh yeah, make sure your pan is well-seasoned. If you can slide a fried egg around in it without it sticking, you’re good to go. If not, the caramel will basically weld itself to the pan. A brand like Lodge is a fantastic, affordable workhorse you can find at most big-box stores or online for about $20 to $40, and it will last you a lifetime.
Let’s Talk Fruit: Fresh, Frozen, or Canned?
The ideal peach for this is one that’s ripe and fragrant but still firm. If it’s mushy, it’ll just turn into applesauce in the hot caramel. Freestone peaches are your best friend because the pit comes out cleanly, making them a breeze to slice. Yellow peaches give you that classic, robust flavor, while white peaches are a bit more delicate and floral.
Quick tip: To peel them easily, just drop them in boiling water for about 30-60 seconds, then immediately plunge them into an ice bath. The skins will slip right off.
But what if it’s the middle of winter and fresh peaches are a fortune? You’ve got options!
- Frozen Peaches: These work great! Just make sure you thaw them completely and—this is important—pat them very dry with paper towels to remove as much excess water as possible. Otherwise, you’ll water down your caramel.
- Canned Peaches: Yep, these work in a pinch, too. Choose peaches packed in juice, not heavy syrup. Drain them thoroughly and, just like with frozen, pat them very, very dry before using.
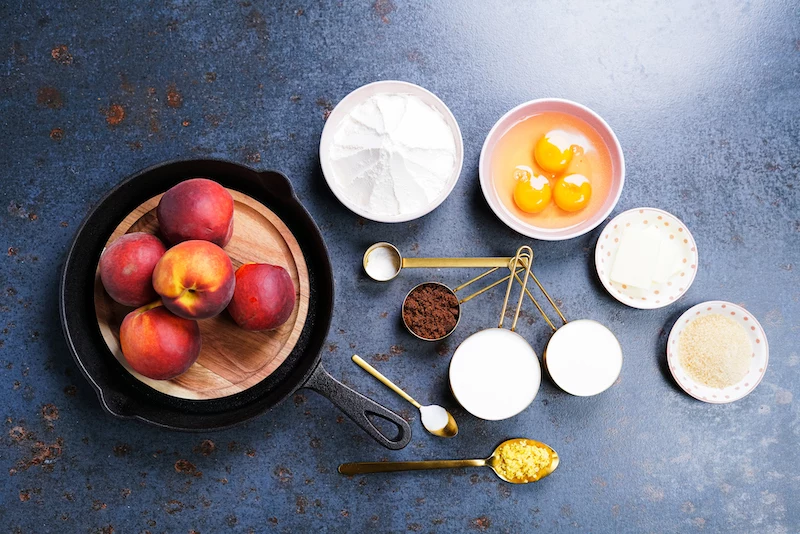
Your Simple Shopping List
Here’s a quick rundown so you can grab what you need.
Pantry Staples (you might already have these):
All-purpose flour, light brown sugar, baking powder, baking soda, salt, cinnamon, vanilla extract, and vegetable oil for seasoning your pan if needed.
Fresh Stuff to Buy:
Unsalted butter, large eggs, buttermilk, and your fruit of choice (about 4-5 medium peaches).
The Magic Trick: Nailing the Caramel
The caramel base is the soul of this pancake. Get this right, and you’re golden. To be frank, it can be intimidating the first time. I’ll never forget the time I burned a batch for a VIP brunch because I got distracted for a split second. I had to start over, sweating bullets. You only make that mistake once! So, stay focused.
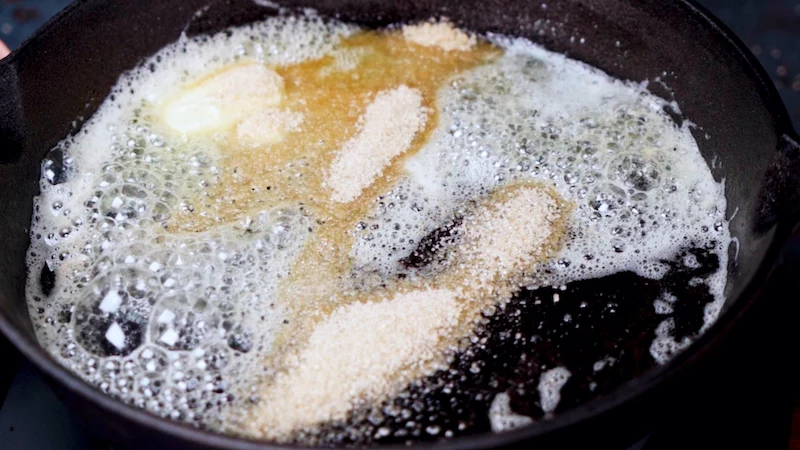
We use a simple method here. You melt butter first, then add the brown sugar. We’re using unsalted butter so we can control the salt level ourselves, and brown sugar because its molasses content adds a deeper flavor and extra moisture. The butterfat coats the sugar crystals, helping prevent them from clumping up.
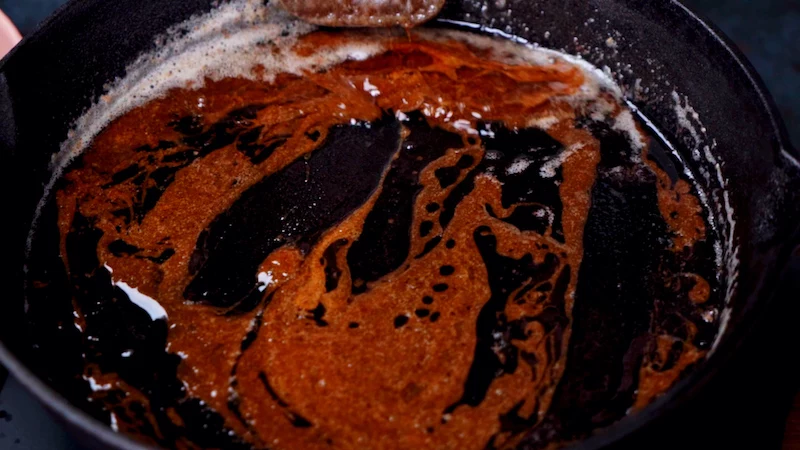
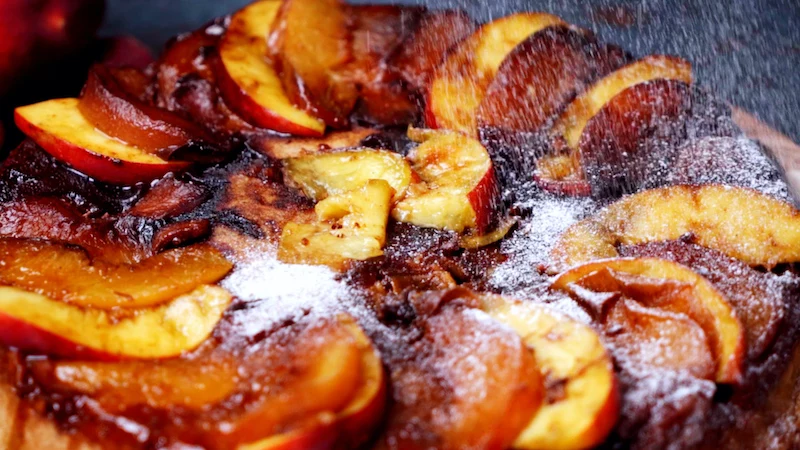
As it heats, swirl the pan gently and just watch. The color is your guide. It’ll go from a pale straw to a honey gold, and then it will deepen to the color of a shiny copper penny. That’s your signal! Pull it off the heat right then. The pan is still screaming hot and will continue cooking the sugar, so you have to act a moment before it looks perfect.
Caramel Emergency Room
What if it’s clumpy? This is crystallization. Your heat might be too high or you stirred it too much before it dissolved. You can try adding a tablespoon of water to save it, but honestly, it’s often better to cut your losses and start over. Make sure your pan was clean!
What if it burned? If it’s dark brown and smells bitter, it’s burnt. There is no fixing this. The bitter taste will ruin everything. Just pour it out (carefully!), clean the pan, and see it as a valuable lesson learned.
Putting It All Together: The Step-by-Step
Alright, let’s build this thing. It’s a process to be enjoyed, not rushed.
Yields: 6-8 servings
Prep time: About 20 minutes
Cook time: 25-30 minutes
The Ingredients
For the Caramel Base:
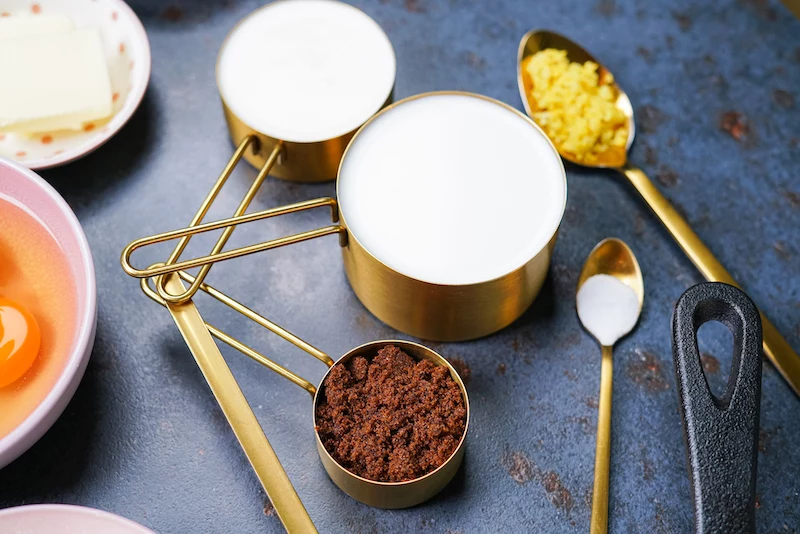
- 4 tablespoons (1/2 stick) unsalted butter
- 1/2 cup packed light brown sugar
- 4-5 medium peaches, peeled, pitted, and sliced 1/2-inch thick
For the Pancake Batter:
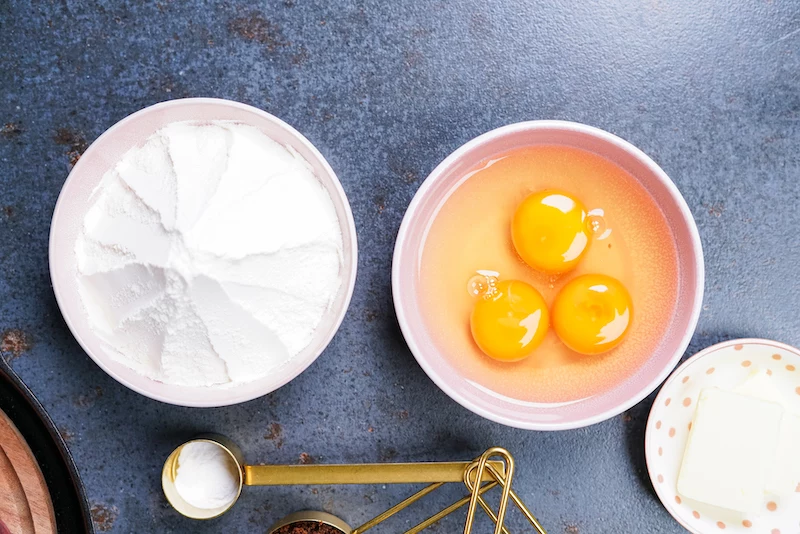
- 1 1/4 cups all-purpose flour
- 2 teaspoons baking powder
- 1/2 teaspoon baking soda
- 1/2 teaspoon fine sea salt
- 1/4 teaspoon ground cinnamon (optional, but so good)
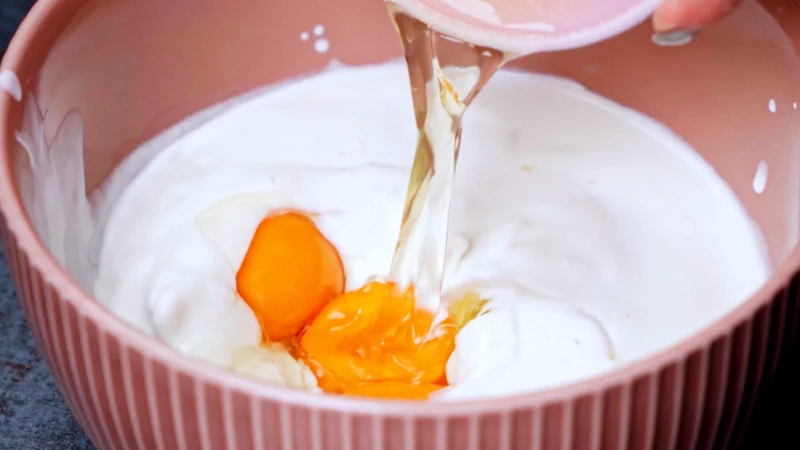
- 2 large eggs
- 1 cup buttermilk
- 2 tablespoons unsalted butter, melted and cooled a bit
- 1 teaspoon vanilla extract
Good to know: Don’t have buttermilk? No sweat. Just pour 1 tablespoon of lemon juice or white vinegar into a measuring cup, then add enough regular milk to reach the 1-cup line. Let it sit for 5 minutes. That slight curdling is exactly what you want—it’ll make the pancake tender and tangy.
The Method
1. Get Ready: First, preheat your oven to 400°F (200°C) with a rack in the middle. Get all your ingredients prepped and measured out. Seriously, having your mise en place ready is the key to a stress-free bake.
2. Make the Caramel: Melt the 4 tablespoons of butter in your 10-inch cast-iron skillet over medium heat. Sprinkle the brown sugar evenly over the top. Let it cook, swirling the pan every so often, for 3-5 minutes until it’s a bubbly sauce the color of a copper penny. Immediately pull it off the heat.
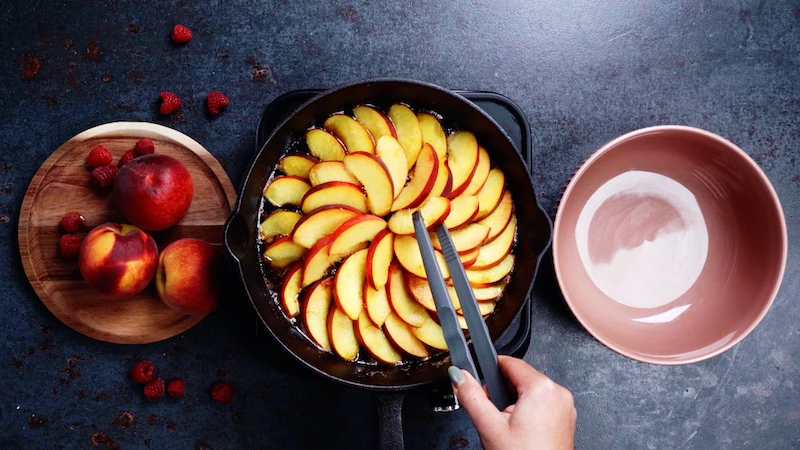
3. Arrange the Peaches: Working carefully (that caramel is HOT), arrange your peach slices in the skillet. I like to start from the outside and make a pretty spiral pattern. Pack them in snugly, as they’ll shrink a little while baking.
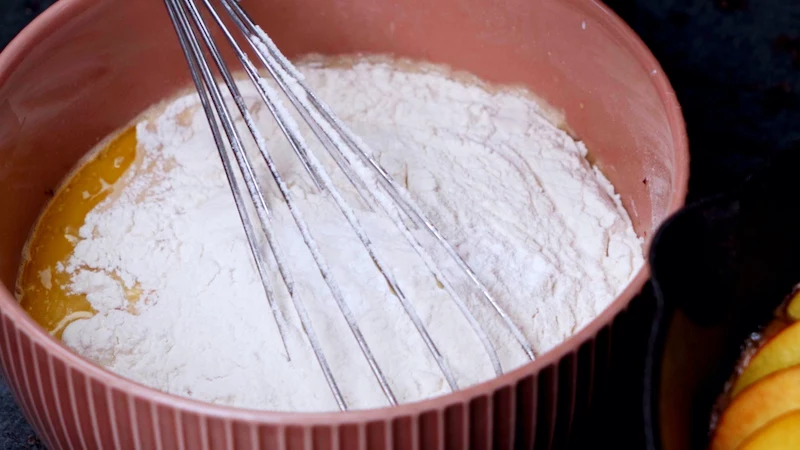
4. Mix the Batter: In one bowl, whisk together the flour, baking powder, baking soda, salt, and cinnamon. In another, bigger bowl, whisk the eggs until frothy, then mix in the buttermilk, melted butter, and vanilla. Pour the dry ingredients into the wet and fold them together with a spatula until just combined. A few lumps are totally fine! Overmixing is the #1 way to get a tough, rubbery pancake.
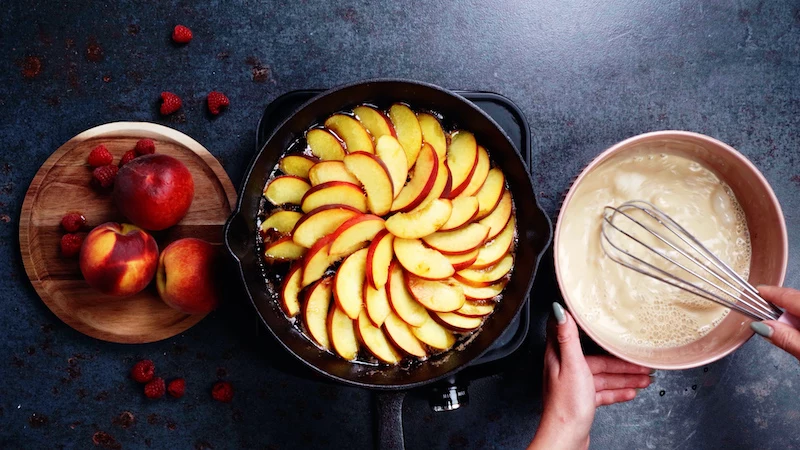
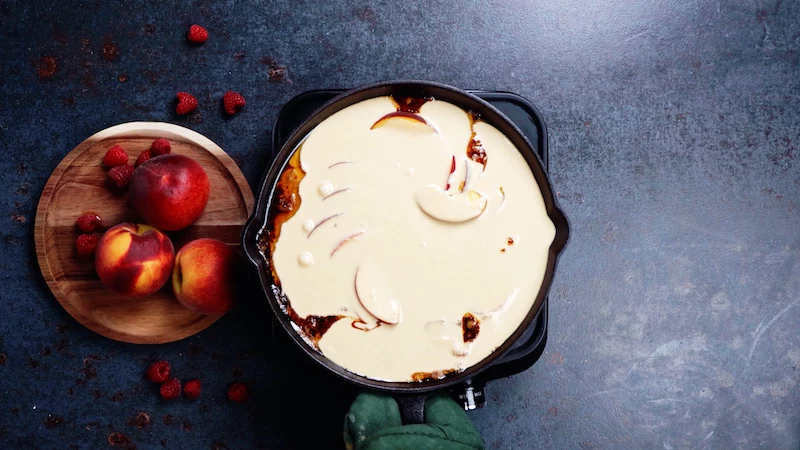
5. Bake It: Gently pour the batter over the peaches, spreading it to the edges. Pop the whole skillet into the oven and bake for 20-25 minutes. It’s done when it’s puffed and golden, and a toothpick stuck in the center comes out clean.
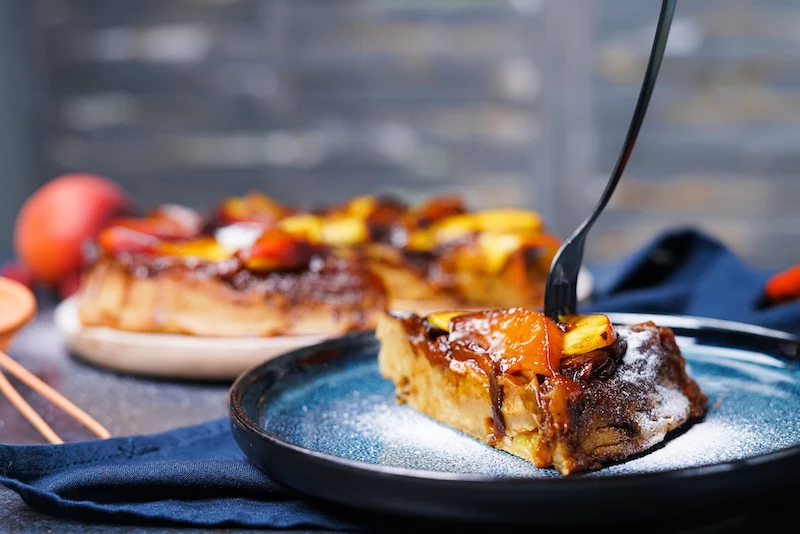
The Grand Finale: The Flip
This is the moment of truth. It’s all about confidence. Let the pan cool on a wire rack for about 5-10 minutes. You want it to be hot enough for the caramel to be liquid, but not so hot that it’s a safety hazard.
Heads up! Molten sugar causes some of the worst kitchen burns because it sticks to your skin. Be careful.
Place a large serving platter (bigger than the pan) over the skillet. Wearing good oven mitts, grab both the platter and the skillet handles firmly. Then, in one quick, smooth, and decisive motion, flip it over. Set the platter down and lift the skillet away. If a peach or two sticks to the pan, just use a spatula to nudge it back into place. No one will ever know.
Get Creative: Other Fruits to Try
Once you’ve got the peach version down, you can swap in other fruits. This recipe is a fantastic template.
For a classic fall version, try apples or pears. Go for firm baking apples like Honeycrisp or Granny Smith, or Bosc pears. Since they’re harder, it’s a good idea to cook them in the caramel on the stovetop for about 5-7 minutes to soften them up before you add the batter. A little nutmeg or allspice in the batter is beautiful with these.
Tart fruits like plums or apricots are also amazing. Their sourness cuts through the sweet caramel perfectly, and you don’t need to precook them. Just slice and arrange.
And for a gluten-free pancake? Use a high-quality 1-to-1 gluten-free flour blend that contains xanthan gum (brands like Bob’s Red Mill are great). Just be extra careful not to overmix, as GF batters can get gummy. The texture will be a little denser, more like a cake, but still delicious.
Serving and Storing
This pancake is at its absolute best served warm, fresh from the flip. The contrast of the warm, gooey fruit and the fluffy pancake is pure magic. A scoop of vanilla bean ice cream that melts into the caramel is, in my opinion, the only way to go. A dollop of tangy crème fraîche is a close second.
Leftovers can be refrigerated for a couple of days, but to be honest, it’s never quite the same. It’s a dish that’s meant to be enjoyed right in the moment. So gather some folks around and dig in.
Inspirational Gallery
Can this pancake handle a gluten-free makeover?
Absolutely. The secret lies in using a high-quality 1-to-1 gluten-free flour blend, like those from King Arthur Baking or Bob’s Red Mill, which already contain xanthan gum for structure. A pro tip: let the prepared GF batter rest for 15 minutes before pouring it into the skillet. This allows the alternative flours to fully hydrate, preventing any grittiness and ensuring a tender, delicate crumb.
The process of caramelization begins at around 320°F (160°C), where sugar molecules break down and reform into hundreds of new aromatic compounds.
This is where your cast-iron skillet, whether it’s a classic Lodge or a premium Le Creuset, proves its worth. Its ability to maintain a steady, even temperature is what allows this complex chemical dance to happen uniformly across the pan’s surface, creating that signature nutty, buttery flavor without the acrid taste of burnt spots.
White Sugar: Your go-to for a classic, clean caramel. It creates a beautiful amber syrup that lets the pure flavor of the fruit, be it peaches or pears, take center stage.
Light Brown Sugar: Contains molasses, which adds moisture and a slight butterscotch note. It caramelizes beautifully with apples or plums, creating a richer, cozier dessert.
Choose based on the flavor profile you’re aiming for—bright and fruity or deep and rich.
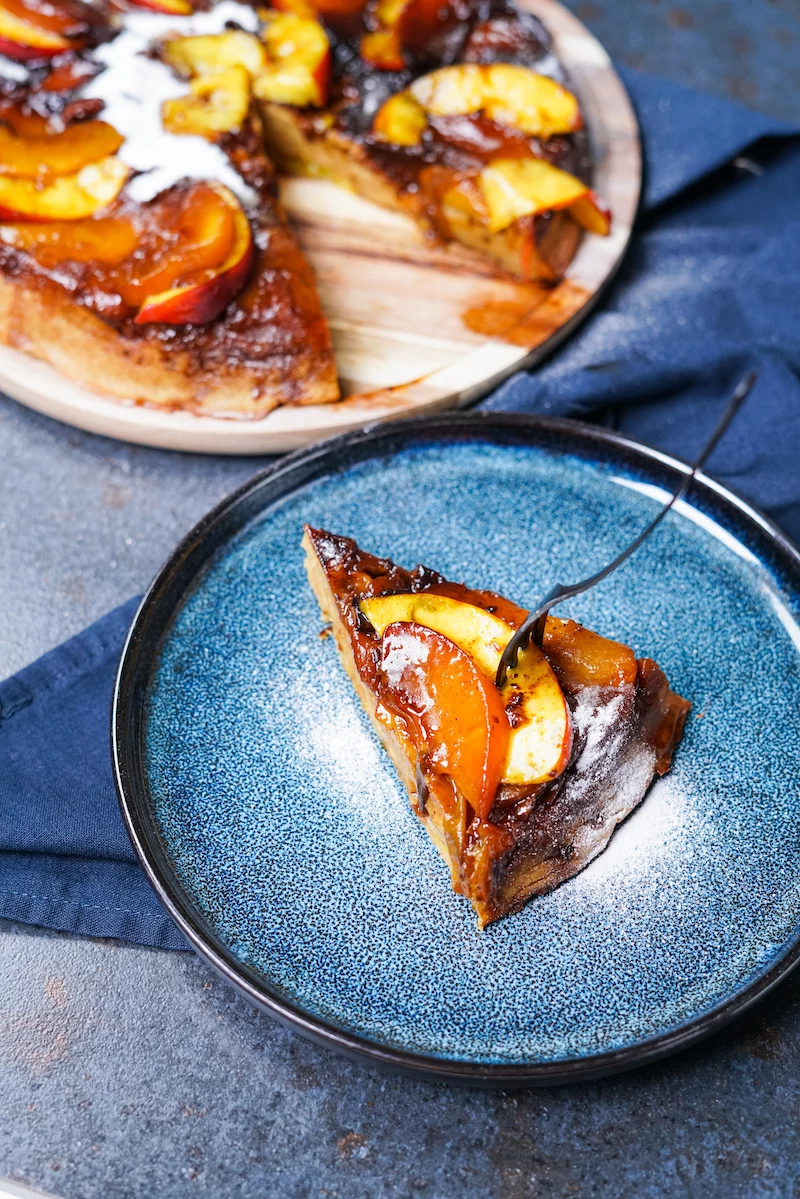
The Final Flourish: A simple dusting of powdered sugar is nice, but to truly elevate your creation, think contrast. A generous dollop of cold, tangy crème fraîche or full-fat Greek yogurt cuts through the sweetness beautifully. Alternatively, a scoop of high-quality vanilla bean ice cream melting over the warm cake is an undeniable classic. Don’t underestimate a sprinkle of flaky sea salt, either!
While peaches are perfect, don’t hesitate to experiment with other fruits as the seasons change. The key is to choose fruits that hold their shape when cooked.
- Apples: Varieties like Honeycrisp or Granny Smith offer a firm texture and a pleasant tartness.
- Pears: Bosc or Anjou pears are ideal, as they become tender without turning to mush.
- Pineapple: Canned or fresh rings create a stunning, retro Tarte Tatin-style look.
- Plums: Halved and pitted, they collapse into a jammy, gloriously deep purple topping.


