Forget Delivery: How to Make a Legitimately Good Pizza Bowl at Home
I’ve spent a good chunk of my life with my hands covered in flour. Seriously, I’ve wrestled with high-hydration sourdoughs, laminated more croissant dough than I can count, and shaped endless pizzas. I have a deep respect for the slow magic of fermentation. But let’s be real—I also live in the real world. Some nights, you walk in the door after a monster of a day, and the craving for pizza just sucker punches you. You don’t have three hours for dough to rise. You just need that hit of warm bread, savory sauce, and gooey, melted cheese. Now.
In this article
And that, my friend, is where the pizza bowl comes in. It’s a concept that sometimes gets a bad rap, maybe making you think of soggy microwave meals. But it absolutely doesn’t have to be that way. Over the years, I’ve dialed in a method for my own family that honors the soul of good pizza while being ridiculously fast. This isn’t traditional pizza, and we’re not going to pretend it is. It’s its own glorious thing. But when you do it right, it’s a game-changer.

So, what are we talking about here, time and money-wise? If you make the base from scratch, you’re looking at about 15 minutes from start to finish and a cost of maybe $4-$6 per bowl, depending on your toppings. It’s a seriously satisfying meal that’s faster and cheaper than delivery.
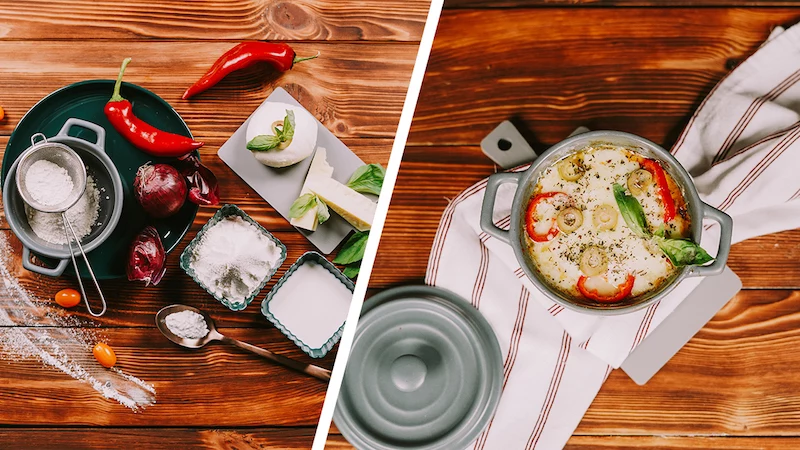
The Foundation: Don’t Call It a ‘Crust’
The base of a pizza bowl is the trickiest part to get right. With a real pizza, the crust gets blasted with intense, direct heat from a stone or steel, creating that perfect crispy-chewy texture. We can’t quite replicate that inside a bowl, so we need to adjust our expectations. Think of this base less as a “crust” and more as a savory, fluffy quick bread or biscuit that’s the perfect vehicle for all the good stuff.
The Super-Fast Biscuit Base
The quickest way to get this done is with a simple dough that uses a chemical leavener instead of yeast. While yeast takes hours to create air bubbles and complex flavor, baking powder works instantly when it hits liquid. It creates a light, almost cake-like texture that’s perfect for this application.
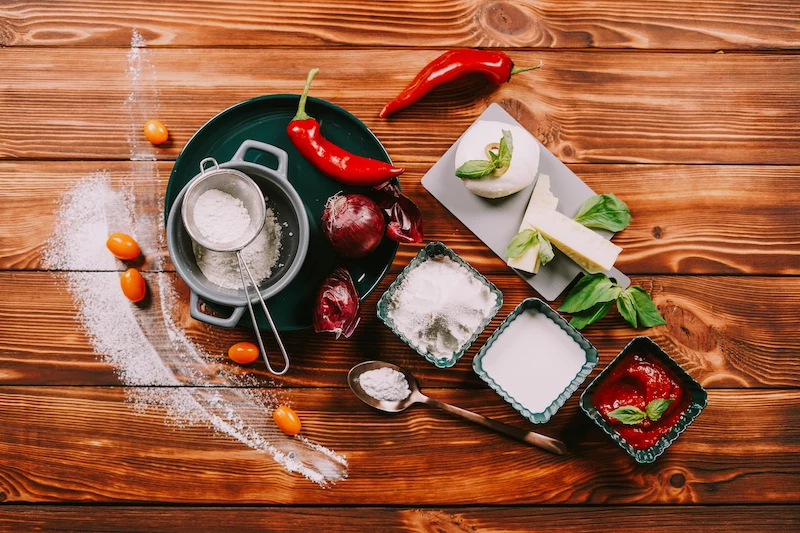
Here’s what you’ll need for one perfect, single-serving bowl:
- 50 grams All-Purpose Flour (that’s about 8 tablespoons—using a kitchen scale is way more accurate if you have one!)
- 1 tsp Baking Powder
- 1/4 tsp Salt
- 2 tbsp Good Olive Oil
- 8 tbsp (120ml) Whole Milk
The Method:
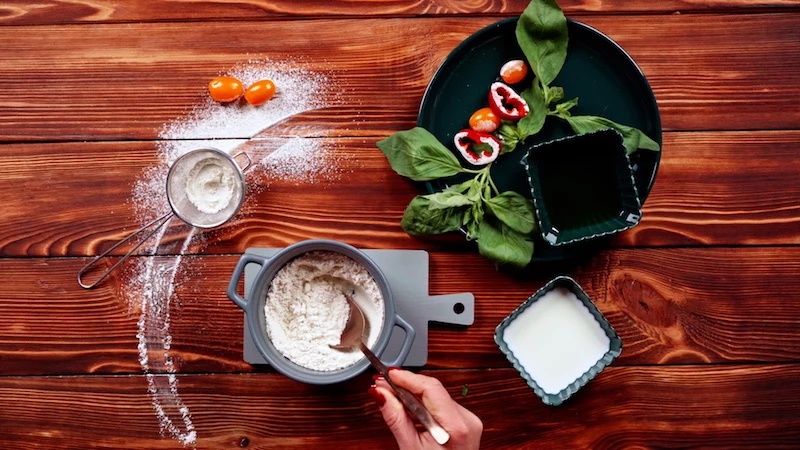
- Grab the right bowl. You need a microwave-safe ceramic bowl or a big ramekin, somewhere in the 16 to 20-ounce range. I find a wider, shallower soup bowl (about 6 inches across) works way better than a deep, narrow one. You can find these at Target or HomeGoods for around five bucks.
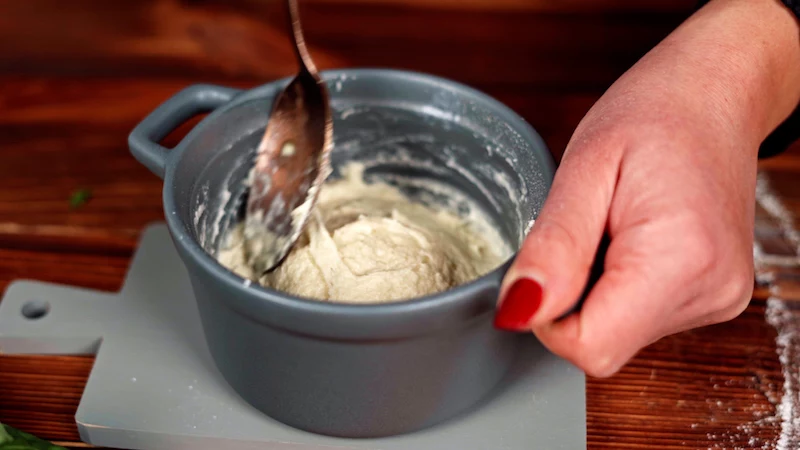
- Mix the dry stuff. In your bowl, whisk the flour, baking powder, and salt together. Don’t skip the whisking! It ensures the baking powder gets evenly distributed so you don’t get a bitter pocket.
- Add the wet stuff. Pour in the olive oil and milk. Use a fork and mix it just until it comes together. Seriously, do not overmix. If you do, you’ll develop too much gluten and end up with a tough, rubbery base. It should look like a thick, lumpy pancake batter. This should take you 30 seconds, max.
Quick Pro Tip: To avoid a soggy bottom, you can pre-cook the base just a little. Pop the mixed dough into the microwave by itself for 60-90 seconds. This sets the dough and creates a much better barrier against the sauce.
The Shortcut Aisle: For When You’re Really in a Hurry
Okay, let’s be honest. Sometimes even mixing a few ingredients feels like too much work. No judgment here! For a true 5-minute emergency meal, you can absolutely use canned biscuit dough. Just press one or two refrigerated biscuits into the bottom of your oiled bowl, and you’re ready for toppings. It’s a different vibe, for sure, but it gets the job done.
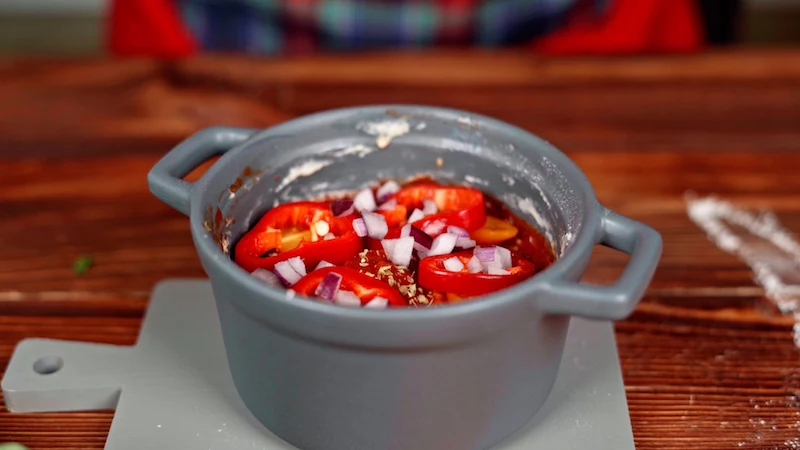
Building Your Bowl: Sauce, Cheese, and Toppings
Since the base is so simple, the quality of your sauce and cheese is what will really make this thing sing. This is where you don’t want to skimp.
A Sauce That Won’t Make Things Soggy
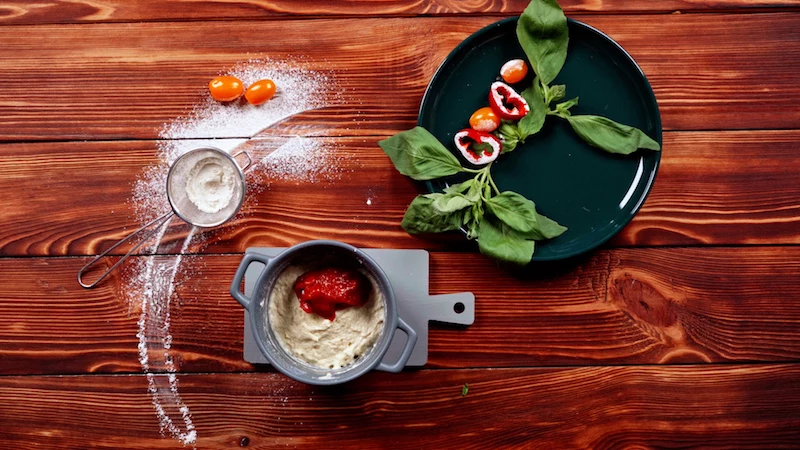
The number one enemy of a good pizza bowl is a watery sauce. It’ll turn your lovely biscuit base into a sad, soupy mess. The secret? Use tomato paste, not tomato sauce.
Just mix these in a small bowl:
- 2 tbsp Tomato Paste
- 2 tbsp Water
- 1/2 tsp Dried Oregano
- A pinch each of Garlic Powder and Salt
This creates a thick, intensely flavorful sauce that packs a punch without adding a bunch of water. It’s enough for one or two bowls.
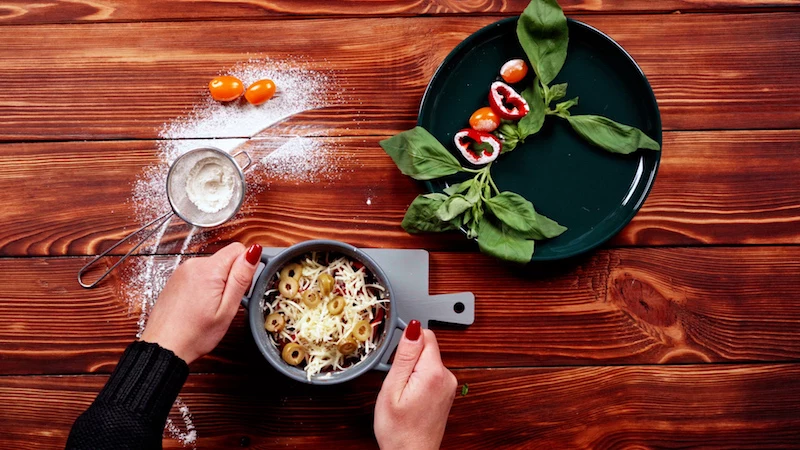
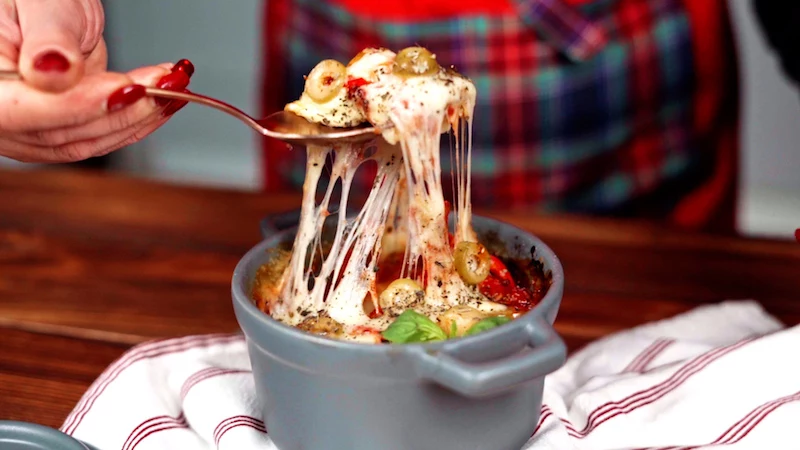
The Cheese Layering Trick
For that perfect cheese pull, you want low-moisture, whole-milk mozzarella. And a quick heads-up: shred your own if you can! The pre-shredded stuff in bags is coated with starches to prevent clumping, which can give you a gritty texture and a less-than-perfect melt. It takes an extra minute but makes a huge difference.
Here’s a little trick I learned in professional kitchens: to create a moisture barrier, put a thin layer of shredded cheese directly on the dough first. Then, spread your sauce over that cheese. It forms a seal that helps keep the base from getting wet.
Toppings: Prep is Everything
In the cooking world, there’s a concept called ‘mise en place,’ which just means “everything in its place.” For a pizza bowl, it means you prep all your toppings before you even mix the dough. This is the key to a smooth process.
And the most important step? You have to pre-cook most of your toppings! The short cooking time of a pizza bowl isn’t enough to cook raw veggies or meat. Trust me on pre-cooking mushrooms and onions. The first time I skipped it, I ended up with pizza soup, and it was a sad, sad dinner. Don’t be like me!
- Veggies like mushrooms, onions, and peppers: Sauté them in a pan for a few minutes to cook off their water and deepen their flavor.
- Raw meats like sausage or ground beef: Must be fully cooked before they go in the bowl. This is a non-negotiable food safety step.
- Cured meats like pepperoni: These are good to go. They’ll release their delicious, spicy oil as they cook.
How to Cook It: Speed vs. Quality
You’ve got options here, and the method you choose really changes the final product. There’s no single “best” way—it all depends on what you’re after.
The Microwave: All About Speed
This is your go-to for a super-fast meal. It works by essentially steaming the food from the inside out. It’ll cook the dough and melt the cheese beautifully in about 2.5 to 4 minutes, depending on your microwave’s power. The trade-off? The base will be soft and pale, not browned or crispy. It’s best for when you prioritize speed above all else.
The Oven: For Better Texture
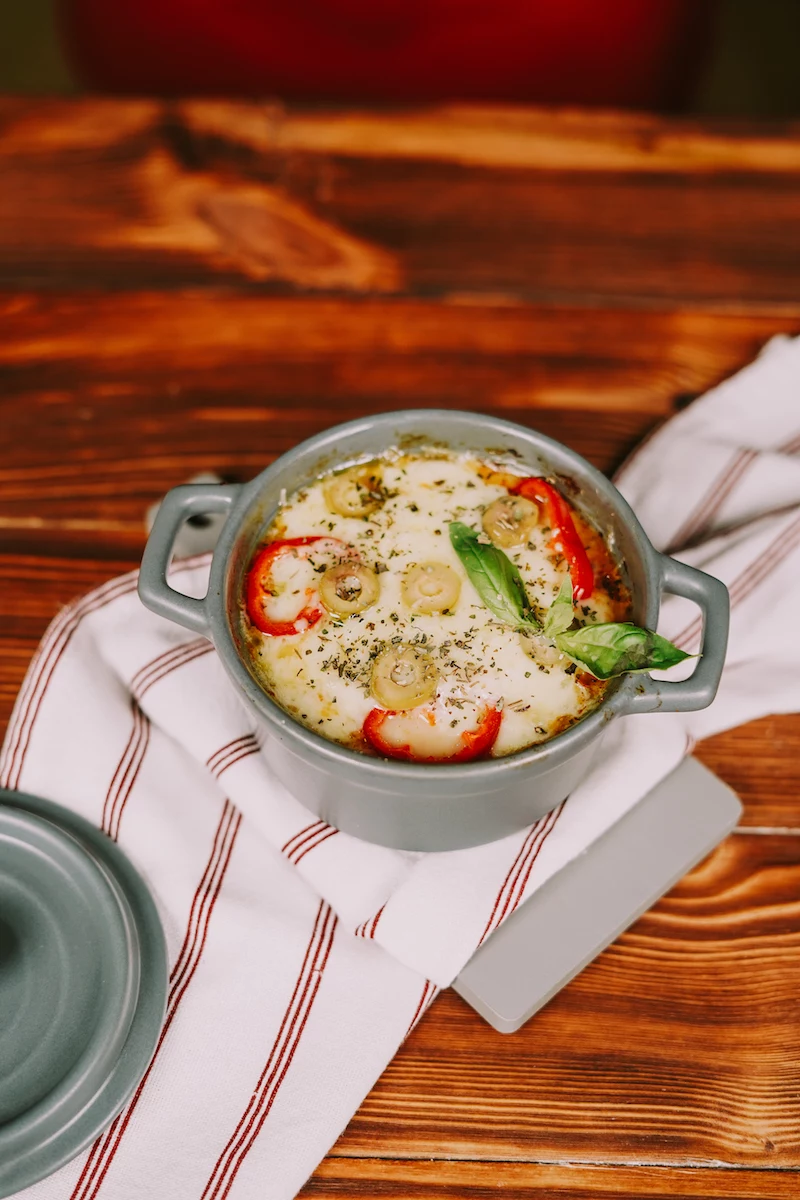
An oven gives you dry, even heat, which is what you need for browning. Assemble the bowl in an oven-safe dish, pop it in a 400°F (200°C) oven for about 15-20 minutes. The result is a much better texture—the edges of the base will get golden brown and the cheese will get bubbly and delicious. This is the best choice for quality if you have the extra time.
The Combo Trick: The Best of Both Worlds
Want it fast and a little crispy? Use both! Microwave the assembled bowl for 90 seconds to 2 minutes to cook the dough through quickly. Then, slide it under your oven’s broiler for 1-3 minutes until the cheese is browned and bubbly. Heads up! You have to watch the broiler like a hawk. It can go from perfect to burnt in under 30 seconds.
What Went Wrong? (And How to Fix It)
- Problem: My base is a watery, soggy mess.
The Fix: This is almost always a moisture issue. You either used a watery sauce (use the tomato paste trick!) or you didn’t pre-cook your watery veggies. Sauté those mushrooms first! - Problem: The dough is still raw in the middle.
The Fix: Your bowl was probably too full or too narrow. Heat couldn’t get to the center. Use a wider bowl, don’t overfill it, and try pre-cooking the base for a minute before adding toppings. - Problem: The cheese is a greasy, separated oil slick.
The Fix: You likely overcooked it. Pull the bowl from the heat as soon as the cheese is melted and bubbly. A little oil from pepperoni is great; a giant pool of grease is not.
A Few Final Tips (And a Safety Warning!)
What about dietary needs? Oh yeah, you can totally adapt this. For a gluten-free version, just swap the all-purpose flour for a good GF all-purpose blend that contains xanthan gum. For a vegan or dairy-free bowl, use a plant-based milk like oat or soy milk and your favorite brand of vegan shredded mozzarella. They melt great these days!
Now, for my one serious warning: BURN PREVENTION. That ceramic bowl gets screaming hot in either the microwave or the oven. And the steam trapped under the cheese is like a volcano. Please, please use real oven mitts, not a flimsy dish towel. Let the bowl rest for a solid 3-5 minutes before you even think about digging in. That rest time isn’t a suggestion; it’s a critical safety step to avoid a nasty burn.
At the end of the day, this is a killer kitchen hack. It’s not a replacement for a beautiful, wood-fired pizza, but it was never trying to be. It’s a delicious, fast, and comforting meal that satisfies a very specific craving. Appreciate it for what it is, and enjoy!
Inspirational Gallery
Once you’ve nailed that speedy base, the real fun begins. A pizza bowl is the perfect laboratory for flavor experiments. Think beyond the classic pepperoni and unlock some next-level combinations.
- The
Does the bowl I use actually matter?
Absolutely. The right vessel is key to avoiding a soggy bottom. A ceramic, oven-safe soup crock or a small ramekin (like those from Staub or Le Creuset) is ideal. Stoneware distributes heat evenly, helping to cook the doughy base all the way through while crisping the cheese on top. Avoid thin-walled bowls, which can create hot spots and lead to uneven cooking. For best results, lightly grease the inside of the crock with olive oil before adding your dough.


