Finally, A Vegan Tartlet Recipe That Doesn’t Crumble and Disappoint
I’ve made thousands of tartlets in professional kitchens, many for clients with some seriously specific dietary needs. And let me tell you, there’s a world of difference between a ‘classic’ tartlet and a truly great vegan one. Let’s be honest: too many homemade vegan pastries are just… sad. They shatter when you look at them, the filling is weirdly grainy, and they miss that rich, satisfying quality you’re craving.
In this article
This guide is here to fix that. We’re not doing a five-minute, no-bake ‘hack’ today. Instead, I’m going to walk you through the real-deal professional methods that guarantee a crisp, sturdy shell and a silky, stable filling. Every. Single. Time. We’ll get into the why behind the ingredients and the hands-on techniques that make all the difference. Forget what you think you know about vegan baking being too hard. With the right roadmap, it’s a total game-changer.
Heads up on timing: This isn’t a quick project. Plan for about 4 to 5 hours total, but most of that is hands-off chilling and baking time. The actual active work is probably only about an hour, which you can easily split up over two days.
Part 1: The Foundation – A Bulletproof Vegan Tart Shell
The success of any tartlet starts and ends with its base. A soggy or fragile crust will absolutely ruin even the most amazing filling. In traditional pastry, butter does all the heavy lifting. To get that same magic in a vegan recipe, we need to be smart about our swaps.
Many vegan recipes lean on simple press-in crusts made with oats or nuts. And while those are easy, they often lack that classic, short texture and can get soft in a hurry. For a truly pro result, we’re making a proper sweet pastry dough, often called a pâte sucrée.
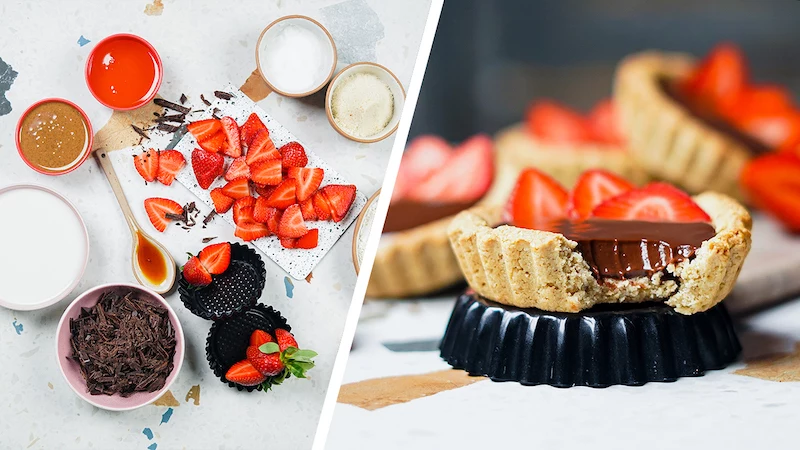
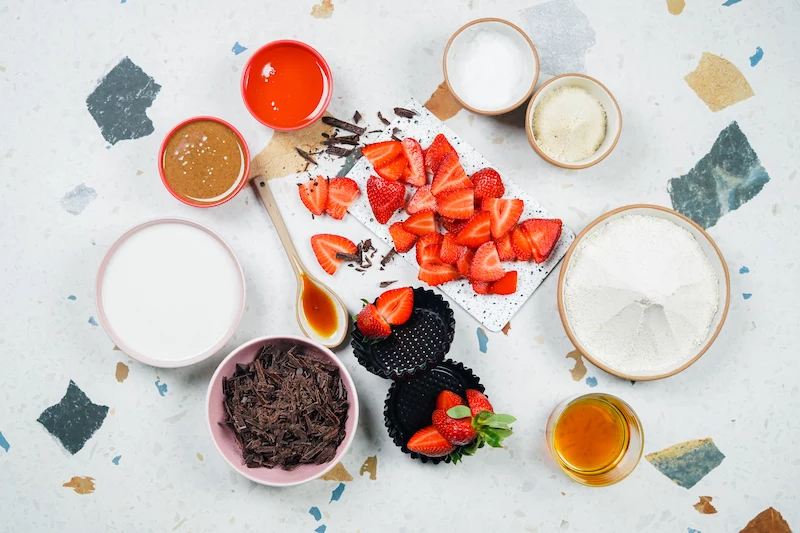
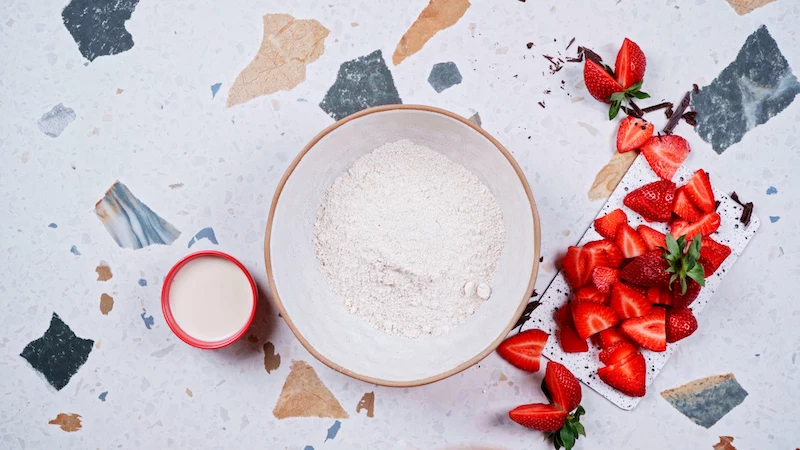
What You’ll Need (Makes 6 x 4-inch tartlets)
Using a digital kitchen scale is your best friend here. Baking is all about ratios, and measuring by weight is the only way to get it right every single time. But, I’ve included cup estimates for those who don’t have one yet!
- All-Purpose Flour: 200g (about 1 ⅔ cups)
- Finely Ground Almond Flour: 50g (about ½ cup)
- Powdered Sugar: 75g (about ⅔ cup)
- Salt: A generous pinch (about ¼ tsp)
- Cold Vegan Block Butter: 125g (about ½ cup + 1 tbsp), cut into small cubes
- Ice-Cold Plant Milk: 2-3 tbsp (I use unsweetened soy or oat milk)
Let’s Talk Ingredients: The ‘Why’ Behind the ‘What’
The Fat: Block Butter vs. Coconut Oil
Okay, this is probably the most critical choice you’ll make. You need a fat that’s solid and cold. This is not optional! Solid fat creates tiny pockets in the dough that steam up in the oven, giving you that light, flaky texture. Melted fat just coats the flour, resulting in a dense, greasy crust.
My strong recommendation is a high-quality, block-style vegan butter. Look for brands like Miyoko’s Kitchen or Flora Plant Butter, which you can usually find for $5 to $7. They’re designed to act like dairy butter. Refined coconut oil can work in a pinch, but make sure it’s the solid, flavorless kind, and it must be chilled solid. To be frank, the butter blocks give a much better flavor and texture.
The Flour: All-Purpose is Your Friend
While nut flours are tasty, a crust made only from them is super delicate and loves to break. We use a base of standard all-purpose flour for strength and structure. Then, we add a bit of finely ground almond flour—about 20% of the total—for fantastic flavor and a tender crumb.
Quick tip for gluten-free folks: This is tricky, as gluten provides essential structure. I’ve had decent (but not perfect) results using a high-quality 1-to-1 gluten-free baking blend that contains xanthan gum. The dough will be more fragile, so handle it with extra care and expect a slightly sandier texture.
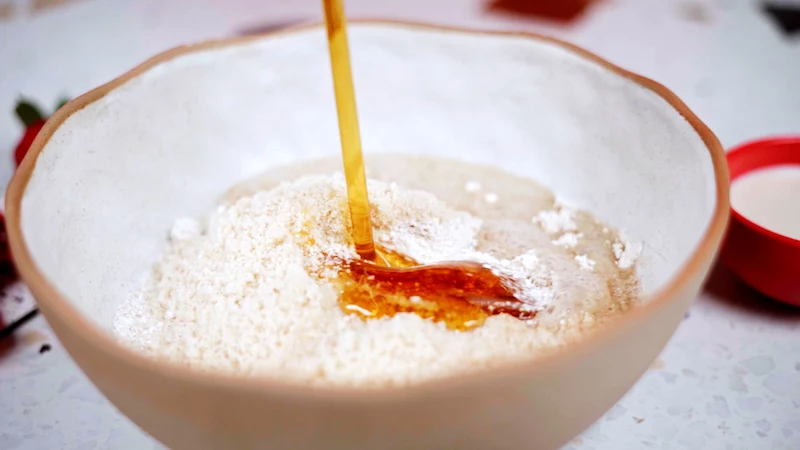
The Binder & Sweetener: Keep it Cold and Dry
We need a tiny bit of liquid to bring the dough together, and the key is ice-cold. This keeps the butter from melting. As for sweetener, liquid ones like maple syrup add too much moisture, which can make the crust steam instead of bake. That’s why we use powdered sugar. It dissolves beautifully and contains cornstarch, which helps create a more tender, melt-in-your-mouth bite.
The Pro Method: Building the Dough
Step 1: The Initial Mix
In a big bowl, whisk together your flours, powdered sugar, and salt. Add your cold, cubed vegan butter. Now, using just your fingertips (or a pastry blender if you have one), quickly work the butter into the flour until it looks like coarse breadcrumbs with some pea-sized chunks of butter still visible. Work fast! You don’t want the butter to melt.
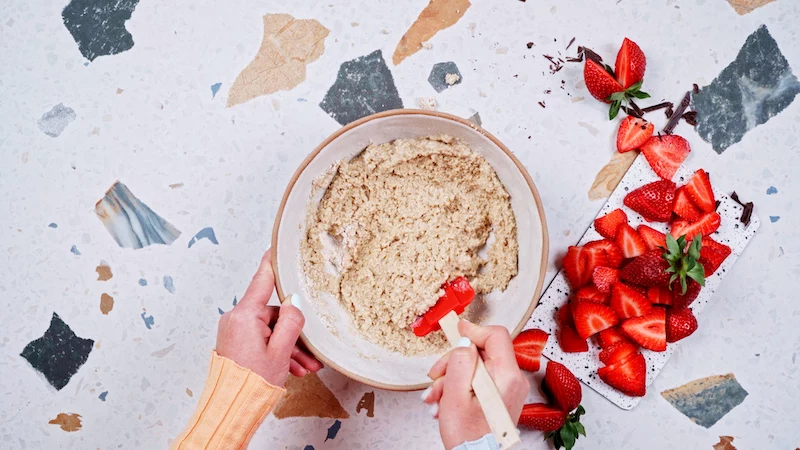
Step 2: The Fraisage (a fancy smear)
This classic pastry technique is the secret to a perfect texture. Turn the crumbly mixture onto a clean, cool counter. Using the heel of your hand, smear small portions of the dough away from you in a quick motion. This flattens the butter into thin sheets without overworking the gluten. Scrape it all back into a pile and repeat this just once or twice more. The dough will start looking more cohesive.
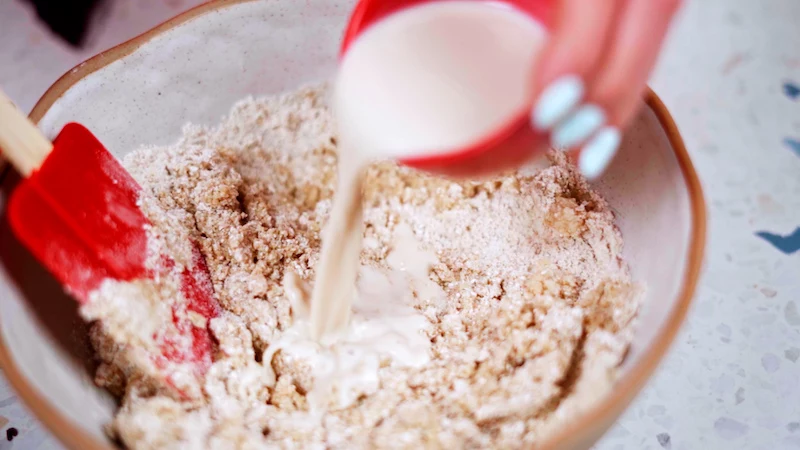
Step 3: Hydrate and Rest (This is Mandatory!)
Gather the dough into a rough ball and add one tablespoon of ice-cold plant milk. Gently work it in. If it’s still too crumbly, add another tablespoon. Stop as soon as it comes together into a single mass. Form it into a flat disc, wrap it tightly in plastic, and let it rest in the fridge for at least an hour, or even overnight. This step allows the flour to hydrate and, crucially, lets the fat get firm again.
Baking the Shells: The Art of Blind Baking
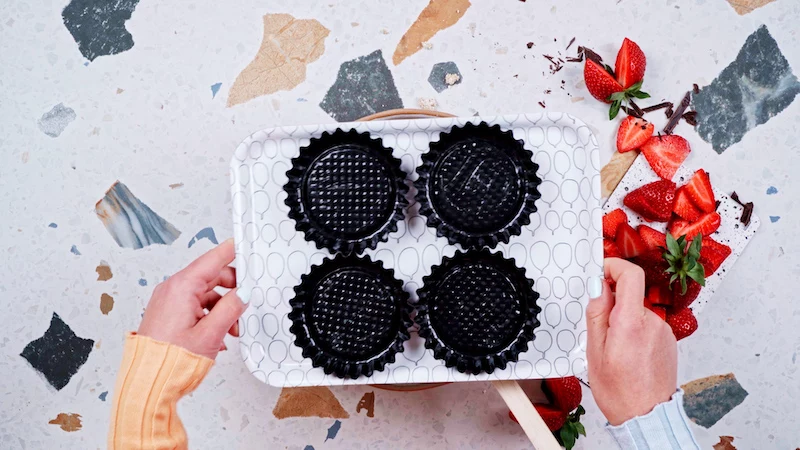
You have to bake these shells empty first—it’s called blind baking. If you don’t, the wet filling will turn the crust into a soggy mess. I highly recommend using 4-inch tartlet molds with removable bottoms, which you can find on Amazon or at kitchen supply stores for about $15-$25 for a set of six.
- Roll and Line: On a lightly floured surface, roll the chilled dough to about 1/8-inch (3mm) thick. Cut circles slightly larger than your molds and gently press them in. Trim the excess dough from the top with a sharp knife.
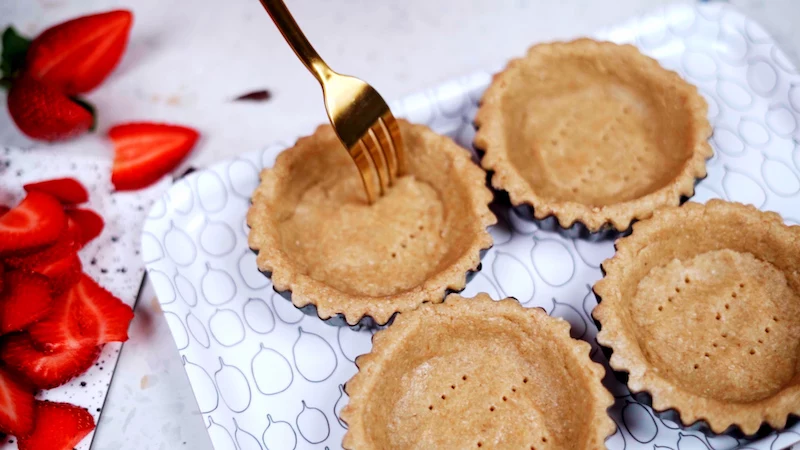
- Dock and Chill Again: Use a fork to poke a few holes in the bottom of each shell. This lets steam escape so the base doesn’t puff up. Pop the lined molds on a baking sheet and into the freezer for 15 minutes. This final chill is key to preventing slumping in the oven.
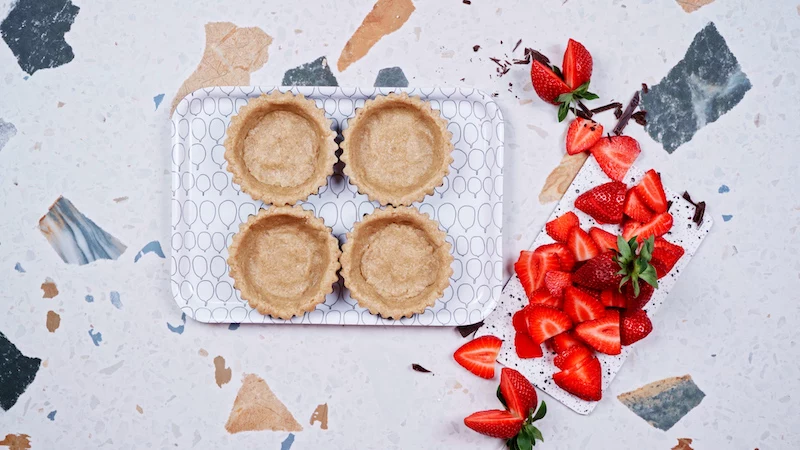
- Bake with Weights: Preheat your oven to 350°F (175°C). Line each chilled shell with a small piece of parchment paper and fill with pie weights, dried beans, or even uncooked rice. Bake for 15-18 minutes until the edges are just golden.
- Finish Baking: Carefully remove the parchment and weights. Return the shells to the oven for another 5-7 minutes, until the bottom is dry and pale gold. Let them cool completely.
Lesser-known trick: For a truly waterproof crust, you can seal the inside. While the shells are still warm, brush a super-thin layer of melted cocoa butter or melted dark chocolate inside. This creates a barrier that keeps the crust crisp for hours longer.
Part 2: The Filling – A Flawless Vegan Ganache
A great ganache is all about that smooth, silky, stable texture. It’s an emulsion—a stable mix of fat and water. The fat comes from the chocolate’s cocoa butter and our plant cream, and the water comes from the liquid in the cream. Getting them to play nice is all about temperature and patience.
Choose Your Ingredients Wisely
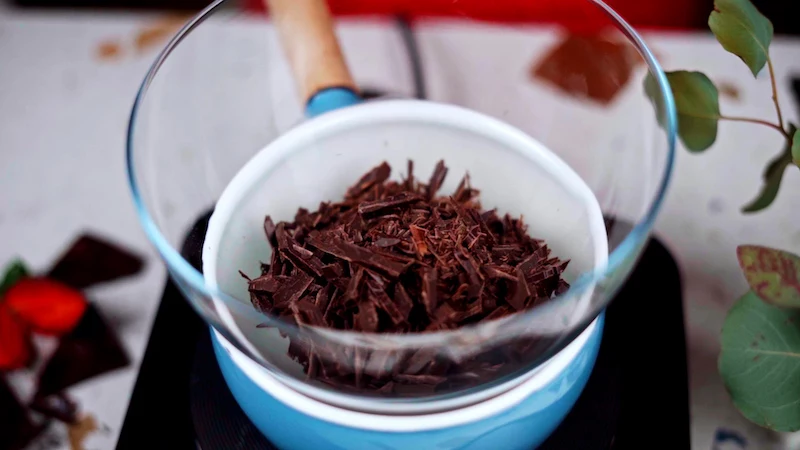
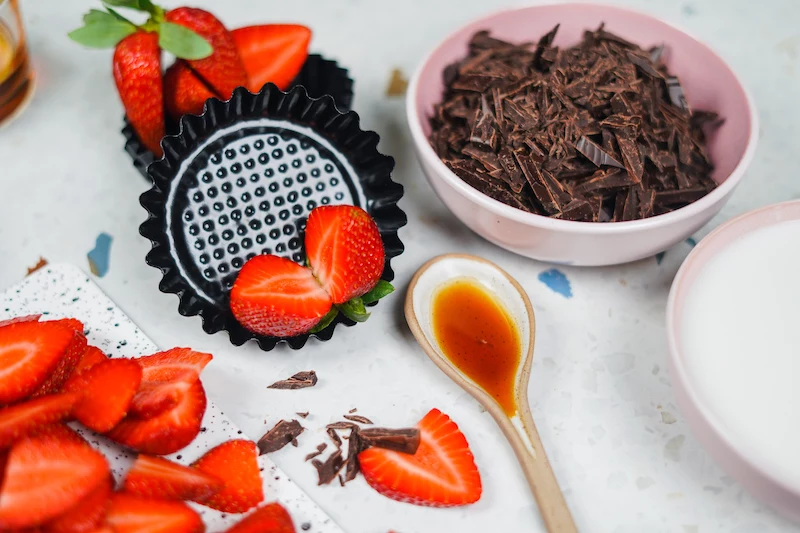
The Chocolate: Quality is Non-Negotiable
The chocolate is the star here, so use the good stuff. Look for a dark chocolate with 60% to 72% cacao—it has deep flavor and enough cocoa butter to set properly. Please, do not use chocolate chips! They have stabilizers that make them hold their shape, which can lead to a waxy ganache. For a splurge, I use something like Valrhona. For a more accessible but still excellent option, Guittard or Callebaut are fantastic and often available at stores like Whole Foods or online at places like King Arthur Baking.
The Liquid: Full-Fat Coconut Milk is King
To replace dairy cream, you need fat. Full-fat canned coconut milk is the best, most reliable option. Don’t even think about using the ‘light’ version or the stuff in a carton. It just won’t work. For the richest possible result, I chill a can overnight, then open it and scoop out only the thick, solid cream from the top, leaving the watery part behind. It makes an incredible difference.
A Quick Note on Sweeteners: The original recipe that inspired this guide mentioned honey. Just so we’re all clear, honey is not a vegan product. To sweeten our ganache, a tablespoon or two of maple syrup or agave nectar works perfectly. A splash of vanilla and a tiny pinch of salt will also make the chocolate flavor pop.
The Method: Temperature is Everything
Making ganache is precise, but not difficult. Rushing is the fastest way to ruin it.
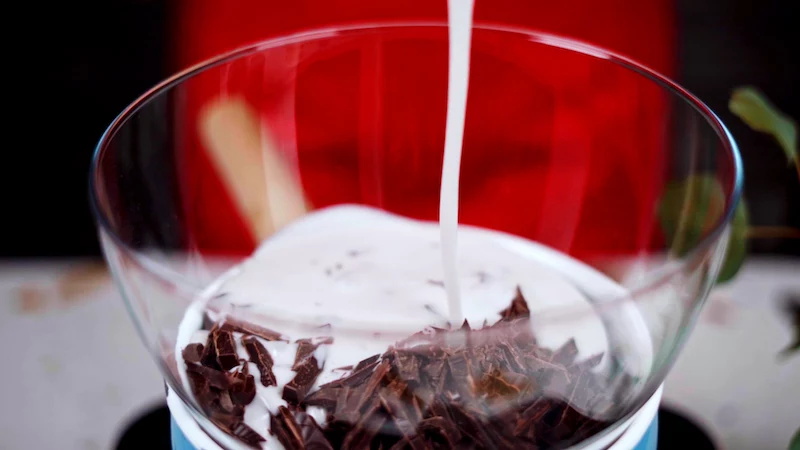
- Prep the Chocolate: Finely chop about 225g (8oz) of your quality dark chocolate and place it in a heatproof bowl.
- Heat the Liquid: In a small saucepan, gently heat 240ml (1 cup) of the thick coconut cream, 1-2 tablespoons of maple syrup, and a pinch of salt. Heat it only until it’s steaming and you see small bubbles around the edge. Do not boil it!
- The Five-Minute Wait: Pour the hot cream over the chocolate. And now for the most important step: DO NOT TOUCH IT. Let it sit for a full five minutes. This allows the heat to gently and evenly melt the chocolate.
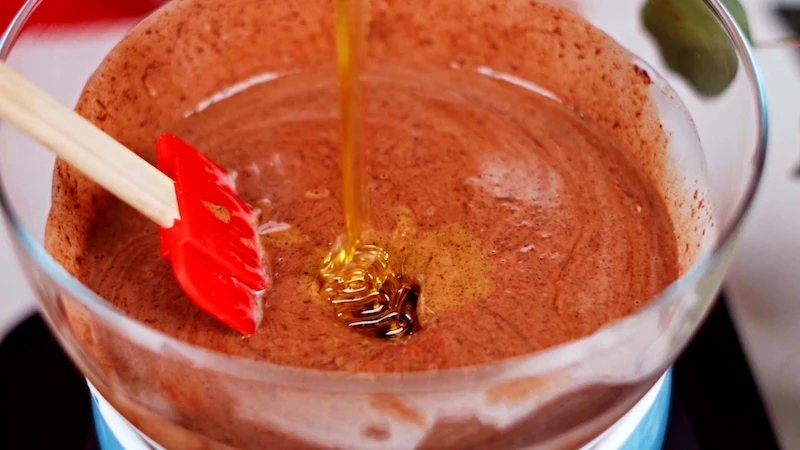
- The Gentle Stir: After five minutes, start stirring slowly from the very center of the bowl. At first, it might look broken or oily—don’t panic! Keep stirring in small circles, gradually widening them. You’ll see it transform into a glossy, smooth, unified liquid. That’s the emulsion forming! Stir in a teaspoon of vanilla extract at the end.
Common Disasters & How to Fix Them
- My ganache looks greasy/separated! It happens! Gently warm one tablespoon of plant milk until hot (not boiling) and whisk it vigorously into the broken ganache. This usually brings it right back together.
- My dough cracked while rolling! It was probably too cold. Let it sit at room temperature for 5-10 minutes to soften slightly before trying again.
- My tart shells slumped in the oven! They weren’t cold enough. That final 15-minute freeze is your best insurance policy against slumping. Don’t skip it!
- My chocolate seized into a grainy clump! Oh no. This happens if even a tiny drop of water or steam gets into your chocolate while melting. Unfortunately, there’s no saving it for ganache. This is a painful lesson every baker learns once. I once ruined a huge batch right before a big event… you never make that mistake twice.
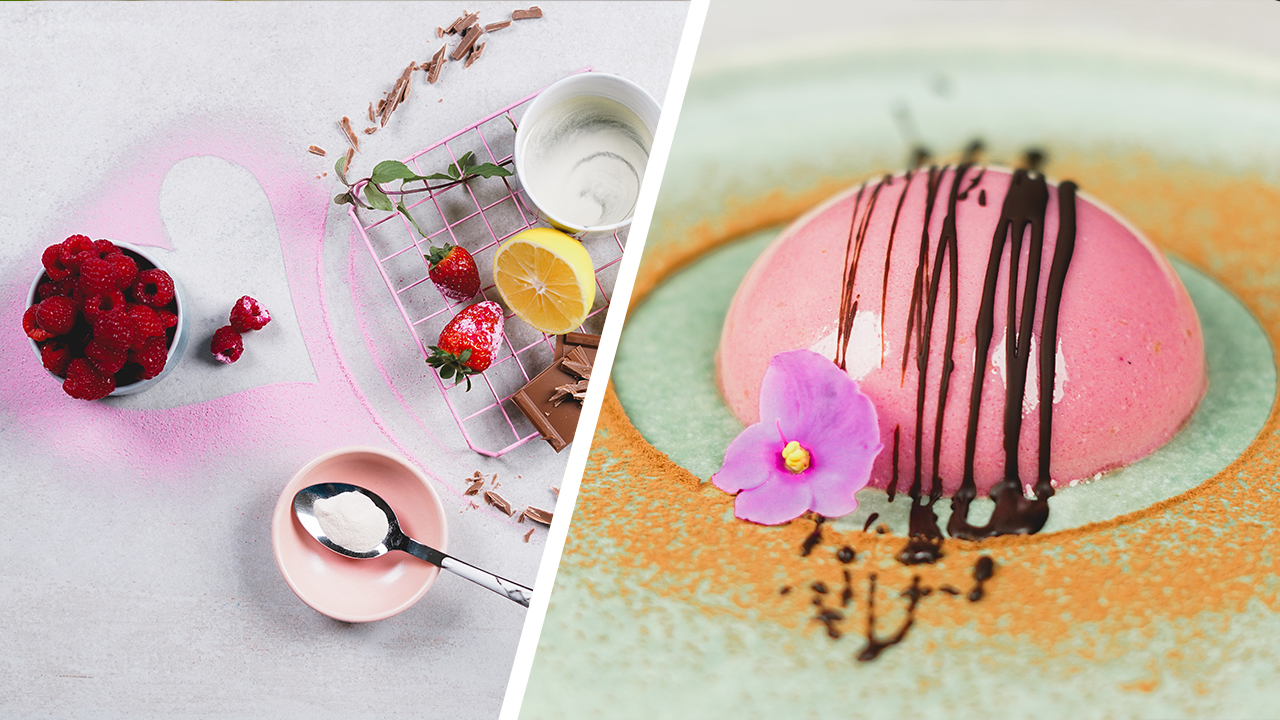
Part 3: Assembly, Storage, and Fun Variations
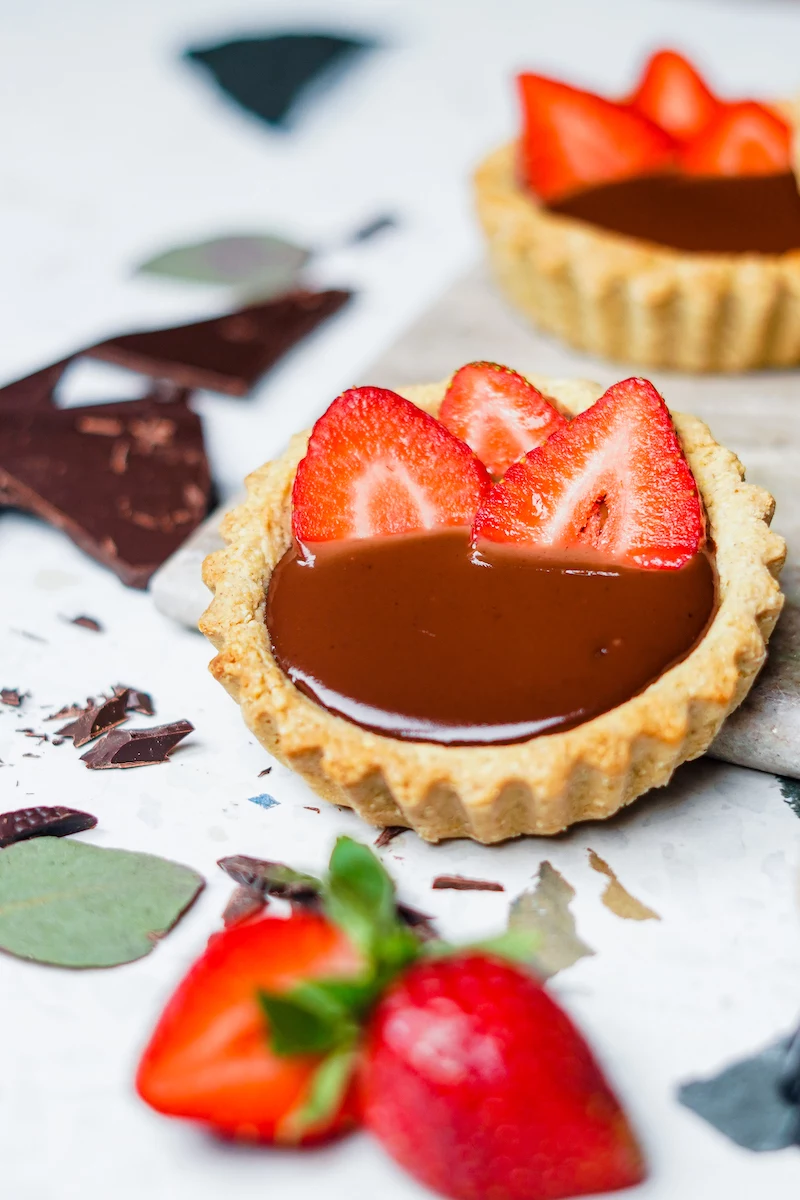
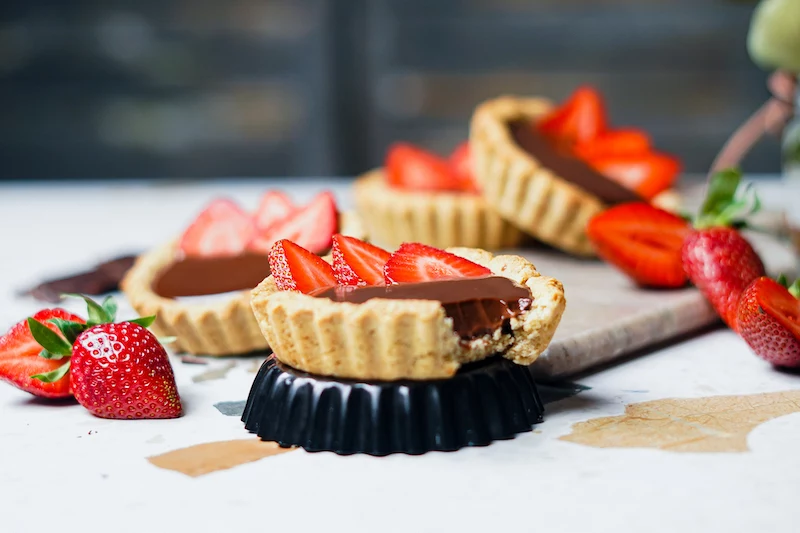
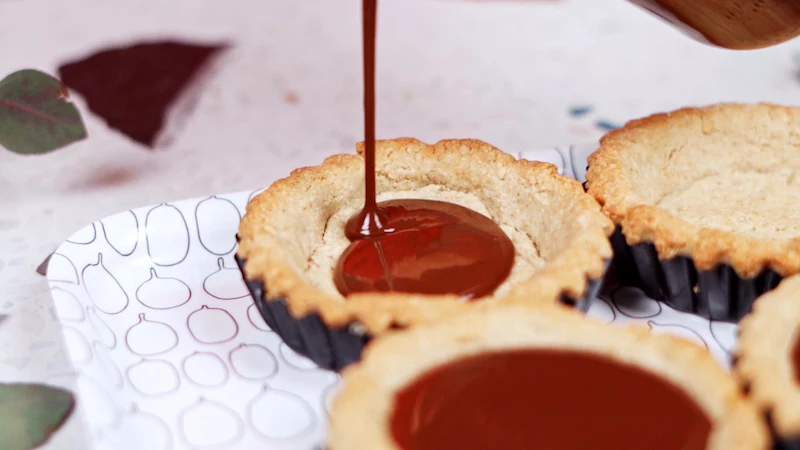
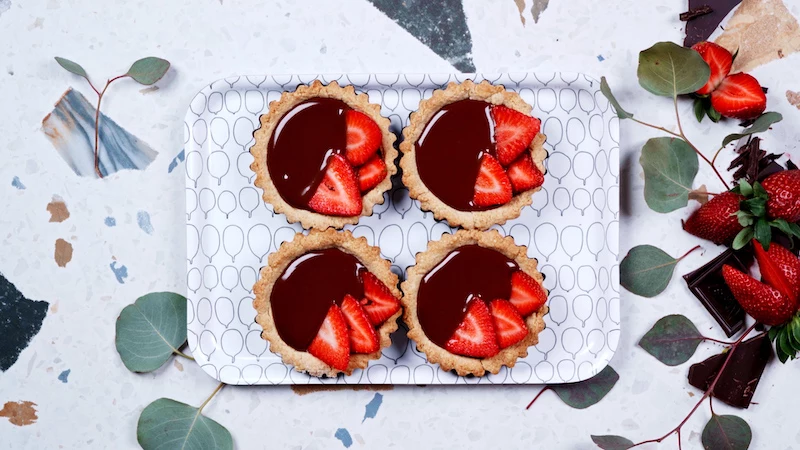
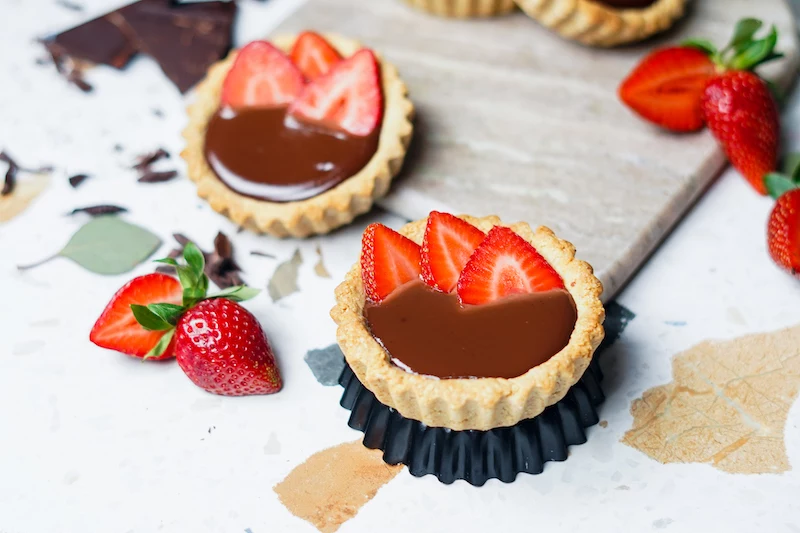
Let your ganache cool at room temperature for about 15-20 minutes until it’s pourable but not hot. Pour it into your cooled tartlet shells, then gently tap the baking sheet on the counter to level the tops. Pop them in the fridge to set for at least 2-3 hours.
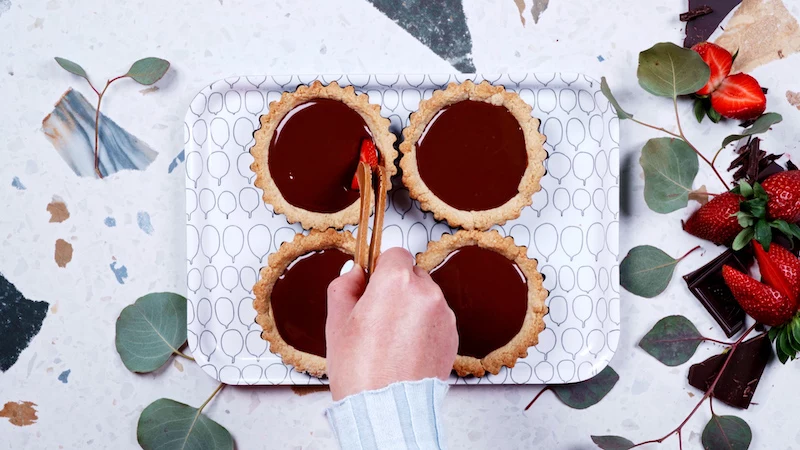
The Topping: Fresh and Bright
Fresh strawberries are a classic choice for a reason. Just make sure to wash them right before you use them and pat them completely dry. Wet berries will bleed onto your beautiful ganache. You can fan sliced berries over the top or, for a pro look, brush them with a simple glaze. Just heat two tablespoons of apricot jam with a teaspoon of water, strain it, and gently brush it over the fruit for that bakery-window shine.
But don’t feel locked in! A good recipe is just a starting point.
- Summer: Fresh raspberries or cherries are amazing.
- Autumn: Drizzle with some vegan caramel and sprinkle with toasted pecans.
- Winter: Top with glistening pomegranate seeds or segments of sweet orange.
Storage and Make-Ahead Plan
These are best enjoyed the day they’re made, but you can absolutely prep ahead to make life easier.
- The Shells: Baked, empty shells can be stored in an airtight container at room temperature for up to 3 days.
- The Dough: You can also make a double batch of dough and freeze half, wrapped well, for a future tartlet emergency. It’s a gift to your future self.
- The Ganache: Can be made 2 days ahead and stored in the fridge with plastic wrap pressed onto the surface. Let it soften at room temp or warm gently before using.
- Assembled Tartlets: Store in the fridge and eat within 24 hours for the best texture. After that, the crust starts to lose its crispness. I wouldn’t recommend freezing the finished tarts, as the fruit gets mushy when it thaws.
So there you have it. This method is a bit more involved, but the results are so worth it. Once you nail this foundational technique, you can create endless variations. Be patient, pay attention to the details, and get ready to make vegan pastries that are every bit as impressive as the classics.
Inspirational Gallery
The secret to a flaky, buttery vegan crust lies in the fat. Not all plant-based butters are created equal. Look for a
- To maintain maximum crispness, store unfilled tartlet shells in an airtight container at room temperature for up to 3 days.
- Once filled, especially with a creamy ganache, they are best enjoyed the same day.
- If you must store them filled, keep them uncovered in the fridge for a few hours to prevent condensation from softening the crust.
The dreaded split ganache: If your chocolate filling looks oily or separated, the emulsion has broken. This usually happens when the plant-based cream is too hot or too cold when poured over the chocolate. The key is gentle, consistent heat. Aim for the cream to be steaming, but not boiling, for a perfectly silky result.
Most dark chocolate with a cacao content of 70% or higher is naturally vegan. Always check the label for milk-derived ingredients like whey or casein, but high-quality brands like Valrhona or Scharffen Berger are often a safe, delicious bet.
A beautiful garnish elevates your tartlet from homemade to patisserie-worthy. Go beyond the simple strawberry slice:
- A sprinkle of flaky sea salt (like Maldon) on a chocolate tart enhances its flavor.
- Fresh mint or basil leaves add a surprising, fresh counterpoint to the richness.
- A dusting of unsweetened cocoa powder or finely chopped pistachios adds texture and color.
- Delicate, organic edible flowers like violas or rose petals create an elegant, professional finish.
Why did my tart shells shrink during baking?
This is usually caused by an under-rested dough. When you roll and fit the dough into the tartlet molds, the gluten gets stretched. Chilling the lined molds for at least 30 minutes (or even 15 minutes in the freezer) before baking allows the gluten to relax, preventing it from snapping back and shrinking in the oven’s heat. Also, never stretch the dough to fit; gently press it into the corners.

For Fruit Fillings – Cornstarch: A powerful and common thickener, but it can sometimes leave a slightly starchy taste and result in a more opaque, matte finish.
For Fruit Fillings – Arrowroot Powder: Creates a glossier, more translucent finish with a cleaner taste. It thickens at a lower temperature but can become stringy if overcooked. Ideal for a fruit coulis or filling that needs a shiny, clear appearance.
In Paris, the home of classic pastry, high-end vegan pâtisseries like Land & Monkeys are gaining immense popularity.
This trend is fantastic news for the home baker. It proves that plant-based ingredients can achieve the same level of sophistication as their traditional counterparts. It also drives innovation, making professional-quality ingredients like stable plant-based creams from brands like Oatly more widely available for all of us to use.
- A subtle warmth that complements spices like cinnamon or cardamom.
- A bright, zesty note that cuts through the richness of chocolate.
- An even deeper, more complex chocolate foundation.
The secret? Customizing your Pâte Sucrée. Simply add a teaspoon of citrus zest, a pinch of spice, or a tablespoon of dark cocoa powder along with your dry ingredients to transform the entire flavor profile of your tartlet.
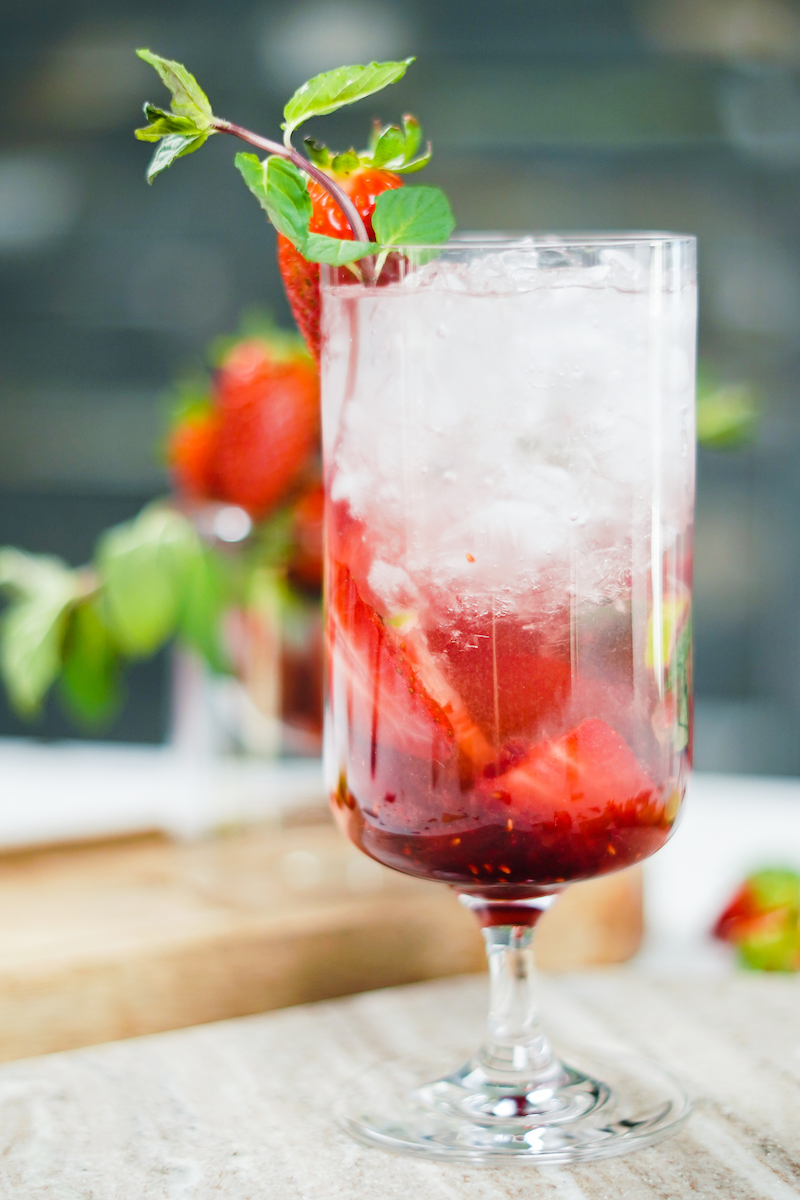
Don’t let your perfect tartlet feel lonely. The right beverage pairing can elevate the entire experience. For a rich chocolate and strawberry tartlet, a freshly brewed espresso or a strong Americano cuts through the sweetness beautifully. For a sophisticated evening treat, consider a glass of Banyuls, a French dessert wine with notes of black fruit and cocoa that harmonizes perfectly without being overly sweet.
Don’t toss those pastry scraps! Reroll them just once, cut out small shapes, and bake them alongside your tartlets.
- Sprinkle with cinnamon-sugar before baking for a quick, crispy cookie.
- Use them as a crunchy
Help! My ganache is grainy, not silky!
A grainy or


