My Kitchen Guide to Finally Nailing Matcha Desserts
My first real run-in with high-quality matcha wasn’t in some trendy cafe latte. It happened in a quiet pastry kitchen, where a seasoned expert taught me a crucial lesson. He opened this small, unassuming tin, and the powder inside was an electric, almost impossibly vibrant green. The smell was grassy, a little sweet, and surprisingly complex.
In this article
That day, I learned that matcha isn’t just another flavor to toss into a recipe. It’s a delicate ingredient with its own set of rules. If you want to get that beautiful color and amazing flavor in your baking, you have to respect it. This guide is built on that foundation—years of professional baking, full of brilliant successes and, honestly, some pretty bitter, muddy-colored mistakes. My goal is to save you the trouble and get you straight to the good stuff.
First Things First: Know Your Matcha
Before you even think about grabbing a whisk, you’ve got to understand the powder you’re working with. Not all matcha is created equal, and using the wrong kind can sink your recipe before you even start. This is the first thing I tell anyone who wants to bake with it: know your materials.
So, What Makes Matcha Special?
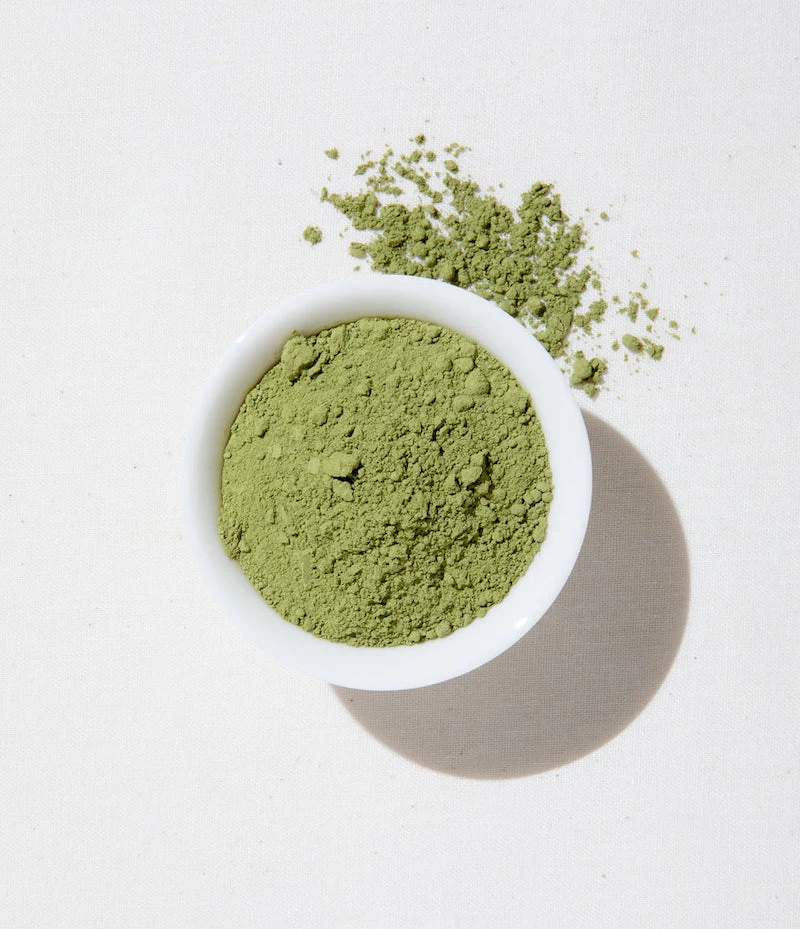
Matcha comes from the same plant as regular green tea, but the process is completely different. Tea bushes are shaded from the sun for a few weeks before harvest. This makes the plant pump out more chlorophyll (hello, vibrant green color!) and an amino acid called L-theanine. That L-theanine is the secret sauce—it’s what gives matcha that unique savory, or umami, flavor and a feeling of calm alertness, not the jittery buzz you get from coffee.
After harvest, the leaves are steamed to lock in that color and all the good stuff. Then, they’re painstakingly stone-ground into a super-fine powder. With regular tea, you just infuse water with the leaves. With matcha, you’re consuming the entire leaf. That’s why the flavor, color, and effects are so much more intense.
Choosing Your Weapon: Culinary vs. Ceremonial Grade
Walk into a specialty shop or browse online, and you’ll see different “grades” of matcha. It can be confusing, but for baking, you really only need to worry about two main categories.
It really boils down to this:
- Ceremonial Grade is the absolute best of the best. It’s made from the youngest leaves, has a brilliant green color, and a delicate, sweet flavor. It’s designed for traditional tea ceremonies where you just whisk it with water. Honestly, baking with it is a waste. Its subtle notes get totally lost behind sugar and butter, and the heat can kill its flavor. It’s also expensive—you could be looking at $40 or more for a small 30g tin. Using it in cookies is like using a fine vintage wine in a stew. Don’t do it.
- Culinary Grade is our workhorse in the kitchen. It’s made from later-harvest leaves, giving it a stronger, more robust, and slightly more bitter flavor. That’s actually a good thing! This assertive taste can stand up to other ingredients like white chocolate, cream cheese, or butter. A good culinary matcha will still have a lovely green color, but be careful. If you see a culinary grade that looks yellowish or brownish, step away. That’s low-quality stuff that will just make your desserts taste like bitter grass. Expect to pay around $20-$30 for a decent 30g tin from a reputable brand. If you see it for $8 at a regular supermarket, it’s almost certainly not worth it.
How to Buy and Store It (Don’t Waste Your Money!)
Matcha’s biggest enemies are oxygen, light, and heat. They will ruin its color and flavor in a heartbeat. I always buy matcha that comes in a small, airtight, opaque tin. Fresher is always better, so check for a harvest or expiration date if you can.
Once you open that tin, the clock starts ticking. I keep my opened matcha in the refrigerator to keep it fresh. But—and this is a big one—you have to let the sealed container sit at room temperature for about 20-30 minutes before you open it. This stops condensation from forming inside. I once lost a whole tin of premium matcha because a new assistant opened it straight from the fridge. The moisture made it clumpy and musty. A total disaster. For best results, try to use up your opened tin within a couple of months.
By the way, if you’re looking for a solid starting point, brands like Ippodo or Marukyu Koyamaen are fantastic and what many pros use, though you’ll likely have to order them online. For something more accessible that’s still good quality, Aiya is often a great choice.
Before You Bake: The Absolute Essentials
Okay, now for the fun part. There are a few key techniques that will take your matcha game from ‘meh’ to ‘wow’.
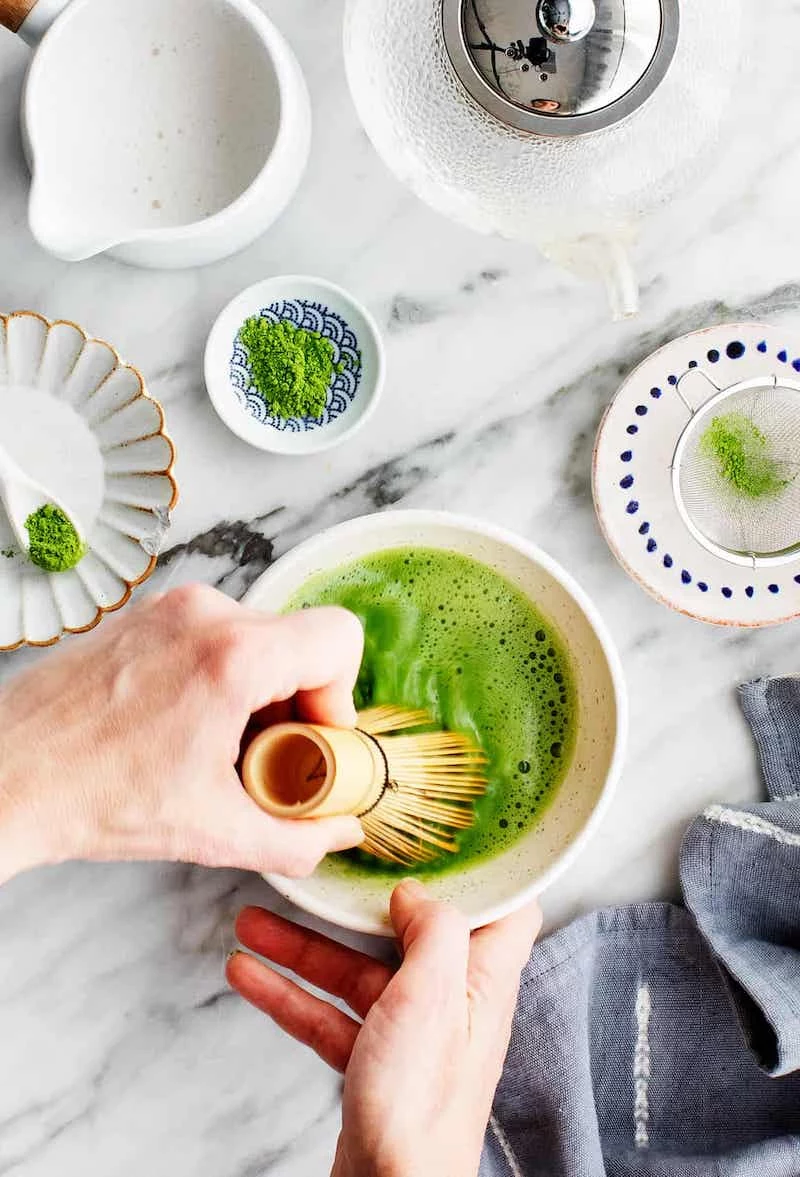
My 2-Minute Confidence Booster: The Perfect Matcha Latte
Before we get into complex baking, let’s master the most basic skill: properly dissolving matcha. This quick latte will give you an immediate win and show you how amazing well-prepared matcha can taste.
- Sift 1 teaspoon of culinary matcha into a mug.
- Add about 2 tablespoons of hot (not boiling!) water.
- Whisk vigorously in a ‘W’ or ‘M’ pattern until it’s a smooth, frothy paste with no lumps. A small bamboo whisk (a chasen) is ideal, but a small regular whisk or milk frother works too.
- Top with about 6-8 ounces of steamed milk (dairy or non-dairy) and sweeten to taste.
See? You just made something delicious and practiced the most important step.
The Sifting Imperative
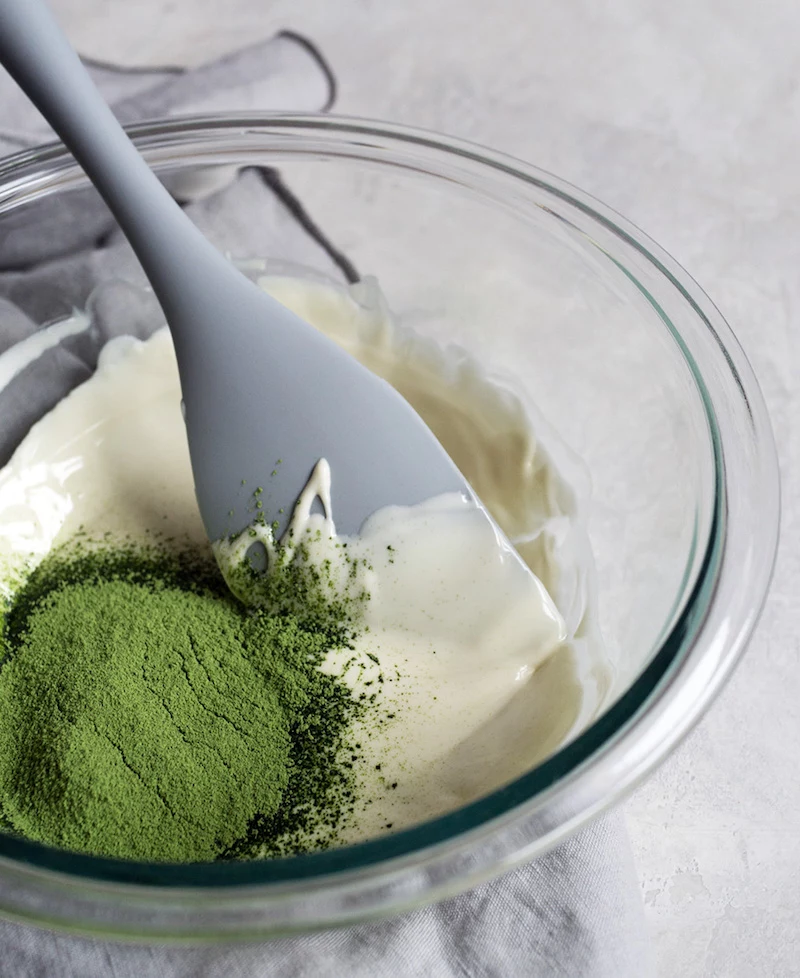
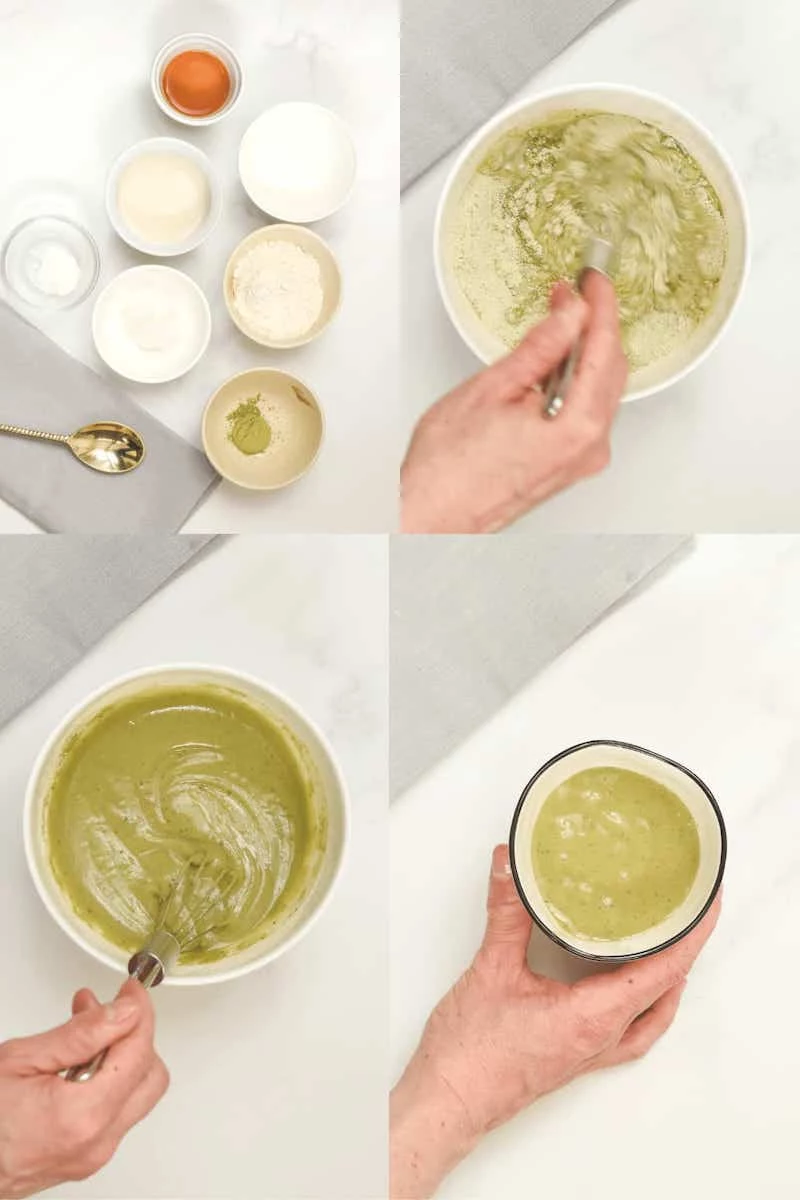
I can’t stress this enough: you MUST sift your matcha. It’s so fine that it gets clumpy from static and moisture. If you dump it straight into your batter, you’ll get these little green specks of pure bitterness in your finished dessert. Trust me, you can’t whisk them out later. A common mistake is thinking, ‘it looks fine enough.’ It’s not. Always sift it, preferably with your other dry ingredients like flour, to get a uniform color and flavor. A fine-mesh sieve is your best friend here.
Keep It Cool: Temperature Matters
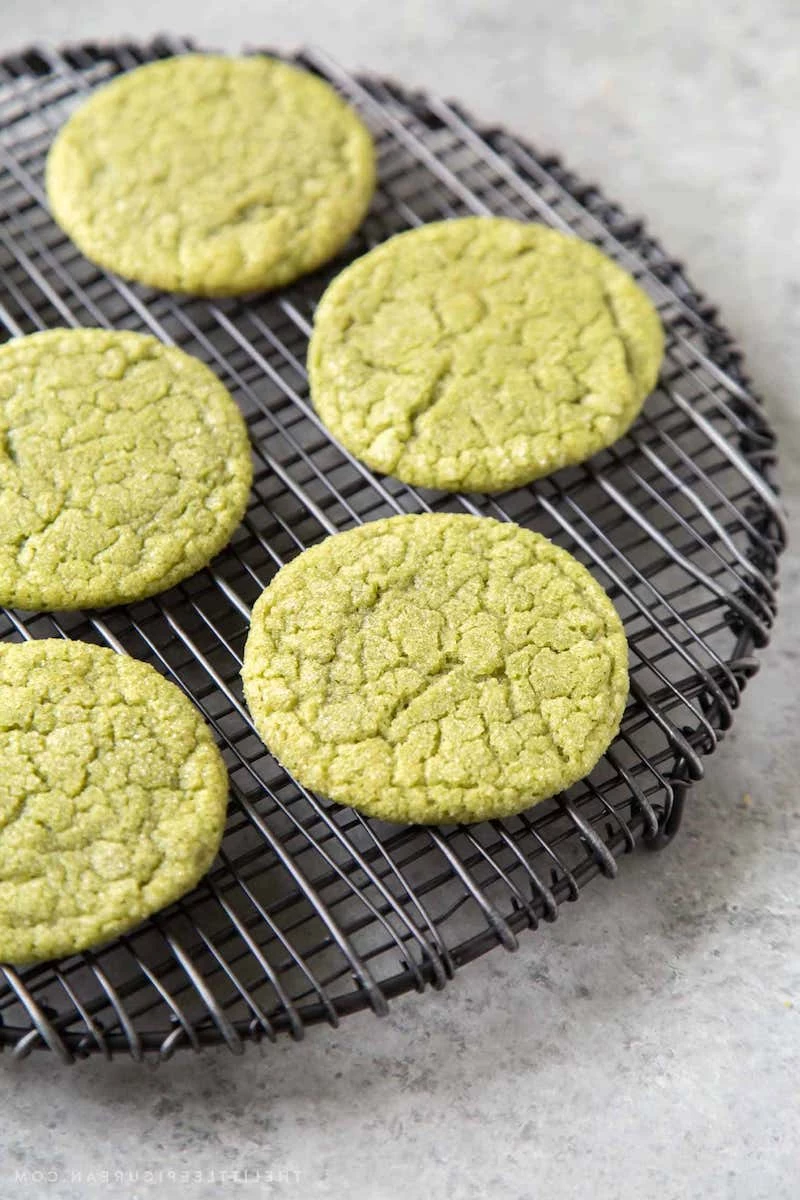
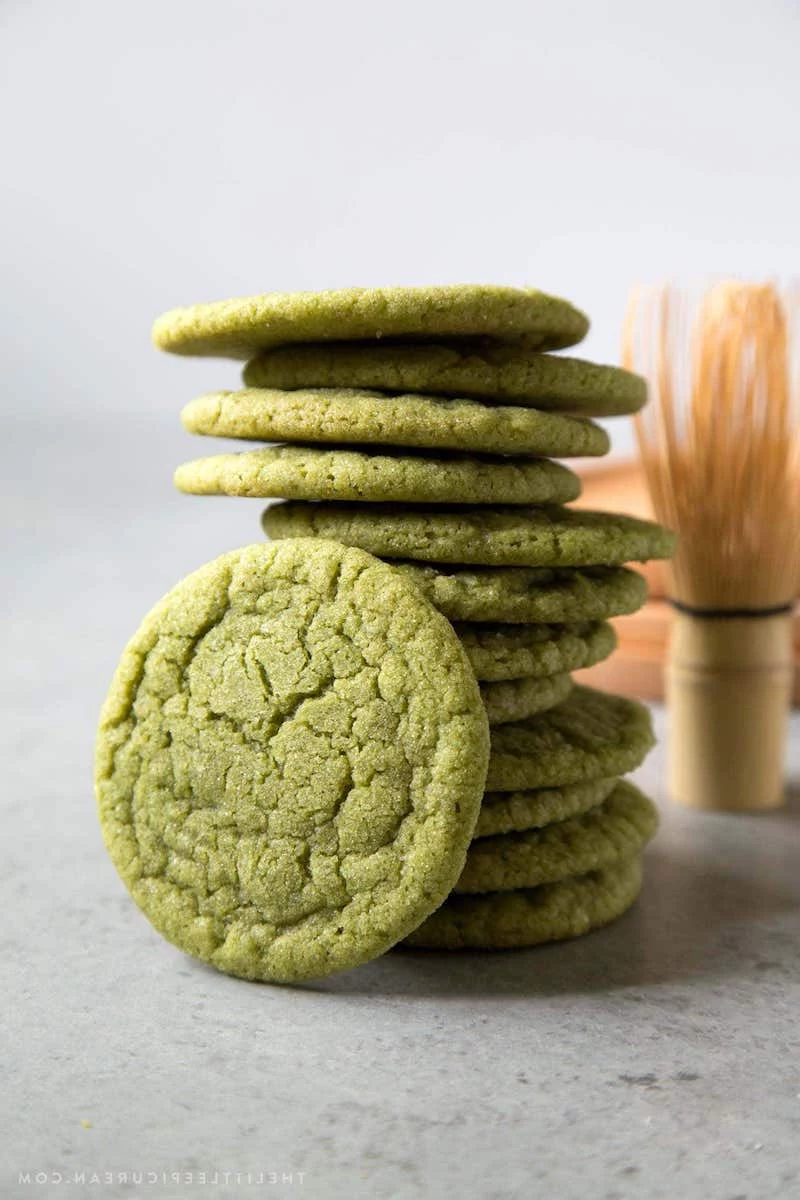
High heat can turn matcha’s pleasant flavor into a harsh, bitter mess. When I’m making matcha cookies or cakes, I often drop the oven temperature by about 25°F (around 15°C) and just bake them a little longer. This helps preserve that delicate character. If your bakes are coming out a muddy, brownish-green instead of a nice vibrant shade, your oven is likely too hot or your matcha is old.
Perfect Pairings
Matcha has a complex flavor—it’s grassy, a little savory, and a bit bitter. It sings when you pair it with the right partners.
- Fats are your friend: Butter, cream, and especially white chocolate are fantastic carriers for matcha’s flavor. The fat mellows any bitterness and lets the complex notes shine.
- Find the sweet spot: You need sugar to balance the astringency, but the goal isn’t to just mask the matcha with sweetness. It’s a delicate dance.
- A splash of acid: A little bit of tartness from ingredients like strawberries, raspberries, or yuzu can really make matcha pop. It cuts through the richness beautifully.
Time to Bake: My Go-To Matcha Recipes
These recipes are more than just ingredient lists; they’re studies in technique. I’ve included notes from my own kitchen to help you nail them.
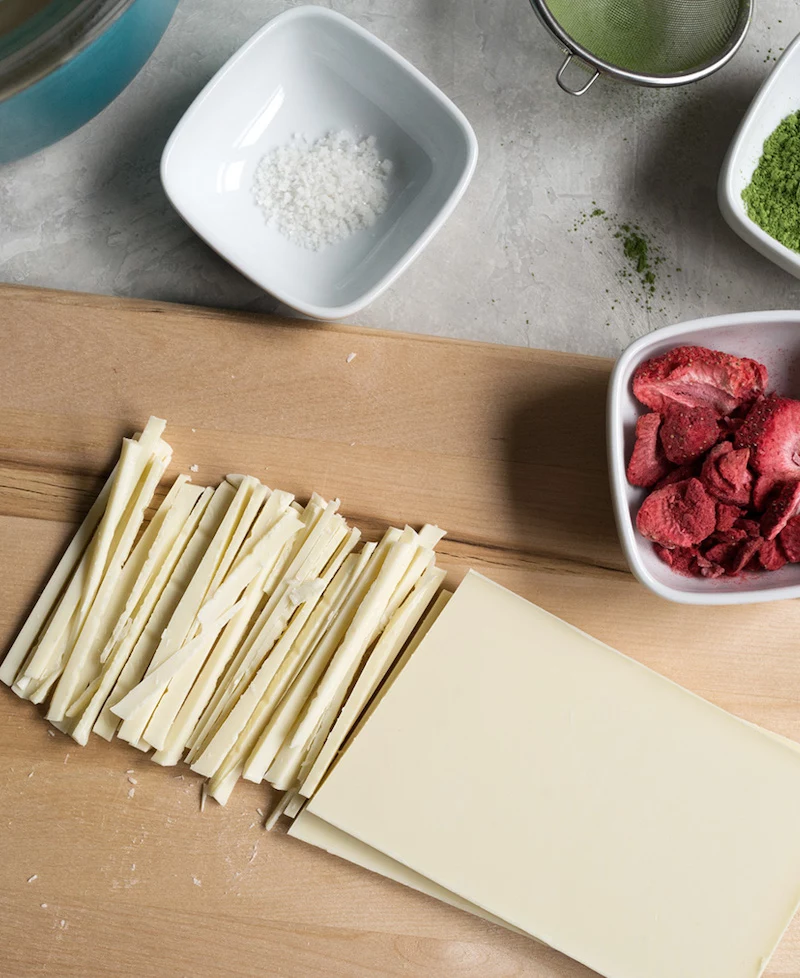
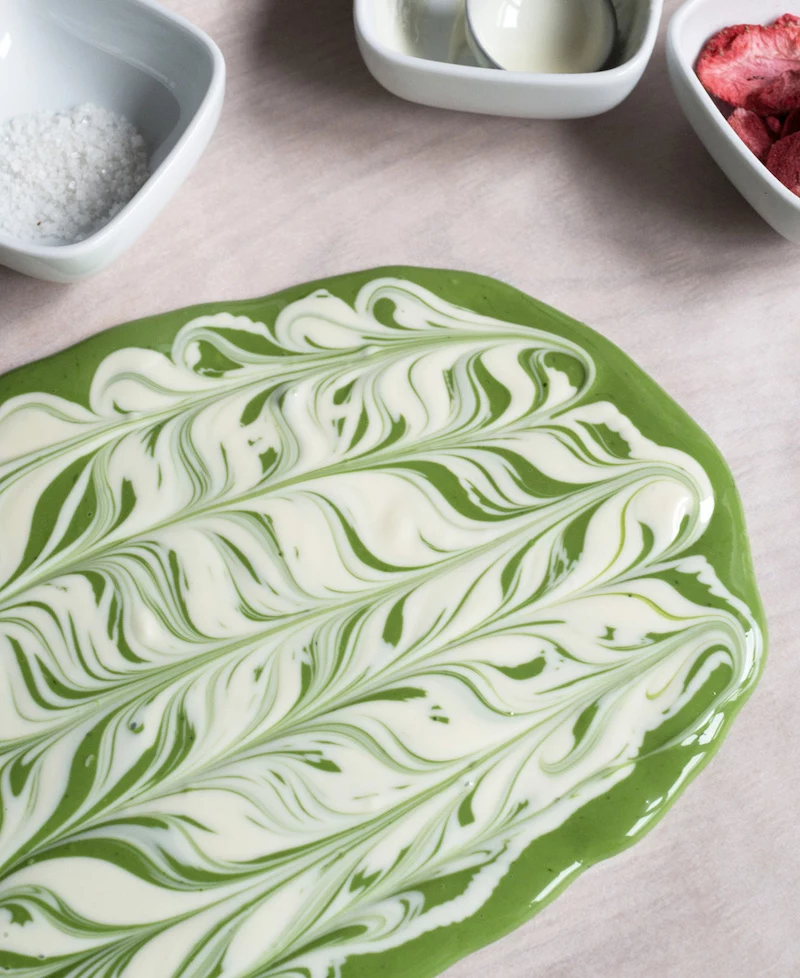
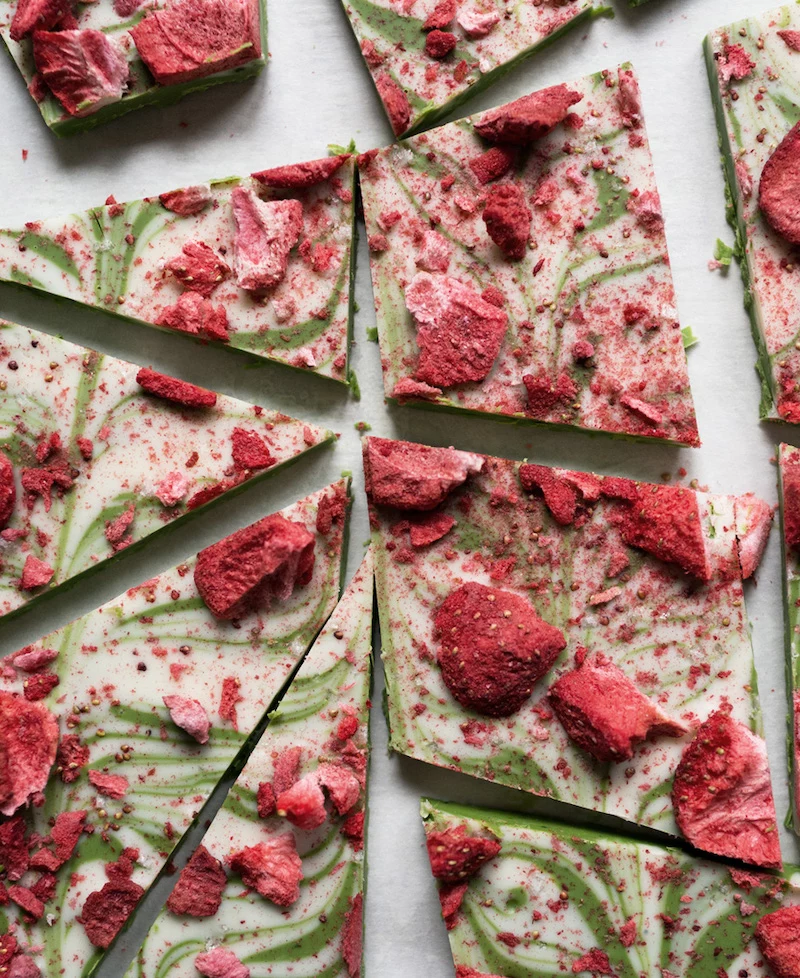
1. Pro-Level Matcha White Chocolate Bark
This is a fantastic first exercise. It’s all about flavor pairing and getting a feel for chocolate work. A good bark should have a clean, satisfying snap when you break it, not be soft or waxy.
You’ll need: 10 ounces (285g) of high-quality white chocolate, 1 tablespoon (8g) of sifted culinary matcha, about 3 tablespoons of crushed freeze-dried strawberries, and a teaspoon of flaky sea salt.
Quick tip: Use the best white chocolate you can find, one where cocoa butter is a primary ingredient. It costs more, maybe $6-$8 a bar, but cheap stuff with palm oil won’t melt properly and has a waxy feel. It makes a HUGE difference.
The secret to that professional snap is tempering the chocolate. It sounds intimidating, but the easiest way is the “seeding method.”
- Chop all your chocolate. Set aside about one-third of it.
- Melt the other two-thirds in a bowl over a pot of simmering water (or in the microwave in 20-second bursts) until it reaches about 110°F (43°C). A digital thermometer is super helpful here.
- Remove the bowl from the heat and stir in the reserved chopped chocolate (the “seed”). Keep stirring until everything is melted and smooth. This cools the chocolate down and gets the right crystals to form.
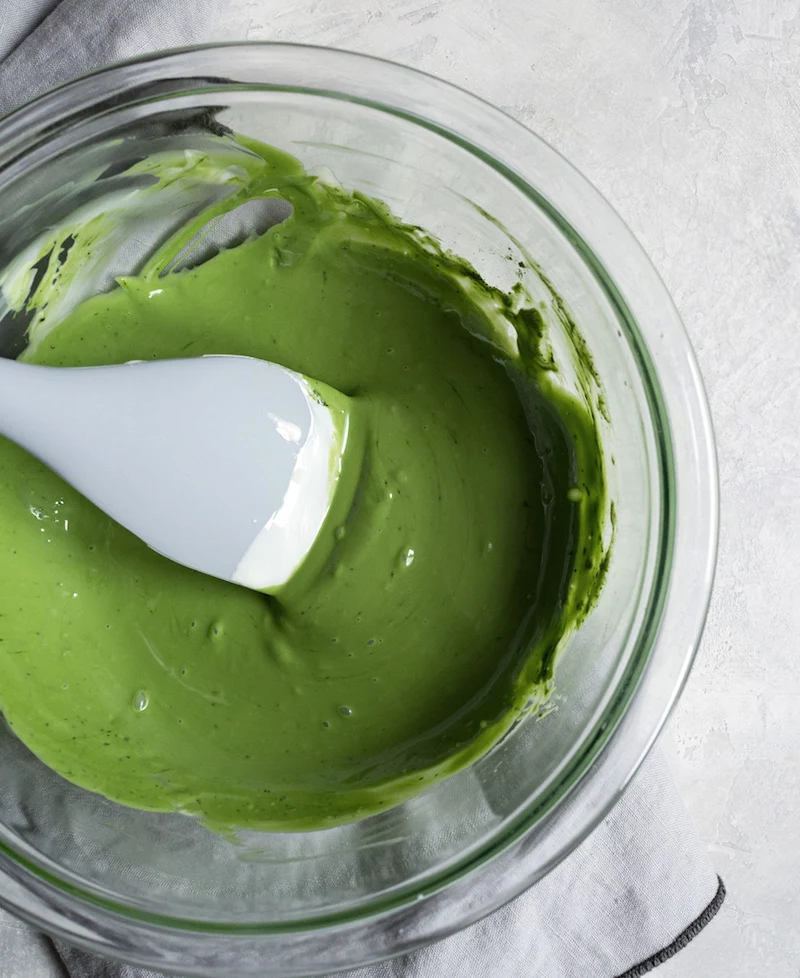
- Once your chocolate is ready, whisk in your sifted matcha until the color is totally uniform.
- Pour it onto a parchment-lined baking sheet and spread it thin. Immediately sprinkle with the crushed strawberries and sea salt.
- Let it set at cool room temperature or in the fridge for about 20 minutes. If it’s tempered right, it’ll harden quickly and have a nice gloss. Then just break it into pieces and store it in an airtight container.
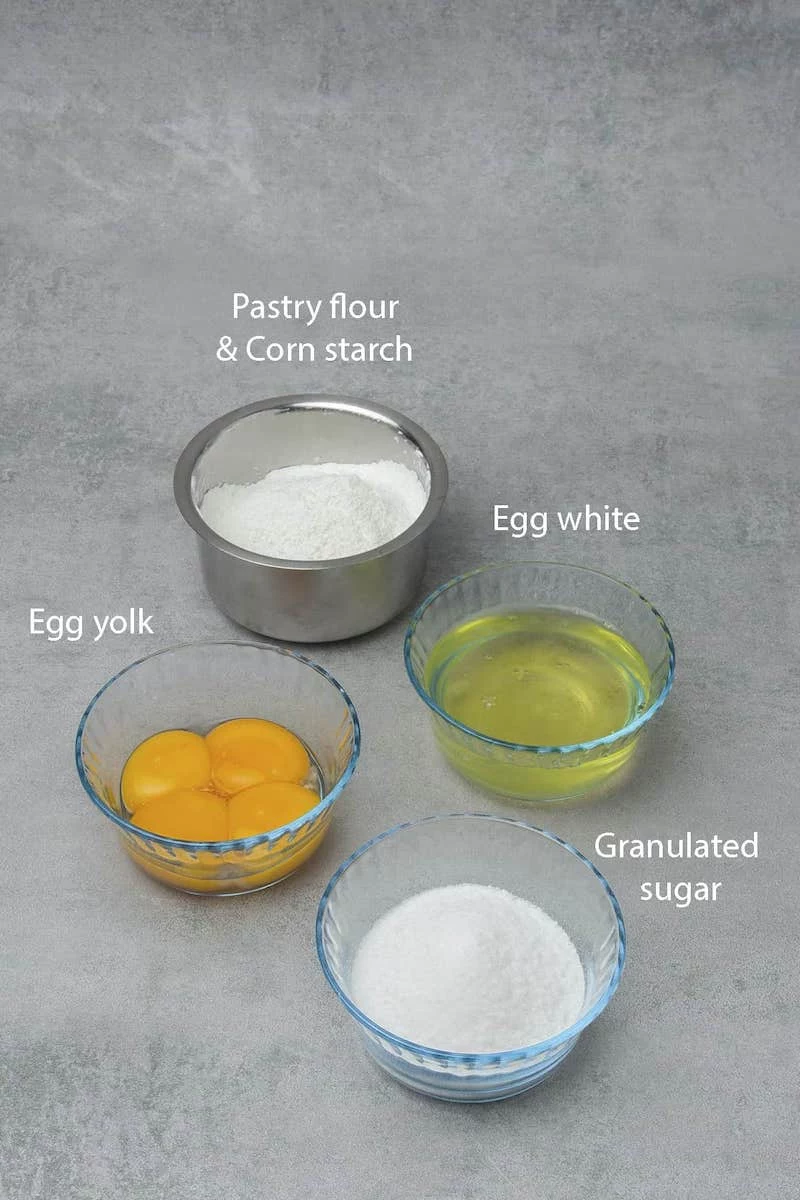
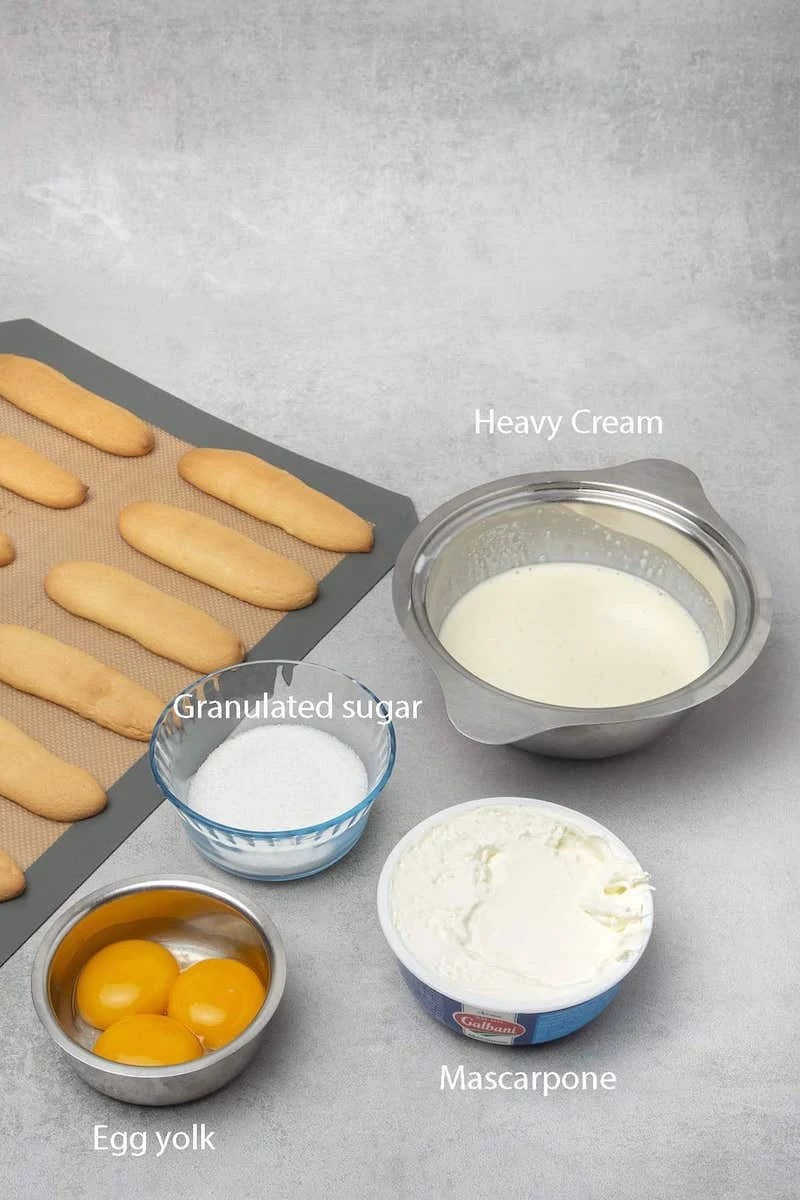
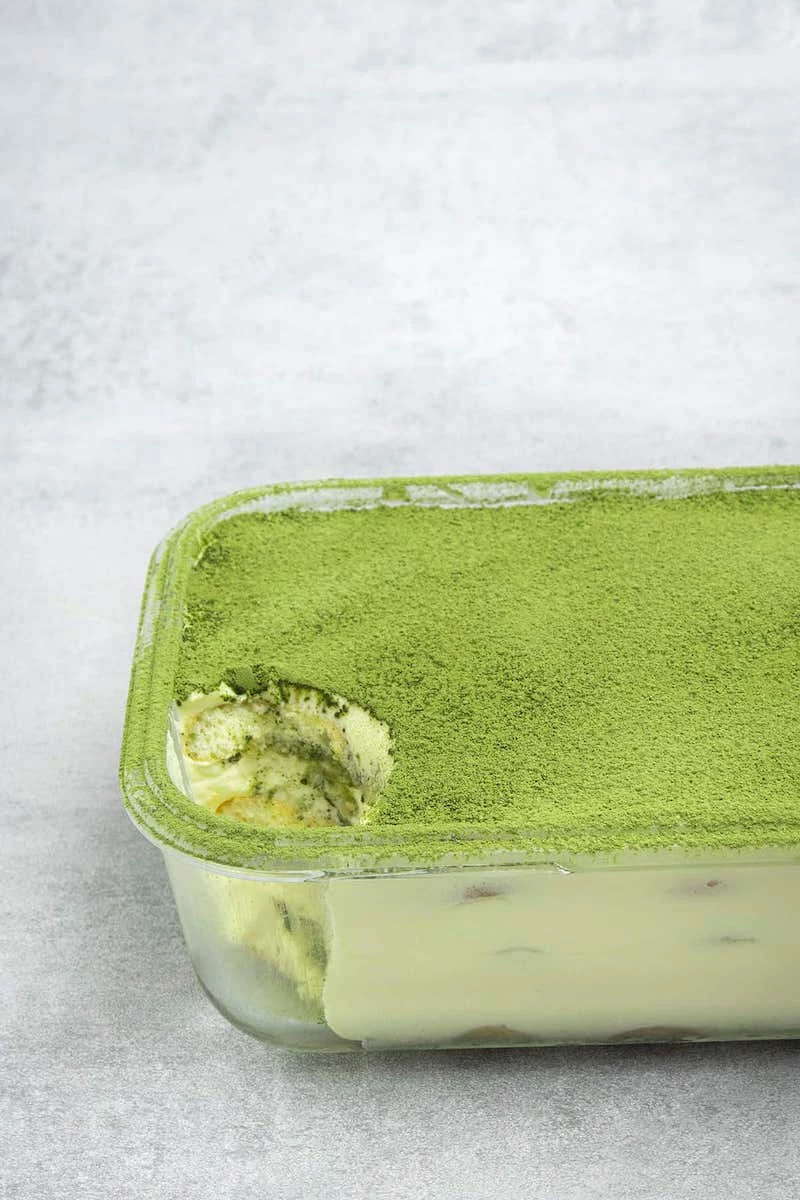
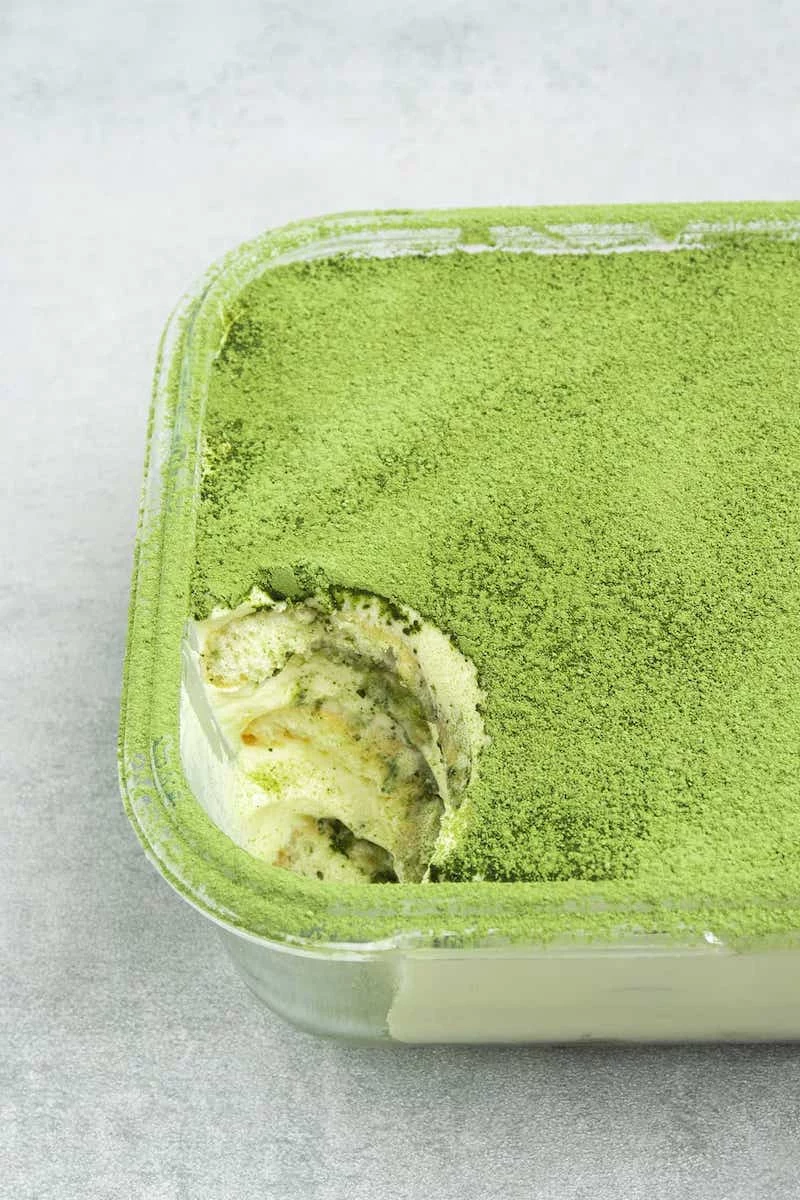
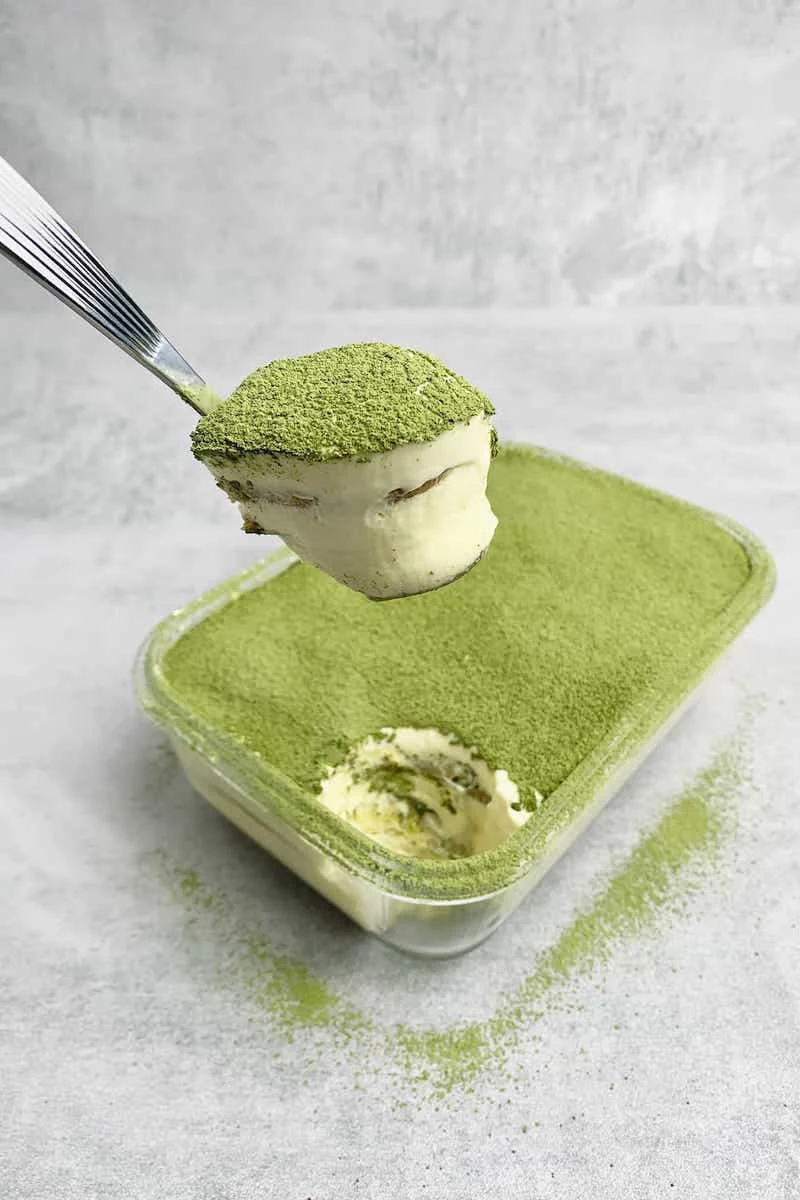
2. A Better Matcha Tiramisu
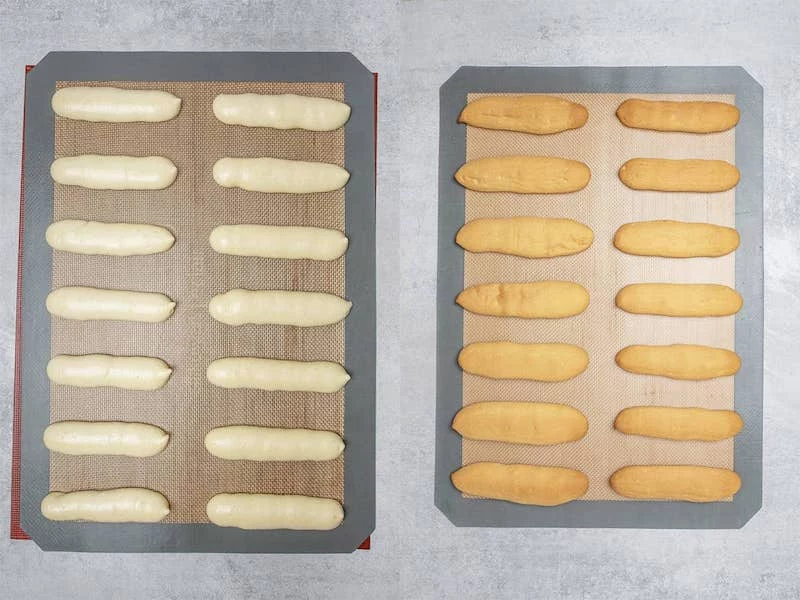
This dessert is all about texture. The ladyfingers need to be spongy, and the cream must be light but stable. Making your own ladyfingers is a step up, but good quality store-bought ones work in a pinch.
Heads up! The classic recipe uses raw egg yolks. If that’s a concern, please use pasteurized eggs, which you can find at most larger supermarkets. Or, you can cook the egg yolks and sugar over a double boiler, whisking constantly until the mixture gets thick and reaches 160°F (71°C).
Good to know: If eggs are a total no-go, you can make a simpler, stable cream! Just whip 250g of cold mascarpone with about 1/2 cup of powdered sugar until smooth, then fold in 200g of heavy cream that you’ve whipped to stiff peaks. The texture is a little denser, but it’s still delicious and totally worry-free.
The biggest pitfall here is the mascarpone. It can get runny if you over-whip it. My trick is to use it straight from the fridge and only give it a few quick whisks just to loosen it up before folding in your other ingredients. Work fast and keep everything cold!
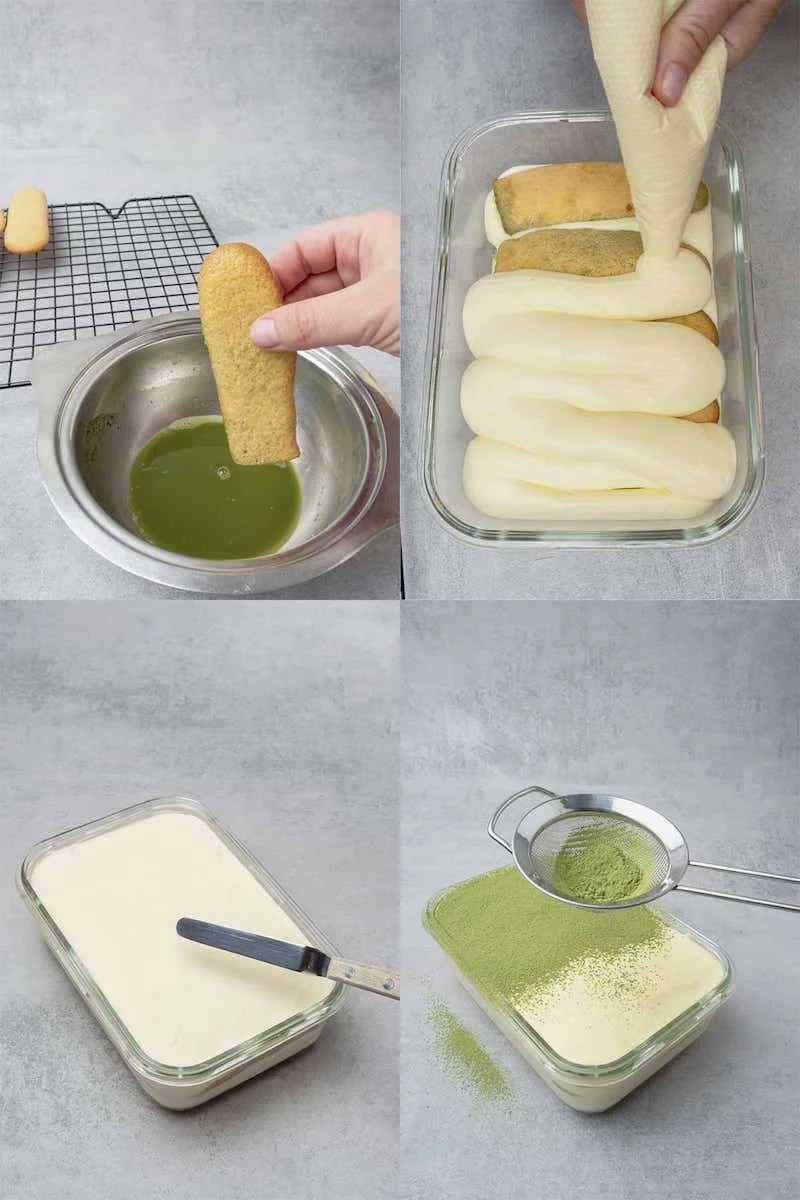
For assembly: Make a matcha ‘tea’ by whisking about 2 tsp of matcha into 1 cup of warm water and letting it cool. Briefly dip your ladyfingers, layer them in a dish with your mascarpone cream, and repeat. Let it chill in the fridge for at least 4 hours (overnight is even better) to let the flavors meld. Just before serving, dust the top generously with more sifted matcha powder.
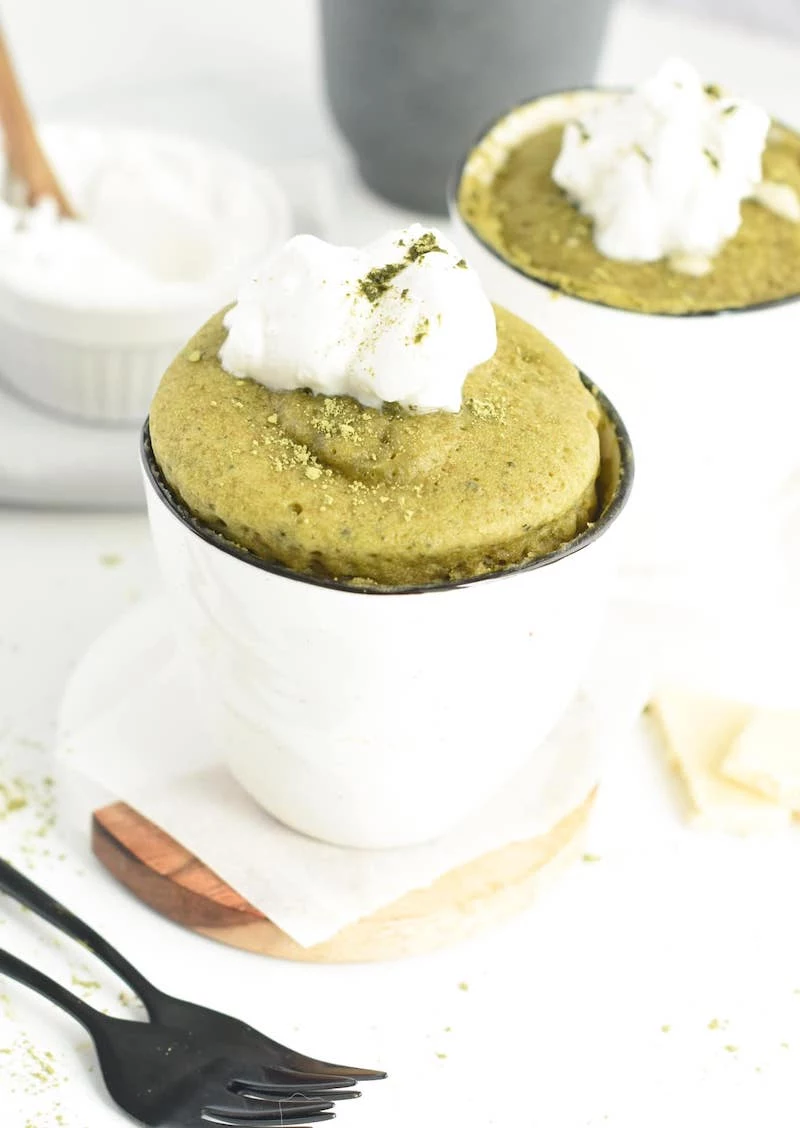
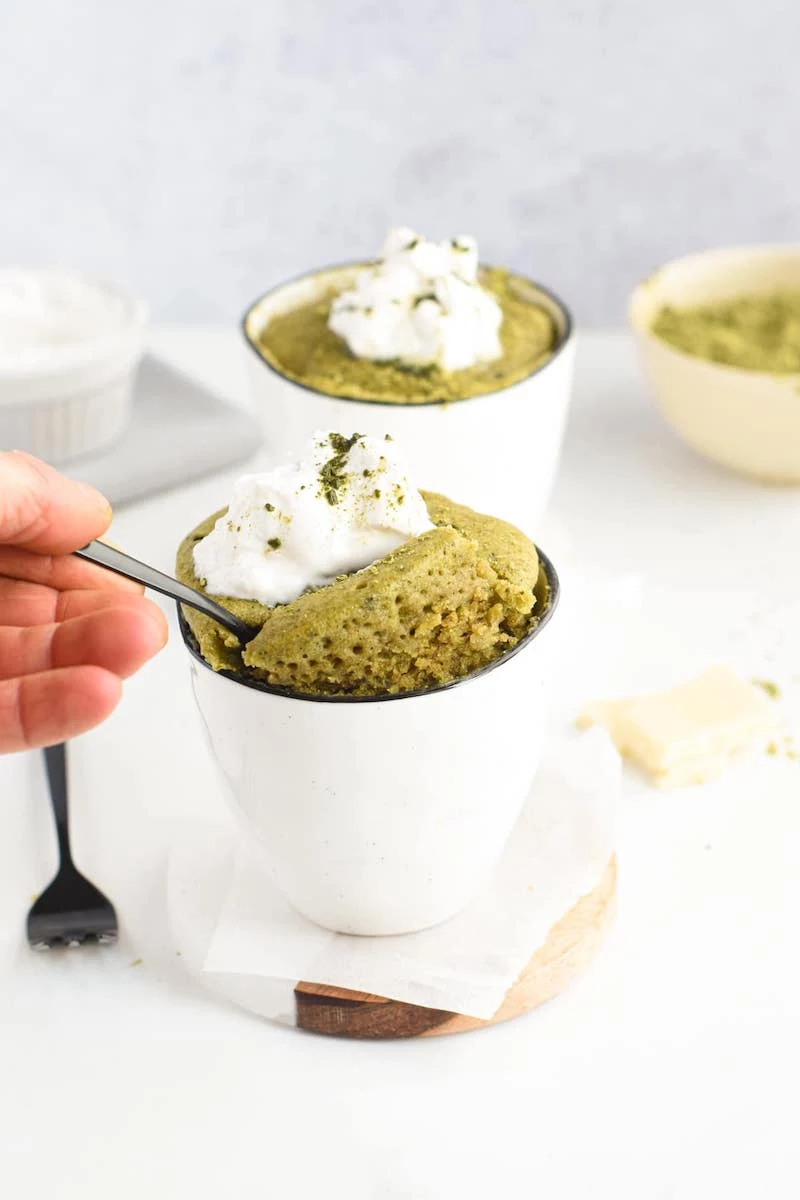
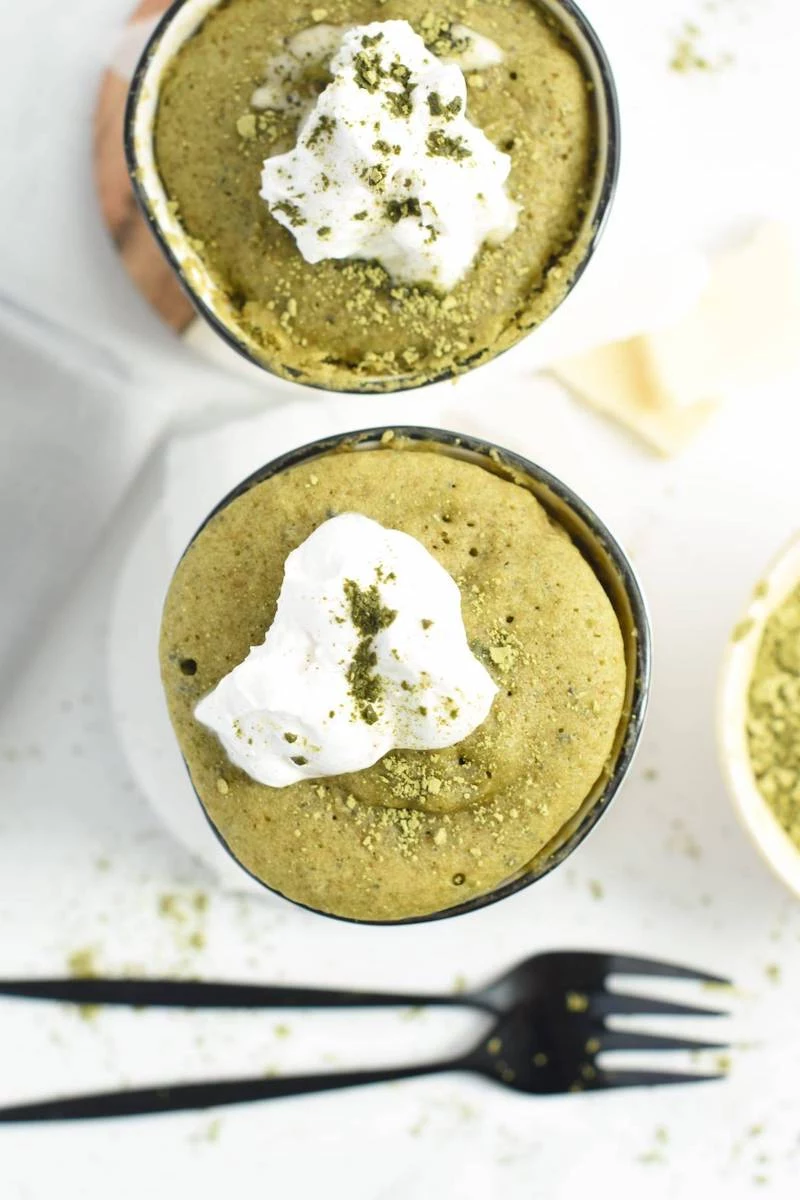
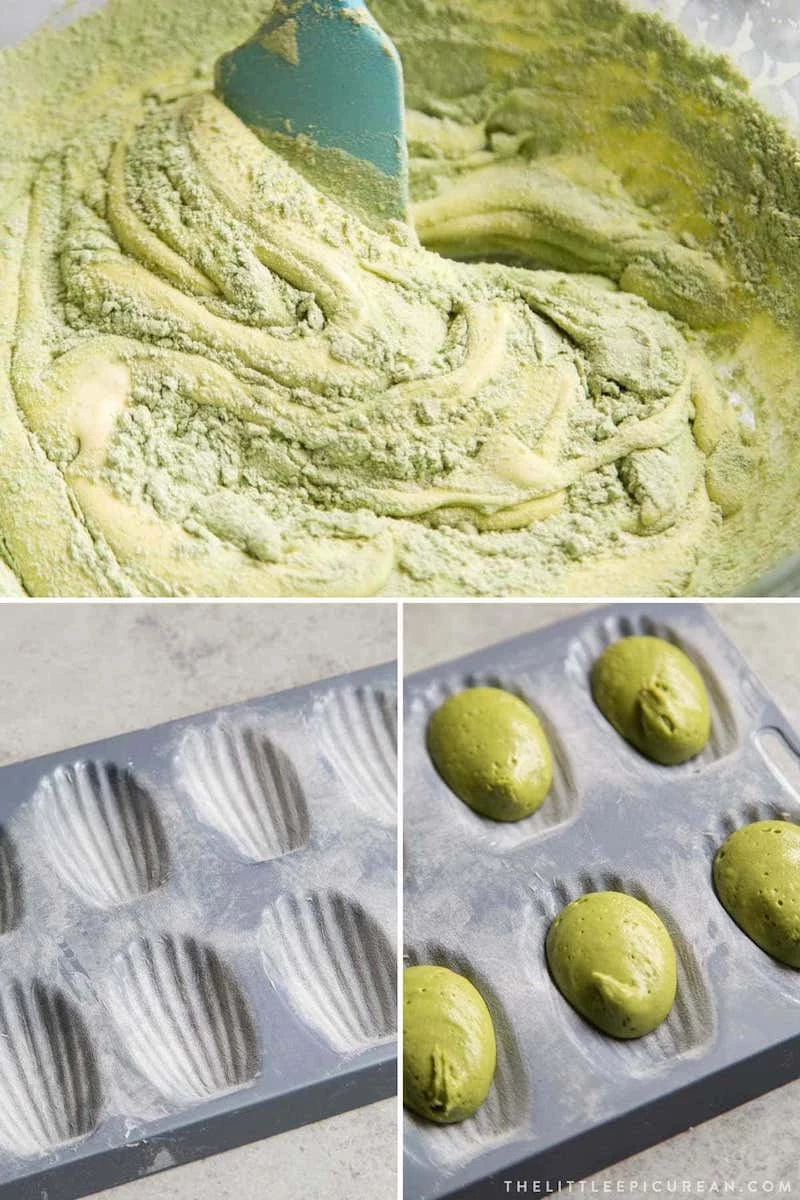
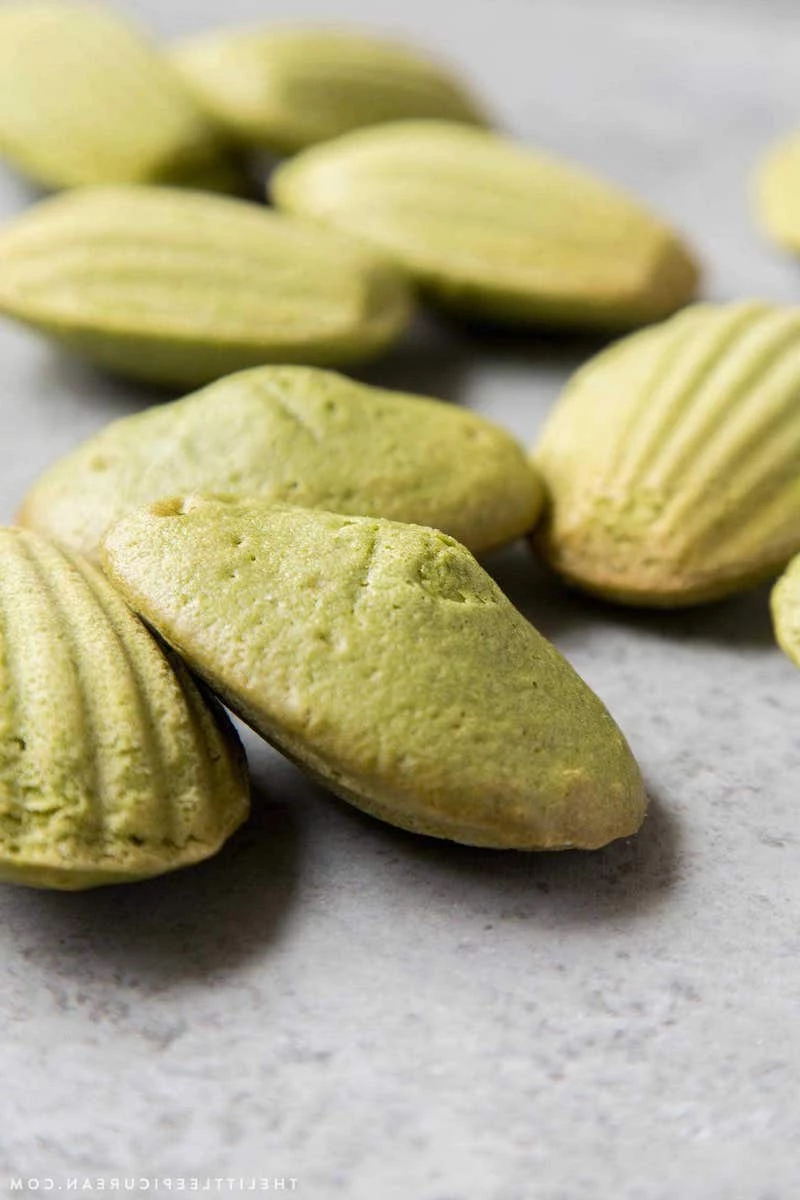
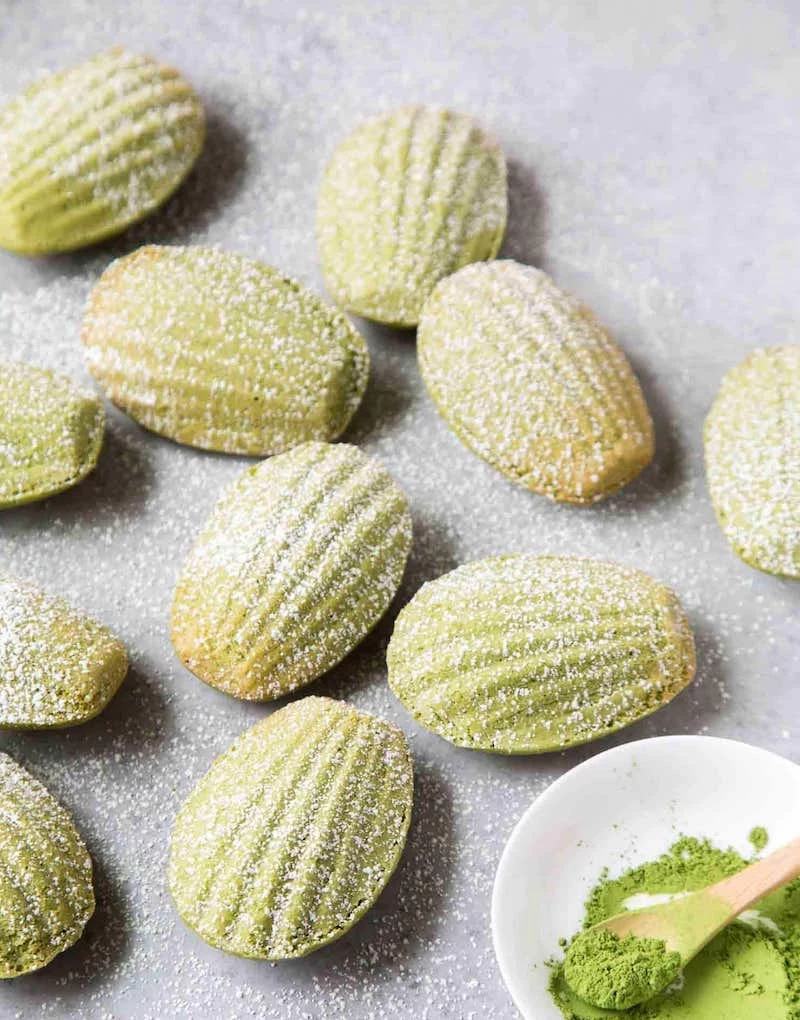
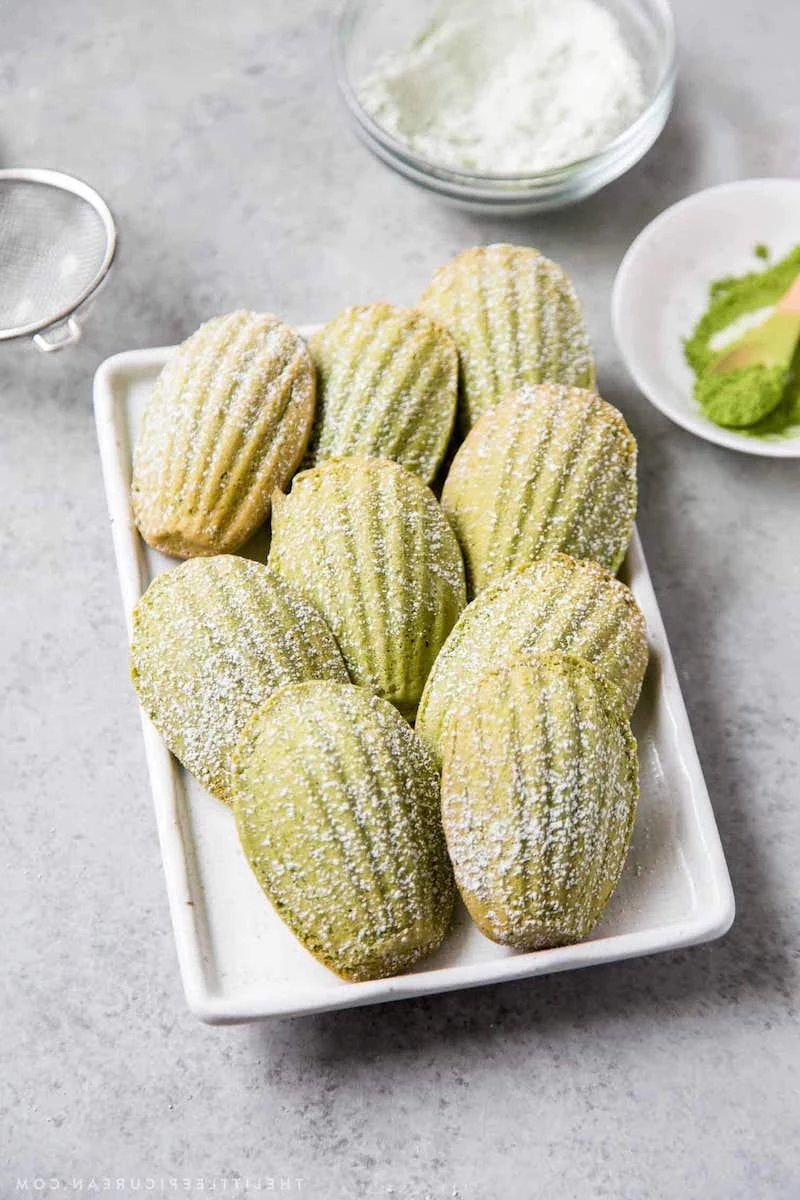
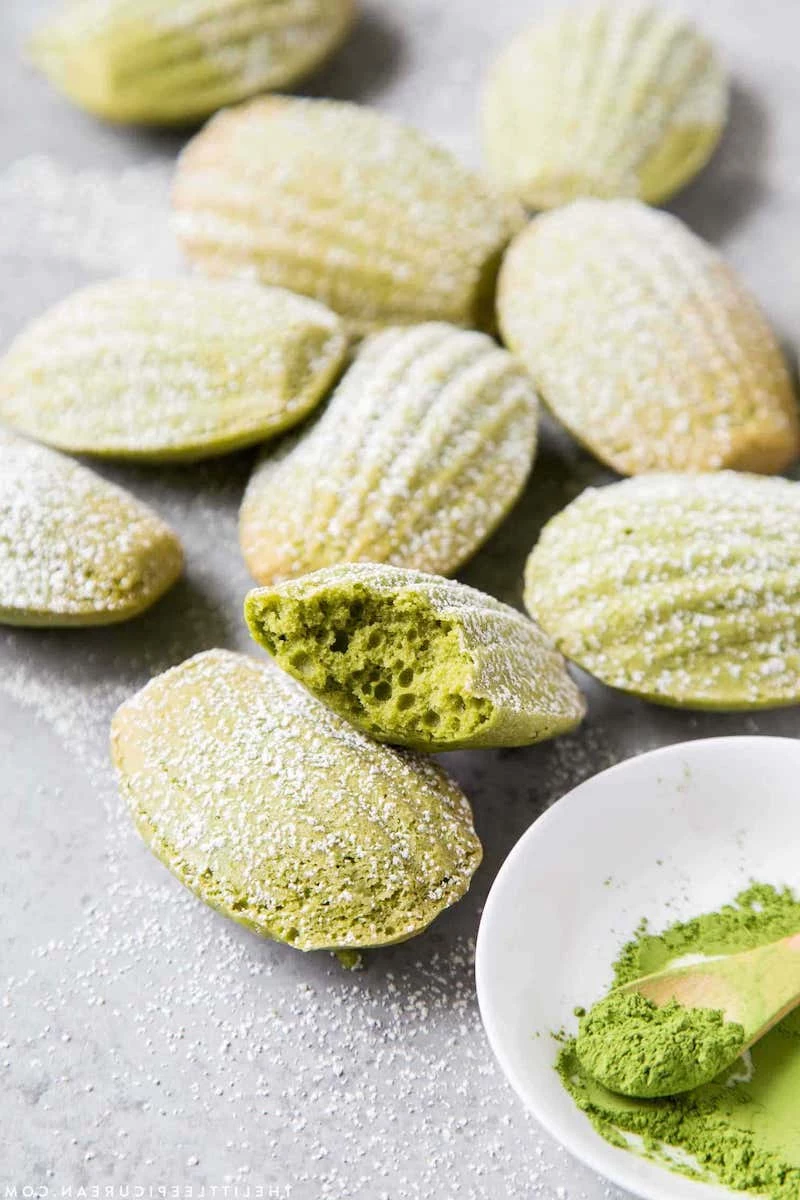
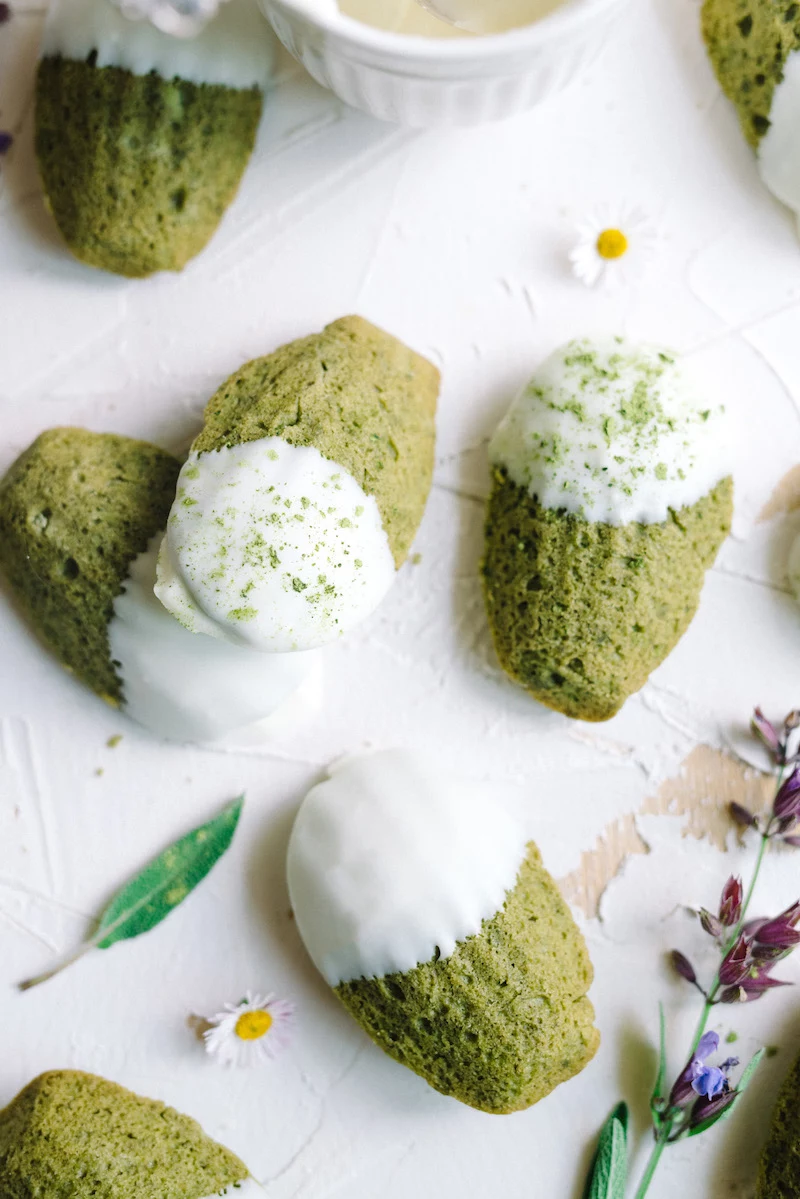
3. The Secret to Perfect Matcha Madeleines (and Their Hump!)
The signature of a classic madeleine is that proud little hump on top. The secret? It’s all about thermal shock. You put a very cold batter into a hot oven, which makes the outside set while the inside is still liquid. The baking powder goes crazy, and the gas has nowhere to go but up, creating that perfect hump. So, chilling the batter isn’t just a suggestion—it’s the whole point!
You’ll need: 6 tbsp (85g) unsalted butter (plus more for the pan), 2 large eggs, 1 large egg yolk, about 2/3 cup (93g) sugar, 3/4 cup (90g) flour, 2 tsp (4g) culinary matcha, and 1/2 tsp baking powder.
The key flavor boost here is browning the butter first. Just melt it in a light-colored pan and let it cook until the milk solids at the bottom turn brown and it smells nutty. It adds an incredible depth.
After you mix your batter (fold everything gently!), cover it and let it rest in the fridge for at least 3 hours, or even overnight. This is non-negotiable for getting that hump!
Lesser-known trick: Don’t have a madeleine pan? No problem. You can bake this batter in a well-buttered-and-floured mini-muffin tin. You won’t get the classic shell shape, but you’ll still get that amazing brown-butter flavor and a cute little hump on top. Bake at 375°F (190°C) for about 10-12 minutes. They are absolutely best eaten fresh, still a little warm from the oven.
Inspirational Gallery
The Golden Rule of Clump-Free Matcha: Always sift your powder. Matcha is incredibly fine and electrostatically charged, meaning it loves to clump together. Forcing it through a small, fine-mesh sieve right before you add it to your batter is the single most important step to ensure a smooth, uniform color and prevent bitter pockets in your finished dessert.
- Vibrant color in your buttercream or white chocolate ganache.
- A smooth, silky texture without a powdery feel.
- An even, well-distributed flavor profile.
The secret? Infuse, don’t just mix. Gently warm your cream or milk, whisk in the sifted matcha, let it steep for 20 minutes off the heat, then strain it. This technique extracts color and flavor flawlessly for liquids.
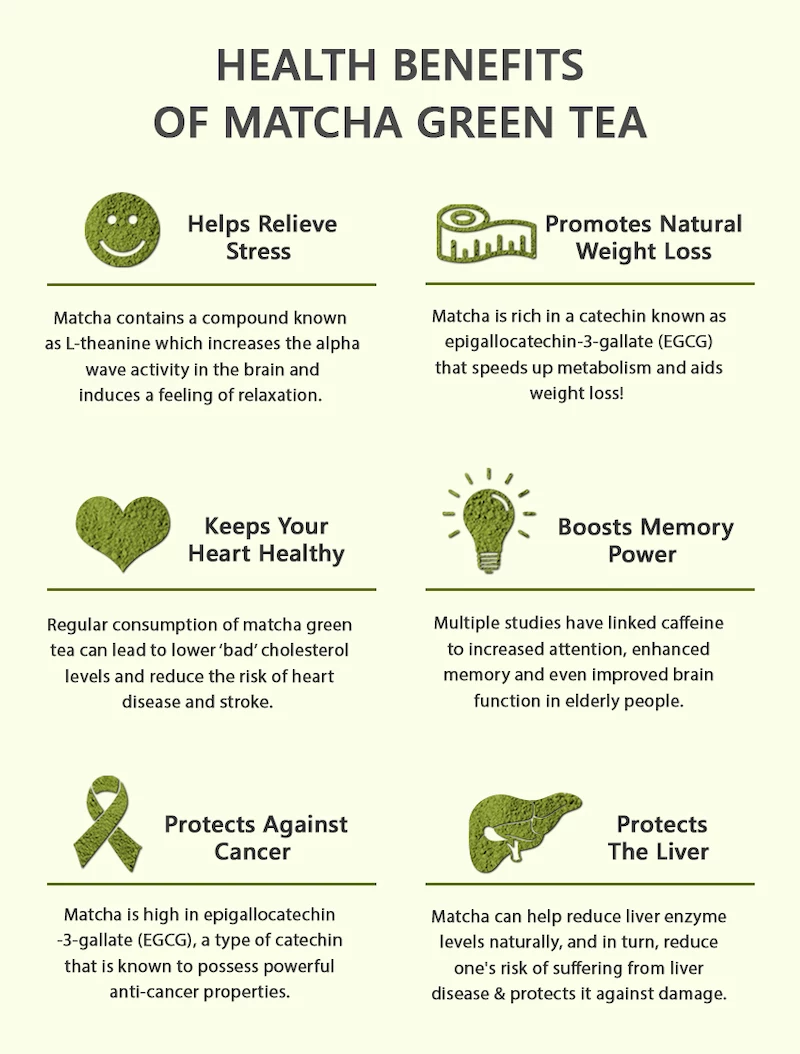
A study in the Journal of Chromatography A found that the concentration of the amino acid L-theanine, responsible for the ‘calm alertness’ feeling, can be up to five times higher in matcha than in regular green teas.
In baking, this translates to more than just a mood. L-theanine imparts a subtle, savory-sweet umami depth that balances the sugars in your recipe, creating a more complex and sophisticated flavor profile that isn’t just ‘green tea’.

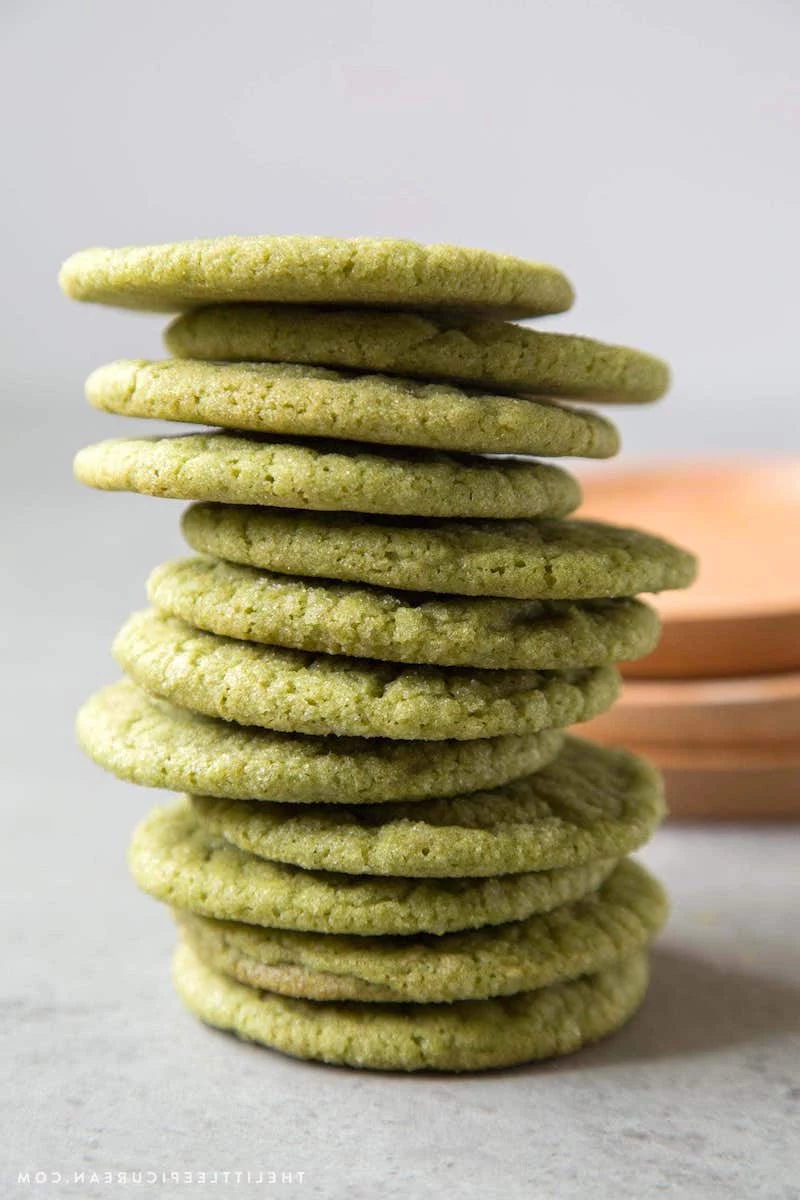
My matcha bake turned a murky, brownish-green. What went wrong?
This is often a result of oxidation from over-baking or high heat. Matcha’s beautiful chlorophyll is sensitive. To protect it, try baking at a slightly lower temperature for a longer time. Also, incorporating fats like butter, cream, or white chocolate helps to coat the matcha particles, shielding them from the oven’s direct heat and preserving that stunning viridian hue.
Ippodo’s ‘Ikuyo’: A fantastic entry point into high-quality culinary matcha. It’s robust enough to stand up to sugar and fat without losing its character, making it a reliable choice for everything from cookies to cheesecakes.
Marukyu Koyamaen’s ‘Aoarashi’: A step up, this one offers a brighter color and more nuanced flavor. It’s the go-to for pastry chefs when the matcha flavor needs to be the star, like in a delicate mousse or panna cotta.
For most recipes, a high-end culinary grade offers the best balance of flavor and value.
Don’t let your expensive matcha go stale! Once opened, its vibrant character degrades quickly when exposed to air, light, and heat. Store your opened tin in the refrigerator, sealed tightly. For best flavor, aim to use it within 3-4 weeks of opening. That fresh, grassy aroma is your indicator of quality.
Did you know? The practice of grinding tea leaves into a powder originated in China with the Song Dynasty (960–1279) but was perfected and ritualized in Japan into the tea ceremony we know today.
Think beyond just green. The earthy, slightly bitter notes of matcha are a perfect canvas for complementary flavors. Here’s what the pros use:
- White Chocolate: Its sweetness and creamy fat content perfectly balance matcha’s astringency.
- Raspberry or Strawberry: The sharp tartness of red berries cuts through the richness and creates a stunning visual contrast.
- Yuzu or Lemon: A hint of bright citrus zest lifts the grassy notes of the tea.
- Black Sesame: A classic pairing in Asian desserts, offering a nutty, toasty depth.
The secret to dissolving matcha perfectly for a liquid batter? Make a paste first. Instead of dumping the powder directly into your milk or water, place your sifted matcha in a small bowl. Add just a tiny splash of the liquid (a teaspoon or two) and use a bamboo whisk (*chasen*) or a small spatula to work it into a smooth, thick, lump-free paste. Then, you can gradually whisk in the rest of your liquid. This guarantees a silky-smooth integration.
For an elegant finish, a simple dusting of matcha powder is classic. But to add texture and visual appeal, try a sprinkle of toasted black sesame seeds, a few freeze-dried raspberry pieces, or delicate white chocolate shavings. The color contrast makes the green pop even more.
Bamboo Whisk (Chasen): Designed specifically for matcha, its 80+ fine tines are unparalleled for creating a smooth, frothy suspension without clumps. Essential for traditional preparation, and excellent for making a paste for baking.
Electric Milk Frother: A modern shortcut. It’s very effective for mixing matcha into lattes or liquid batters, but it can be too aggressive for making a pre-dissolving paste and less effective at breaking down small, stubborn clumps.
For bakers, the frother is a great time-saver for liquids, but a small regular whisk and a sieve are a must.
- Creates a rich, creamy base for your dessert.
- Adds sweetness to balance matcha’s earthy flavor.
- The cocoa butter helps stabilize mousses and ganaches.
The key is using white chocolate with your matcha. Its high-fat content is an excellent carrier for matcha’s complex flavors, mellowing any bitterness and enhancing its fragrant notes. It’s a match made in pastry heaven.
That unique, savory depth in high-quality matcha is called ‘umami’. While we associate it with savory foods like mushrooms and soy sauce, in desserts it works as a sophisticated flavor enhancer. It prevents the sweetness from being one-dimensional and cloying, adding a lingering, pleasant aftertaste that keeps you coming back for another bite.
How much matcha should I use?
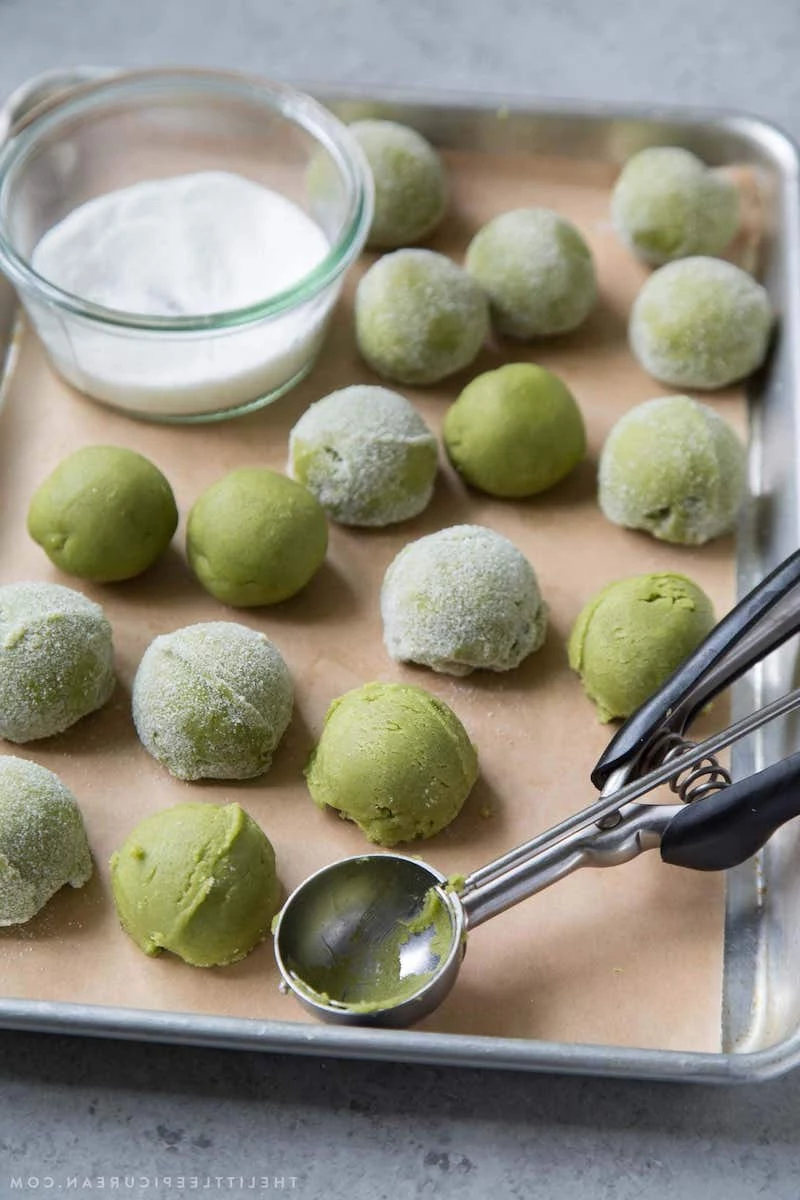
A common mistake is being too heavy-handed, resulting in an overwhelmingly bitter dessert. A good starting point for a standard cake or batch of 12 cookies is 1.5 to 2 tablespoons of culinary-grade matcha. For unbaked items like cheesecake or ice cream where the flavor isn’t cooked off, you can start with 1 tablespoon and taste as you go. Remember, you can always add more, but you can’t take it out.

Matcha contains one of the highest concentrations of antioxidants, specifically catechins, found in any natural food. The primary catechin, EGCG, is the subject of extensive research for its health benefits.
While a slice of matcha cake isn’t a health food, it’s a small bonus knowing you’re incorporating an ingredient packed with beneficial compounds. This is because, unlike steeped tea, you are consuming the entire, nutrient-rich leaf.
Looking for inspiration? Explore the world of Japanese *wagashi*. These traditional sweets have centered around matcha for centuries. Think of *daifuku mochi* with a matcha-and-anko (sweet red bean) filling, or a simple *yokan* (a firm jelly dessert) flavored with green tea. Their delicate sweetness is designed specifically to complement, not overpower, the tea.
Crucial point: Fat is matcha’s best friend in baking. The complex, fat-soluble flavor compounds in matcha need fats (like butter, oil, egg yolks, or cream) to truly bloom. A low-fat matcha recipe often tastes flat or grassy. A recipe with sufficient fat will have a deeper, richer, and more rounded matcha flavor.
The next time you’re at a specialty tea shop, look for hojicha powder. Made from the same plant as matcha, hojicha is roasted before being ground. This gives it a nutty, toasty, and less caffeinated profile with a reddish-brown color. It’s a fantastic alternative for desserts, pairing beautifully with chocolate, caramel, and autumn spices.
Create a quick, versatile matcha glaze for donuts, cookies, or pound cakes.
- Start with 1 cup of powdered sugar in a bowl.
- Sift in 1 to 2 teaspoons of high-quality culinary matcha.
- Add 2 tablespoons of milk or cream and a splash of vanilla.
Whisk vigorously until completely smooth, adding more milk by the half-teaspoon until you reach your desired drizzling consistency.
A baker’s tip: To prevent your matcha from oxidizing and turning brown in cookies, try adding a tiny pinch (about 1/8 teaspoon) of baking soda to your dry ingredients. The alkalinity helps to preserve the chlorophyll, keeping that vibrant green color more stable during the bake.


