Finally, A No-Bake Peanut Caramel Bar That Actually Tastes Amazing
Let’s Get Real About Homemade Candy Bars
I’ve spent a good chunk of my career in professional kitchens, getting way too familiar with fancy pastries and chocolates. You learn pretty quickly that some combinations are classics for a reason. And let’s be honest, the blend of nougat, caramel, peanuts, and chocolate is basically perfect.
In this article
A lot of us want to capture that magic at home using simpler, more wholesome ingredients. That’s exactly what this guide is for. This isn’t a straight-up copy of a store-bought candy bar; it’s something better, in my opinion. It’s a dense, chewy, and seriously rich treat that just happens to be made from whole foods.
My goal here isn’t just to hand you a recipe. I want to pull back the curtain on the why behind each step, just like I would with my apprentices. Once you understand the ingredients and techniques, you can make these bars perfectly, every single time.
Heads up on what you’re in for:
- Total Time: About 2.5 hours, but most of that is hands-off chilling time!
- Active Prep: Roughly 25-30 minutes.
- Yield: Makes about 16 small bars or 9 larger ones.
- Allergy Note: This recipe is a peanut powerhouse. But no worries! For a peanut-free version, just swap the peanut butter 1:1 with almond or sunflower seed butter and use almonds or sunflower seeds instead of peanuts. Easy.
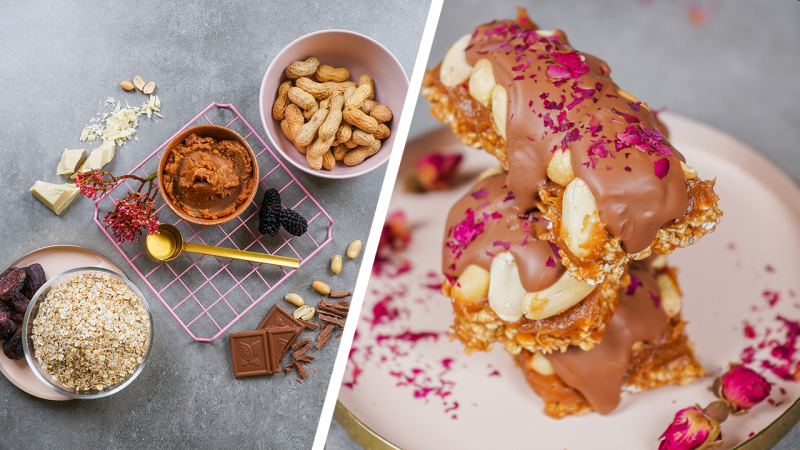
The Building Blocks: Understanding Your Ingredients
The success of these bars comes down to the quality of your ingredients and how they play together. Each one has a job to do. Knowing their roles is your secret weapon for nailing the recipe and even making smart substitutions down the road.
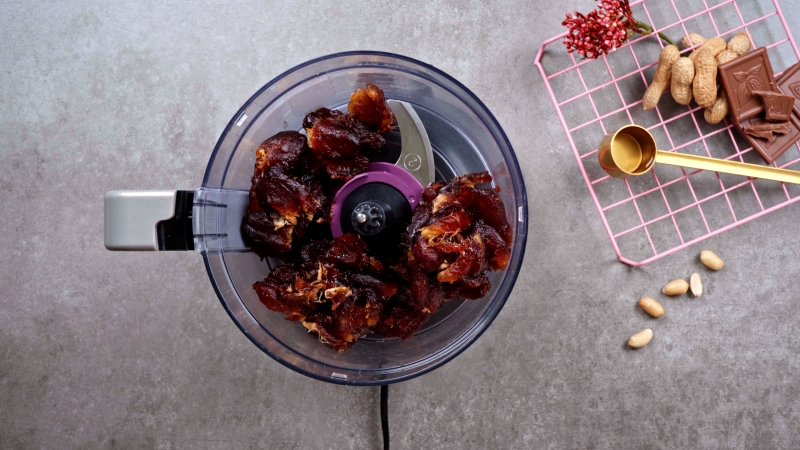
Dates: The All-Natural Sweetener & Glue
Dates are the undisputed MVP of this recipe. They bring the sweetness, the structure, and that gooey, caramel-like texture. But not all dates are created equal. You’ll mainly run into two types: Medjool and Deglet Noor.
- Medjool Dates: These are the big, soft, super-luxe dates with a deep caramel flavor. Their high moisture content makes them blend into a silky paste, which is why they’re perfect for our caramel layer. They can be a bit pricier—expect to pay around $7 to $10 per pound in the produce section or bulk bins—but they are so worth it for that top layer.
- Deglet Noor Dates: These are smaller, a bit firmer, and have a more subtle sweetness. Their lower moisture content gives them a great chew, making them the ideal choice for the bar’s base. They provide structure without making everything a sticky mess. You can usually find these for a steal, often around $4 to $6 per pound.
Quick Tip: If your dates feel a little dry or stiff, just soak them in warm water for about 10 minutes. This rehydrates them and wakes up their natural binding power.
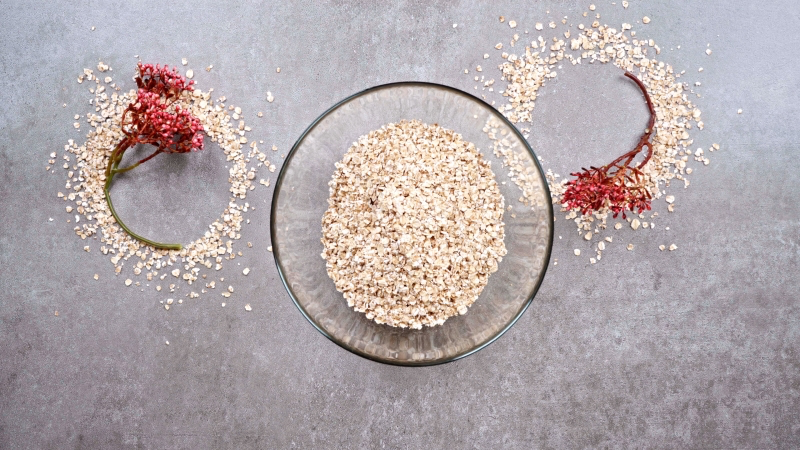
Oats: The Unsung Hero of the Base
Oats give the base layer its body and texture. They’re like a sponge, soaking up extra moisture from the dates and preventing the base from turning into a goopy disaster. For this recipe, I find that Quick Oats work best. They absorb moisture perfectly and create a bar that holds together beautifully without being too tough. Rolled oats can work in a pinch, but whatever you do, do NOT use steel-cut oats. They’ll stay hard and gritty. Trust me on this.
Peanut Butter & Peanuts: The Heart and Soul
This is where that signature flavor comes from. The kind of peanut butter you choose really matters here. Go for a natural peanut butter where the only ingredients are peanuts and maybe some salt. That natural oil separation is a good sign! Avoid the conventional stuff with added sugars and hydrogenated oils; those additives can make the caramel layer waxy or greasy.
Chocolate: The Grand Finale
The chocolate coating is what takes these bars from a tasty snack to a legit dessert. And honestly, the quality of your chocolate can make or break the whole experience.
- The Pro Choice: In the pastry world, we use couverture chocolate because it has a higher percentage of cocoa butter. This helps it melt into a super-smooth, fluid coating that gives a satisfying ‘snap’ when you bite into it. If you want to get fancy, look for brands like Guittard or Callebaut online or at a specialty cooking store.
- The Supermarket Solution: For a more accessible option, a high-quality dark chocolate bar (think 65-72% cacao) works great. Brands like Lindt or Ghirardelli are solid choices. Just try to avoid regular chocolate chips, as they have stabilizers in them to hold their shape, which means they don’t melt as smoothly.
A word of warning: Chocolate’s mortal enemy is water. Even a single, tiny drop can cause it to “seize” and turn into a clumpy, grainy mess. Always, always use a completely dry bowl and spatula when melting chocolate. You can’t fix seized chocolate for coating, so it’s worth being careful!
The Method: Let’s Make Some Bars
Think of this as a process, not just a list of instructions. Follow these steps, and you’ll get a fantastic result. Consistency is king!
Getting Your Gear Ready (Mise en Place)
In any kitchen, getting all your tools and ingredients ready before you start is a non-negotiable rule. It makes everything go so much smoother.
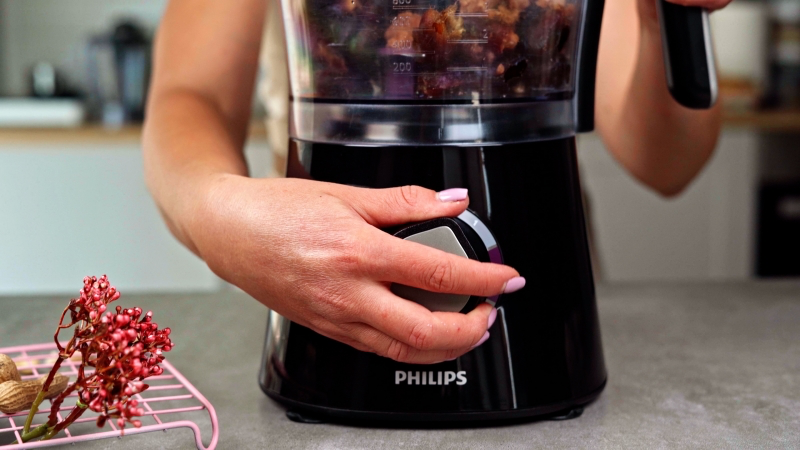
- Food Processor or High-Speed Blender: You’ll need something with a bit of muscle to break down those dates. (Good to know: If your blender isn’t super powerful, just soak all your dates, even the Deglet Noor ones, for about 15 minutes. Add the soaked dates to the blender first to make a paste before you add the oats. This is much easier on the motor.)
- 8×8 inch (20×20 cm) Baking Pan: This gives the bars the perfect thickness.
- Parchment Paper: The secret to easy removal. Line the pan with two strips, one going each way, leaving some extra hanging over the sides to use as handles.
- Digital Scale: I really recommend weighing your ingredients. It’s way more accurate than cups and is how all pros work. I’ve included both measurements for convenience.
- Spatulas, bowls, and a good, sharp knife.
The Recipe Rundown
For the Chewy Base:
- 150g (about 1 cup, packed) Deglet Noor dates, pitted
- 150g (about 1 ½ cups) quick oats
- A tiny pinch of fine sea salt
For the Peanut Butter Caramel:
- 250g (about 1 ½ cups, packed) Medjool dates, pitted
- 120g (about ½ cup) natural, runny peanut butter
- 1 teaspoon vanilla extract
- ½ teaspoon fine sea salt
- 100g (about ¾ cup) roasted, unsalted peanuts
For the Chocolate Topping:
- 200g (about 1 ¼ cups) high-quality dark chocolate (65-72%), chopped
- 1 teaspoon coconut oil (this is optional, but helps the chocolate melt a bit smoother)
Step 1: Build the Foundation
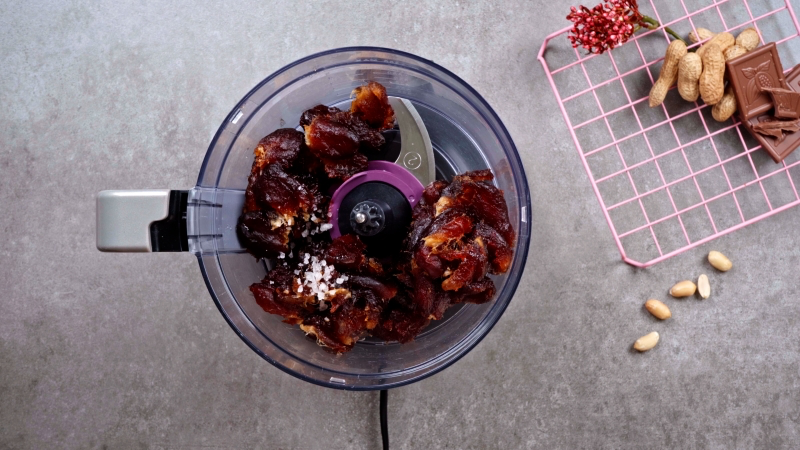
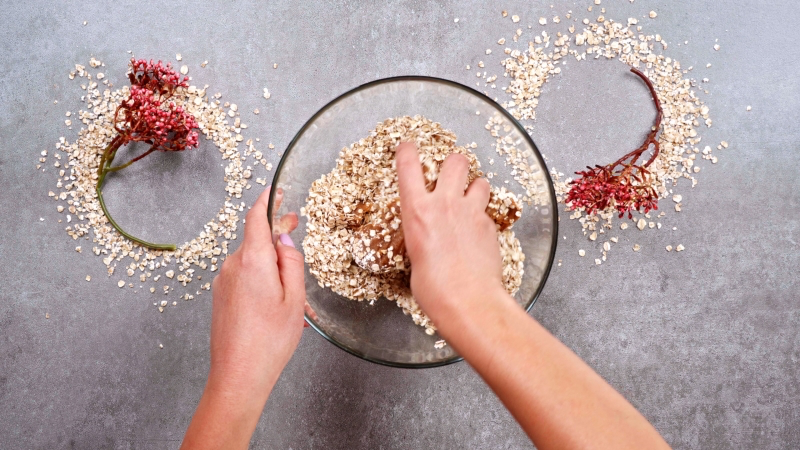
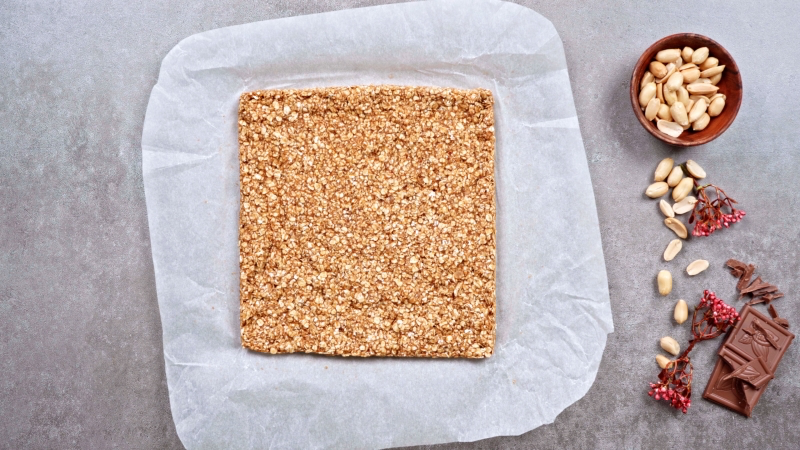
Toss the Deglet Noor dates, quick oats, and salt into your food processor. Use the pulse button in short bursts. This gives you control and stops the mixture from turning into a dense paste. After 10-15 pulses, it should look like a coarse, crumbly meal. The test? Pinch some between your fingers. If it sticks together, you’re golden. If it’s too dry, add another date or a teaspoon of water. Too wet? A tablespoon more of oats should do it. Dump this into your parchment-lined pan and press it down firmly and evenly. A flat-bottomed glass works great for this. Pop it in the freezer while you make the next layer.
Step 2: Whip Up the Date Caramel
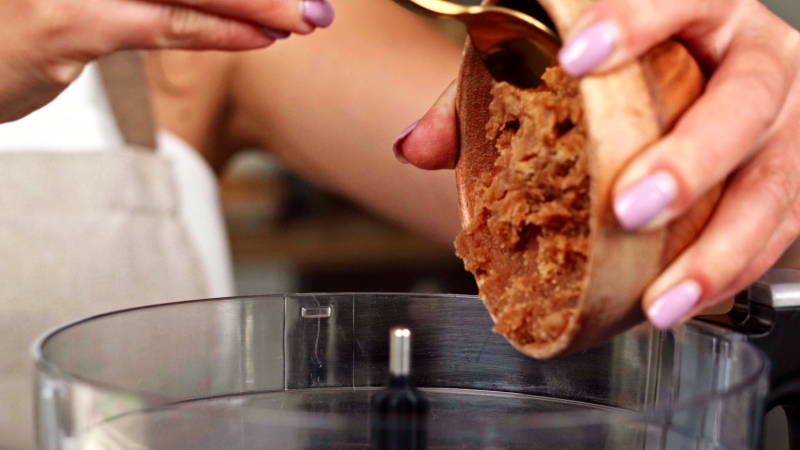
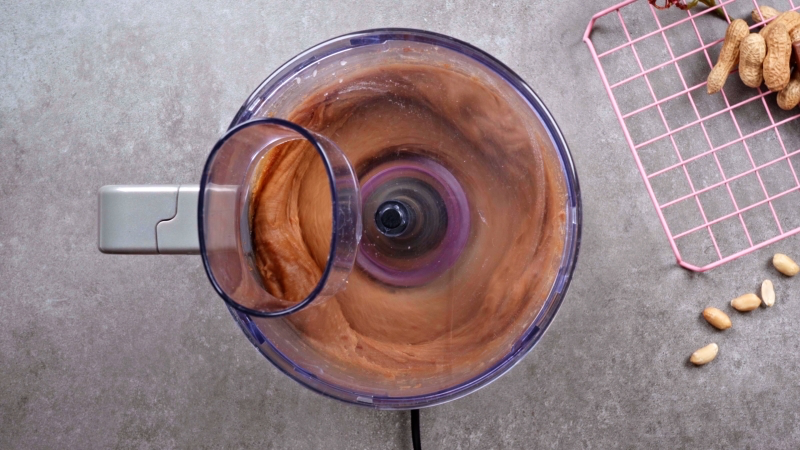
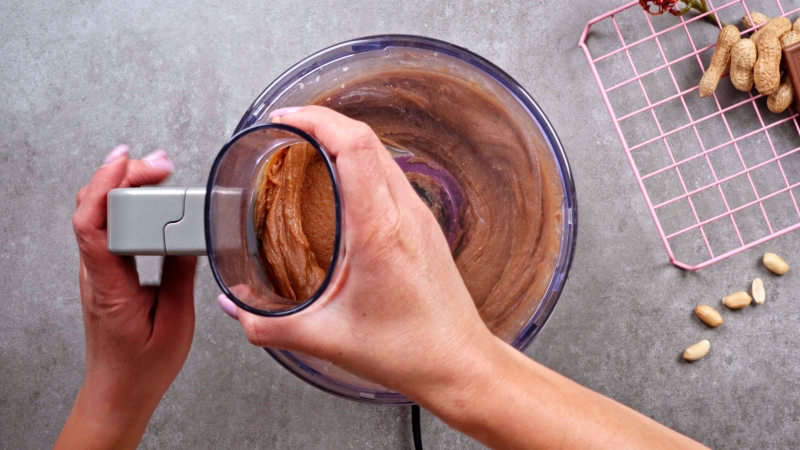
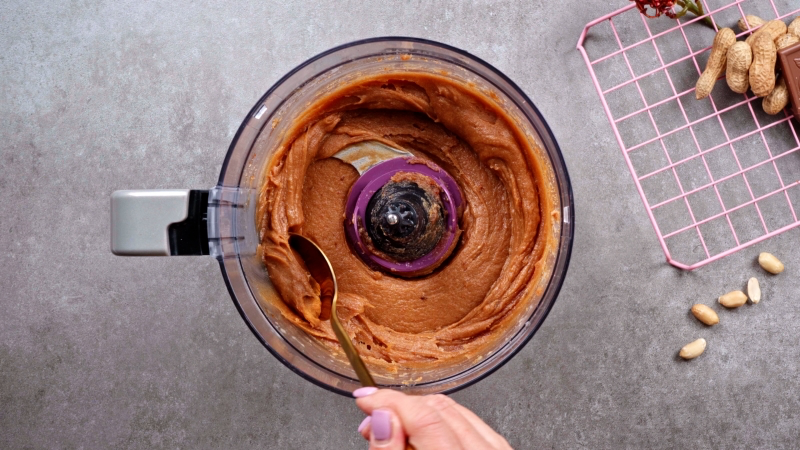
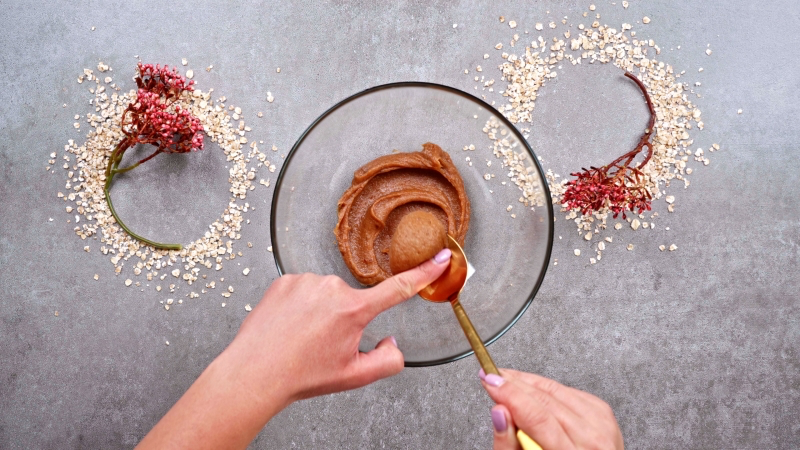
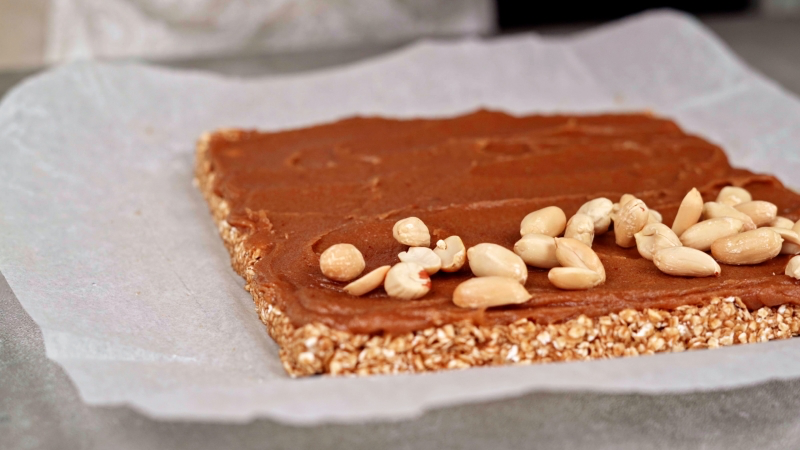
Wipe out your food processor bowl. Now, add the soft Medjool dates, peanut butter, vanilla, and salt. Blend continuously until it’s completely silky smooth, scraping down the sides as you go. The final texture should be like a very thick, luscious frosting. No date chunks allowed!
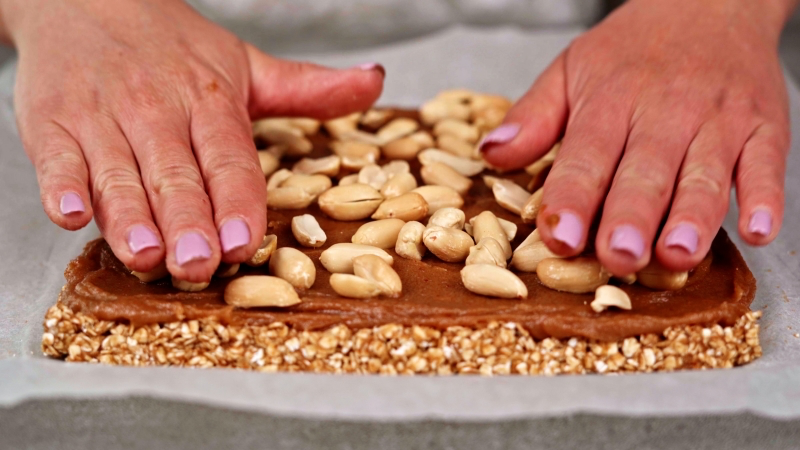
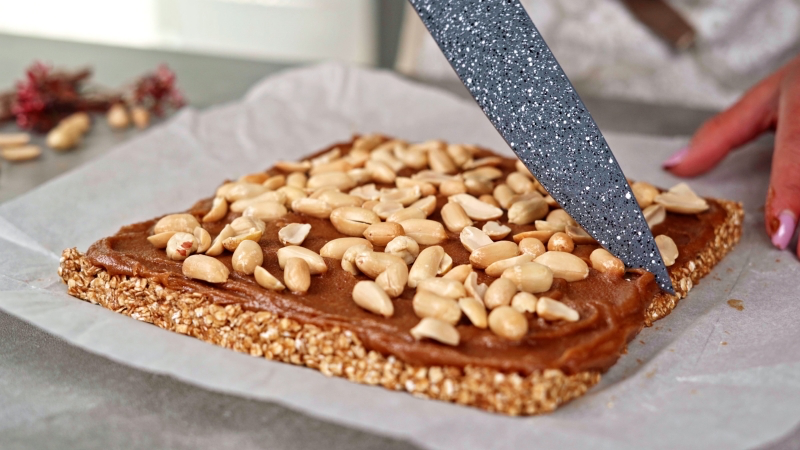
Grab your pan from the freezer. The base should be nice and firm. Spoon the caramel on top and spread it evenly with a spatula. Sprinkle the roasted peanuts over the caramel and gently press them in with your hands. This little step is key to making sure they don’t fall off later.
Step 3: The Big Chill
This part is absolutely mandatory. The bar needs to chill in the freezer for at least one hour, but honestly, two is even better. This solidifies the fats and sugars, making the whole thing firm enough to cut cleanly. Rushing this step will only lead to sad, misshapen bars. A super-cold bar also helps the warm chocolate set almost instantly when you pour it on top.
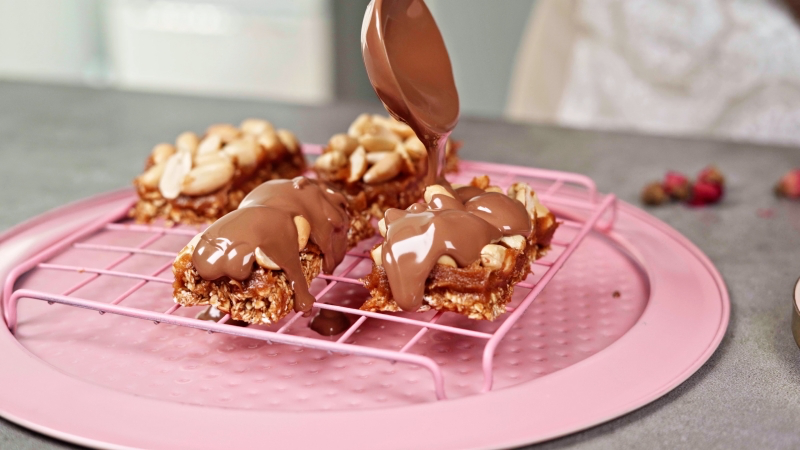
Step 4: The Cut and Coat
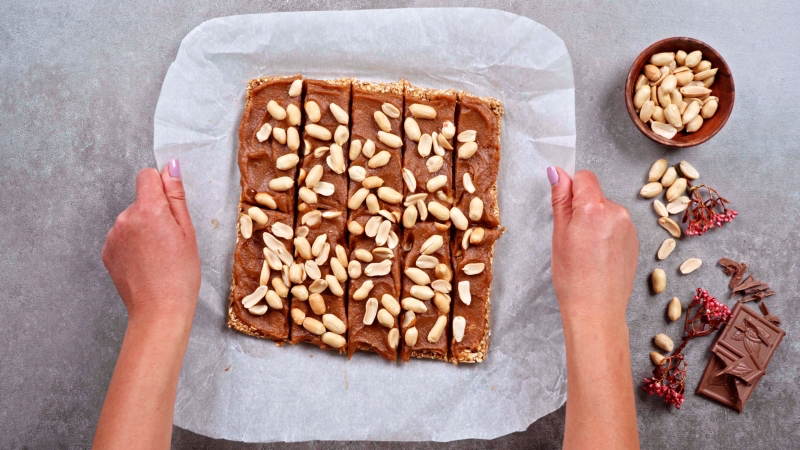
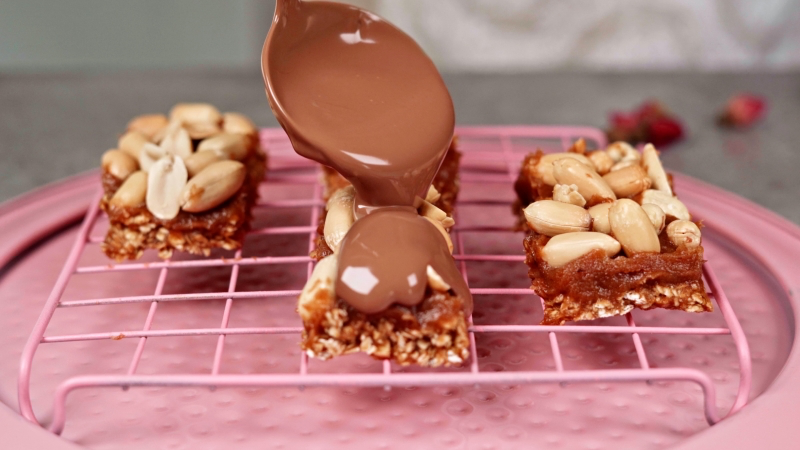
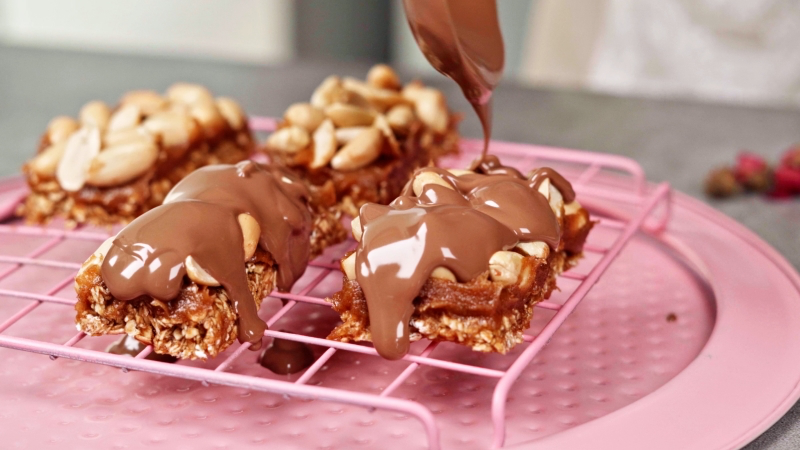
Once the slab is rock-solid, use those parchment handles to lift it onto a cutting board. The secret to professional-looking bars? A long, sharp knife and hot water. Fill a tall glass with hot water. Dip the knife in, wipe it completely dry with a towel, and make one clean, decisive cut. The warm, dry knife melts a microscopic path through the cold fats, giving you a clean slice instead of a crumbly fracture. It’s the little detail that makes all the difference. Wipe, dip, and dry the blade before every single cut. Yes, it’s tedious, but the results are worth it.
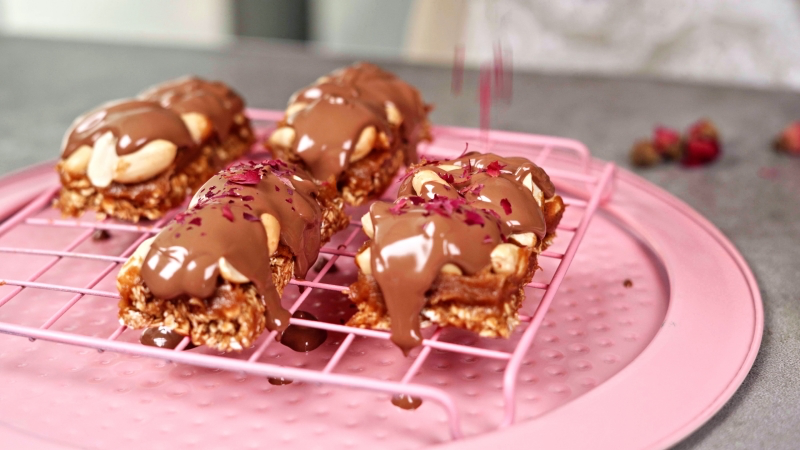
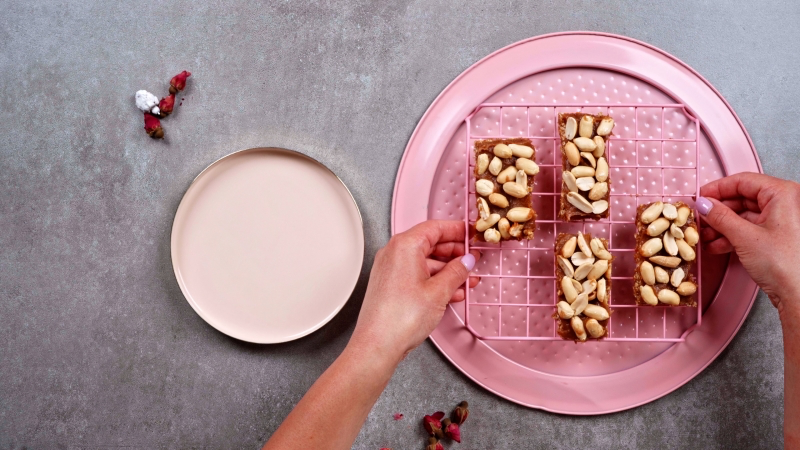
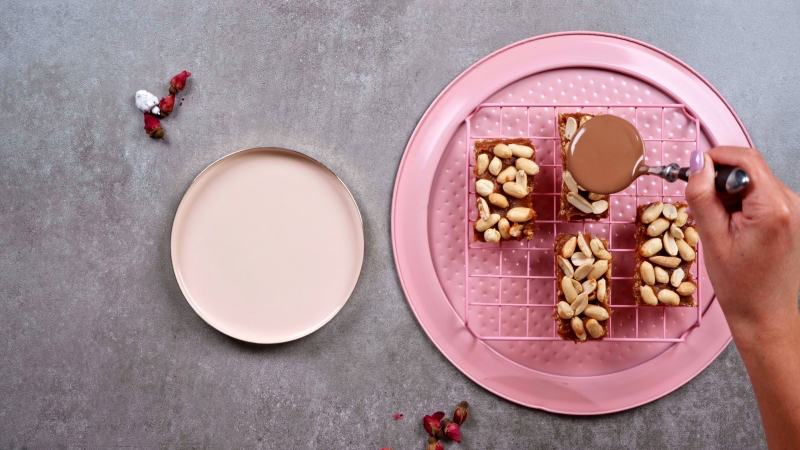
Now, for the chocolate. You can get great results by simply melting your chopped chocolate with that optional teaspoon of coconut oil in a bowl over a pot of simmering water (a double boiler). Stir until it’s perfectly smooth. Place your cold, cut bars on a wire rack with parchment paper underneath to catch any drips. Then, just pour or spoon the melted chocolate over each bar. Work fast, because that cold bar will make the chocolate set quickly! Let them sit until the chocolate is completely hard.
Common Hiccups & Creative Twists
Once you’ve got the hang of the basic recipe, the fun really begins. Here’s how to fix common problems and get creative.
Troubleshooting Like a Pro
- The Problem: My base is a sticky mess or a dry, crumbly pile.
The Fix: This is a simple moisture issue. If it’s too sticky, you just need more oats. Add a tablespoon at a time. If it’s too dry, your dates were probably dry. Pulse in another soaked date or a tiny splash of water. - The Problem: The caramel layer is too runny.
The Fix: This can happen if your peanut butter was extra oily. A thorough chill usually solves it. But if you’re in a pinch, here’s a lesser-known trick: blend in a tablespoon of coconut flour. It absorbs moisture like magic without really changing the flavor.
Flavor Variations to Try
Think of this recipe as your playground. It’s so easy to adapt.
- Mocha Vibe: Add 1-2 teaspoons of instant espresso powder to the date caramel. So good.
- Almond Joy Style: Use almond butter instead of peanut butter, mix some unsweetened shredded coconut into the base, and press toasted almonds into the caramel.
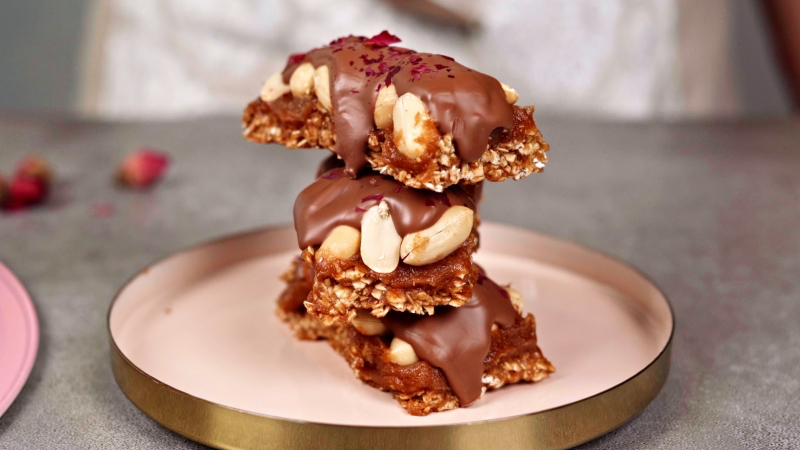
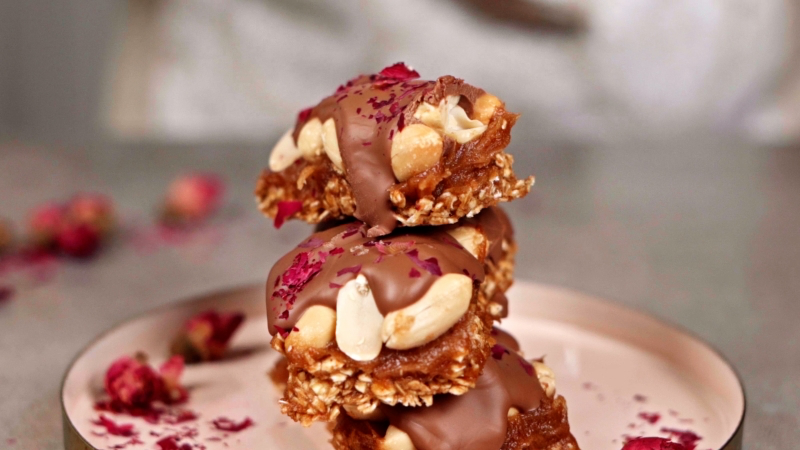
- The Salty Finish: Right after you coat the bars in chocolate, sprinkle on a tiny pinch of flaky sea salt (like Maldon). The crunch and flavor pop is incredible.
By the way, just want the good part? If you’re short on time, just make the date caramel from Step 2. It takes five minutes and is an amazing dip for apple slices or pretzels. You’re welcome.
How to Store These Beauties (And Final Thoughts)
Keeping Them Fresh
These bars are made with fresh ingredients and no preservatives, so they need to be kept cold. Store them in an airtight container in the fridge for up to a week. For longer-term storage, wrap them individually and pop them in the freezer, where they’ll be good for up to 3 months. Just let them sit out for 5-10 minutes before eating from frozen to let them soften up a bit.
A Final Word of Advice
Look, your first batch might not be Instagram-perfect, but I promise it will be delicious. The real skill comes from paying attention to how the mixtures feel and learning from each attempt. You’ll develop an instinct for it over time. This recipe is a solid starting point for making something truly satisfying from scratch. Enjoy the process!
Inspiration:
The right tool for the job: While both can work, your choice of appliance affects the texture of the nougat and caramel layers.
Food Processor: Its S-blade is perfect for pulverizing nuts and dates into a uniform, slightly textured dough, which is ideal for the base. It handles the thick mixture without overheating.
High-Speed Blender (like Vitamix or Blendtec): Excels at creating an ultra-smooth, silky date caramel. The trick is to not over-blend the nougat, or you’ll get nut butter instead of a textured base. For the smoothest caramel, the blender is king.

Don’t underestimate the power of a tiny pinch of salt! In a recipe this rich and sweet, salt is not just for flavor; it’s for balance. It cuts through the sweetness of the dates and chocolate, enhancing the nutty flavor of the peanuts and making the entire bar taste more complex and less cloying. A sprinkle of flaky sea salt, like Maldon, on top before the chocolate sets is a professional touch that adds both flavor and a delightful crunch.

Over 95% of the dates commercially produced in the United States are grown in California’s Coachella Valley. The Medjool variety, prized for this recipe, is often called the ‘Cadillac of dates’ due to its size and rich, moist texture.
Struggling to get clean, sharp slices?
The secret is a combination of temperature and technique. First, ensure the bars are thoroughly chilled—at least two hours in the fridge, or even 30 minutes in the freezer. Use a large, heavy chef’s knife. For perfectly clean cuts, dip the knife in hot water and wipe it dry between each slice. This warms the blade just enough to glide through the cold chocolate and dense layers without smearing or cracking.

Choosing your chocolate is a crucial final step. For a truly decadent finish, opt for a dark chocolate with 60-72% cacao. This percentage provides a rich, intense flavor that beautifully contrasts the sweet caramel and nougat. Chocolate chips often contain stabilizers to hold their shape, which can result in a thicker, less fluid coating. For a professional-grade melt and a satisfying ‘snap’, consider using chocolate feves or pistoles from brands like Callebaut or Guittard.
- Toast the peanuts before adding them to the nougat and topping.
- Let the date caramel cool slightly before spreading it over the base.
- Chill the final bars for at least two hours before cutting.
The result? A bar with a deeper, more roasted flavor, layers that stay distinct, and a texture that’s perfectly firm and chewy, not messy.
Important note on peanut butter: For the best texture in the nougat layer, use a natural-style peanut butter where the only ingredients are peanuts and salt. Brands like Smucker’s Natural or Santa Cruz Organic work perfectly. Avoid conventional peanut butters (like Jif or Skippy) that contain added sugar and hydrogenated oils, as these can make the base greasy and overly sweet, altering the final consistency.
A 2021 study found that 58% of consumers were more likely to cook at home than before the pandemic, with a significant rise in ‘recreational baking’ and creating healthier versions of comfort foods.
This recipe is a perfect example of that trend. It taps into our nostalgia for a classic candy bar while satisfying a desire for more control over ingredients. You’re not just making a treat; you’re participating in a larger cultural shift towards mindful, homemade indulgence.
Ready to move beyond the classic? Think of this recipe as a blank canvas. Here are a few ideas to customize your bars:
- Mocha Kick: Add one teaspoon of instant espresso powder to the chocolate as it melts.
- Spiced Caramel: Blend a pinch of cinnamon or cardamom into the date caramel layer for a warm, aromatic twist.
- Textural Contrast: Mix some raw cacao nibs into the nougat base for an extra layer of crunch and a slightly bitter note.
My date caramel turned out runny and didn’t set properly. What happened?
This is a common issue, often caused by one of two things. First, you may have added too much of the soaking water back into the dates when blending. Start with just a tablespoon and add more only if absolutely necessary. Second, the type of dates matters. Deglet Noor dates have less moisture and fiber than Medjool, and may require a bit more liquid, but can sometimes lead to a thinner result. The fix? Try adding a tablespoon of coconut flour or a bit more ground oats to the caramel to help it thicken and set.
To maintain that perfect chewy-firm texture, storage is key. Keep your bars in an airtight container in the refrigerator. They’ll stay fresh and delicious for up to two weeks. For longer-term storage, they freeze beautifully. Simply pre-slice them and place them in a freezer-safe bag or container. They’ll last for up to three months and are a fantastic treat straight from the freezer on a warm day!

- Perfectly uniform, professional-looking shapes.
- Easy release without any sticking or breaking.
- Consistent thickness for every single bar.
The secret is using a silicone bar mold. Brands like Silikomart offer a variety of rectangular molds that are perfect for this. Simply press the layers directly into the cavities and chill. No lining a pan, no uneven cutting—just flawless bars every time.
Chilling is not optional: It might be tempting to slice into your creation early, but patience is a virtue here. The chilling time is when the magic happens. It allows the coconut oil in the base to solidify, the date caramel to firm up, and the chocolate to set into a crisp shell. Rushing this step will result in a soft, messy bar that falls apart. Trust the process and give it the full time in the fridge.
These bars make a fantastic homemade gift. To elevate the presentation:
- Wrap each bar individually in parchment paper, twisting the ends like an old-fashioned candy.
- Arrange them in a simple kraft paper box tied with baker’s twine.
- For a final touch, add a custom tag with the ingredients or a personal note. It’s a thoughtful, delicious present that feels far more special than anything store-bought.
Can I use a different nut?
Absolutely! While peanuts provide the classic flavor, this recipe is incredibly versatile. For a sophisticated twist, try swapping the peanuts and peanut butter for toasted almonds and almond butter to create a bar reminiscent of an Almond Joy (just add shredded coconut to the nougat!). For a richer, deeper flavor, toasted pecans or walnuts work wonderfully with the date caramel.
Don’t just toss the pits from your Medjool dates! While inedible on their own, they can be repurposed. Once washed and thoroughly dried, date pits can be ground into a coffee-like powder that makes a surprisingly robust, naturally caffeine-free beverage. It’s a small step towards a zero-waste kitchen and a fun way to get the absolute most out of your ingredients.


