Let’s Be Honest: How to Make a Geode Cake That Won’t Collapse
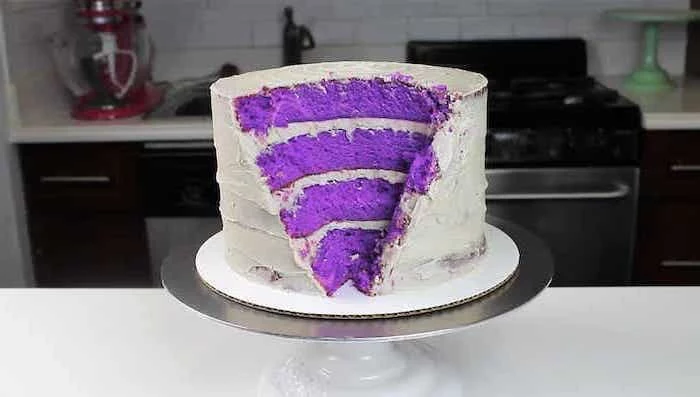
I’ll never forget the first time a client asked me for a geode cake. The trend was pretty new, and she came in with a picture of this gorgeous, brilliant purple design. It was stunning, but honestly? My first thought wasn’t about the color. It was about the gaping hole carved into the side of a tiered wedding cake.
In this article
- The Real Secret to a Stable Geode Cake? It’s the Foundation
- Frosting: It’s Not Just Decoration, It’s Glue
- Gathering Your Gear: The Baker’s Toolkit
- Step-by-Step: Let’s Build This Thing
- Common Problems I’ve Seen (And How to Fix Them)
- Final Thoughts: Safety, Sanity, and What It’s Like to Eat
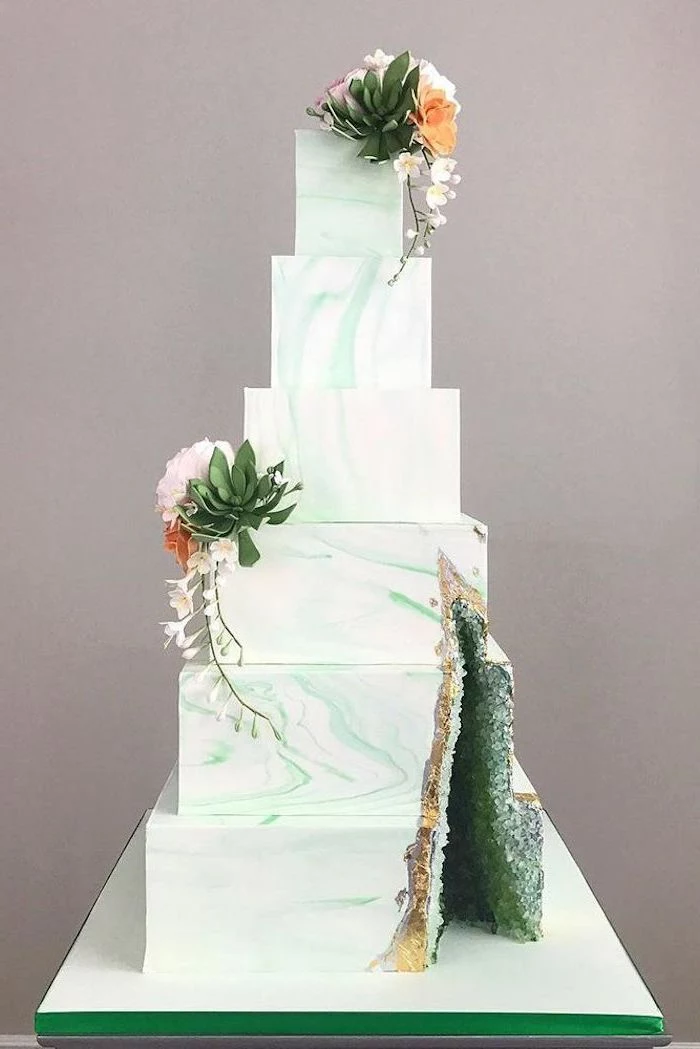
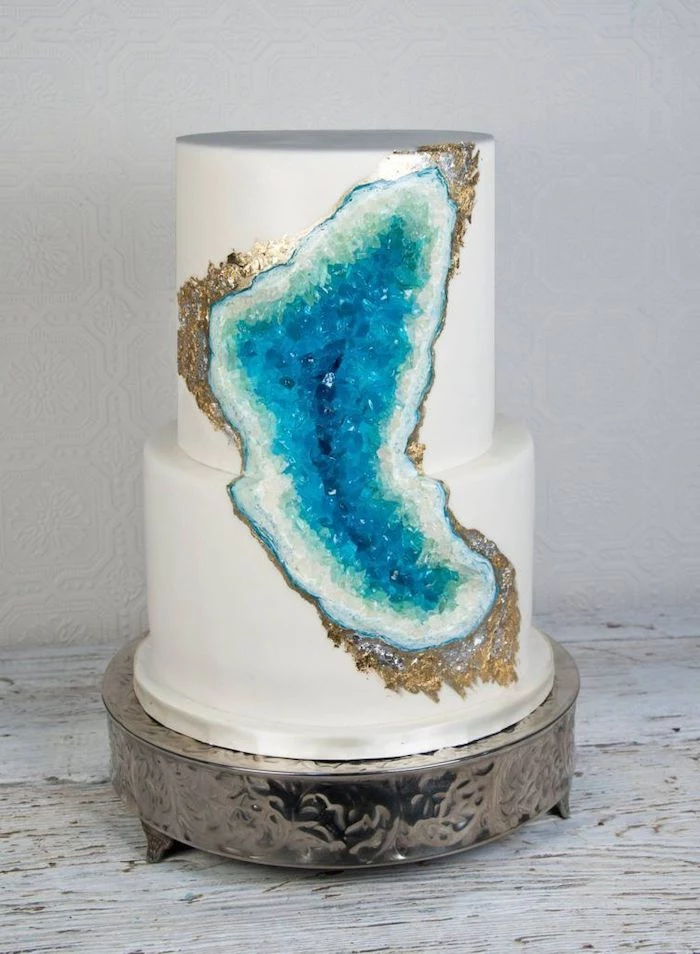
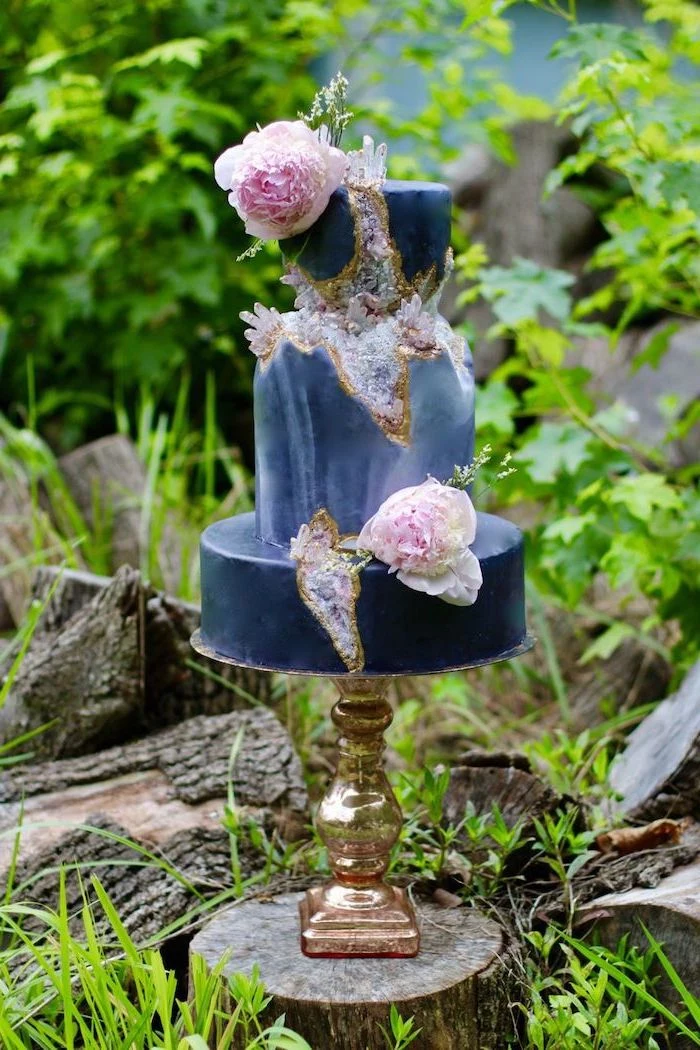
- Inspirational Gallery
As a baker, my brain immediately screamed, “structural failure!” My job isn’t just to make pretty things; it’s to make cakes that can survive a car ride, sit proudly at a venue for hours, and not give the event planner a heart attack. A huge wedge taken out of the side is basically an invitation for disaster.
That first project was a crash course in edible engineering. I learned more through trial and error than any tutorial could ever teach. I figured out which cakes have the backbone for this kind of stress and which frostings act like structural glue. This guide is all that hard-won experience rolled into one place. We’re going beyond the pretty pictures to focus on building a geode cake that’s stable, safe, and genuinely impressive. Let’s get into it.
The Real Secret to a Stable Geode Cake? It’s the Foundation
A geode cake is a lesson in managing pressure. The moment you carve out that wedge, you’ve created a weak point. All the weight from the upper tiers, the frosting, and those heavy sugar crystals is now pressing down on a compromised structure. So, your success starts before you even touch a carving knife.
Forget about light, airy sponges or delicate chiffon cakes for this project. They just don’t have the density and will collapse under the pressure. You need a cake with some real heft. My go-to choices are:
- Classic Butter Cakes: A good vanilla or chocolate butter cake has a tight, dense crumb that holds its shape beautifully, especially when chilled. It carves cleanly without a ton of crumbling.
- Pound Cakes: These are the heavyweights for a reason. Their super-dense structure is absolutely ideal for carving and can handle a lot of weight.
- Sturdy Oil-Based Cakes: A well-made carrot cake (hold the chunky nuts and pineapple in the area you plan to carve) or a dense chocolate mud cake can also do the trick. The key is a firm crumb.
Heads up: This is a non-negotiable step. Once baked and fully cooled, wrap each cake layer tightly in plastic wrap and chill it in the fridge for at least four hours, but overnight is even better. A cold cake is a firm cake. It carves like cold butter instead of tearing apart. Don’t skip this!
Frosting: It’s Not Just Decoration, It’s Glue
So, what should you use to hold this whole thing together? Soft, whipped frostings are out. You have two main contenders, and each has its pros and cons.
First is a stiff American buttercream. For this to work, it has to be really stiff. I’m talking a higher ratio of powdered sugar to fat than you might normally use—think a 2:1 ratio of powdered sugar to fat by weight. It’s relatively easy to make and affordable, but it’s not as iron-clad as the other option. To be frank, it’s best for smaller, single-tier cakes.
The professional’s choice, especially for anything tiered or large, is ganache. A firm-set chocolate ganache creates a hard, candy-like shell around your cake that provides incredible structural support. It’s made from just chocolate and heavy cream, typically in a 2:1 ratio (two parts chocolate to one part cream by weight) for a dark chocolate version that sets up like a rock. It costs a bit more and takes time to set, but the peace of mind is worth every penny.
Gathering Your Gear: The Baker’s Toolkit
Having the right stuff on hand makes this project fun instead of frustrating. You don’t need a ton of fancy equipment, but the right tools are essential. Oh, and let’s talk budget. This project isn’t super expensive, but you should plan on spending around $40-$70 on the specialty materials if you’re starting from scratch.
The Edible Stuff:
- A Chilled, Sturdy Cake: We covered this, but make sure it’s at least 6 inches tall to give you room for a nice, deep geode.
- Stiff Buttercream or Ganache: Your structural glue.
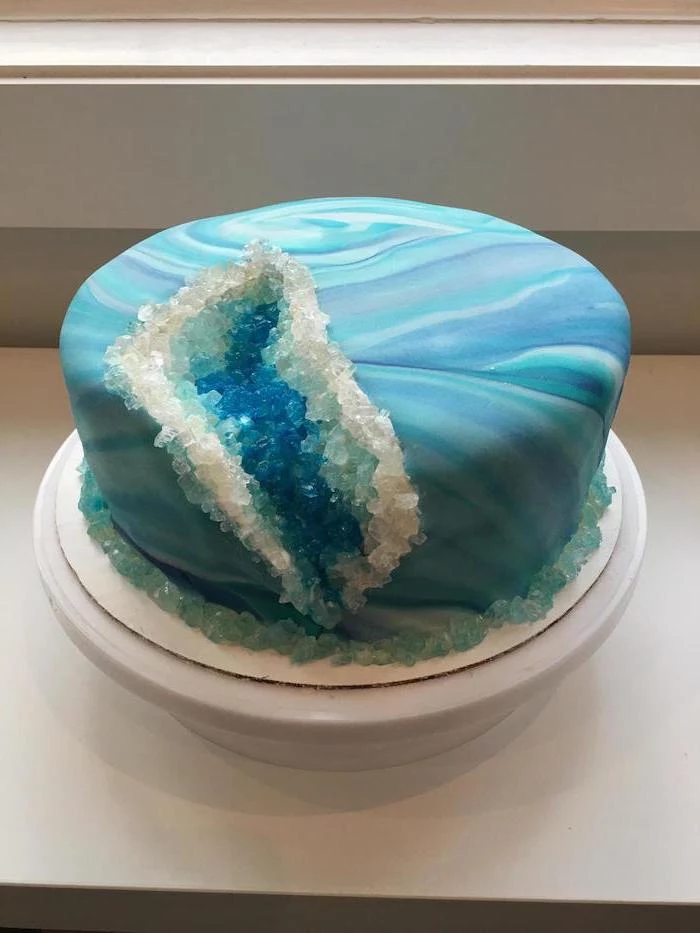
- Rock Candy Crystals: This is your geode! For a standard 8-inch round cake, you’ll want about 1.5 to 2 cups of crystals. Buy clear rock candy and color it yourself for the most natural look. Get a mix of large chunks for the back and smaller pieces for the front to create depth. You can find this online or at bulk candy stores.
- Gel Food Coloring: Don’t use the liquid stuff from the grocery store; it’s water-based and will just dissolve your sugar. Concentrated gels are what you need.
- High-Proof Clear Alcohol: Vodka or clear grain alcohol (like Everclear) is key for painting. It dissolves the gel color and then evaporates quickly, leaving the pigment behind without making your crystals soggy.
- Edible Gold or Silver: For that classic polished border. Make sure it’s explicitly labeled “edible.” A lot of craft store metallics are just “non-toxic,” which isn’t the same thing! Expect to pay around $15-$25 for a small booklet of real edible gold leaf, but a little goes a long way. Edible paint is a great, easier-to-use alternative.
The Tools:
- A cake turntable, a small serrated knife for carving, offset spatulas (big and small), a bench scraper for smooth sides, and a set of small, food-only paintbrushes. Seriously, keep a separate set for food—no crossing over from your craft kit!
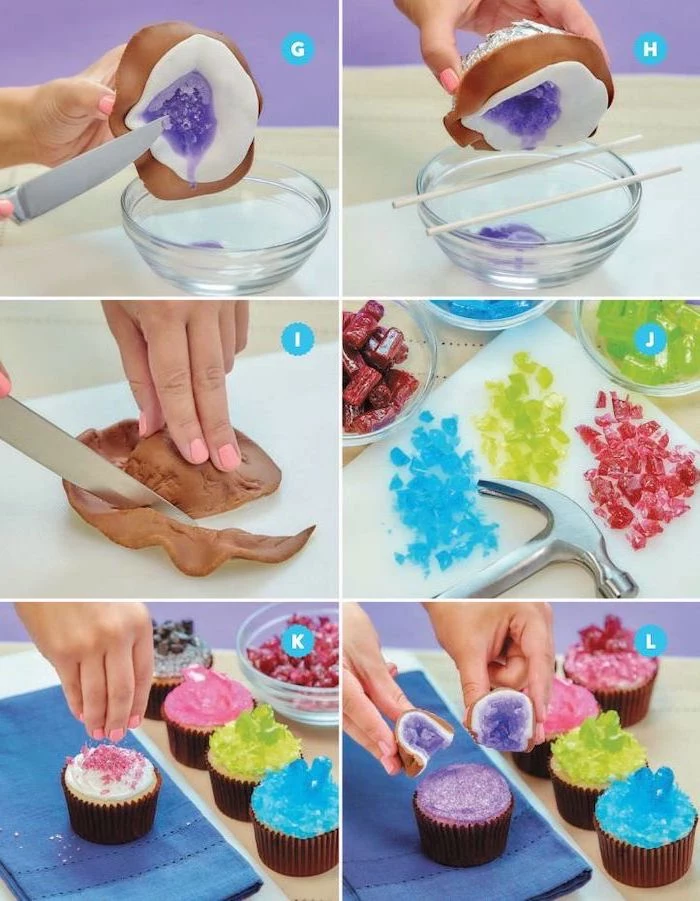
By the way, if you want to color your own crystals (which I highly recommend), it’s easy. Just put your clear rock candy in a ziplock bag, add a few drops of gel color and a tiny splash of that high-proof alcohol. Seal the bag and shake it like crazy until the crystals are evenly coated. Spread them on a baking sheet to dry completely before you use them. The alcohol will evaporate, leaving you with perfectly colored, dry crystals.
Step-by-Step: Let’s Build This Thing
Alright, let’s get our hands dirty. Plan for this to be a two or three-day project. Day 1 is for baking and chilling. Day 2 is for carving, frosting, and applying crystals. Day 3 is for painting and finishing touches. Rushing is your enemy here.
Step 1: Build and Secure Your Base. Level and stack your chilled cake layers with a thin layer of buttercream or ganache in between. Apply a thin “crumb coat” of frosting over the whole cake to trap any loose crumbs. Now, chill it for at least 30 minutes until that coat is firm.
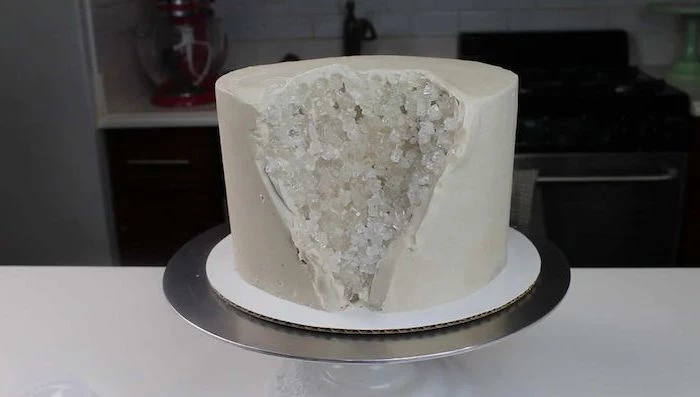
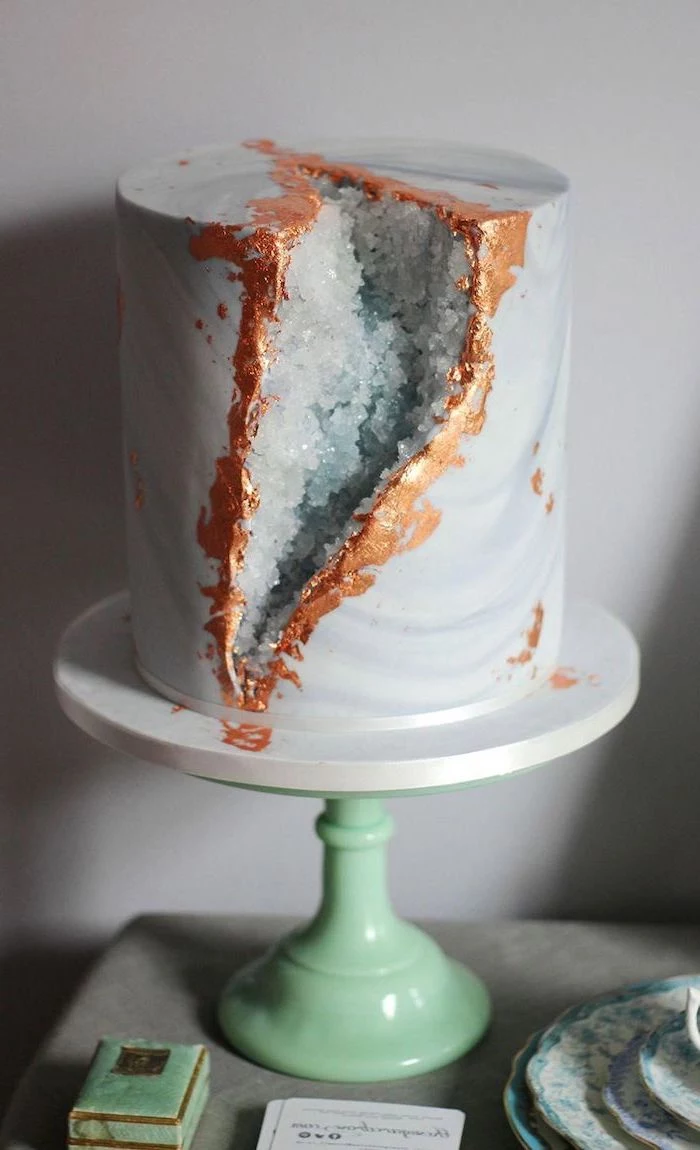
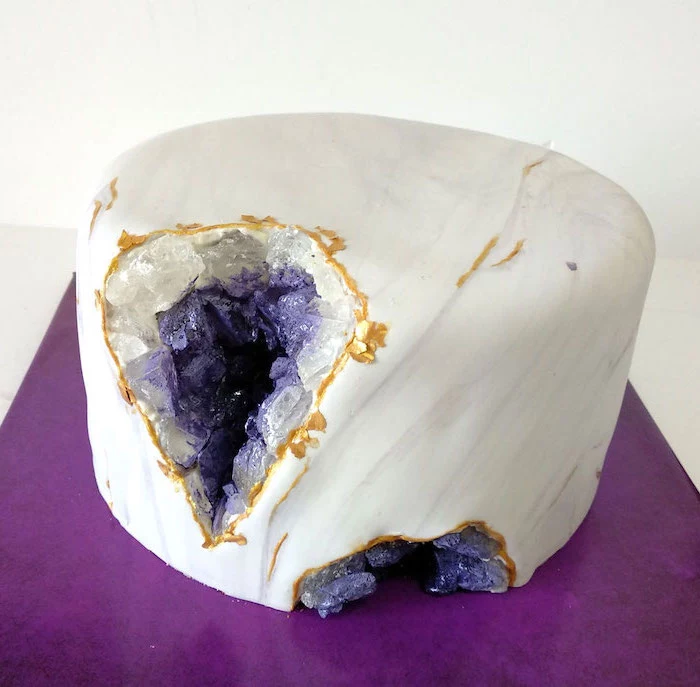
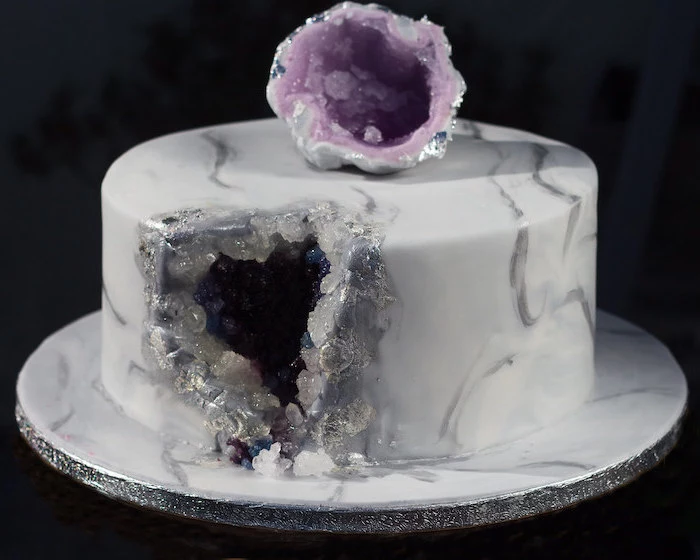
Step 2: Plan and Carve the Cavity. Before you cut, sketch your geode shape onto the chilled cake with the tip of your knife. Quick tip: don’t go deeper than one-third of the cake’s diameter. For a 9-inch cake, that’s a 3-inch deep max. Use your serrated knife to carve at a slight angle, creating an irregular, jagged cavity. Think natural rock, not a perfect triangle. Pop it back in the fridge for 20 minutes to firm up again.
Step 3: Fortify and Frost. This is a step a lot of people miss. Take your stiff frosting and slather a thick layer inside the entire carved area. This is the adhesive for your candy and adds back some structural integrity. After that, you can apply the final, smooth coat of frosting to the rest of the cake.
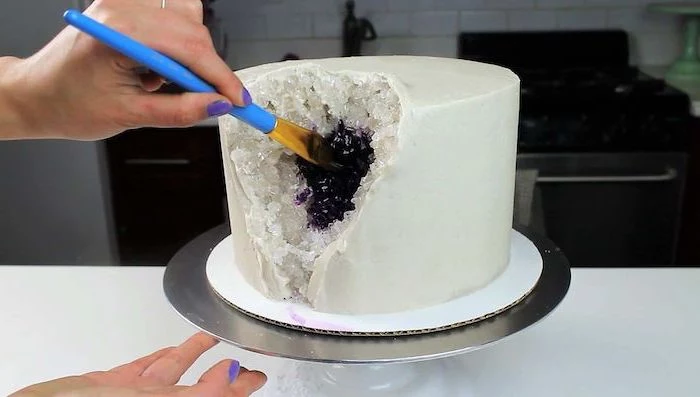
Step 4: Place Your Crystals. Now for the fun part. Start with your biggest crystals and press them firmly into the frosting at the deepest part of the cavity. Work your way from the inside out, using smaller crystals as you get to the edge. Pack them in tightly! A common mistake is being too sparse. You want to completely cover the frosting. I like to work in small sections—apply frosting to one area, add crystals, then move on. This stops the frosting from crusting over before you can stick the candy to it.
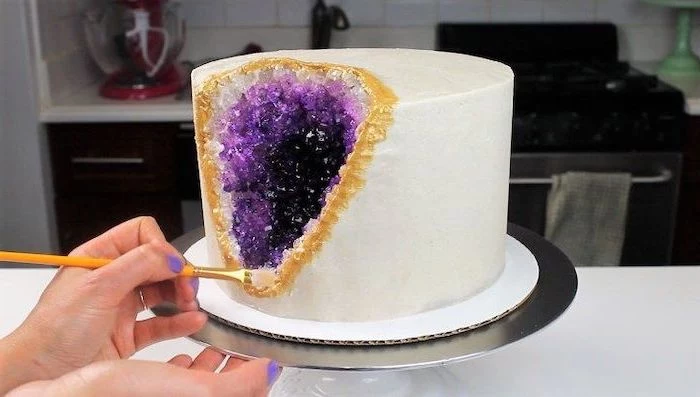
Step 5: Paint the Geode. In a small bowl, mix a tiny bit of your darkest gel color with a few drops of vodka to make a thick paint. Paint this onto the largest crystals in the center. In another bowl, mix a lighter shade and paint that around the dark center, blending slightly. Keep going, getting lighter as you move to the edge. Let it dry completely for about an hour.
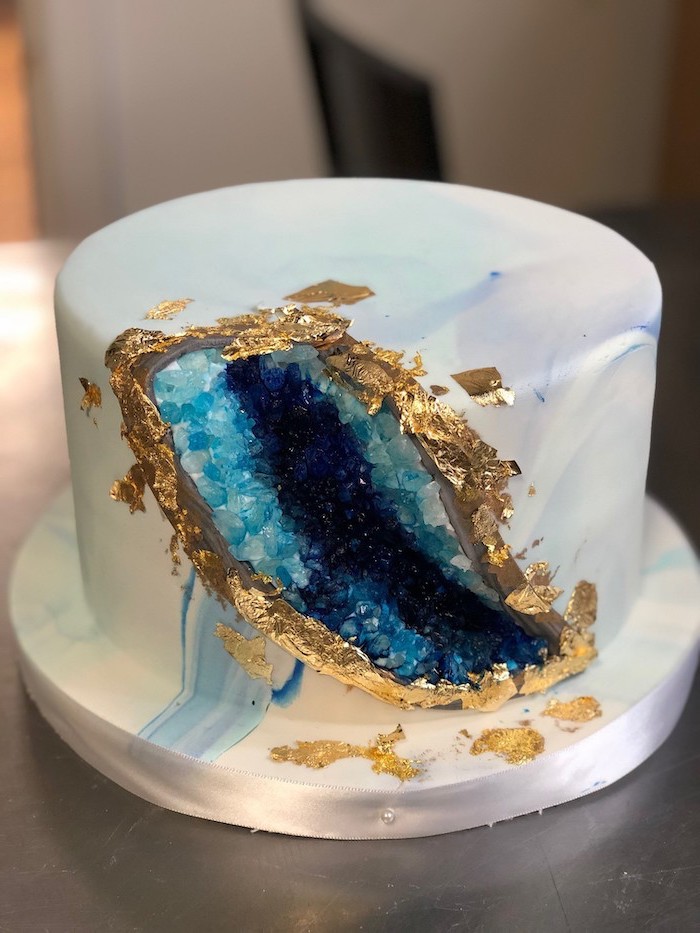
Step 6: Add the Bling. The final touch! Using a fine-tipped, clean brush, carefully paint a thin border of edible gold or silver paint right along the edge where the crystals meet the cake. This is what gives it that professional, polished finish.
Common Problems I’ve Seen (And How to Fix Them)
Things can and do go wrong. Here are a few SOS situations I’ve run into.
- Help! My crystals are falling off! This usually means your frosting wasn’t thick enough or it dried before you added the candy. You can try to carefully “paint” a thin layer of clear corn syrup or piping gel onto the area with a small brush and re-press the crystals. It’s a bit fussy, but it can save the day.
- Oh no, my cake is bulging! This is a major warning sign that your cake was too soft, not chilled enough, or you carved the geode too big. Prevention is the only real cure here: use a dense cake and a ganache shell. If you see a slight bulge, extreme chilling might firm it up, but the cake is compromised.
- My paint is bleeding! You probably used too much vodka, making your paint too watery. Make sure your color mix is a thick paste, not a wash, and that your main cake frosting is well-chilled and firm.
Final Thoughts: Safety, Sanity, and What It’s Like to Eat
Before we wrap up, a quick word on safety. Only use materials labeled “edible.” Craft glitter is plastic; it has no business being on food. Use dedicated, food-safe tools and work clean.
And what about the eating experience? A lot of people wonder if it’s like biting into a rock. Not really! The rock candy provides a sweet, sugary crunch that’s actually quite pleasant against the soft cake. It’s a fun texture! Most people eat around the very largest crystals, but the smaller ones are just like crunchy sprinkles.
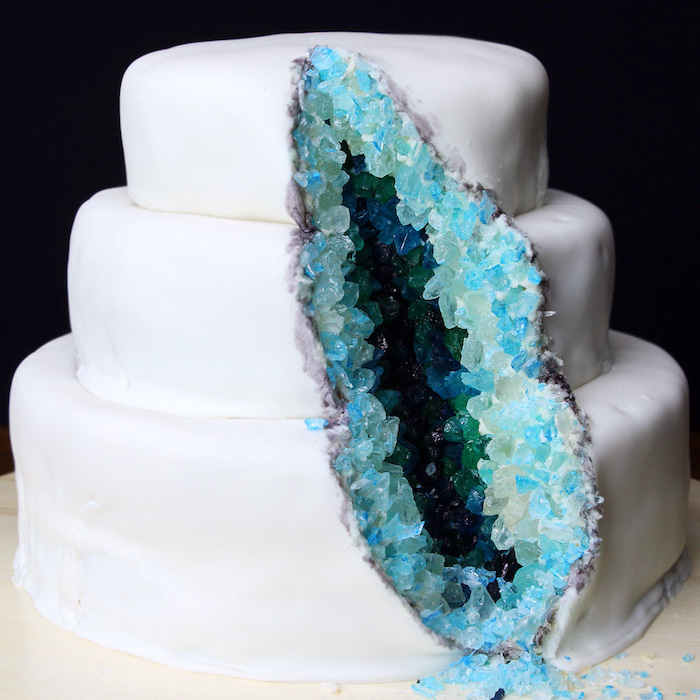
Finally, know your limits. A single-tier geode cake is a fantastic project for a determined home baker. But a multi-tiered geode wedding cake? That’s a job for a pro who has experience with internal supports, transport, and on-site assembly. The peace of mind is worth the investment.
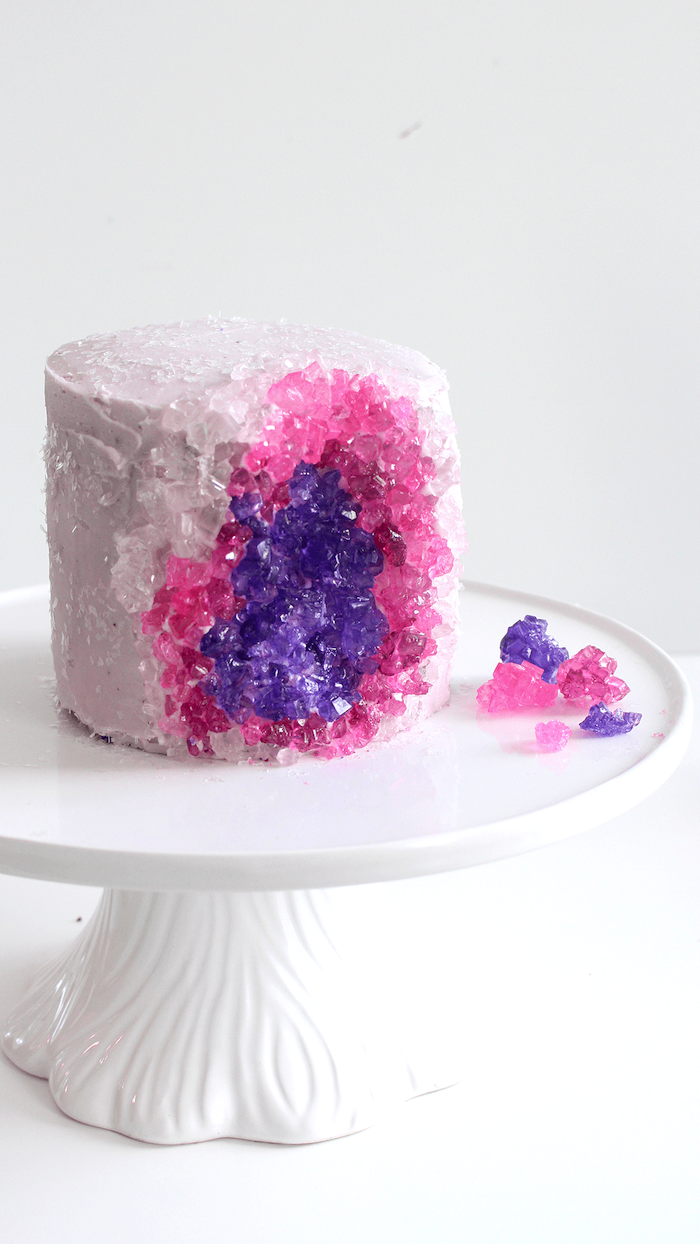
Not ready to tackle a whole cake? Good to know: you can practice this on a smaller scale! Try making geode cupcakes. Just core out the center, fill it with a dollop of stiff frosting, and practice your crystal placement and painting. It’s a great way to build your confidence before committing to the main event.

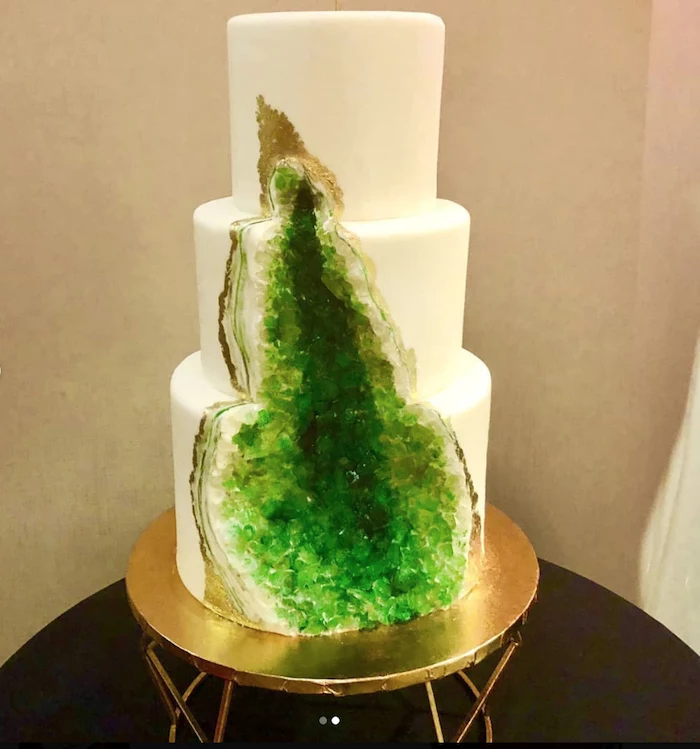
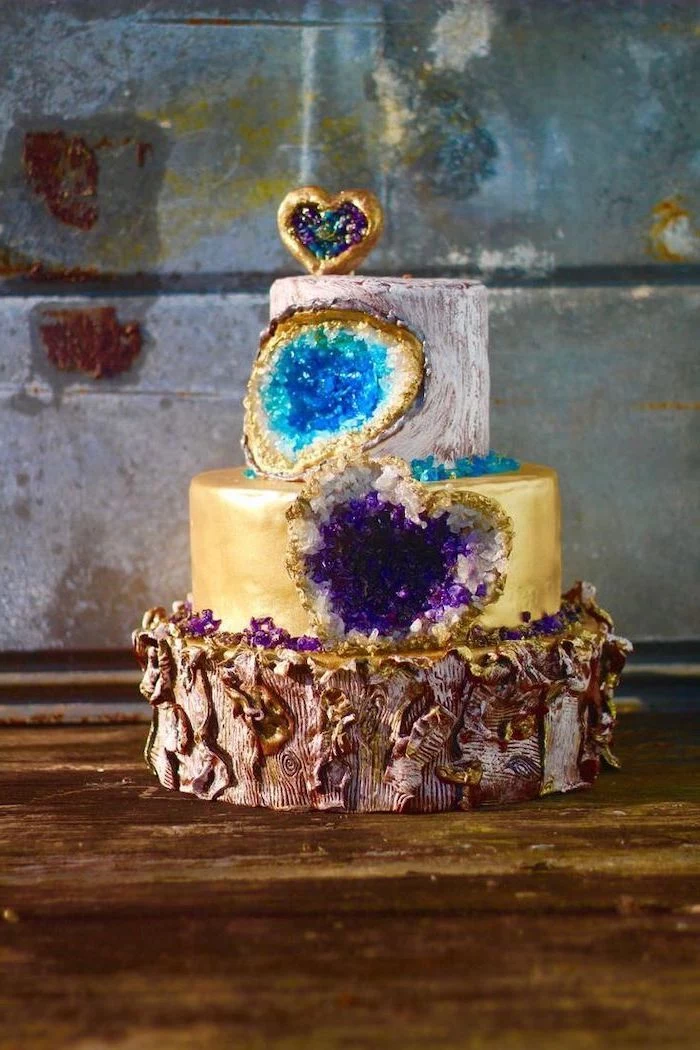
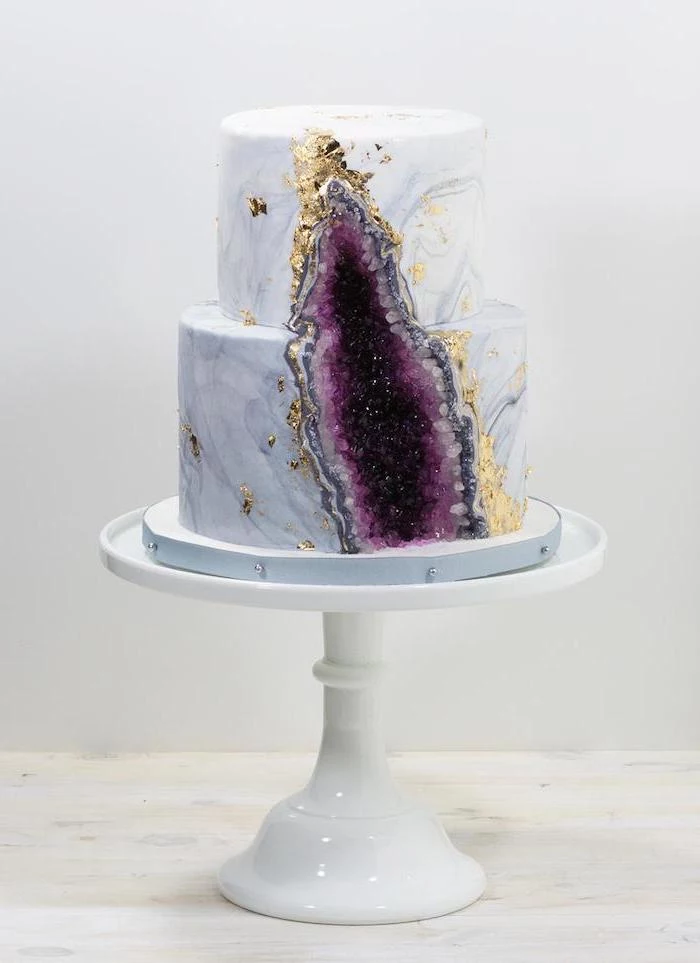
Inspirational Gallery
Rock Candy vs. Isomalt: Rock candy offers a classic, chunky crystal look that’s easy for beginners to apply. It’s ready to use right out of the bag. Isomalt: This sugar substitute must be melted and carefully shattered, offering more control over shape and a glass-like clarity. It’s the pro’s choice for custom crystal structures, but requires handling high temperatures. For a first attempt, rock candy is the safer, simpler bet.

- A small, sharp serrated knife (a steak knife works well).
- A small offset spatula for precision frosting.
- Food-safe tweezers for placing individual crystals.
- Fine-tipped paintbrushes (dedicated to food use only!).
The secret? Having the right tools on hand before you start makes the process feel less like surgery and more like artistry.
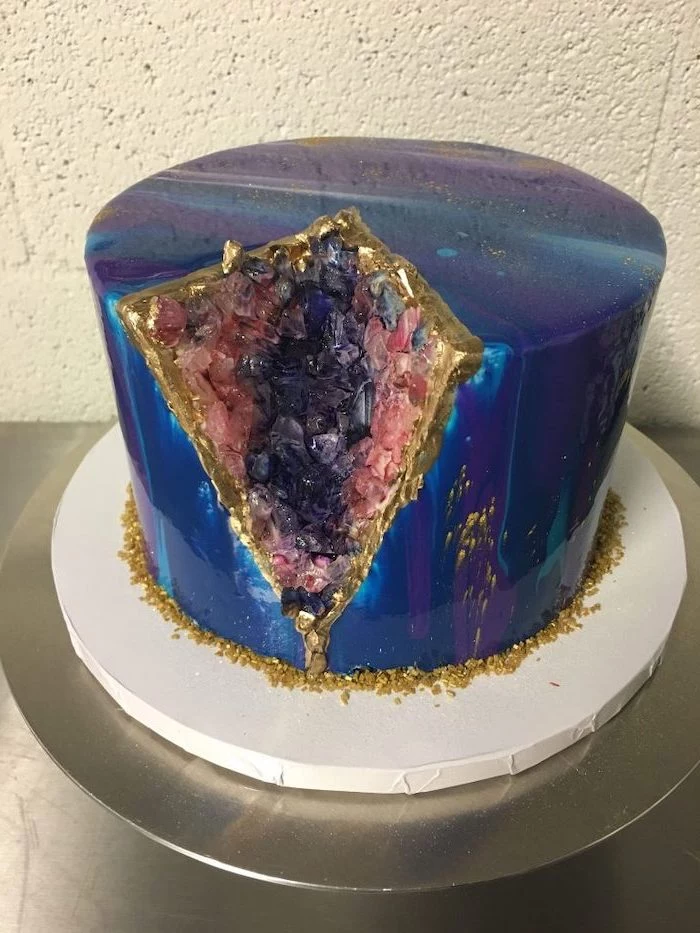
That brilliant, deep color in professional geode cakes rarely comes from pre-colored candy. The magic is in painting clear or white rock candy *after* it’s been placed. Use a high-quality gel food coloring, like those from AmeriColor or Chefmaster, diluted with a few drops of high-proof clear alcohol (like Everclear or vodka) to create a watercolor effect. This prevents the color from becoming sticky or dissolving the sugar.
Did you know? Isomalt, a key ingredient for creating hyper-realistic crystals, has only about half the calories of regular sugar and doesn’t promote tooth decay.
How do I get my geode to have that realistic, multi-toned depth?
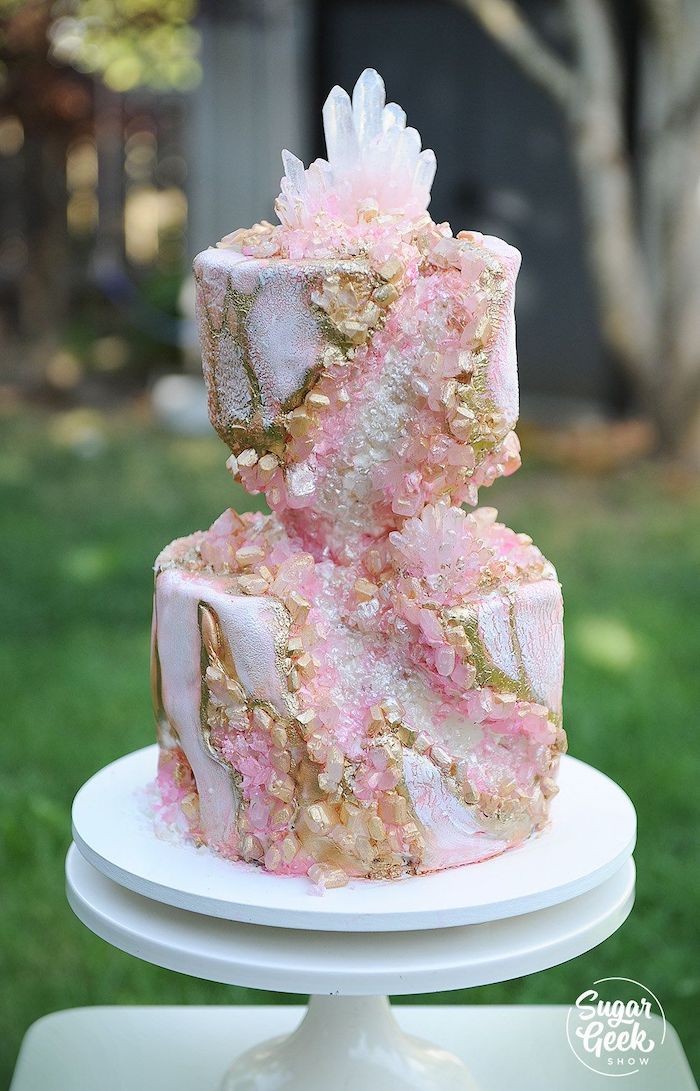
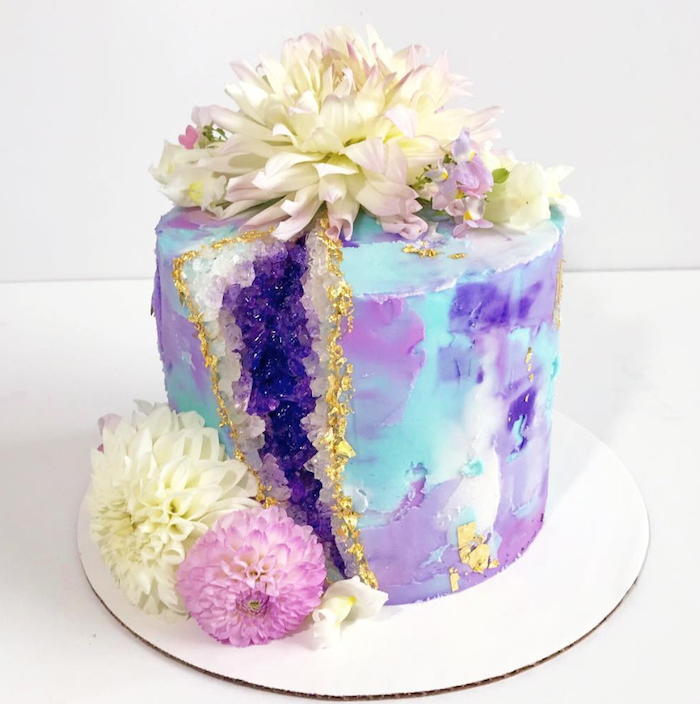
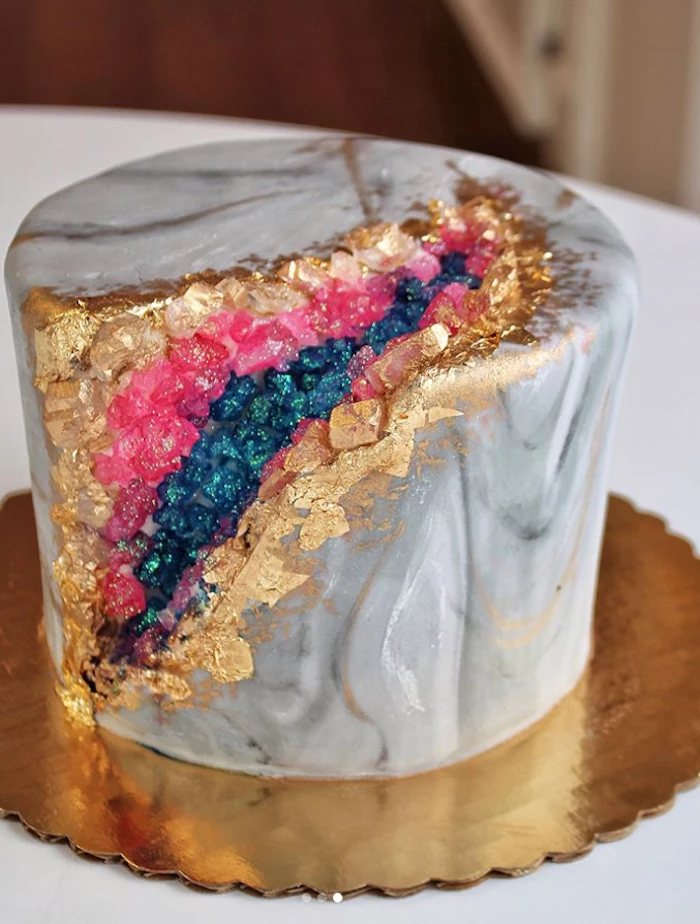
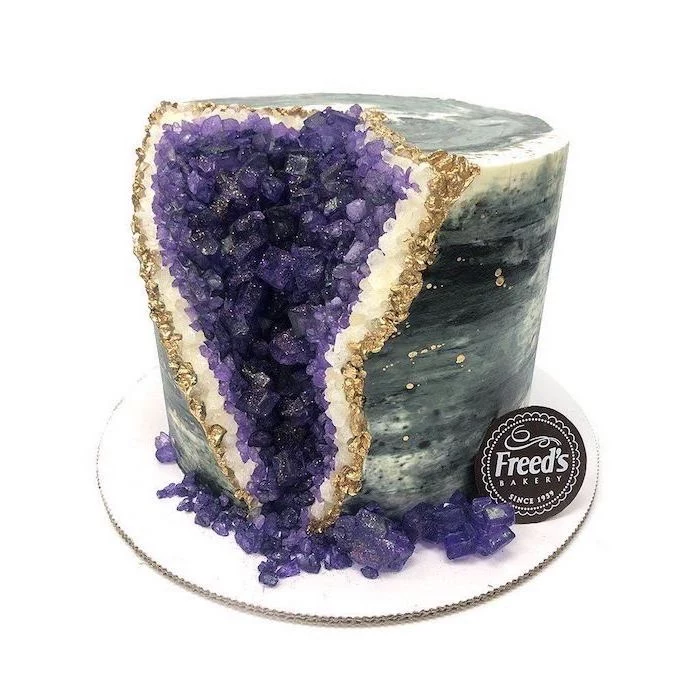
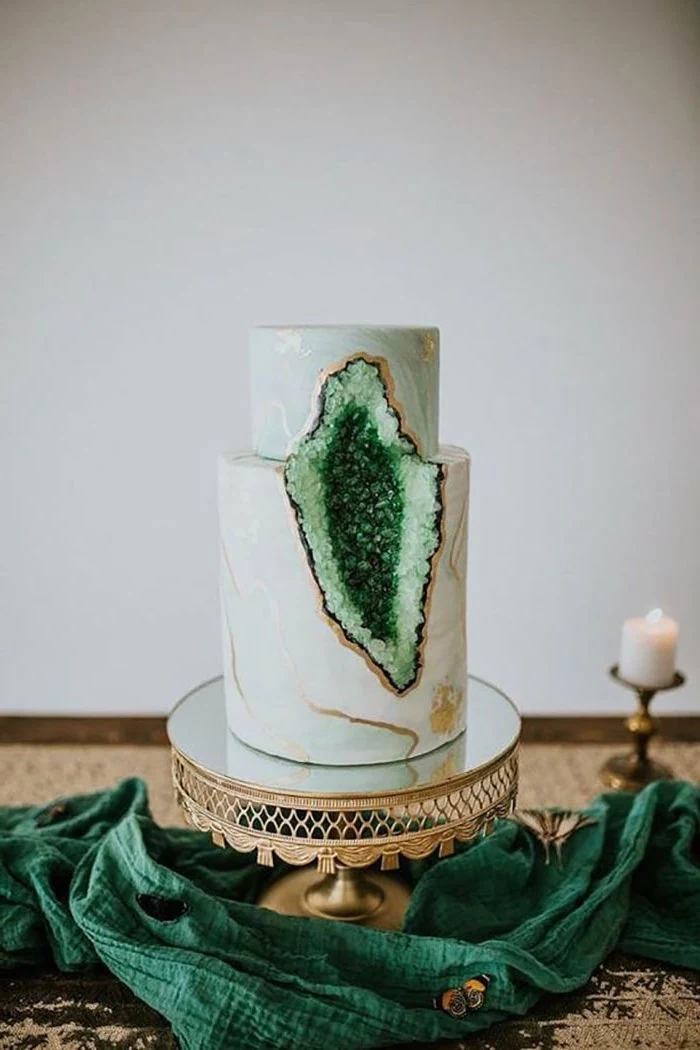
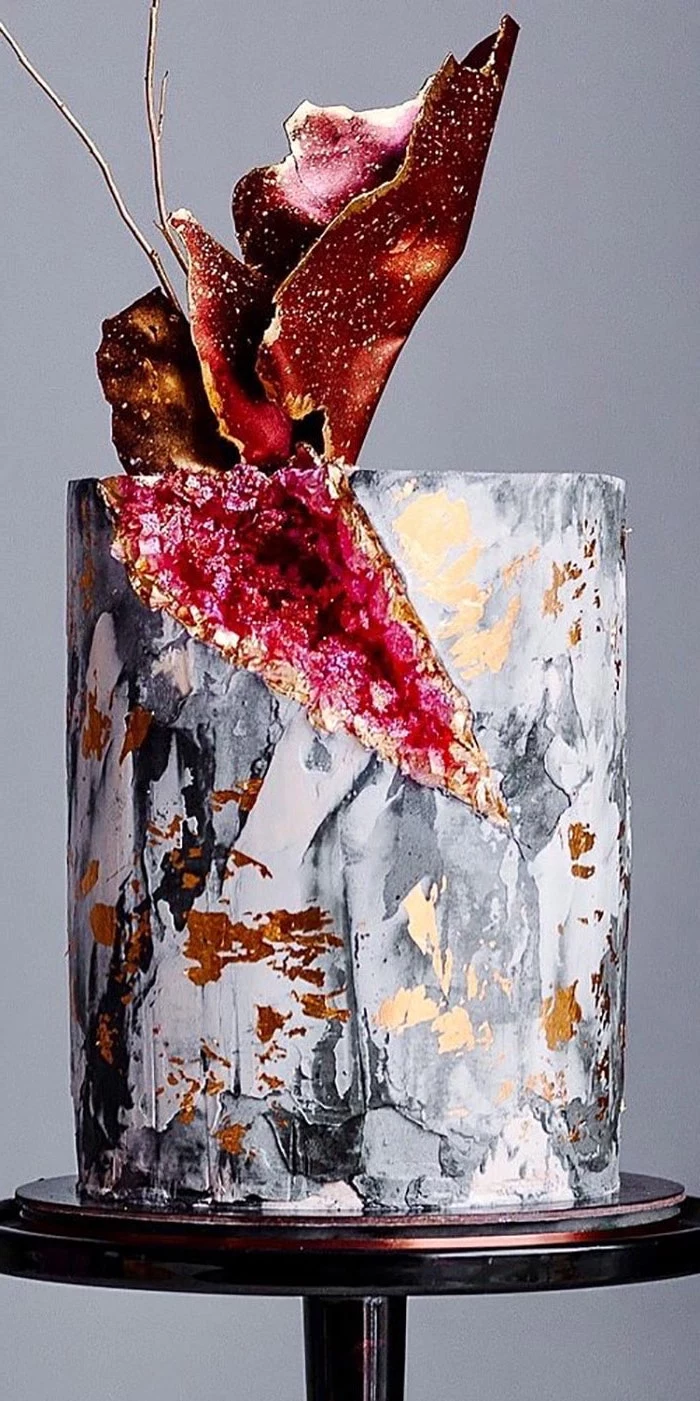
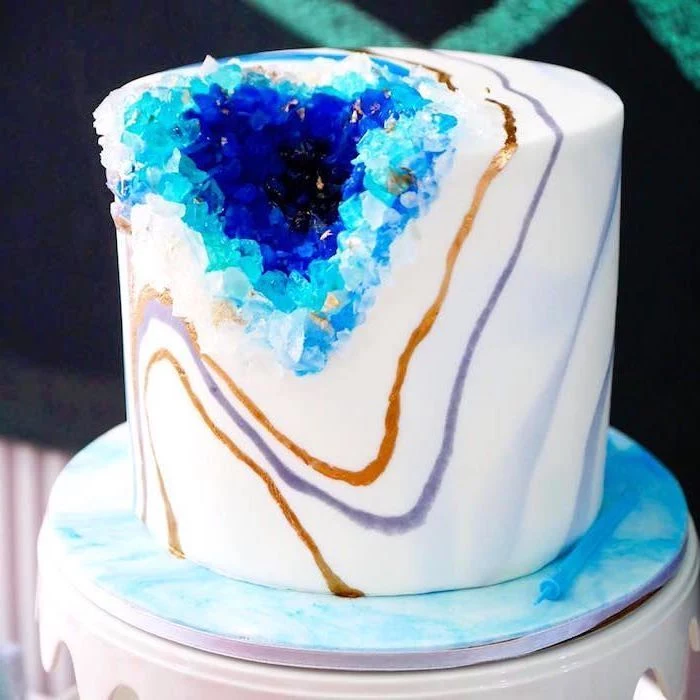
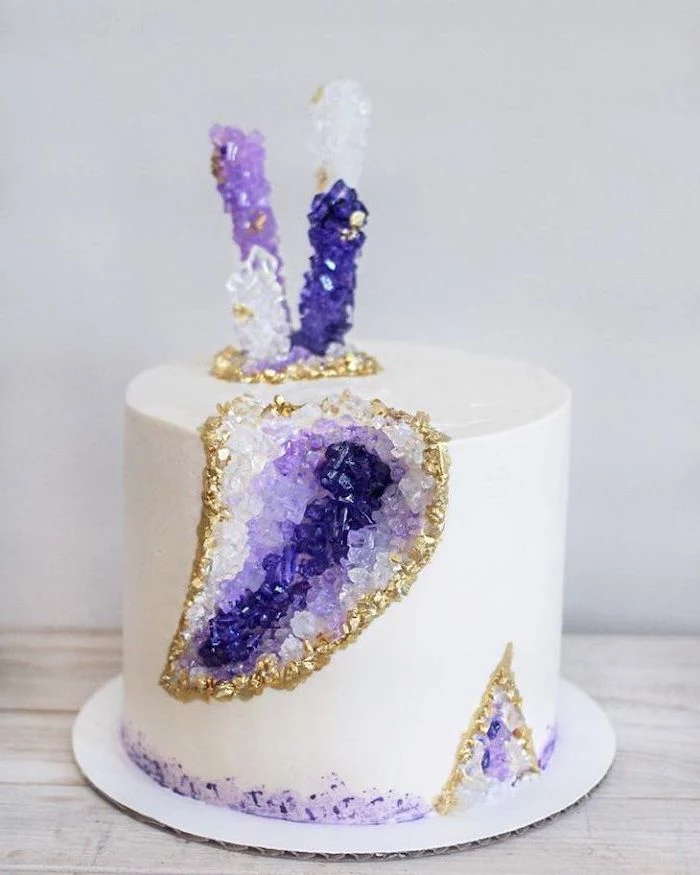
It’s all about layering your colors. Start by placing your largest, darkest-colored crystals deep inside the carved-out section. As you build outward, transition to medium-toned crystals, and finally to the smallest, lightest-colored or clear crystals around the edges. This mimics how real geodes form, with the most concentrated color at the center.
The essential anchor: Don’t just stick your crystals to the cake. Apply a thick, firm layer of buttercream or royal icing inside the carved cavity first. This ‘glue’ should be the same color as your darkest crystals. Gently but firmly press the first layer of rock candy into this icing. It provides a much stronger bond than relying on the cake’s crumb alone.
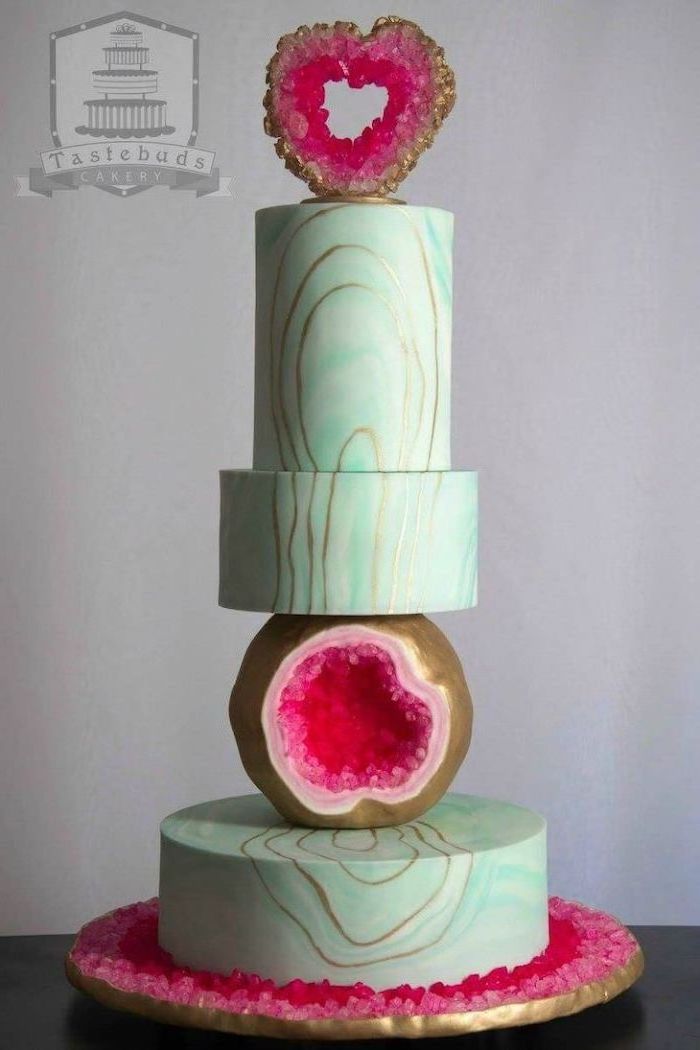
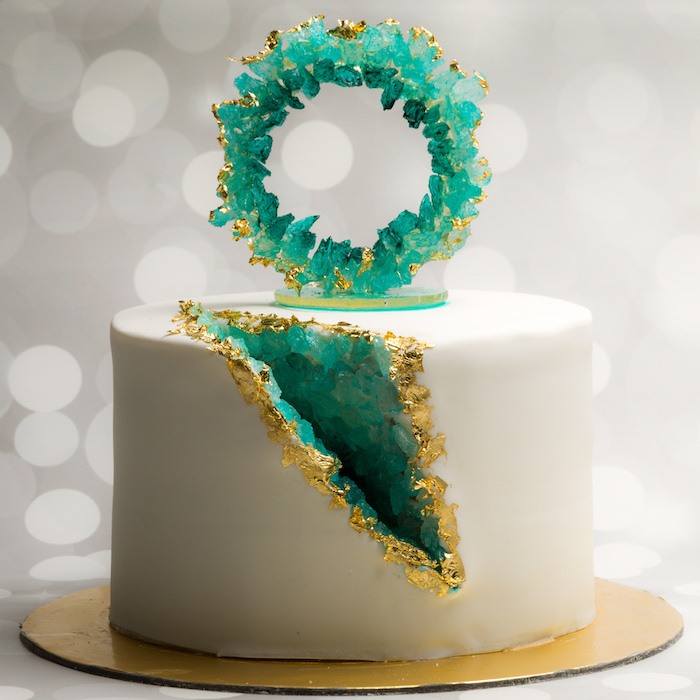
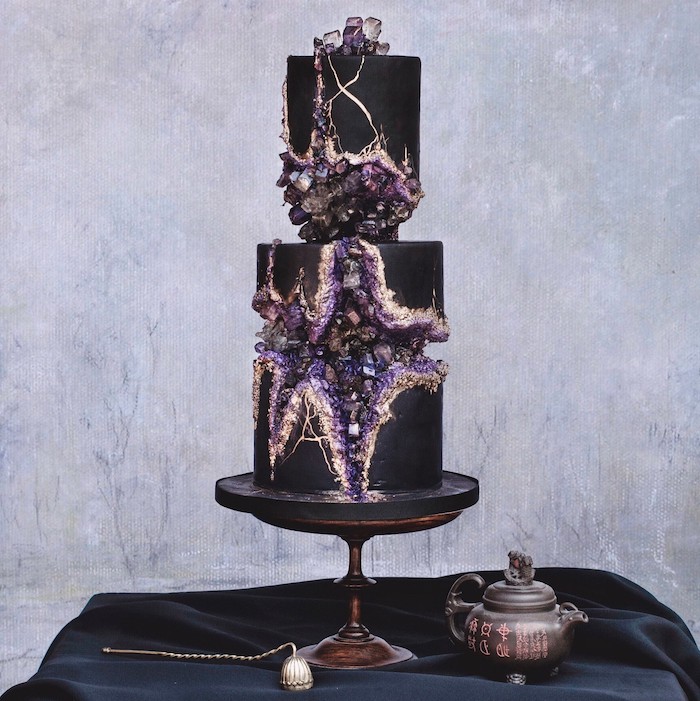
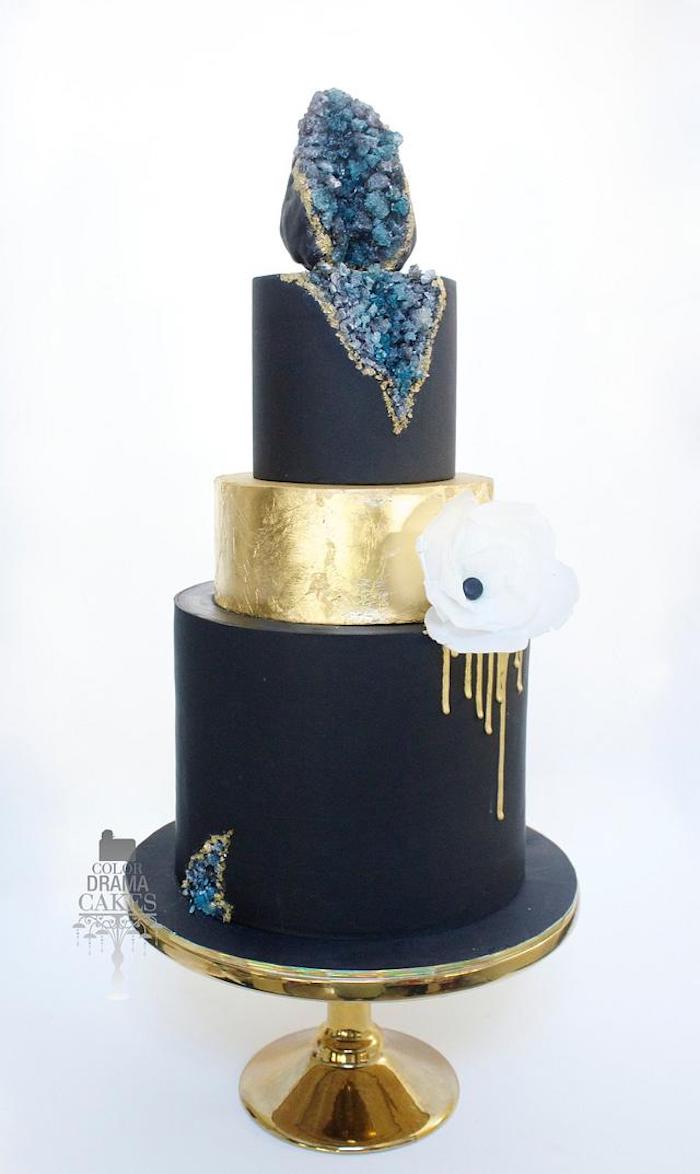
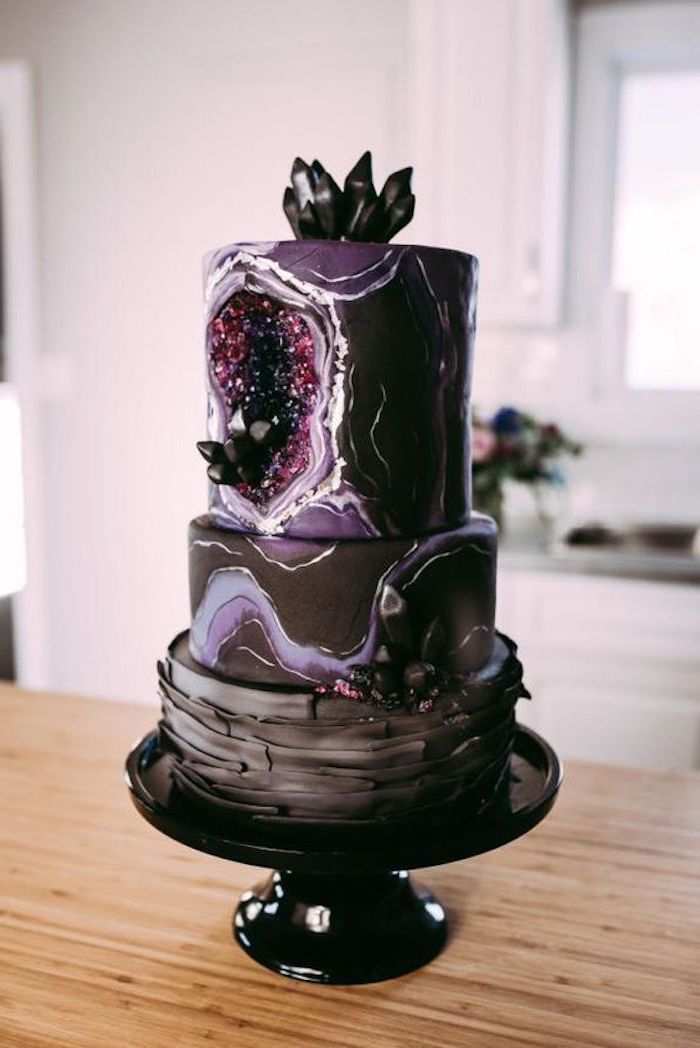
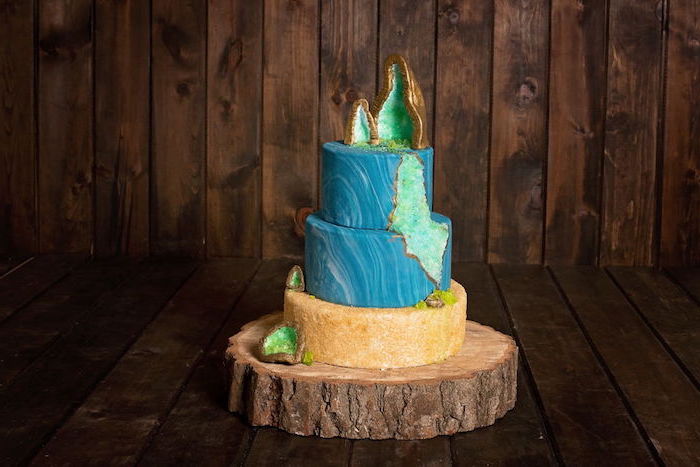
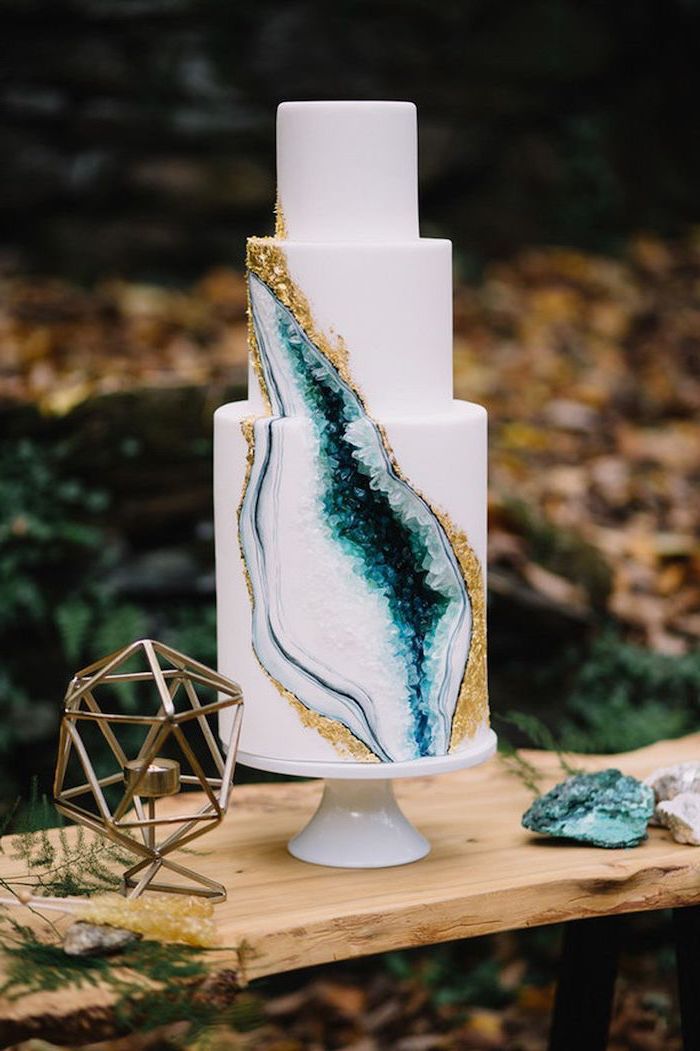
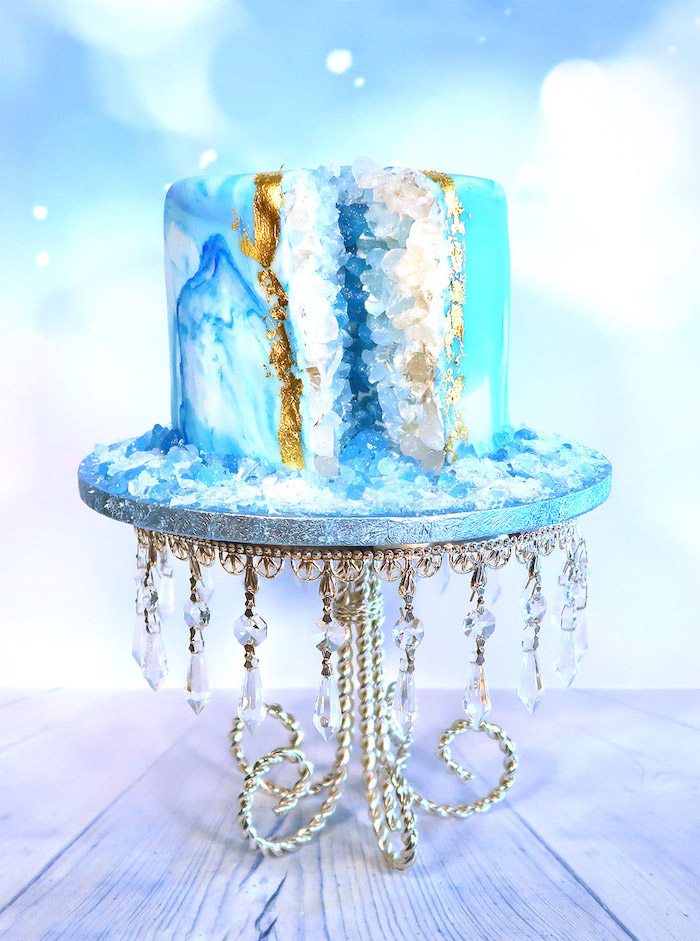
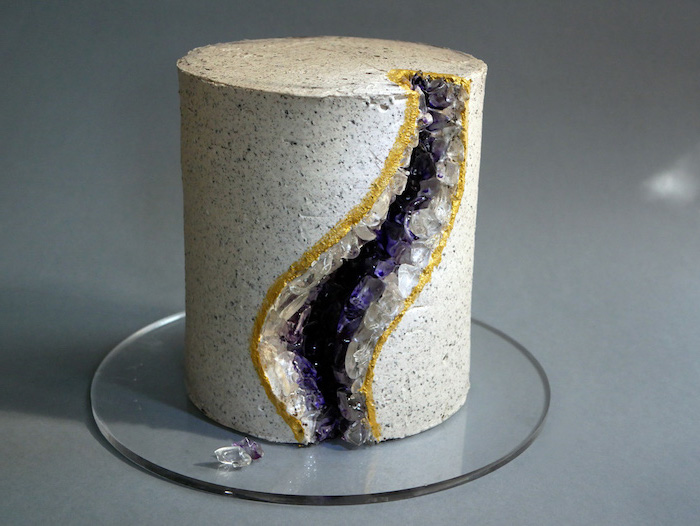
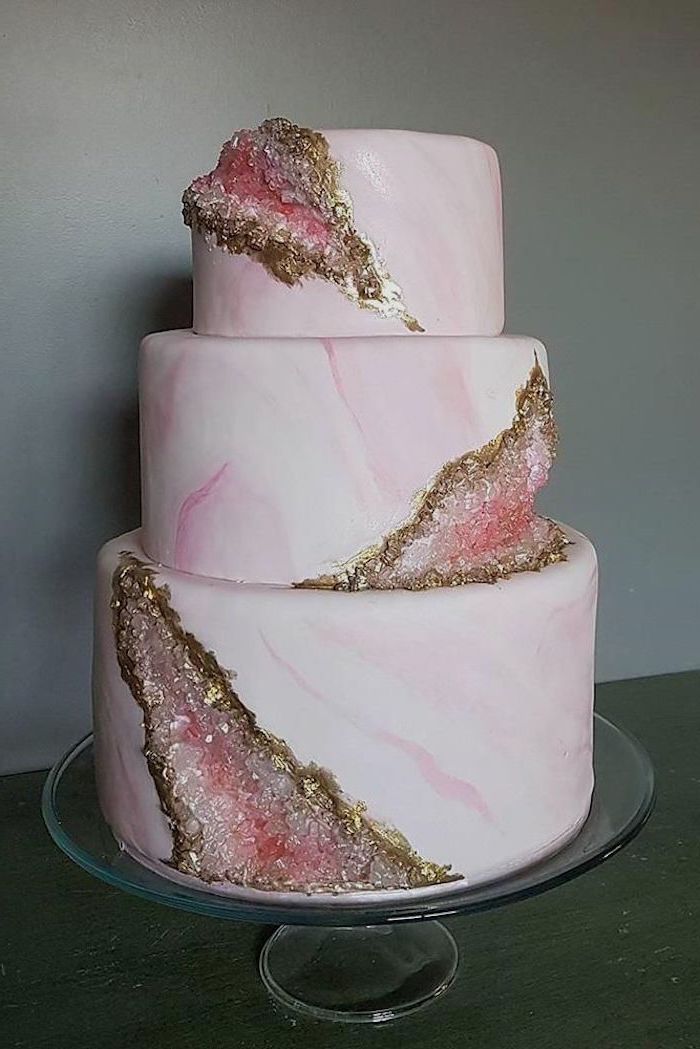
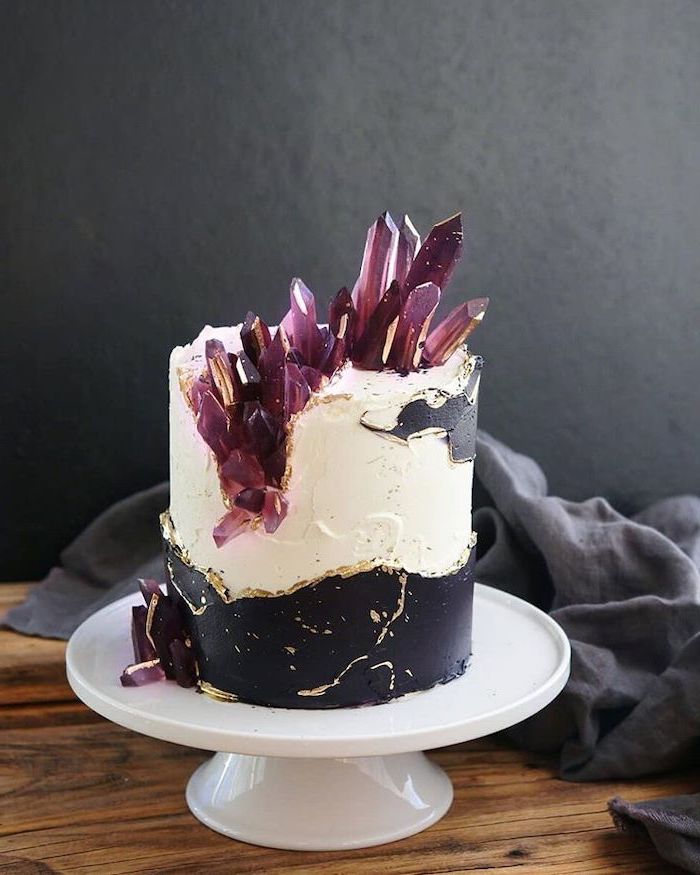
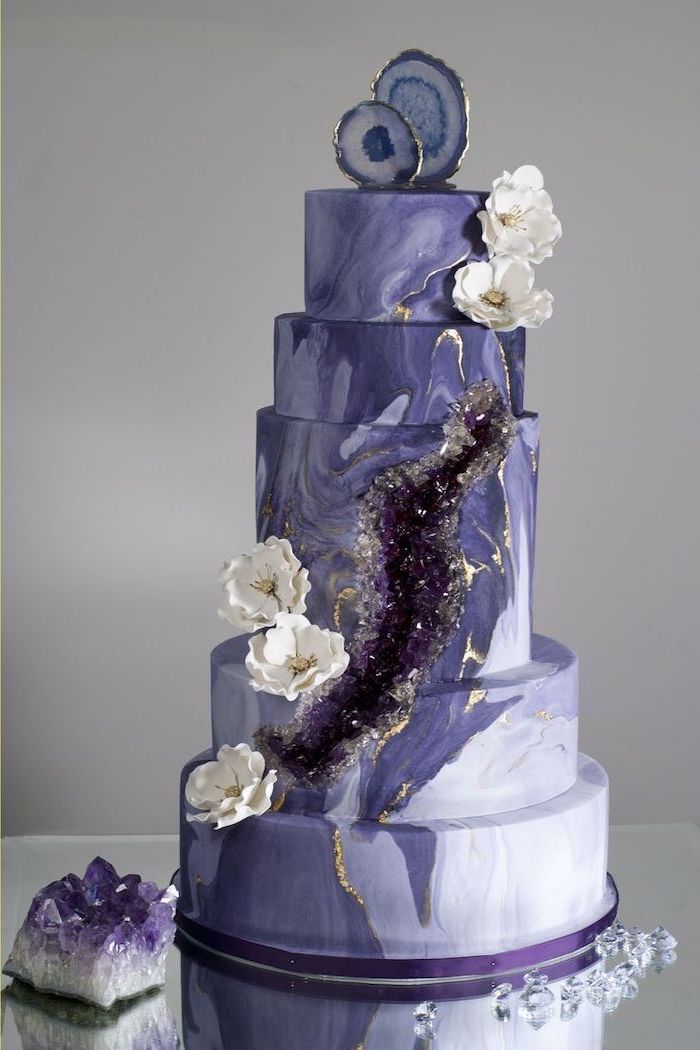
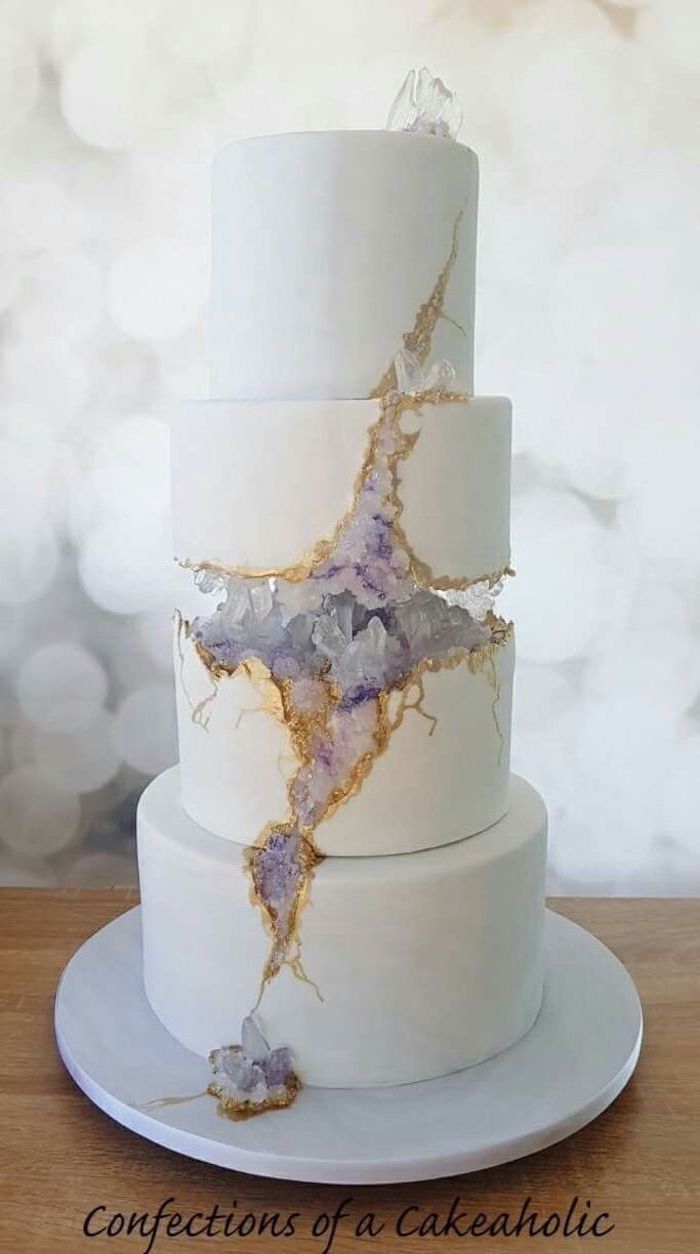
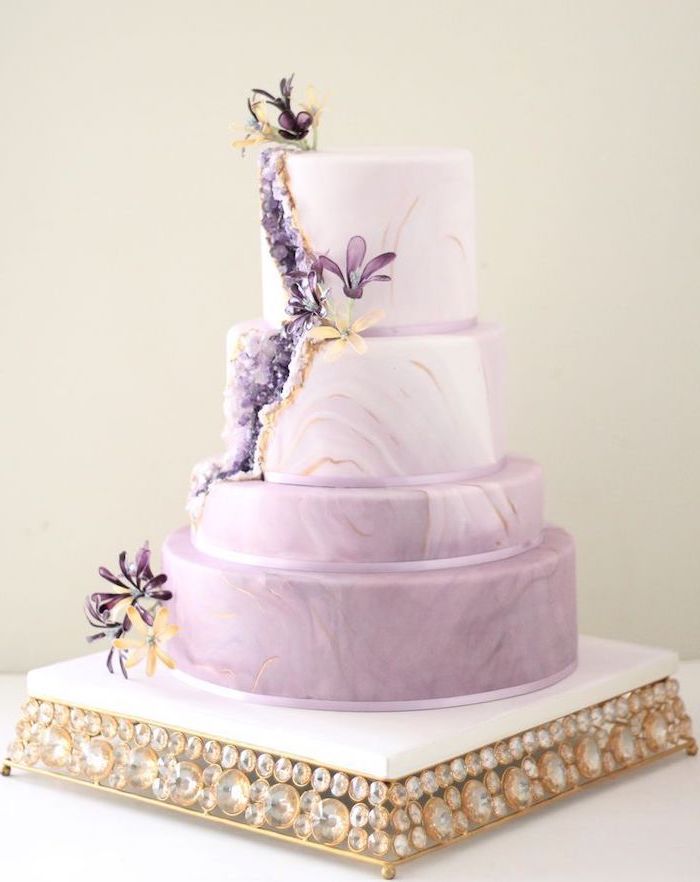
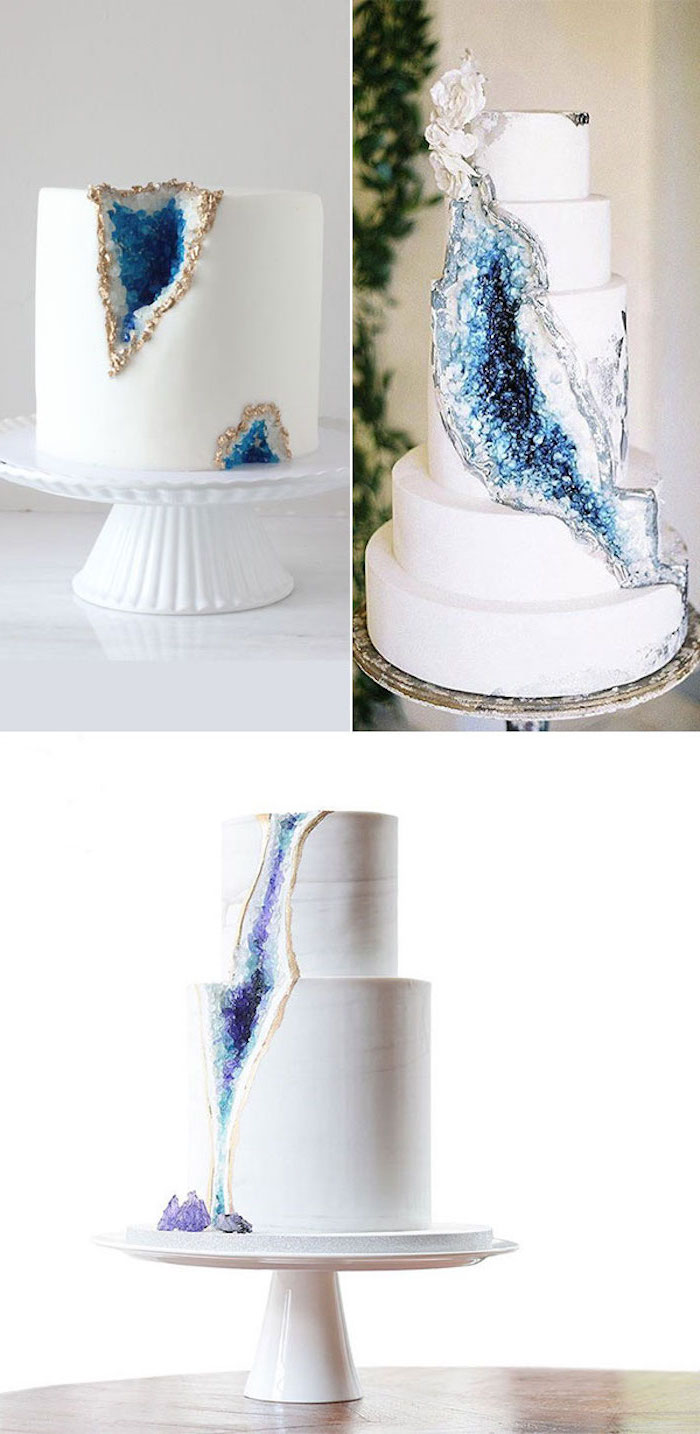
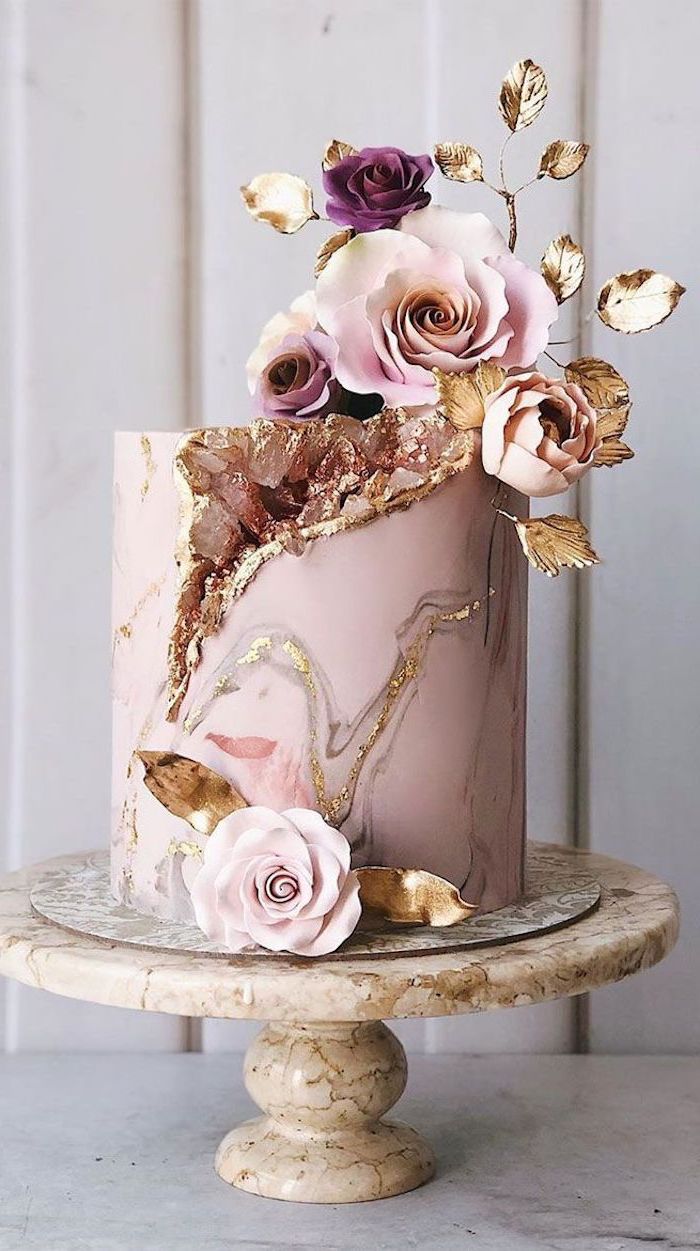
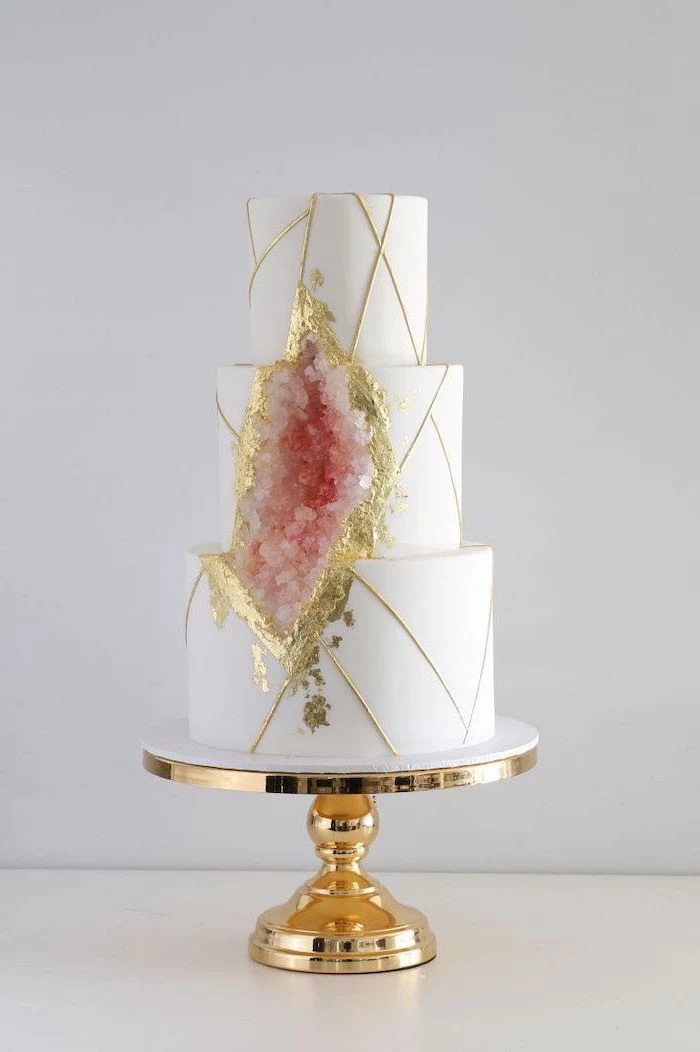
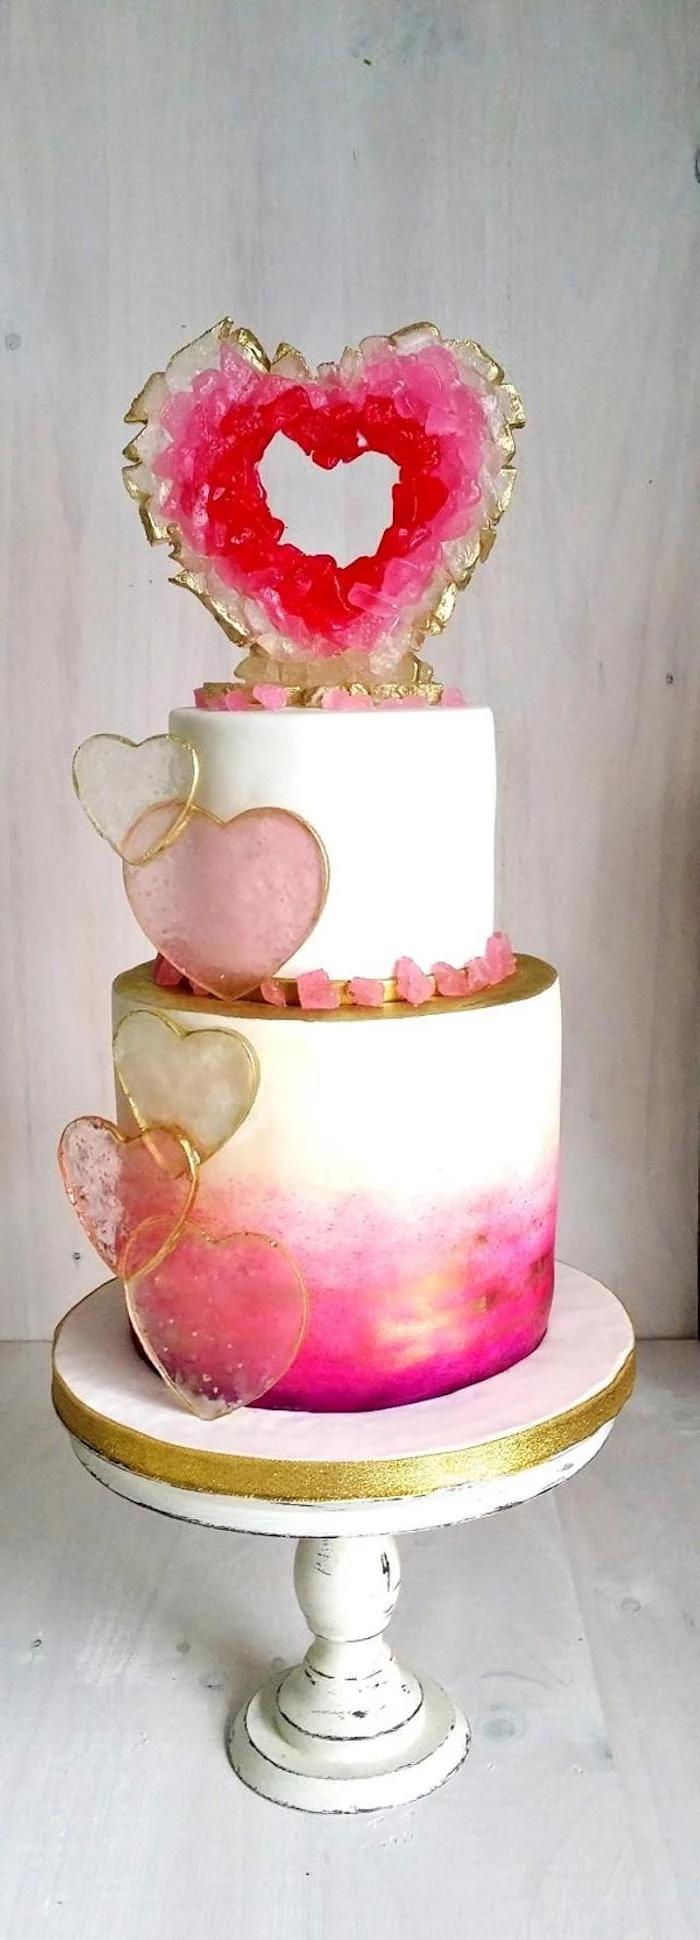
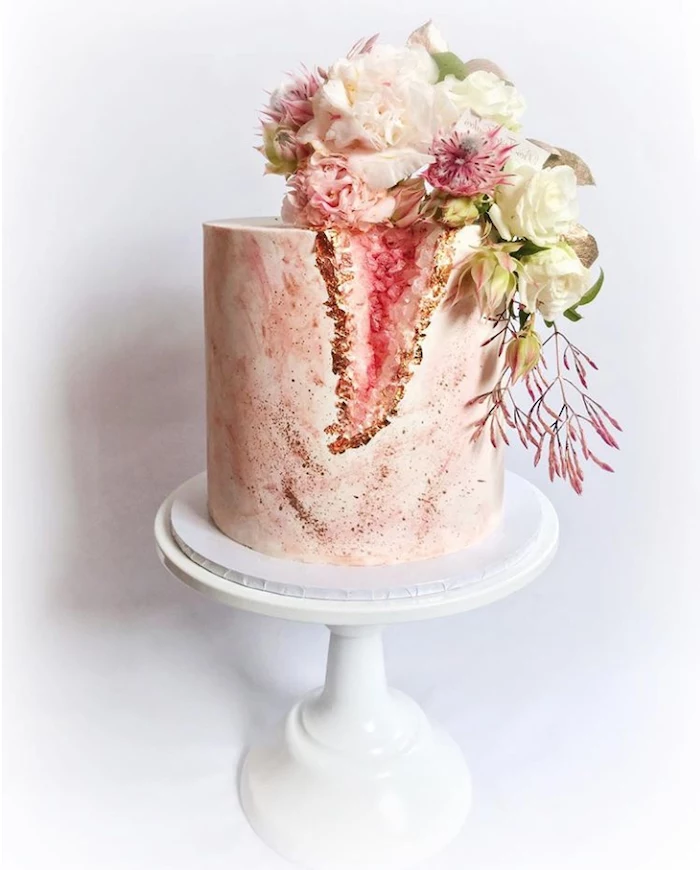
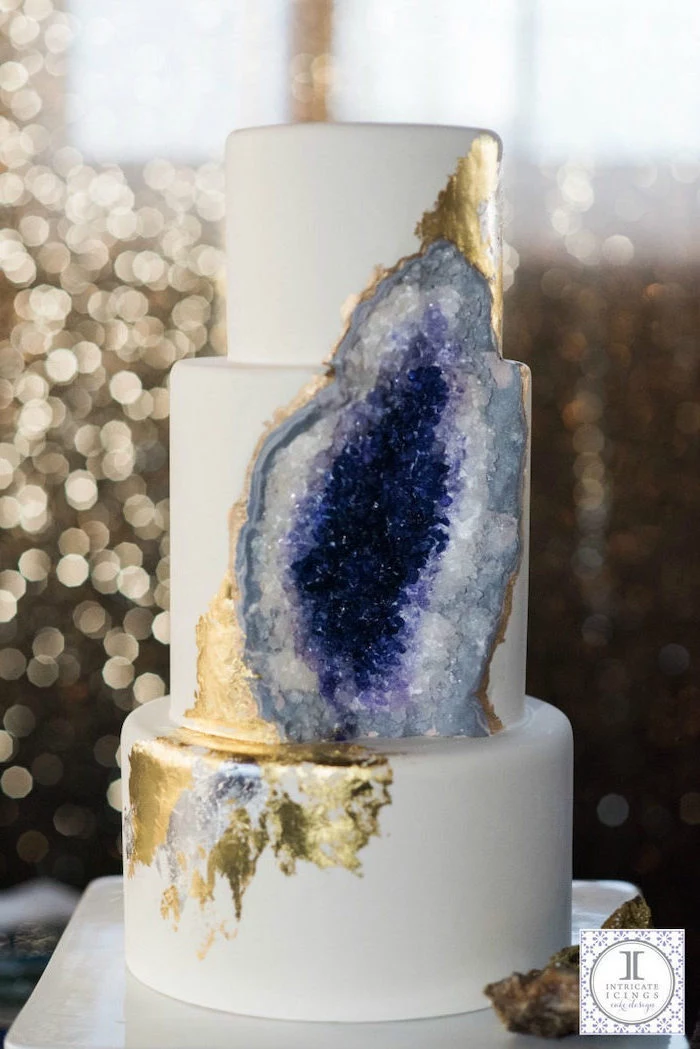
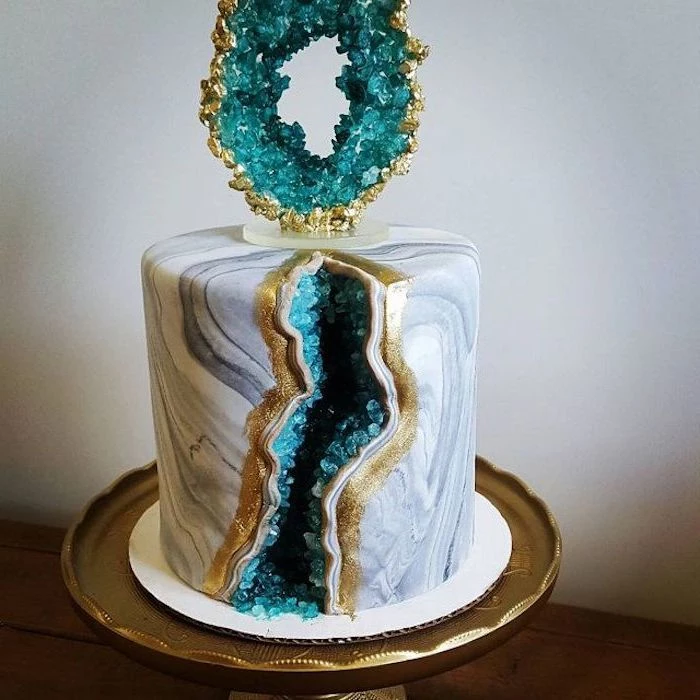
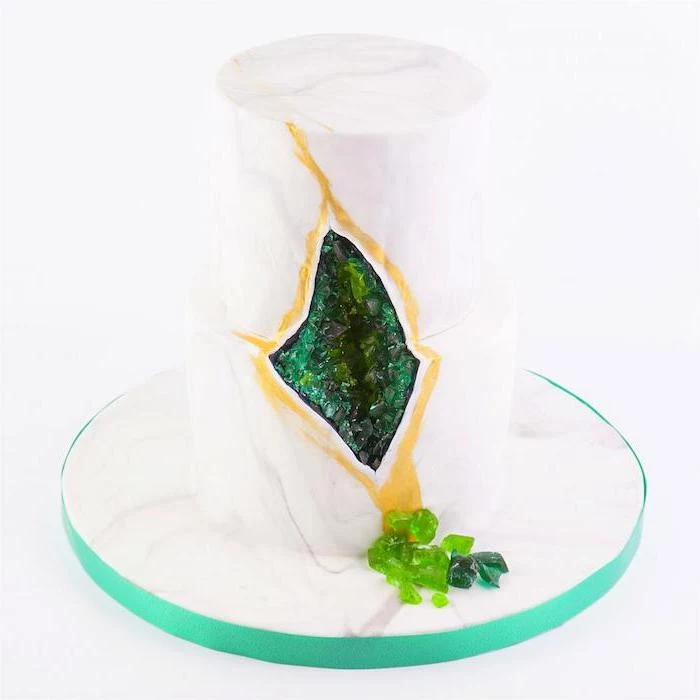
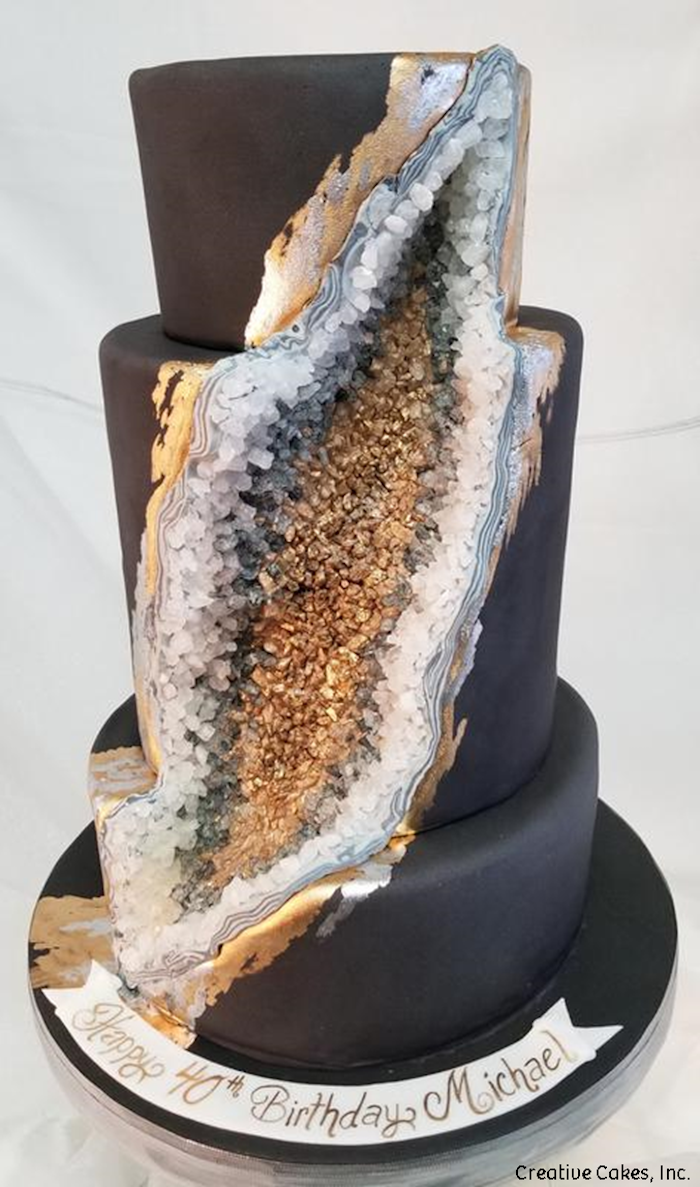
Let your inspiration come from nature’s palette. For a classic purple Amethyst look, layer shades from deep violet to lavender. Recreate a Rose Quartz by blending soft pinks with white and hints of gold. For a striking Celestine blue, combine sky blue, silver, and translucent crystals. Looking up photos of real minerals is the best way to plan a believable color scheme.

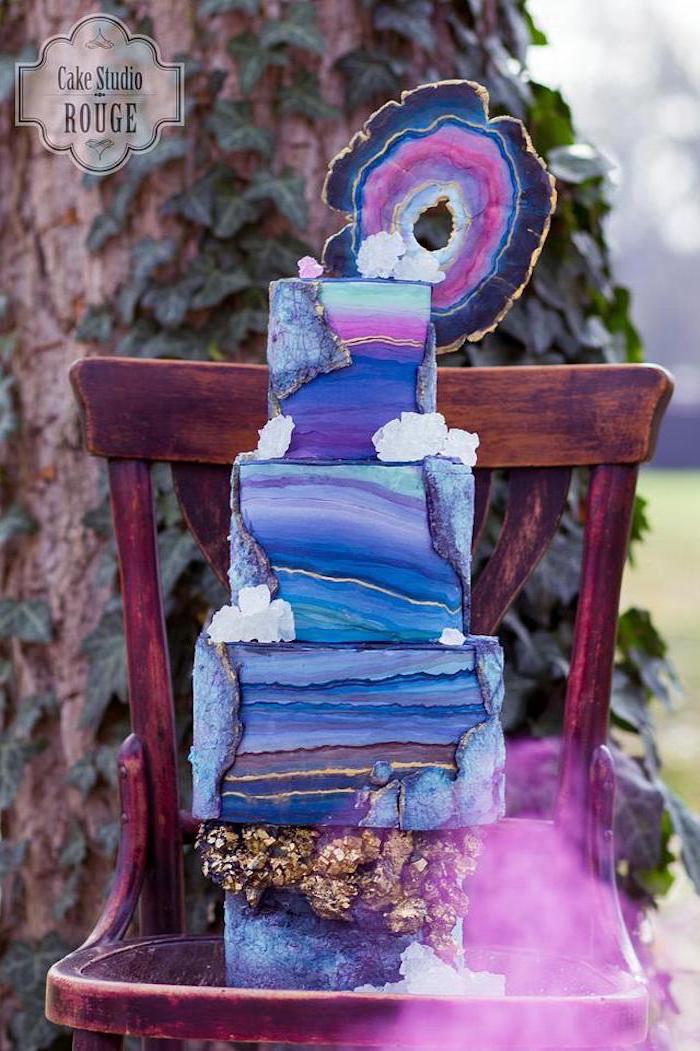
The average wedding cake in the U.S. can range from $300 to over $700. A complex geode design often pushes a cake into the higher end of that spectrum due to the intensive labor and materials.
This cost reflects the hours spent not just on baking, but on meticulous carving, crystal placement, and hand-painting. It’s a true work of edible art where structural engineering meets confectionary design.
- They become delicious truffle-like cake pops.
- They can be crumbled over ice cream.
- They form the base of a stunning trifle dessert.
The best part? No cake waste! The carved-out portion doesn’t need to go in the bin. Simply mix the cake scraps with a little buttercream, roll into balls, chill, and dip in chocolate.
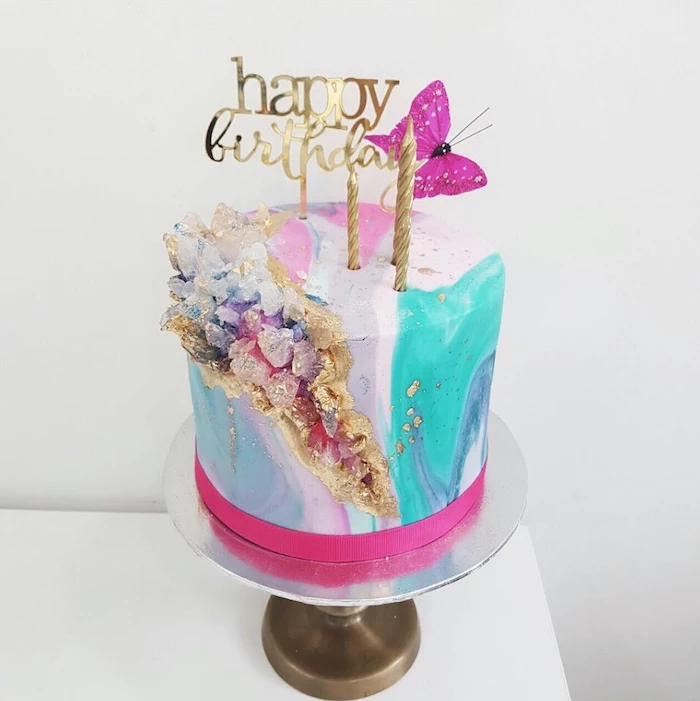
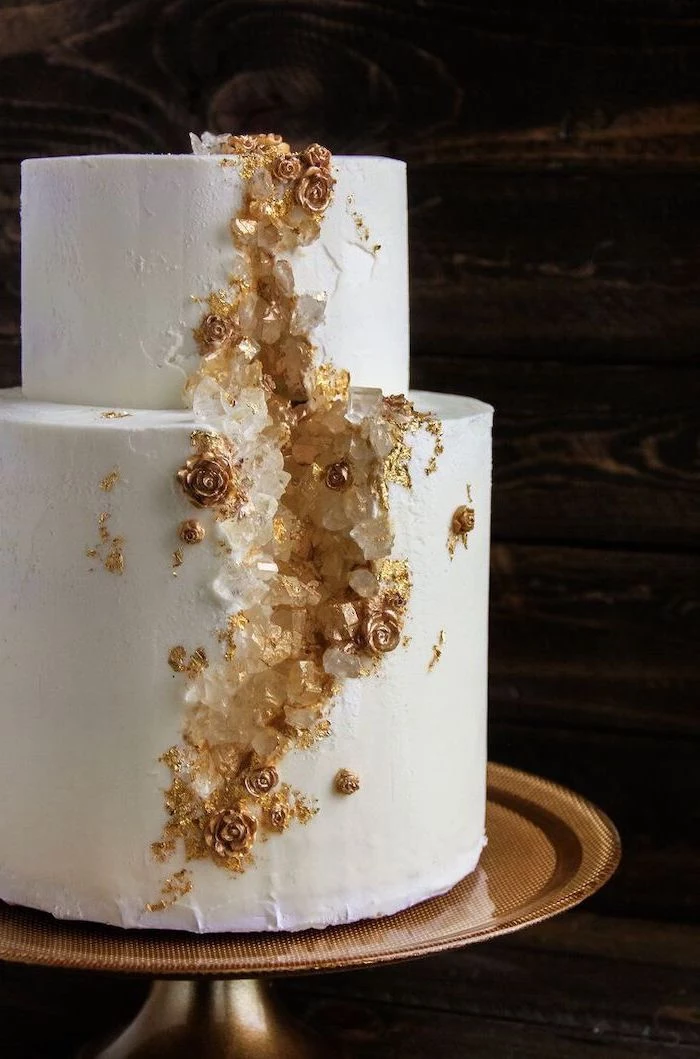
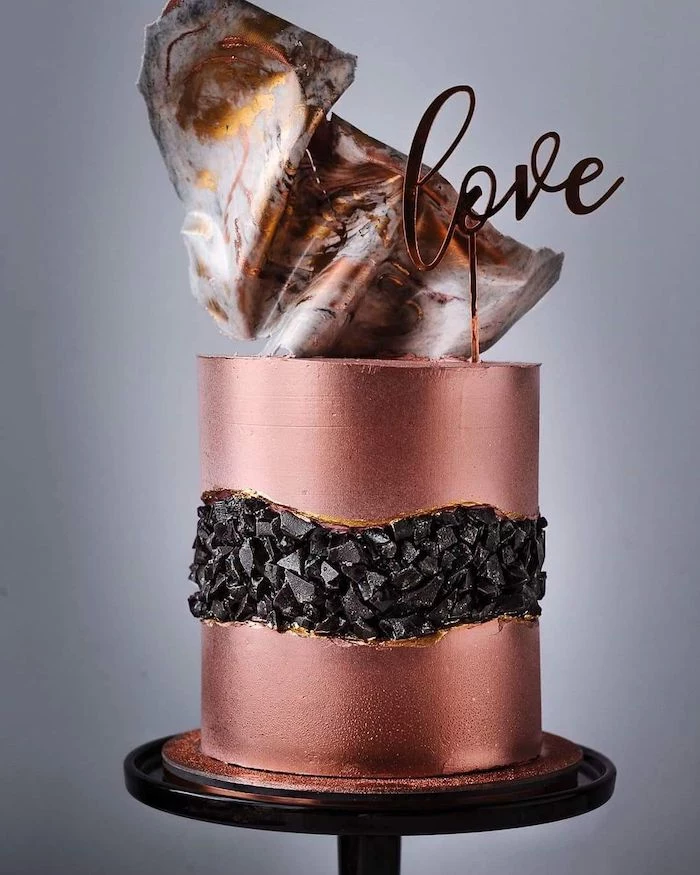
For an extra touch of luxe, don’t forget the metallic edge. Using a fine, soft brush, gently apply edible gold or silver leaf (brands like Mona Lisa or Slofoodgroup are excellent) to the very edge where the fondant or buttercream ‘crust’ meets the crystals. This defines the geode’s opening and adds a level of polish that elevates the entire design.
The Beginner’s Geode: Not ready to carve into a whole cake? Try making geode cupcakes first. Core the center of a baked cupcake, fill it with a dollop of buttercream, and press in a small cluster of colored rock candy. It’s all the glamour with none of the structural anxiety.
Mistake to Avoid: Bleeding Colors. This often happens when using water-based liquid food coloring or too much gel color. The moisture slowly dissolves the sugar crystals, causing the colors to run and bleed into your frosting. Always mix gel colors with a touch of clear, high-proof alcohol for painting; it evaporates quickly, setting the color without melting the candy.
Feeling anxious about carving? You don’t have to.
Try the ‘build-out’ method instead. Instead of carving a cavity *in*, you build the geode *out*. Apply a thick sausage of firm buttercream or ganache to the side of a smoothly frosted cake, creating a crescent shape. Then, press your rock candy directly into that foundation. It gives a similar 3D effect without compromising the cake’s internal structure at all.
Firm Ganache: A 2:1 ratio of dark chocolate to heavy cream creates a shell that is incredibly strong once set. It’s the ultimate structural support for a heavy geode section.
Crusting Buttercream: A good American buttercream made with part shortening will form a firm, dry crust. It’s easier to work with than ganache but provides slightly less heavy-duty support.
For multi-tiered or very large geode cakes, ganache is the professional’s choice for peace of mind.
On the Mohs scale of mineral hardness, sucrose (table sugar) crystals rank around a 2. That’s about the same hardness as a fingernail!
While that doesn’t seem very hard, when clustered together and bonded with icing, they create a surprisingly rigid structure that helps support the carved-out area of the cake. It’s a beautiful example of how delicate components can create collective strength.
Important Detail: The angle of your cut matters immensely. Don’t carve straight into the cake. Instead, angle your knife to create a tapered, V-shaped cavity, wider at the surface and narrower towards the center of the cake. This leaves more structural mass at the base of the cut, distributing the weight far more effectively and reducing the risk of a dreaded collapse.
Want to go fully custom? You can grow your own rock candy! It’s a simple science experiment. Just create a supersaturated sugar solution (about 2 parts sugar to 1 part water, boiled until dissolved) and suspend a wooden skewer in the solution for a week. While time-consuming, it allows you to control the size and shape of your crystals from scratch. A great project to do while your cakes are baking and cooling!
- A flawless, glittering finish.
- Vibrant, deep colors that pop.
- A professional, hand-painted look.
The technique? Use clear, high-proof alcohol like vodka or a grain alcohol like Everclear as your painting medium. Unlike water, it evaporates almost instantly, depositing a pure layer of pigment from your luster dust or gel color without making the sugar crystals weepy or sticky.
A geode cake is not the ideal candidate for a long, bumpy car ride. If you must transport it, here’s the game plan: Chill the finished cake until it’s very firm (at least 2 hours in the fridge). Use a cake box that is taller than the cake and place non-slip matting underneath the cake board. Drive like you’re transporting a VIP—slow turns and no sudden stops!
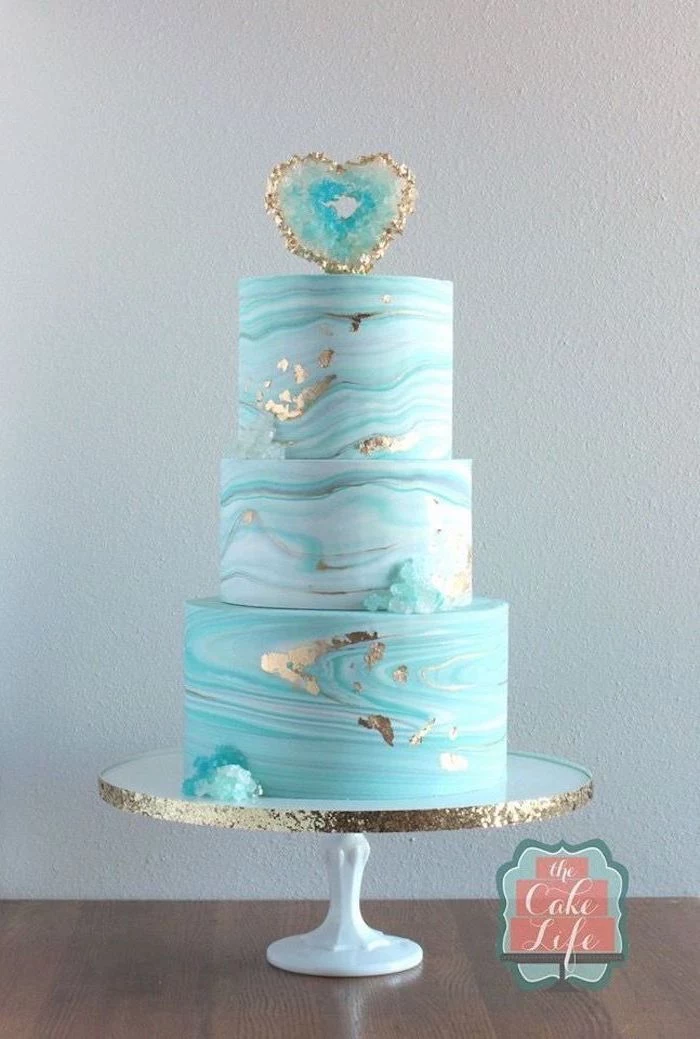

Don’t just think about the cake itself; consider the stand. A geode cake is an architectural statement. A simple, elegant stand in a metallic finish—like a gold, silver, or even a modern rose gold—will complement the crystal theme without competing with it. Avoid busy, ornate stands that might clash with the geode’s organic texture.
Is there a trend beyond the classic side-carve?
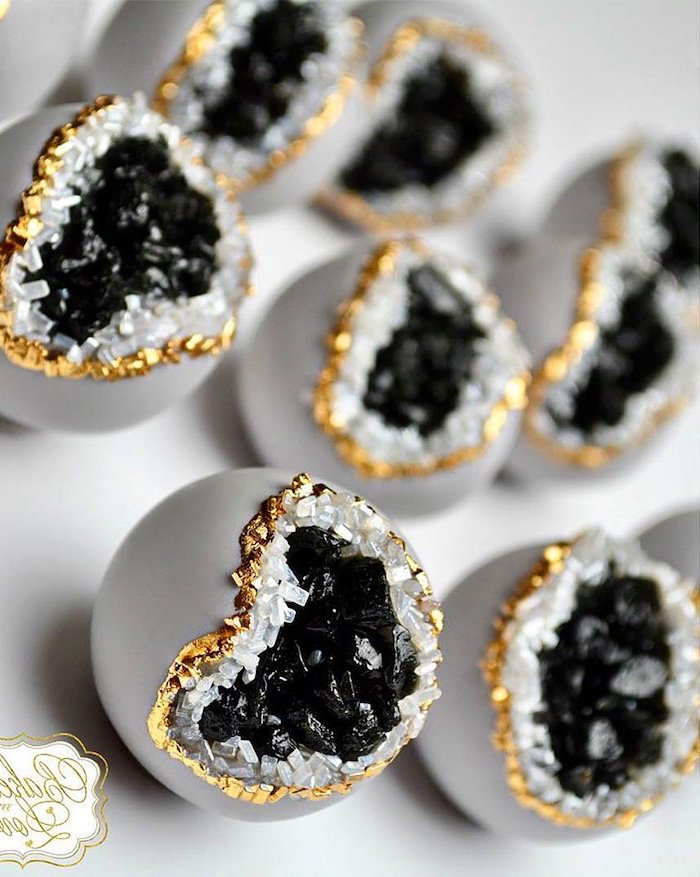
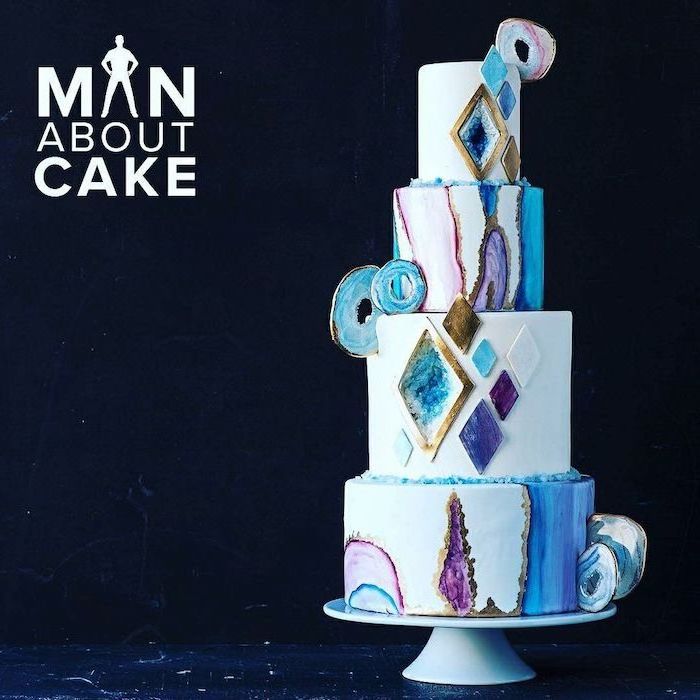
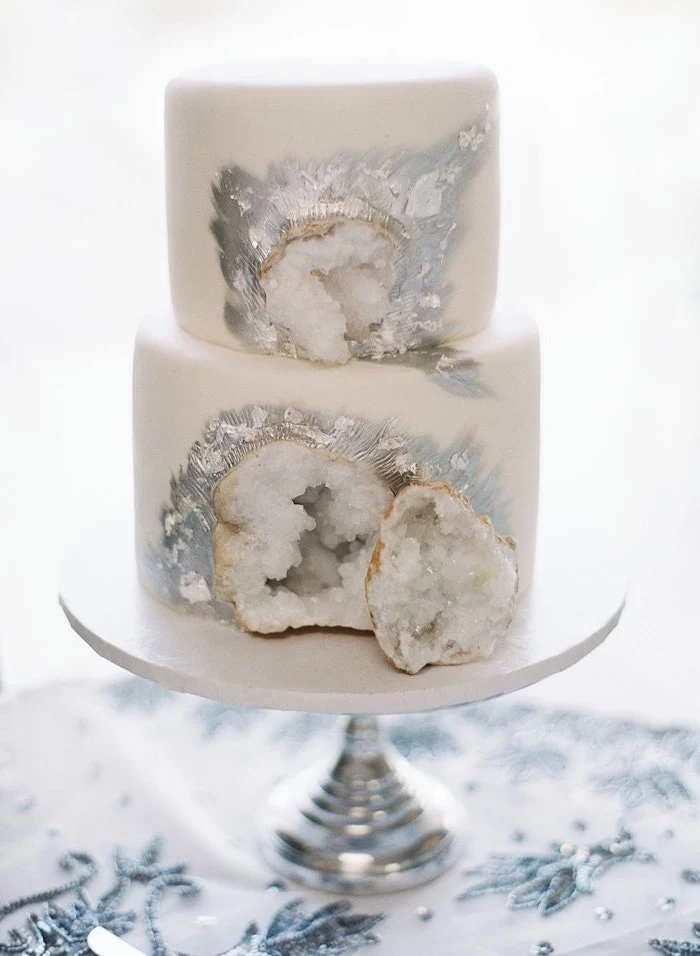
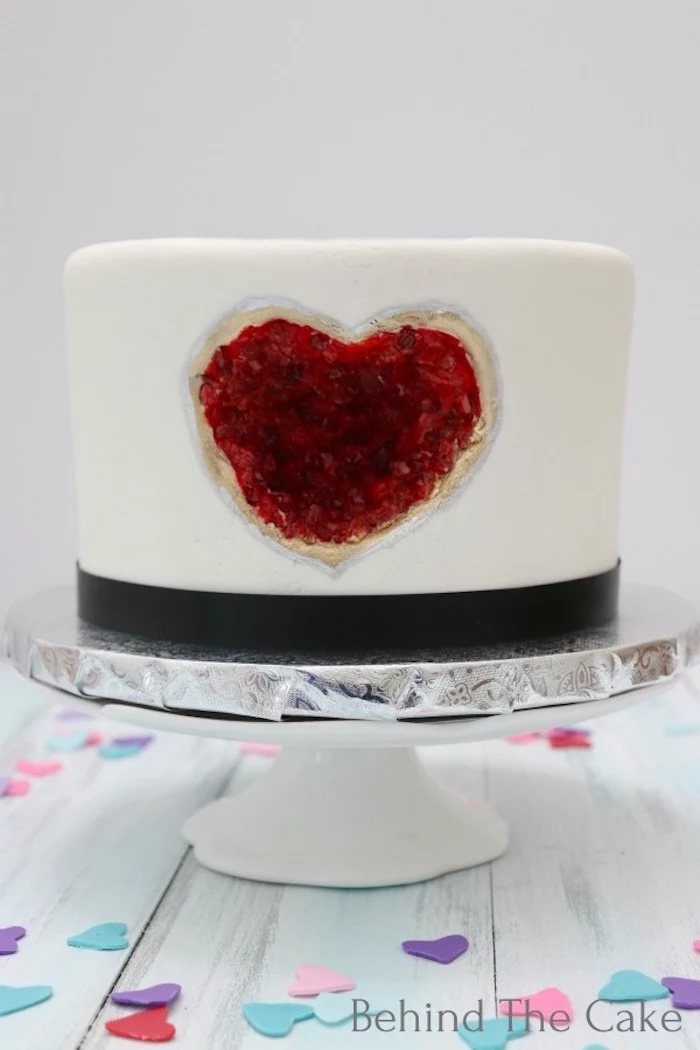
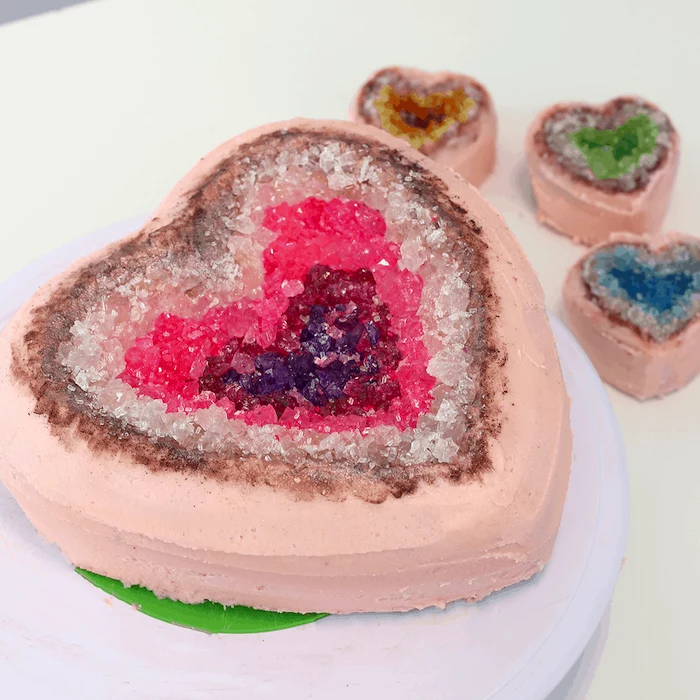
Yes! The ‘geode vein’ is gaining popularity. Instead of one large cavity, this style features thinner, crack-like lines of crystals running across the cake’s surface, sometimes connecting two tiers. Another variation is the ‘heart geode,’ where the carved-out shape is a heart, perfect for weddings or anniversary cakes. These designs can be less structurally terrifying, too.
For darker crystals: Use chocolate rock candy or paint white candy with a mix of black and purple gel coloring for a deep, smoky quartz effect.
For lighter crystals: Use plain white or clear rock candy and lightly dust the tips with a pearlescent luster dust, like those from Roxy & Rich, for a subtle shimmer.
This contrast between light and dark elements within the geode is what creates a stunning visual depth.

- A cleaner, sharper cut into the cake.
- Buttercream that doesn’t stick to your spatula.
The tip is simple: chill your tools! Before carving, pop your serrated knife in the freezer for 15 minutes. When applying frosting, occasionally dip your offset spatula in hot water and wipe it dry. Cold tools cut firm cake cleanly, and a warm spatula smooths frosting like a dream.
The final secret to a beautiful geode cake is to embrace a little bit of nature’s chaos. Real geodes aren’t perfectly symmetrical. Don’t stress if a few crystals are out of place or the colors blend unexpectedly. These small imperfections are what make the final result look organic, authentic, and truly breathtaking.


