Your No-Nonsense Guide to Brewing Amazing Kombucha at Home
I got into brewing kombucha well over a decade ago. A friend handed me this weird, rubbery-looking disc floating in a jar of sweet tea, and honestly, I was pretty skeptical. The whole thing felt more like a strange science experiment than a recipe. My first few batches were a total mess—some were so vinegary they could strip paint, and others were disappointingly flat. But I’m stubborn, so I stuck with it.
In this article
- What is This SCOBY Thing Anyway?
- Getting Your First SCOBY: The First Big Step
- Is It Worth It? A Quick Look at the Cost
- The Main Event: Your First Fermentation (F1)
- Level Up: Getting That Fizz and Flavor with F2
- Brewer’s Help Desk: Common Worries & Quick Fixes
- Let’s Be Honest About the Health Hype
- Inspirational Gallery
Over time, after digging through brewing guides and talking with other fermenters, I started to understand the living science behind the fizz and tang. These days, I get to help local cafes get their own kombucha programs off the ground and teach workshops to folks who are just starting out at home.
There’s a ton of noise out there about kombucha. Some people treat it like a magic potion. I want to cut through all that. This guide is all about the practical, hands-on reality of brewing. We’ll get into what’s actually happening in that jar, how to get consistent results, and have an honest chat about the health stuff. My goal is to give you the confidence to brew safely and know exactly what you’re drinking.
What is This SCOBY Thing Anyway?
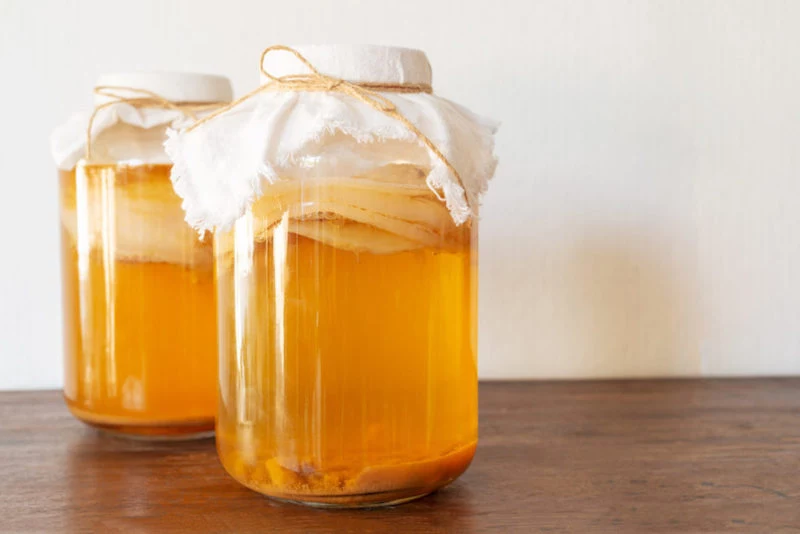
Before you can brew, you need to know your main ingredient. At the heart of every batch of kombucha is the SCOBY, which stands for Symbiotic Culture of Bacteria and Yeasts. And no, it’s not a mushroom, despite what some people call it. Think of it as a living, breathing community of microbes all working together.
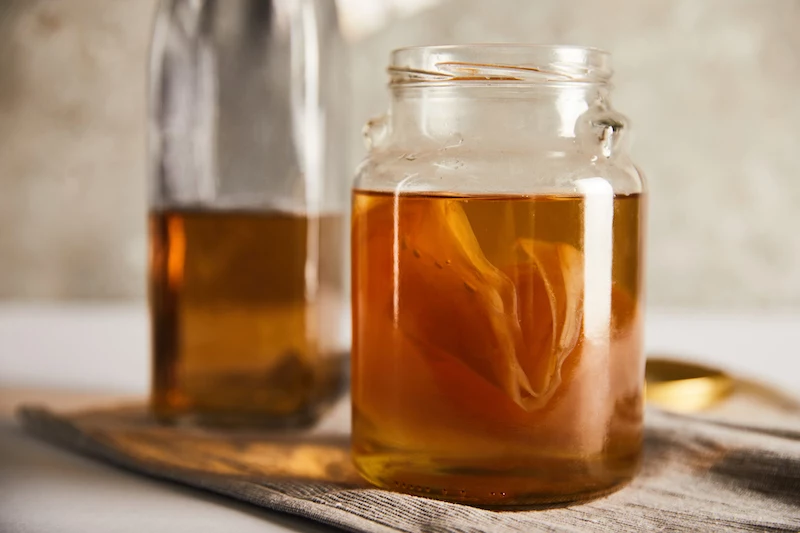
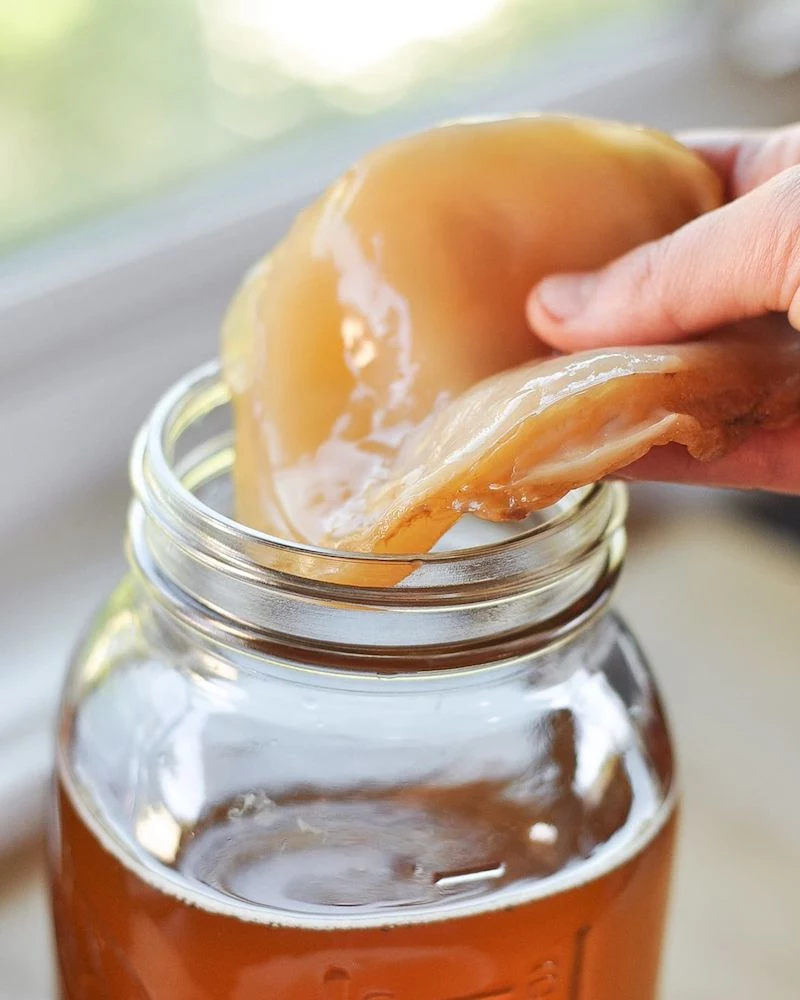
The SCOBY is really two parts. First, you have the starter liquid—this is just strong, mature kombucha from a previous batch that’s packed with all the good bacteria and yeast. The second part is the pellicle, which is that rubbery disc that floats on top. A lot of people think the pellicle is the whole SCOBY, but it’s more like the microbes’ home. The real magic is happening in the liquid.
So, what are these microbes doing? First up are the yeasts. They have one job: eat the sugar you add to the tea. As they feast, they produce a tiny bit of alcohol and the carbon dioxide that will eventually give you fizz. It’s the same basic idea behind making beer.
Then, the bacteria take their turn. They consume the alcohol the yeast made and convert it into healthy organic acids, like acetic acid. That’s what gives kombucha its signature tart, slightly vinegary taste. It’s also a natural preservative that keeps your brew safe from any nasty, unwanted microbes.
By the way, that pellicle is actually made of cellulose, which the bacteria spin as a protective layer on the surface of the tea. It acts like a cap, shielding the brew from dust and oxygen. A new, thin layer will usually form with every batch you brew, which is a great sign!
Getting Your First SCOBY: The First Big Step
Okay, so how do you even get one of these things? This is the first hurdle for every new brewer. You’ve got a couple of solid options.
- Buy a Quality SCOBY Online: This is the most reliable way to start. You can find reputable sellers on brewing supply websites or places like Etsy and Amazon. A good kit will cost you around $15-$25 and should come with a healthy, thick pellicle submerged in at least a cup of very strong starter tea. This is critical because that strong starter tea protects your first batch from mold.
- Grow Your Own from Scratch: Feeling adventurous? You can absolutely grow your own SCOBY from a bottle of store-bought kombucha. It’s cheaper but takes more patience. Just make sure the bottle you buy is labeled “raw” and “unpasteurized,” and you can see some of those little floaty brown strands at the bottom—that’s the good stuff. Simply mix that bottle of kombucha with about a cup of cooled, sweet black tea in a jar, cover it with a cloth, and wait. In a couple of weeks, you should see a thin, jelly-like film forming on the surface. That’s your baby SCOBY!
Is It Worth It? A Quick Look at the Cost
Before you dive in, you might be wondering if this will actually save you money over buying those $4 bottles at the store. The short answer? Absolutely.
Here’s a quick shopping list to get you started:
- A One-Gallon Glass Jar: You can find these at Target, Walmart, or online for about $10-$15.
- A SCOBY with Starter Tea: This will be your biggest one-time cost, around $15-$25 if you buy it. Or, it’s the cost of a bottle of raw kombucha (about $4) if you grow your own.
- Swing-Top Bottles for F2: These are essential for safe carbonation. A set of six 16-ounce bottles usually runs between $20 and $30 on Amazon or at a local homebrew shop. Don’t cheap out here!
- Tea and Sugar: This is incredibly cheap. A box of plain black tea and a bag of regular white sugar will cost less than $10 and will last you for dozens of batches.
So, your initial investment is somewhere around $50-$70. But after that, each gallon of kombucha (which fills about eight 16-ounce bottles) will cost you less than a dollar to make. The savings add up fast.
The Main Event: Your First Fermentation (F1)
Alright, let’s brew. Making great kombucha is all about giving the SCOBY what it needs and then getting out of the way. Follow these steps, and you’ll be in great shape.
- Brew a Batch of Sweet Tea: Bring a gallon of filtered water to a boil (if you’re using tap water, let it boil for 10 minutes to get rid of chlorine). Remove it from the heat and stir in one cup of plain white cane sugar until it’s completely dissolved. Then, add 8-10 bags of plain black or green tea. Let it steep for about 15 minutes. Heads up: avoid any teas with oils, like Earl Grey, as they can harm your SCOBY over time.
- Let It Cool. COMPLETELY. This is the most important step, and the one everyone rushes. You have to let the sweet tea cool all the way down to room temperature (between 68-78°F). If you add your SCOBY to hot tea, you will kill it. I learned this the hard way. Just cover it and walk away for a few hours. Patience is key.
- Combine and Cover: Pour your cooled sweet tea into your one-gallon glass jar. Gently slide in your SCOBY pellicle and pour in the starter tea. Don’t worry if the pellicle sinks or floats sideways—that’s totally normal. Cover the mouth of the jar with a few layers of cheesecloth or a clean tea towel and secure it with a rubber band. This keeps pests out but lets the brew breathe.
- Find a Good Spot and Wait: Place the jar somewhere warm, out of direct sunlight, and where it won’t be disturbed. Your kitchen counter is usually fine. The first fermentation (F1) typically takes anywhere from 7 to 21 days. If your house is cool, it’ll take longer; if it’s warm, it’ll be faster.
- Taste Test Time: After about a week, it’s time to start tasting! Gently push a straw down the side of the jar, past the pellicle. Trap some liquid with your finger and have a sip. At first, it’ll taste like sweet tea. As the days go on, it will get progressively more tart. When it hits that perfect balance of sweet and tangy for your taste, it’s ready for the next step.
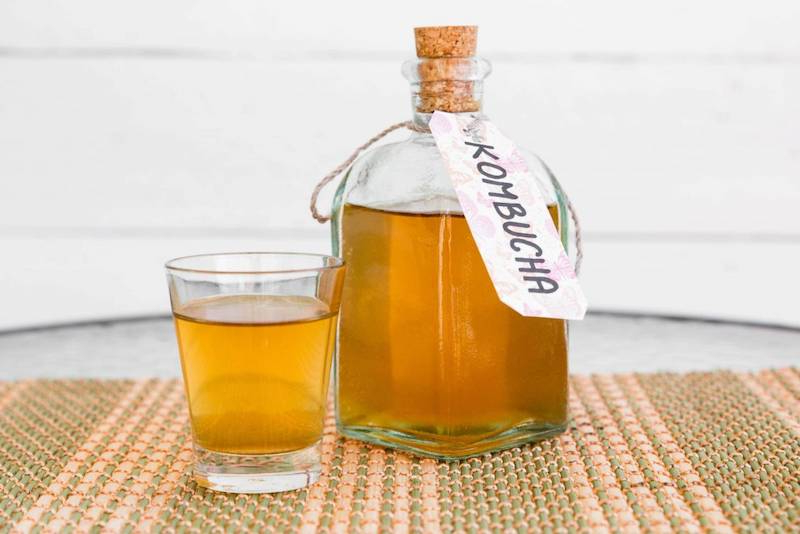
Level Up: Getting That Fizz and Flavor with F2
The kombucha you have now is mostly flat. To get that signature fizz and add delicious flavors, you need a second, sealed fermentation, often called F2. Think of it this way: F1 is an open-air (aerobic) process to create the kombucha itself. F2 is a sealed (anaerobic) process designed purely to create carbonation and infuse flavor.
A Serious Safety Warning: Avoid Bottle Bombs!
Before we go any further, we have to talk about safety. When you seal a fermenting liquid in a glass bottle, you are creating a pressure vessel. If that pressure builds up too much, the bottle can literally explode, sending glass flying. This is no joke. To prevent this, you absolutely MUST use round, pressure-rated bottles. The swing-top (or Grolsch-style) bottles are perfect. Never, ever use square decorative bottles or old Mason jars for this—they aren’t built to handle the pressure.
The F2 Process
- Flavor and Bottle: Using a funnel, pour your finished F1 kombucha into your pressure-rated bottles. First, add your flavoring—a good rule of thumb is about 10% juice or 1-2 tablespoons of fruit puree per 16-ounce bottle. Mashed raspberries or a bit of ginger juice are fantastic starters. Leave about one to two inches of empty space (headspace) at the top.
- Seal and Ferment (Again): Clamp the lids shut and let the bottles sit at room temperature for another 2 to 7 days. The warmer it is, the faster they’ll carbonate.
- Burp Your Bottles: This is non-negotiable for safety. Once a day, carefully open each bottle to release any excess pressure. You’ll hear a hiss. If it’s a weak hiss, it needs more time. If it fizzes up aggressively, it’s ready for the fridge!
- Refrigerate: Once it’s as fizzy as you like, move the bottles to the refrigerator. The cold dramatically slows down fermentation, locking in the carbonation and preventing the pressure from building any further.
Oh yeah, a quick note on alcohol: all home-brewed kombucha contains a small amount of alcohol as a natural byproduct of fermentation. It’s usually very low, typically between 0.5% and 1.5%, but it’s something to be aware of.

Brewer’s Help Desk: Common Worries & Quick Fixes
When you’re starting out, it’s easy to panic. Here are a few common issues and what to do about them.
- “Help! My SCOBY sank! Is it dead?” Nope, it’s perfectly fine! A SCOBY’s buoyancy doesn’t indicate its health. Sinking, floating, or turning sideways are all normal. As long as a new layer starts to form on top within a week or two, you’re golden.
- “Is this MOLD?!” This is the big one. Mold is always dry, fuzzy, and will grow in distinct circular patches on the very top surface. It can be white, green, blue, or black. If you see fuzzy spots, you MUST throw out the entire batch, including the SCOBY, and start over. Brown, stringy bits hanging down or dark spots within the pellicle are just yeast, and they are totally normal and healthy!
- “Why isn’t my kombucha fizzy?” Lack of fizz in F2 usually comes down to one of three things: not enough sugar for the yeast to eat (try adding a 1/4 teaspoon of sugar per bottle), not enough time fermenting at room temperature, or your F1 brew was too young and didn’t have enough active yeast.
- “I’m going on vacation. What do I do with my SCOBY?” Easy! You can create a “SCOBY hotel.” Just place your SCOBY and any extra pellicles in a jar with a few cups of finished kombucha. Cover it with a cloth and leave it on the counter. It will be fine for up to a month. When you get back, just use the liquid from the hotel as your starter tea for a new batch.

Let’s Be Honest About the Health Hype
This is where we need to be really clear. Kombucha is a delicious, fermented tea. It is not a miracle drug. A lot of the claims you see online are overblown.
Here’s the real deal. Raw kombucha does contain live probiotics, but the specific strains and amounts vary wildly from batch to batch. It’s a great part of a diet rich in fermented foods, but it’s not a standardized supplement. It’s also full of antioxidants from the tea, but you can get those from just drinking a regular cup of tea, too.
And the whole “detox” thing? Your body already has an incredible detoxification system: your liver and kidneys. While staying hydrated with things like kombucha is great for your overall health, it’s not magically scrubbing your system clean. So, enjoy kombucha for what it is: a fantastic, tangy, and bubbly drink that you can have fun making yourself.

Inspirational Gallery


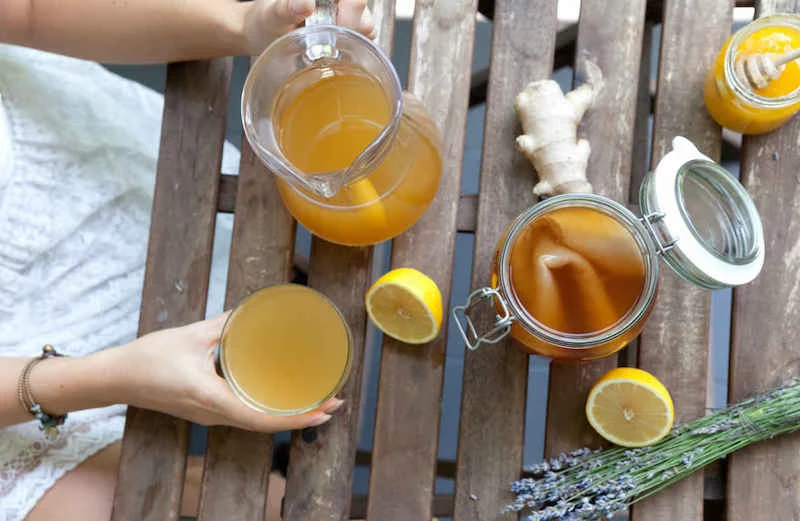
Once you’ve mastered the first fermentation, the real fun begins. The second fermentation, or F2, is where you add carbonation and bespoke flavors. The key is to add a small amount of sugar (from fruit or juice) to your finished kombucha in an airtight bottle.
- Classic Fizz: Add a teaspoon of fresh grated ginger and a squeeze of lemon to each 16oz bottle.
- Berry Blast: A few mashed raspberries or blueberries provide both sugar and beautiful color.
- Herbal Infusion: Try a sprig of fresh mint or rosemary for a more sophisticated, aromatic brew.
Seal them tight in Grolsch-style swing-top bottles for 2-5 days at room temperature, but be sure to “burp” them daily to release excess pressure!
A 2020 study in the journal ‘Foods’ confirmed that the type of tea used significantly alters the final kombucha’s antioxidant profile and microbial composition.
This isn’t just about taste; it’s about the health of your SCOBY. Black tea (like a simple Lipton or English Breakfast) provides the essential nutrients and tannins for a robust, healthy culture—it’s the gold standard for beginners. Green tea creates a lighter, more delicate kombucha but can weaken a SCOBY over many generations if used exclusively. Many brewers find a sweet spot by using a mix of 75% black and 25% green tea to get the best of both worlds.

Dreaming of that perfect ‘psst’ sound but getting flat, disappointing kombucha?
The issue often lies in one of three areas. First, check your seal; during the second fermentation, your bottle must be truly airtight to trap the CO2 produced. Second, ensure you added a little sugar (about 1/2 tsp per 16oz bottle) for the yeast to feast on. No sugar, no fizz. Finally, a weak or overly acidic starter liquid can hinder yeast activity from the get-go.
The pH Litmus Test: The single most important factor for a safe brew is acidity. Your kombucha must drop below a pH of 4.5 within the first few days of fermentation to prevent the growth of harmful molds and pathogens.
For the home brewer: This is why using enough strong starter tea from a previous batch is non-negotiable—it acidifies the new sweet tea right away. For extra peace of mind, inexpensive pH test strips, available online or at homebrew shops, can give you a precise reading. Aim for a starting pH of 4.5 or lower and a final pH between 2.5 and 3.5.


