Your Complete Guide to Perfectly Pressed Flowers (The Right Way)
I still have the very first flower I ever pressed. It’s a tiny purple pansy, tucked away inside a worn-out book my grandfather gave me. I was just a kid, so I did what kids do—I smashed it between the pages and forgot about it. Weeks later, I rediscovered it, a delicate, papery ghost of its former self. The color was a bit faded, and yeah, it was stuck to the page, but the shape was perfectly preserved. That one little flower kicked off a lifelong passion for me. What started as simple curiosity has grown into a deep dive into the art of patience and preservation.
In this article
- The Science of a Good Press (The ‘Why’ That Matters)
- Choosing and Prepping Your Flowers
- Method 1: The Classic Book Press
- Method 2: The Wooden Flower Press (The Hobbyist’s Go-To)
- Method 3: The Microwave Press (For When You’re in a Hurry)
- Advanced Tips and Troubleshooting
- What to Do With Your Beautifully Pressed Flowers
- A Final Word on Safety and Foraging
- Inspirational Gallery
You see, pressing flowers is so much more than just squishing them flat. It’s a delicate dance of removing moisture while keeping the plant’s structure and color intact. Once you get the ‘why’ behind the process, you can elevate this from a simple hobby into a true art form. This isn’t about getting results fast. It’s about technique, patience, and really respecting the natural beauty you’re working with. So, let’s walk through the methods I rely on, from the easiest starting points to the techniques that deliver gallery-worthy results.
The Science of a Good Press (The ‘Why’ That Matters)
Before you even think about picking a flower, it helps to understand what’s happening on a microscopic level. Every single petal, leaf, and stem is essentially a collection of tiny cells filled with water. If you just leave a flower on the counter, that water evaporates unevenly, causing the cells to shrink and collapse. That’s wilting in a nutshell.
The whole goal of pressing is to remove that water in a super controlled way. By putting a flower under pressure, you’re holding its cellular structure in a flat, fixed shape. The absorbent paper you use acts like a wick, pulling water out of the plant. But this has to be a slow and steady process. If you apply too much pressure too quickly, you can burst the cells, releasing enzymes that turn the flower a sad brown or black. On the flip side, if the moisture isn’t wicked away efficiently, you’re basically inviting mold to the party, and that will ruin everything. Every single technique we’re about to cover is just a different way to manage this delicate balance of pressure and moisture.

Choosing and Prepping Your Flowers
Honestly, your success is pretty much decided the moment you choose your plant. I’ve learned this the hard way, trying to rescue flowers that were just never going to press well. A little planning here goes a long way.
The Easiest Flowers to Start With
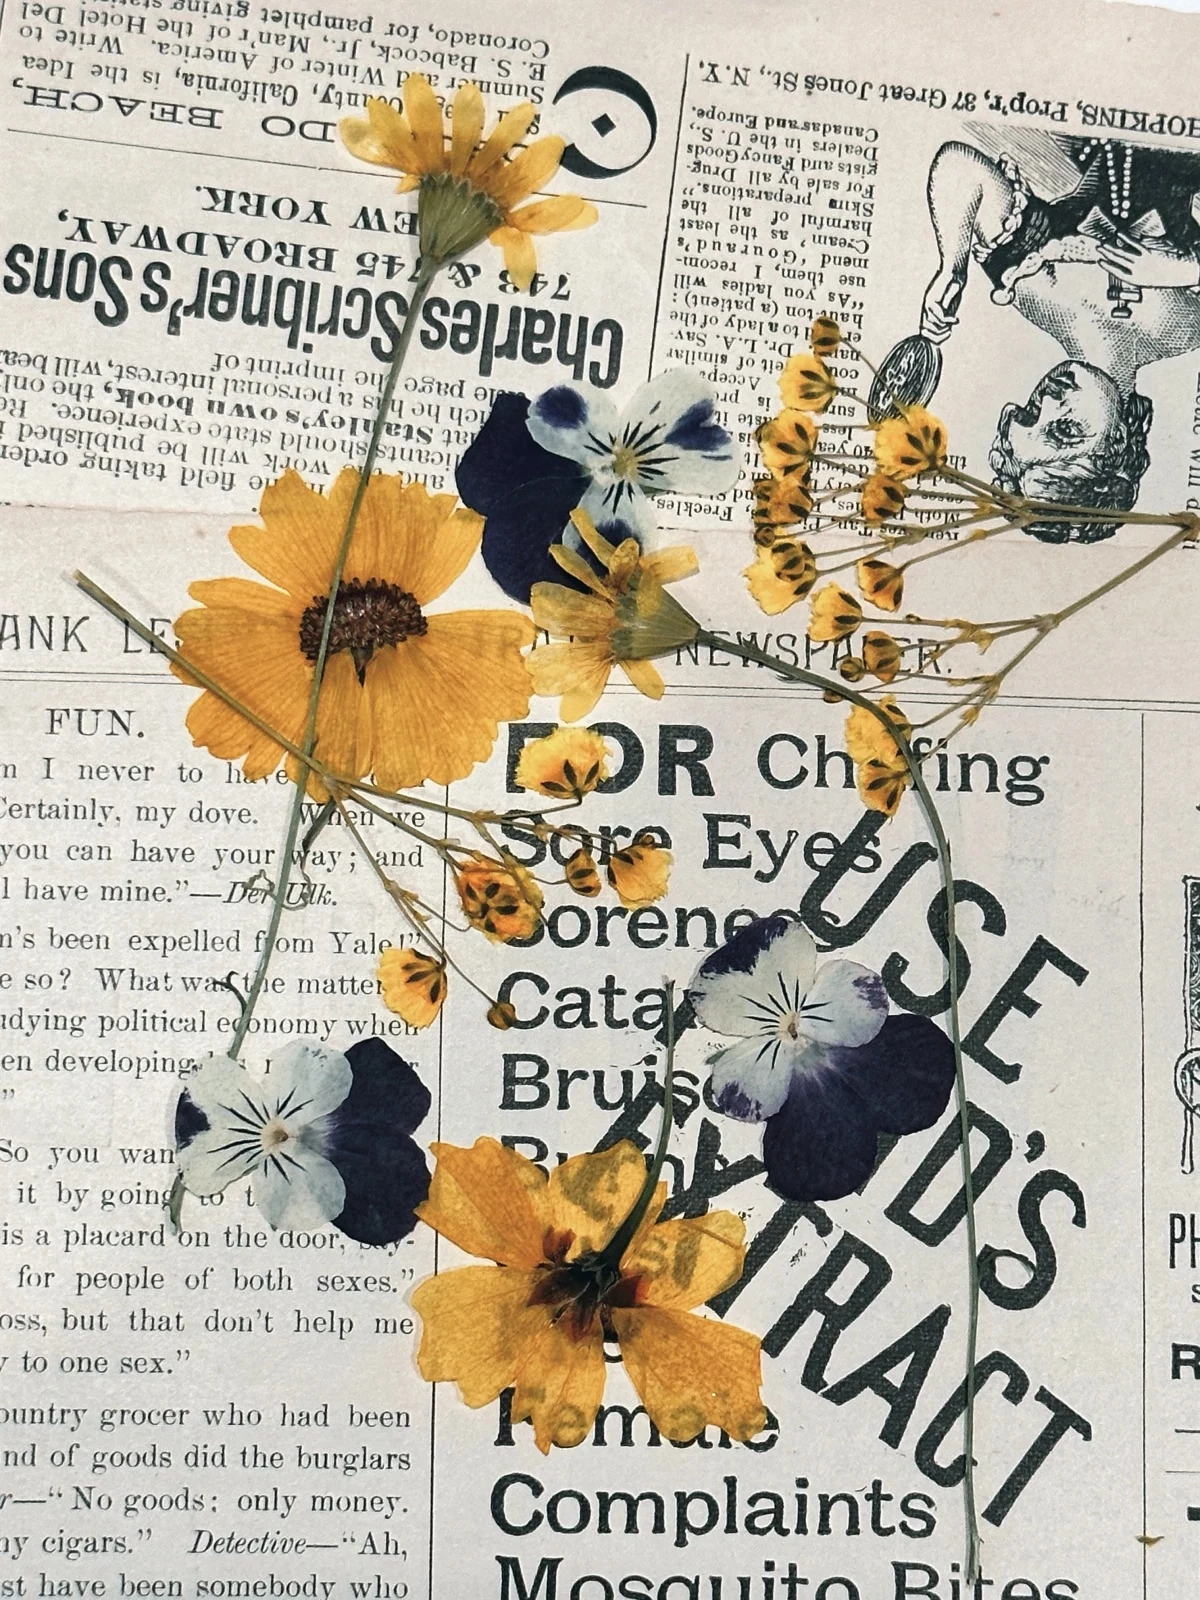
Your best bet is to begin with flowers that are already kind of flat or have a single layer of petals. They have way less moisture to deal with and press much more evenly. Some of my go-to choices for beginners are:
- Violets and Pansies: Their faces are naturally flat, and they hold their color beautifully.
- Cosmos and Poppies: They have delicate, single-petal layers that dry out in no time.
- Ferns and single leaves: These are fantastic for practice. They have very little moisture, making them super forgiving.
- Larkspur and Delphinium: The individual little florets on the stalk press like a dream and keep those gorgeous blue and purple colors.
- Forget-Me-Nots: Tiny, delicate, and they press with amazing detail.
Flowers That Need a Bit More Finesse
Thicker, globe-shaped flowers like roses or carnations are a bit of a challenge because of their shape and high water content. But it’s not impossible! You just need a different strategy.
- Roses: I almost never press a whole rosebud. The moisture trapped inside will rot long before it dries. What you can do is carefully pull the petals off and press them individually. For a more advanced move, take a sharp craft knife, like an X-Acto knife, and slice the entire rose cleanly in half lengthwise, right through the stem.
- Carnations and Zinnias: These are packed with dense petals. Just like with roses, you can carefully slice them in half from top to bottom.
- Daisies and Sunflowers: That thick central disk is the tricky part. You can sometimes press them whole, but it takes a ton of pressure and you have to change the paper frequently to avoid mold. A better way is to press the petals and the center separately.
When to Pick Your Flowers
The perfect time to harvest flowers for pressing is mid-morning. By then, any morning dew has evaporated, so you’re not adding extra moisture. The flower is also at its most hydrated and vibrant, right before the afternoon sun starts to take a toll. Always look for flowers that are just hitting their peak bloom. If it’s already starting to fade or brown, pressing it will only make it look worse.
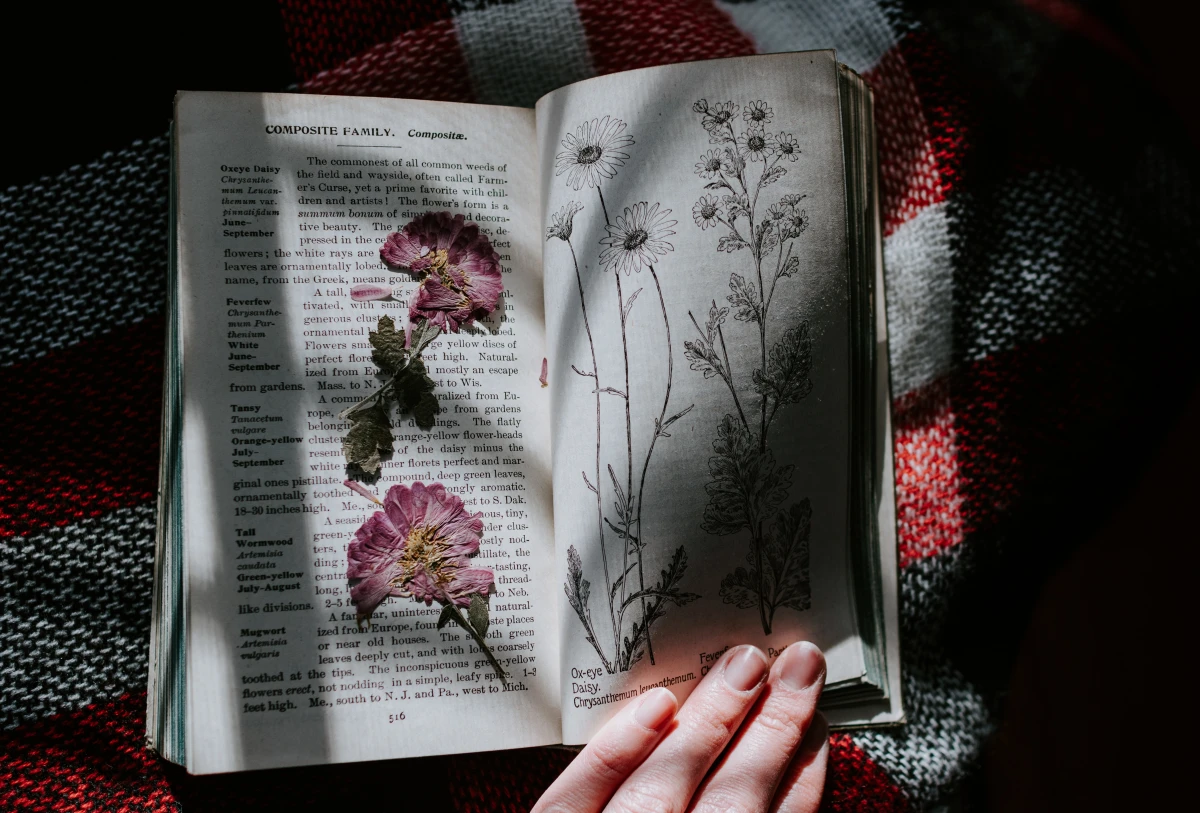
Method 1: The Classic Book Press
This is how most of us start, and it’s beautifully simple. I still use this method for a random, pretty leaf I might find on a walk. But you should know it comes with risks, both to your flower and your book.
Good for: Absolute beginners, kids, or for pressing just a few sturdy flowers without buying any special gear.
What you’ll need:
- A heavy book you don’t care about (an old phone book or textbook is perfect).
- Absorbent paper. Parchment paper works well. Quick tip: If you can’t find proper blotting paper, plain, uncoated printer paper or coffee filters are your next best bet. Just avoid paper towels—their bumpy texture will imprint on the petals!
- Your prepared flowers.
- A few more heavy objects, like extra books or even a brick.
The Process:
- Open your book to somewhere in the middle.
- Lay down a sheet of your absorbent paper on one of the pages.
- Arrange your flowers on the paper, making sure none of them are touching. If they overlap, they’ll stick together and are much more likely to trap moisture and mold.
- Carefully place another sheet of absorbent paper on top.
- Slowly close the book, trying not to shift anything.
- Put the book on a flat surface and stack your other heavy items on top for firm, even pressure.
- Now, leave it alone! The biggest mistake people make is peeking too early. Don’t even think about looking for at least one full week.
- After a week, you can do a quick check. Carefully open the book and swap out the absorbent paper for fresh, dry sheets. The old paper will feel a little damp. This step is key for preventing mold.
- Close it all back up, re-apply the weights, and wait another two to three weeks. You’ll know it’s ready when the flower feels like thin paper and is completely dry.
My two cents: The book method definitely works, but it’s not very precise. The pressure can be uneven, and the moisture can warp the book’s pages or even damage its spine. I’ve seen some beautiful old books get ruined this way, so please, only use a book that has zero sentimental or monetary value.
Method 2: The Wooden Flower Press (The Hobbyist’s Go-To)
For anyone who thinks they might press flowers more than once, a dedicated wooden press is the single best investment you can make. It gives you consistent, even pressure and much better air circulation, which are the keys to getting professional-looking results.
Good for: Hobbyists and artists who want high-quality, reliable results and want to press a bunch of flowers at once.
What you’ll need:
- A wooden flower press. You can find a nice starter press online or at craft stores like Michaels or Jo-Ann for about $20-$50. Or, if you’re feeling handy, you can make your own for under $10 with two small boards, four bolts, and four wing nuts from any hardware store.
- Sheets of corrugated cardboard cut to the size of your press.
- Blotting paper (or your chosen alternative), also cut to size. You can usually find blotting paper at art supply stores or online.
The Process:
- Unscrew the wingnuts and take off the top wooden board.
- Now you build your layers, or your “sandwich.” The order is important. Start with a piece of cardboard on the bottom board.
- Place a sheet of blotting paper on top of the cardboard.
- Arrange your flowers on the blotting paper. You have more room here, but the same rule applies: avoid overlapping.
- Cover the flowers with a second sheet of blotting paper.
- Place another piece of cardboard on top. That completes one layer.
- Now you can keep stacking! Repeat the process: blotting paper, flowers, blotting paper, cardboard. I often stack 5 to 10 layers in my bigger presses.
- Once you’re done, put the top wooden board back on.
- Insert the bolts and hand-tighten the wingnuts in a crisscross pattern, like you’re changing a tire. This distributes the pressure evenly. Tighten until they’re firm, then give them one final quarter-turn. Don’t use tools, or you might crush the flowers.
- Store the press in a warm, dry spot with good air circulation.
- Just like the book method, wait a week before your first check. Then, open the press and replace all the blotting paper. The cardboard can usually be reused unless it feels damp.
- Reassemble the press and leave it for another two to three weeks until the flowers are perfectly dry.
My two cents: This is the gold standard for home pressing. The cardboard provides stiffness and creates little air channels, letting moisture escape much more effectively than in a closed book. The pressure is far more even and controlled. It’s a total game-changer.
Method 3: The Microwave Press (For When You’re in a Hurry)
Sometimes you just need a pressed flower now for a card or a quick craft project. The microwave method can dry a flower in minutes instead of weeks. But… that speed comes at a price. It’s really easy to scorch the flower, and the color often isn’t as vibrant as with the slower methods.
Good for: Crafters on a deadline, impatient experimenters. I wouldn’t recommend this for a precious or sentimental flower.
What you’ll need:
- Two microwave-safe ceramic tiles or flat plates.
- Two pieces of cardboard, cut to the size of the tiles.
- Two sheets of parchment paper.
- Two heavy-duty rubber bands.
- Your microwave, of course.
The Process (and a Safety Warning!):
- Build your pressing stack: Start with a ceramic tile, then add cardboard, then parchment paper.
- Arrange your flowers on the parchment.
- Cover with the second sheet of parchment, the second piece of cardboard, and finally the other ceramic tile.
- Carefully wrap the whole stack together with the two rubber bands so it’s snug.
- Heads up! Never, ever use metal in the microwave. Make sure your tiles are 100% microwave-safe. Microwaving paper is a fire risk, so do not walk away from the microwave while it’s on.
- Place the stack in the microwave. Set the power to a low or medium setting. A good starting point is 50% power, or if your microwave has one, the ‘defrost’ setting.
- Microwave in short bursts of 30-45 seconds.
- After each burst, take the press out (use oven mitts, it will be HOT!) and let it cool for a few minutes. This cooling period is important, as moisture is still escaping.
- Carefully open it up to check. If the flowers are still damp, reassemble and give it another short burst.
- It’s done when it feels dry and papery. Be careful not to overdo it, or the flower will become super brittle and break.
My two cents: This is a method of convenience, not quality. The fast heating can essentially ‘cook’ the pigments, leading to major color loss, especially with reds and purples. It’s a handy trick for a quick project, but I would never use it for my archival pieces.
Advanced Tips and Troubleshooting
Once you’ve got the basics down, you can start refining your technique to get even better results, especially when it comes to preserving that beautiful color.
Keeping Colors Vibrant
Some color fading is just inevitable over time due to light and oxygen, but you can definitely minimize it.
- Work Fast: The sooner you get a flower from the garden into the press, the better the color will be.
- Get it BONE Dry: Any lingering moisture will speed up decay and color loss. This is why changing that absorbent paper is so critical.
- Lesser-known trick: Silica Gel. For really special or thick flowers like orchids, I sometimes pre-dry them. I’ll place the flower in an airtight container on a bed of silica gel beads for a few hours (try 2-4 hours for delicate petals, maybe up to 6 for thicker ones). This wicks away a ton of moisture before it even sees the press. You can find silica gel at most craft stores in the floral aisle.
- Store in the Dark: Once your flowers are pressed, keep them away from direct sunlight. UV light is the number one enemy of color.
Common Problems and How to Fix Them
- Problem: My flowers are moldy! This is the most common issue and it’s caused by too much moisture and not enough airflow. The fix is to change your paper more often and make sure you’re storing your press in a dry, warm place (not a damp basement).
- Problem: My flowers turned brown or black. This usually means the flower was too wet to begin with, you applied pressure too fast and ruptured the cells, or it was already past its prime when you picked it. Unfortunately, there’s no fix for this once it happens; it’s a lesson in selection and technique.
- Problem: The paper is stuck to the petals. This can happen with really delicate flowers or if you use cheap paper like facial tissues. Using quality parchment or blotting paper usually prevents this. If it happens, you might be able to gently peel it away with a pair of fine-tipped tweezers.
What to Do With Your Beautifully Pressed Flowers
Okay, the waiting is over and you have a collection of gorgeous pressed botanicals. Now the fun really begins!
A few ideas to get you started:
- Framed Art: Arrange your flowers on high-quality, acid-free paper. Use a toothpick to apply a tiny dot of archival PVA glue to stick them down. For work you want to last, framing it under UV-protective glass is a worthwhile investment to prevent fading.
- Resin Crafts: This is super popular, but there’s a huge catch: the flower must be absolutely, 100% dry. Trust me, I’ve learned this the hard way. Even a trace of moisture will create cloudy spots or keep your resin from curing properly. I always let my flowers sit for an extra week after I think they’re done before putting them in resin.
- Stationery and Cards: A single pressed pansy on a blank notecard is a simple, elegant way to make a personal statement.
A Final Word on Safety and Foraging
Anytime you work with natural materials, it’s good to be mindful.
- Know Your Plants: Be aware of what you’re picking. Some common garden plants like Foxglove or Lily of the Valley are toxic. Handle unknown plants carefully, wash your hands after foraging, and keep any toxic pressed plants away from kids and pets.
- Forage Ethically: If you’re gathering from the wild, follow local rules. Never take more than you need, and never, ever take the last of any plant in an area. Be a good steward of the environment that’s providing your materials.
- When to Call a Pro: If you need to preserve something truly irreplaceable, like a wedding bouquet, I highly recommend finding a professional preservation service. They use things like commercial freeze-dryers that can preserve the 3D shape of a flower in a way pressing just can’t. This service can be pricey, often running a few hundred dollars, but for a once-in-a-lifetime memory, it can be worth it.
Flower pressing is a wonderfully slow and quiet craft in our fast-paced world. It teaches you to notice the small details in nature and to have a little patience. Every flower is an experiment. Some will fail—they’ll turn brown or crumble into dust. But others will emerge from the press as perfect, paper-thin memories, and those are the ones that make it all worthwhile.
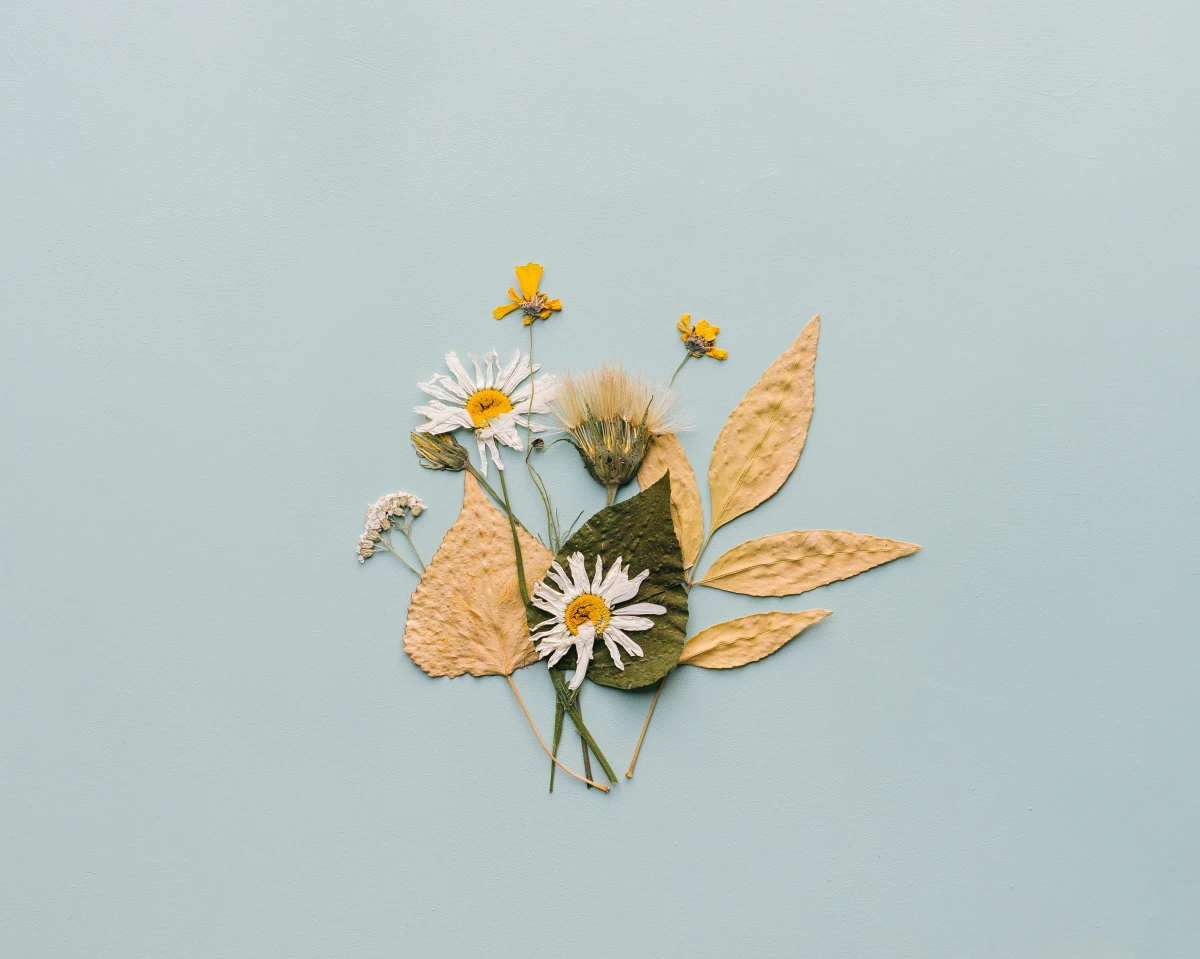
Inspirational Gallery
Microwave Press: Ideal for fast results, a press like the Microfleur can dry flowers in minutes. It’s perfect for impatient crafters but requires careful monitoring to avoid
In the Victorian era, sending a pressed pansy wasn’t just a pretty gift; it meant ‘thinking of you’. This secret ‘language of flowers,’ or floriography, gave each pressed bloom a hidden, romantic meaning.
Beyond the simple beauty, a pressed flower is a tangible piece of a memory. That single daisy from a first date, the clover from a lazy park afternoon, or a petal from a wedding bouquet—pressing them transforms them into personal time capsules. Each time you look at the finished piece, it’s not just a flower you see, but the sun on your face, the sound of laughter, and the feeling of that specific moment, perfectly preserved under glass.
Ever wondered why your beautiful red roses turn a muddy brown or deep purple after pressing?
It’s all about chemistry. The red pigments in many flowers, called anthocyanins, are notoriously unstable and highly sensitive to pH changes and oxidation during the drying process. While you can’t always prevent it, pressing quickly and ensuring the paper is perfectly dry can help. For truer reds, consider flowers like red poppies or zinnias, which tend to hold their color more reliably.
The number one enemy of your finished pressed flowers is sunlight. Even after being perfectly preserved, UV rays will bleach the delicate pigments over time. If you’re framing your work, always opt for UV-protective glass or acrylic. Brands like Tru Vue offer museum-grade options that keep those vibrant blues and yellows from fading to beige.
Take your creations off the wall and bring them to life with light. Gently apply delicate pressed flowers like violas or fern leaves to the exterior of a plain pillar candle. A thin layer of craft decoupage medium, like Mod Podge, brushed over the top will seal them in place, creating a botanical lantern that glows from within when lit.
The Japanese art of Oshibana, or pressing flowers, dates back to the 16th century, where samurai supposedly used it to develop patience, discipline, and an appreciation for nature.
This ancient practice views flower pressing not just as a craft, but as a form of meditation. Modern Oshibana artists create incredibly intricate landscapes and portraits, proving this is an art form with limitless depth and not just a simple hobby.
When faced with thick, dense flowers like a full rose or a zinnia, don’t try to press them whole; they’ll likely trap moisture and rot.
- Carefully slice the flower head in half vertically with a sharp craft knife before pressing.
- Alternatively, deconstruct the flower and press each petal individually to be reassembled later in your design.
This ensures every part makes good contact with the paper, leading to a much more successful and even press.
- Brighter, more vibrant colors that last significantly longer.
- A much-reduced chance of browning or mold developing in the press.
The secret? A quick pre-treatment bath. For very moisture-rich flowers, some professional artists lightly dip them in a 1:10 solution of denatured alcohol and water, then blot them thoroughly dry before pressing. This helps to displace water and fix the color more effectively.
- Blotting Paper: The professional’s choice for maximum absorbency. You can find dedicated botanical blotting paper online.
- Parchment Paper: A great, non-stick alternative that prevents delicate flowers from sticking to the absorbent layer above it.
- Un-waxed Coffee Filters: Surprisingly effective and budget-friendly for smaller, individual blossoms.


