Your Freezer Isn’t a Black Hole: How to Finally Get It Organized
For the longest time, my freezer was a source of pure chaos. Seriously. It was a jumble of mystery packages covered in ice crystals and leftovers I couldn’t even identify. Opening the door felt like a gamble. I knew good food was in there somewhere, but finding it was a full-on archeological dig. I wasted food, I wasted money buying things I already had, and I wasted so much time. It was a lesson learned the hard way.
In this article
- First, Let’s Talk About What’s Happening in There
- The Game-Changing System for Freezer Organization
- Keeping It All Straight: Inventory and Rotation
- How Long Does Food Actually Last in the Freezer?
- A Few Pro Tips You Might Not Know
- Taming Different Freezer Types
- The Quick-Start Shopping List
- Inspirational Gallery
A freezer isn’t just a cold box; it’s a dynamic tool for preserving food and saving you serious cash. Getting it right took a lot of trial and error, but I eventually figured out a system that actually works, both for my family and for friends I’ve helped in their own kitchens.
This guide isn’t about creating perfectly tidy, Instagram-worthy shelves. It’s about food safety, preserving quality, and making your life easier. We’ll go through the ‘how’ and, more importantly, the ‘why’ behind each step, so you can build a system that sticks.
First, Let’s Talk About What’s Happening in There
Before we start tossing things around, it helps to understand the science. Knowing what’s going on inside that frozen box helps you make smarter choices and avoid the common mistakes that ruin perfectly good food. This is the foundation of everything else.
The #1 Enemy: Freezer Burn
We’ve all seen it—those dry, leathery, discolored patches on frozen food. That’s freezer burn. It happens when moisture on the surface of your food turns directly into vapor, basically drying your food out even while it’s frozen. Air is the culprit here. When food is exposed to the cold, dry air in the freezer, moisture gets sucked right out of it, causing that awful texture and flavor loss.
The key to stopping this is to eliminate air contact as much as humanly possible. This is why the pros are so obsessed with proper packaging like vacuum sealing. You’re creating a fortress against air, stopping freezer burn before it even starts.
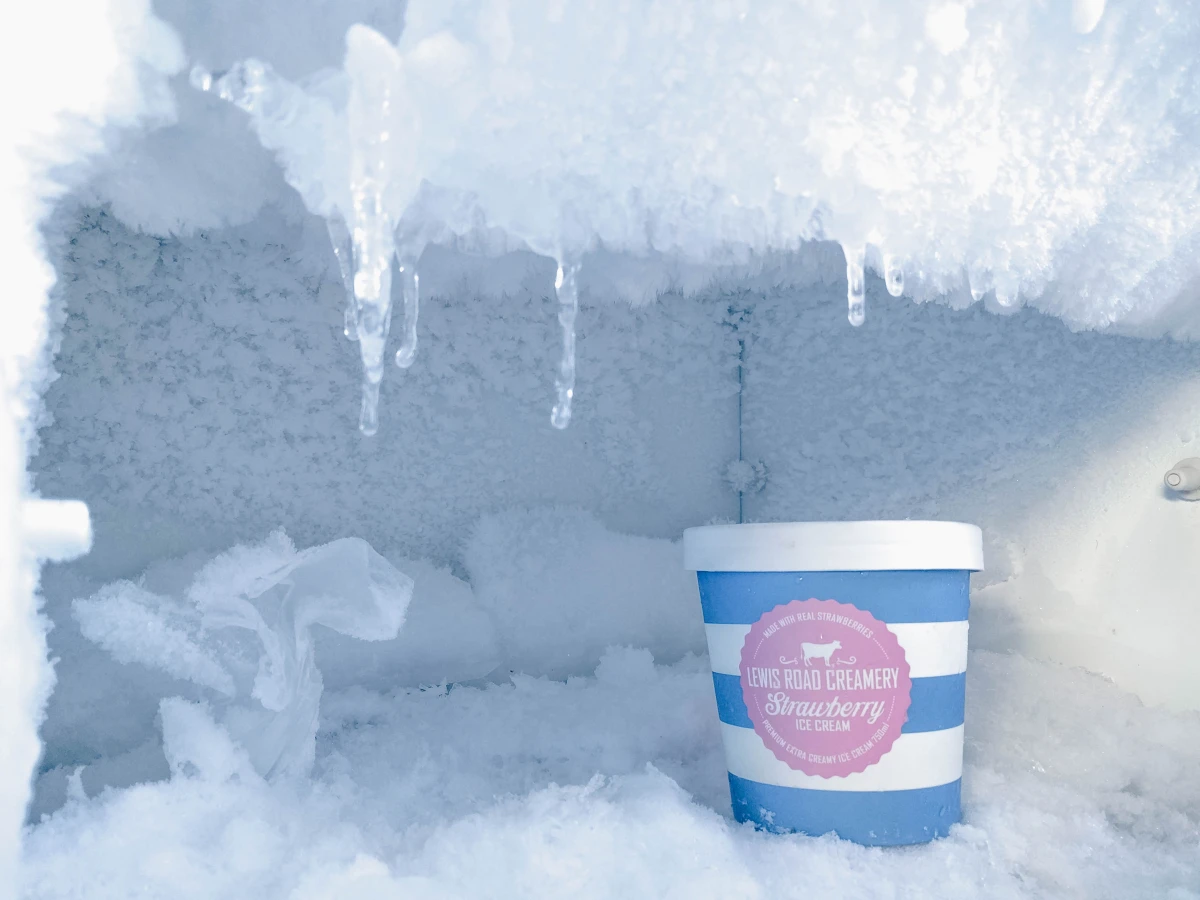
Your Freezer’s Happy Place: Temperature and Fullness
Food safety experts recommend keeping your freezer at or below 0°F (-18°C), and for good reason. At that temperature, the growth of nasty microorganisms like bacteria and mold grinds to a halt. It doesn’t kill them, but it puts them into a deep sleep. It also dramatically slows down the natural processes that cause food to spoil and lose nutrients.
By the way, how full your freezer is matters, too. Think of the frozen food inside as a “cold battery.” A well-stocked freezer holds the cold better, so when you open the door, the temperature doesn’t fluctuate as much. This means your compressor works less, saving energy. But don’t cram it completely full! Air still needs to circulate. A good rule of thumb is to aim for about 75-80% full for peak performance.
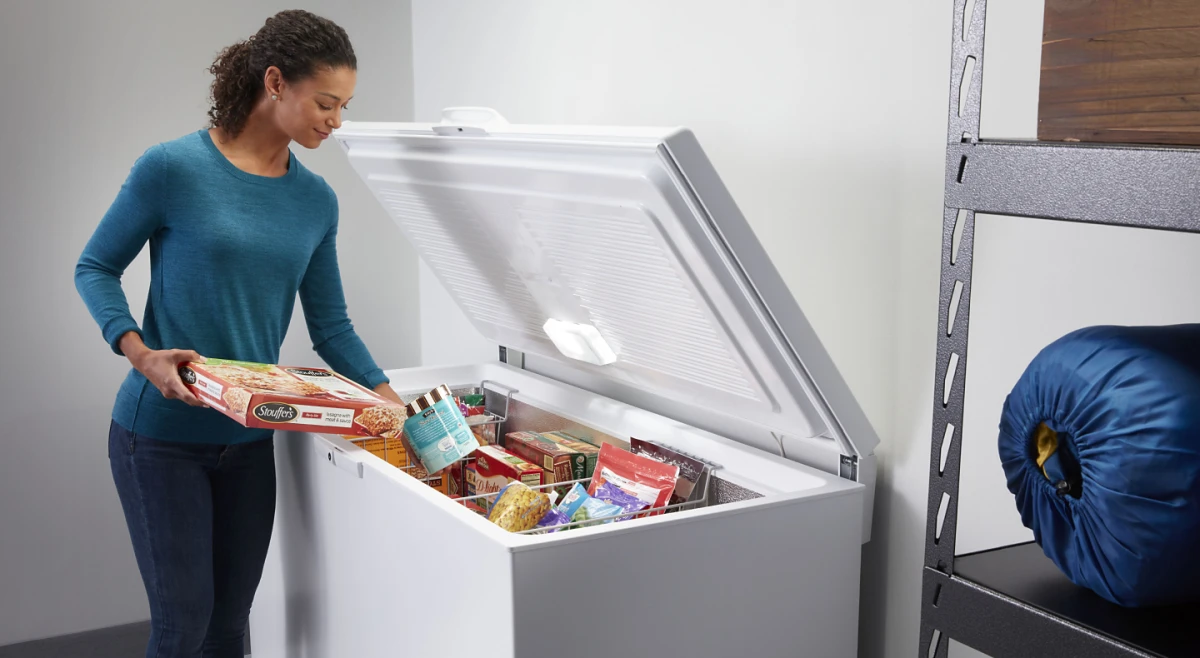
The Game-Changing System for Freezer Organization
Getting your freezer in order isn’t a one-and-done project. It’s a simple system you follow. Here’s the step-by-step method that turns a chaotic mess into a manageable, rotating inventory.
Step 1: The Great Purge and Defrost
Okay, deep breath. You have to start by emptying everything out. Plan for a couple of hours and have a cooler or two on standby to hold the food you want to keep. As you take each item out, give it a hard look. Is it covered in freezer burn? Can you even tell what it is? Be honest. If you have no idea what it is or you know it’s ancient, it’s time to say goodbye.
Remember the golden rule: when in doubt, throw it out. It’s never worth the risk.
Once it’s empty, unplug the freezer and let it defrost. This is especially important for older models without an auto-defrost function. That icy buildup acts like insulation, making your freezer work harder and eat up electricity. Clean the inside with a simple mix of warm water and baking soda (harsh chemical smells can get into your food), dry it completely, and plug it back in. Let it get back down to 0°F before you start reloading.

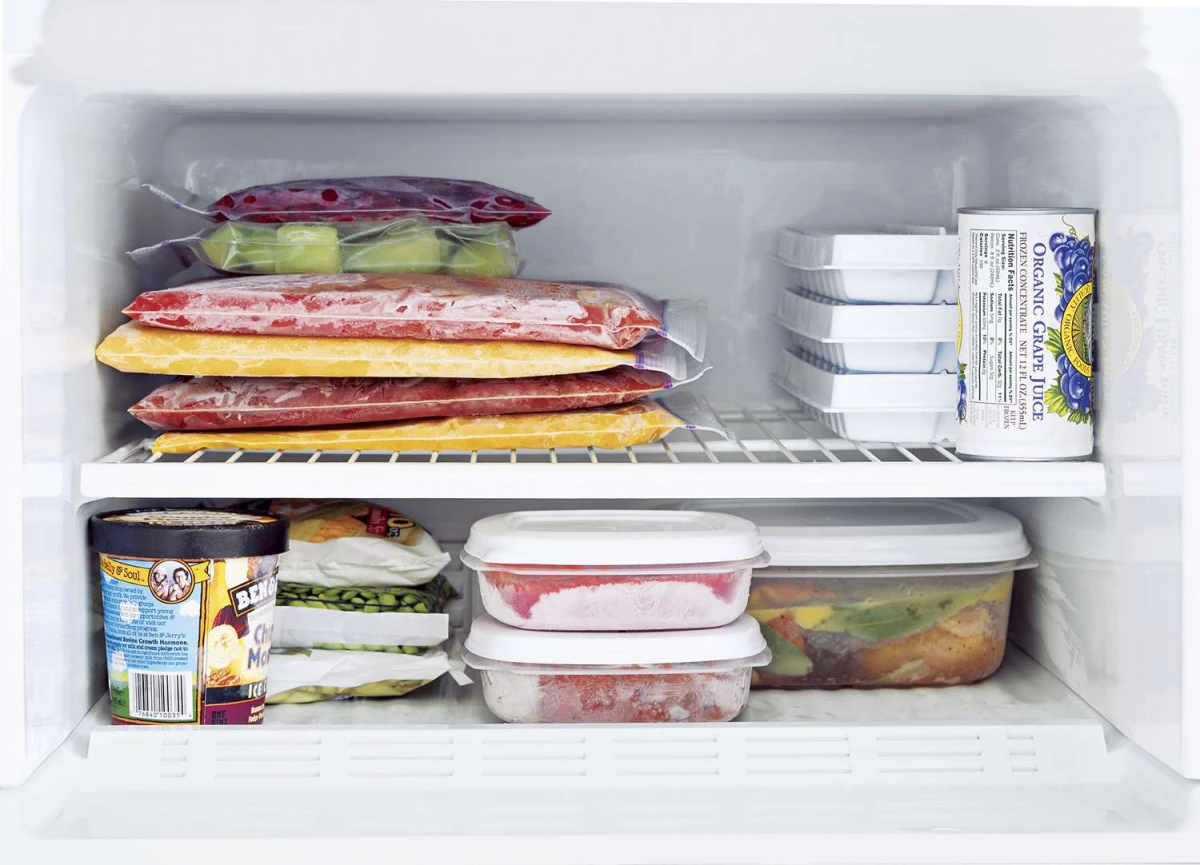
Step 2: Choosing Your Gear (Containers and Packaging)
Your choice of containers will make or break your system. I’ve tried them all, and here’s the breakdown:
- Vacuum Sealer Bags: Honestly, for long-term storage of meat, fish, or blanched veggies, nothing beats a vacuum sealer. It sucks out all the air, which pretty much eliminates freezer burn. I bought one after losing a bunch of expensive steaks to bad packaging, and it paid for itself within a year. You don’t need a top-of-the-line model; you can find great ones from brands like Nesco or FoodSaver for between $70 and $200.
- Plastic Deli Containers: For soups, stocks, and chili, I swear by these. They’re cheap, they stack perfectly, and they come in standard pint and quart sizes, which makes portioning a breeze. You can find them on Amazon or at a local restaurant supply store. Just make sure they’re rated for freezer use so they don’t crack.
- Glass Containers: Glass is awesome for reheating, but I use it carefully in the freezer. I’ll never forget the sound of a glass dish of chili cracking because I didn’t leave enough room for it to expand. The cleanup was NOT fun. If you use glass, make sure it’s the tempered kind and always leave at least an inch of headspace at the top for liquids.
- Freezer-Safe Zip-Top Bags: A kitchen staple. Always get the thicker ‘freezer’ bags, not the flimsy ‘storage’ ones. A great trick for ground meat is to put a pound in a quart-size bag, seal it almost all the way, and use a rolling pin to flatten it into a thin, half-inch slab before sealing completely. It stacks like a file folder and thaws in under 20 minutes!
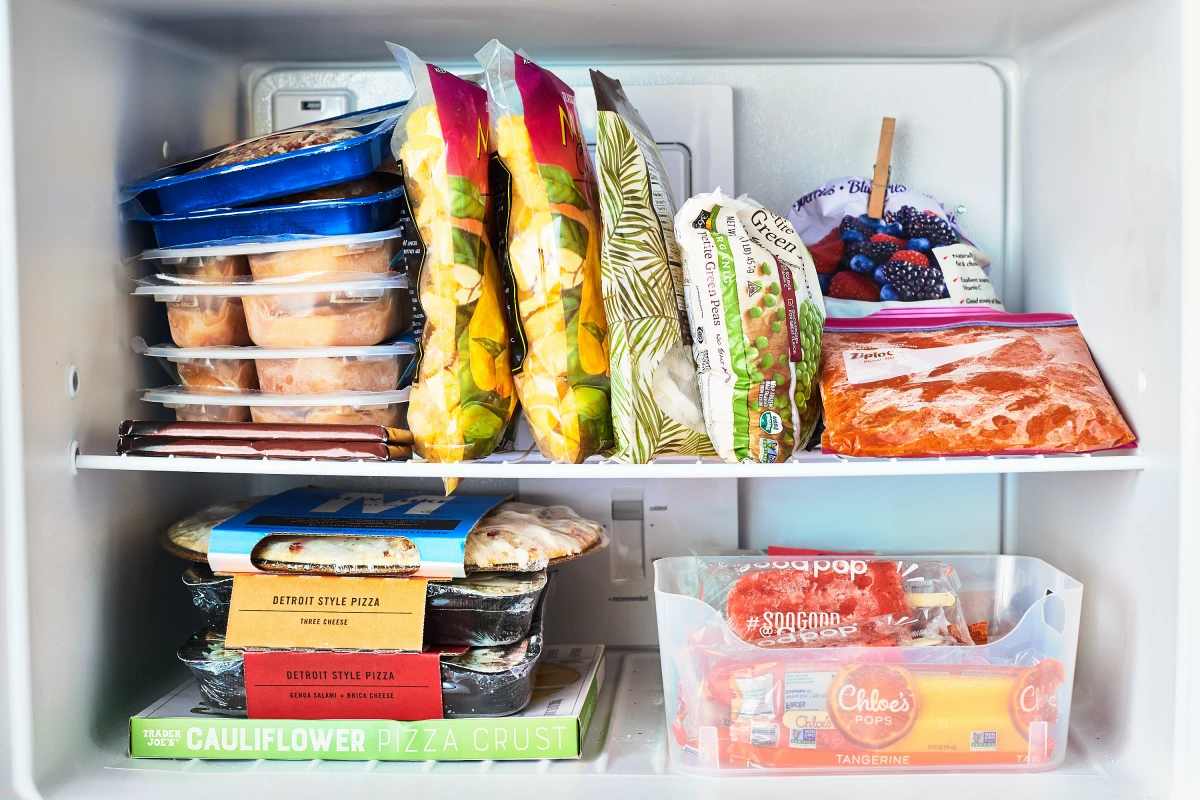
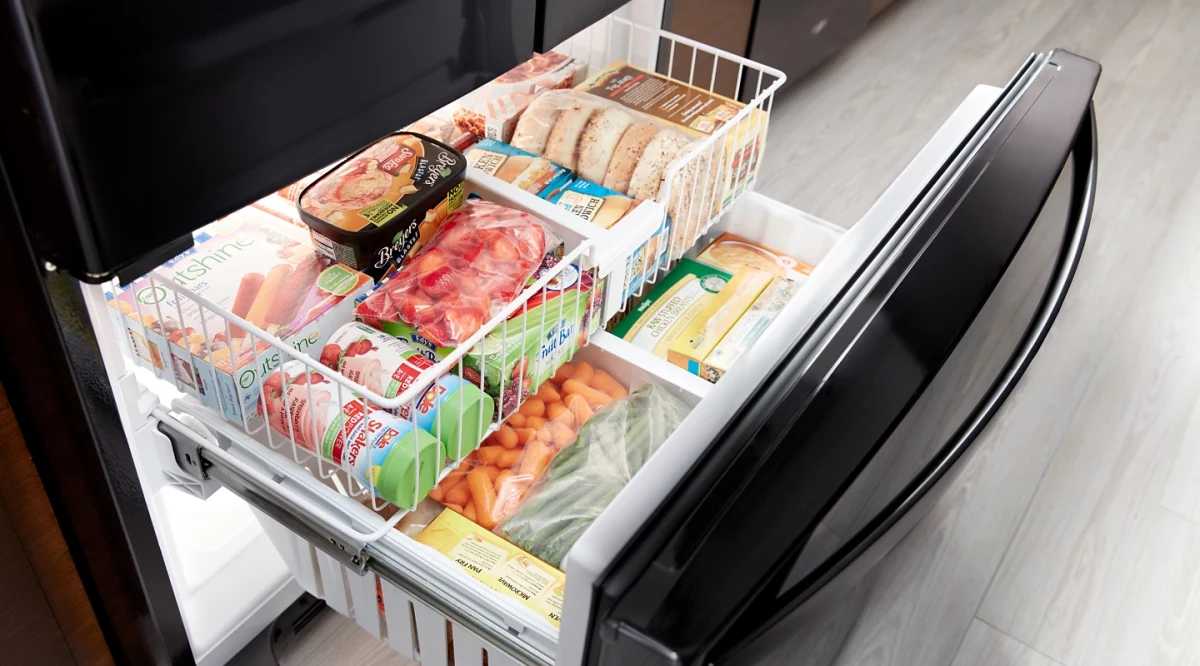
Step 3: The Zoning Method
Now, let’s put it all back—with a plan. Grouping similar items is a good start, but creating dedicated ‘zones’ makes finding things ridiculously easy. Here are my typical zones:
- Raw Meats/Poultry: ALWAYS on the bottom shelf or in a bin at the very bottom. This is a non-negotiable food safety rule. If a package ever leaks, it won’t drip down and contaminate everything else.
- Cooked Meals: This is where I keep portioned-out lasagna, casseroles, and leftover chili for busy weeknights.
- Veggies & Fruits: Frozen berries for smoothies, blanched green beans from the garden, etc.
- Baked Goods: Bread, muffins, and tortillas freeze incredibly well and thaw super fast.
- Soups & Stocks: My neat stack of labeled deli containers lives here.
- The ‘Fast Lane’: On an upright freezer door, I keep high-turnover stuff like ice cream or frozen nuggets for the kids. These are things that get used up quickly and aren’t as sensitive to slight temperature changes.
Heads up! If this all feels overwhelming, just start with one zone. Spend 30 minutes this weekend just organizing your raw meat. That’s it. Small wins build momentum!
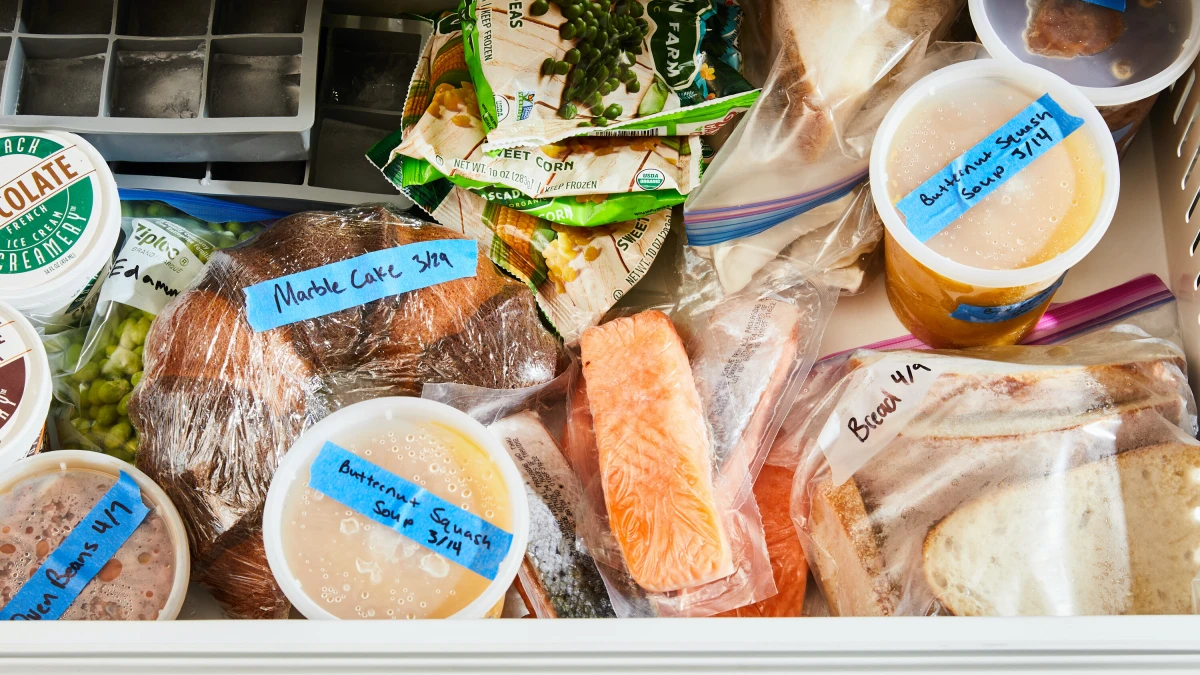
Step 4: Label Everything. No, Really.
I cannot say this enough: every single item needs a label. A mystery package is wasted food. Trust me, you will not remember what that container holds in three months. My system is dirt cheap and effective: a roll of masking tape and a permanent marker. It sticks in the cold but peels off easily.
Each label needs three things: 1. Item Name (be specific: “Boneless Chicken Thighs,” not just “Chicken”), 2. Date Frozen, and 3. Quantity or Portions (“4 thighs,” “1 quart”).
Keeping It All Straight: Inventory and Rotation
An organized freezer is great, but you need a system to use what you have. This is what separates the pros from the amateurs and is the key to stopping food waste.
First In, First Out (FIFO)
This is a core principle in any professional kitchen. It just means you use the oldest food first. When you add new groceries, put them at the back of their zone and pull the older items to the front. Your labeling system makes this easy. It’s a simple habit that ensures nothing gets lost and forgotten in the back.
The 2-Minute Inventory List
I resisted this for years because it felt like homework. Then I found three containers of chicken stock right after I had spent a whole afternoon making a new batch. Never again. An inventory list saves you from buying duplicates and helps you meal plan.
It can be as simple as a magnetic whiteboard on the freezer door. When you take something out, you erase it. When you add something, you write it down. It takes less than 30 seconds and the payoff is huge.
How Long Does Food Actually Last in the Freezer?
This is the million-dollar question, right? These are general guidelines for best quality—food stored properly at 0°F is technically safe indefinitely, but the texture and flavor will degrade over time.
- Soups & Stews: 2 to 3 months
- Cooked Casseroles & Leftovers: About 3 months
- Ground Meat (beef, pork, chicken): 3 to 4 months
- Raw Chicken or Turkey Parts: Up to 9 months
- Raw Steaks, Chops, & Roasts: 6 to 12 months
- Bread & Baked Goods: Around 3 months
- Blanched Vegetables: 8 to 12 months
A Few Pro Tips You Might Not Know
Over the years, I’ve picked up a few tricks that make a big difference.
Quick lesson on Blanching Vegetables: If you’re freezing fresh veggies like green beans or broccoli, you should blanch them first. It sounds fancy, but it’s simple. You just boil them for a very short time (like 2-3 minutes) and then immediately plunge them into a bowl of ice water to stop the cooking process. This step deactivates the enzymes that cause them to lose their color, texture, and nutrients in the freezer. It’s a small step that makes a world of difference.
Never Put Hot Food in the Freezer: This is a big one. Placing a hot container of soup in the freezer will raise the temperature inside, potentially partially thawing the food around it and creating a safety risk. It also makes your freezer work overtime. Always cool food completely in the fridge first. Quick tip: To cool a big pot of soup quickly, place it in an ice bath in your sink for about 30 minutes, or pour it into a few smaller, shallow metal containers before putting it in the fridge.
Taming Different Freezer Types
Not all freezers are the same. Here’s how to handle the two main types.
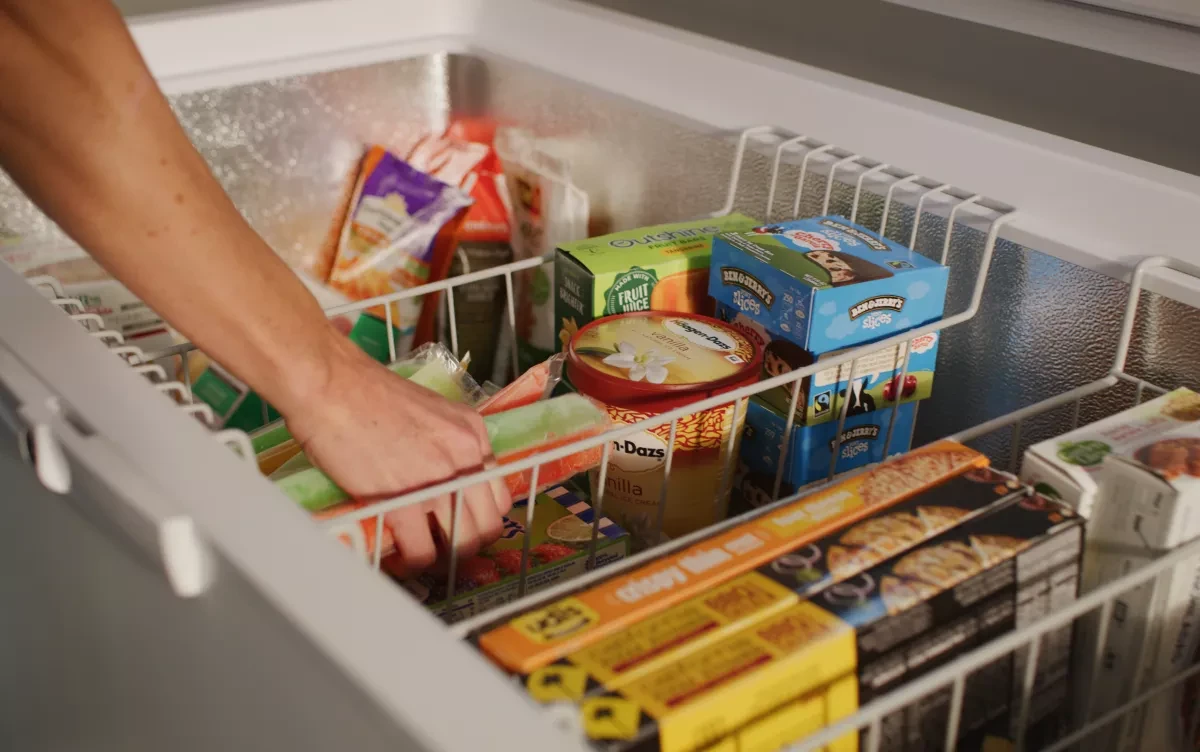
Chest Freezers: These are workhorses for bulk storage. The big challenge is the “black hole” effect where things get lost at the bottom. The solution? Bins. Use stackable, sturdy bins or even plastic milk crates to categorize your food (‘Beef,’ ‘Pork,’ ‘Veggies’). When you need something, you just lift out a bin or two instead of digging through a frozen pile.
Upright Freezers: These are amazing for organization because you can see everything on the shelves. Their main weakness is that cold air spills out when you open the door. Use clear bins or baskets on the shelves to contain smaller items. And remember, the door is the warmest spot. Reserve it for things like bread, nuts, or butter—never raw meat.
The Quick-Start Shopping List
Feeling ready to tackle this? You don’t need a lot to get started. Here’s a bare-bones kit that will get you 90% of the way there, probably for under $30.
- A roll of masking tape
- A permanent marker (like a Sharpie)
- A box of gallon and quart-size freezer-safe zip-top bags
- A 10-pack of quart-size deli containers (search ‘deli containers with lids’ online)
And that’s it. The effort you put into setting up a simple system will pay you back every single time you open that freezer door to find exactly what you need, right when you need it.
Inspirational Gallery
- Perfectly portioned smoothies, ready to blend.
- Quick weeknight dinners using pre-cooked ground beef.
- Single-serving soups that defrost in minutes.
The secret? A simple freezer inventory. Keep a magnetic whiteboard on the freezer door or use an app like Cozi to track what goes in and what comes out. You’ll stop buying duplicates and always know what’s available for dinner.
The golden rule of labeling: Be specific! Don’t just write
According to the Food and Agriculture Organization (FAO), roughly one-third of the food produced for human consumption is lost or wasted globally. A well-organized freezer is a direct counter-attack on that statistic in your own home.
Can you refreeze food that has thawed?
This is a critical food safety question. The official USDA guideline is: yes, you can safely refreeze food if it was thawed in the refrigerator and still contains ice crystals or is at 40°F (4°C) or below. However, never refreeze food that was left out on the counter for more than two hours. While it may be safe, expect a loss in quality and texture with each refreeze cycle.
For perfect, non-clumpy frozen berries or chopped vegetables, try the ‘flash freeze’ method at home. Spread your items in a single layer on a parchment-lined baking sheet and freeze for about an hour until solid. Once frozen, you can transfer them into a single freezer bag. They won’t stick together, allowing you to grab just the amount you need without defrosting a giant ice block.
Freezer Bags: Best for saving space. Brands like Ziploc Freezer Bags are thicker than standard sandwich bags and allow you to press out all the air, protecting odd-shaped items like a whole chicken or bread loaf from freezer burn.
Rigid Containers: Ideal for liquids. Glass or BPA-free plastic containers (like those from Pyrex or OXO) are perfect for soups, stocks, and sauces. They stack neatly, are reusable, and prevent messy spills.
For ultimate flexibility, use both for what they do best.
Ever notice how store-bought frozen peas are all perfectly individual? That’s because they are ‘Individually Quick Frozen’ (IQF) on an industrial scale.
This process freezes each item so rapidly that large, texture-damaging ice crystals don’t have time to form. By spreading berries or diced chicken on a tray to freeze before bagging them, you are essentially creating your own small-batch IQF system, preserving a much better texture for when you’re ready to cook.
Tame the chaos of a deep chest freezer with a simple, brilliant hack: color-coded reusable shopping bags. Designate one color for beef, another for chicken, one for vegetables, and so on. The sturdy bags act as removable, flexible bins, allowing you to simply lift out the ‘chicken bag’ to find what you need without having to dig through everything else.
A common mistake to avoid: Never place hot or even warm food directly into the freezer. This raises the ambient temperature inside, partially thawing nearby items and forcing your freezer’s compressor to work overtime. This not only wastes energy but also puts other foods at risk of developing ice crystals. Always let leftovers cool completely in the fridge first.
Tired of freezing an entire pot of chili only to have to defrost it all? Think in single portions. Silicone trays are your best friend here. A standard muffin tin is perfect for freezing single servings of pasta sauce or egg bites. For larger portions, specialty products like Souper Cubes allow you to freeze perfect one or two-cup blocks of soup or broth that stack like bricks, revolutionizing your freezer space.


