The Real Way to Clean White Vans (So They Actually Look New)
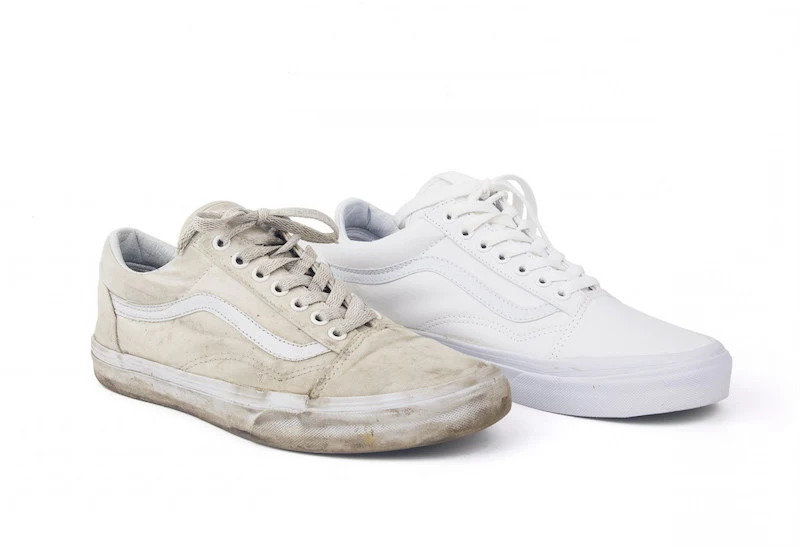
We’ve all been there. You unbox a brilliant, crisp pair of white canvas Vans, and for a glorious day, they’re perfect. Then life happens. A scuff from a curb, a drip of coffee, or just the general grime of the world seems magnetically drawn to them. It’s a classic dilemma—how do you keep one of the most iconic shoes on the planet from looking like you’ve been gardening in them?
In this article
- First, Know Your Shoe’s Anatomy
- The Pre-Cleaning Ritual: Don’t Skip This
- Method 1: The Gentle Hand-Wash (Safest Bet)
- Method 2: The Baking Soda Paste (For Tougher Jobs)
- Advanced Moves: A Pro’s Troubleshooting Guide
- The Washing Machine: A Last Resort Method
- The Final Step: How to Dry Your Vans Correctly
- Help! A Troubleshooting FAQ
- How to Keep Them Clean Longer
- Inspirational Gallery
If you’ve Googled this before, you’ve seen the flood of quick fixes. The problem is, many of those internet hacks can do more harm than good. I’ve seen it countless times. They treat the shoe as one single thing, but it’s not. It’s an assembly of different parts: absorbent cotton canvas, scuff-prone rubber, and heat-sensitive glue. Each piece needs to be handled differently.
So, let’s skip the five-minute miracles that don’t work. This is the real-deal guide, based on the methods the pros use. It’s all about understanding what you’re working with so you can clean your shoes without accidentally destroying them. We’ll cover the best way to hand-wash them, how to tackle stubborn stains, and even how to (safely) use a washing machine as a last resort. Most importantly, I’ll explain the ‘why’ behind each step.
First, Know Your Shoe’s Anatomy
Before you even think about getting your shoes wet, you gotta know what you’re dealing with. Seriously, this little bit of knowledge is what separates a clean pair from a ruined pair.
The Canvas Upper
The top part of your shoe is made of cotton canvas. Think of it as a really sturdy t-shirt for your foot. Because it’s a woven fabric, it’s full of tiny little gaps that are basically magnets for fine dust and dirt. Add water, and that dust instantly turns into mud that gets smeared deep into the cotton fibers. The canvas is also super absorbent, so one drop of a dark liquid can bloom into a huge, ugly stain. This is exactly why we always start with a dry brush—to get the loose stuff off before it becomes a real problem.
The Rubber Sidewalls (Foxing) and Toe Cap
That white rubber strip wrapping around the sole is called ‘foxing.’ It’s tough, but it’s not invincible. Its two biggest enemies are scuffs and yellowing. Scuffs are just what they sound like—physical marks from bumping into things. Yellowing, on the other hand, is a slow chemical reaction called oxidation, mostly caused by UV light from the sun. Using the wrong cleaners can actually speed this up, and some harsh solvents can make the rubber brittle or even sticky. You need a totally different game plan for the rubber than for the canvas.

The Glue That Holds It All Together
What keeps the canvas stuck to the rubber sole? A powerful, heat-activated adhesive. And this, right here, is the shoe’s Achilles’ heel. I once saw a pair come into the shop that looked like a sad, wilted taco because the owner put them in the dryer. The intense heat literally melted the glue and the sole peeled away from the upper. Even leaving them on a radiator or in scorching direct sunlight can be enough to weaken that bond. So when I say air-dry only, I mean it. It’s a rule, not a suggestion.
The Pre-Cleaning Ritual: Don’t Skip This
Any pro will tell you that prep work is 90% of the job. Jumping straight to scrubbing is how you lock in stains. These first few steps only take five minutes but make a world of difference.
1. Take Out the Laces and Insoles
First things first, unlace the shoes completely. Laces need their own separate bath to get truly clean. Plus, leaving them in creates little tan lines and stops you from getting to the tongue and eyelets. If your Vans have removable insoles, pop those out, too. This lets the inside of the shoe actually dry and prevents the insoles from turning into a stinky, mildewy mess.
2. And Speaking of Laces… Here’s How to Wash Them
So, what do you do with those grimy laces? It’s simple. Fill a small bowl with warm water and a splash of laundry detergent or a few drops of dish soap. Let the laces soak for about an hour while you work on the shoes. After they’ve soaked, you can rub them between your hands to work out the dirt, rinse them thoroughly, and then hang them up to air dry.
3. The All-Important Dry Brush
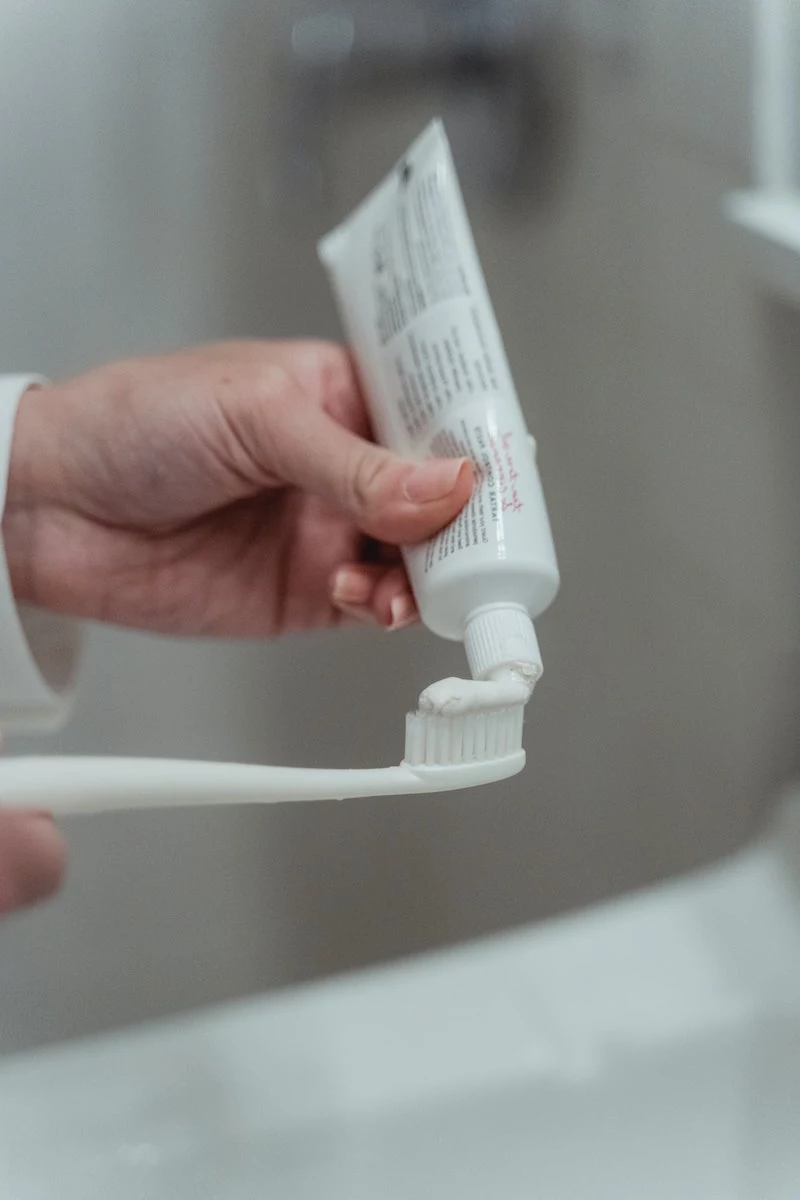
This is the step everyone skips and everyone should do. Before a single drop of water touches your shoes, grab a medium-bristled brush (a dedicated shoe brush is great, but a clean vegetable brush or an old toothbrush works fine) and scrub off all the loose dirt and dust. Go over the entire canvas, paying extra attention to the seam where it meets the rubber. Then, bang the soles together to knock out any caked-on mud. You’re literally preventing yourself from making mud pies all over your shoes.
4. Set Up Your Station
Find a spot where you can make a bit of a mess, like a utility sink or even outside on the grass. Lay down an old towel. Grab another clean, white towel or some paper towels. Heads up: Always use white cloths for cleaning. Colored rags can sometimes bleed dye when they get wet, and the last thing you want is to fix a dirt stain only to create a blue one.
Method 1: The Gentle Hand-Wash (Safest Bet)
For most regular cleaning, this is the method to use. It gives you maximum control and is the kindest to your shoes. It takes a bit more elbow grease, but the results are worth it. Expect this to take about 20-30 minutes of active work per pair.
What You’ll Need:
- A bowl of cool water (never hot!)
- A mild, clear cleaning agent. A few drops of a gentle dish soap like Dawn Free & Clear works great. For a pro-level clean, you could grab a dedicated product like Jason Markk or Reshoevn8r cleaner.
- A soft-bristled brush (an old toothbrush is perfect)
- A microfiber cloth
- A Magic Eraser (optional, but awesome for scuffs)
The Step-by-Step Process:
- Mix Your Solution: Fill your bowl with cool water. Hot water can set protein stains like grass or blood, making them permanent. Add about a teaspoon of your clear soap for every two cups of water and give it a little mix. You want a slightly soapy solution, not a bubble bath.
- Clean the Canvas: Dip your soft brush into the solution and gently scrub the canvas in small, circular motions. Work on one section at a time. A light lather will form, which is what’s lifting the dirt out of the fabric. Let the bristles do the work; don’t mash them into the shoe.
- Wipe and Blot: After scrubbing a section, use a clean, damp microfiber cloth to wipe away the soap and grime. Rinse the cloth often in a separate bowl of clean water so you’re not just smearing dirt around.
- Clean the Rubber: Now for the rubber sidewalls. You can use the same soapy solution, but you might need a bit more muscle. For stubborn black scuffs, this is where a Magic Eraser comes in handy. Just wet it and gently rub the scuffs away—it works wonders.
- Final Rinse: Give the whole shoe a final, quick wipe-down with a cloth dampened with only water. This removes any leftover soap residue. Try to avoid holding the whole shoe under a running faucet, which can over-saturate it and make drying take forever.
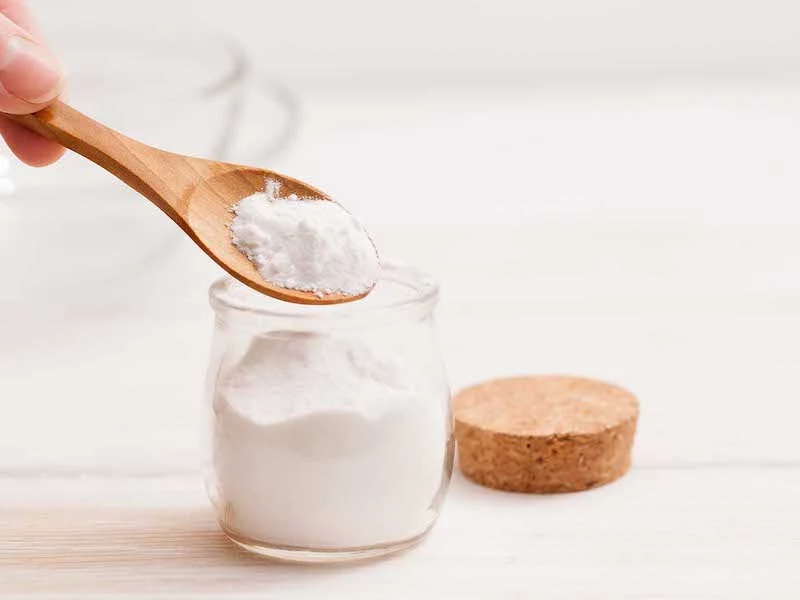
Method 2: The Baking Soda Paste (For Tougher Jobs)
If your shoes are looking generally dingy or have some stains that the soap method couldn’t kick, a baking soda paste is your next move. It’s a fantastic mild abrasive that scrubs and whitens without being too harsh.
What You’ll Need:
- Baking soda
- Cool water
- A small bowl
- A toothbrush
How It Works:
- Make the Paste: In your bowl, mix about two parts baking soda to one part water. You’re aiming for a thick, smooth paste, kind of like toothpaste. The measurements don’t have to be perfect, just get a consistency that’s easy to spread.
- Apply and Scrub: Using a toothbrush, slather the paste onto the dirty areas of the canvas. You can cover the whole shoe if you need to. Gently work the paste into the fabric with circular motions.
- Let It Work Its Magic: Now, you wait. Let the paste sit on the shoe and dry for at least 30-60 minutes. As it dries, it pulls the dirt out of the canvas. You’ll actually see the paste get dirty, which is how you know it’s working.
- Brush and Wipe: Once the paste is caked and dry, use a dry brush to flake off as much as you can. Then, use a damp cloth to wipe away the rest of the residue. The canvas underneath should look way brighter.
Which Method is Right for You?
So, how do you choose? It’s pretty simple, honestly.
- The Gentle Hand-Wash is your go-to for regular upkeep and light dirt. It’s the safest option with virtually no risk to your shoes.
- The Baking Soda Paste is what you bring out for tougher, set-in stains or when your shoes need a serious brightening boost. The risk is still very low, but it’s a bit more intensive.
- The Washing Machine… well, that’s the nuclear option. We’ll get to that. It’s for emergencies only and carries a high risk of damaging your shoes.
Advanced Moves: A Pro’s Troubleshooting Guide
Sometimes you need to bring out the big guns for a specific, nasty stain. A word of caution: always, always test these spot treatments on a hidden area first (like the inside of the tongue) to make sure they don’t discolor the fabric.
How to Fix Yellowed Rubber (De-oxidation)
This is probably the most common issue with older Vans. The rubber turns a dingy yellow from sun exposure. You can’t scrub this off; it needs to be chemically reversed. The secret weapon here is a product called Salon Care 40 Volume Creme Developer. You can find it at any Sally Beauty Supply or similar beauty store, usually for under $10.

- The Technique: Using a small paintbrush, carefully apply a thin, even layer of the cream ONLY on the yellowed rubber. Try your best not to get it on the canvas, as it can bleach it.
- The Activation: Tightly wrap the shoes in clear plastic wrap. This stops the cream from drying out. Place the shoes in direct sunlight for a few hours. The sun’s UV rays activate the peroxide in the cream, which reverses the yellowing. Check on them every hour. It can take anywhere from 2 to 6 hours.
- The Cleanup: When the rubber is bright white again, unwrap the shoes and carefully wipe all the cream off with a damp cloth.
Tackling Oily and Greasy Stains
Got a grease spot from a French fry? Don’t hit it with water! Your first move is to absorb the oil. Pile a generous amount of cornstarch or baby powder directly onto the stain. Let it sit for a few hours (overnight is even better). The powder will literally pull the oil out of the canvas. Afterwards, brush the powder off and then clean any remaining mark with the gentle soap-and-water method.

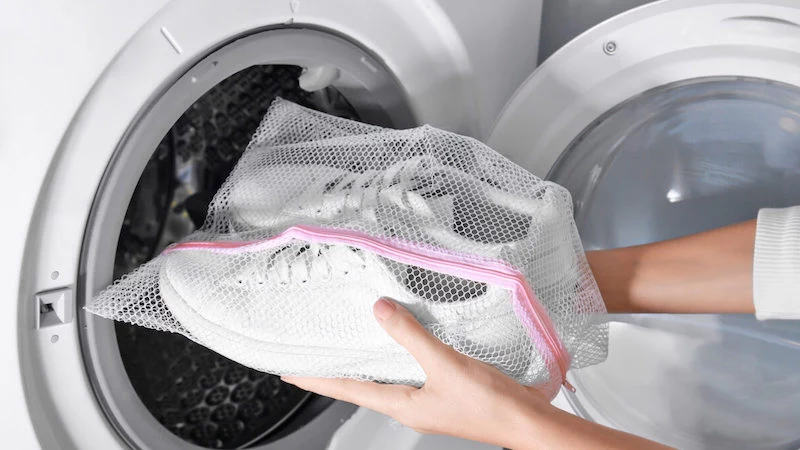
The Washing Machine: A Last Resort Method
I get asked this all the time: can you just throw them in the wash? My honest, professional opinion is… please don’t. It’s a violent experience for a shoe. It can warp the shape, kill the glue, and fray the canvas. But I get it. Sometimes they’re so far gone it feels like the only choice.
If you absolutely MUST use a washing machine, follow these steps to the letter to minimize the damage. This is for all-canvas shoes ONLY. Never, ever machine wash leather or suede models.
How to Do It as Safely as Possible:
- Prep is Everything: Do all the pre-cleaning steps we talked about. Remove laces and insoles, and do a thorough dry brushing. A washing machine is not magic; it won’t remove caked-on mud or deep stains on its own.
- Bag Them Up: Place the shoes in a mesh laundry bag or a pillowcase that you tie shut. This stops them from slamming against the drum.
- Balance the Load: This is critical. Throw in a few old, heavy towels. This balances the machine so it doesn’t sound like a helicopter taking off, and the towels cushion the shoes.
- Use the Right Settings: Use a tiny amount of a gentle liquid detergent. Select a delicate cycle with cold water only. And make sure the spin speed is on low or, even better, no spin.
- NO DRYER. EVER. I can’t say this enough. When the cycle is done, take the shoes out. Do not even think about putting them in a clothes dryer. The heat will destroy the glue, guaranteed.

The Final Step: How to Dry Your Vans Correctly
You can do a perfect cleaning job and still ruin your shoes by drying them wrong. This is where patience is everything. Improper drying causes water marks, mildew, and structural damage.
- Stuff Them: Right after cleaning, stuff your shoes tightly with white paper towels or clean white rags. (Don’t use newspaper; the ink will bleed all over your nice clean canvas). This does two things: it wicks moisture out from the inside and helps the shoe hold its shape while it dries.
- Change the Stuffing: For the first few hours, that paper is going to get soaked. A quick tip: change it out every couple of hours. This one small step will dramatically speed up the drying time and is the best way to prevent that funky mildew smell.
- Find the Right Spot: Put the shoes in a dry, well-ventilated spot indoors, away from direct sunlight or heat sources like radiators. A spot near a fan is perfect for air circulation.
- Wait for It…: A properly cleaned pair of Vans can take a full 24 to 48 hours to dry completely. Don’t rush it. They need to be bone dry before you wear them again.
Help! A Troubleshooting FAQ
Sometimes things don’t go perfectly. Here are a few common problems and how to fix them.
- “My shoes turned yellow AFTER I cleaned them!” This is a classic. It’s usually caused by soap residue left in the canvas that oxidizes as it dries. The fix is to give them another rinse—go over them again with a brush and just plain water, then do a very thorough wipe-down with a damp cloth to make sure all the soap is gone before letting them dry again.
- “I got the de-oxidizer cream on the canvas!” Okay, don’t panic. As soon as you notice it, wipe it off immediately with a wet cloth. If it sits for too long in the sun, it can leave a faint light spot. If that happens, there isn’t much to be done, which is why being careful during application is so key!
- “The inside of my shoes still smells.” To clean the inside and insoles, use the same gentle soap and water solution. Use a brush to scrub the inside lining and the insoles. A great trick for odor is, once they’re fully dry, to sprinkle some baking soda inside and let them sit overnight. Just dump it out before you wear them.

How to Keep Them Clean Longer
Once you’ve put in all that work, you want it to last, right? A little proactive care goes a long way.
Your best defense is a good fabric protector spray, like Crep Protect or Scotchgard for Fabric. The best time to do this is when they’re brand new, but it’s also highly effective after a deep clean (once they are 100% dry, of course). Just apply a light, even coat, let it dry for an hour, then apply a second coat. It creates an invisible shield that makes spills bead up and roll right off.
By understanding what you’re working with and being patient, you can keep your white Vans looking fresh for years. It’s not about magic; it’s about good technique. And now, you’ve got it.
Inspirational Gallery


The mystery of the yellowing shoe: why do my white Vans turn yellow after washing?
It’s a common tragedy. You spend an hour cleaning, and they come out yellower than before. The culprit is often detergent residue left in the canvas fibers. When exposed to sunlight, this residue oxidizes and creates that unwanted tint. The solution is about rinsing and drying: rinse them meticulously with cool water until no suds remain. Then, let them air-dry in a well-ventilated spot away from direct sunlight, which can bake in stains and accelerate yellowing. Stuffing them with crumpled white paper towels (not newspaper, the ink can transfer!) helps them hold their shape and absorb excess moisture from the inside.
For the laces, you have two solid options:
The Hand-Wash: Remove laces and let them soak in a small bowl of warm water with a few drops of a gentle cleaner like Reshoevn8r’s solution. Use a small brush (an old toothbrush is perfect) to scrub away any stubborn grime. Rinse thoroughly and hang to dry.
The Machine Method: For a hands-off approach, place the laces in a small mesh laundry bag and toss them in with your next load of whites. This prevents them from tangling into an impossible knot. Always let them air-dry; the heat from a dryer can damage the plastic aglets (the tips).


