Your Ultimate Guide to Holiday Nails (That Actually Look Good)
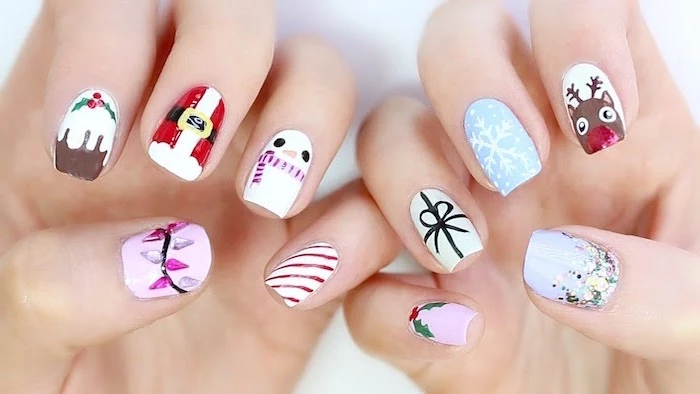
Every year, it’s like a switch flips. One minute my clients are asking for sunset oranges and deep reds, and the next, BAM—it’s all about holiday cheer. Honestly, it’s my favorite time of year behind the chair. The creativity is flowing, everyone’s feeling festive, and I get to paint endless tiny snowflakes and glittery designs. It’s pure joy.
In this article
But I also see the other side of it. You know, the stunningly intricate designs you see online that are, let’s be real, almost impossible to pull off at home without a ton of practice and pro-grade gear. I’ve seen my fair share of DIY attempts that ended in smudges and frustration. So, my goal here isn’t just to show you pretty pictures. It’s to give you the real-deal knowledge I’ve picked up over the years, explaining the ‘how’ and the ‘why’ behind gorgeous, long-lasting holiday nails.
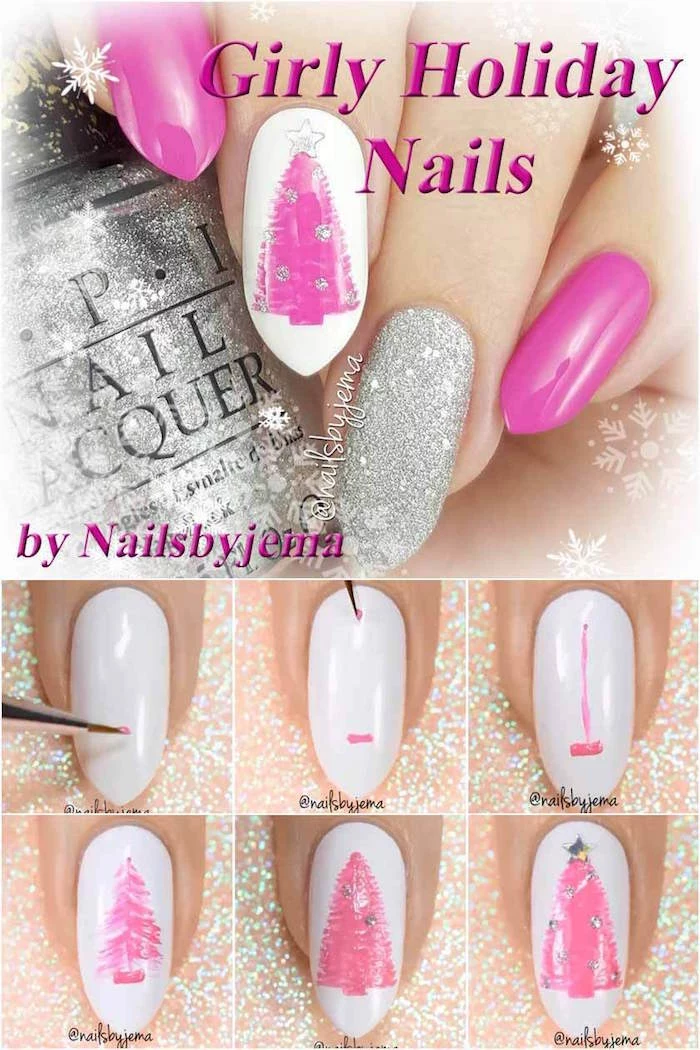
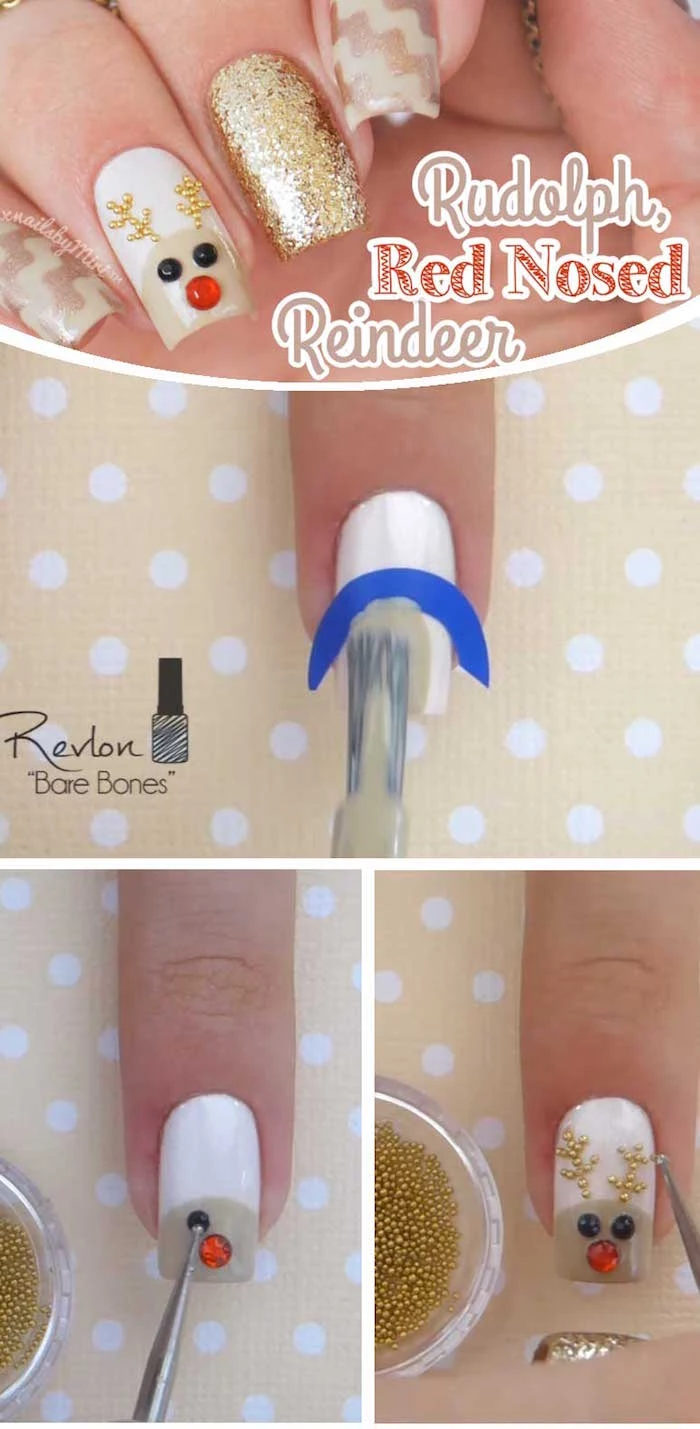
By the way, if you’re short on time or just want something super simple, here’s your 5-minute holiday nail win: Paint your nails a classic deep red. While the top coat is still wet, use tweezers to place a single, tiny gold star confetti piece near your cuticle on one or two accent nails. Done. It’s chic, festive, and ridiculously easy.
First Things First: It’s All About the Prep
Before you even think about picking up a bottle of polish, we need to talk about the foundation. I tell every new nail tech I train the same thing: A great manicure is 90% preparation. You can have the most expensive polish in the world, but if the nail isn’t prepped right, your beautiful art will chip or lift in a day or two. Sometimes even hours.
Understanding Your Nail
Your nail isn’t just a tiny canvas; it’s made of keratin layers and produces natural oils. These oils are the number one enemy of a lasting manicure. Our job is to create a clean, dry surface for the polish to grip onto, all without damaging the nail or the delicate skin around it.
A critical point here is the difference between the cuticle and the eponychium. The cuticle is the super thin, non-living tissue that grows on the actual nail plate. This is what we want to remove. The eponychium is the band of living skin at the base of your nail. You should NEVER cut this part. It’s your nail’s natural seal against bacteria and infection. Pushing it back gently is fine, but cutting it is a major no-no and a fast track to problems.
The Pro-Level Prep Routine
This is the exact process we follow in the salon for every single client, and it’s what makes a manicure last.
- Sanitize Everything: We start by washing hands thoroughly. Then, we spray the nails with 99% isopropyl alcohol. This dehydrates the nail plate just enough for the polish to get a solid grip.
- Gentle Cuticle Work: I use a sanitized metal pusher to gently push back the eponychium. Then, very carefully, I remove only that invisible layer of true cuticle from the nail plate. At home, you can do this with a wooden or orange stick. You’ll feel the difference when the surface is clean; the tool just glides smoothly.
- Shape and Buff: Shape the nail’s edge with a fine-grit file (a 180 or 240-grit is perfect). Then, lightly—and I mean LIGHTLY—buff the entire nail surface with a soft buffer block. You’re just removing the shine to create some texture for the base coat to grab, not thinning the nail. Over-filing is one of the biggest causes of nail damage I see.
- Final Cleanse: Scrub the nail one last time with a lint-free wipe and more alcohol to get rid of every speck of dust and oil. From this moment on, don’t touch your nails! No running your fingers through your hair or touching your face.
Choosing Your Weapon: Polish, Gel, or Something More?
The kind of art you can create depends entirely on what medium you’re using. Each has its own personality, and some are way more forgiving than others.
Let’s talk about the two most common choices for DIY art: regular polish versus gel polish.
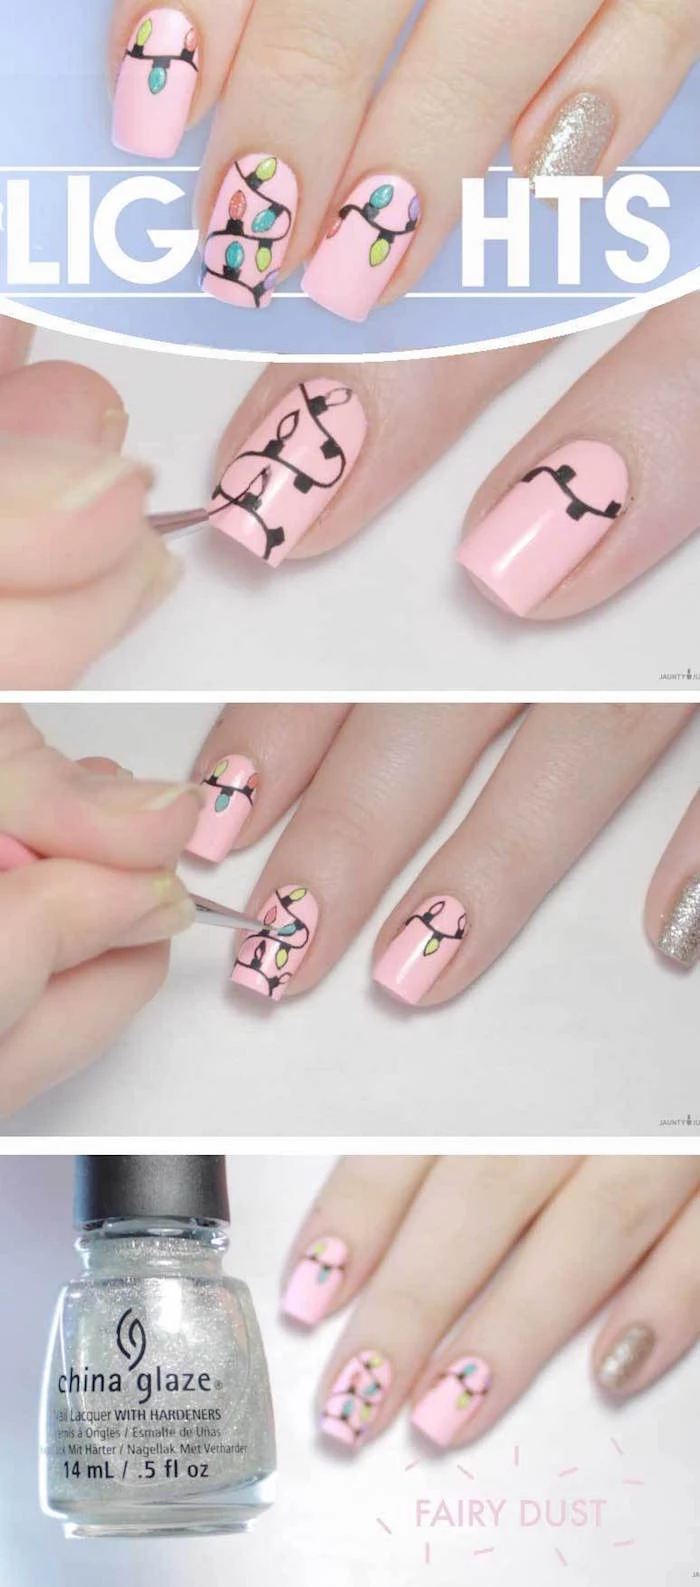
Honestly, regular nail polish is tough for detailed art. It starts drying the second it hits the air, so you have to work incredibly fast before it gets gummy. It’s fantastic for simple looks like dots, glitter toppers, or basic stripes. Gel polish, on the other hand, is a game-changer for nail art because it only hardens (or “cures”) under an LED or UV lamp. This gives you literally all the time in the world to perfect your design. You can tweak a snowflake for ten minutes, and it won’t dry until you’re ready. This makes gel way easier for beginners to get crisp, clean results.
Durability is another big one. A regular polish manicure might last you 3-5 days if you’re careful. A gel manicure? Two to three weeks, easy. The trade-off is the initial investment. You’ll need a lamp, but you can get a great one online for about $25-$40.
Heads up on gel allergies: They are a real thing, often linked to an ingredient called HEMA. The allergy usually develops from uncured gel repeatedly touching the skin. So if you’re doing gel at home, be incredibly neat and clean any smudges off your skin before curing. If you’re concerned, look for HEMA-free brands; some good ones are Madam Glam or Light Elegance.
Then you have the heavy hitters like acrylic and hard gel, which are used to build nail extensions. These are amazing for 3D art, like a tiny snowman, or for “encapsulated” designs where glitter looks like it’s floating deep inside the nail. This is definitely pro-level territory. For reference, a simple gel manicure with some candy-cane art at a salon might cost you $55-$75. A more complex set with 3D or encapsulated art could easily be $100 or more, depending on where you live and the artist’s skill.
My Go-To Art Toolkit
You don’t need a million tools, just the right ones. I always tell people to invest in a few good basics instead of a giant kit of stuff you’ll never use.
Here’s a great DIY starter kit you can build without spending a ton:
- A Decent LED Lamp: Look for a brand like SUN UV on Amazon. The $25-$40 models are more than powerful enough for home use.
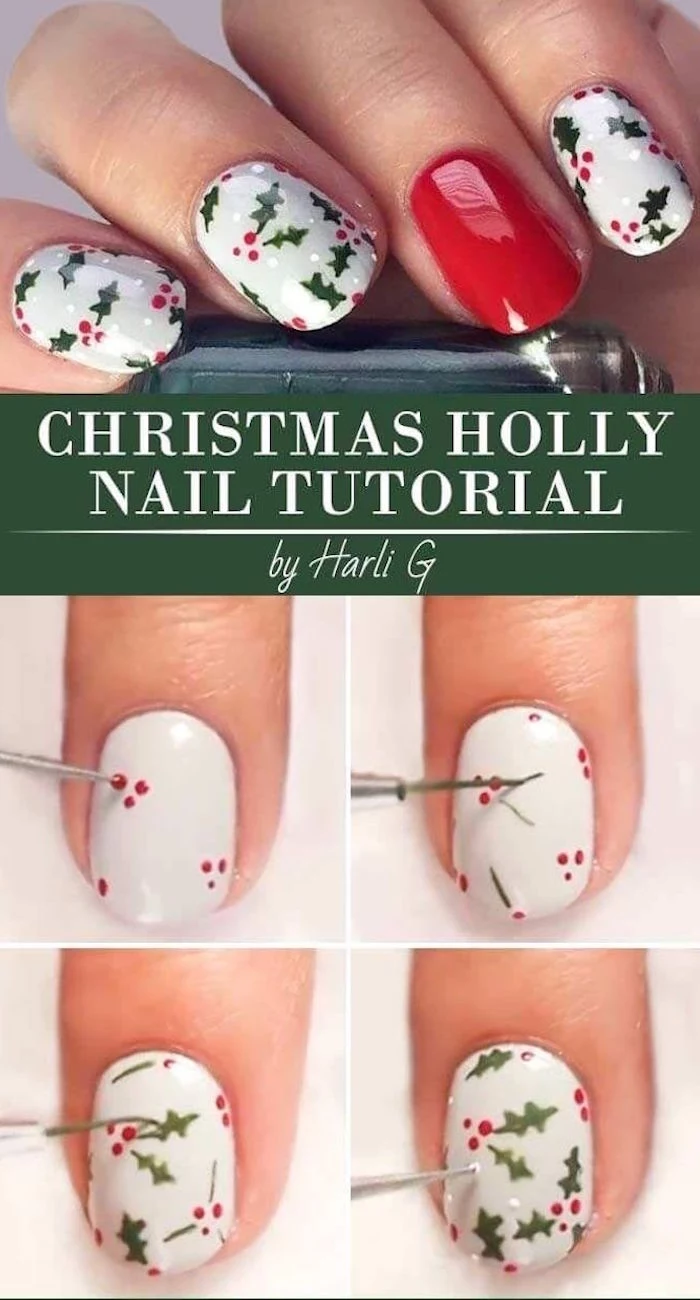
- Brushes and Dotting Tools: You can get a fantastic starter set of various brushes and double-ended dotting tools for around $10. The dotting tools are non-negotiable for perfect little snow dots or holly berries.
- A Good At-Home Gel Brand: Brands like Gelish or Beetles are widely available, have great color selections, and are formulated for safe home use.
- Cuticle Oil: My number one tip for nail health! You don’t need anything fancy. Simple Jojoba oil from a health food store or online works wonders.
Oh, and a quick tip from my own hard-learned lessons: I never work directly from the polish bottle. I put a little drop of each color on a small ceramic palette (or even a piece of tin foil). It gives me way more control. And PLEASE, never clean your good art brushes with acetone! It will absolutely destroy the bristles. I clean my gel brushes by wiping them with a bit of clear base coat on my palette until they’re clean.
How to Paint 3 Classic Holiday Designs
Alright, let’s get to the fun part. Here’s how to tackle a few popular designs with the tricks we use in the salon.
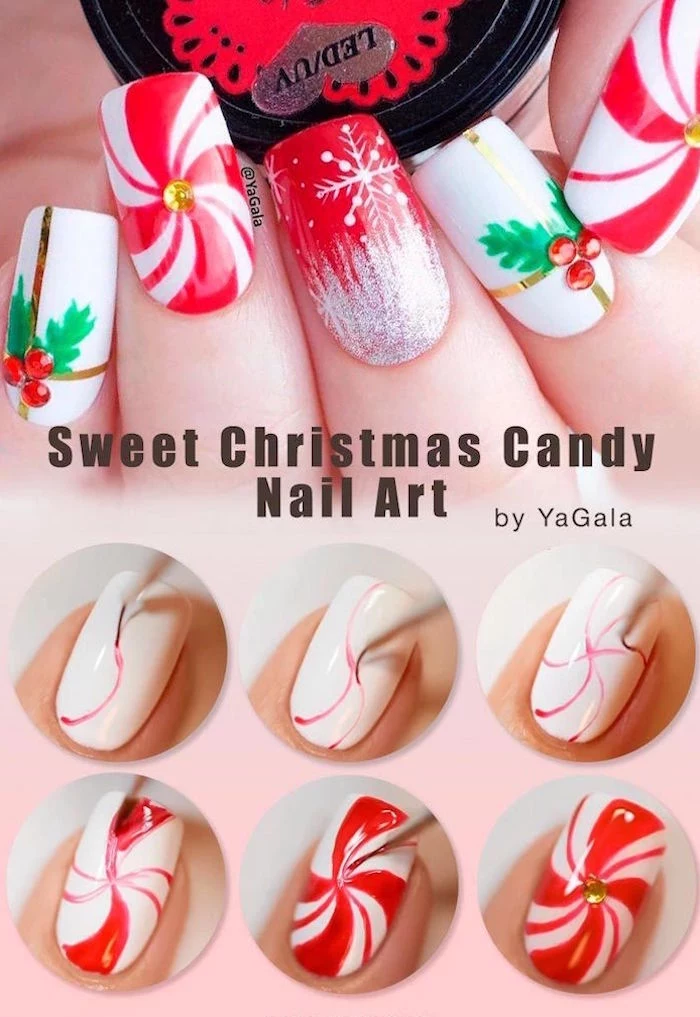
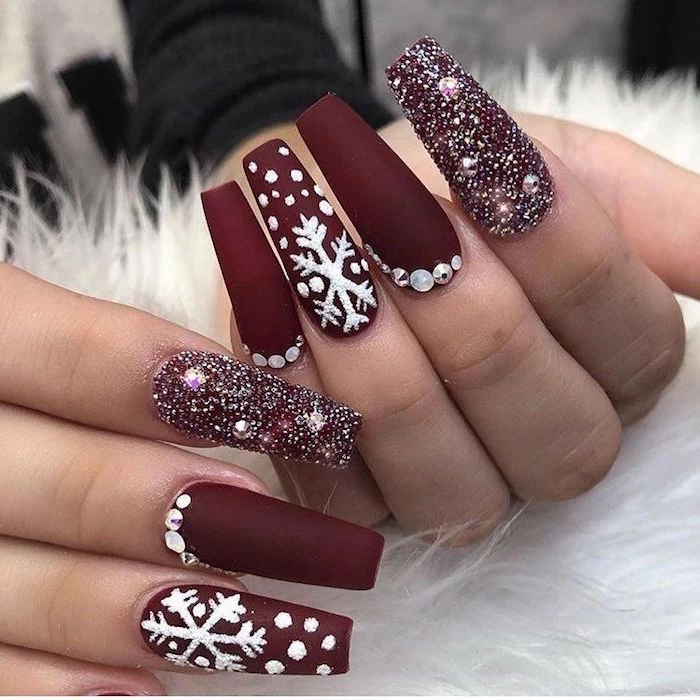
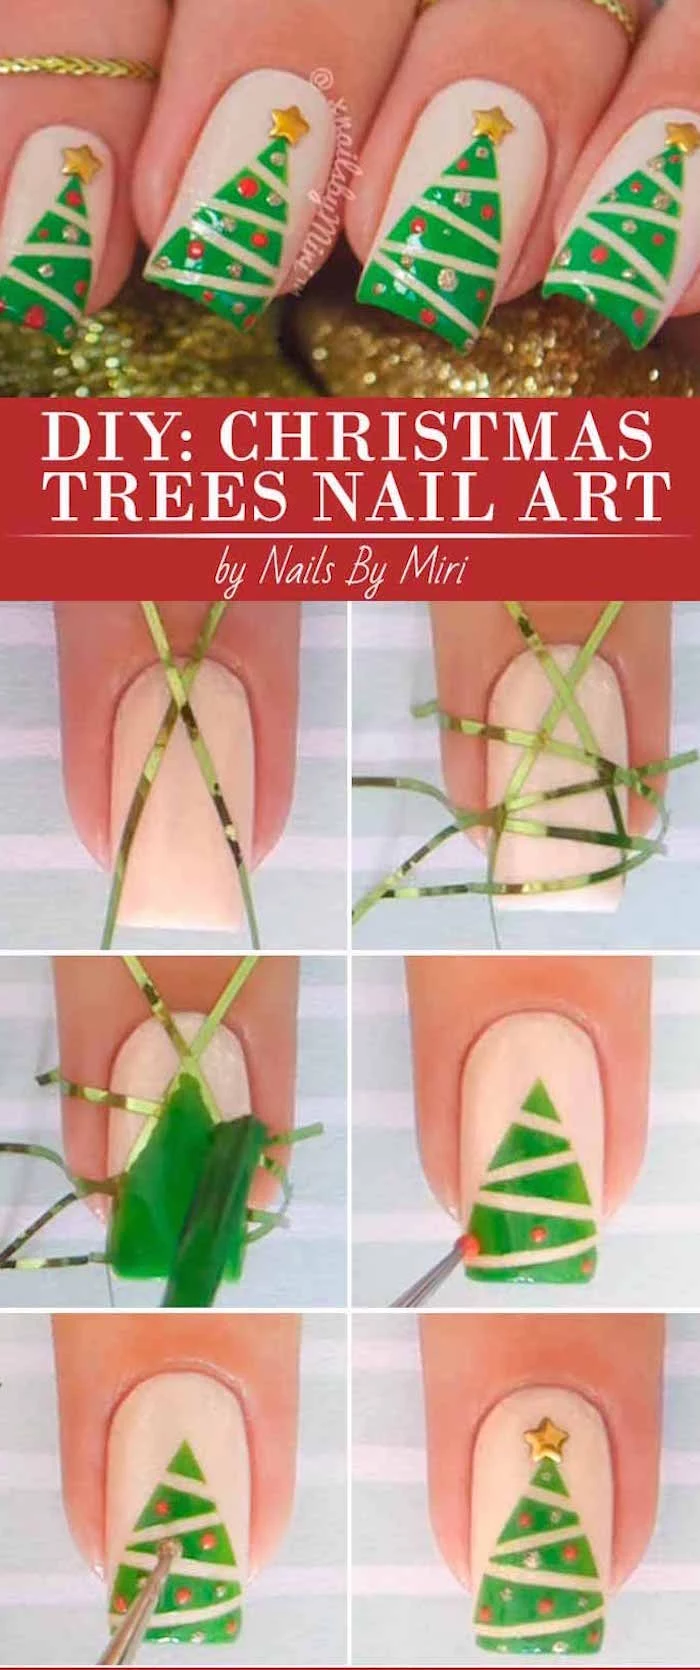
1. The Crisp Snowflake
The key here is thin, sharp lines, not thick, blobby ones. I recommend a white gel art paint for this; it’s more pigmented than regular white polish.
Time to Complete: Approx. 20-25 minutes for a few nails
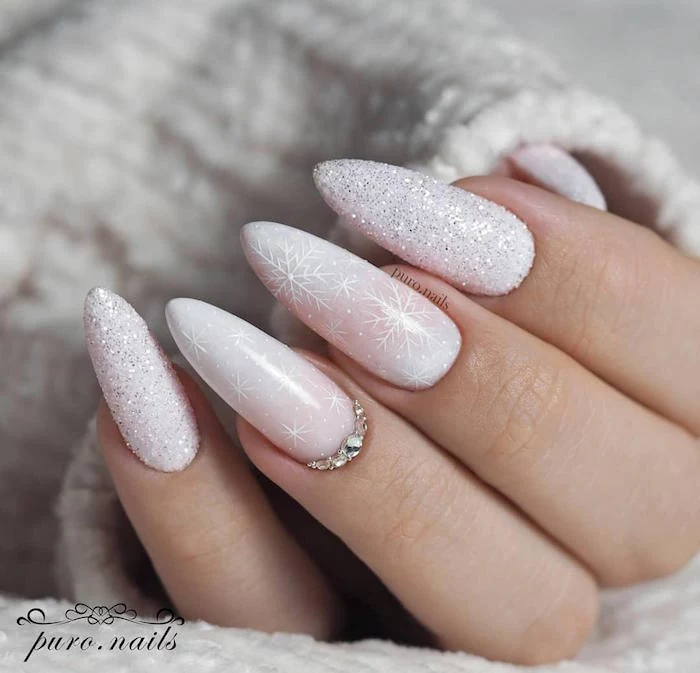
Technique: Start with your cured base color. Using a long, thin striper brush, draw your main cross shape. Then, here’s the secret: pop your hand in the lamp for a 10-second “flash cure.” This locks those lines in place so you can’t smudge them while adding the smaller details. It’s a total game-changer! Now go back in with a shorter brush to add the little “V” shapes and surrounding dots. For a cool “sugared” effect, sprinkle fine clear acrylic powder or white glitter over the wet snowflake before the final cure. Dust off the excess, and you have a sparkly, textured snowflake.
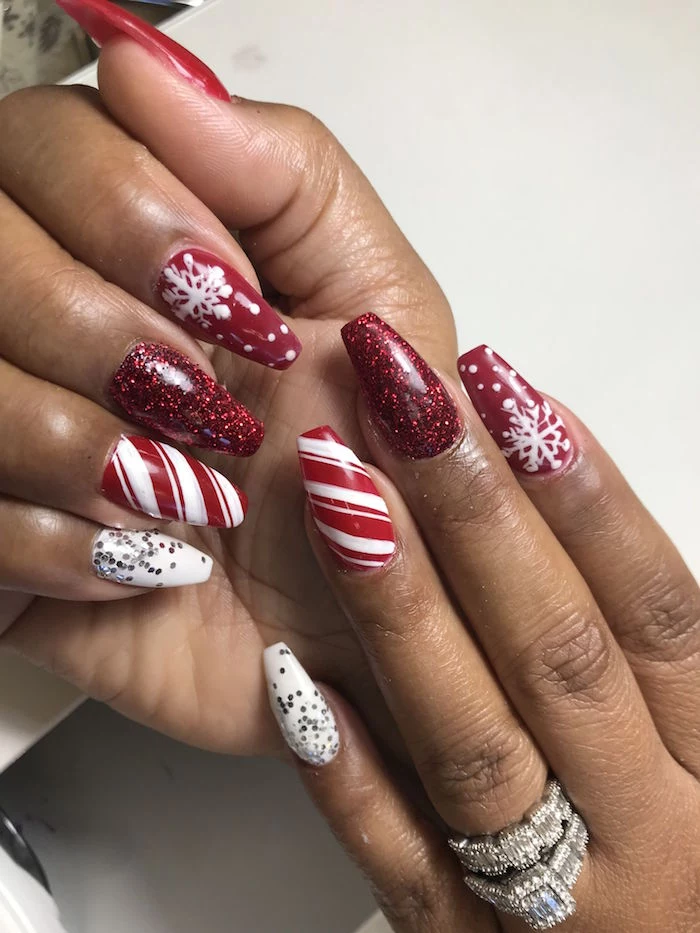
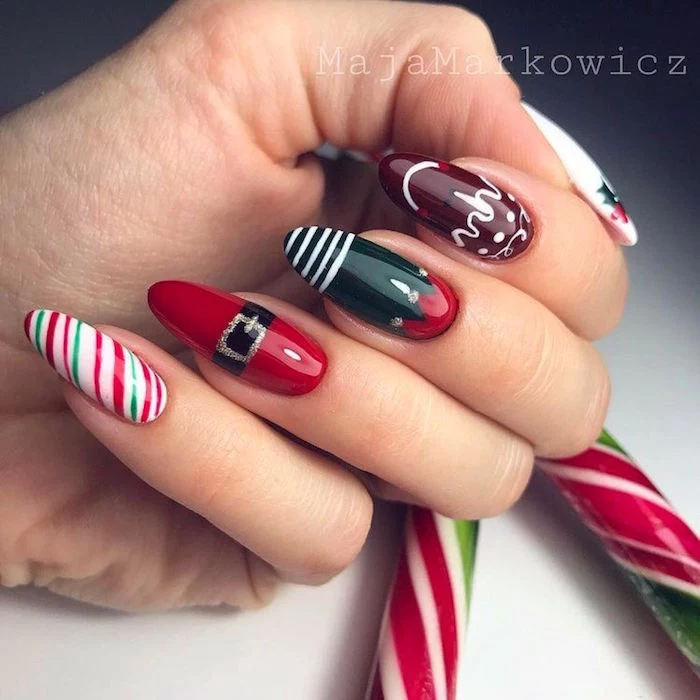
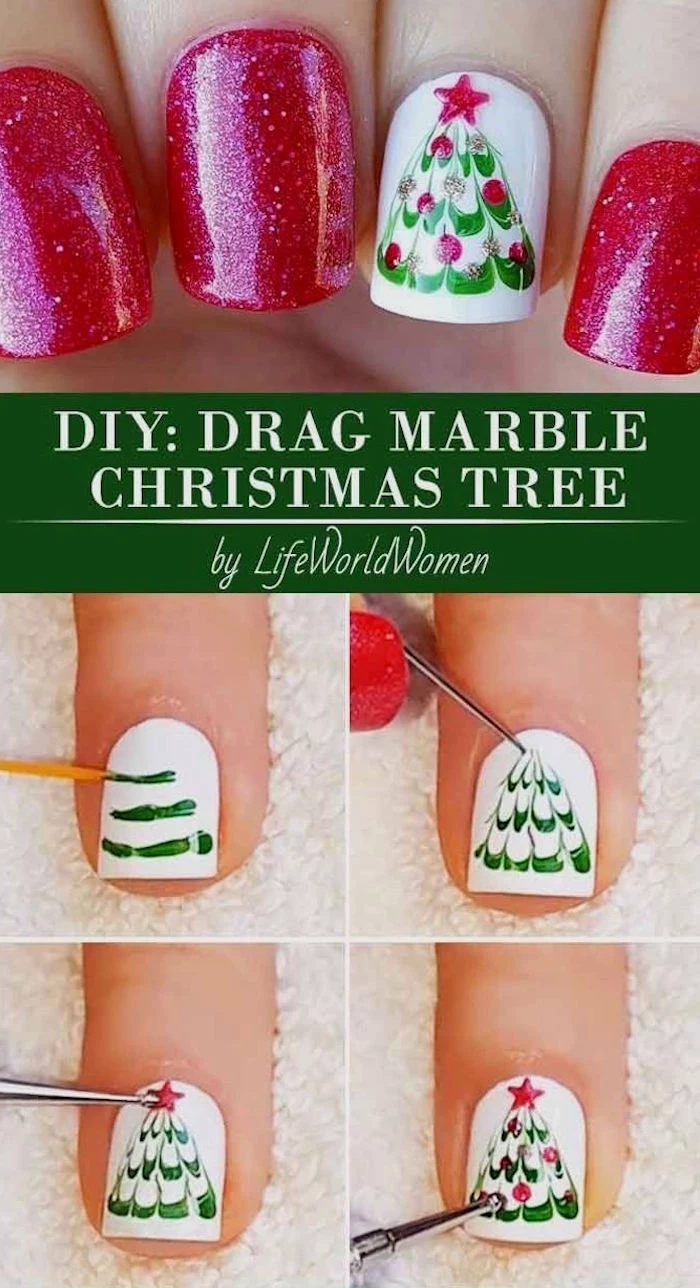
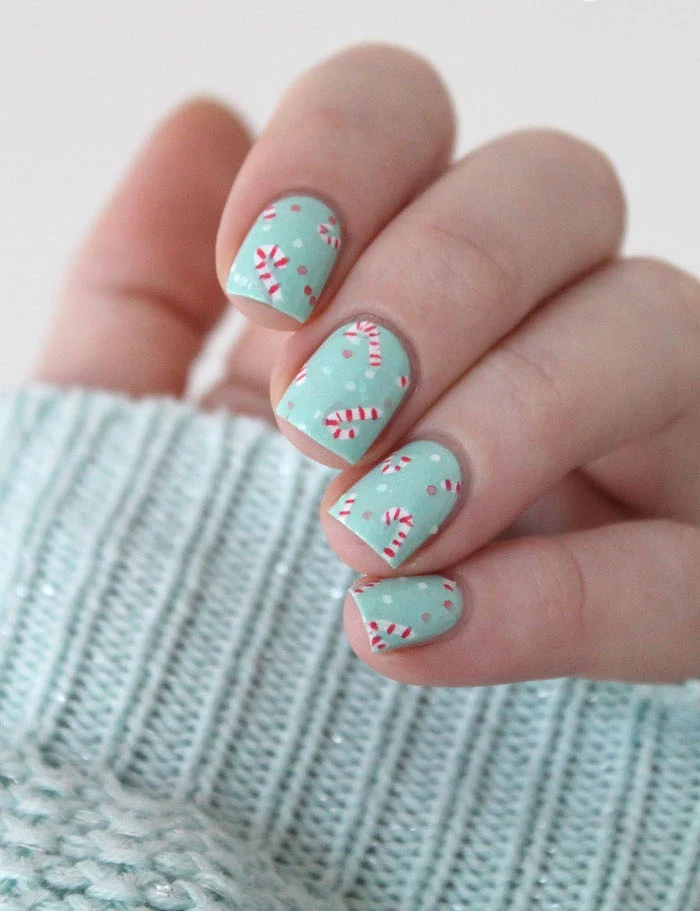
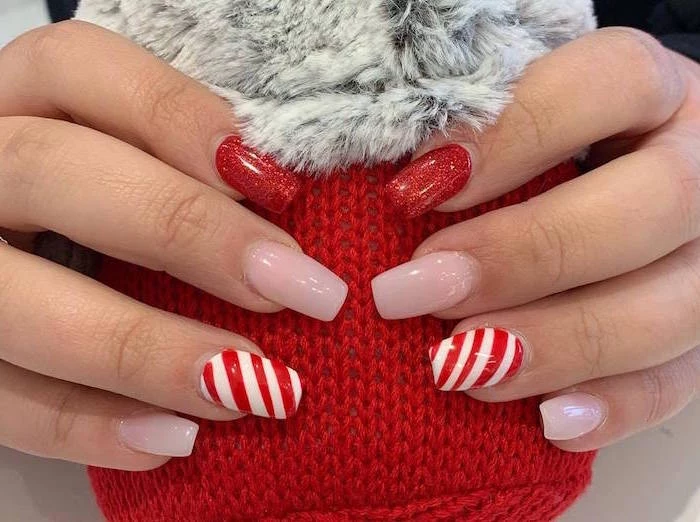
2. The Perfect Candy Cane Stripe
The goal is perfectly clean, bleed-free lines. It’s easier than it looks.
Time to Complete: Approx. 15-20 minutes
Technique: Start with a fully cured, opaque white base. Using a striper brush, paint your red diagonal lines. Cure them. Now, here’s the trick I teach all my apprentices: take your white gel polish on a clean brush and trace right alongside the red lines. This cleans up any wiggles and makes the edges incredibly sharp. Finish with a glossy top coat.
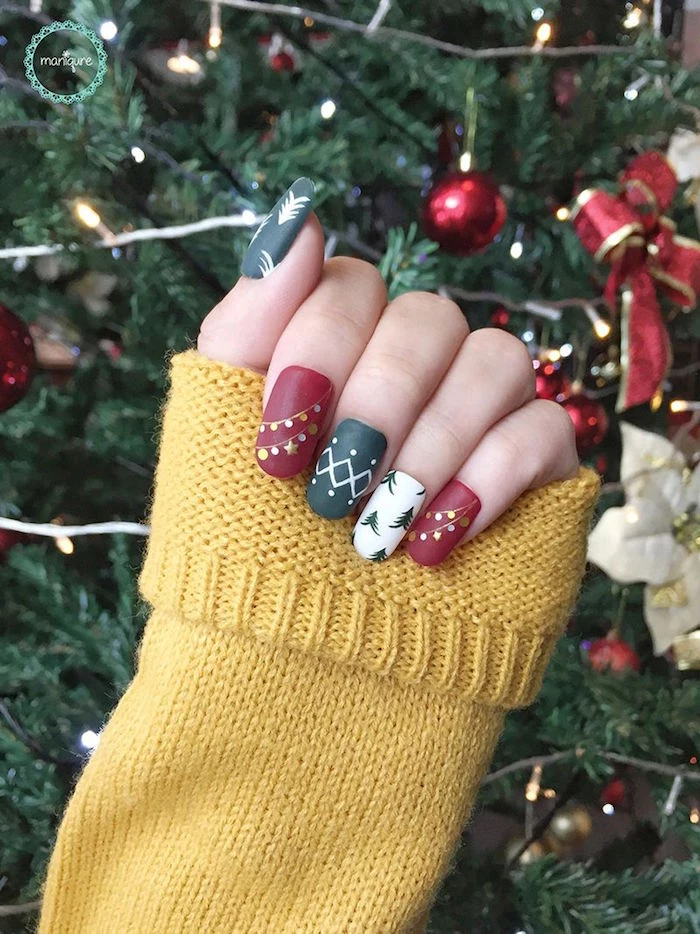
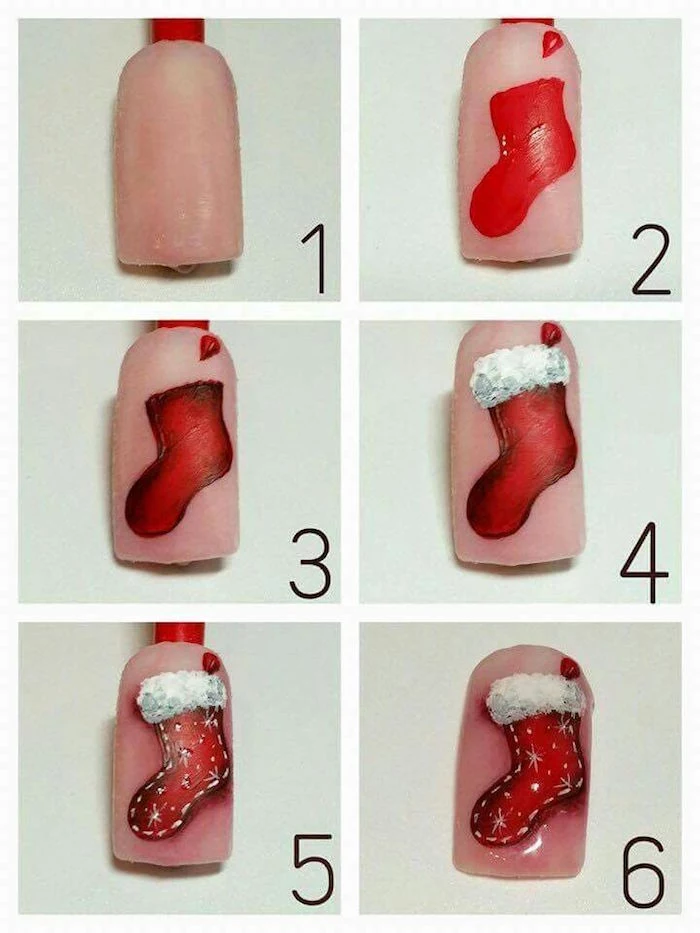
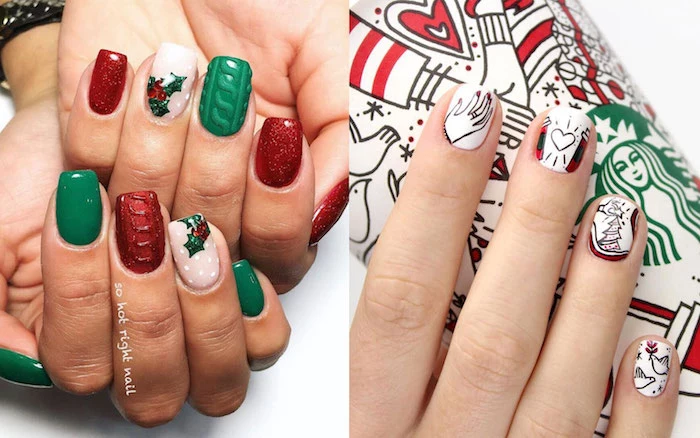
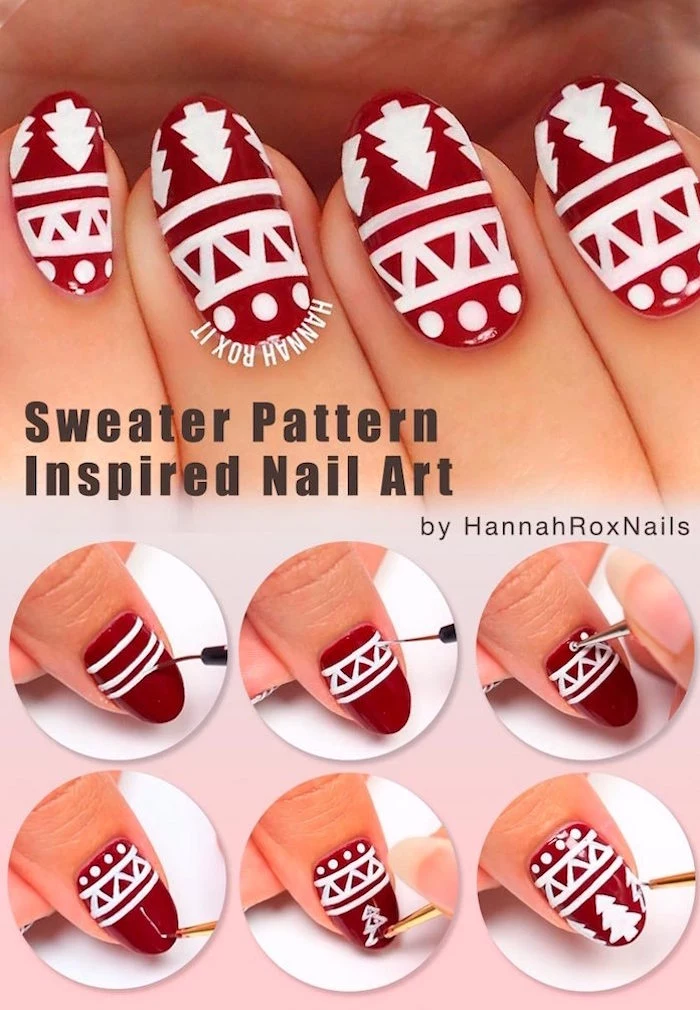
3. The Cozy Sweater Nail
This textured design is so popular and surprisingly simple. The key is a matte finish.
Time to Complete: Approx. 15 minutes
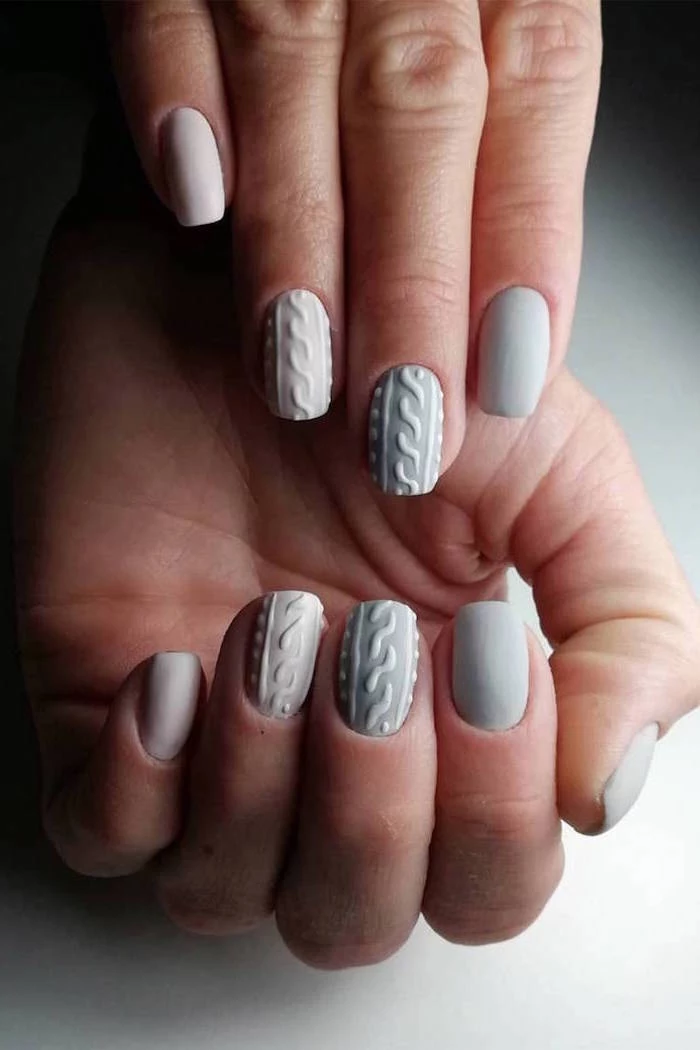
Technique: Start with two coats of your color (creams, soft grays, and pinks look amazing) and a matte top coat. Cure everything. Now, using the exact same polish color, paint your raised sweater pattern—think cables, dots, and zig-zags. While the pattern is still wet, generously sprinkle clear acrylic powder all over it. Tap off the excess, then do a full cure (60 seconds). Brush away all the leftover powder, and you’re left with a raised, textured, matte design that looks just like a tiny sweater.
Help, my texture isn’t sticking! This is a common pitfall. It usually means your layer of wet gel for the pattern was too thin, or you waited too long to add the powder. Use a slightly thicker, generous line of polish to give the powder something to really grab onto!
Beyond the Basics: Different Styles and Safety
Once you get comfortable, you can explore so much more. It’s fascinating how nail art styles differ around the world. In the U.S., we often see bold, flashy looks with lots of crystals and glitter. Then you have the minimalist Scandinavian style, with lots of negative space—maybe just a single, delicate evergreen sprig on a bare-looking nail. In parts of Eastern Europe, the focus is on incredibly detailed, fine-art-level hand painting. It’s a reminder that there are a million ways to be creative.
Your Salon Safety Checklist
Pretty nails are never worth your health. If you’re visiting a salon, please keep an eye out for these things.
- Licenses Displayed: The salon and the nail tech should have their state licenses clearly visible. This is non-negotiable.
- Tool Sterilization: Ask how they clean their metal tools. They should be using a steam autoclave or soaking them in a blue, hospital-grade disinfectant for at least 10 minutes between clients.
- Ventilation: A good salon shouldn’t have an overwhelming chemical smell. Proper ventilation is key, especially if they’re doing acrylics. A very strong, distinct odor can be a red flag for the use of MMA, a dangerous and illegal substance in many places that can seriously damage your natural nails.
When to Call a Pro
Be honest about your skill level. You should always see a professional for applying or removing acrylic or hard gel. Prying them off is the number one way people destroy their nails. And please, stay away from electric files (e-files) at home. In untrained hands, they can cause permanent damage. If you ever see any signs of an infection, skip the DIY and see a doctor. We can make nails pretty, but we can’t treat medical issues.
At the end of the day, nail art is a fun, temporary way to show off your personality. Have fun with it, prioritize the health of your nails, and happy painting!
Inspirational Gallery
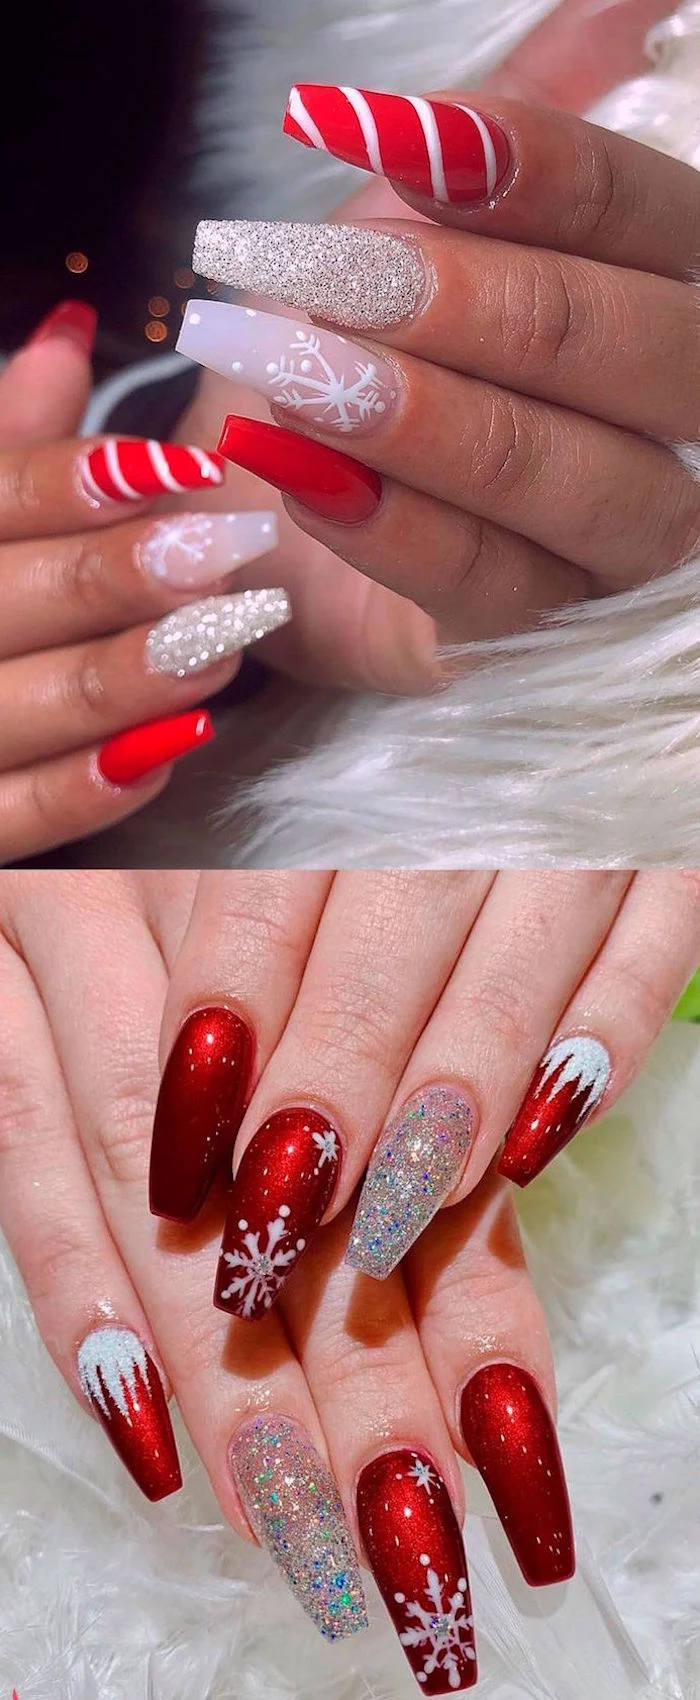
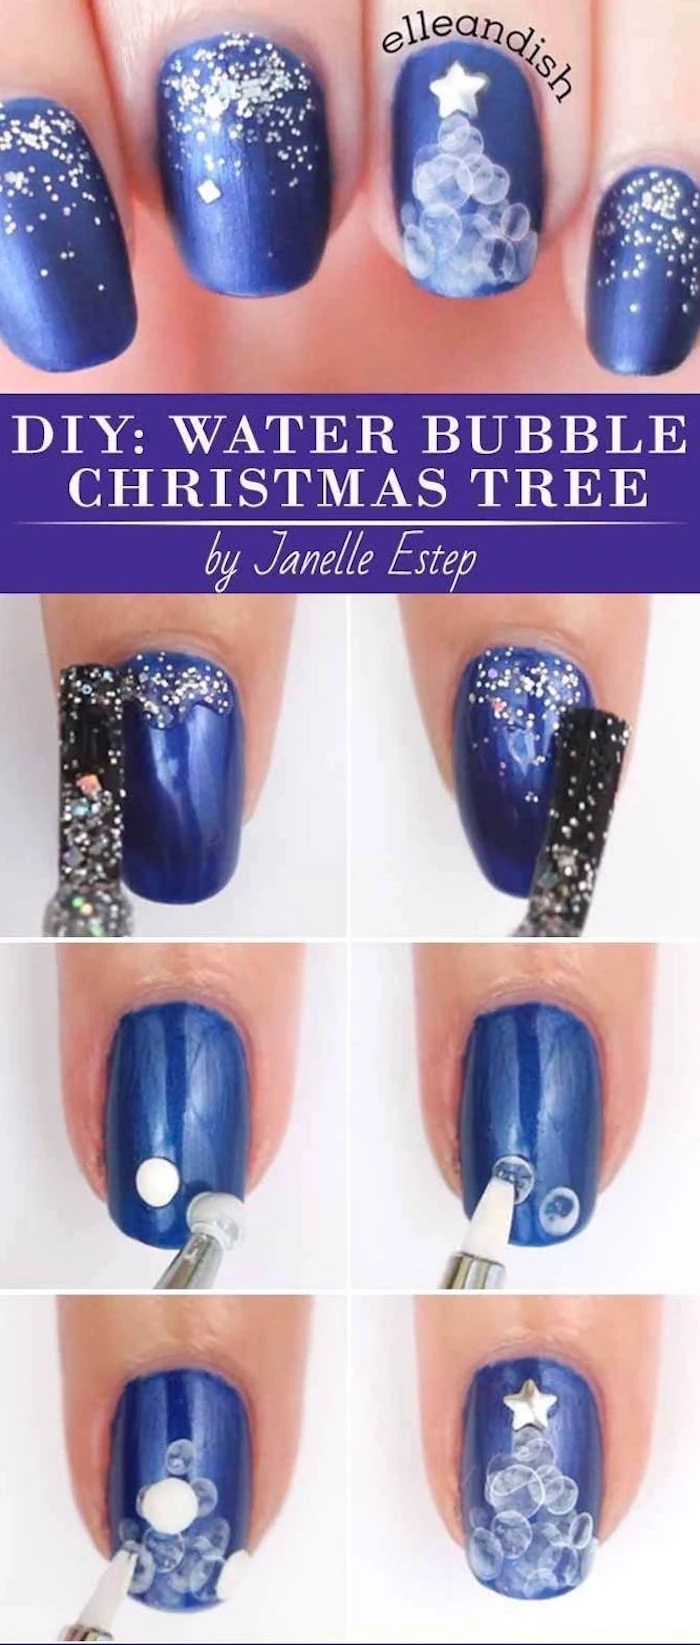
Don’t feel tied to the classic red and green. This season, moody blues and rich plums are having a moment. Think of a deep sapphire like Essie’s ‘Butler Please’ as a base for silver snowflakes, or a velvety aubergine like OPI’s ‘Lincoln Park After Dark’ for a sophisticated, less literal take on holiday cheer.
- A brilliant, quick-drying top coat is non-negotiable. Seche Vite is a cult classic for a reason.
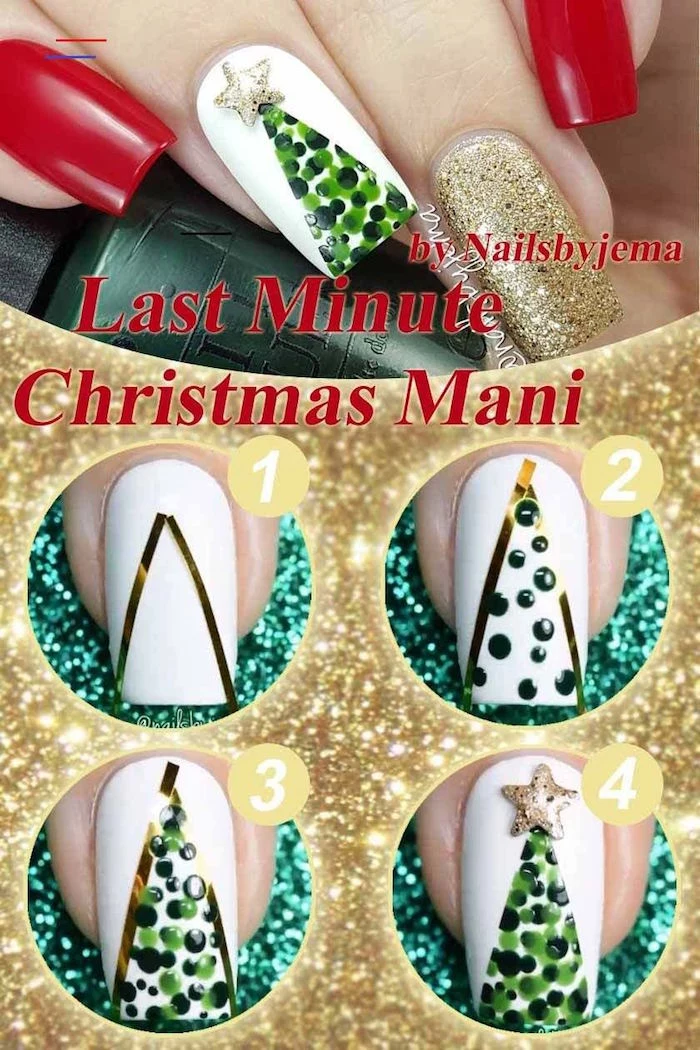
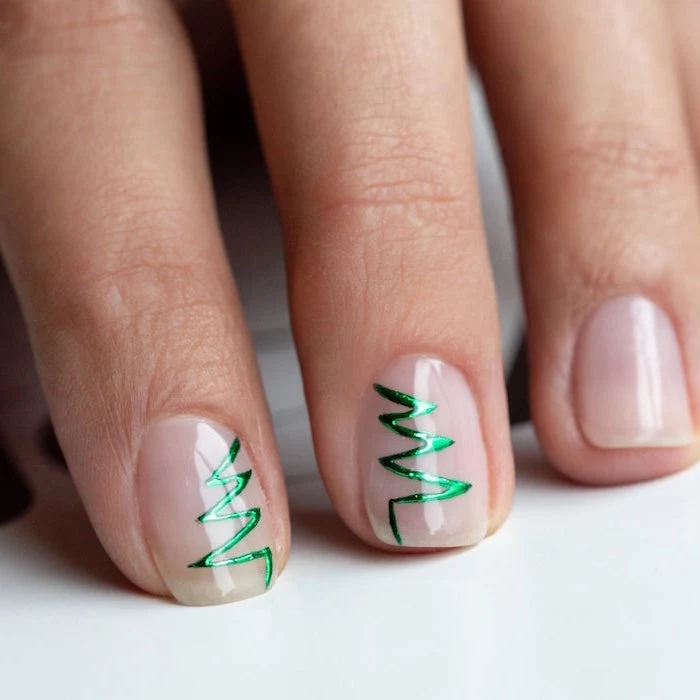
- A super-thin striping brush (much finer than the one in the bottle) is key for clean lines on trees or candy stripes.
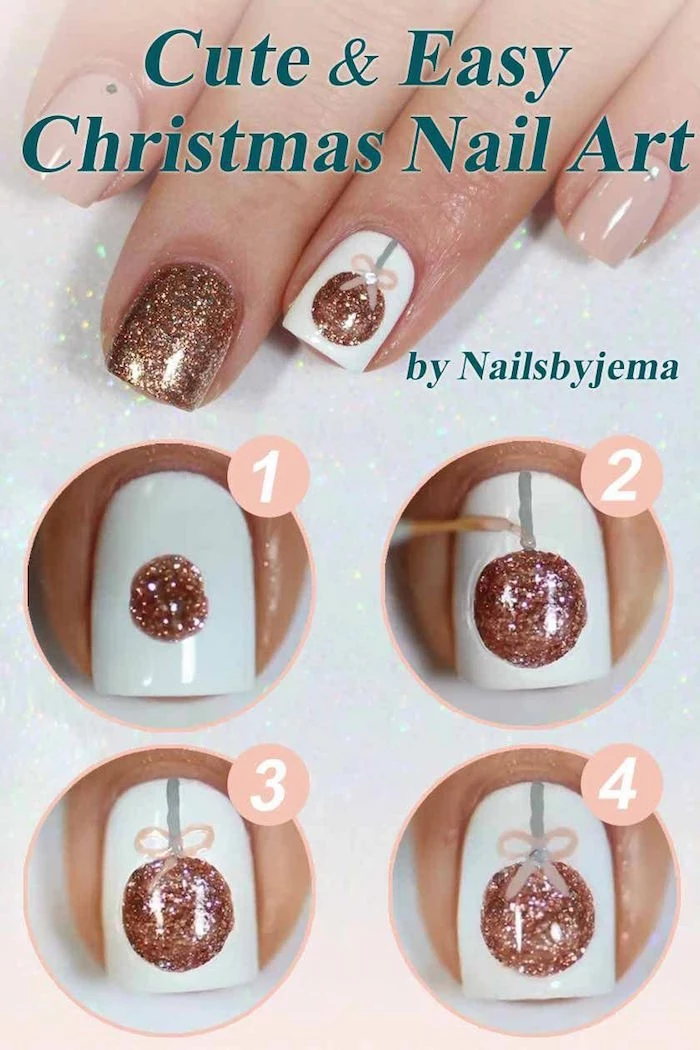
- A set of dotting tools in various sizes makes creating perfect snowflakes, ornaments, or polka dots incredibly simple.
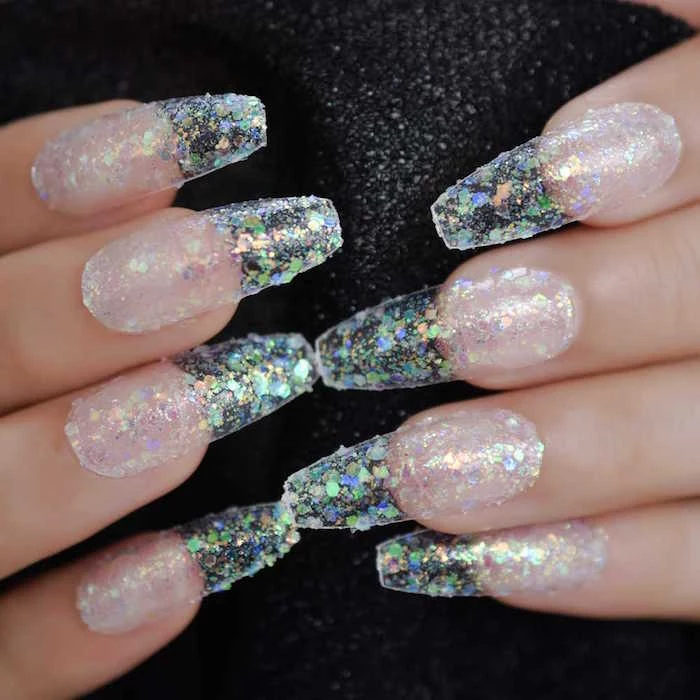
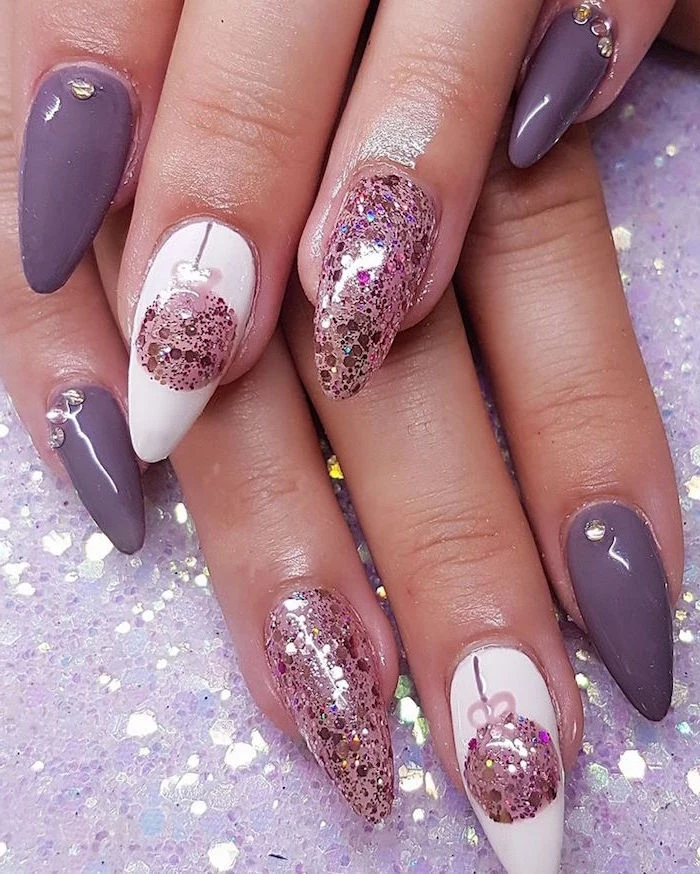
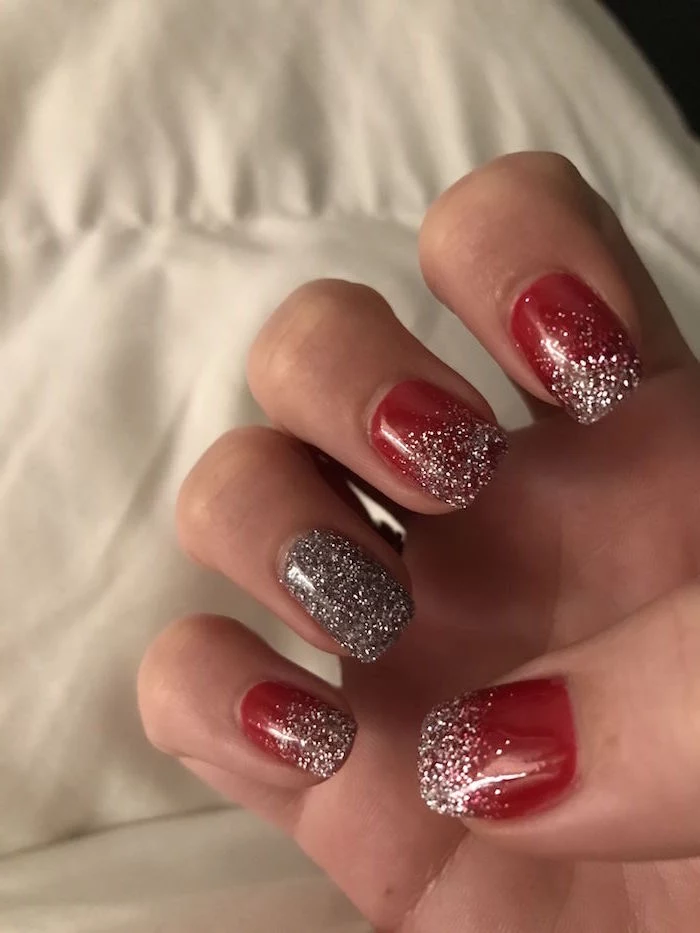
The secret to a flawless glitter accent nail: Instead of brushing the glitter polish on, dab it on with a small wedge of makeup sponge. This technique deposits the glitter flakes much more densely, giving you a fully opaque, dazzling finish in just one or two coats without the gloppy thickness.
According to Pinterest data, searches for “Christmas nail art designs” often begin surging as early as September, increasing by over 1,500% by December.
Love the cozy look of a cable-knit sweater? You can recreate it on your nails. Here’s the basic idea:
- Paint your nail with a cream or pastel color and let it dry completely.
- Using a dotting tool or a fine brush and the same polish color, draw your cable-knit pattern. Let it get a little tacky.
- Apply a second layer of the pattern directly on top of the first to build up a 3D texture. Finish with a matte top coat to complete the ‘yarn’ effect.
How do I keep my festive manicure from chipping while wrapping gifts and baking cookies?
Hydration and protection are your best friends. After your manicure is fully cured (give it at least a few hours), apply cuticle oil daily. We love CND’s SolarOil. When it comes to chores like washing dishes, wear gloves! It’s the single most effective way to protect your polish from water and harsh soaps, which are its mortal enemies.
Regular Polish: Perfect for those who love changing their design weekly. More affordable and easier to apply and remove at home. Ideal for a specific party look.
Gel Polish: The marathon runner. It will last you from the office party straight through to New Year’s Day without a single chip. Requires a UV/LED lamp and a more involved removal process, but the durability is unmatched.
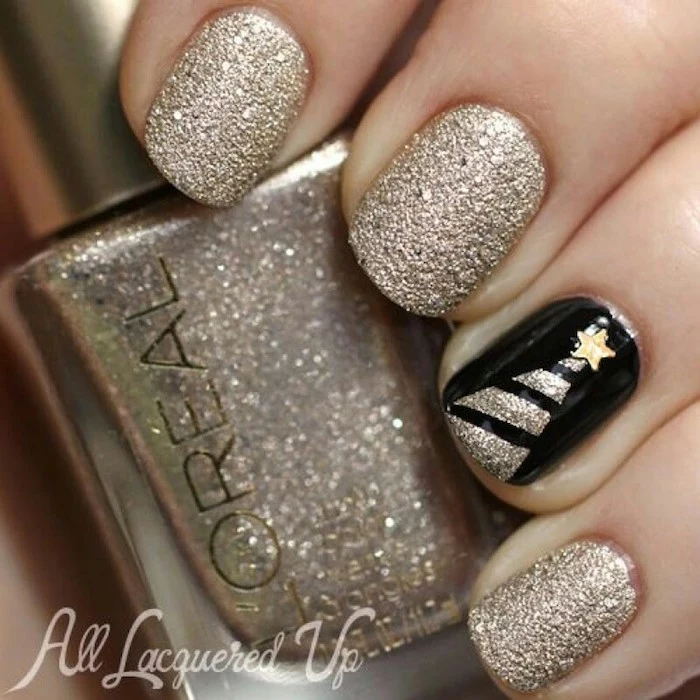
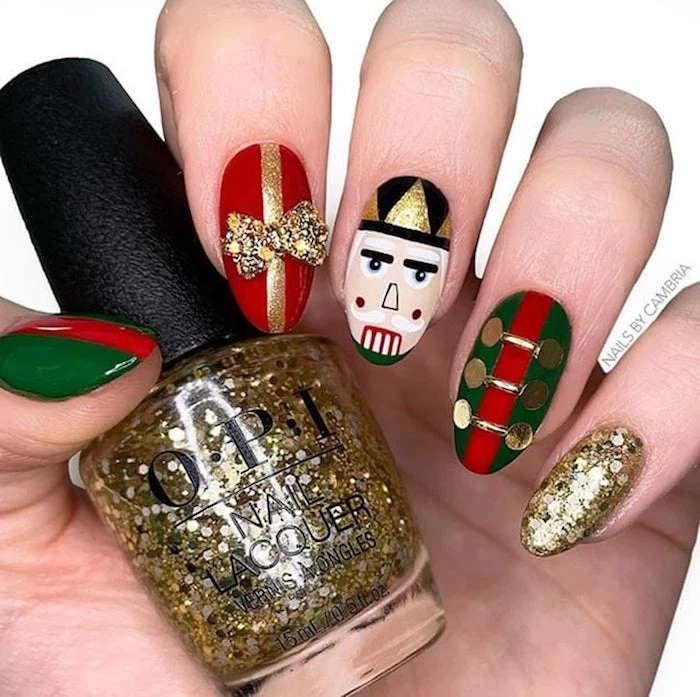
The color red has been shown in studies to increase heart rate and energy levels.
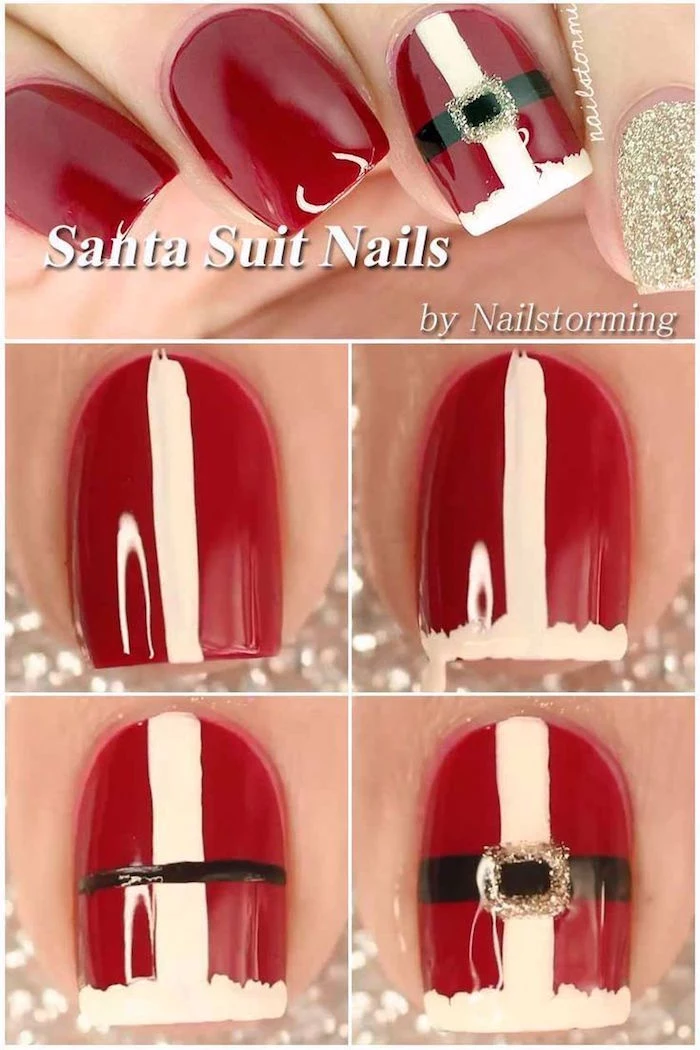
It’s no wonder that a classic crimson manicure makes you feel instantly more powerful and festive. When you pair it with gold, a color associated with luxury and warmth, you get a combination that’s psychologically wired to feel like a celebration. It’s not just a color choice; it’s a mood.
- It creates a stunning contrast that makes details pop.
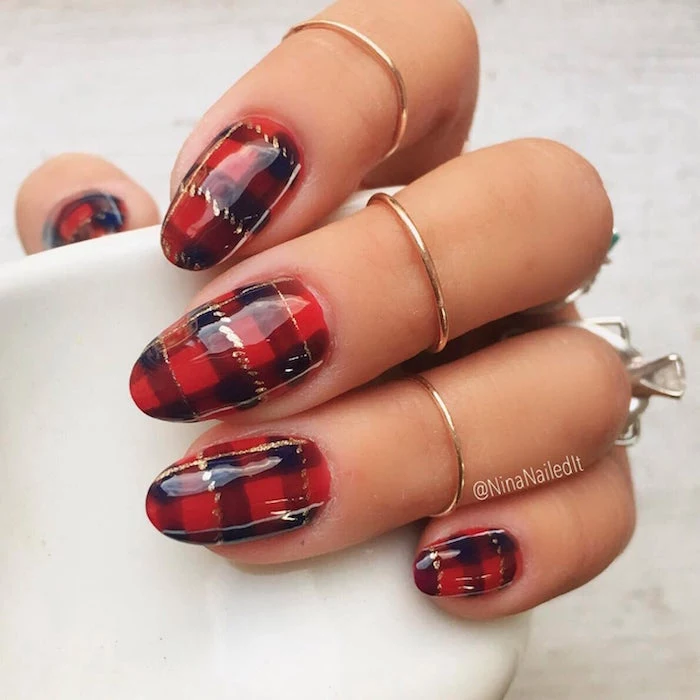
- It gives a cozy, fabric-like finish to sweater or plaid designs.
- It instantly elevates a simple dark polish into something chic and modern.
The secret? A quality matte top coat. Applying one like OPI’s Matte Top Coat over a single glittery accent nail or a detailed design can completely transform your manicure’s vibe.
The ‘velvet nails’ trend is perfect for the holidays. This mesmerizing look is created using a special magnetic polish, like those from Cirque Colors or Mooncat. After painting a coat, you hover a small magnet over the wet polish, which pulls the tiny metallic particles into a pattern that mimics the soft, light-catching shimmer of velvet fabric.
The dreaded glitter removal: Don’t scrape and damage your nails! Use the foil method.
- Soak a small piece of cotton ball in pure acetone.
- Place it on your nail, covering all the glitter.
- Wrap your fingertip tightly in a small square of aluminum foil.
- Wait 5-10 minutes, then press down and slide the foil and cotton off. The glitter will come with it.
The biggest mistake with nail decals: Not sealing them properly. After applying the sticker to a dry polish base, you must apply one or two layers of top coat, making sure to ‘cap’ the free edge of your nail. This creates a seal that prevents the sticker’s edges from lifting and catching on things.

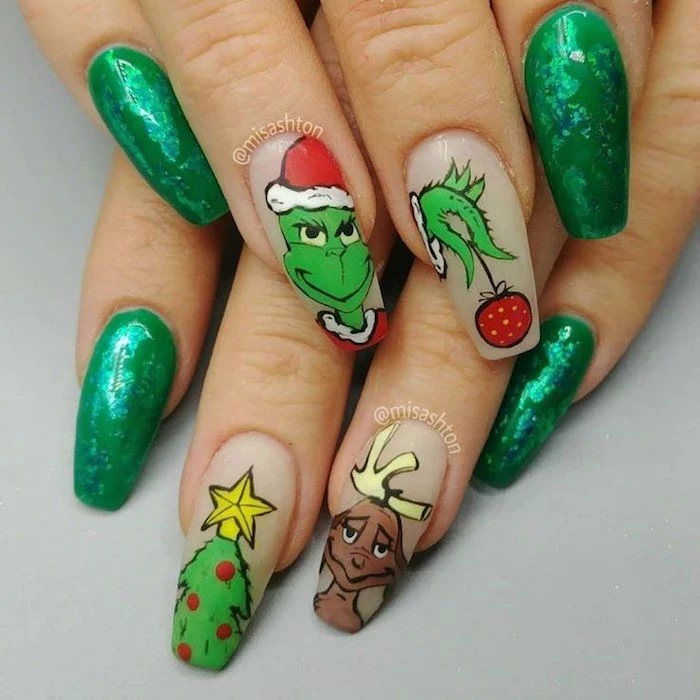
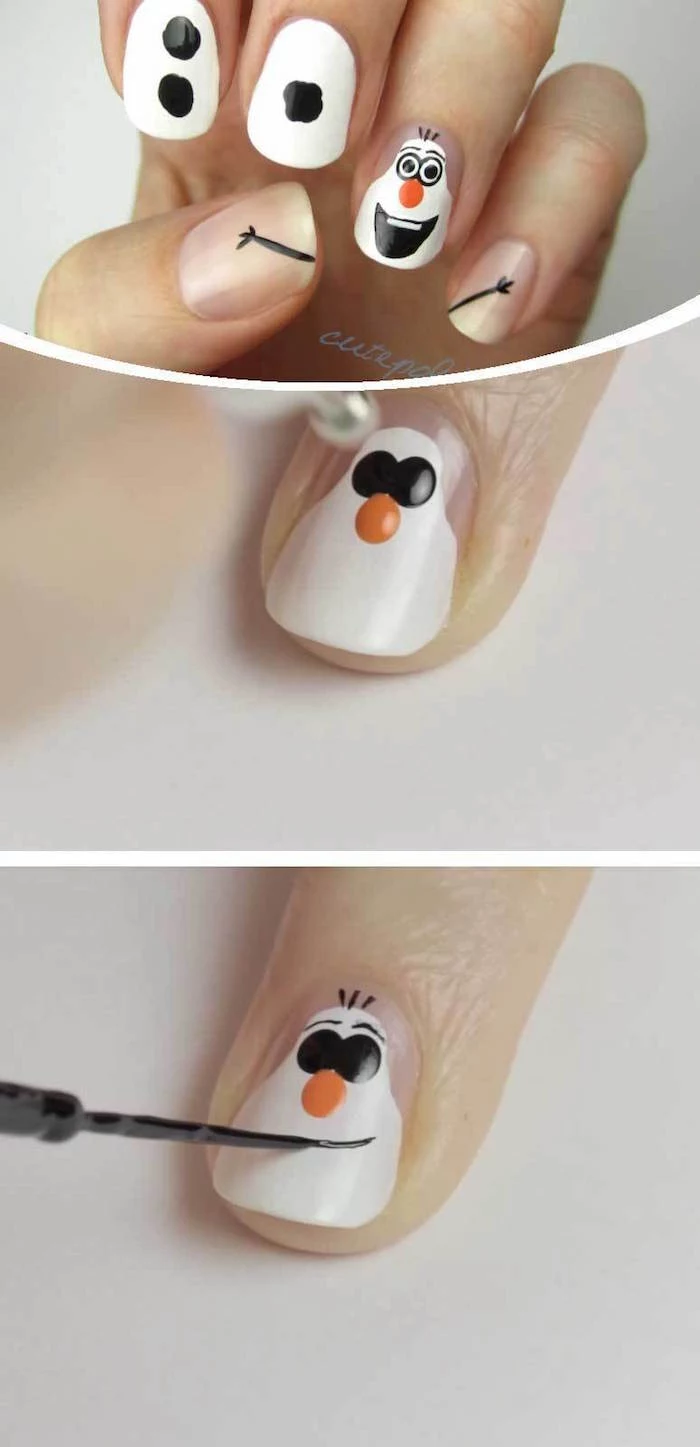
“The holiday season is the one time of year my clients feel completely free to experiment. A tiny, hand-painted gingerbread man on a ring finger can bring more joy than you’d ever expect.” – An observation from a seasoned nail professional.

Want an easy but impressive design? Try a minimalist approach. A perfectly painted nude or deep red nail with a single, elegant vertical or horizontal stripe in metallic gold or silver is incredibly chic. Use thin nail art tape to get a perfectly crisp line: paint the stripe, and remove the tape while the metallic polish is still wet.
Are press-on nails a good alternative for holiday parties?
Absolutely! They’re the ultimate time-saver. Brands like Static Nails or Kiss offer reusable, paintable sets that look incredibly natural. You can get a perfect, trendy shape and intricate design in minutes. Use the included glue for longer wear (up to two weeks) or adhesive tabs for a single night of glamour with zero damage to your natural nails.
Dotting Tool: Creates perfectly uniform, round dots every time. Essential for polished-looking polka dots, eyes on characters, or the center of snowflakes.
Toothpick: Better for creating less uniform shapes or for dragging polish to create fine, wispy lines. It’s a great DIY alternative, but a dotting tool provides a more professional finish.
Did you know that in the 1950s, Revlon’s ‘Fire and Ice’ campaign linked red lipstick and matching nails to a confident, daring personality?
That cultural moment cemented red nails as a symbol of glamour and festivity. The tradition continues today, making a classic red manicure the little black dress of the holiday season—it simply always works.
- It adds a subtle, modern touch to any manicure.
- It protects your nail art just as well as a glossy version.
- It feels incredibly smooth and satisfying to the touch.
The trick? Use a high-quality, fast-drying base coat. This prevents staining from deep holiday colors like reds and greens, and creates the perfect smooth canvas for your color, ensuring an even application.
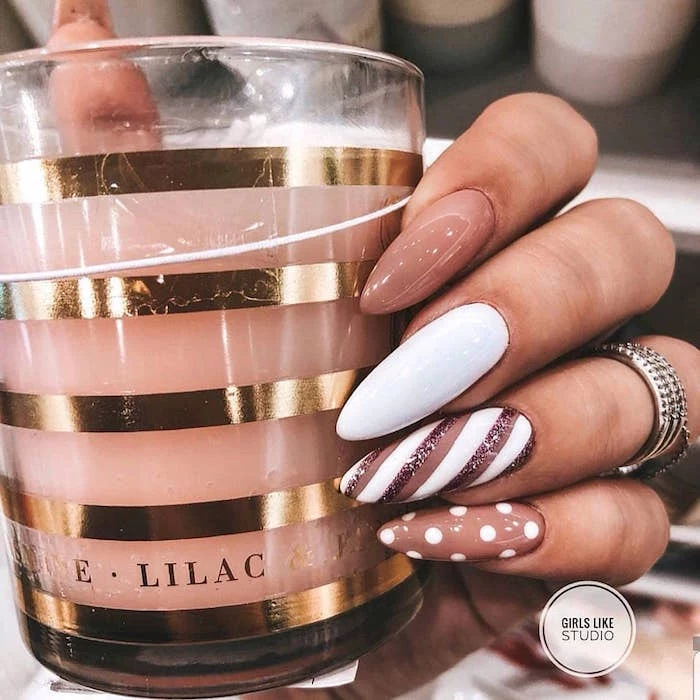
Your inspiration might be sitting on your dessert plate! Think candy cane stripes on an accent nail using a fine brush. Or try a gingerbread-inspired look with a warm brown polish like OPI’s ‘Suzi Needs a Loch-smith’, adding tiny white details for the ‘icing’. It’s a sweet and playful way to get festive.
Emergency smudge fix! It happens. Don’t wipe it off. Wait for the surface to dry a little, then take a tiny drop of the same polish on another finger and gently pat the smudged area. This helps to self-level the polish. Alternatively, for a minor smudge, a quick coat of a glitter or shimmer polish can hide the imperfection beautifully.
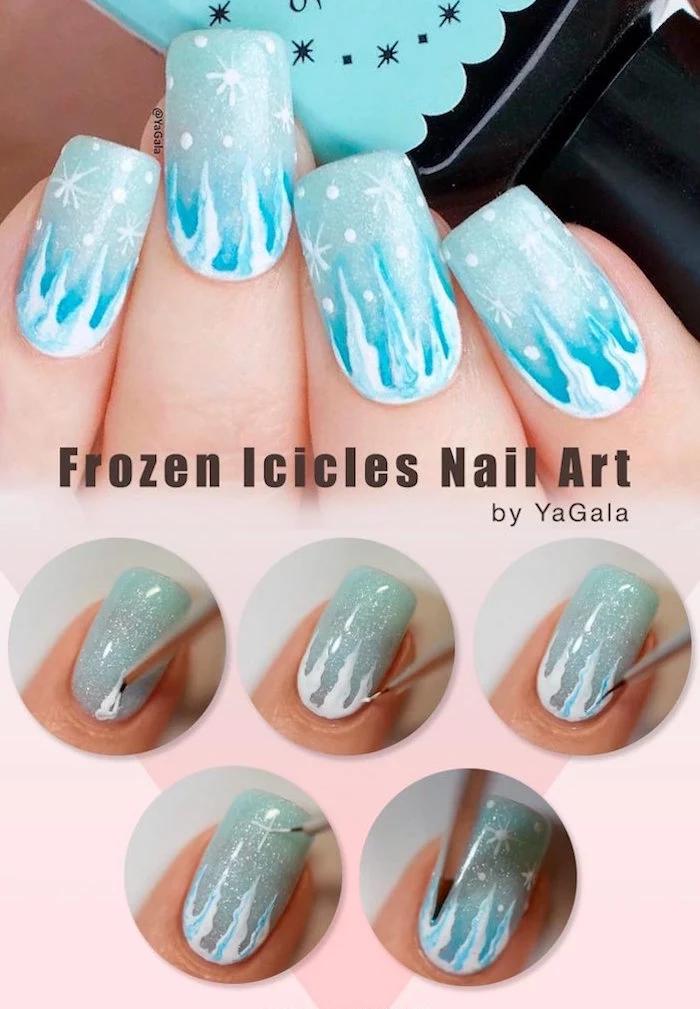
Important point: Consider your nail shape when choosing a design. Long, elegant almond or coffin shapes are fantastic canvases for intricate vertical designs like icicles or glitter fades. Shorter, square or squoval nails look amazing with whole-nail designs like sweater patterns or a single, bold central element like a snowflake or star.

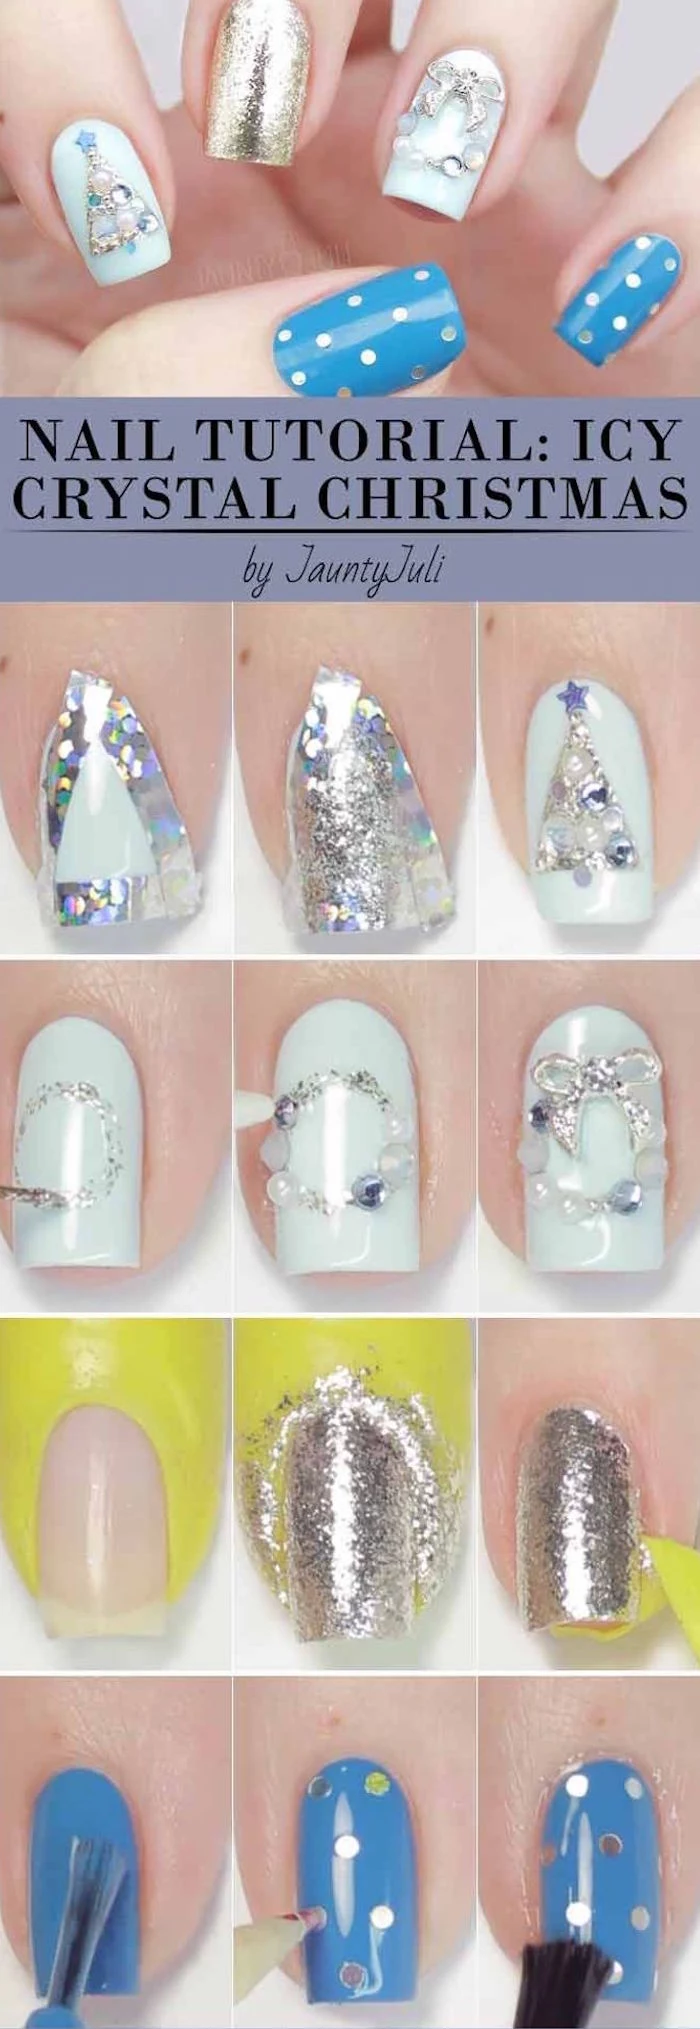
While red and green dominate Christmas, blue and silver are the go-to shades for stunning Hanukkah nails. A deep navy or royal blue base with a silver glitter gradient or tiny, stamped Stars of David offers a beautiful way to celebrate the Festival of Lights.
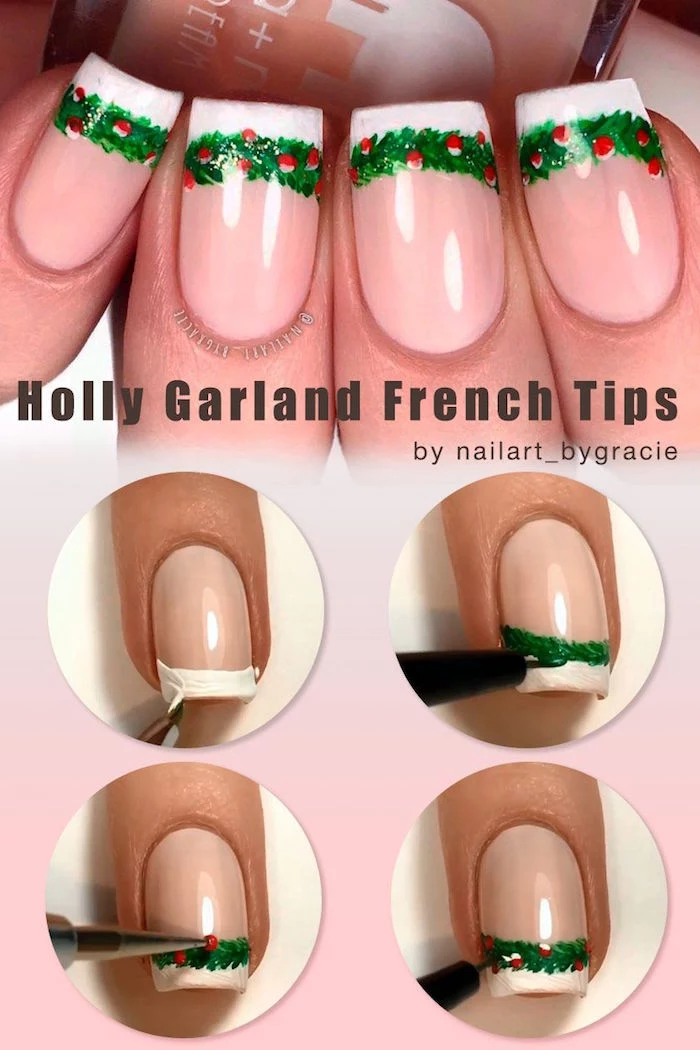
Give the classic French manicure a holiday makeover. It’s simple but always looks polished.
- Instead of a white tip, use a fine-milled gold or silver glitter polish.
- Try a deep cranberry red tip on a sheer, milky-pink base for a ‘Santa Baby’ vibe.
- For a modern twist, use a matte forest green for the tip.
Why is my polish bubbling?
This is usually caused by trapped air. The culprit is often shaking the polish bottle, which creates tiny air bubbles. Instead, gently roll the bottle between your palms. Also, applying coats that are too thick can trap solvents as they evaporate, leading to bubbles. Thin, even coats are the key to a glassy finish.
Glitter Polish: Convenient and less messy. The glitter is suspended in a base, making application as easy as painting a normal color. Best for a more scattered, subtle sparkle.
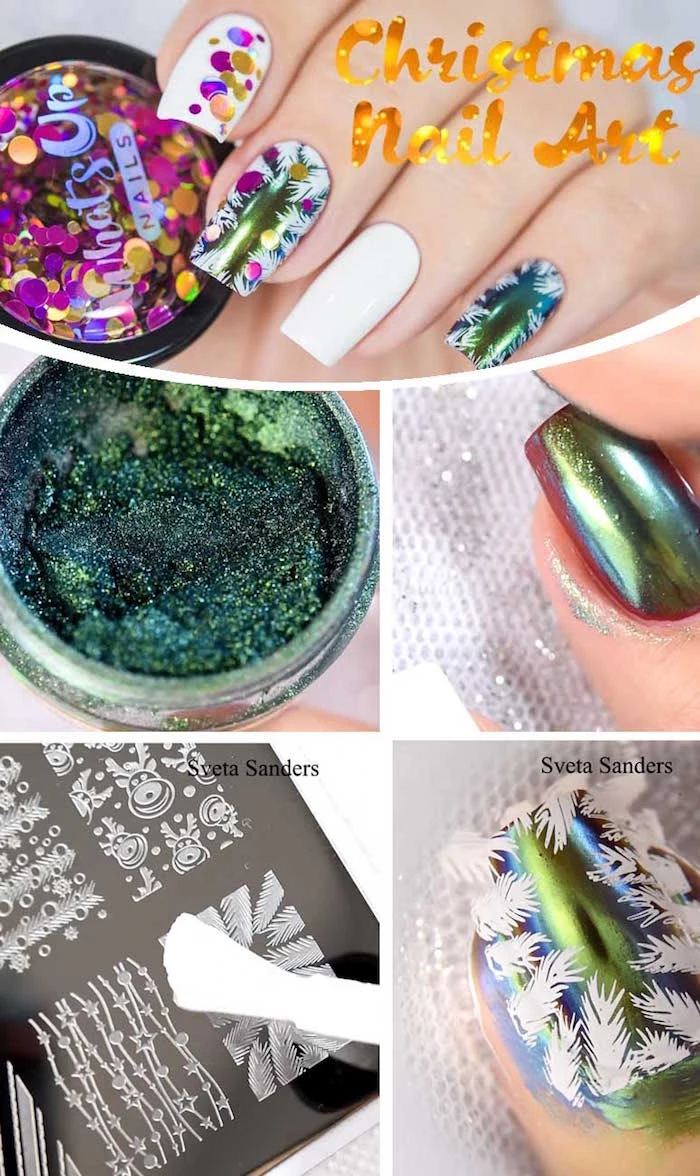
Loose Craft Glitter: Offers ultimate sparkle and control. By pressing loose nail-art glitter onto a wet base coat, you get an intense, multi-dimensional texture that’s impossible to achieve with polish alone. A bit messy, but the payoff is huge.


