How to Actually Fix Your Favorite Jeans (So They Last Forever)
Your Jeans Tell a Story. Don’t Let a Hole Be the Last Chapter.
I’ve worked with textiles for a long time, and if there’s one thing I know for sure, it’s that a good pair of jeans is like a personal diary. The fade on the thighs, those creases behind the knees… that’s not damage, that’s life. It’s a record of concerts, long drives, and lazy Sundays. So, tossing a pair just because of a rip? It feels like giving up on an old friend.
In this article
- Your Jeans Tell a Story. Don’t Let a Hole Be the Last Chapter.
- First Things First: Understand Your Fabric and the Damage
- Your Mending Toolkit: What You Actually Need
- Choosing Your Battle: Which Repair Technique Is Best?
- Technique 1: The Internal Machine Patch (for Maximum Strength)
- Technique 2: Hand Darning (for Small, Invisible Fixes)
- Technique 3: Sashiko Mending (for Artistic, Visible Repairs)
- Okay, but What About Iron-On Patches?
- Protecting Your Work and Knowing When to Call a Pro
- Inspirational Gallery
And here’s the thing: you don’t need to be some master tailor to save them. Honestly. With a little patience and the right know-how, you can make repairs that are not only strong but also add a ton of character. This isn’t about those flimsy iron-on patches that peel off after one wash. We’re talking about real, durable fixes that will give your favorite jeans a second life.

First Things First: Understand Your Fabric and the Damage
Before you even think about threading a needle, take a close look at what you’re working with. Denim is a tough cotton twill, which means the threads are woven in a distinct diagonal pattern. You can see the little lines if you look closely. This weave is what makes denim so strong, and working with that diagonal grain, not against it, is the secret to a repair that lasts.
What About Stretch Jeans?
Oh yeah, this is a big one. Most jeans today aren’t 100% cotton; they have a bit of stretch (elastane or spandex) woven in. This changes the game slightly. If your jeans stretch, your repair needs to stretch, too.
Heads up! For stretch denim, you’ll need two specific things: polyester thread (which has some give) and a special needle for your machine called a ballpoint or stretch needle. A regular sharp needle can shred the elastic fibers, but a ballpoint needle slides right past them.
Types of Damage and When to Act
Holes are rarely a surprise. They’re the result of friction wearing down the cotton fibers in high-stress spots like the crotch, inner thighs, and knees. Knowing what you’re up against helps you choose the right fix.
- Thinning Fabric: The danger zone. The area feels soft, and you can see a lot of the white horizontal threads. This is the absolute best time to act! Reinforcing it now is a super easy, 15-minute job that prevents a full-blown hole. This is the perfect project for a total beginner.
- Simple Tears: Usually an L-shaped or straight rip from snagging on something. Not much fabric is lost, so these are pretty straightforward to patch up from behind.
- Holes and Blowouts: The classic! The fabric has completely worn away, leaving a hole with frayed edges. These are common at the knees and crotch and will definitely need a solid patch for reinforcement.

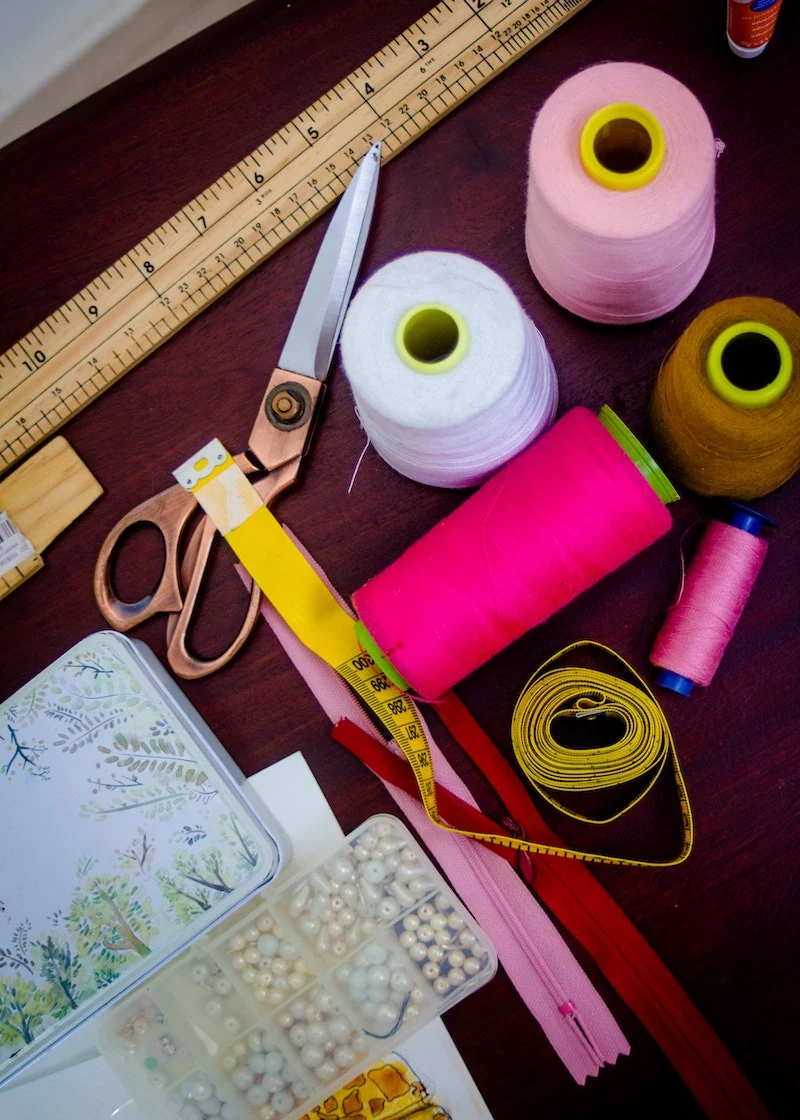
Your Mending Toolkit: What You Actually Need
Your success really depends on having the right tools. Using a flimsy needle or cheap thread is just setting yourself up for frustration. Here’s a rundown of what I recommend keeping in a small mending kit. You can get all of this for about $25-$35, and it’ll last you for years.
The Essentials:
- Needles: For hand sewing, grab a pack of assorted ‘sharps’ or specific denim needles. For your sewing machine, don’t even try without a proper denim needle (size 90/14 or 100/16 is perfect). A 5-pack costs maybe $3-$5 at any craft store or online.
- Thread: This is critical. Standard all-purpose thread will just snap. You need heavy-duty thread. Personally, I love Gütermann Mara 70 or any top-stitching thread. It has a polyester core for strength but looks like cotton. A spool will run you $4-$6. For serious menders, I’d check out a site like Wawak for bulk deals.
- Patch Material: The best source is an old pair of jeans you can’t save. Try to match the weight and color. Otherwise, a sturdy piece of cotton canvas works great, too.
- Sharp Scissors: You need one good pair for fabric and a smaller pair of snips for threads. A good pair of fabric shears is a lifetime investment.
- Fusible Web: This is my secret weapon. It’s a thin, iron-on adhesive sheet (like HeatnBond Lite, which is about $5 a roll). You use it to temporarily tack your patch in place before sewing, so it doesn’t shift around. This one step makes your repair look so much more professional.
- A Thimble: Please, use a thimble. Pushing a needle through thick denim is no joke, and a simple $2 metal thimble will save your fingers. Trust me on this.
Choosing Your Battle: Which Repair Technique Is Best?
Okay, so you’ve got your kit and you know your damage. Which technique should you use? There’s no single right answer, it’s all about what you’re trying to achieve.
If you’re dealing with a big hole in a high-stress area (like the crotch or inner thigh) and you need maximum durability, the Internal Machine Patch is your workhorse. It’s strong, flexible, and should take about 45-60 minutes once you get the hang of it. It’s not invisible, but it’s built to last.
For smaller holes (less than an inch) or thinning areas where you want a discreet fix, Hand Darning is the way to go. It’s a quiet, meditative process that literally re-weaves the fabric. It can be nearly invisible if you match your thread well, but it is slow—budget at least an hour for a small spot.
And if you want to turn that hole into a piece of art? That’s where Sashiko Mending comes in. It’s a beautiful, visible mending technique that uses a contrasting patch and thread to make a statement. It’s perfect for knees and is incredibly strong. Plan for 1-3 hours, depending on how complex your pattern is.

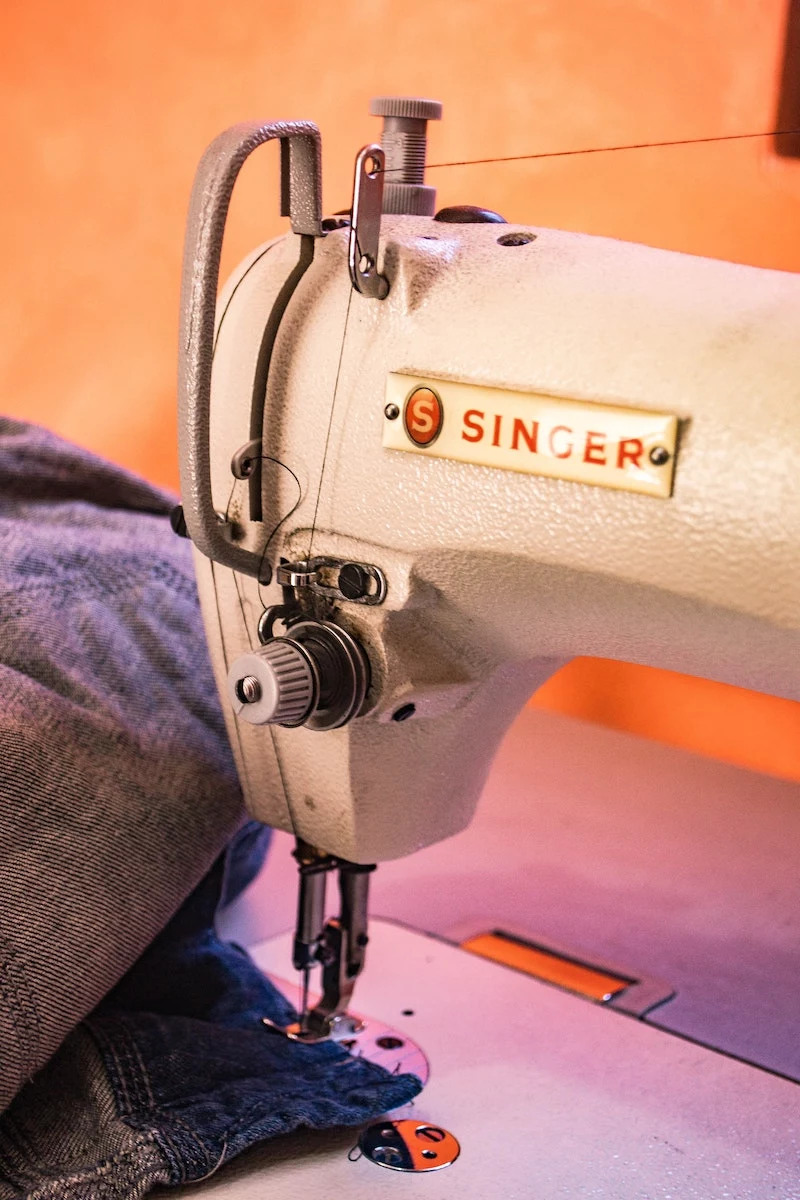
Technique 1: The Internal Machine Patch (for Maximum Strength)
This is my go-to for serious repairs on jeans that I plan to wear hard. It integrates the patch so well that the repaired area is often stronger than the original fabric.
- Prep the Area: Turn the jeans inside out. Trim away the messy, long frayed threads around the hole. You want a relatively clean edge to work with.
- Cut and Position Your Patch: Cut a denim patch that’s about an inch bigger than the hole on all sides. Rounding the corners helps stop them from peeling up later. Place it over the hole on the inside of the jeans.
- Fuse It in Place: Cut a piece of that fusible web to the same size as your patch. Sandwich it between the jeans and the patch, and press with a hot, dry iron for 5-10 seconds. Now your patch is lightly tacked down and won’t budge while you sew. Game changer.
- Set Up Your Machine: Turn the jeans right side out. Pop in a denim needle (100/16 is great for this) and thread your machine with heavy-duty thread.
- Sew It Up: Here’s the key. You’re going to sew back and forth in straight lines, following the diagonal grain of the denim. Think of it like you’re coloring in the worn-out area with thread. Start sewing on solid fabric, go across the hole, and end on solid fabric. These dense, parallel stitches build a new, super-strong layer of fabric.
- Finish It: Once the whole area is covered in thread, backstitch to lock it in and trim your threads. It’ll feel a bit stiff at first but will soften up perfectly after a wash and wear.
A common mistake: Your needle keeps breaking. If this happens, you’re either going too fast or your needle is too small. Slow way, way down, especially over thick seams, and double-check you’re using a strong 100/16 denim needle. If you don’t have a sewing machine, by the way, you can do this by hand with a simple running stitch. It takes longer, but it’s just as tough.
Technique 2: Hand Darning (for Small, Invisible Fixes)
Darning is a timeless skill for fixing small holes. You’re literally weaving a new piece of fabric with just a needle and thread. It takes patience, but the results are so satisfying.
- Prep the Area: Tidy up the loose threads. To make this way easier, stick a tennis ball or a darning mushroom inside the leg under the hole. This gives you a firm surface and keeps the fabric taut.
- Lay the First Threads: Using a single strand of matching thread, stitch a series of parallel lines across the hole. Don’t pull them tight. These are your new foundation threads.
- Start Weaving: Now, working at a 90-degree angle, weave your needle over and under the first set of threads. On the next row, reverse the pattern (under, then over). You’ll see a new patch of fabric forming right before your eyes.
- Finish: Once the hole is filled, run your needle through the back of your stitches to secure it and snip the thread. No knot needed!
The biggest pitfall: The fabric gets all puckered. This means you pulled your weaving threads too tight. The key is to keep your tension relaxed and even. Using a hoop or ball really helps prevent this.
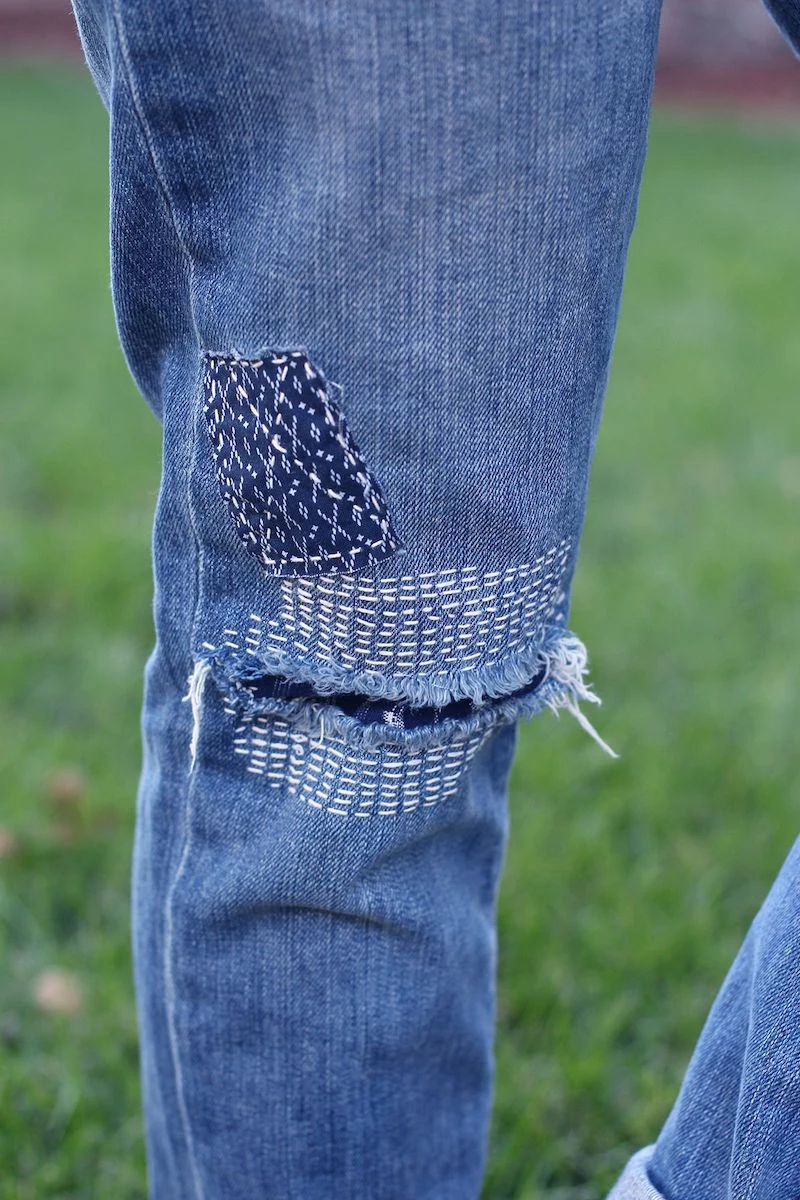
Technique 3: Sashiko Mending (for Artistic, Visible Repairs)
Sometimes a repair should be celebrated. Sashiko is a traditional mending style that does just that, using a patch and contrasting thread to create beautiful, geometric patterns. It’s my favorite for knee holes.
- Choose Your Materials: You’ll need a patch (patterned cotton is fun), a long sashiko needle, and special sashiko thread. The thread is key—it’s a thick, matte cotton that gives a distinct look. Can’t find it? A great substitute is cotton Perle floss (size 8), which you can find at any craft store for a couple of bucks.
- Position the Patch: Place your patch on the inside or outside of the jeans—your call! Pin it or use a few dabs of fabric glue to hold it.
- Start Stitching: The basic stitch is just a simple running stitch, but consistency is everything. Load several even stitches onto your needle before pulling it through. Start by stitching a grid of parallel lines across the entire patch, extending onto the solid denim.
A quick tip here: Don’t stress about making every stitch perfect. It’s the overall rhythm and pattern that creates the beautiful, textured effect. The result is an incredibly strong repair that tells a new story.
Okay, but What About Iron-On Patches?
I have to address this. You’ll see them everywhere, promising a quick, no-sew fix. To be frank, an iron-on patch is a temporary solution at best. The heat from your dryer will eventually break down the glue, and the edges will start to peel. If you absolutely must use one for an emergency, at least do yourself a favor and sew down the edges with a simple whip stitch to give it a fighting chance.
Protecting Your Work and Knowing When to Call a Pro
You did it! To keep your repair looking great, always wash your jeans inside out in cold water and try to air dry them. The high heat of a dryer is tough on any patch or mend over time.
And listen, while you can fix most things, sometimes it’s wise to call a professional tailor. It’s not failure, it’s smart! For tricky jobs like a full zipper replacement or a complex crotch blowout on a pair of expensive raw denim jeans, a pro can work magic. Expect to pay somewhere between $20 and $40 for a repair like that. Honestly, it’s often money well spent for a perfect result.

Taking care of your clothes is a skill that saves money, reduces waste, and connects you to the things you own. Every stitch you make just adds more to the story. So take your time, enjoy the process, and take pride in a job well done.
Inspirational Gallery
Did you know? Extending the active life of a piece of clothing by just nine months can reduce its carbon, water, and waste footprints by around 20-30%. Your repair isn’t just saving a favorite pair of jeans; it’s a genuine act of sustainability.
Beyond a basic needle and thread, a dedicated mending kit can make all the difference. Consider adding these to your arsenal:
- A metal thimble: Pushing a needle through thick denim seams is tough work. A thimble saves your finger and gives you better leverage.
- Denim needles: For machine sewing, a Schmetz Jeans Needle (size 90/14 or 100/16) has a reinforced blade and sharp point designed to penetrate dense fabric without breaking.
- Embroidery floss: For visible mending, a sturdy cotton embroidery floss from a brand like DMC offers great color variety and strength.
What about holes that are already fraying badly?
Before you even begin stitching, you need to stabilize the area. The easiest way is to apply a liquid seam sealant like Fray Check around the edges of the hole. Let it dry completely. This creates an invisible, flexible border that stops the threads from unraveling further as you work, making your final repair much cleaner and more durable.
The secret to a truly invisible crotch repair: Work from the inside. Instead of placing a patch on top, iron on a fusible interfacing and then place your denim patch on the *interior* of the jeans. From there, use your sewing machine to darn back and forth over the worn area from the outside, using a thread that closely matches the denim’s color. The internal patch provides strength while the external stitches blend into the fabric’s texture.
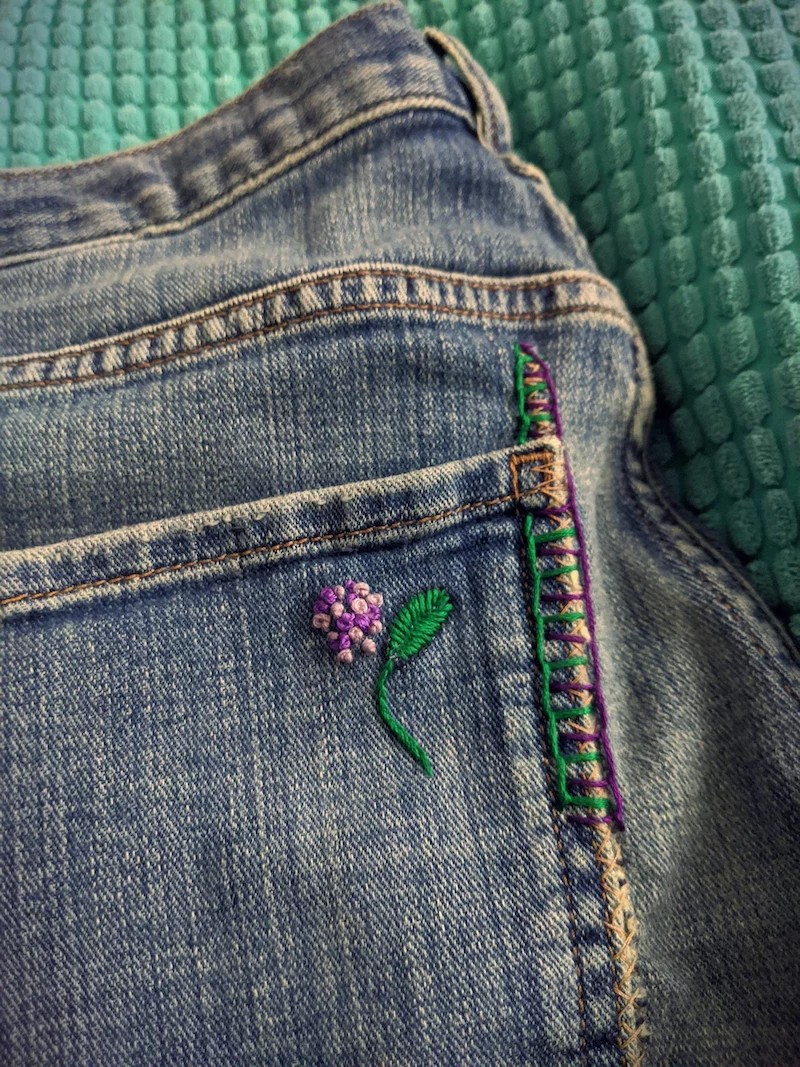
Internal Patch: Placed on the inside of the jeans, this is the go-to for discreet repairs, especially on thinning thighs or small tears. It provides reinforcement without changing the outer look.
External Patch: Applied to the outside, this turns the repair into a style statement. It’s perfect for covering large holes on knees or for adding a contrasting color or texture.
For a blend of both, use an internal patch for strength and add a few decorative external stitches for character.
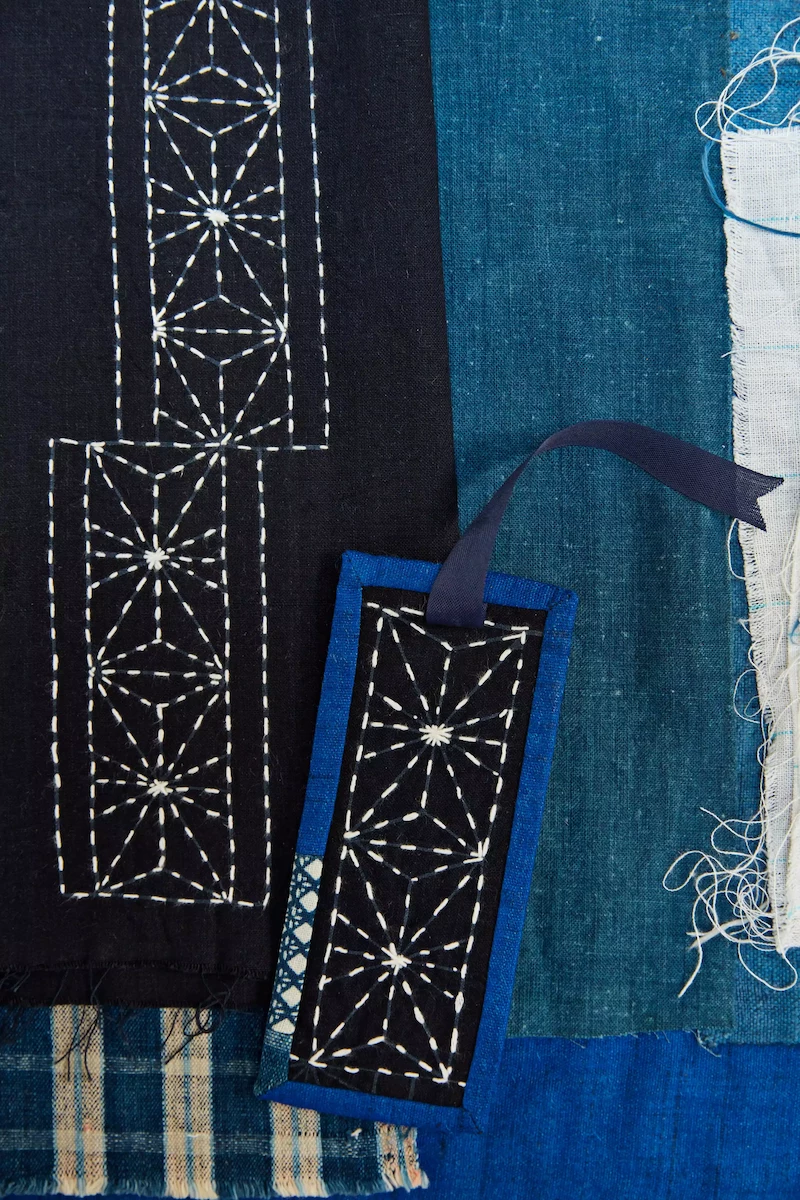
Embrace the Japanese art of Sashiko for a repair that’s both beautiful and strong. This traditional technique uses simple running stitches to create stunning geometric patterns. It’s not about hiding the damage, but celebrating it.
- Start with a strong, contrasting thread (classic white on indigo is traditional).
- Use a long Sashiko needle for even stitching.
- The goal is reinforcement through pattern, making the mended area a focal point.
- Prevents the dreaded “phone corner” blowout.
- Adds a hidden pop of personality every time you use them.
- Makes your pockets stronger than they were originally.
The secret? Reinforcing your back pockets from the inside. Before a hole even starts, iron a sturdy, lightweight cotton patch (an old shirt or bandana works perfectly) to the inside of your pocket bags.
One of the most common repair mistakes is using a patch fabric that’s too light for the job. Placing a thin cotton patch on heavy 14oz denim is a recipe for failure; the patch will shred and tear away from the stitches under stress. Always aim to match the weight and weave of your patch fabric to the denim itself for a repair that moves and wears in harmony with your jeans.
A well-executed darning repair, where threads are woven back and forth to essentially recreate the fabric, can be stronger than the original denim surrounding it.
This is because you’re not just covering a hole; you are building a new, dense matrix of thread that distributes stress over a wider area. When done correctly with a sewing machine, this technique is the ultimate solution for high-friction zones like the inner thighs, ensuring the fix outlasts the rest of the garment.
Protect your work: Once your repair is complete, change how you wash your jeans. Turn them inside out, use a gentle, cold water cycle, and always air dry them. The high heat and tumbling of a dryer can shrink the cotton fibers around your polyester repair threads, causing puckering and putting unnecessary stress on your new stitches.


