The Real Deal on Skirting Boards: Your Guide to a Flawless Finish
I’ve spent more years than I can count fitting skirting boards—or baseboards, depending on where you’re from. I’ve worked on everything from sleek, modern apartments to rambling old houses with walls that aren’t straight in any dimension. And let me tell you, the difference between a job that looks stunning and one that’s just… off? It all comes down to a few key secrets. It’s not just a plank of wood you nail to the wall; it’s the frame for your entire room.
In this article
- First Things First: How to Measure Your Room
- Choosing Your Weapon: A Breakdown of Materials
- Looks Matter: Picking a Profile
- The Pro’s Playbook: Getting That Flawless Finish
- The Art of the Cut: Perfect Corners Every Time
- Been There, Done That: Common Goof-Ups
- Safety First (And I Mean It)
- Inspirational Gallery
Most people get bogged down in paint colors, but they miss the fundamentals that make for a pro finish. So, think of this as the advice I’d give a friend over a cup of coffee. We’re going to cover the what, the why, and the how, from picking the right material to the final, satisfying bead of caulk.
First Things First: How to Measure Your Room
Before you even think about materials, you need to know how much to buy. This is where so many first-timers trip up. It’s simple, I promise.
Grab a tape measure and measure the length of every single wall in the room where the skirting will go. Add all those numbers together to get your total length. Now, here’s the most important part: add 10-15% to that total. Why? Because of cuts, waste, and that inevitable moment you cut a piece just a little too short (we’ve all been there). This extra bit is your safety net, and trust me, you’ll be glad you have it. Running back to the store mid-project is no fun.
Choosing Your Weapon: A Breakdown of Materials
Okay, with your measurements in hand, let’s talk materials. This choice affects your budget, the final look, and how easy (or frustrating) the job will be. There’s no single “best” option, only what’s best for your specific room and skill level.
MDF: The Reliable Workhorse
MDF, or Medium-Density Fibreboard, is an engineered wood product. The pros love it for one main reason: it’s incredibly stable. It has no wood grain, so it doesn’t warp or twist with temperature changes like real wood can. That means your joints stay tight and crisp. Its surface is perfectly smooth, making it an absolute dream for a painted finish—no knots to seal, no imperfections to fill.
- Budget Corner: Primed MDF is usually the most budget-friendly option, running somewhere between $2 to $4 per meter (or about $0.60 to $1.20 per foot).
- Heads up! Standard MDF will swell up like a sponge if it gets wet. For kitchens, bathrooms, or laundry rooms, you MUST use Moisture-Resistant (MR) MDF. It’s often tinted green and contains resins that repel water. I once had to rip out a whole bathroom of standard MDF a client supplied themselves because a tiny leak destroyed it. Lesson learned.
- The Downside: Cutting MDF creates a super fine dust that you do not want to breathe. Seriously. Always wear a good quality mask (FFP3-rated is the standard for a reason) and work in a well-ventilated area or with dust extraction.
Softwood (like Pine): The Traditional Choice
When people think of skirting, they often picture pine. It’s real wood, it’s relatively lightweight, and it’s easy to cut. It’s got a natural character that many people love.
- Budget Corner: Pine is a solid mid-range choice. Expect to pay around $5 to $8 per meter ($1.50 to $2.40 per foot), depending on the profile and quality.
- Critical Step: Pine has knots. Before you even think about painting, you have to seal every single knot with a knotting solution. It’s a shellac-based sealer that stops the natural resin from bleeding through your paint and creating ugly yellow stains months later. Two or three coats, no excuses!
- Watch Out For: It’s called softwood for a reason—it dents pretty easily. A stray knock from the vacuum cleaner can leave a mark. It’s great for bedrooms, but in a high-traffic hallway, you might want something tougher.
Hardwood (like Oak): The Premium Finish
Ah, hardwood. This is the top-tier stuff. You choose hardwood for its incredible durability and natural beauty. You don’t paint oak; you celebrate it with an oil or clear lacquer finish. It has a satisfying heft and is incredibly resistant to dings and scrapes, making it perfect for busy homes.

- Budget Corner: This is an investment. Oak skirting can easily start at $15+ per meter ($4.50+ per foot) and go up from there. The price reflects its quality and longevity.
- The Challenge: Its density makes it tough to work with. You’ll need sharp, high-quality saw blades. A dull blade will just burn the wood and give you a sloppy cut. Mistakes are also expensive, so measure three times, cut once!
Plastic & Polymer: The Niche Player
Modern plastic-based skirtings are also on the market. Their biggest selling point is that they’re 100% waterproof, making them a potential fit for commercial kitchens or wet rooms. To be frank, I rarely use them in homes. They can feel a bit brittle and look cheap, and getting a seamless finish on the joints is tricky. In most cases, a properly painted MR MDF gives a much better result.
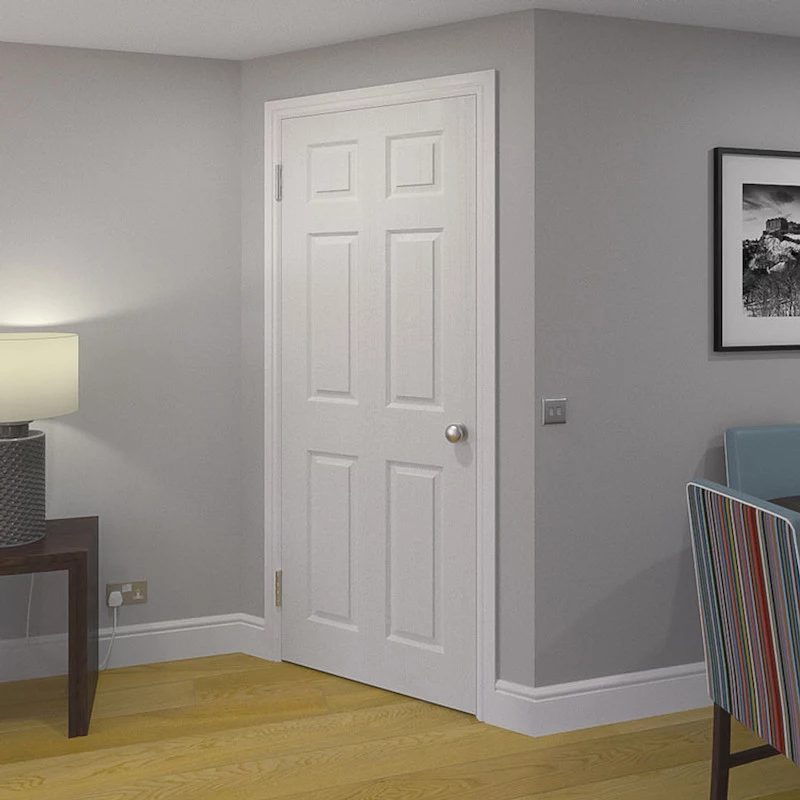
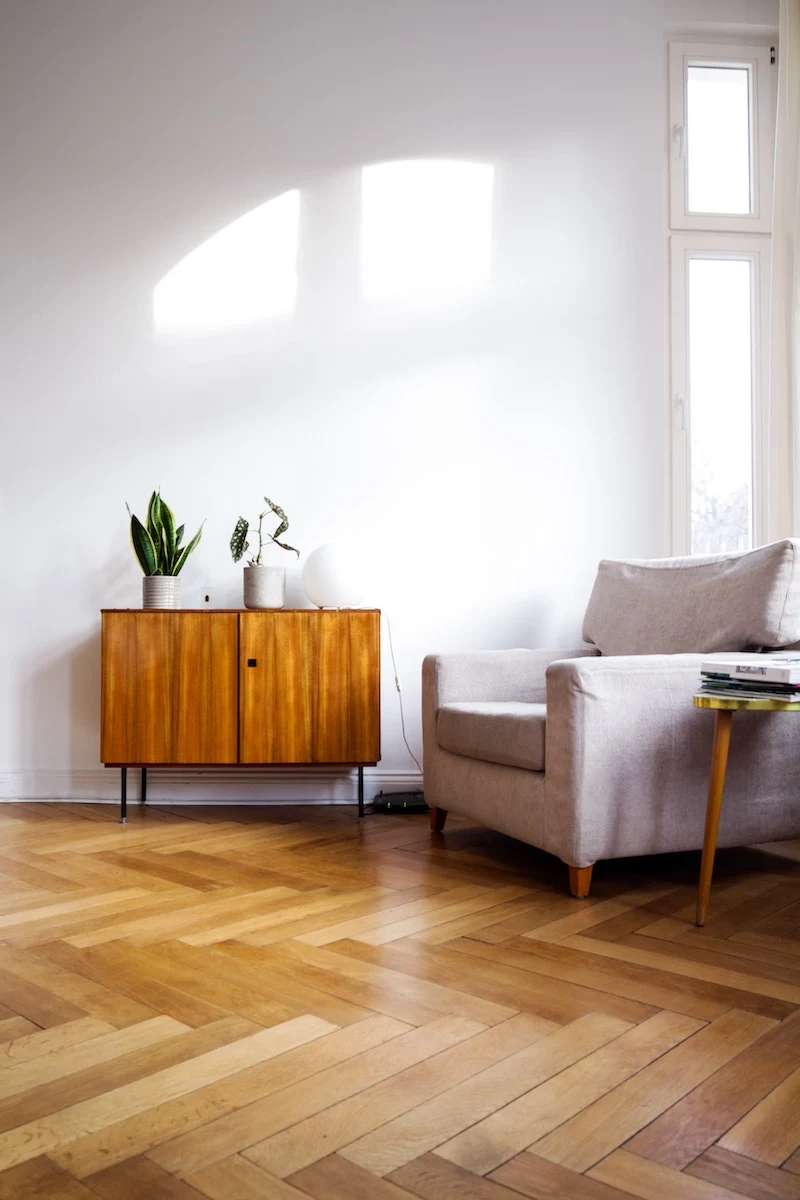
Looks Matter: Picking a Profile
The profile is the decorative shape on top of the board. The height and style you choose can really change the feel of a room.
- Torus or Ogee: These classic, curved profiles are perfect for traditional homes. The extra detail is also great at hiding slight imperfections in scribed joints.
- Chamfered or Pencil Round: A simple angled or rounded top. It’s a clean, versatile look that works almost anywhere.
- Square Edge: Just a flat, crisp board. It’s a very minimalist, modern look but also the most unforgiving. It demands perfectly flat walls and floors, as any gap will stick out like a sore thumb.
A quick rule of thumb on height: Taller skirtings (around 150mm or 6 inches) look great with high ceilings. For more modern rooms with lower ceilings, a shorter board (around 100mm or 4 inches) often feels more balanced.
The Pro’s Playbook: Getting That Flawless Finish
This is where the magic happens. The difference is all in the prep and the technique.
My Biggest Time-Saving Tip: Paint FIRST!
Here’s a trick that separates the pros from the novices. Do most of your painting before you cut a single board. Lay all your lengths out on sawhorses. Prime them (use a specific MDF primer for MDF), then apply your first topcoat with a small roller. It’s a million times faster than cutting-in on your hands and knees later. After installation, all you need to do is fill the nail holes and joints, sand them, and apply one final, perfect topcoat. Game changer.
Oh, and don’t forget to let your wood acclimatize! Especially for softwood and hardwood, let the boards lie flat in the room they’ll be installed in for 2-3 days. This lets them adjust to the humidity and prevents gaps from opening up at the joints later.
Your First-Timer’s Shopping List
Feeling overwhelmed? Here’s what you’ll likely need for one room:
- Your skirting boards (with that 10-15% extra!)
- A tape measure and pencil
- A saw. A powered mitre saw is fastest, but a $20 manual mitre box and a sharp handsaw are totally fine for a room or two. It just takes more patience.
- A coping saw (this is non-negotiable for good internal corners)
- A caulk gun
- Grab adhesive (a reliable brand like Liquid Nails or No More Nails)
- Fixings: A nail gun is a luxury. A hammer, some panel pins, and a nail punch work just as well. For brick walls, you’ll need a drill, wall plugs, and screws.
- Decorator’s caulk (like DAP Alex Plus) for the top gap
- Wood filler for nail holes
- Sandpaper (a medium 120 grit and a fine 240 grit)
The Art of the Cut: Perfect Corners Every Time
Ready for the most important technique? Forget what you think you know about corners.
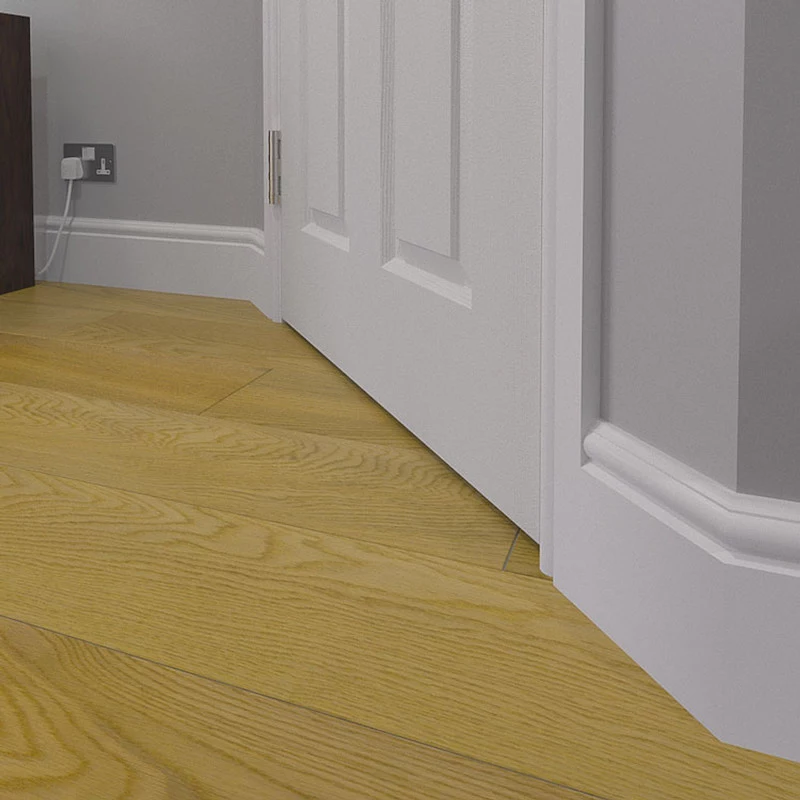
Internal Corners: The Secret of the Scribe
Amateurs cut both pieces at a 45-degree angle. This only works if your corner is a perfect 90 degrees, which it almost never is. The result is a gap. A pro uses a scribed joint.
- Cut your first piece with a straight, 90-degree end and butt it right into the corner.
- Take your second piece and cut a 45-degree internal mitre on it. This cut reveals the exact profile of the board.
- Now, with your coping saw, carefully cut along that exposed profile line, angling the blade back slightly. You’re basically carving the shape of the first board into the end of the second.
- This newly shaped piece will now slot perfectly over the first board, creating a tight joint even if the wall is wonky.
Your turn: Grab two offcuts and try it. Your first one will probably look terrible. Mine did! It’s a skill you develop by feel, but once you nail it, you’ll never go back.
External Corners & Long Walls
External corners are the easy ones—these are simple 45-degree mitre joints. Add a dab of wood glue before you pin them for a rock-solid corner. If a wall is longer than your boards, join two pieces with a 45-degree scarf joint. It’s just two opposing 45-degree cuts that overlap, creating a diagonal join that’s much stronger and less visible than a straight butt joint.
Been There, Done That: Common Goof-Ups
Everyone makes mistakes. It’s how you handle them that counts.
What if you cut a piece too short? First, don’t panic! Don’t throw it away. That piece is now the perfect starter for your next wall, or for that small section you need above a doorway. Waste not, want not.
What if the floor is uneven? If you have a big gap under the board, you can scribe it to the floor. Set a small block of wood or a compass to the height of the largest gap, and run it along the floor, tracing a line onto the skirting. Cut along that line with a jigsaw, and it will follow the floor’s contour perfectly.
Safety First (And I Mean It)
Let’s be serious for a second. Your safety is more important than a perfect corner.
- Dust: I’ll say it again. MDF dust is nasty stuff. Wear a proper mask.
- Hidden Dangers: Before you drill or nail into a wall, use a stud/pipe/cable detector. Hitting a water pipe is a very bad, very wet day. Hitting a live wire can be fatal. If you do hit a pipe, the very first thing you do is run and turn off your water at the mains stopcock!
- Know Your Limits: Fitting skirting is a learnable skill. But if you’re feeling out of your depth, there’s no shame in calling a pro. Sometimes, it’s the cheapest option in the long run when you factor in time, tools, and wasted materials.
Ultimately, taking your time and using the right techniques is what it’s all about. A well-fitted skirting board is a sign of true craftsmanship, and it’s a finishing touch that brings a quiet satisfaction every time you walk into the room.
Inspirational Gallery
The eternal DIY question: should I paint the walls before or after fitting the skirting boards?
The professional consensus is clear: paint your walls first! It’s far easier to protect new skirting with a strip of masking tape than to meticulously ‘cut in’ a perfectly straight line along its top edge later. Fit the boards, fill nail holes, caulk the gaps, and then do your final touch-up painting on the skirting itself. This order of operations saves time and guarantees a razor-sharp finish.
For a truly contemporary and minimalist aesthetic, consider the ‘shadow gap’ detail. Instead of a board sitting on the floor, the plasterboard is held slightly up from the floor, and a recessed, painted channel is created in its place. This gives the striking illusion that the wall is floating. It’s a high-impact architectural choice that completely rethinks the role of traditional skirting.
Historically, skirting boards weren’t just decorative. Known as ‘mopboards’ in the 18th century, their primary function was to protect delicate plaster walls from the scuffs and water damage caused by cumbersome floor cleaning methods.
The height of your skirting board can dramatically alter the perception of a room. It’s all about proportion.
- For standard ceilings (around 2.4m), a height of 90-120mm offers a classic, balanced look. Profiles like ‘Torus’ or ‘Ogee’ are popular choices here.
- In period properties with high ceilings (3m+), don’t be afraid to go for taller, more commanding profiles of 150mm or even 200mm to match the grander scale.
Mitre Saw: An electric mitre saw is a game-changer for speed and precision, especially for larger projects or rooms with non-standard angles. An entry-level model from a brand like Bosch or Metabo makes every cut perfect.
Hand Saw & Mitre Box: This manual option is budget-friendly and fine for a single, simple room. It requires more patience and a steady hand to get clean 45-degree angles, but it’s a classic for a reason.
If you plan on more home projects, investing in an electric saw pays for itself in time and frustration saved.
- It creates a seamless, professional join.
- It eliminates ugly gaps against uneven walls.
- It is the mark of true craftsmanship.
The secret? Learning to scribe. Instead of a simple mitre cut for internal corners, scribing involves tracing the profile of one board onto the end of another and cutting along that line. It creates a perfect puzzle-piece fit, a technique worth mastering for any older home.
Don’t underestimate the power of adhesive: While nails or screws provide the initial hold, a strong grab adhesive like Loctite’s No More Nails is what truly secures the skirting to the wall. Applied in a zigzag pattern, it prevents squeaks, reduces movement over time, and helps pull the board tight against any minor undulations in the plaster for a solid, lasting fit.
- To hide pesky cables, look for specialised skirting profiles with a rebate (a pre-cut channel) on the back.
- Alternatively, you can create your own channel in standard skirting using a router before installation.
- For a simple retro-fit, plastic trunking that mimics the look of a skirting board, like D-Line’s decorative trunking, can be added to the base of existing boards.
A 2021 survey by the Home Staging Association UK & Ireland found that well-executed finishing touches can increase a property’s value by up to 10%.
This is where details like perfectly fitted skirting boards make a difference. They signal quality and care to potential buyers, creating a subconscious feeling of a well-maintained home. Gappy, poorly cut skirting does the exact opposite, suggesting other, bigger corners were cut too.
The final, magical touch is a thin bead of flexible decorator’s caulk (not silicone!) along the top edge where the skirting meets the wall. It seals any tiny gaps, provides a perfectly smooth surface for painting, and crucially, allows for minor seasonal movement without cracking, ensuring your perfect line stays perfect.


