My Unfiltered Guide to a Modern Farmhouse Kitchen That Actually Lasts
I’ve built a ton of kitchens over the years, and let me tell you, the modern farmhouse look has some serious staying power. It’s not just a passing trend. I think it’s because it feels genuine—it’s that perfect mix of cozy, traditional warmth and clean, modern living. You see the stunning photos online and instantly want that vibe.
In this article
- First Things First: My Builder’s Cheat Sheet
- The Order of Operations: Don’t Do Things Backwards!
- The Foundation: Layout and Floor Support
- Cabinetry: The Soul of the Kitchen
- Countertops: Your Main Work Surface
- Walls and Backsplashes: Adding Texture
- Flooring: The Foundation You Walk On
- The Sink: A Hardworking Centerpiece
- Finishing Touches: Lighting & Shelving
- The Unseen Hero: Ventilation
- The Builder’s Shopping List
- Inspirational Gallery
But here’s the thing: a beautiful kitchen is more than just a pretty picture. It’s about smart planning and solid materials that work in the real world. Getting it right is a balancing act. It’s not about just slapping up some shiplap and calling it a day. So, I’m going to walk you through how to build a farmhouse kitchen from a builder’s point of view—the stuff that makes it not only look good but feel right and stand the test of time.
First Things First: My Builder’s Cheat Sheet
Before we dive in, here are the non-negotiable rules I live by on every single kitchen job. Pin this to your fridge.
- Plan the Workflow, Not Just the Look. The distance between your sink, fridge, and stove (your work triangle) should be between 13 and 26 feet total. Any more and you’re running a 5k just to make spaghetti.
- Respect Your Clearances. You need at least 42 inches of walkway space, and 48 inches if two people will be cooking together. Don’t choke your kitchen with an island that’s too big for the room!
- Ventilation Isn’t Optional. A real range hood that vents outside is essential. A microwave fan doesn’t count. Seriously. Your walls and lungs will thank you.
- Account for Wood’s Nature. Wood floors and butcher block counters will expand and shrink. If you don’t plan for this movement, you’re asking for buckled floors and cracked countertops.
- Know When to DIY and When to Hire. Painting? Go for it. Moving a gas line or messing with a structural beam? Stop. Immediately. Call a professional.

The Order of Operations: Don’t Do Things Backwards!
One of the most common and costly mistakes is doing things in the wrong sequence. Here’s the general order we follow on a full gut renovation. Sticking to this will save you a world of headaches.
- Planning & Design: Finalize your layout before anyone swings a hammer. This is when you hire designers or architects if you need them.
- Demolition: Tear out the old stuff. (DIY-friendly, but be sure you know what’s in the walls before you start smashing.)
- Structural Changes: This is when you move walls, add beams, or beef up floor joists. PRO-ONLY ZONE.
- Rough-in Plumbing & Electrical: Running new pipes and wires in the open walls. Again, hire licensed pros for this. It’s a safety and code issue.
- Insulation & Drywall: Close up the walls. Hanging drywall is DIY-able, but getting a smooth finish is an art form. Taping and mudding is harder than it looks.
- Flooring: Install your flooring. Some pros prefer to do this after cabinets, but putting it in first means you don’t have to make tricky cuts around cabinet feet.
- Cabinet Installation: The kitchen starts to take shape! This can be a DIY job if you’re meticulous, but getting everything perfectly level and secured is crucial.
- Countertop Templating & Installation: The pros will come to make a precise template after your base cabinets are in. Installation is almost always handled by the fabricator.
- Backsplash Installation: Tiling a backsplash is a great weekend DIY project that can save you a few hundred bucks in labor.
- Appliance Installation: Hooking up the fridge, dishwasher, and range. A plumber and electrician might be needed here, especially for gas ranges and water lines.
- Final Finishes: Install the sink, faucet, lighting, hardware, and paint. These are mostly DIY-friendly tasks.
The Foundation: Layout and Floor Support
Before you even think about finishes, get the layout right. An open-plan kitchen needs to flow. The work triangle I mentioned is a great starting point, but in bigger kitchens with islands, think more in terms of “work zones”—a prep zone, a cooking zone, and a cleaning zone.
Oh yeah, and about that huge island you’ve been dreaming of? A heavy stone countertop puts a massive load on the floor. If you’re on a wood-framed floor, you might need to add support. By the way, “adding blocking” just means installing short, solid wood pieces between the floor joists directly under where the island will sit. This spreads the weight and prevents the floor from sagging. If you’re unsure, paying a structural engineer $400-$800 for a consultation is the best money you’ll ever spend.
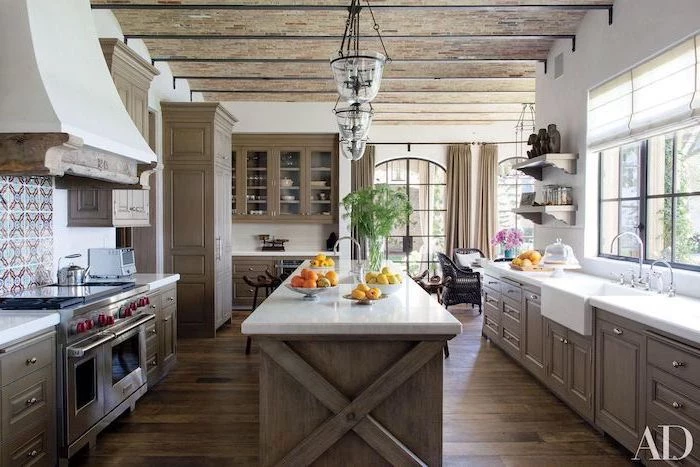
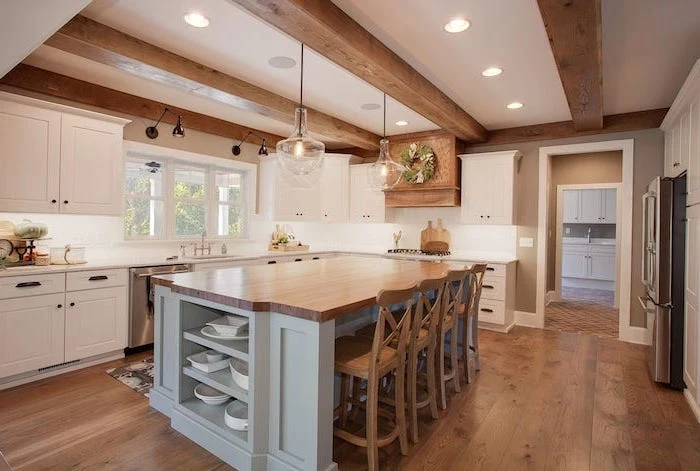
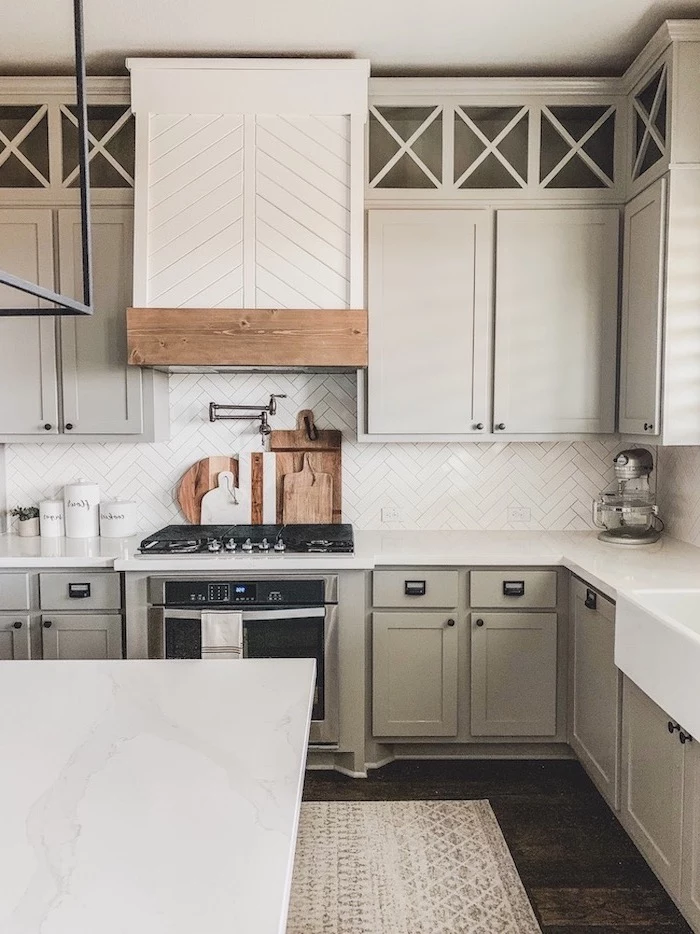
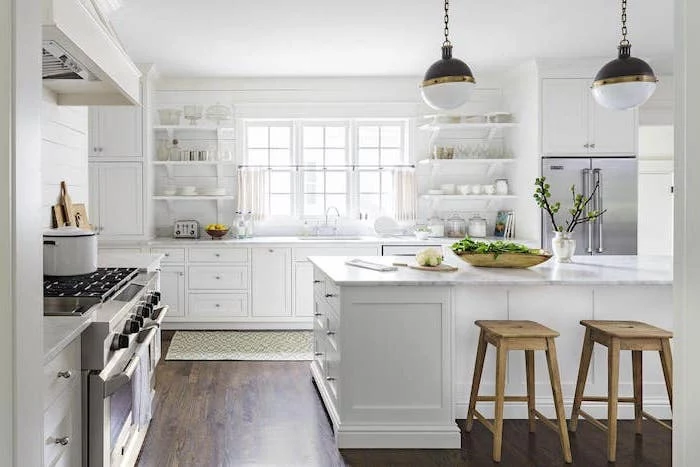
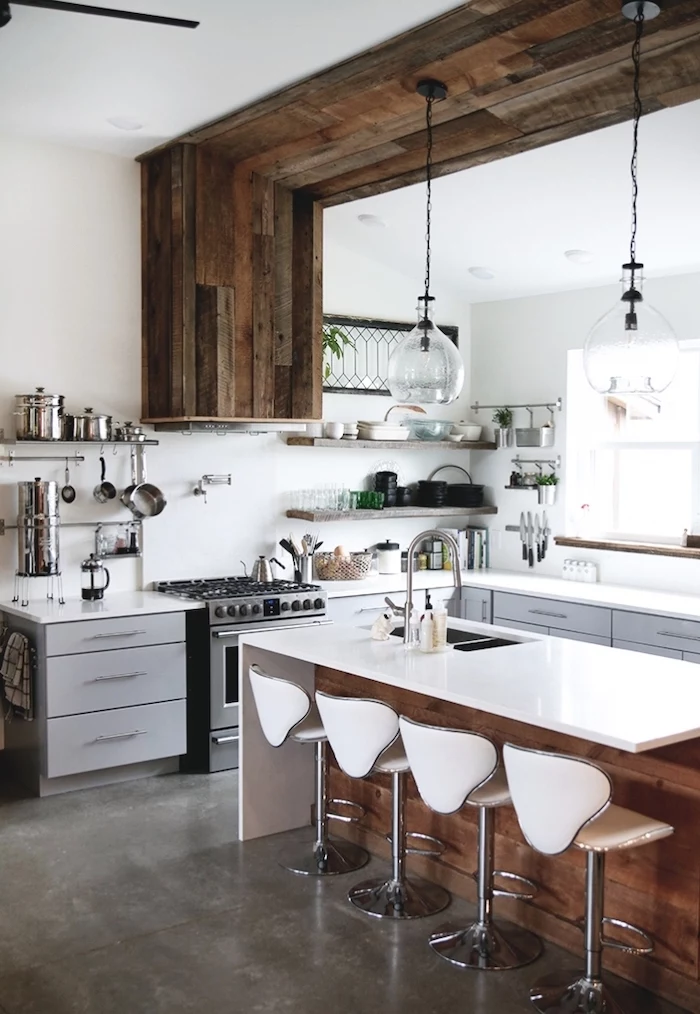
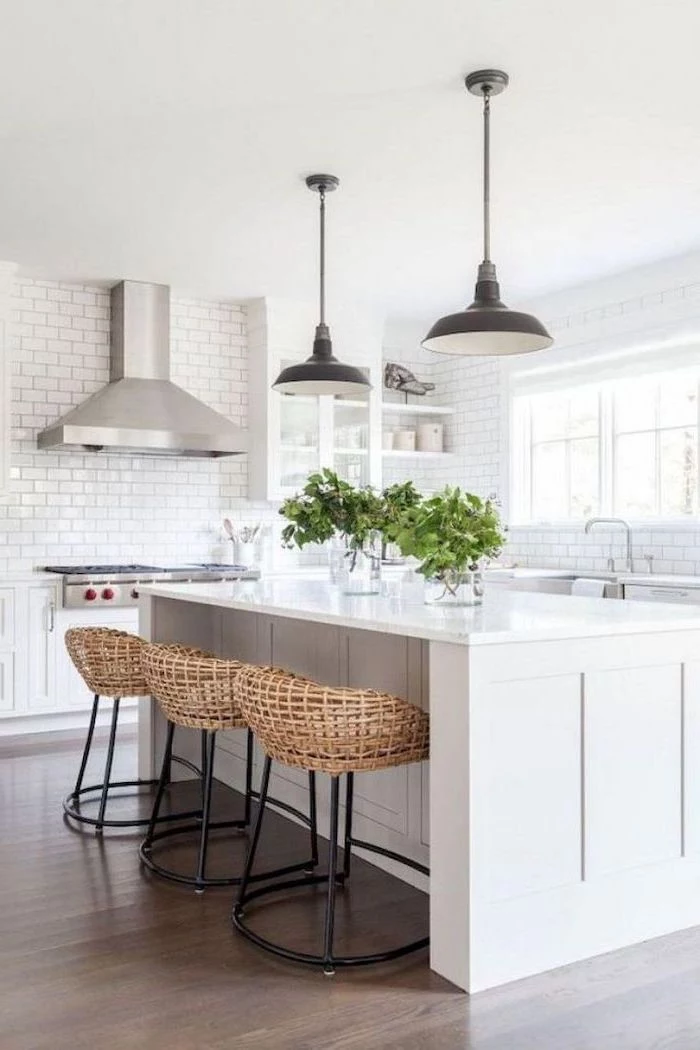
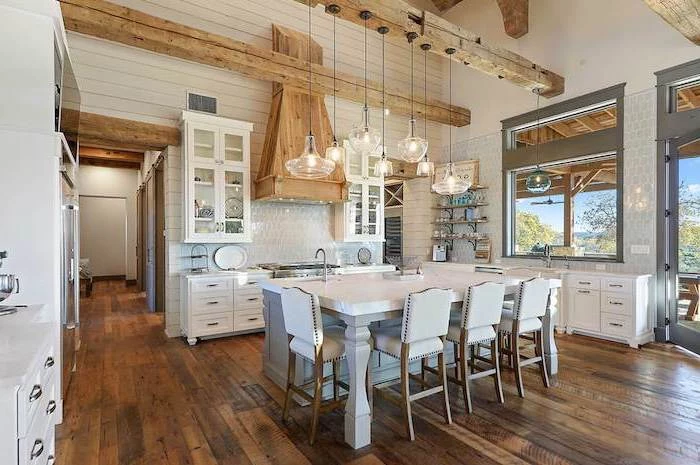
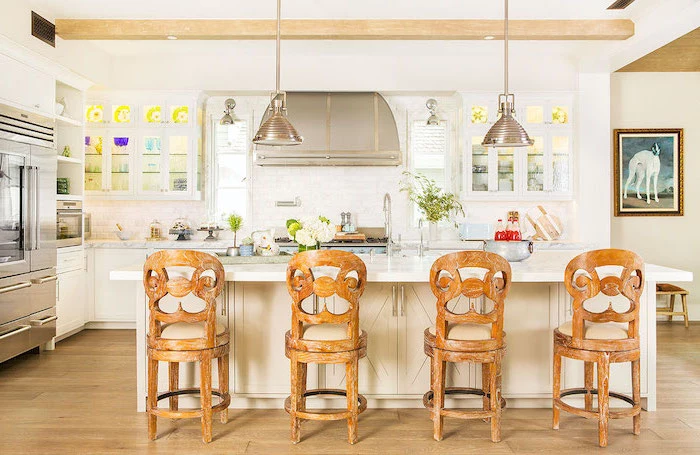
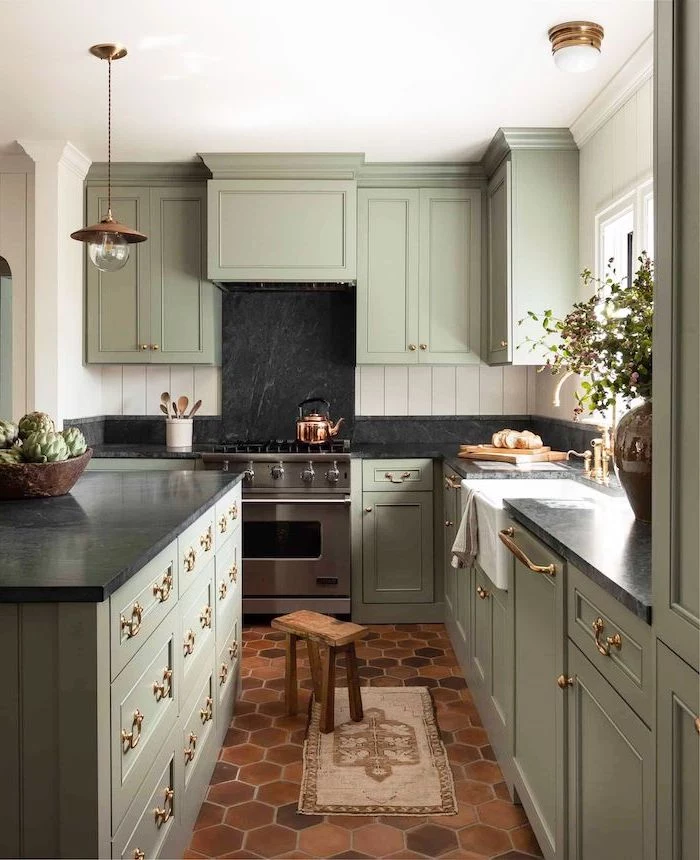
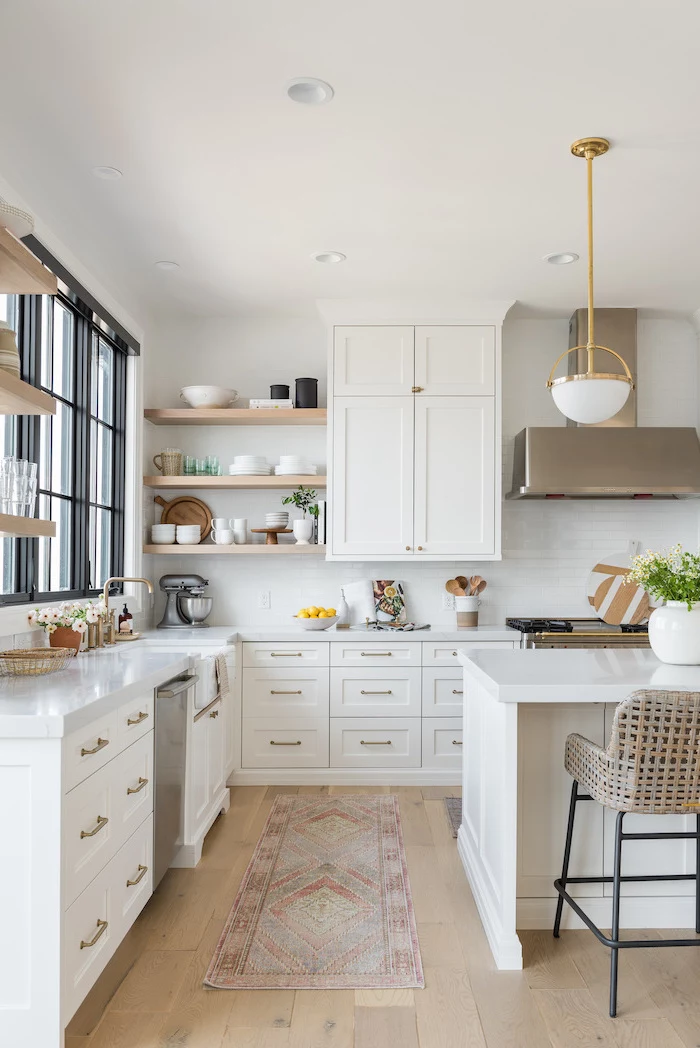
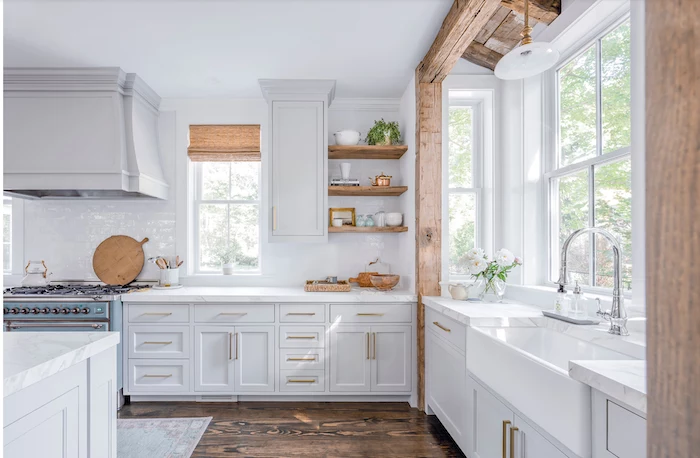
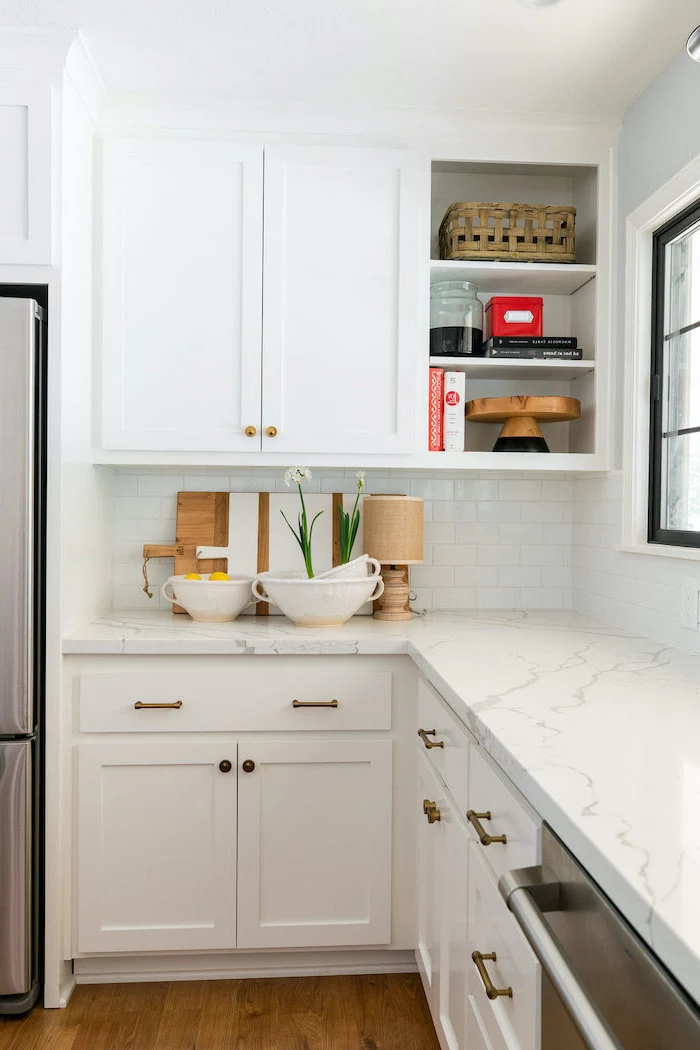
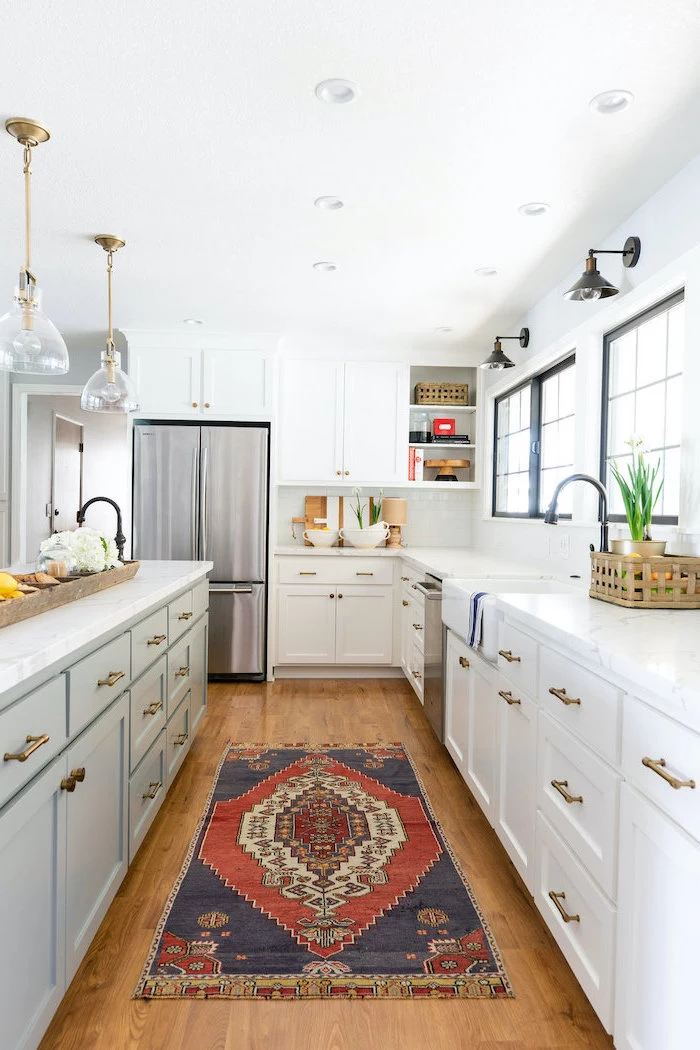
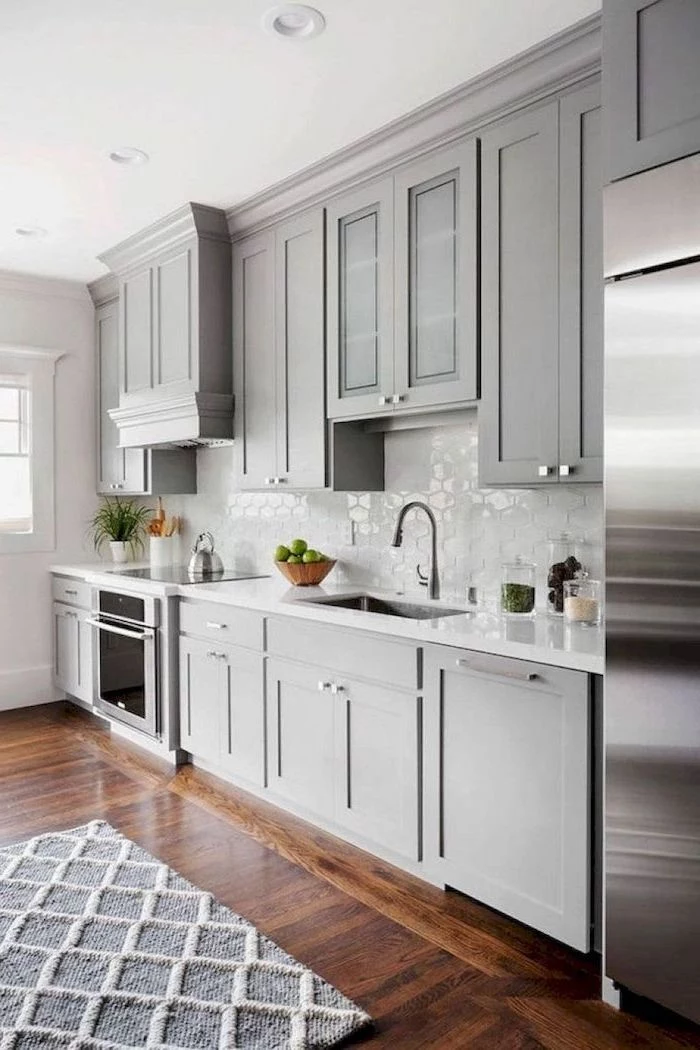
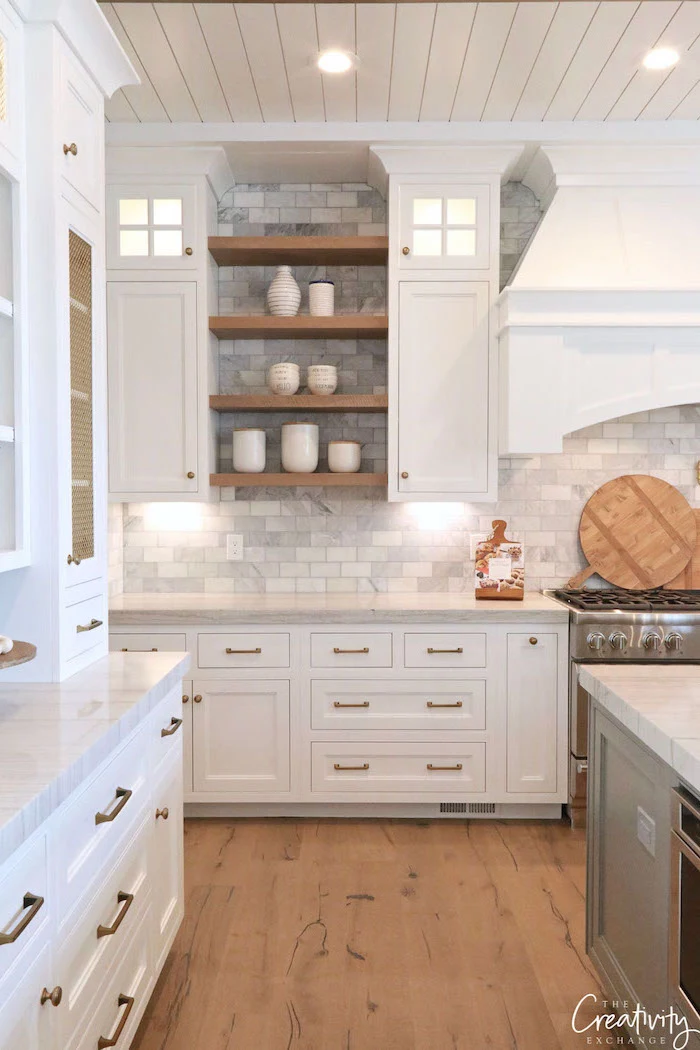
Cabinetry: The Soul of the Kitchen
Cabinets are the biggest visual element, and Shaker-style doors are the go-to for a reason. Their simple, clean design is absolutely timeless. You’ll have a choice between inset doors (which sit flush inside the frame for a classic, furniture look) and full overlay doors (which cover the frame for a more modern, seamless look). Inset is gorgeous but more expensive and can sometimes stick in humid weather. Full overlay is more common and budget-friendly.
Now for a pro secret. For painted cabinets, I often recommend MDF center panels instead of solid wood. I know, it sounds cheap, but hear me out. Wood expands and contracts, which can cause ugly hairline cracks in the paint at the joints. High-quality MDF is stable—it doesn’t move. Your paint finish will stay flawless for years. For stained cabinets, of course, you’ll want solid wood to see that beautiful grain.
Heads up on budget: Cabinets are a huge part of your cost. Stock cabinets from a big box store might run you $5,000-$10,000. Semi-custom lines (think KraftMaid or Schrock) offer more options and better quality for $10,000-$25,000. Fully custom cabinets can easily be $25,000 and up. A professional spray finish is almost always worth the investment for its durability.
Countertops: Your Main Work Surface
This choice is huge for both looks and daily use. For a modern farmhouse kitchen, the big three are wood, quartz, and soapstone. Let’s break them down.
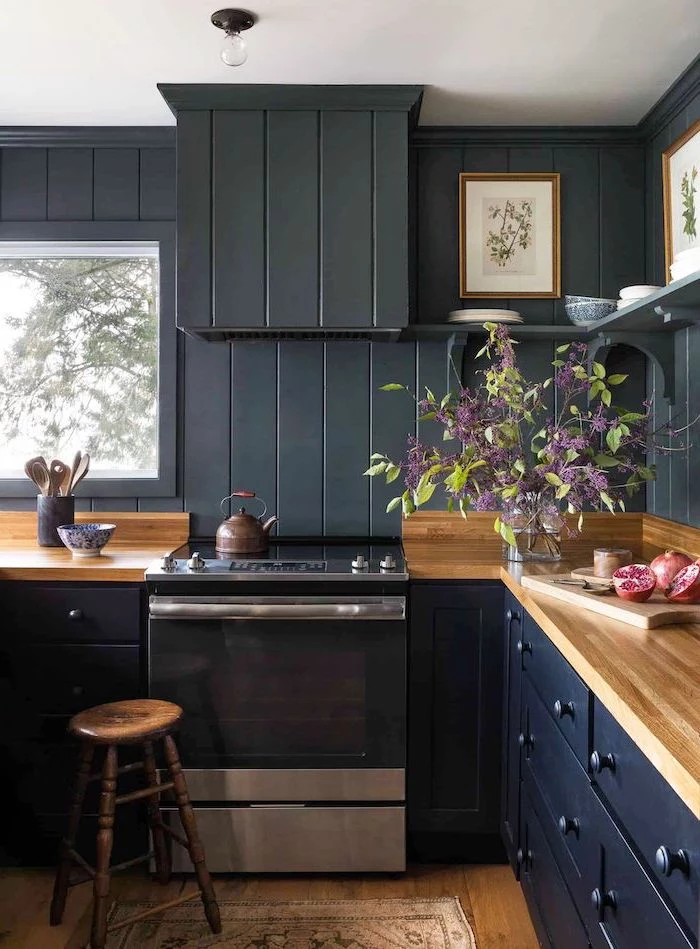
- Butcher Block (Wood): Nothing beats wood for warmth. It’s quiet and feels great to work on. The downside? It’s needy. It needs to be sealed with a food-safe oil every few months, especially around the sink, to prevent water damage and rot. A polyurethane finish is more durable but not ideal for direct food prep. Cost: $50-$100 per square foot, installed.
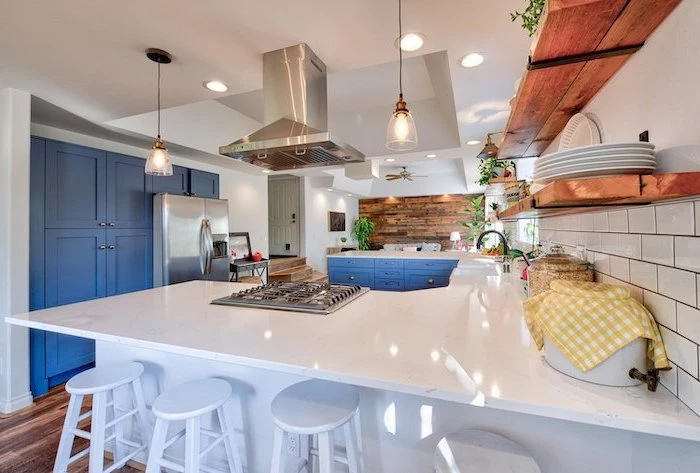
- Quartz: This is the crowd-pleaser for a reason. It’s an engineered stone that’s non-porous (so it doesn’t stain) and incredibly durable. You never have to seal it. Many brands offer fantastic imitations of marble without the high maintenance. Its only real weakness is heat—a hot pan can burn the resin and leave a permanent mark. So, always use a trivet. Cost: $70-$150 per square foot, installed.
- Soapstone: My personal favorite for an authentic, lived-in feel. It’s a natural stone with a soft, matte look that gets darker and develops a beautiful patina over time. But you have to be okay with imperfection. It’s soft, so it will scratch. The good news is that most scratches can be easily sanded out or hidden with a dab of mineral oil. Cost: $80-$180+ per square foot, installed. You’ll typically find it at local stone yards rather than big box stores.
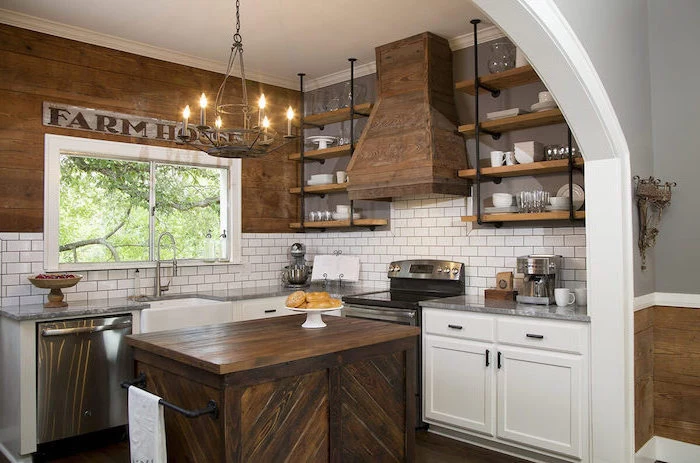
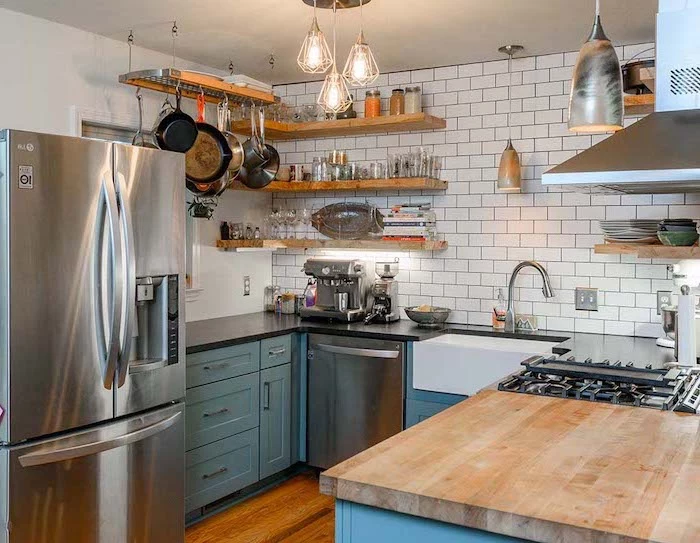
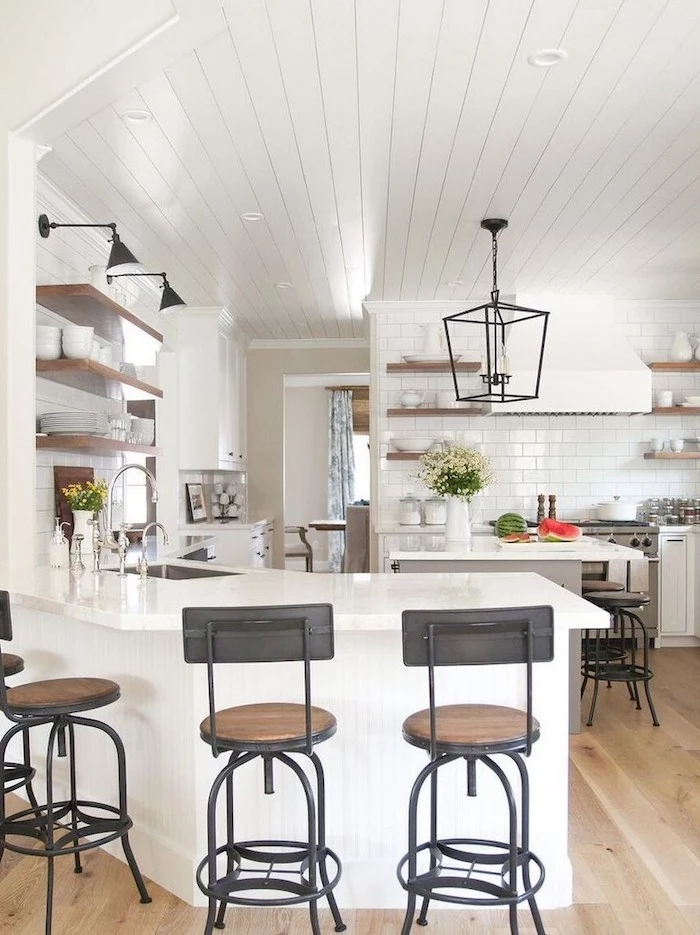
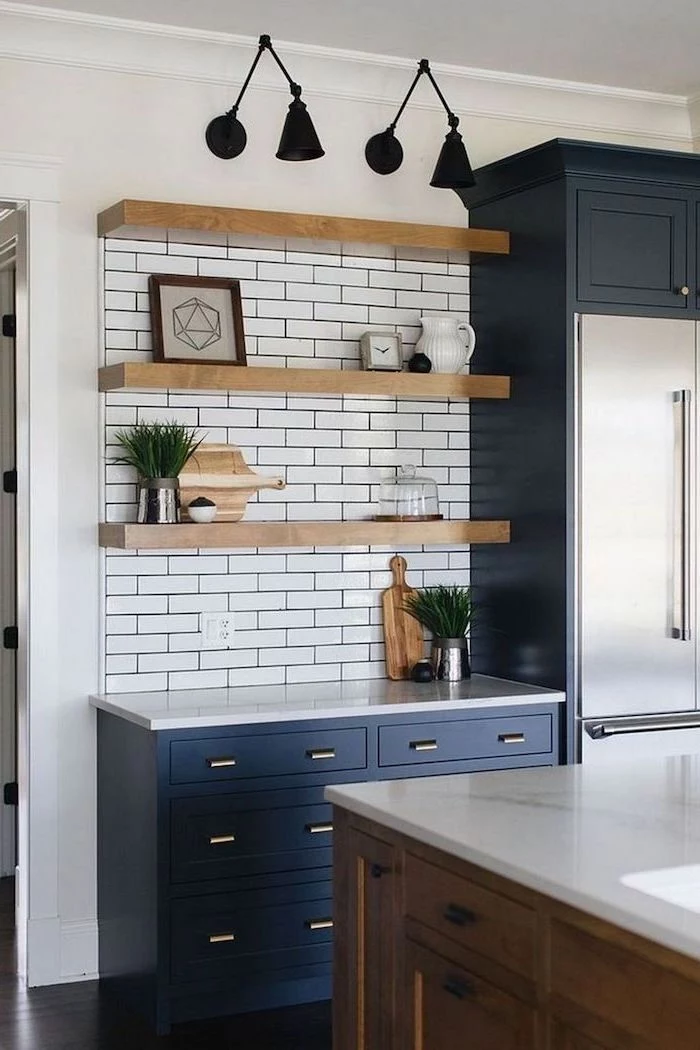
Walls and Backsplashes: Adding Texture
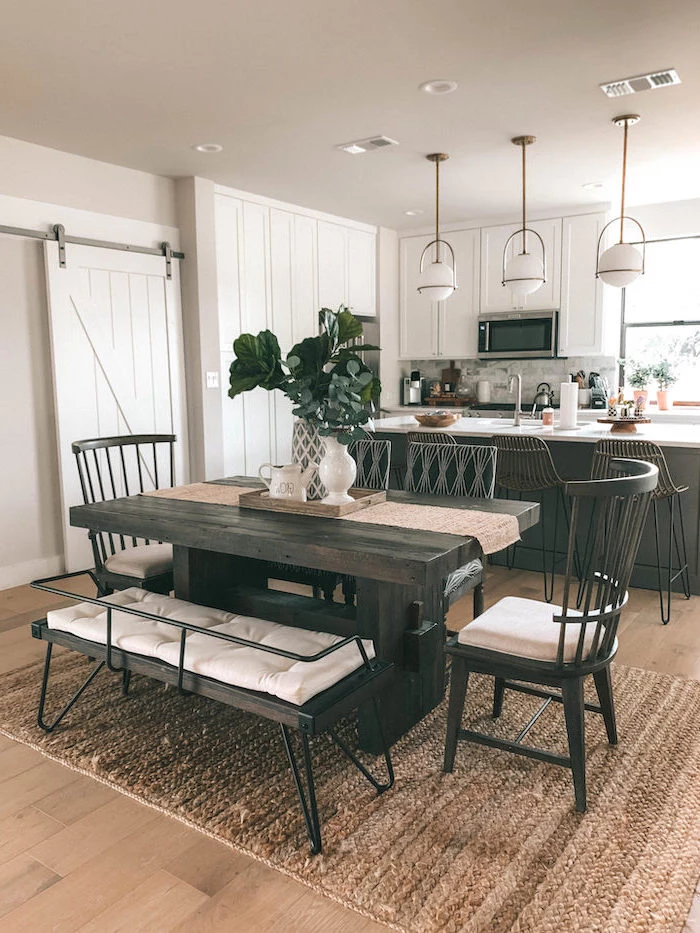
Shiplap is practically the poster child for this style. But a quick tip: what most people call shiplap is actually nickel-gap siding. Either way, always paint the boards before you install them. Trust me. Otherwise, you’ll see ugly unpainted lines when the wood shrinks in the winter. And please, don’t put wood shiplap directly behind a gas stove. It’s a cleaning nightmare and a potential fire hazard. Use tile in that area.
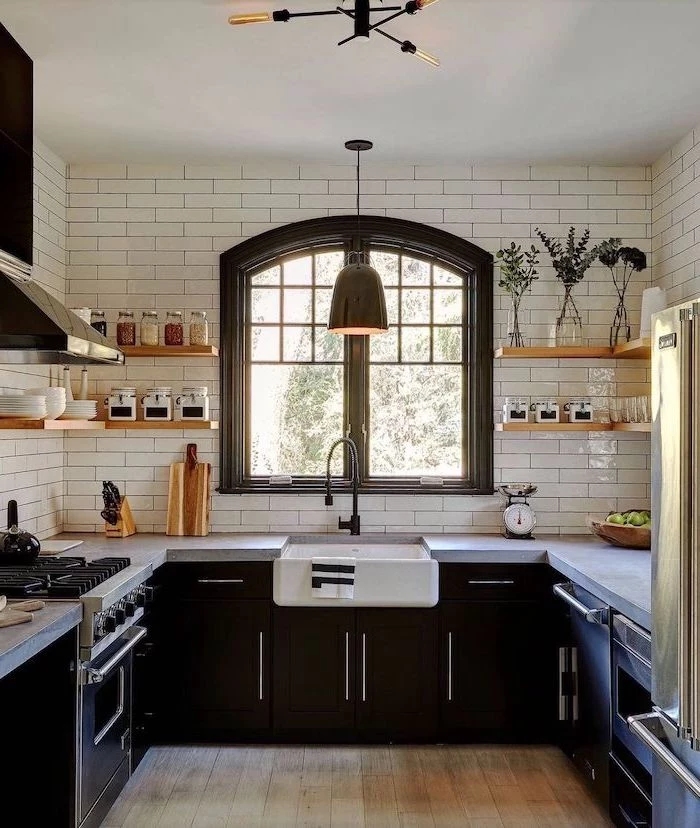
You can’t go wrong with classic 3×6 inch white subway tile. It’s affordable (often just a few bucks per square foot), timeless, and a breeze to clean. The real game-changer is the grout color. White grout looks clean and seamless, while a dark gray or black grout creates a bold, graphic look that makes the pattern pop.
Flooring: The Foundation You Walk On
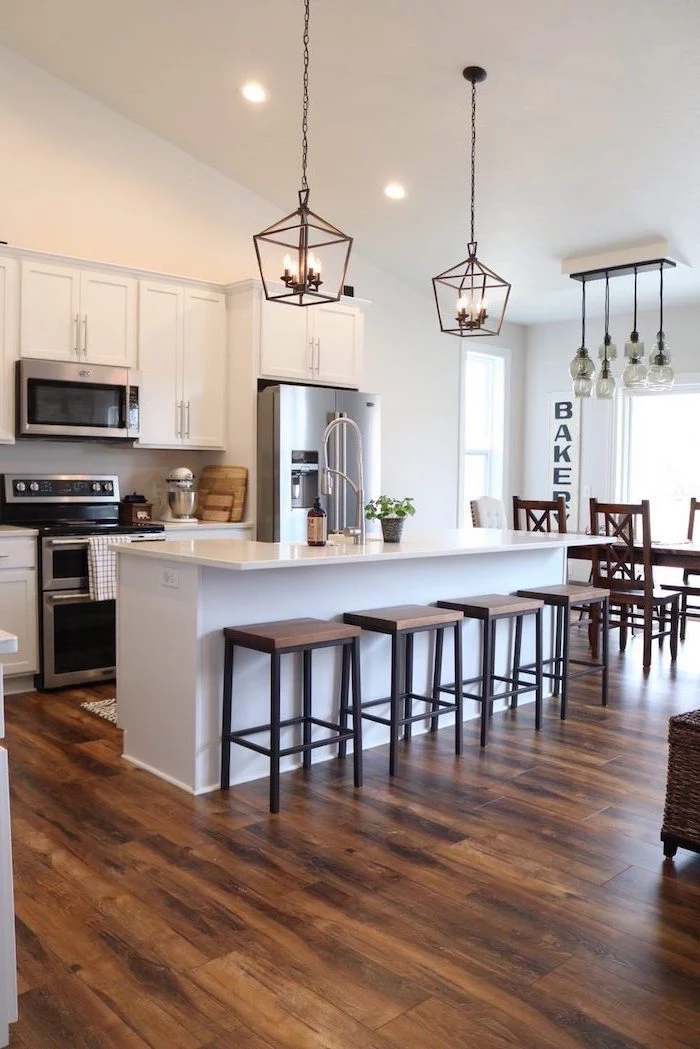
Kitchen floors need to be tough. Wide-plank hardwood is a classic choice and can be refinished for decades of life. Engineered hardwood is a bit more stable for basements or humid areas. For either, make sure you leave a small expansion gap around the edge of the room (hidden by baseboards) so the floor doesn’t buckle.

Honestly, for pure practicality, it’s hard to beat Luxury Vinyl Plank (LVP). It’s 100% waterproof, which is a massive plus in a kitchen. The new stuff looks shockingly realistic and is much softer to stand on than tile. A great option for busy families or homes with pets.
If you love a bold look, patterned cement tile is stunning, but like butcher block, it’s porous and needs regular sealing. A more practical choice is porcelain tile, which is incredibly dense and durable. Pro Tip: If you’re laying a tile floor, use an uncoupling membrane (the pros often use a product called Schluter-DITRA). It’s an orange plastic mat that goes between the subfloor and the tile, preventing cracks down the line. It’s an extra step that DIYers often skip, but it’s the secret to a floor that lasts.
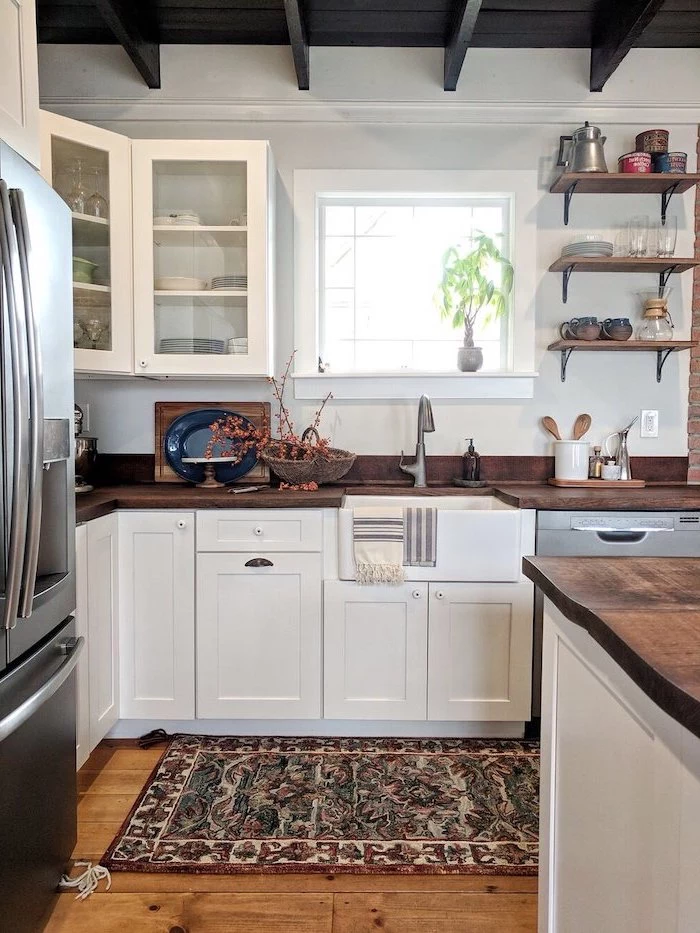
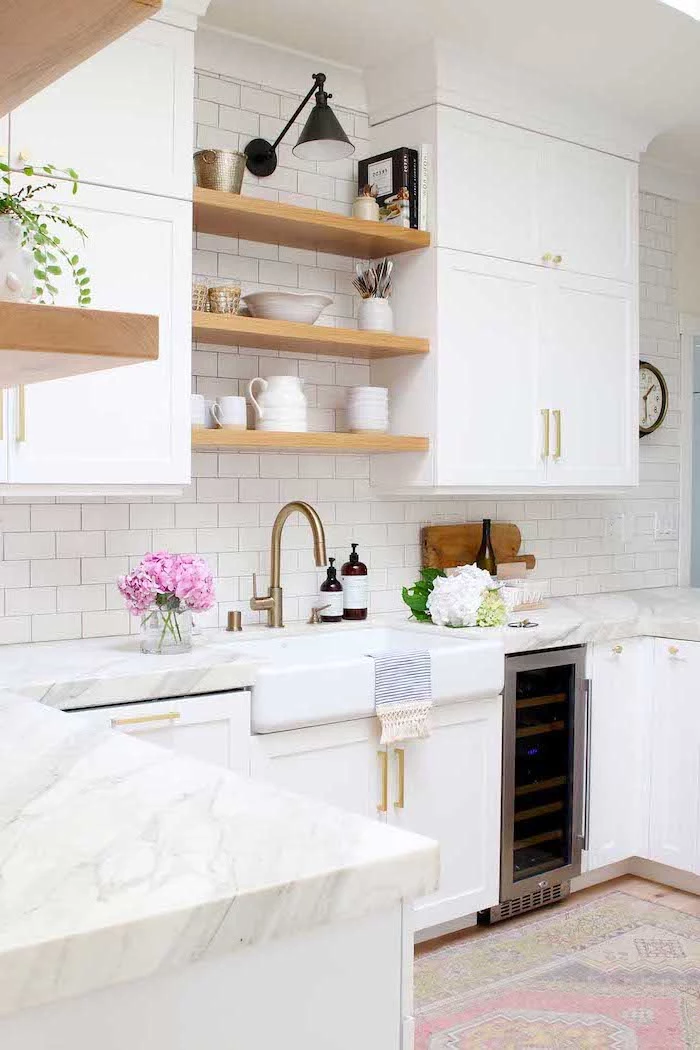
The Sink: A Hardworking Centerpiece
That big, deep apron-front or “farmhouse” sink is an icon for a reason—it’s incredibly practical. Fireclay sinks are super hard and resistant to stains, but they can chip if you drop a heavy cast iron pan. Cast iron sinks have a beautiful glossy enamel finish but are even heavier, and the enamel can also chip. Both require a reinforced base cabinet to handle the weight, which can be a few hundred pounds.
Expect to pay between $500 and $1,500 for a quality fireclay or cast iron sink. And don’t skimp on the faucet—look for solid brass construction and ceramic disc valves to prevent drips. A good faucet will set you back $250-$600 but is well worth it.
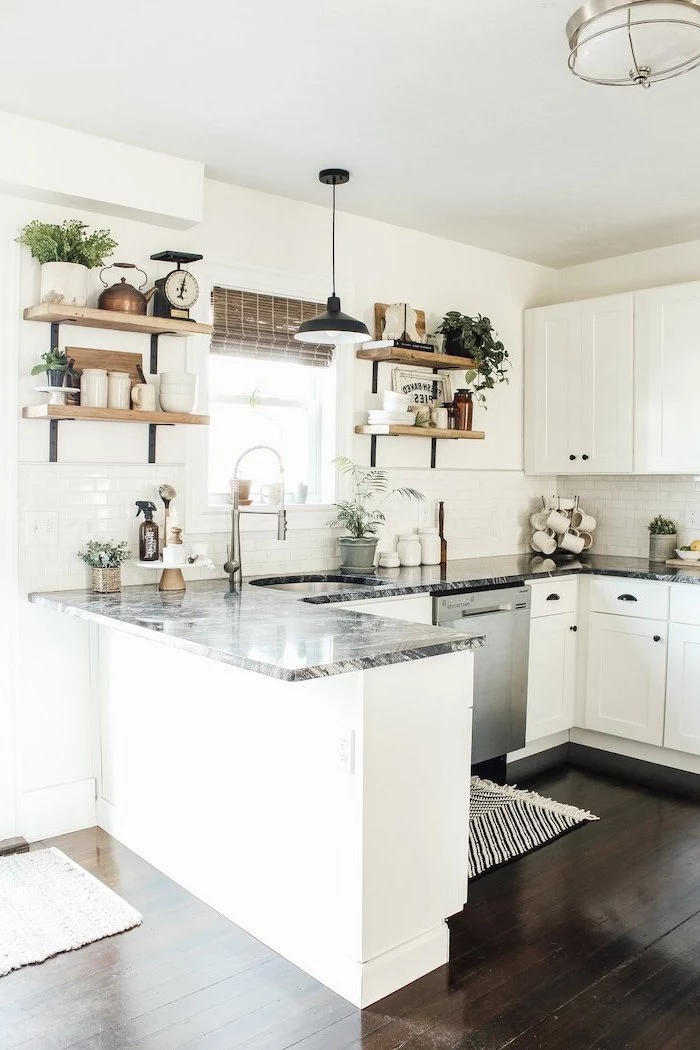
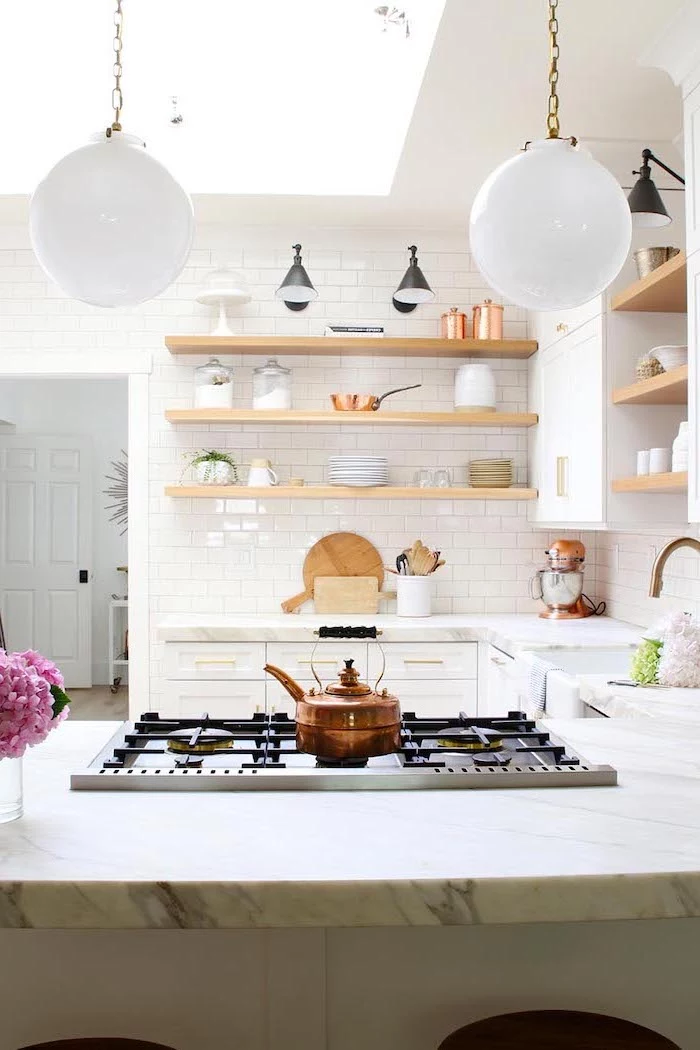
Finishing Touches: Lighting & Shelving
Good lighting is all about layers: ambient (overall light from recessed cans), task (focused light like under-cabinet strips), and accent (to highlight pretty things). For work areas, I like an LED bulb around 3000K—it’s bright without being harsh. And put everything on a dimmer!
Exposed beams add so much character. Faux beams, which are lightweight hollow boxes, are a fantastic way to get the look without major structural work and can be installed for a few hundred dollars per beam. Serious warning: Never, ever cut or drill into a real structural beam without an engineer’s approval. I once saw a homeowner who cut a hole in a ceiling joist for a pipe. The entire floor above was sagging. It’s a dangerous and wildly expensive mistake to fix.
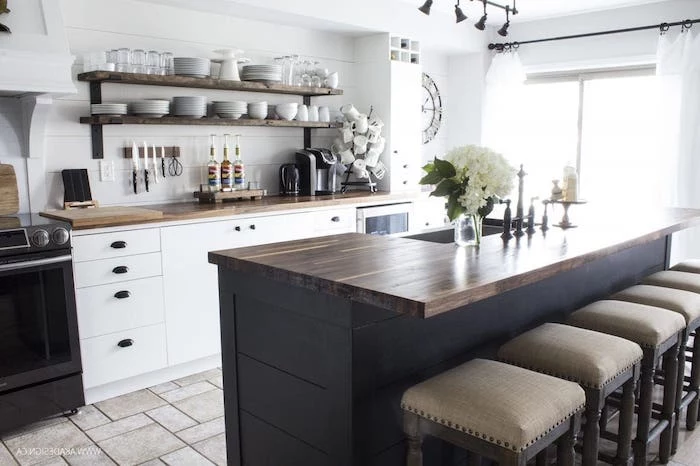
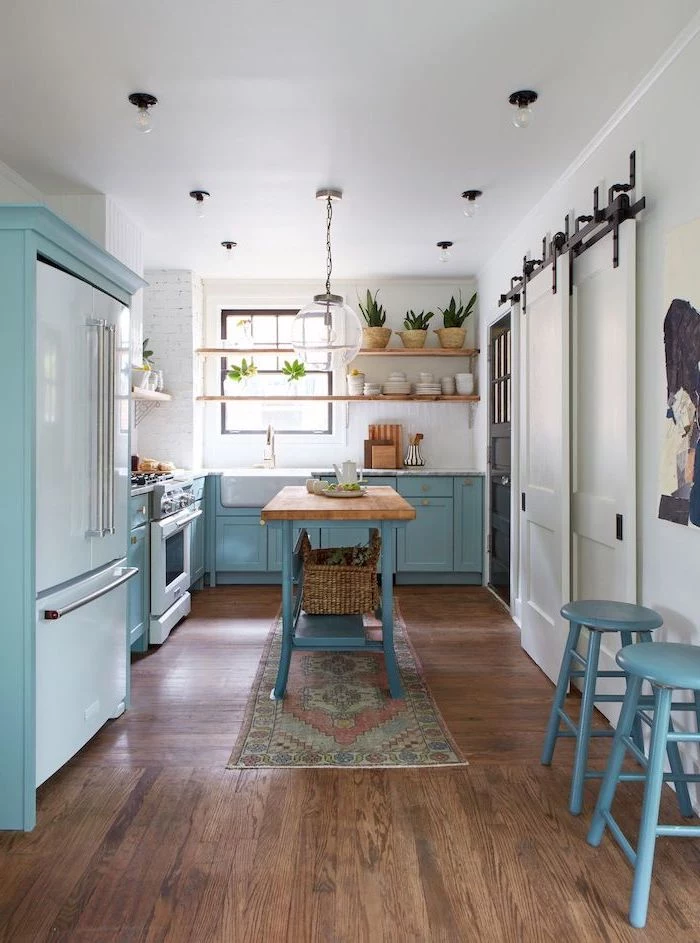
Open shelving looks great but requires you to be neat. Quick tip: make sure the brackets are screwed directly into wall studs. Drywall anchors won’t hold the weight of a stack of dinner plates. A good stud finder is your best friend here.
The Unseen Hero: Ventilation
I’m ending with this because it’s the most overlooked part of a kitchen remodel. A good range hood that vents to the outside is not a luxury. A powerful hood might cost you $600 to $2,000 plus installation, but it’s critical for protecting your air quality and your finishes from grease and steam. If you get a really powerful hood (over 400 CFM), building codes often require a “make-up air” system to bring fresh air back into your home. This is an HVAC pro’s job and can add another $1,000-$2,500 to the project, so be sure to budget for it.
The Builder’s Shopping List
As you plan, here are a few of the things I mentioned that are worth asking for or seeking out:

- For Cabinets: Ask about stable MDF center panels for painted finishes.
- For Tile Floors: Insist on an uncoupling membrane like Schluter-DITRA.
- For Shelving: Use a quality stud finder and long, structural screws.
- For Butcher Block: Get a good food-grade mineral oil or beeswax blend for maintenance.
- For Faucets: Look for the words “solid brass construction” and “ceramic disc valves.”
Building a kitchen with that modern farmhouse soul is a big undertaking, but it’s so rewarding when it’s done right. Focus on a smart layout and honest, quality materials, and you’ll create a space that’s truly the heart of your home.
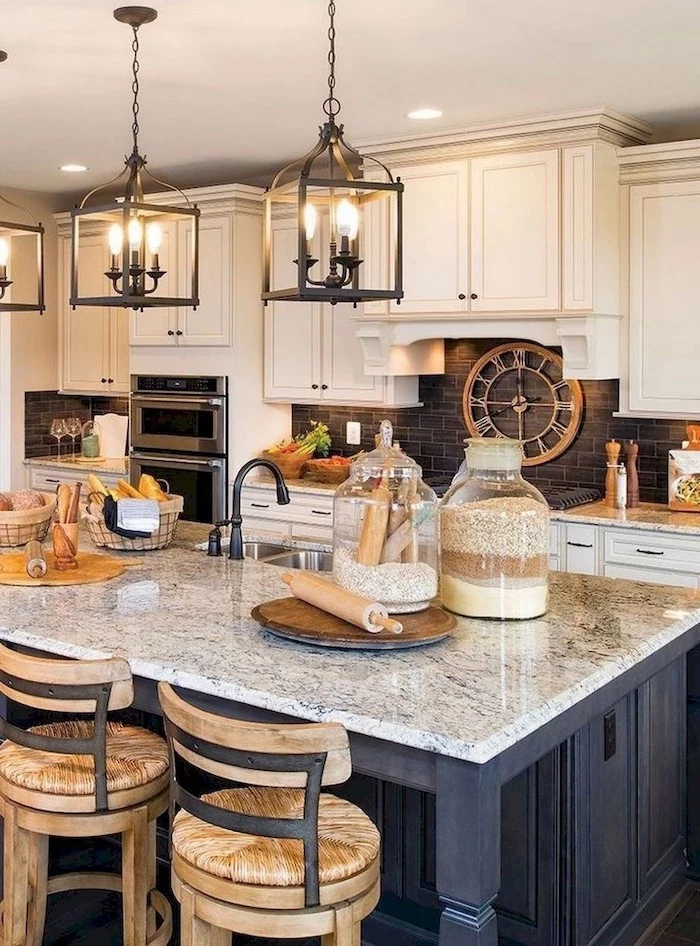
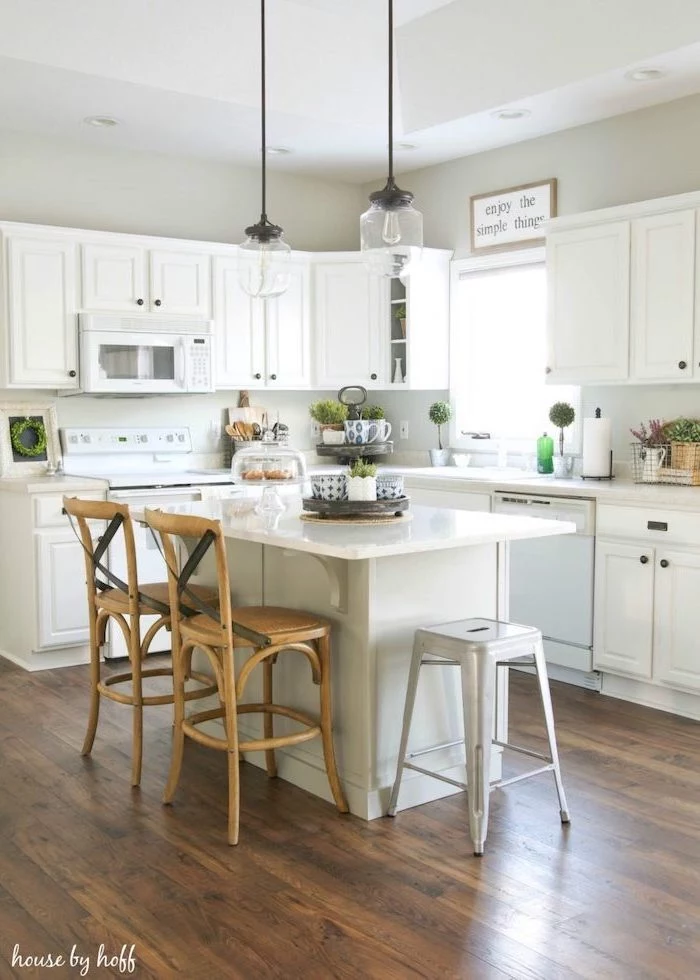
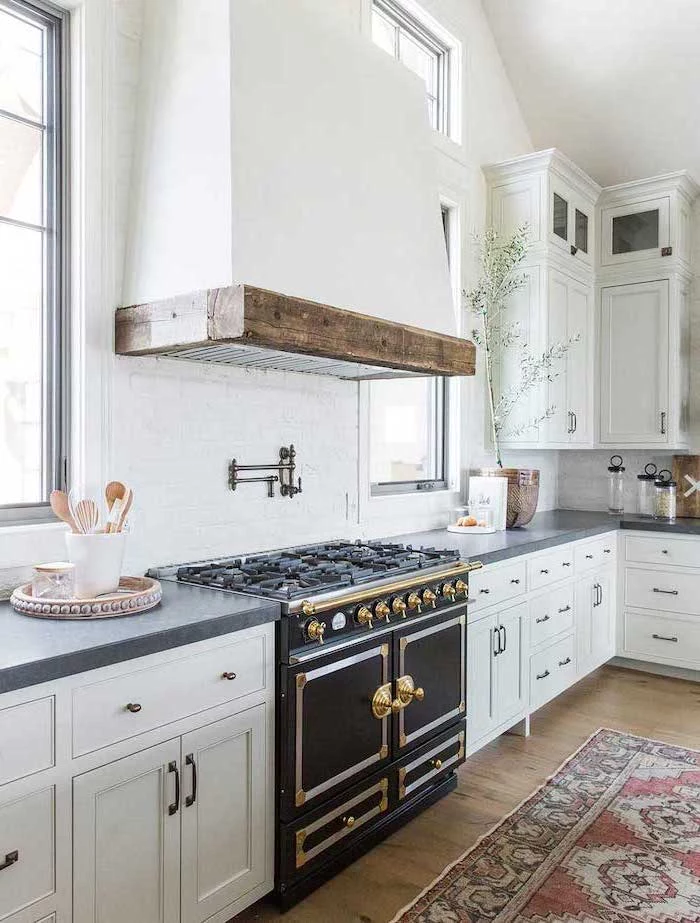
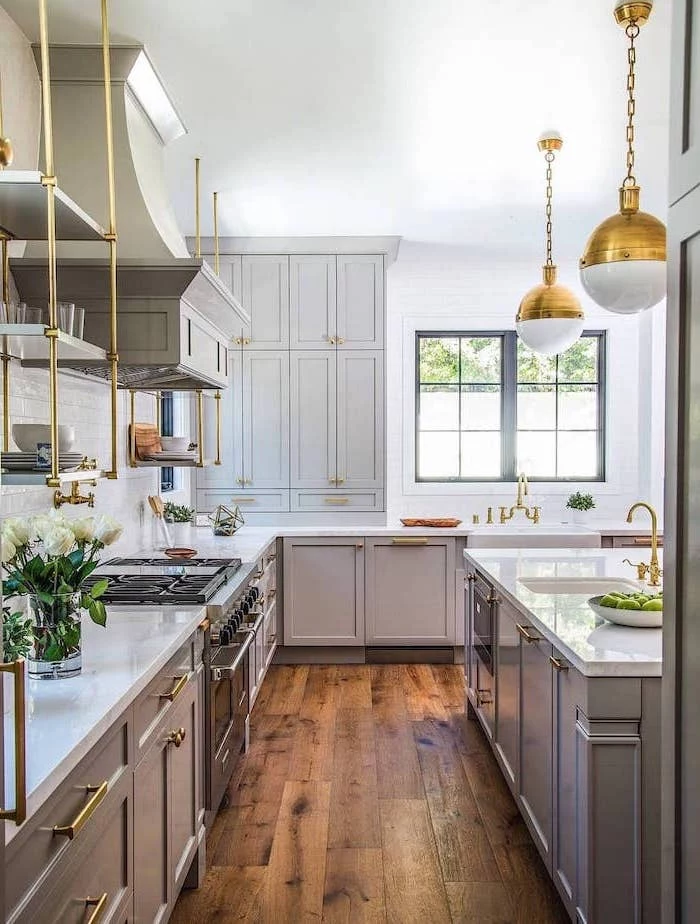
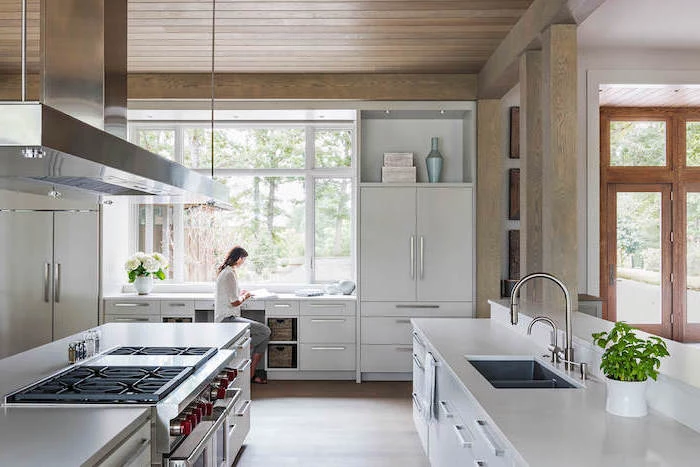
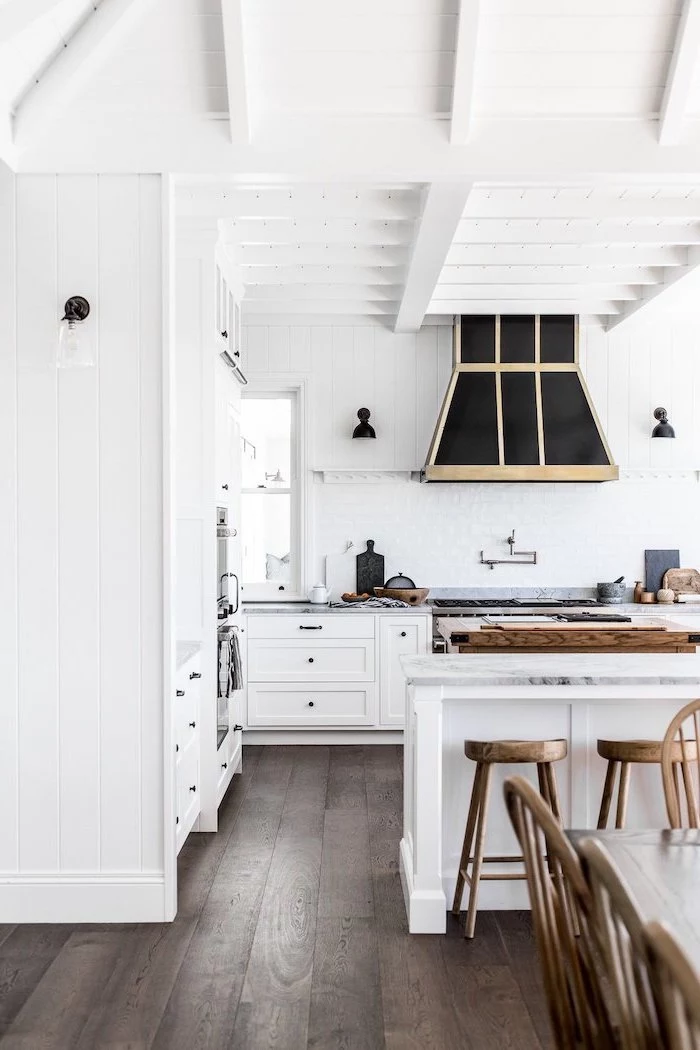
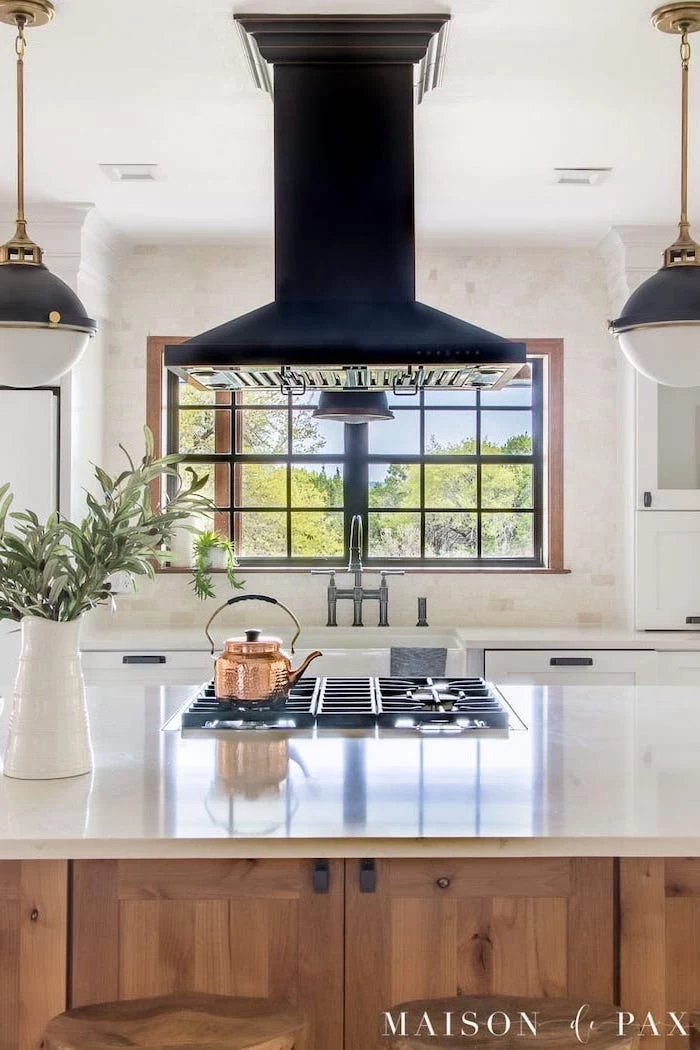
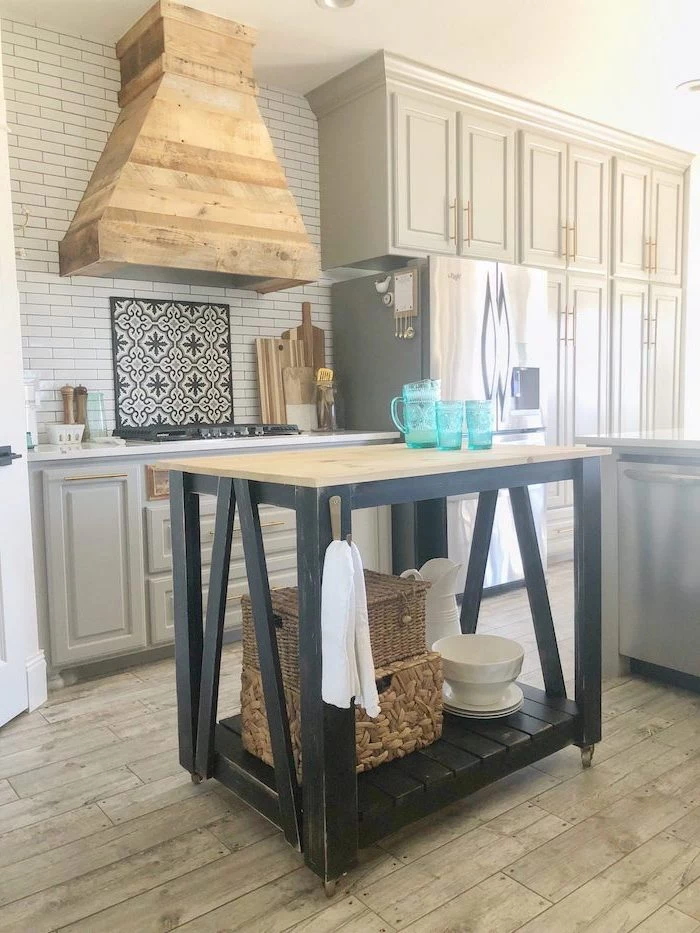
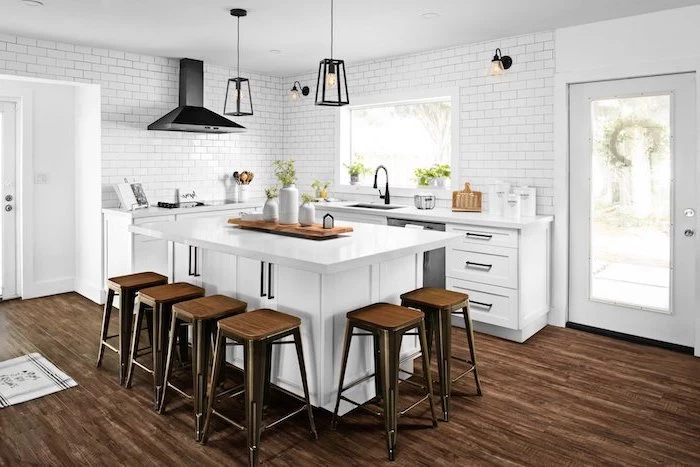
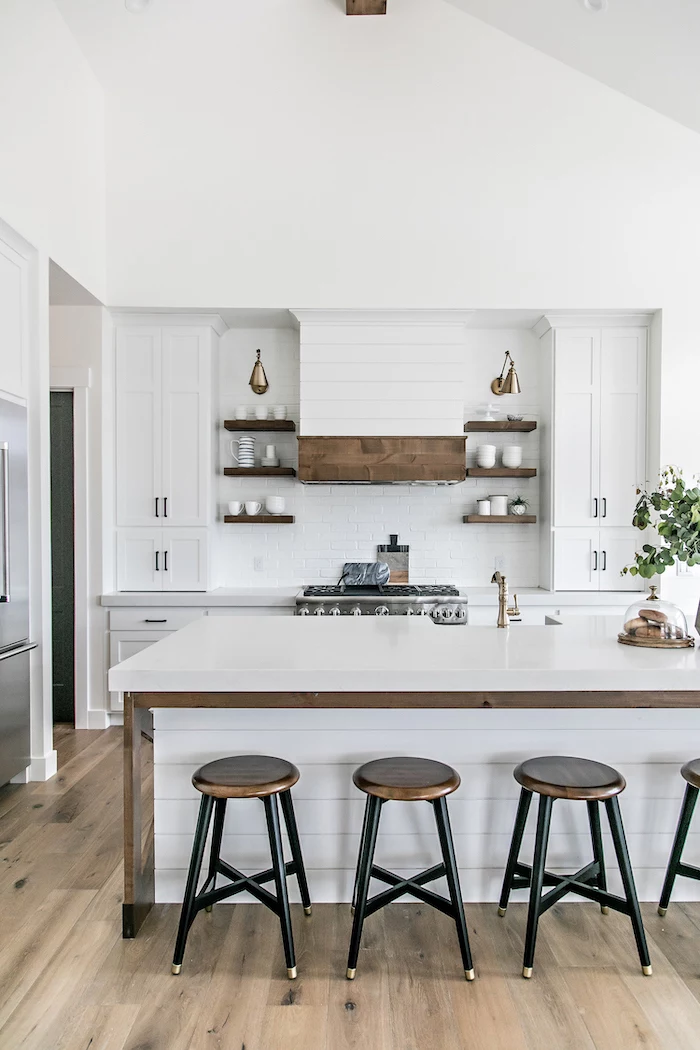
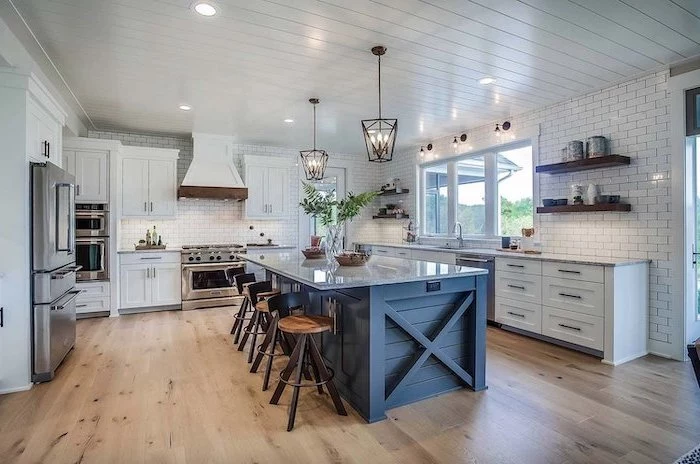
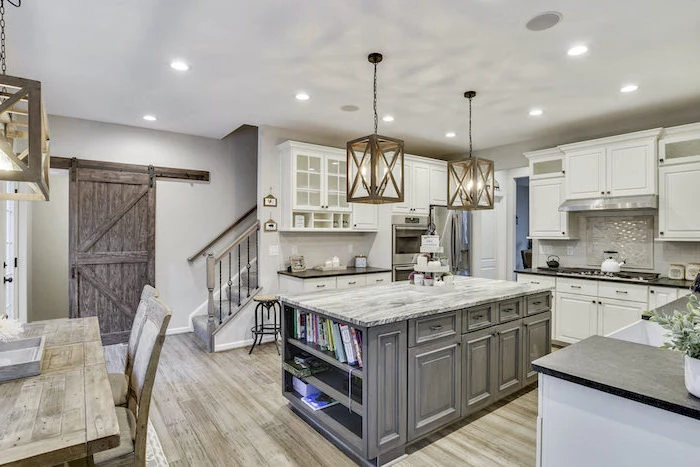
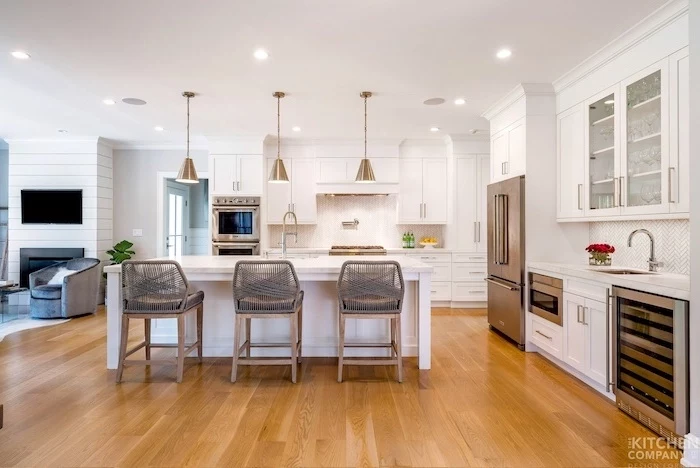
Inspirational Gallery
The right white paint is crucial: Not all whites are created equal. For that warm, inviting farmhouse feel without looking yellow, test shades like Benjamin Moore’s
- Adds incredible warmth and character.
- Provides a durable, functional surface for food prep.
- Can be sanded and re-oiled to look new again.
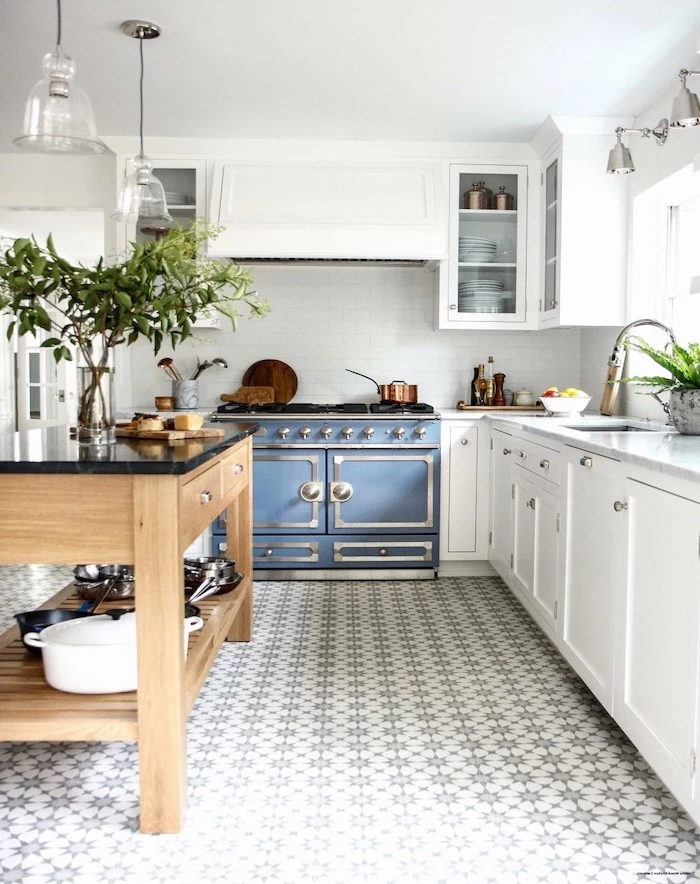
The secret? A high-quality butcher block island countertop. Brands like John Boos & Co. offer end-grain or edge-grain options that are both beautiful and built to last.
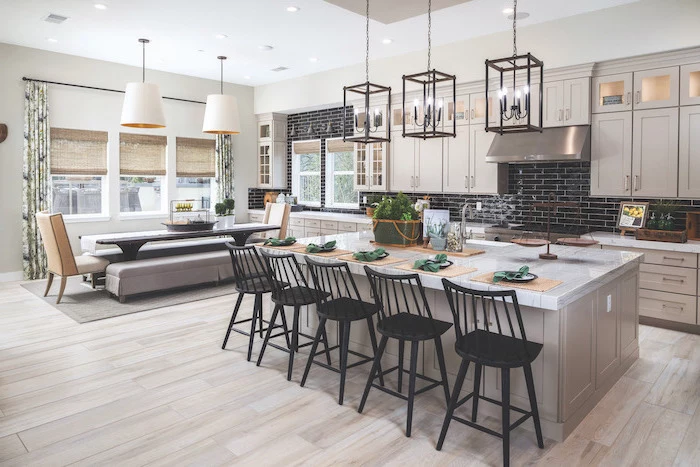
Nearly 70% of homeowners use their kitchen islands for both meal prep and dining.
This statistic highlights why island design is so critical. Ensure your island includes a comfortable seating overhang (at least 15 inches for counter height) and durable, easy-to-clean countertop material like quartz. Functionality should always lead the design conversation.
Is shiplap on its way out?
Not entirely, but its use is becoming more refined. Instead of covering every wall, consider using it as a targeted accent, like on the range hood cover or the back of an island. For a more timeless and subtle texture, look at V-groove or beadboard paneling. It offers a similar linear effect with a more classic, less trend-driven feel.
When choosing an apron-front or ‘farmhouse’ sink, think beyond classic fireclay.
- Stainless Steel: A model like the Kohler Whitehaven in stainless offers a modern, industrial edge to the farmhouse look and is incredibly durable.
- Soapstone: Dark, moody, and develops a beautiful patina over time.
- Copper: Makes a bold statement and has natural antimicrobial properties.
A common mistake: Forgetting layered lighting. A single overhead light creates a flat, sterile environment. A successful farmhouse kitchen layers three types of light: ambient (recessed cans or a central fixture), task (pendants over the island, under-cabinet strips), and accent (a small lamp on the counter or a picture light over open shelves).
Engineered Hardwood: More stable in environments with fluctuating humidity (like a kitchen). The top layer is real wood, offering authentic beauty. Great for installation over concrete slabs.
Solid Hardwood: Can be sanded and refinished multiple times over its lifespan. Offers unmatched classic appeal, but requires careful acclimation before installation to prevent gapping.
For most modern farmhouse kitchens, a high-quality, wide-plank engineered oak is the perfect blend of stability and style.
Create a focal point with your range hood. Instead of a standard stainless steel unit, a custom-built hood adds immense character. Simple designs using drywall finished with a strapping of reclaimed wood or a smooth Venetian plaster finish can elevate the entire kitchen from standard to statement.
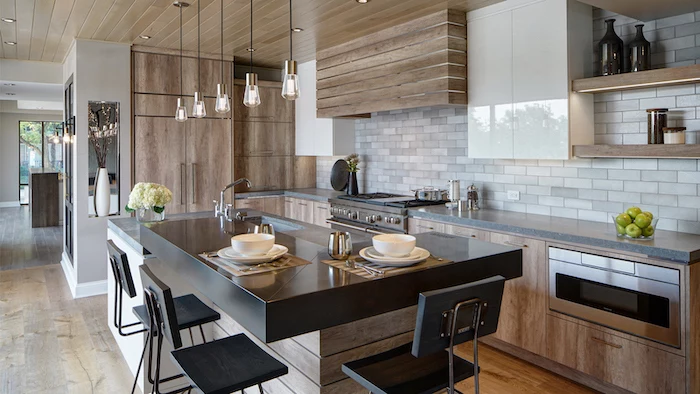
Don’t be afraid to mix your metal finishes, but do it with intention. A good rule of thumb is to stick to two, maybe three, finishes. For example, use matte black for cabinet hardware and the faucet, then introduce a warm contrast with aged brass or copper for your pendant lights.
- Choose a dark, moody grout like Mapei’s

Splurge here: The faucet. It’s the most used appliance in your kitchen. A high-quality pull-down model from a brand like Brizo or Delta will not only look better but will withstand daily use for years without dripping or failing. The quality of the internal valve matters.


Reclaimed wood, often sourced from old barns and factories, can be more than 100 years old, making it denser and more stable than new lumber.
Using reclaimed wood for open shelving or a feature beam isn’t just about rustic aesthetics; it’s about incorporating a piece of history and a material that has already stood the test of time. Its imperfections—nail holes, saw marks, and rich patina—add soul that new materials can’t replicate.


Open shelving looks beautiful in photos but requires curation. The key is a balance of practical and personal. Mix everyday dishes (like simple white stoneware from Crate & Barrel) with a few decorative items: a small plant, a piece of pottery, or your favorite cookbooks. This keeps it functional but visually interesting.

Can you get the marble look without the maintenance?
Absolutely. High-end quartz manufacturers like Cambria and Silestone have perfected their marble-look designs. Their patterns offer incredibly realistic veining and depth, but because quartz is an engineered stone, it’s non-porous. This means no staining from coffee or wine, and no etching from lemon juice. It’s the ideal choice for a hardworking family kitchen that still wants that elegant, bright aesthetic.
- A runner in a vintage-inspired pattern adds color, texture, and softness underfoot.
- Changing out cabinet hardware is a simple DIY that can completely transform the look.
- A vase of fresh or high-quality faux greenery instantly breathes life into the space.
These are high-impact updates you can make on a small budget to personalize your farmhouse kitchen.

The unsung hero of cabinet design: Inset cabinets. While more of an investment, this style, where the door sits inside the cabinet frame, is a hallmark of high-quality, traditional joinery. It provides a timeless, furniture-like quality that perfectly suits the modern farmhouse aesthetic and will never look dated.


According to a study by the National Association of Home Builders, a pantry is the #1 most-wanted kitchen feature for homebuyers.
Soapstone: A natural, dark stone that’s heat-resistant (you can put hot pans on it). It’s soft and can scratch, but scratches can be oiled or lightly sanded out, contributing to a lovely patina.
Honed Black Granite: A more durable option that provides a similar matte, dark look. It’s much harder to scratch or stain than soapstone, making it a lower-maintenance alternative.


Let your island color set the tone. While an all-white kitchen is classic, painting the island in a contrasting color adds depth and personality. Popular choices for a modern farmhouse look include deep navy (like Benjamin Moore’s


- They develop a unique patina over time, reflecting the life and use of the kitchen.
- The warm, golden tone pairs beautifully with both white and dark cabinet colors.
- They feel substantial and high-quality to the touch.
The material? Unlacquered brass hardware. It’s a living finish that ages gracefully, adding an authentic, evolved layer to your design.

Think about the sounds of your kitchen. The solid thud of a heavy cabinet door with soft-close hinges, the quiet glide of full-extension drawer slides, the substantial feel of a solid wood floor underfoot. These sensory details contribute just as much to the feeling of quality as the visual elements do.


A detail that matters: Electrical outlets. Instead of jarring white plastic outlets on your beautiful new backsplash, consider outlets that match the tile color. Or, for an even cleaner look on an island, install an under-counter outlet strip, like those from Legrand’s Adorne collection, to keep the sides seamless.

A bridge faucet, with its distinct two-hole installation and exposed pipe, is a direct nod to early 20th-century plumbing and adds instant vintage credibility to a farmhouse sink.
To keep your butcher block countertop from drying out and cracking, treat it once a month with a food-safe mineral oil or a specialized board cream. This simple maintenance ritual takes only a few minutes and will dramatically extend the life and beauty of your wood surface, keeping it rich and water-resistant.