Your Home’s Fall Tune-Up: A Pro’s Guide to Saving Money and Stress
After years in the contracting business, I’ve seen it all. I’m the person folks call when a small, ignored autumn task snowballs into a full-blown, wallet-draining disaster. A single forgotten hose spigot can lead to a burst pipe and a basement that looks more like a swimming pool. Clogged gutters? I’ve seen them rot the very bones of a roof.
In this article
These problems are almost always expensive, and honestly, they’re always preventable.
Getting your home ready for fall isn’t about breaking out the pumpkin spice decor. It’s about smart, preventative maintenance that protects your biggest investment from the harsh realities of cold, wind, and water. This is the stuff that saves you thousands in the long run and, more importantly, gives you priceless peace of mind.
Let’s walk through the same checklist I use for my own house, focusing on what really matters.
Feeling Overwhelmed? Start With the “Big Three” This Weekend.
Look, I get it. The list can seem long. If you only have one day, tackle these three tasks. They give you the most bang for your buck in preventing catastrophic damage.
- Gutters & Downspouts: Get the leaves out. Water needs a clear path away from your house. This is non-negotiable.
- Exterior Faucets: Disconnect hoses and shut off the water supply to each outdoor spigot. This five-minute job prevents thousands in potential flood damage.
- Smoke & CO Detectors: Test them and check their expiration dates. This is pure and simple life safety.
Once you’ve got those handled, you can move on to the rest with confidence.
First Up: Secure the Outside of Your Home
Your home’s exterior is its first line of defense. We need to make sure it’s buttoned up tight before the weather turns nasty. My approach is simple: start at the top and work your way down.
Gutters and Downspouts: Your Roof’s Drainage System
Nobody enjoys cleaning gutters. It’s a messy, awkward job. But from my experience, clogged gutters are the #1 cause of preventable, expensive water damage. When water can’t get away from your house, it will find a way in. It seeps under shingles, rots wood, and spills over to saturate the ground right next to your foundation.
A Pro’s Gutter Cleaning Method:
This is a 2-4 hour job for a typical single-story house, depending on how many trees you have. Your main cost is your time, but you’ll want a few supplies.
Quick Shopping List: Heavy-duty waterproof gloves (~$15), a gutter scoop or garden trowel (~$10), a sturdy ladder, and a tarp for easy cleanup.
- Safety is Everything. Seriously. Use a solid ladder, and if you can, get a ladder stabilizer (around $40 at a hardware store). It rests on the roof instead of the gutter, so you won’t crush it. Always keep three points of contact with the ladder (two feet and a hand, for example).
- Get the Gunk Out. With your gloves on, use the scoop or trowel to remove all the heavy stuff—leaves, twigs, and shingle grit. I like to drop it all onto a tarp I’ve laid out below. Makes cleanup a breeze.
- Time for a Flush. Grab a garden hose and flush the gutters out, pushing any remaining gunk toward the downspout. This is also your leak-test. If you see water dripping from seams or end caps, you’ve found a problem spot.
- Clear the Downspouts. If water pools and won’t drain, the clog is in the downspout. Sometimes a few firm taps on the outside will dislodge it. If it’s stubborn, a plumber’s snake fed down from the top usually does the trick.
Quick Tip: What to do with leaks?
If you found a dripping seam during your flush test, the fix is pretty easy. Once the area is completely dry, clean it with a wire brush and apply a generous bead of gutter sealant, which you can find at any home improvement store for about $10 a tube. Smear it into the seam to create a waterproof patch.
Heads up! If you have a tall two-story house or a really steep roof, please hire a professional. It’s not worth the risk. A pro crew will usually charge between $250 and $450 for the job, and it’s money well spent on safety.
Roof and Chimney: Your Home’s Shield
I don’t recommend homeowners get on their roof without proper safety gear and training. But you can do a fantastic inspection from the ground with a simple pair of binoculars.
Walk around your house and look for:
- Problem Shingles: Are any missing, cracked, or curling up at the edges? These are neon signs for potential leaks.
- Failing Flashing: Check the metal strips around chimneys, vents, and skylights. If they look rusty, bent, or have gaps, they need attention from a roofer.
- Cracked Chimney Crown: The concrete cap on top of your chimney can develop cracks. Water gets in, freezes, expands, and turns small cracks into big problems.
And when it comes to the inside of your chimney, I have one piece of advice: hire a pro. I don’t even clean my own. Burning wood creates a flammable, tar-like substance called creosote. A certified chimney sweep has the specialized tools to remove dangerous buildup and inspect the flue for cracks that you can’t see. A chimney fire is terrifyingly destructive. National safety guidelines recommend an annual inspection. Just do a quick online search for a certified chimney specialist in your area—it’s the best peace of mind you can buy before lighting that first fire.

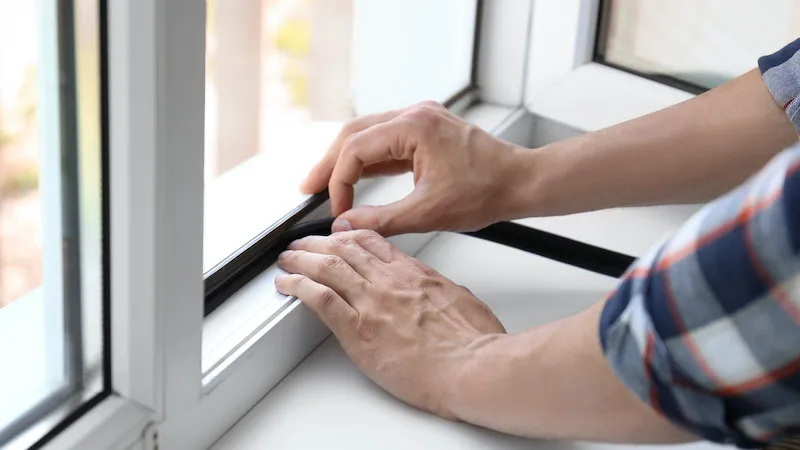
Windows and Doors: Stop Paying to Heat the Outdoors
Drafts are just money seeping out of your house. All those tiny gaps around windows and doors can add up to the equivalent of leaving a window open all winter. Your furnace works overtime, and your energy bill skyrockets.
How to Find Leaks:
Try the “dollar bill test” on your exterior doors. Close the door on a bill. If you can pull it out with zero drag, your weatherstripping isn’t sealing properly. Test the top, bottom, and sides.
Budget-Friendly Fixes:
- Weatherstripping: Don’t buy the cheap adhesive foam tape; it barely lasts a season. For doors, a quality vinyl V-seal or a kerf-style seal that pushes into a pre-cut groove is far more durable and effective. For older, drafty windows, simple rope caulk is a great temporary and removable solution.
- Caulking: Check the caulk around the exterior of your window and door frames. If it’s cracked or peeling, it’s useless. Scrape out the old stuff and apply a fresh bead of a high-quality, paintable siliconized acrylic caulk (a tube costs about $8).
A common mistake I see all the time: People cut the tip of the caulk tube way too big, and it makes a huge mess. Start with a very small angled cut. You can always make it bigger, but you can’t make it smaller again!

Next: Get Your Interior Systems Ready
Once the outside is sealed up, it’s time to prep the machines that keep your home comfortable and safe all winter.
Your HVAC System: The Hardest Worker in the House
My rule for heating systems is simple: a pro tunes it up, and I maintain it. An annual service call from a qualified HVAC tech is cheap insurance against a no-heat emergency on the coldest night of the year.
Your part of the bargain? The filter. A clogged furnace filter is the simplest and most common cause of problems. It restricts airflow, making your furnace work harder, burn more fuel, and eventually overheat. I check my filter monthly and use a pleated one with a MERV rating between 8 and 11. You can find them at any big-box store for $15-$30. Just don’t get one with a super-high rating unless your system is specifically designed for it, as it can actually choke the airflow.

Plumbing: Avoid a Frozen Nightmare
I’ve seen more homes wrecked by burst pipes than I care to count. When water freezes, it expands with incredible force—enough to split a copper pipe wide open. The fix is so simple.
The 5-Minute Hose Bib Drain:
- Disconnect all garden hoses. This is the most important step!
- Find the shut-off valve for each outdoor faucet inside your house (usually in the basement or a crawlspace). Turn the valve handle clockwise to close it.
- Go outside and turn the faucet on to drain the remaining water. Leave it open.
- Head back inside. Look for a tiny metal cap on the side of the shut-off valve—the “bleeder cap.” Put a small bucket under it and unscrew it to drain the last bit of trapped water.
By the way, if your valve doesn’t have a bleeder cap, don’t worry. Just make sure you follow steps 1-3. Leaving the outside faucet open is key, as it gives any residual water a place to go if it expands.
For any pipes in unheated areas like a crawl space or garage, grab some foam pipe sleeves. They’re cheap (less than $10 a roll) and easy to install.
Finally: The Safety Checks You Can’t Skip
This is the most important part of the list. These tasks are not optional; they are about protecting your family. I do these every fall without fail.
Smoke and Carbon Monoxide (CO) Detectors
We all know to test them, but here’s what most people miss: these devices expire. On the back of every single unit, there is a manufacturing date or an expiration date. They are typically only good for 7-10 years. After that, the internal sensors degrade and can’t be trusted. If yours are expired, replace them immediately.
Good to know: Detectors have different chirps. A spaced-out, single chirp usually means a low battery. But a series of three or four chirps often signals the unit has reached its end-of-life and needs to be replaced. Check your manual!
Fireplace and Wood Stove Readiness
A crackling fire is pure magic, but it comes with real responsibility. First, only burn seasoned, dry hardwood. Green or wet wood smolders, creates very little heat, and produces a ton of dangerous creosote. A great investment is a simple wood moisture meter—you can get a decent one online for $20-$30. You’re looking for a moisture content below 20%.
And when you clean out the ashes, never put them in a paper bag or a plastic bin. Embers can stay hot for days. I know of a house fire started by ashes put in the garage. Always use a covered metal can and store it outside, away from anything flammable.
A Final Thought
This might seem like a lot, but you can knock out most of it in a single weekend. Think of it as a small investment of your time. An afternoon of work in the fall can save you from a week of absolute misery and thousands of dollars in repairs come winter.
By doing this, you’re not just a homeowner; you’re the knowledgeable caretaker of your own space. Now you can kick back and actually enjoy the season, knowing your home is safe, sound, and ready for whatever winter throws at it. That feeling is worth more than anything.
Inspiration:

According to the U.S. Department of Energy, reducing drafts in a home can cut energy use by 5% to 30%.
That’s real money leaking out of your home. Before the first frost, run your hand along window and door frames. Feel a draft? Seal the exterior gaps with a high-quality, paintable exterior caulk like DAP’s Dynaflex 230. It’s a small task that pays for itself in a single heating season by keeping expensive warm air exactly where you want it: inside.
My furnace worked fine last spring. Do I really need to get it serviced for the fall?
Absolutely. Think of it like an oil change for your car. A professional HVAC tune-up ensures your system runs at peak efficiency, preventing sky-high energy bills. More importantly, a technician will check for dangerous issues like a cracked heat exchanger, which can leak carbon monoxide. At a minimum, change your furnace filter yourself—upgrading to a pleated filter with a MERV 8 rating or higher can significantly improve air quality.


