Your House Is a Leaky Bucket: A No-Nonsense Guide to Staying Warm
I spent one of my first winters as a builder’s apprentice in an old Vermont farmhouse. You know the type. The single-pane windows rattled with every gust of wind, and at night, you could literally feel the cold seeping out of the walls. Down in the basement, an ancient oil furnace would roar to life, but all that warmth just seemed to vanish into thin air. My mentor, a guy who had been building and fixing homes his entire life, saw me shivering one morning. He just smiled and said, “This house isn’t losing a fight with winter. It’s not even fighting.”
In this article
That lesson has stuck with me for my entire career. Keeping a home comfortable isn’t just about cranking up the thermostat—that’s like trying to fill a leaky bucket by turning up the faucet. It’s about understanding how your home loses warmth and then systematically plugging the holes. It’s a craft, really, a mix of simple science and practical skills.

For years, my job has been to diagnose why homes are so uncomfortable and expensive to heat. This guide is all about sharing the foundational knowledge we use in the field. It’s about giving you real control over your home’s comfort, not just for one winter, but for good.
The Real Reason Your House is Cold
Before you can fix the problem, you’ve got to understand it. A cold house is basically a physics problem. Heat always, always moves from a warmer place to a colder one. It does this in three main ways, and once you get these, everything else will click into place.
1. Conduction: Heat Traveling Through Stuff
Conduction is just heat moving through direct contact. Picture a metal spoon in a hot cup of coffee—the heat zips right up the handle. In your home, heat conducts straight through the solid materials: your window panes, the wooden studs in your walls, your doors. How well a material resists this flow is its “R-value.” A higher R-value means better insulation. A single pane of glass has an R-value of about 1. A properly insulated attic? It could be R-49 or even higher. The difference is massive.

2. Convection: Heat Carried by Air
Convection is heat moved by fluids, and for our purposes, that fluid is air. This is the engine behind drafts. Warm air is less dense, so it rises. In your house, this creates loops: warm air from your vents rises to the ceiling, travels across the room, cools, sinks, and flows back to the floor. Cracks and gaps in your home turn these small loops into major highways for heat loss. A tiny gap under your front door lets cold air pour in, while a hole in your attic ceiling lets warm air escape like smoke up a chimney. To be frank, air leaks are usually the biggest comfort-killer in any home.
3. Radiation: Heat Moving in Invisible Waves
Radiation is heat transfer through electromagnetic waves. You feel it from the sun or when you stand near a hot woodstove. What you might not realize is that your body is also radiating heat to the colder surfaces around you. If you sit near a chilly, single-pane window, you can feel cold even if the thermostat says 70°F. That’s your body heat literally jumping from you to the cold glass. This is why just warming the air isn’t enough; you have to deal with cold surfaces, too.
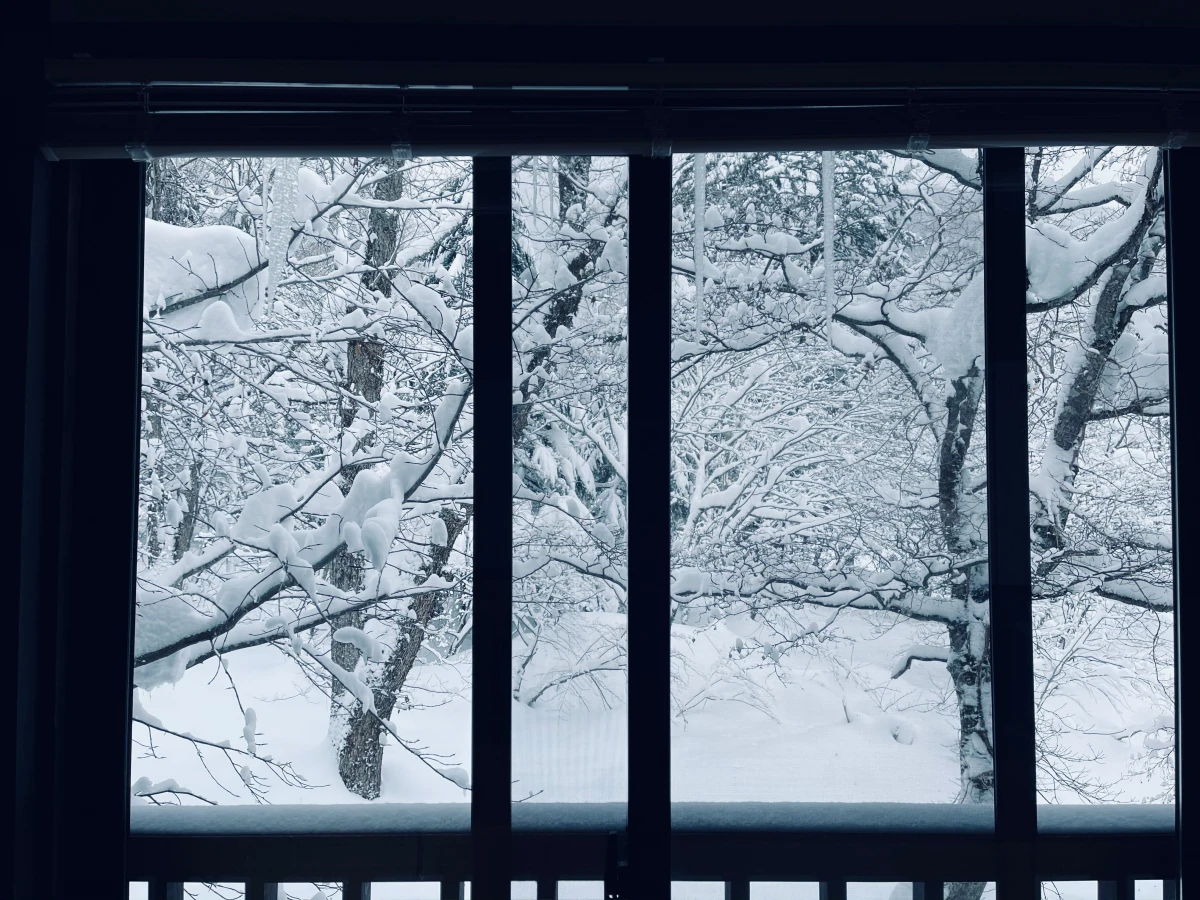
Your home’s defense against all this is its “building envelope”—the continuous barrier that separates your cozy inside from the chilly outside. Any break in that envelope is a win for winter.
Finding and Sealing the Leaks Like a Pro
In the professional world, we use a tool called a blower door. It’s a big, calibrated fan we mount in a doorway to suck air out of the house. This makes outside air rush in through every single leak, which we can then find with smoke pencils or infrared cameras. But you don’t need all that fancy gear to find your biggest problems.
How to Hunt for Drafts Yourself
The best time for this is a cold, windy day. Turn off your furnace and any fans so the air inside is still. Then, light a stick of incense and carefully move it around the usual suspect areas. If the smoke blows sideways or gets sucked out of the room, congratulations—you’ve found an air leak.
Got 15 minutes? Do these two things RIGHT NOW: Check the weatherstripping on your most-used exterior door. Can you see daylight around the edges? If so, that’s a huge leak that needs fixing. Next, grab a pack of foam gaskets and install them on the electrical outlets on your main exterior wall. It takes 30 seconds per outlet and makes a surprising difference.
Here are the top spots to check:
- Windows and Doors: All around the frames, where window sashes meet, and especially under doors.
- Electrical Outlets & Switches: Particularly on outside walls. These are often unsealed holes into your wall cavities.
- Plumbing Penetrations: Look under every sink and behind toilets where pipes go into walls or floors.
- Recessed Lights: Oh yeah. Older “can” lights are notoriously leaky, often acting as open vents directly into your attic.
- Attic Hatch: This is frequently the single BIGGEST air leak in an entire house.
- Rim Joists: In your basement or crawlspace, check the very top of the foundation wall where the wood frame of the house sits.
Your Weekend Air-Sealing Shopping List
Once you’ve found the leaks, you need to seal them with the right stuff. The great news? You can make a massive impact for less than $40 and a bit of time on a Saturday. Here’s what to grab at Home Depot or your local hardware store:
- Paintable Acrylic Latex Caulk (~$5): Perfect for sealing stationary gaps less than 1/4-inch wide, like around window and door trim. Look for one that says “flexible.”
- Low-Expansion Spray Foam (~$10): Use this for larger gaps, like around pipes. CRITICAL: Use the “low-expansion” type for around window and door frames, otherwise the foam can expand so forcefully it warps them, preventing them from opening. And wear gloves—this stuff is messy and permanent.
- Foam Outlet Gaskets (12-pack for ~$5): The fastest, easiest win on this list. These pre-cut foam pads go behind the cover plates on your outlets and switches. Just be sure to turn off the circuit breaker before you take any covers off!
- Weatherstripping (~$15 for a door kit): For the moving parts. Simple adhesive-backed foam tape is cheap but honestly, it doesn’t last. I prefer a more durable V-seal (a plastic or metal tension strip) for window sashes, and a tubular rubber or vinyl compression-style seal for door frames. They create a positive seal and last for years.

Adapting to Your Home’s Style and Climate
A one-size-fits-all solution doesn’t exist. The right approach depends on your local climate and how your home was built.
For Cold, Snowy Climates: Here, the main event is fighting extreme cold. The focus is on high R-value insulation (especially in the attic, aiming for R-49 to R-60) and meticulous air sealing. You have to stop warm, moist indoor air from getting into cold walls or attics, where it can condense and cause frost or rot. This is also key to preventing ice dams on the roof.
For Milder, Wet Climates: In these regions, moisture is the bigger enemy. The focus shifts to robust moisture management. This means high-quality kitchen and bathroom exhaust fans that vent outside are non-negotiable. If you have a crawlspace, it absolutely must have a good vapor barrier on the ground to stop moisture from seeping up into the house.

For Classic, Older Homes: Houses built before energy was a major concern are often full of charm… and drafts. They frequently have zero wall insulation. When tackling these homes, air sealing is priority number one. Adding insulation to empty walls is usually a job for the pros, as doing it wrong can trap moisture. The most impactful DIY work is always in the basement and attic—effectively putting a lid on the top and bottom of the house.
For More Modern Homes: These homes are generally built much tighter, which is good for energy bills but can sometimes be bad for air quality if there isn’t a proper ventilation strategy. Improvements here are often about fine-tuning, like sealing leaky air ducts (a huge and often hidden energy waster) or adding a heat recovery ventilator (HRV) to bring in fresh air without the energy penalty.
Smarter Fixes for Windows, Walls, and Floors
Once you’ve dealt with the major air leaks, you can upgrade the performance of the envelope itself.
Windows: Beyond Just Sealing
Windows are thermal weak spots. A good double-pane window might be R-2, while the wall around it is R-13 or more. Here’s how to improve them without a full replacement:
- Window Insulation Film: This stuff really works. It’s a clear film you apply to the inside of the window frame with double-sided tape. A quick blast with a hairdryer shrinks it tight, creating a pocket of dead air. For about $15 a kit, you can cut heat loss through that window by 25-50%. It’s a fantastic seasonal solution.
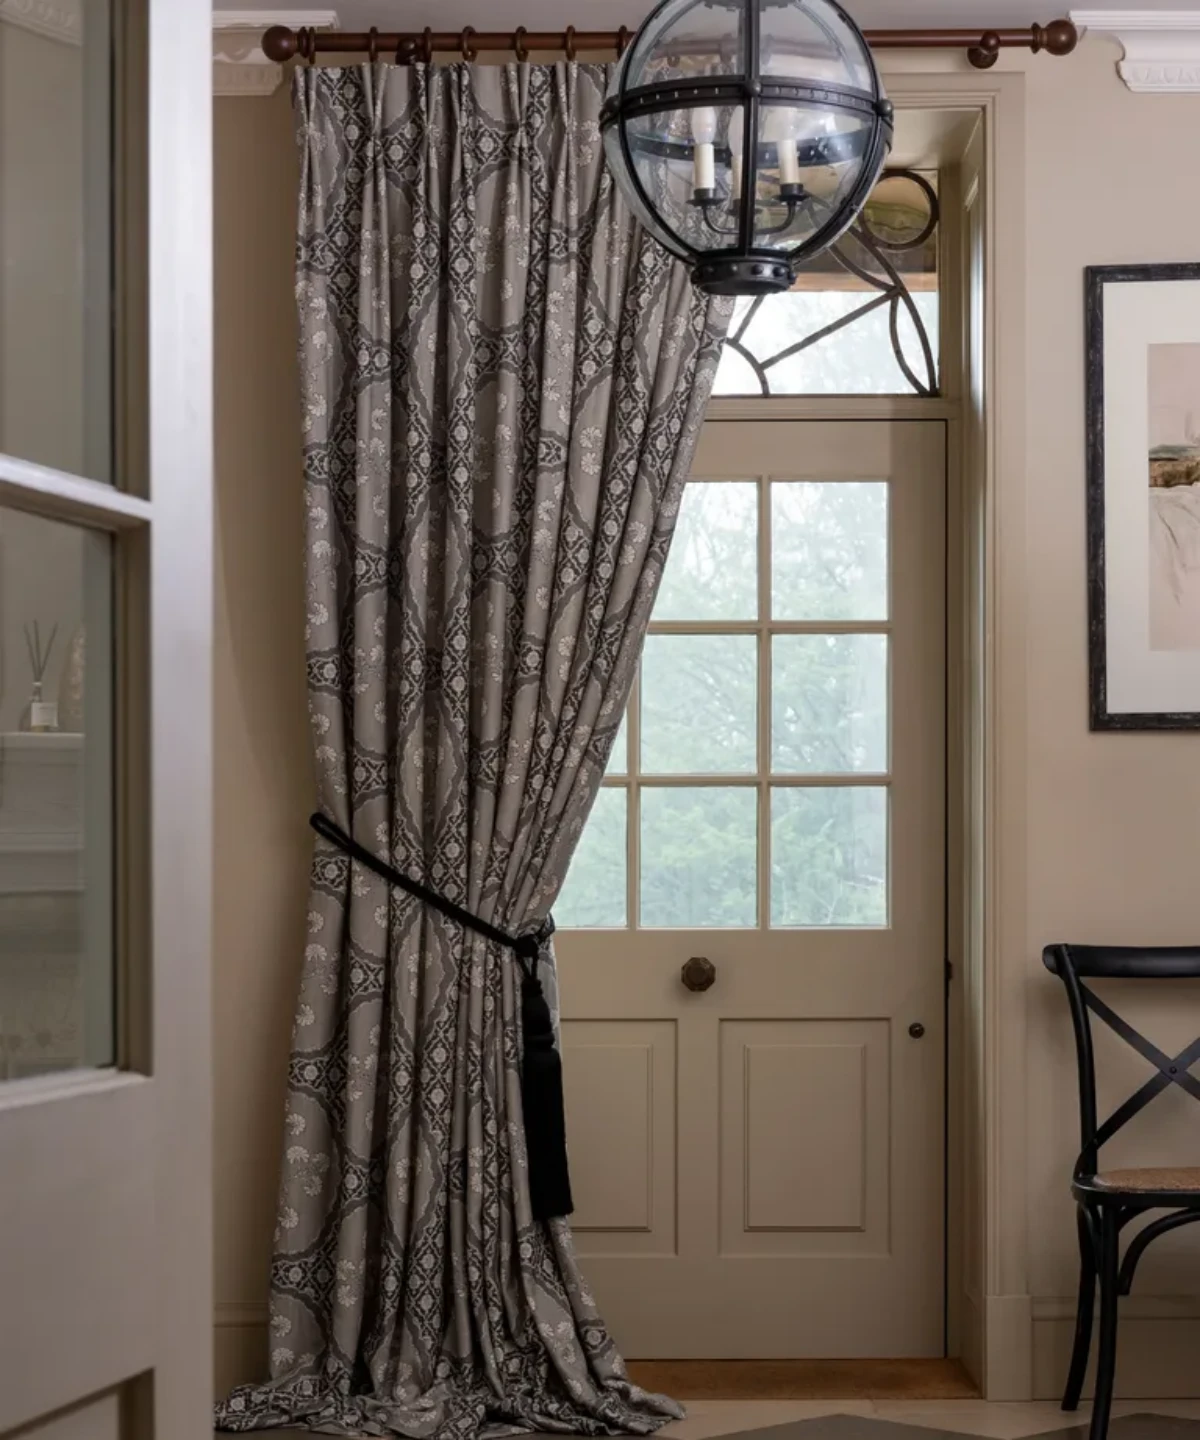
- Thermal Curtains: A good thermal curtain is thick, heavy, and often has a foam backing. The trick is to install it correctly. The rod should extend several inches past the window frame on all sides, and the curtain should touch the floor or windowsill. This creates a sealed air pocket. For maximum effect, you can even use magnetic tape to seal the curtain sides to the wall.
- Interior Storm Windows: This is a more serious, but amazing, upgrade. These are custom acrylic panels that mount inside your existing windows. They create a much better seal and an extra air gap, significantly boosting your R-value and cutting down on drafts and noise.
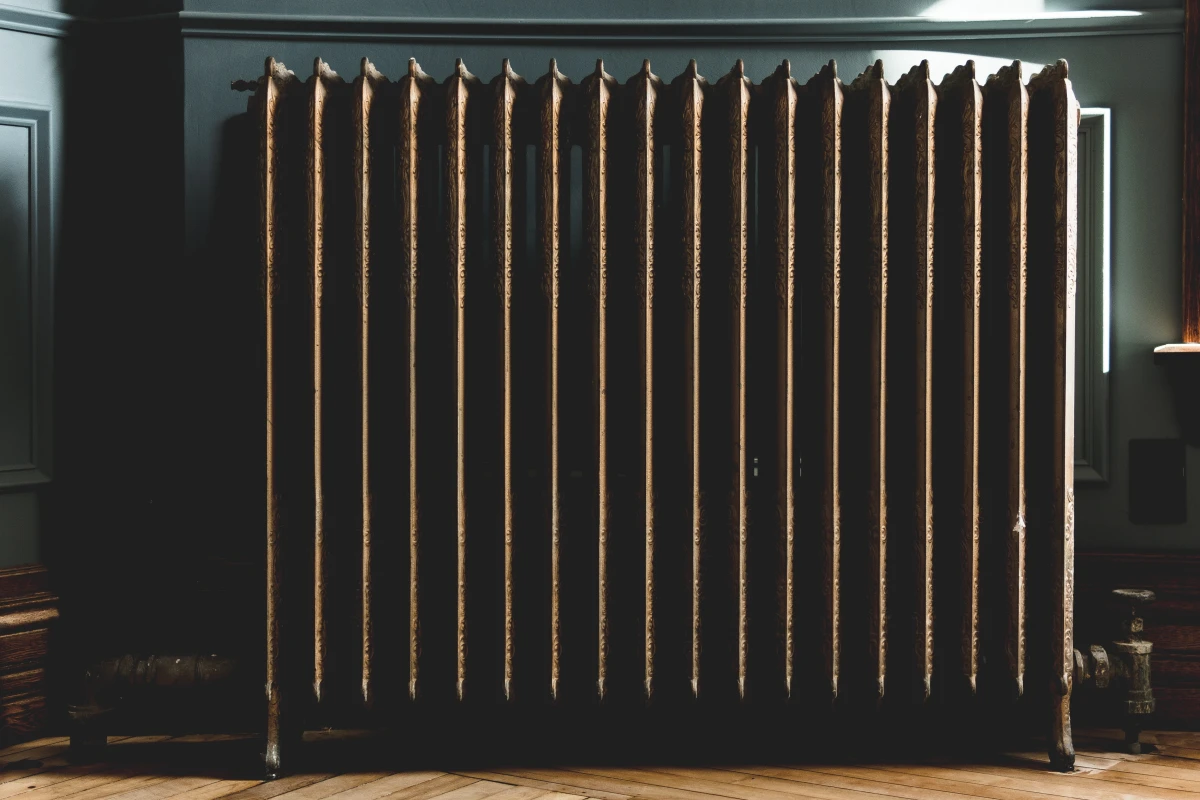
A Quick Tip for Radiators: If you have a radiator on an exterior wall, slip a foil-covered piece of rigid foam insulation behind it. You can buy these or make one yourself. It reflects heat back into the room instead of letting it conduct straight into the cold wall.
Where to Invest for the Biggest Bang for Your Buck
If you’ve done the basic sealing and are ready for a bigger project, two areas offer an incredible return on investment.
1. Attic Insulation: The Undisputed #1 Priority
Warm air rises, so your attic is the main escape route for heat. Upgrading attic insulation is almost always the most cost-effective energy project you can do. Go up there and check—if you can see the tops of your ceiling joists, you don’t have enough. You should be aiming for an R-value of R-38 to R-60, which is roughly 12 to 20 inches of fiberglass or cellulose.
BUT… air seal first! It makes zero sense to put a thick blanket on top of giant holes. Seal every single penetration between your living space and the attic—wiring holes, plumbing stacks, and especially around recessed lights. (Heads up! For older can lights that aren’t marked ‘IC-rated’ for insulation contact, you need to install special fire-rated covers over them first. You place them over the fixture from the attic side, seal the edges to the drywall with caulk, and then you can safely insulate over them.)
I’ve seen the results firsthand. I worked with a homeowner whose heating bill was consistently over $350 a month. We spent about $500 on materials to air-seal their attic and top up the insulation. Their bills dropped to under $250. The project paid for itself in a single winter.
2. Rim Joist Insulation: The Unsung Hero
In homes with a basement or crawlspace, the rim joist—that wooden perimeter sitting on top of the foundation—is a massive, uninsulated source of heat loss. Insulating it is a perfect Saturday project. For an average-sized basement, plan for about 4-6 hours. The best method is to cut pieces of rigid foam insulation to fit snugly in each joist bay, then use spray foam to seal all four edges. This tackles both conduction and convection at once.
A Serious Warning: Safety First
When you tighten up a house, you change how it breathes. This is a good thing, but it comes with serious safety responsibilities.
Carbon Monoxide (CO): The Silent Danger
This is the most important warning here. If you have any fuel-burning appliances—like a furnace, boiler, water heater, or woodstove—you have to be careful. As you tighten your house, you reduce the amount of air available for them to burn fuel and vent properly. This can cause them to spill deadly, odorless carbon monoxide gas into your home. Every home, no exceptions, needs working CO detectors on every level. After any major air-sealing work, it’s wise to have a pro perform a combustion safety test.
When to Call a Professional
Many of these jobs are perfect for a determined DIYer, but some are best left to the pros. This includes installing insulation in closed walls, any work on your furnace or boiler, and major electrical jobs. If you want a comprehensive plan, I highly recommend hiring a certified energy auditor. Expect to pay between $300 and $600 for a full audit with a blower door test. It sounds like a lot, but they give you a custom roadmap that can save you thousands in the long run.
My old mentor was right. A home that feels cold isn’t putting up a fight. By understanding how heat moves and by methodically sealing and insulating the envelope that protects you, you can finally stop fighting. You can create a home that works with you, keeping you truly warm and comfortable, no matter how hard the wind blows.
Inspirational Gallery
According to the U.S. Department of Energy, drafts can waste 5% to 30% of your energy use.
That’s like leaving a window open all winter long. The biggest culprits are often hidden in plain sight: unsealed gaps around electrical outlets on exterior walls, recessed lighting fixtures, and the attic hatch. A simple tube of caulk and some foam gaskets are your first line of defense in this battle.
Is replacing my old windows the only real solution?
Not necessarily. While new, high-performance windows are great, the real energy loss often comes from air leaking around the window frame, not through the glass itself. Before investing thousands in replacements, check for drafts. If you feel a breeze, re-caulking the exterior trim and applying new interior weatherstripping can make a massive difference for a fraction of the cost. For a budget-friendly boost, a 3M Window Insulator Kit creates an extra air gap that mimics a double-pane window for the season.
The Rim Joist: The Forgotten Frontier
Everyone talks about the attic, but one of the most significant sources of heat loss is the rim joist in your basement or crawlspace. This is the wooden perimeter that sits on top of your concrete foundation. It’s notoriously under-insulated. Sealing and insulating this area with rigid foam board or mineral wool like Rockwool Comfortbatt can dramatically reduce cold floors on the first level and stop a major source of air infiltration.
- Finds leaks you can’t see or feel.
- Gives you a precise ‘leakiness’ score for your home.
- Helps prioritize the most effective sealing projects.
The secret? A professional Blower Door Test. This diagnostic tool depressurizes your house, making it easy to pinpoint exactly where outside air is getting in. It’s the gold standard for turning your leaky bucket into a fortress.
Beyond warmth, proper air sealing and insulation have a welcome side effect: quiet. That same insulation that blocks thermal energy also dampens sound vibrations. Sealing air gaps reduces whistles and wind noise, while insulation in walls and ceilings can muffle traffic sounds and noise from other rooms, creating a more peaceful, serene living environment.
Foam Tape: A self-adhesive strip, great for irregular gaps on window sashes and door frames. It’s easy to apply but can compress and wear out over a few seasons.
V-Seal (Tension Seal): A durable, plastic or metal strip that springs open to block drafts. It’s more permanent and effective for the sides of double-hung windows or along a door jamb.
For high-traffic doors, the durability of V-Seal is usually worth the extra installation effort.
The ‘stack effect’ in a home acts like a chimney, pulling cold air in through the basement and lower levels and pushing warm air out through the attic and upper levels.
Your weekend mission, should you choose to accept it: a comprehensive draft hunt. Grab a stick of incense and get started.
- Hold the lit incense near the edges of windows and exterior doors. See where the smoke wavers.
- Check where pipes and wires enter your house from the outside (e.g., under sinks).
- Don’t forget the mail slot and pet door.
- Test the seal on your attic hatch or pull-down stairs.
Common Mistake: Blocking Your Soffits. When adding insulation to your attic, it’s tempting to push it all the way to the edges. However, blocking the soffit vents (the screened openings under your roof’s eaves) can trap moisture, leading to mold and rot. Always use insulation baffles or rafter vents to maintain a clear channel for air to flow from the soffits to the ridge vent.
Thermal curtains are a powerful ally, but they only work if used correctly. They must be mounted so they sit as close to the window frame as possible, with the edges ideally sealed by Velcro or magnetic tape to the wall. For best results, they should extend below the windowsill. This creates a trapped pocket of air, significantly slowing down the heat transfer you feel as a cold draft.


