Your Radiators Are Filthy (And It’s Costing You Money). Here’s the Right Way to Clean Them.
I’ve spent a lot of time working on heating systems in all sorts of homes, and I’ve seen one simple thing make a massive difference in both comfort and energy bills: cleaning the radiators. And I don’t mean a quick wipe-down. I’m talking about a proper deep clean that gets to the heart of the machine.
In this article
- So, How Does a Dirty Radiator Even Waste Energy?
- Safety First… Seriously.
- The Best Tools for a Proper Radiator Clean
- The Step-by-Step Deep Cleaning Method
- A Quick Guide to Different Radiator Types
- Going Deeper: Maintenance Beyond Cleaning
- Only Got 10 Minutes? Do This.
- How Often Should I Do This?
- Inspirational Gallery with Photos
Honestly, a clean radiator is an efficient radiator—it can be up to 15% more efficient, which can really add up over a long winter. It also massively improves your indoor air quality. Forget the weird online hacks; I’m going to walk you through the professional method, explaining why it works and sharing a few hard-won lessons from the field.
So, How Does a Dirty Radiator Even Waste Energy?
Before we grab any tools, let’s get into what’s actually happening. Your radiator isn’t just a hot box; it’s a finely-tuned heat exchanger that works mostly through convection. It pulls cool air up from the floor, heats it by passing it over a series of metal fins inside, and then sends that warm air rising toward the ceiling. This creates a constant, circulating current of warmth.
Now, imagine what happens when dust, pet hair, and other gunk get pulled into that system. It forms a thick, insulating blanket over those crucial metal fins. This does two very bad things. First, it physically blocks the heat from transferring to the air, forcing your boiler to work harder and longer to get the room to the right temperature. Second, it clogs up the narrow channels, slowing down that convection current to a crawl. It’s like trying to breathe with a stuffy nose—the whole system gets sluggish and ineffective.
Safety First… Seriously.
The first thing any pro learns is to have a healthy respect for the equipment. A radiator might seem harmless, but you can definitely get hurt if you’re not careful. I once saw the aftermath of a homeowner trying to clean a hot radiator with a wet cloth. The instant burst of steam left a nasty burn on their hand. It’s a mistake you only make once.
So, before you do anything, please follow these steps. No shortcuts!
- Turn the Heating System OFF. Go to your thermostat and shut the whole system down, not just turn down the temperature. This prevents burns and also stops the radiator from actively sucking dust into the air while you’re trying to clean it.
- Let it Cool Down Completely. This can take at least an hour, maybe more for those big, old cast-iron models. Give it a quick touch to be sure. Patience now prevents pain later.
- Protect Your Floor. Lay down old towels or a drop cloth underneath and behind the radiator. You’re going to be shocked by the amount of crud that falls out. This step saves you a ton of cleanup later.
- Heads Up! Never Pour Water Inside. There’s a wild trend of people dumping buckets of water down their radiators. Please, don’t do this. It’s a fast track to water-damaged floors, baseboards, and walls. Even worse, if there’s an electrical outlet nearby, you’re creating a serious hazard. It’s totally unnecessary and dangerous.
- Wear a Mask. The dust inside a radiator can be ancient. It’s full of fine particles you really don’t want to be breathing in. A simple dust mask from a hardware store is a smart, cheap investment.
The Best Tools for a Proper Radiator Clean
You don’t need a professional-grade toolkit, but having the right gear makes this job way easier and more effective. Here’s what I recommend.
Your Must-Have Shopping List:
- A Vacuum with Attachments: You’ll want that long, skinny crevice tool and a soft brush attachment.
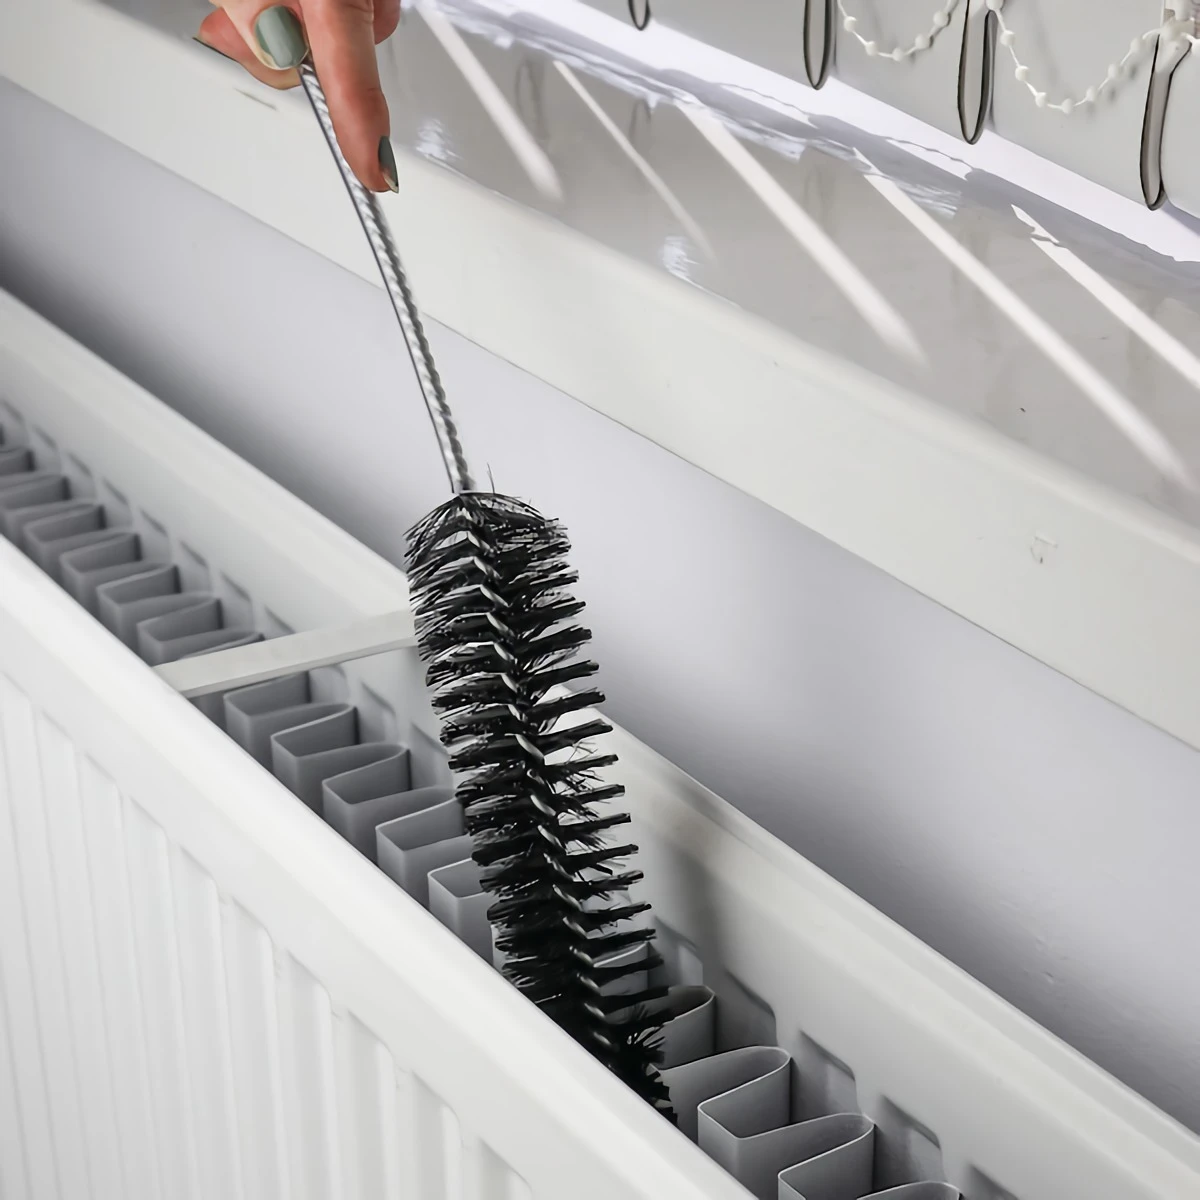
- Long-Handled Radiator Brush: This is your most important tool. It’s a long, flexible brush designed to get into those tight spots. A good one will run you about $15 to $25 at Home Depot or online. Don’t cheap out on a flimsy one; a sturdy one with a bendable metal core is what you want.
- Microfiber Cloths: Grab at least two. They trap dust without leaving lint behind.
- A Bucket and Mild Soap: Just a bucket for water and a little bit of regular dish soap will do. Steer clear of harsh chemical cleaners or anything with bleach, as they can strip the paint finish over time.
Pro-Level (But Optional) Tools:
- Canned Air: The same kind you use for keyboards can be great for blasting dust out of really tight corners that the brush can’t reach.
- Handheld Steam Cleaner: On a sturdy, well-painted radiator, a steam cleaner can melt away grime. But use it with caution! Too much pressure or heat can easily strip the paint off older units. I’d only recommend this if you’re already comfortable using one.
The Step-by-Step Deep Cleaning Method
Alright, you’ve done your prep and have your tools. Set aside about 30-45 minutes for each radiator to do a really thorough job. Rushing is how you miss spots.
Step 1: The Dry Dust Removal
First things first, we want to get rid of all the loose dust before we introduce any water. Start with your vacuum’s soft brush attachment and go over the entire outside of the radiator. Then, switch to the crevice tool and work it down between the fins from the top, getting as deep as you can. It’s so satisfying to hear all that old dust getting sucked up.
Step 2: Brush Out the Stubborn Grime
Now grab that long radiator brush. This is for the compacted gunk the vacuum couldn’t get. Push the brush down into each channel and use a firm up-and-down motion. You’ll see a little dust storm fall onto your drop cloth. If you have a modern panel radiator with a grille on top, you’ll probably need to pop it off for better access. Most just lift off, but some have small plastic clips on the inside edge you might need to gently pry up with a flathead screwdriver. Others might slide to the side before lifting. Just take a peek and see how it’s attached—don’t force it!
By the way, here’s a little trick: if your brush still can’t reach a spot, grab a hairdryer. Set it to the coolest temperature and highest speed, then aim it into the top of the fins to blow the remaining dust down and out.
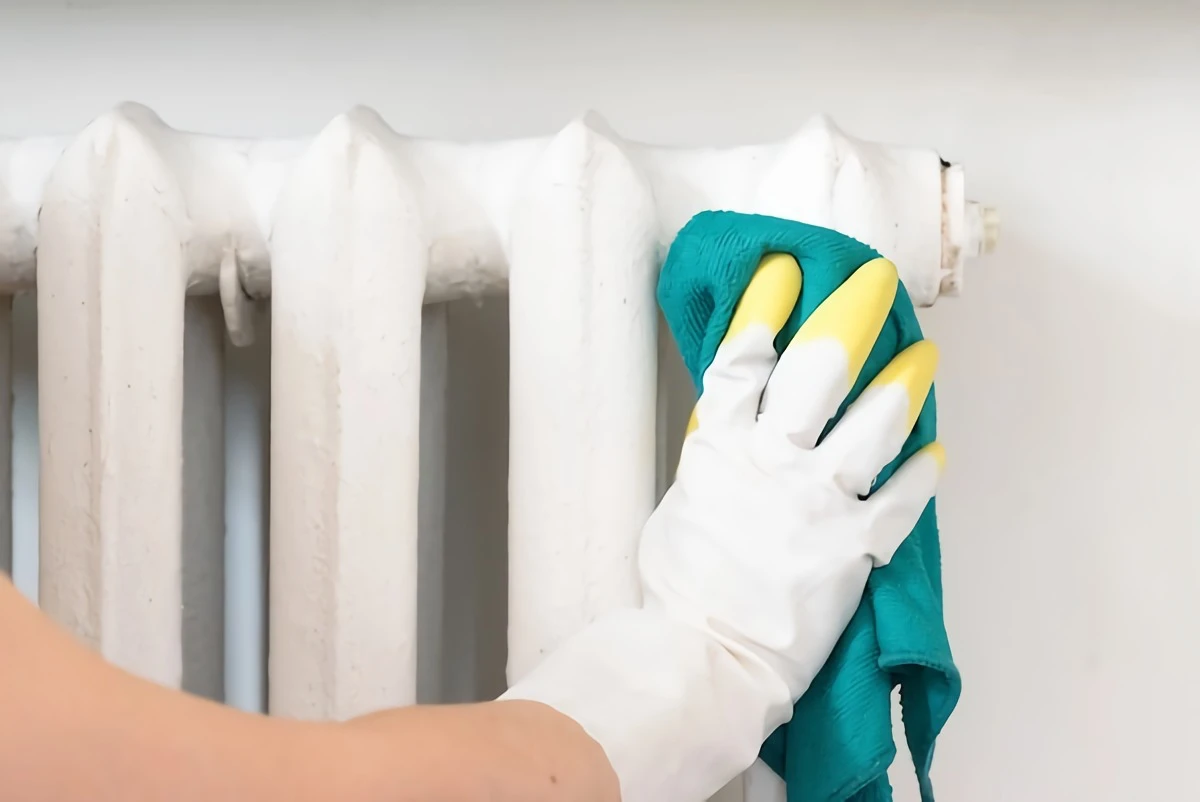
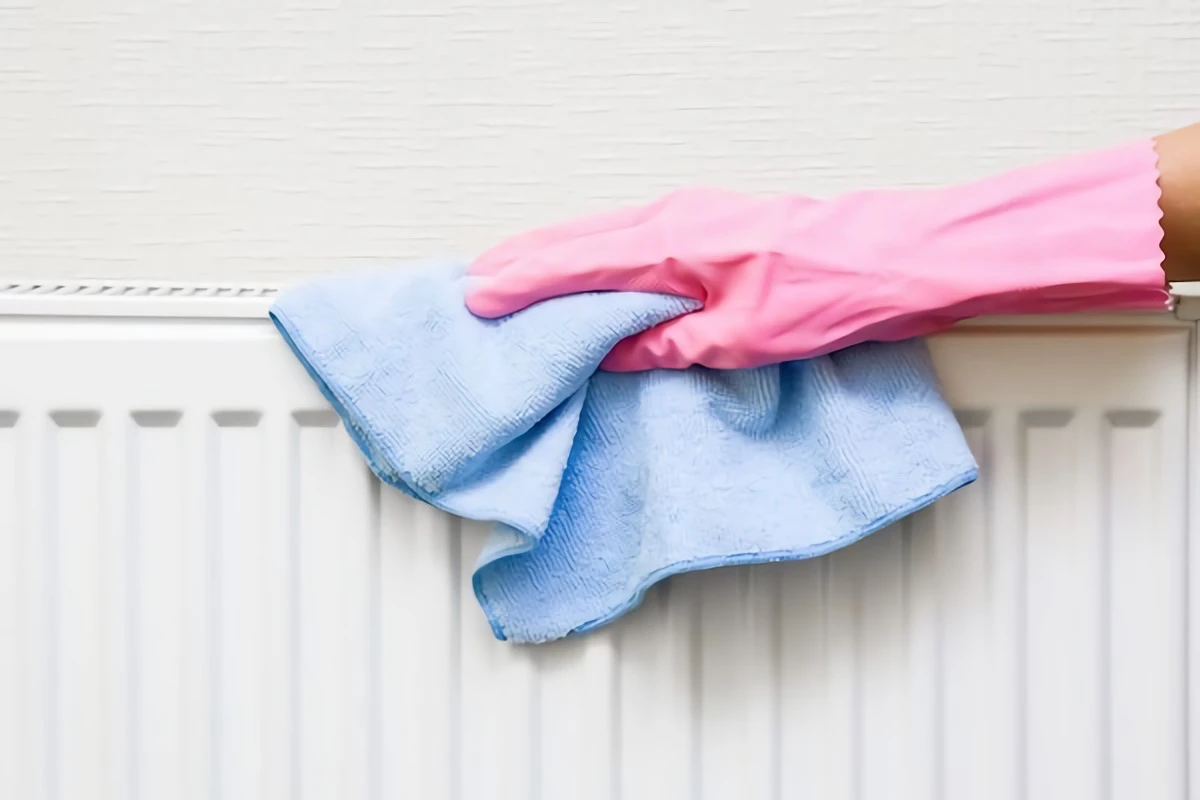
Step 3: The Damp Wipe-Down
Fill your bucket with warm water and add just a small amount of dish soap—think about a teaspoon for a gallon of water. You don’t want a ton of suds. Dip a microfiber cloth in, then wring it out until it’s just damp, not dripping wet. A soaking wet cloth will leave streaks and could cause rust.
Wipe down the entire exterior. To get between the fins, try wrapping your damp cloth around a ruler or a paint stirrer and sliding it down into the channels. You’ll be amazed at how much more dirt comes off. Rinse your cloth out often so you’re not just smearing grime around.
Step 4: Rinse and Dry (Don’t Skip This!)
This part is non-negotiable. Soap residue is sticky and will attract dust even faster. Dump your soapy water, rinse the bucket, and refill it with clean water. With a fresh cloth, wipe the whole radiator down again to remove any soap film. Finally, take a dry microfiber cloth and buff the whole thing dry. Moisture is the enemy, so make sure it’s completely dry to prevent any chance of rust.

Step 5: Clean the Area Around It
Heat tends to bake dust onto the wall behind your radiator, often leaving dark, shadowy marks. While you’re at it, use your damp cloth to wipe down the wall and baseboards. It makes the whole corner of the room look fresh and clean.
A Quick Guide to Different Radiator Types
Not all radiators are created equal, and your cleaning approach might need a slight tweak depending on what kind you have.
- Old-School Cast-Iron Radiators: These are the heavy, ornate ones you see in older homes. They’re built like tanks but their intricate shapes are dust magnets. The good news is the gaps between sections are usually wide enough for a flexible brush to get deep inside. Their weight means they’re not going anywhere, so a thorough approach is key.
- Modern Steel Panel Radiators: These are very common in newer construction. They have smooth outer panels with a network of delicate fins sandwiched in the middle. The main challenge here is those fins, which are fragile and tightly packed. Removing the top grille and side panels is usually the best way to get access for your vacuum and brush. Just be gentle—you can bend those fins easily.
- Hydronic Baseboard Heaters: Often found in mid-century homes, these have a long copper pipe covered in hundreds of paper-thin aluminum fins. The metal cover usually pops right off for cleaning. Crucial tip: These fins are incredibly delicate. Never use a stiff brush on them, or you’ll bend them flat and ruin the airflow. Careful vacuuming with a soft brush attachment and a blast of canned air is the only safe way to clean these.
Going Deeper: Maintenance Beyond Cleaning
A clean radiator is great, but sometimes you need to do a little more. Here are a few related tasks.
Bleeding Trapped Air: If the top of your radiator is cold but the bottom is hot, you’ve got trapped air. Releasing it is an easy DIY job. You’ll need a radiator key from any hardware store. With the heat off, put a cloth under the small bleed valve at the top corner. Slowly turn the key counter-clockwise. You’ll hear a hiss as the air escapes. The second water starts to dribble out, close the valve snugly. Don’t overtighten it!
A quick pro tip for this: if you have a modern, sealed system (the kind with a pressure gauge on your boiler), bleeding a lot of air out can cause the system pressure to drop. You may need to top it up by using the filling loop connected to your boiler. It’s a common ‘gotcha’ that can leave you with no heat if the pressure gets too low!
Fixing Surface Rust: Spot a little rust? Nip it in the bud. With the radiator cold and dry, lightly sand the spot with some 120-grit sandpaper. Wipe off the dust, then apply a metal primer that’s made for inhibiting rust. Finish with a high-heat radiator paint that matches the color. Regular wall paint will just yellow and peel.
System Flushing (A Job for the Pros): If your radiators are cold at the bottom and hot at the top, you likely have a buildup of sludge. This is a mix of rust and dirt that blocks water flow. The fix is a full system power flush. This is one job I strongly recommend leaving to a certified HVAC professional. It involves powerful chemicals and specialized pumps. A DIY attempt can cause serious damage to your boiler and create leaks. Expect to pay somewhere between $500 and $1000 depending on the size of your home, but it’s far cheaper than replacing a ruined boiler.
Only Got 10 Minutes? Do This.
Look, I get it. Sometimes you don’t have an hour. If you want the biggest bang for your buck in just 10 minutes, do this:
- Turn the heat off.
- Grab your vacuum with the crevice tool and go down every single fin from the top.
- Use a hairdryer on its cool/high setting to blow out whatever the vacuum missed.
It’s not a deep clean, but it’ll make a noticeable difference in airflow and reduce that ‘burning dust’ smell next time the heat kicks on.
How Often Should I Do This?
For a deep clean like the one we just walked through, doing it once a year is perfect for most homes. The ideal time is late summer or early fall, right before you need to fire up the heat for the first time. If you have pets that shed a lot or family members with allergies, a quick monthly pass with the vacuum’s brush attachment during heating season is a great idea.
At the end of the day, taking care of your heating system is a smart investment. It’s not just about appearances; it’s about efficiency, savings, and comfort. When you take care of your home’s equipment, it takes care of you.
Inspirational Gallery with Photos
The right tool for the job: A specialized radiator brush, which is long and flexible, is designed to snake between the fins. It’s great for dislodging deep-seated dust.
A clever alternative: A high-quality microfiber duster on a bendable wand, like the OXO Good Grips Microfiber Extendable Duster, can be just as effective. Its electrostatic charge grabs dust rather than just moving it around.
For a final pass, the microfiber option often picks up fine particles the brush might miss.
According to the U.S. Environmental Protection Agency (EPA), indoor levels of some pollutants can be 2 to 5 times higher than outdoor levels.
A significant portion of this indoor pollution is dust, which contains allergens, skin cells, and other particulates. When your heating kicks in, it circulates this dust throughout your home. A deep clean of your radiator fins isn’t just about efficiency; it’s a direct investment in your home’s air quality.
My freshly cleaned radiator still looks a bit tired. Can I paint it?
Absolutely, but don’t just grab any can of paint. Standard emulsions can trap heat, flake, and release fumes when the radiator gets hot. You need a specialist radiator paint, like Rust-Oleum’s Radiator Enamel or the water-based Radiator Paint from Farrow & Ball, which is designed to withstand high temperatures and provide a durable, professional finish. Always apply to a cold, clean, and properly prepared surface for the best results.
- A consistent, even warmth that reaches every corner of the room.
- A noticeable reduction in floating dust particles.
- A longer, more efficient life for your entire heating system.
The secret? Bleeding your radiators once a year, right after their annual deep clean. This releases trapped air, allowing hot water to circulate freely and ensuring you get all the benefits of your hard work.
Don’t have a specialized brush? A simple trick: After turning the radiator off and letting it cool completely, use a hairdryer on its coolest, most powerful setting. Aim it down through the top fins to blow stubborn dust and debris out from the bottom, where you can easily vacuum it up. Place an old towel underneath to catch the fallout.
When thinking about modern heating, consider how design impacts maintenance. The latest radiator trends are a perfect example:
- Column Radiators: Models from brands like Stelrad or Reina offer a vintage look with wide gaps between the columns, making them incredibly easy to wipe down from all angles.
- Flat-Panel Radiators: These minimalist designs have a smooth, solid surface. A quick wipe is often all that’s needed, as there are no intricate fins to trap dust on the front.
The subtle scent of burning dust when you turn on the heat for the first time in autumn is a sure sign the convection fins are clogged. A truly clean radiator is odorless, silently radiating heat without circulating last season’s allergens. It’s the difference between a stuffy, dusty warmth and a fresh, clean heat that makes a room feel genuinely cozy and healthy.
A common mistake to avoid: Using harsh chemical cleaners or abrasive sponges. These can damage the radiator’s paint finish, leading to rust spots over time. A simple solution of warm water with a few drops of dish soap is all you need to wipe down the exterior surfaces after you’ve dealt with the interior dust.
- Vacuum cleaner with a crevice nozzle
- A long, flexible radiator brush
- Bucket with warm, soapy water
- Several microfiber cloths
- An old towel or dust sheet


