My Field Guide to Home Emergencies (And How to Not Panic)
I’ve spent the better part of my life working on homes, learning from old-timers who could tell you what was wrong just by the sound a pipe was making. Over the years, I’ve seen it all. I’ve watched brand-new kitchens turn into swimming pools from a single burst pipe and seen folks ready to sell their house over a furnace issue that took me five minutes to fix. That feeling of helplessness when your own home seems to turn on you? It’s real.
In this article
So, my goal here is simple: I want to give you a field guide for the first 30 minutes of a crisis. What you do right away can literally save you thousands of dollars and, more importantly, put you back in control. We’ll walk through the big ones, why they happen, and exactly what to do to stop the bleeding until a pro can make a permanent fix.
But first, a quick challenge. Pause reading this article for one minute. Go find your main water shut-off valve and take a photo of it with your phone. If you can’t find it or don’t know how to turn it, you’ve just found your project for this weekend. Trust me on this.
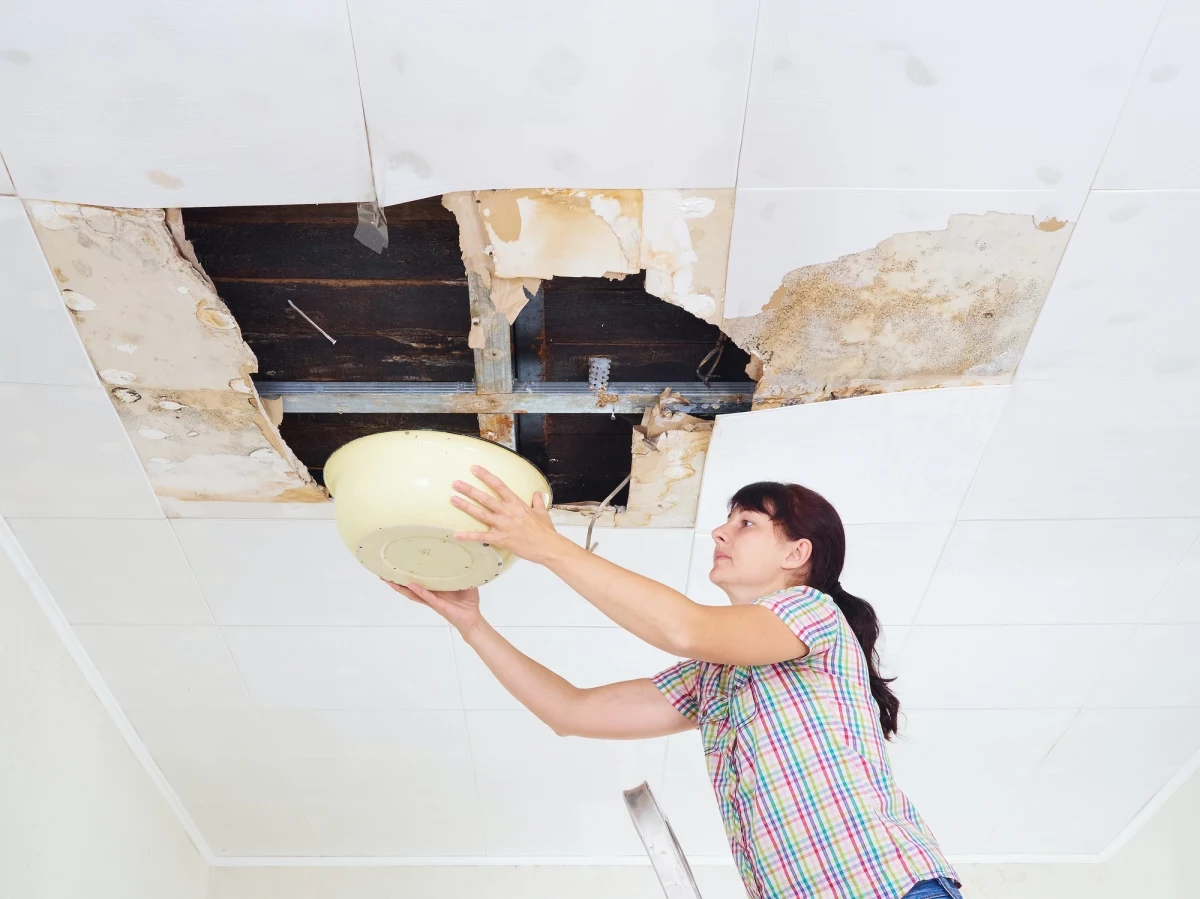
1. The Dreaded Ceiling Stain: Dealing with a Leaky Roof
Seeing a water stain on your ceiling is a gut-punch. It means water has already gotten past your roof, which is your home’s main line of defense. And here’s the tricky part: water is sneaky. A leak can start from a loose shingle on one side of your roof, travel down a beam, and only show up as a drip ten feet away. It’s a real pain to track down.
Why Roofs Suddenly Spring a Leak
Most of the time, it comes down to a few key culprits. Strong winds can get underneath shingles and break the factory sealant, leaving them vulnerable. The next storm pushes water right under there, and it’s all downhill from there—through the underlayment, the decking, and into your attic. In colder places, ice dams are a huge problem. Snow melts on the warmer parts of the roof, then refreezes at the colder eaves, creating a literal dam of ice that forces water backward and under the shingles. Honestly, that’s often a sign of poor attic insulation or ventilation.

From my experience, about 90% of the leaks I’m called to fix aren’t in the middle of the roof. They’re around things that poke through it: chimneys, skylights, and plumbing vents. The sealant around these areas gets baked by the sun, dries out, cracks, and becomes a perfect doorway for water.
Your Immediate Damage Control Plan
Okay, you’ve got a drip. Your job isn’t to become a roofer in the middle of a storm. Your job is damage control. Focus on the water inside the house first.
Crisis Toolkit: For this, you’ll need a bucket, a screwdriver, and for the temporary outdoor fix (if it’s safe!), a heavy-duty tarp. I’m talking about the thick, 6-mil silver or brown kind, not the flimsy blue ones you see everywhere. You’ll also want a few 8-foot 2x4s and some 3-inch exterior screws.
- Inside the house: Get a bucket under that drip, obviously. But what if the ceiling is bulging? That means water is pooling, and the drywall is about to give way. It feels wrong, but you need to take a screwdriver and carefully puncture the center of that bulge. This lets the water out in a controlled stream instead of having a huge, waterlogged chunk of ceiling crash down. A tiny hole is way easier to patch.
- Get stuff out of the way! Move furniture, electronics, and anything valuable out from under the leak zone. Water ruins things fast.
A temporary outdoor fix (use extreme caution):
Let me be crystal clear: DO NOT get on a roof during a storm or if it’s wet. It’s incredibly dangerous, and no amount of saved drywall is worth a fall. This is only for a low-slope roof you can safely walk on after the rain has stopped.
The goal is to cover the leaky area with that heavy-duty tarp. The trick is to lay the tarp down and then lay the 2x4s on top of it, screwing through the wood and the tarp into the roof. This ‘sandwich’ method spreads the pressure and prevents the wind from tearing the tarp off the screw heads. Make sure the tarp goes all the way over the peak of the roof to stop water from running down underneath it.
When to Call a Roofer
This tarp fix is a bandage, not a cure. As soon as you can, call a roofer. An emergency patch might cost a few hundred dollars, but that’s a bargain compared to replacing a whole ceiling. If a roofer says you need a full replacement, which can run anywhere from $8,000 to $20,000 or more, I always recommend getting at least a second, if not a third, opinion.

2. The Burst Pipe: How to Stop an Indoor Tsunami
Few things cause more panic than a burst pipe. Water can gush out at an alarming rate, doing an incredible amount of damage in minutes. This can happen for a couple of reasons. The most common is freezing. When water freezes, it expands with enough force to split a copper or PVC pipe wide open. The funny thing is, the leak often shows up when things start to thaw. The other cause is something called a water hammer—a shockwave that happens when a valve shuts off suddenly (some washing machines are notorious for this). Over time, that shockwave can weaken pipe joints until they fail.
The Single Most Important First Step
Every single person living in your house should know where the main water shut-off valve is. It’s usually a wheel or a lever in your basement, crawl space, or a utility closet where the main water line enters the house. The lever ones (called ball valves) are best—a quick quarter-turn and the water is off. The wheel-style ones (gate valves) can get stiff, which is why I tell homeowners to turn them off and on once a year just to keep them from seizing.
An emergency plumber call can easily cost $200-$400 just for the visit, before they even touch a tool. Knowing how to turn off your water is the most valuable five minutes of work you will ever do for your home.
Your 15-Minute Action Plan
- Shut off the main water supply! This is step one, two, and three. Nothing else matters until you stop the flow.
- Kill the power. If water is anywhere near your electrical panel or outlets, shut off the main breaker. If you can’t get to it safely, get out of the house and call an electrician and the fire department. Water + electricity is a deadly mix.
- Open your taps. After the main is off, go open the faucets on the highest and lowest floors of your house. This helps drain the water still in the pipes.
- Attempt a temporary patch. For a tiny pinhole leak, you can buy a pipe repair clamp at any hardware store for about $10-$15. It’s a metal sleeve with a rubber liner that you clamp over the hole. It’s a fantastic temporary fix. Pro Tip: You need to know your pipe’s diameter before you run to the store. Most homes use 1/2-inch or 3/4-inch copper or PEX. Measure it, write it down, and tape it to the inside of your utility closet door. You’ll thank yourself later.

Time to Call in the Pros
Once the water is off, call a licensed plumber. Don’t trust a temporary patch for long. They’ll need to cut out the damaged section and replace it. While they’re there, it’s smart to have them look at the surrounding pipes, as one failure can be a sign of more to come. If you have significant water on the floor, you should also call a water mitigation company. They have special equipment to dry everything out and prevent mold, which can start growing in just a day or two and is often covered by homeowner’s insurance.
3. The Overflowing Toilet: A Messy but Fixable Fiasco
Okay, this one is gross, but it’s usually manageable. The key is to act fast and stop the water before you worry about the clog.
A toilet works by siphoning the bowl’s contents away when a large volume of water from the tank rushes in. If there’s a clog, that water has nowhere to go but up and over the rim. The fill mechanism in the tank doesn’t know there’s a problem; its only job is to refill the tank, which just keeps feeding the overflow. You have to break that cycle.

Your Step-by-Step Response
- DO NOT FLUSH AGAIN. It’s a tempting, panicked instinct. Don’t do it.
- Stop the Water: Look behind the toilet near the floor. You’ll see a small valve. Turn it clockwise to shut off the water. If it’s stuck, take the lid off the tank and lift the float arm (the thing with a ball or cup on the end) to stop the tank from refilling.
- Clean Up the Mess: Use old towels to contain the water. And please, wear rubber gloves. This is a sanitation issue.
- Plunge Like You Mean It: You need a flange plunger (it has a bell-shaped end), not a flat cup plunger. Get a good seal in the toilet bowl. Push down gently first to get the air out, then plunge vigorously 15-20 times. You’re using water pressure to dislodge the clog.
- Bring in the Auger: If plunging fails, the next tool is a toilet auger (or closet snake). You can get one for $15-$25. It’s a cable designed to snake through the toilet’s trap and break up or pull back whatever is stuck in there without scratching the porcelain.
When the Clog Wins
So what’s the usual culprit? Let’s be honest, it’s almost always something that shouldn’t be flushed. The number one offender I see? So-called “flushable” wipes. Let me tell you, as a guy who deals with the aftermath, there is no such thing. They are a plumber’s retirement plan. They don’t break down and they cause stubborn clogs.
If your auger can’t clear it, the problem is deeper in the pipes. Don’t pour chemical drain cleaners down there. They rarely work on these kinds of clogs, can damage your pipes, and make the water caustic and dangerous for the plumber who eventually has to deal with it. Time to make the call.
4. The Furnace Goes Silent: Restoring Heat Safely
A furnace quitting in the dead of winter is a serious problem. But before you make that expensive emergency call, run through this checklist. I’ve probably solved a third of my “no heat” calls over the phone by having the homeowner check these things first.
A Quick Diagnostic Checklist
- Check the Thermostat: Seriously. Is it set to “Heat”? Is the temperature set above the current room temp? Are the batteries dead? This solves more problems than you can imagine.
- Check the Breaker: Your furnace has its own circuit. Find your panel and see if it’s tripped. Flip it all the way off, then firmly back on.
- Find the Emergency Switch: Most furnaces have a power switch that looks just like a light switch. It’s usually near the furnace unit or at the top of the basement stairs. I can’t tell you how many times I’ve driven 45 minutes in a snowstorm to find someone accidentally flipped it off. That’s a very expensive mistake.
- Check the Air Filter: A badly clogged filter can choke the furnace, causing it to overheat and shut itself down as a safety measure. Pull yours out. A clean one is white or blue; if yours is covered in a thick, gray blanket of dust, you’ve found the problem. Try running it for a few minutes without the filter. If it kicks on, go buy a new filter immediately. A new one costs between $5 and $20, while an emergency HVAC call can be $150-$300 just for the visit.
The Big Safety Warning
This is non-negotiable. Your furnace burns fuel, and a byproduct of that is carbon monoxide (CO), an invisible, odorless, and deadly gas. Every home with a fuel-burning appliance MUST have working CO detectors. If your detector ever goes off, don’t try to be a hero. Get everyone out of the house immediately and call 911 from outside or a neighbor’s house. Period.
When to Call an HVAC Tech
If you’ve gone through the checklist and it’s still silent, it’s time to call a pro. Don’t start trying to fix things inside the furnace cabinet yourself. You’re dealing with natural gas, high voltage, and complex electronics. It is not a DIY job.
5. Unwanted Guests: The Sudden Pest Invasion
Finding pests in your house feels like a violation. The key to dealing with them is to think like they do: they’re just looking for food, water, and shelter. Your job is to take all three away.
When I’m called about a rodent problem, the first thing I do is a lap around the outside of the house. Traps inside are great, but they won’t stop new ones from getting in. A mouse can squeeze through a hole the size of a dime.
Your Immediate Response Kit
Your anti-invader kit is simple: a pack of coarse steel wool, a can of expanding foam sealant, and the right kind of traps. For mice, the classic wooden snap traps are still brutally effective. For ants or roaches, bait stations are usually better than sprays because the workers carry the poison back to the nest.
- Seal All Entry Points: Find any gap around pipes or in the foundation and stuff it TIGHTLY with steel wool. Mice hate chewing on it. For larger gaps, you can use the foam. A DIY sealing effort might cost you $30 in materials, while a professional visit will start around $150-$300.
- Cut Off the Buffet: This is huge. All food, including pet food, goes into sealed glass or hard plastic containers. Clean up every crumb, every spill. A spotless kitchen is your best weapon.
- Trap Smart: Place mouse traps along walls, where they like to travel, with the baited end facing the wall. A little peanut butter is all you need.
When to Call an Exterminator
Be smart with pesticides, especially if you have kids or pets. Read the label. Some problems, however, are not DIY jobs. If you suspect termites (look for mud tubes on your foundation or damaged wood), bed bugs, or have a massive infestation of anything, call a licensed professional. They have the tools and training to deal with it safely.
A Final Bit of Advice: Build Your Pro Team Early
Look, the best time to find a great plumber, electrician, or roofer is when you don’t actually need one. Ask your neighbors for recommendations now. Get their numbers and put them in your phone. Having a trusted pro you can call when things go sideways is the single best tool a homeowner can have. A little preparation goes a long, long way.
Inspirational Gallery
A ticking time bomb in your laundry room: The standard rubber supply hoses that connect your washing machine. They are under constant pressure and degrade over time. Experts recommend replacing them with braided stainless steel hoses every five years to prevent a sudden, catastrophic burst.
According to the Insurance Information Institute, water damage and freezing account for nearly 24% of all homeowners insurance claims, with the average claim costing over $11,000.
Hear a mysterious buzzing or sizzling from an outlet or switch?
That sound often indicates a loose wire or a failing connection, which is a serious fire hazard. Do not touch it or try to unplug anything from it. Go directly to your electrical panel, identify the corresponding circuit, and shut off the breaker. Only then is it safe to call an electrician.
For a pinhole pipe leak: A self-fusing silicone tape is excellent. It stretches and bonds to itself under tension, creating a high-pressure seal that works even on wet, active leaks.
For a larger crack or joint leak: A two-part epoxy putty is your best bet. You knead it together and mold it over the damaged area, where it hardens like steel. It offers a more rigid, structural patch while you wait for a plumber.
Beyond a standard toolbox, every home should have a dedicated
Did you know some smart devices can detect leaks as small as one drop per minute?
That’s the power of modern smart water monitors. Devices like the Moen Flo or Phyn Plus attach to your main water line and use sophisticated sensors to learn your home’s unique water pressure signature. If they detect an anomaly—a burst pipe or even a tiny drip—they can automatically shut off your main water supply and send an alert to your phone, potentially averting disaster whether you’re home or away.
- It speeds up your insurance claim significantly.
- It provides undeniable proof of the extent of the damage.
- It helps the adjuster understand the situation before they even arrive.
The secret? Before you clean up any major water or fire incident, take 60 seconds to document everything with your phone’s camera. Get wide shots of the room, close-ups of the source, and photos of any damaged property.
The Most Overlooked Fire Hazard?
It’s not the kitchen stove; it’s the dryer vent. Lint is highly flammable, and when it builds up in the long, often flexible, duct behind your dryer, it drastically reduces airflow. This causes the machine to overheat, creating a perfect scenario for a fire. Clean the ductwork thoroughly at least once a year.


