Your Ultimate Guide to Flocking a Christmas Tree (Without a Total Mess)
I’ve been wrapped up in holiday decorating for years, and I’ve seen countless trends pop up and fade away. But you know what never goes out of style? The quiet magic of a flocked Christmas tree. There’s just something about it. A properly flocked tree can completely change the vibe of a room, making you feel like you’ve brought a piece of a silent, snowy forest inside.
In this article
But let’s be honest, it can feel a little intimidating. People love the look but worry about the mess, getting the technique right, or how on earth to decorate a canvas that’s already so bold. I get it. I’ve flocked everything from little six-foot trees for cozy living rooms to massive evergreens for commercial spaces, and trust me, I’ve made all the mistakes so you don’t have to.
My goal here is to cut through the fluff (pun intended) and give you the real, hands-on scoop. We’ll cover what flocking actually is, how to do it yourself, and—most importantly—how to decorate it like a pro. Let’s get you set up to create something amazing.
First Off, What Exactly Is This ‘Snow’?
Before you even think about buying a bag of powder or a pre-flocked tree, it’s good to know what you’re actually working with. In the design world, we don’t just call it “fake snow.” We talk about what it’s made of and how it works, because that’s the key to getting it right.
Modern Christmas tree flock is a pretty clever mix. The fluffy white stuff is usually cellulose pulp—basically, fine paper fibers. Some fancier versions might use cotton or rayon for a slightly different texture. But the magic ingredients are the adhesive and a fire retardant.
The adhesive is what makes it stick, and it’s typically a cornstarch-based glue. This is why water is so important. When you mist the tree and then the powder, you’re activating that glue, creating a bond that gets surprisingly tough as it dries. It’s way more durable than those spray cans of snow, which just sit on the surface and flake off if you breathe on them too hard.
And the fire retardant? That’s an absolute must. Any professional job has to meet strict fire safety codes, and thankfully, any reputable flocking powder you buy for home use includes these retardants, too. It’s a huge safety feature, especially with lights involved. This is the main reason I always steer people away from those DIY flocking recipes using soap shavings or flour—they completely lack this tested fire protection.
Choosing Your Snowy Adventure: The Three Paths
You’ve got three main ways to get a flocked tree, and each one has its pros and cons, especially when it comes to cost and effort.
- The Easy Way: Pre-Flocked Artificial Trees. This is your cleanest, most convenient option. The flock is applied in a factory, so there’s zero mess for you. The downside? Quality and cost vary wildly. A cheap pre-flocked tree might look chalky and shed like crazy. A high-quality one, on the other hand, will have a thick, fibrous texture and can last for a decade if you treat it right. Expect to pay anywhere from $250 for a basic 7-footer to well over $800 for a premium model. Oh, and a quick tip: Store it in a proper tree bag, not the original cardboard box. Boxes can crush the flock and scrape it off.
- The Hybrid: Professionally Flocked Real Trees. Love the smell of a real pine but want the snowy look? Some tree farms and local nurseries will flock a fresh tree for you for an extra fee, usually somewhere between $50 and $100 depending on the tree’s size. The flock actually helps seal in the needles’ moisture, so your tree might even last a little longer. Just make sure to ask if their flock is fire-retardant and take a look at a sample so you know what you’re getting.
- The Creative Route: DIY Flocking. This is my favorite, because you have total control. You pick the tree, you pick the flock, and you decide if you want a light dusting or a heavy-blizzard look. It’s a messy but incredibly rewarding project, and it’s the method we’re going to focus on.
The Art of DIY Flocking: A Step-by-Step Guide
I always say that flocking is 80% preparation and 20% application. If you rush the setup, you’re going to have a bad time. Seriously, take your time here and the rest is a breeze.
Let’s Talk Prep (and Cleanup!)
First, your workspace. A garage with the door open or a sheltered patio on a calm, windless day is perfect. I beg you, do not try this in your living room. The fine dust will get EVERYWHERE. Lay down a big plastic or canvas drop cloth—I’m talking way bigger than the tree. For an 8-foot tree, a 12×15 foot cloth is a good starting point.
Next up, your shopping list. This isn’t the time to skimp on safety gear.
- Flocking Powder: You can find this online or in bigger craft stores. Brands like Sno-Bond are fantastic. A 5-pound bag runs about $20-$35 and should be plenty for a 7-foot tree with medium coverage. Some come in brilliant white, while others have a touch of iridescence for sparkle.
- N95 Respirator Mask: This is non-negotiable. A simple dust mask won’t cut it. You’ll be working with airborne particles, and you don’t want that in your lungs. A good one is only about $5.
- Safety Goggles: To keep that powder out of your eyes.
- A Good Sifter: For small jobs, a kitchen flour sifter works. For a whole tree, I’d invest in a dedicated hand-crank flock sifter for about $10-$15. It makes life so much easier.
- Spray Bottle: Get one that produces a fine, even mist. A bottle that shoots streams or big droplets will make the flock clumpy. You can find a good one at any hardware store for around $5.
A quick note on cleanup: The best time to clean is when it’s dry! Let any powder that falls on the drop cloth dry completely. Then you can just fold the cloth, take it outside, and shake it out. If you get wet, sticky flock on a surface you didn’t mean to, let it dry fully before trying to scrape it off. Trying to wipe it up while wet just smears the adhesive.
The Application: My Wet-Flock-Wet Method
Not ready to commit to a whole tree? A great way to start is by flocking a small wreath or a few pinecones. It’s a 20-minute project that lets you get a feel for the material without the pressure.
Ready for the main event? Plan for about 2-3 hours of actual work for a 7-foot tree. The rhythm is simple: mist a section, sift on the flock, then mist it again to seal it. Work in small, manageable sections from the top of the tree down.
- The First Mist (The Primer): Lightly mist a 2-foot-square section of branches. You want them damp, not dripping. This is the primer that helps the powder grab on.
- Apply the Flock: Hold your sifter above the damp section and sift the powder downwards, letting gravity do the work. This creates a natural, settled-snow look. For a light frost, go easy. For heavy snow, apply it generously until it builds up.
- The Second Mist (The Sealant): This is the crucial step! Give the freshly powdered section another light misting. This activates all the adhesive and locks the flock onto the needles as it dries, making it durable.
Keep going with this rhythm, rotating the tree as you work. Don’t forget the inner branches! A little bit of snow on the inside adds a ton of depth and realism.

Common Pitfall: What if you use too much water? You’ll know because the powder will turn into a clumpy, paste-like mess instead of staying fluffy. Don’t panic! Just stop, let that section dry a bit, and then you can usually just gently brush the clump off and try again with a lighter mist.
My Big Flocking Mistake (So You Don’t Make It)
Early in my career, I was rushing to finish a project. I moved a freshly flocked tree indoors before it had fully cured. The tree looked fine, but overnight, the still-damp flock absorbed moisture from the air, and little white, gluey clumps started dripping onto the client’s beautiful dark wood floors. I spent the next morning on my hands and knees cleaning up my mess. It was humbling, to say the least. The lesson? Patience is everything. Give your tree a full 48 to 72 hours to dry completely before you even think about decorating it.

How to Decorate a Flocked Tree
Okay, your tree is dry and you’re ready for the fun part. Decorating a flocked tree is different. You’re starting with a bright, textured base, so your job is to add color and depth without it looking chaotic.
Let There Be (the Right) Light
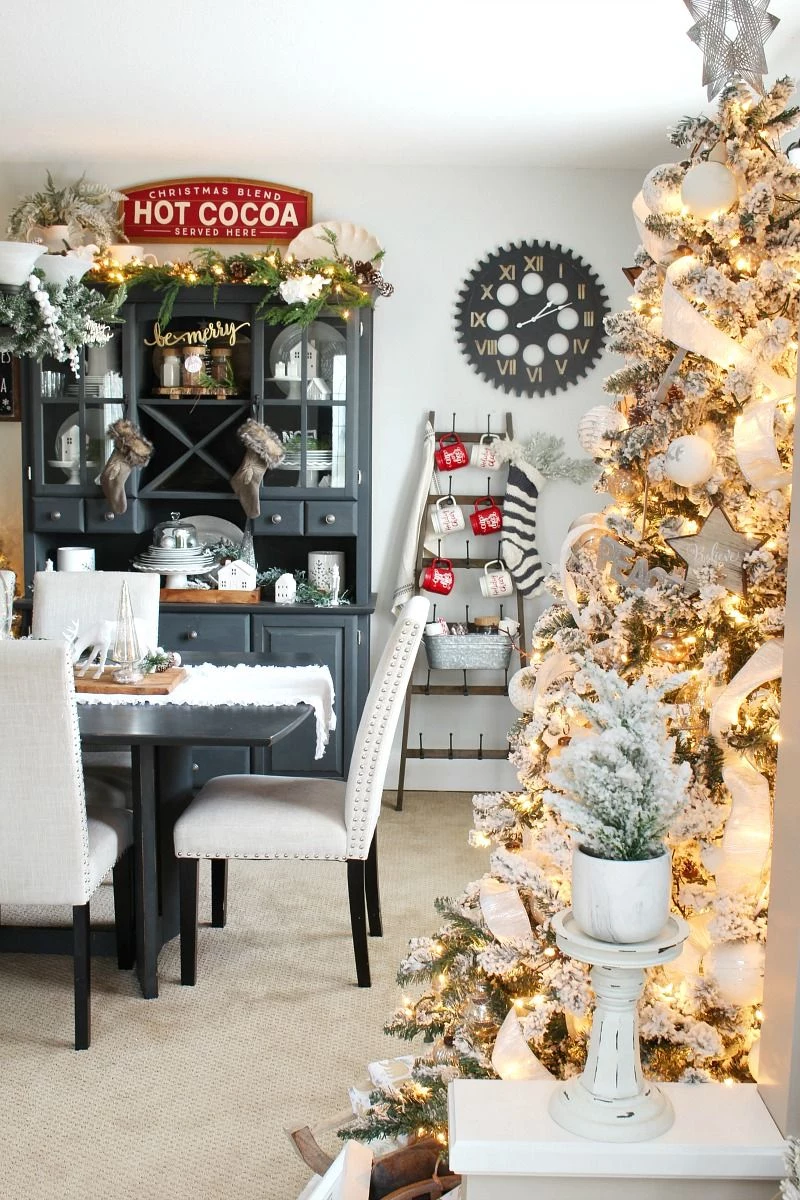
Lighting is everything on a flocked tree. The white surface acts like a giant, soft reflector, creating a gorgeous ambient glow. I almost always use warm white lights (look for a 2700K to 3000K color temperature). That soft, candle-like glow against the cool white of the snow is just beautiful and cozy. Cool white lights can work for an icy, modern look, but they can easily feel sterile.
Here’s a pro tip: Aim for at least 150 lights per vertical foot. The snow really soaks up the light, so a 7-foot tree needs over 1,000 lights to look truly spectacular. And use two sets:

- The Inner Glow: Wrap your first set of lights deep inside the tree, close to the trunk. This makes it look like it’s glowing from within.
- The Tip Sparkle: Drape the second set loosely around the outer tips of the branches to add that classic holiday sparkle.
Heads up! A critical safety reminder: Never have your lights plugged in while you’re applying flock with water. It’s a shocking combination… literally. Always check your light strings for damage before you put them on the tree.
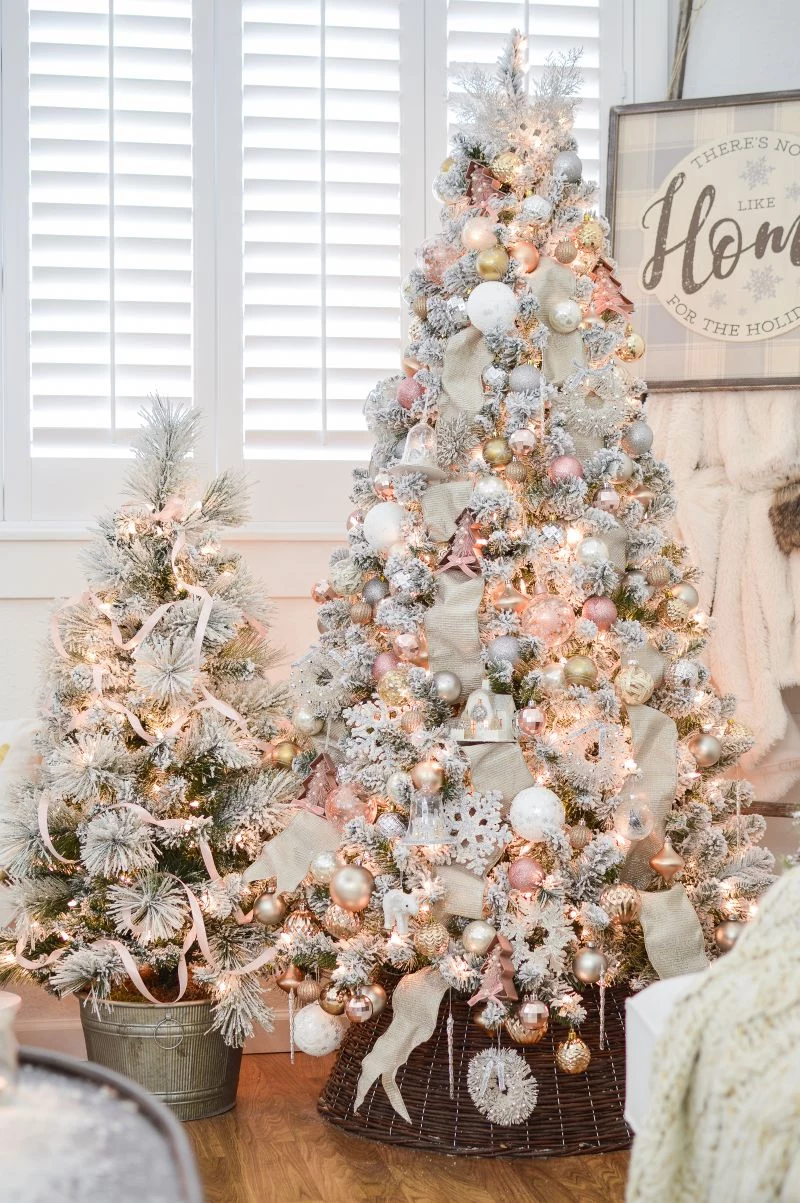
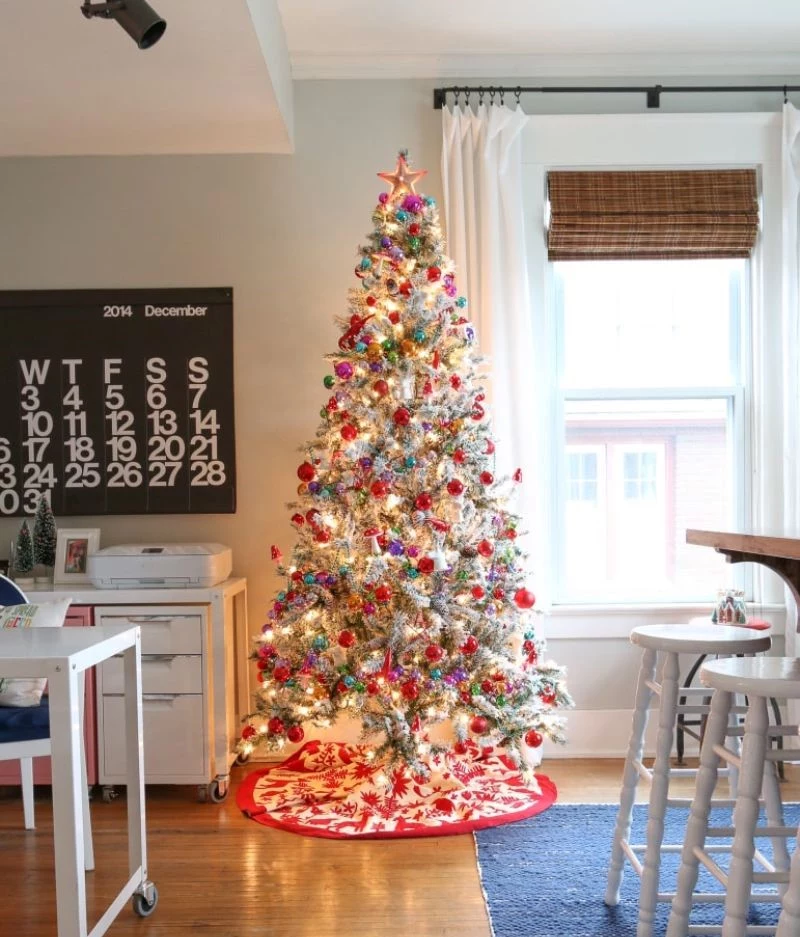
Color Palettes That Really Pop
With a white canvas, your color choices are super important. Here are a few foolproof palettes:
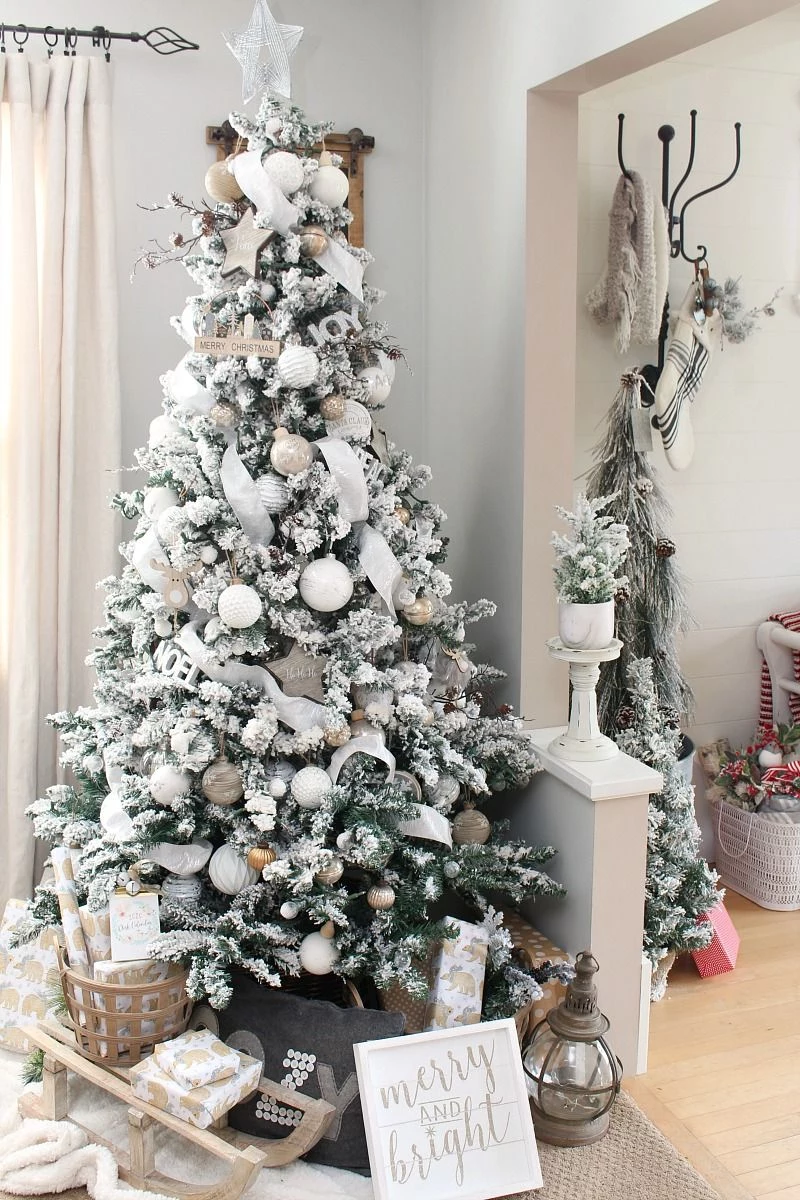
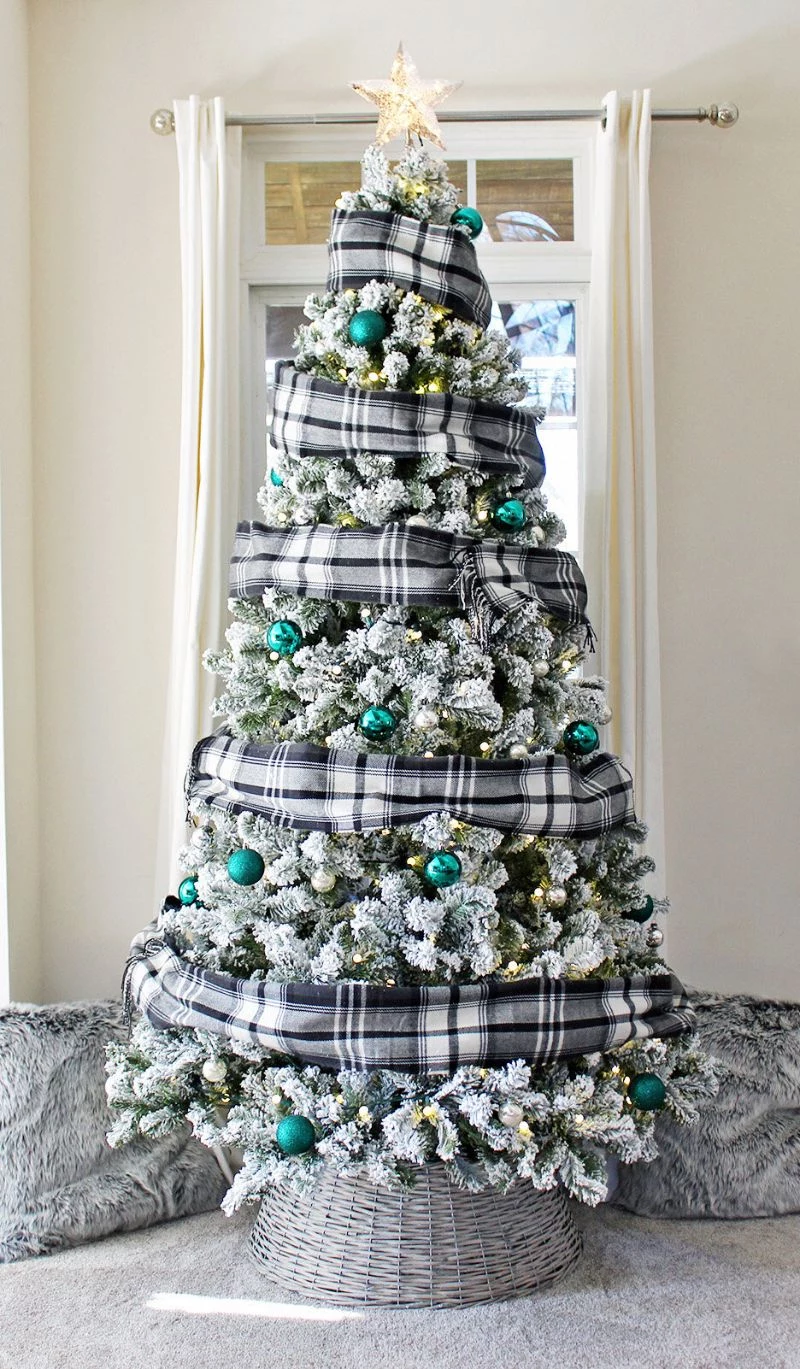
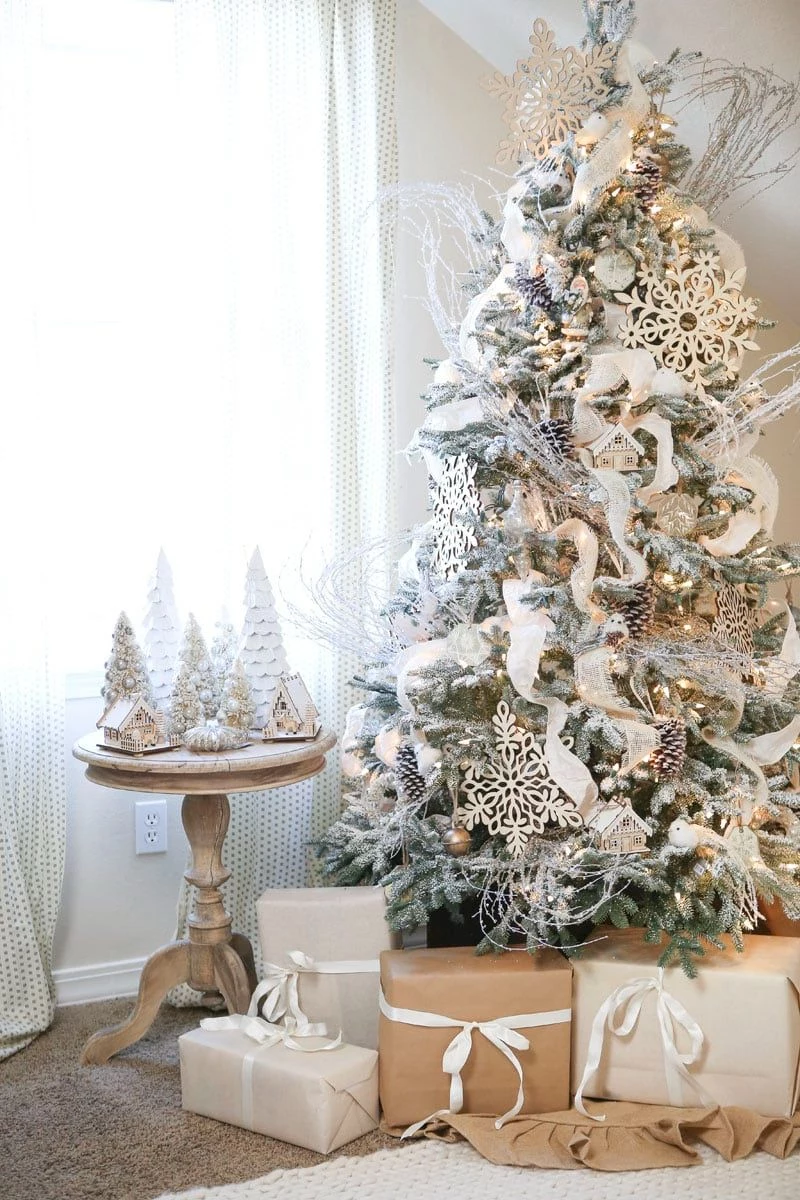
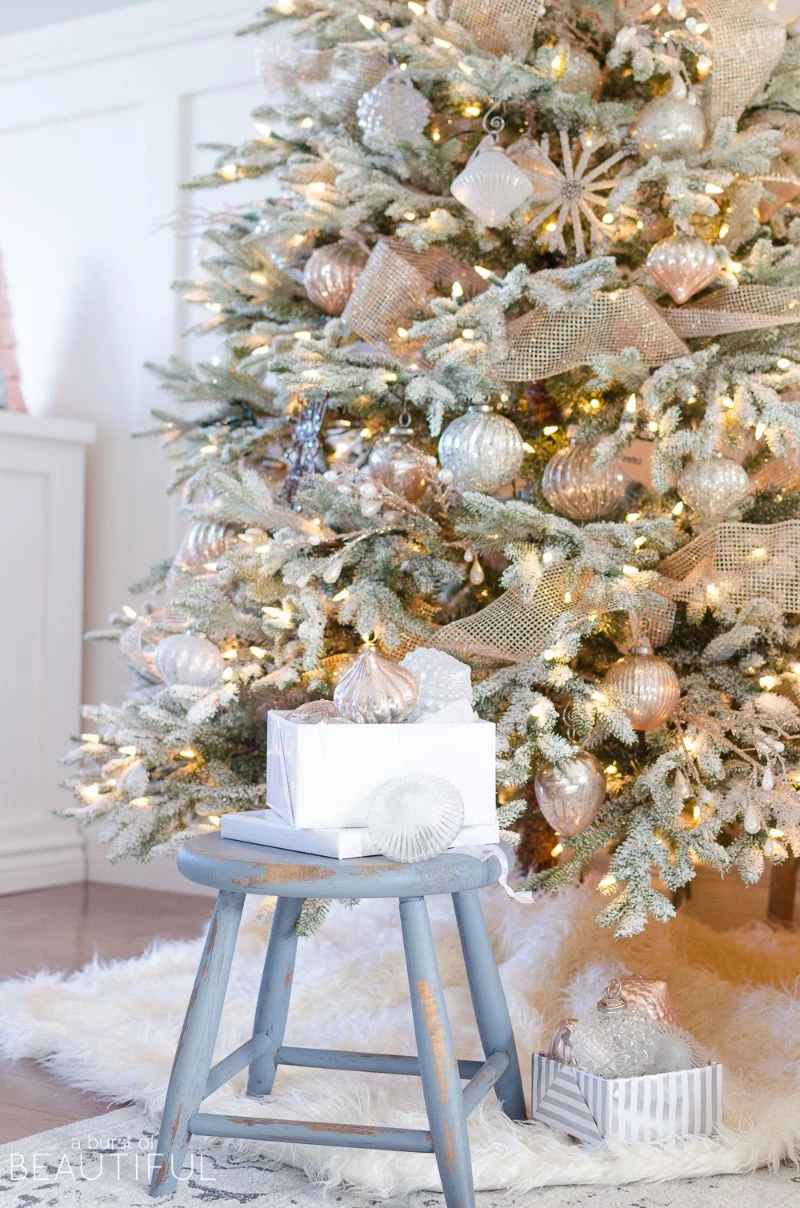
- Monochromatic Metals: So elegant. Mix silver, champagne, pearl, and white ornaments. The key is to vary the textures and finishes—shiny balls, matte icicles, glittered snowflakes. This creates a rich look without using a lot of color.
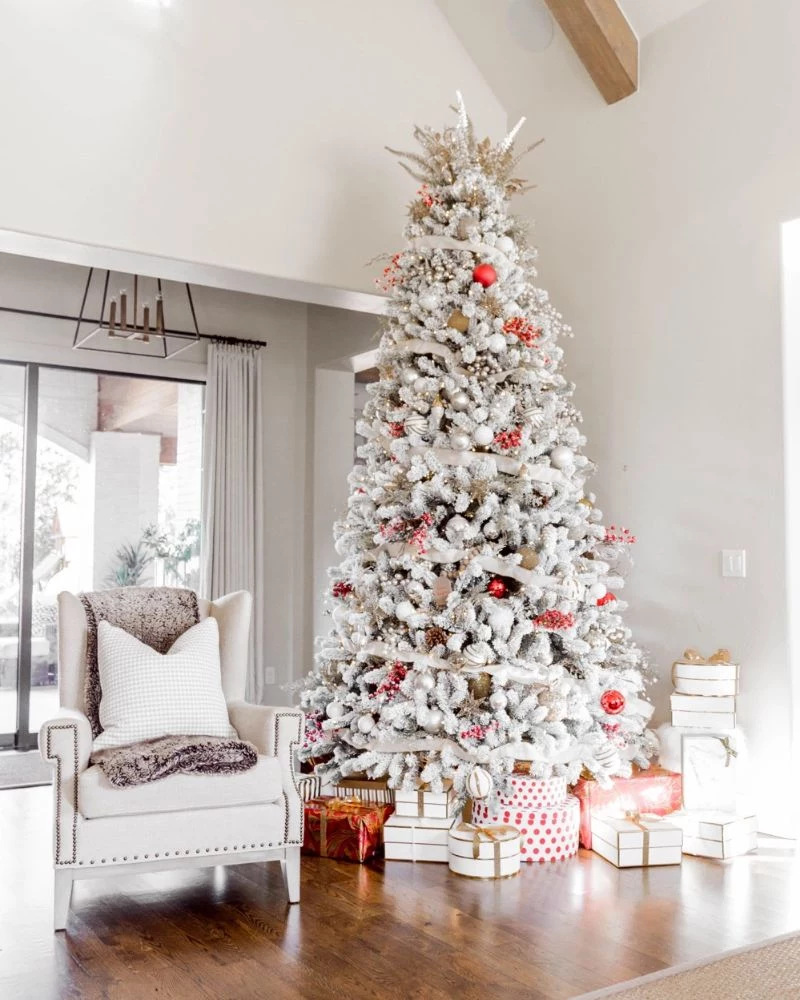
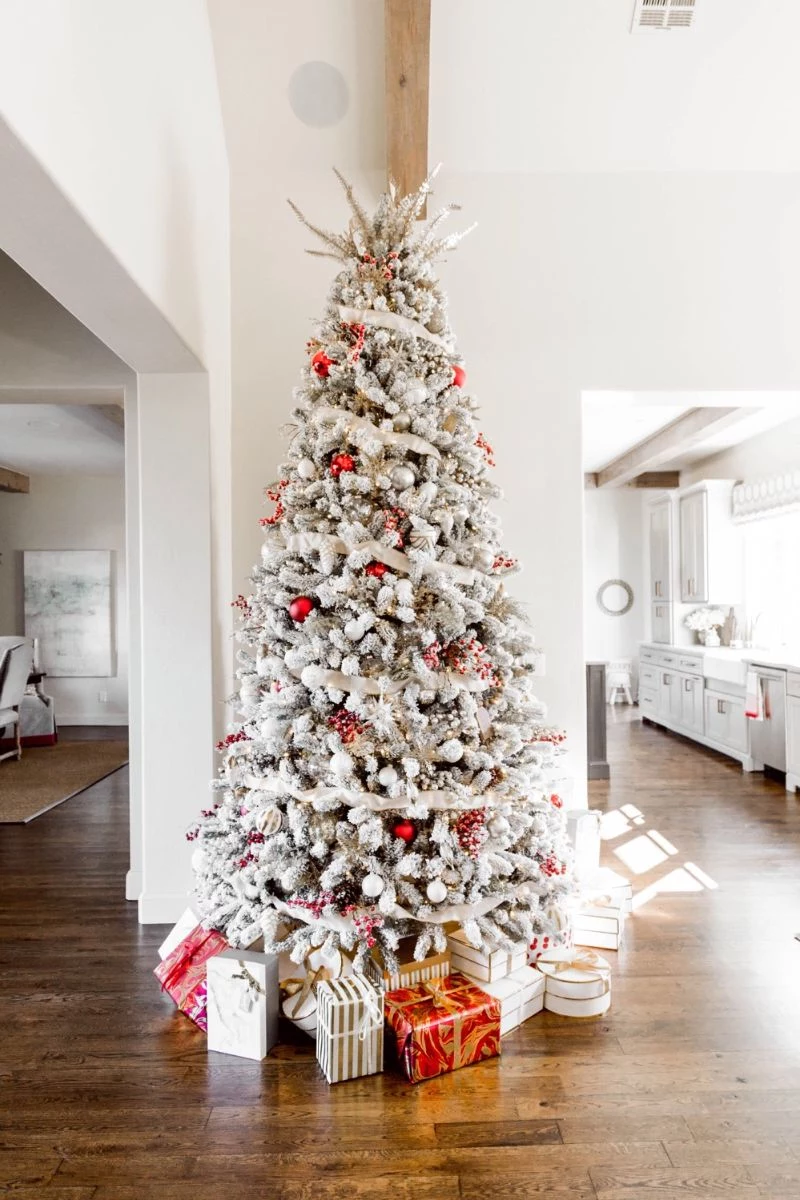
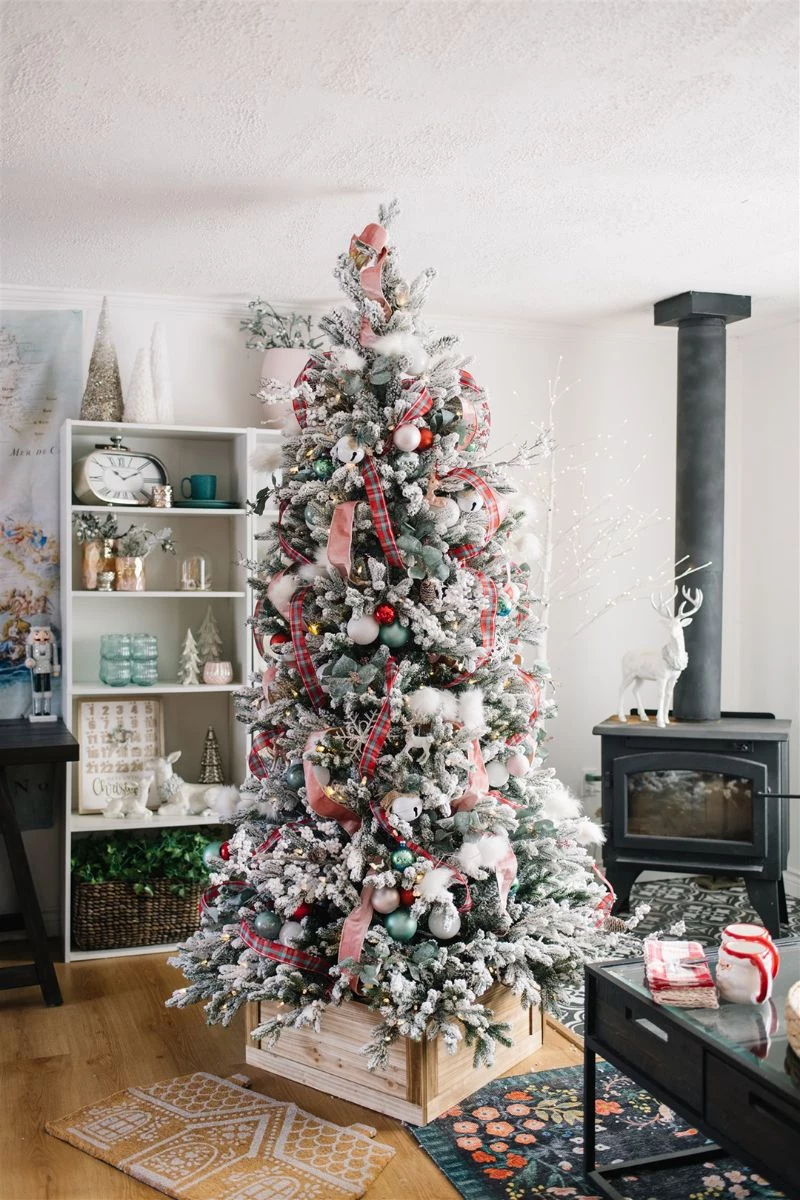
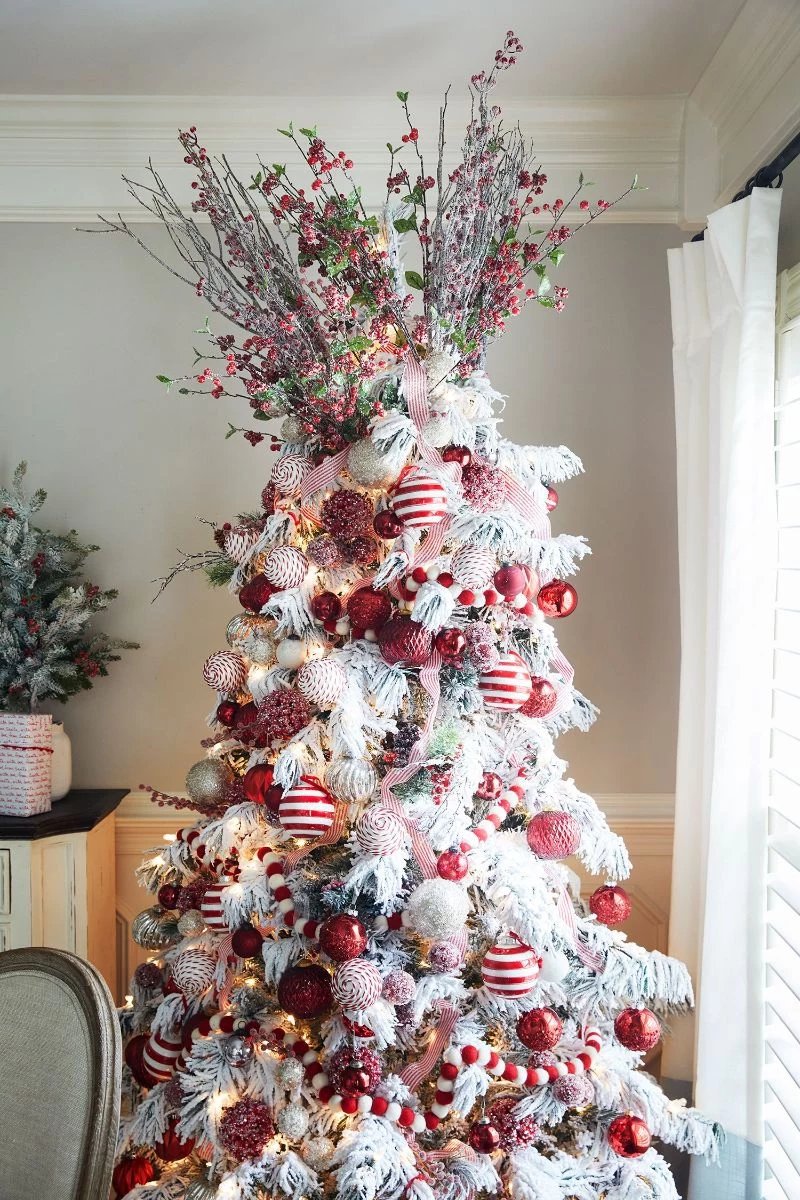
- Classic Red and White: You can’t go wrong. Red stands out dramatically against the white. To keep it feeling sophisticated, use a couple of different shades, from a deep burgundy to a bright berry. A high-quality plaid or velvet ribbon really anchors this theme.
- Warm, Rich Metallics: Think gold, bronze, and copper. This combination looks incredibly luxurious against the white flock. It’s a warm, inviting look that feels very high-end. Again, mix your finishes: brushed gold, shiny copper, and muted bronze.
- Natural & Rustic: For that cozy, cabin-in-the-woods vibe. Use natural elements like pinecones (you can lightly flock them to match!), wooden bead garlands, and burlap ribbon. This style is all about the contrast between the soft snow and rough, organic textures.
It’s funny, I’ve noticed that even climate can influence style. In warmer, sunnier places, clients sometimes ask for brighter, more coastal-inspired themes with cool blues, sea glass greens, and silvery accents. It just goes to show you, once you have your beautiful snowy canvas, you can take it in any direction you want!

Inspirational Gallery

Can you flock a real Christmas tree?
Absolutely, but with a few caveats. The flocking process requires misting the branches with water, which can accelerate the drying process of a live tree. To maximize its freshness, give it a very deep drink of water for 24 hours before you begin and flock it as soon as possible after bringing it home. Also, be aware that most tree recycling services will not accept flocked trees, so plan for disposal ahead of time.
- Create a protective “tent” by draping plastic drop cloths from the ceiling around your work area.
- Wear a mask and goggles; flocking powder is fine and gets everywhere.
- Ensure your tree stand is level and secure before you start.
The secret? Proper preparation transforms a potentially messy job into a smooth, creative process.

Think beyond white! While classic snow-white is timeless, modern flocking powders are venturing into new territories. Brands like Peak Seasons offer powders in delicate metallics like champagne gold or soft blush pink. These can be a stunning base for a monochromatic or pastel-themed tree, creating an effect that is both trendy and uniquely personal.

The first widespread commercial use of flocking for Christmas trees in the U.S. dates back to the late 1950s, turning the artificial tree industry into a high-fashion affair.
The magic of a flocked tree is how it plays with light. The textured white surface diffuses light beautifully, creating a soft, ethereal glow that uncoated artificial branches can’t replicate. This means you can often use fewer lights to achieve a brighter, more impactful look. For an extra touch of winter wonder, mix warm white and cool white LED strands.
Heavy Flocking: Creates a dramatic, snow-laden look perfect for larger rooms and minimalist decoration. It makes a bold statement on its own.
Light Dusting: Offers a subtle, frosted appearance, as if kissed by the first frost. This works beautifully for more delicate or heavily ornamented trees where you want the decorations to pop.
Ultimately, the choice depends on whether you want the tree itself or your ornaments to be the star of the show.
Once you’ve flocked your tree, the decoration strategy changes. The white ‘snow’ provides a high-contrast background, making certain elements pop.
- Texture is Key: Pair the soft flocking with different textures like burlap ribbons, shiny glass baubles, or matte wooden ornaments.
- Strategic Color: Deep jewel tones like emerald, sapphire, and ruby look incredibly rich against the white.
- Embrace Nature: Simple additions like pinecones and clusters of red berries provide an authentic, rustic touch.

A study by the Electrical Safety Foundation International (ESFI) notes that while tree fires are not common, when they do occur, they are more likely to be serious.
This is why choosing the right lights for a flocked tree is critical. Always opt for low-heat LED lights. Older incandescent bulbs can get hot enough to potentially yellow the flocking material over time or, worse, pose a fire risk in close contact with ornaments and other decorations. Check all light strands for frayed wires before decorating.
DIY Flocking Powder: Using a product like Sno-Bond flock gives you complete creative control over the thickness and placement of your ‘snow.’ It’s a hands-on project that offers a highly customized, professional-looking result. It’s more work, but the payoff is a unique tree.
Pre-Flocked Tree: A ready-to-go option from brands like Balsam Hill or King of Christmas saves you all the time and potential mess of a DIY project. The flocking is applied by machine for a perfectly even coat, though you sacrifice customization.
What about the cleanup and storage?
Some shedding is inevitable. After your tree is fully dry (wait at least 48 hours), take it outside and gently shake it to remove any loose particles before bringing it in for decorating. When the season is over, invest in a high-quality, upright tree storage bag. These zippered canvas bags protect the branches from being compressed, preserving the flocking and saving you from a cloud of dust next year.

A common mistake: Forgetting about the tree’s scent. An artificial tree, especially one covered in flocking, has no natural pine aroma. Bridge the gap by using scented ornaments, or discreetly hang a few ScentSicles sticks deep within the branches. A fragrance like ‘Spruce’ or ‘Winter Fir’ will complete the illusion of a snowy forest in your living room.

- Less mess and powder to handle.
- A more natural, ‘first frost’ appearance.
- Uses significantly less flocking material.
The secret? Instead of a powerful applicator, use a simple kitchen sifter or fine-mesh sieve. Lightly tap it over the tips of the branches to gently dust them, creating a delicate, realistic layer of snow exactly where you want it.
Most modern, commercially available flocking powders for home use are non-toxic and consist of paper pulp (cellulose) and a cornstarch adhesive.
While generally considered safe, it’s always best practice to keep pets, especially curious cats and dogs, away from the flocking area while it’s being applied and until it’s completely dry. Ingesting a large amount of the dry powder or wet mixture could cause digestive upset.


