How to Make an Advent Calendar That Lasts: From a Simple Branch to a Family Heirloom
I can still picture the advent calendar from my childhood. It was this simple felt wall hanging my grandmother sewed, with 24 totally mismatched pockets. But man, every single morning in December felt like magic. It wasn’t even about the cheap little chocolate inside; it was the ritual, you know? That one handmade thing connected our family to the season and, more importantly, to her. It was so much more than a countdown—it was part of our story.
In this article
- The Nitty-Gritty: Choosing Your Materials
- A Quick Word on Safety (Don’t Skip This!)
- Choosing Your Project: A Quick Breakdown
- Project 1: The Beginner’s Branch Calendar (An Afternoon Project)
- Project 2: The Intermediate’s Fabric Pocket Calendar (A Weekend Project)
- Project 3: The Advanced Heirloom Wooden Cabinet (A Multi-Week Project)
- Final Touches and Filling It Up
- Inspirational Gallery
For years now, I’ve been getting my hands dirty making things out of wood, fabric, and pretty much anything else I can get ahold of. I’ve seen firsthand how an object you create yourself holds a special kind of weight that you just can’t buy off a shelf. An advent calendar is the perfect project for this. It can be a super simple afternoon craft or a detailed piece you end up passing down through the family.
So, this isn’t going to be one of those lists of trendy, disposable ideas. Instead, I want to walk you through the real-deal techniques and materials that make a project go from “good enough” to truly great. My goal is to help you make something you’re genuinely proud of—a calendar that keeps building memories long after that last little door is opened.
The Nitty-Gritty: Choosing Your Materials
Before you even think about cutting or gluing, let’s talk materials. Honestly, this is where a project succeeds or fails. Picking the wrong stuff can lead to a warped backboard, saggy pockets, or a calendar that falls apart after one Christmas. No thanks.
For a Sturdy, Classic Vibe: Wood
Wooden calendars just feel timeless and substantial. Build one of these right, and it could seriously last a lifetime.
First up, you have to choose between plywood and solid wood for your main backboard. For a big, flat panel, I almost always recommend birch or maple plywood, which you can find at big box stores like Home Depot. Plywood is made of thin wood layers glued together, which makes it incredibly stable and resistant to warping—a huge issue for solid wood inside a dry, heated home. A solid pine board, for example, can look great at first but might cup or twist over the winter. If you love the look of solid wood, save it for smaller parts like the little drawers.
Oh yeah, and a heads-up: DO NOT skip the primer. Raw wood is basically a sponge. If you paint directly on it, the grain soaks up the paint unevenly, leaving you with a blotchy, amateur-looking finish. A good water-based primer seals the surface, giving you a perfect canvas for your paint. It also helps the paint grip better, so no chipping down the road.
Want that pro, glass-smooth finish? The secret is sanding between coats. After your primer dries, it’s going to feel a little rough. That’s the wood grain being raised by the water in the primer. Just give it a light sanding with 220-grit sandpaper, wipe the dust off with a damp cloth, and then you’re ready for your first coat of paint. Let that dry, sand it lightly again, and then apply your final coat. It feels tedious, but trust me, it’s worth it.
For a Cozy, Soft Touch: Fabric
Fabric calendars are wonderful. They have a cozy, warm feeling, they’re great for homes with little kids, and they’re super easy to store.
The key here is choosing a fabric with some body to it, so it doesn’t sag. Felt is a fantastic choice, especially for beginners. It doesn’t fray (so no hemming!), it’s easy to cut, and you can even assemble it with fabric glue if you’re not a fan of sewing. For a more traditional sewn calendar, a medium-weight cotton or a cotton-linen blend from a store like Jo-Ann works beautifully. Burlap gives a great rustic look, but be warned: it frays like crazy and can be messy.
A big fabric calendar needs some structural support to hang straight. I learned this the hard way after my first attempt ended up looking like a sad, stretched-out t-shirt on the wall. The solution is to sew a simple channel, or a tube of fabric, along the top edge. You just slide a wooden dowel through it, and the dowel distributes the weight perfectly, keeping everything crisp and straight.
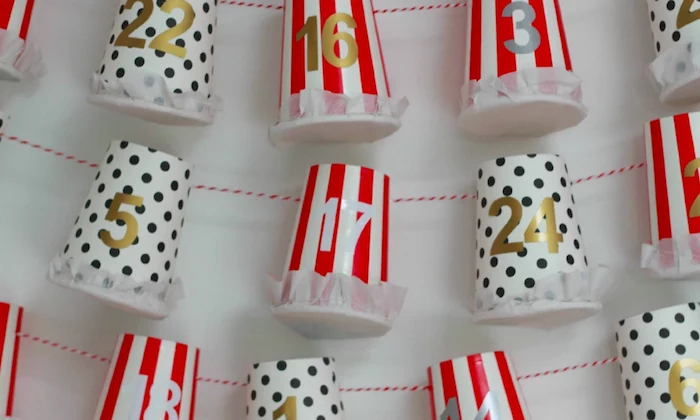
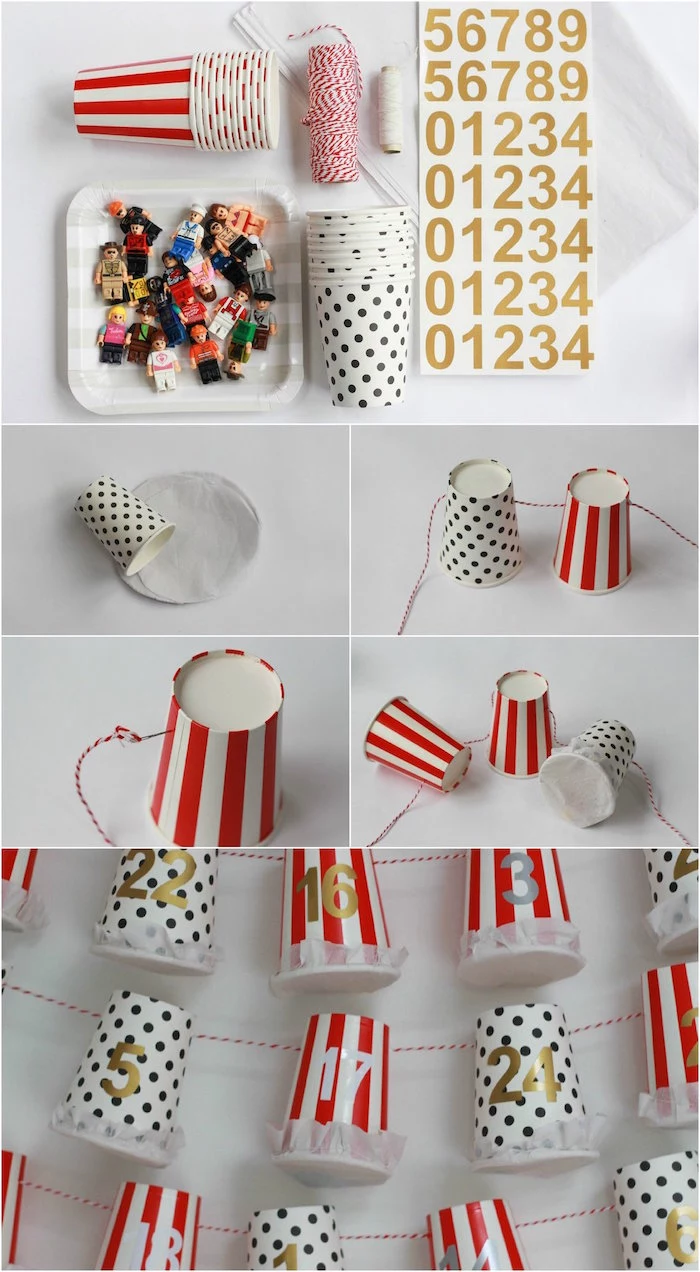
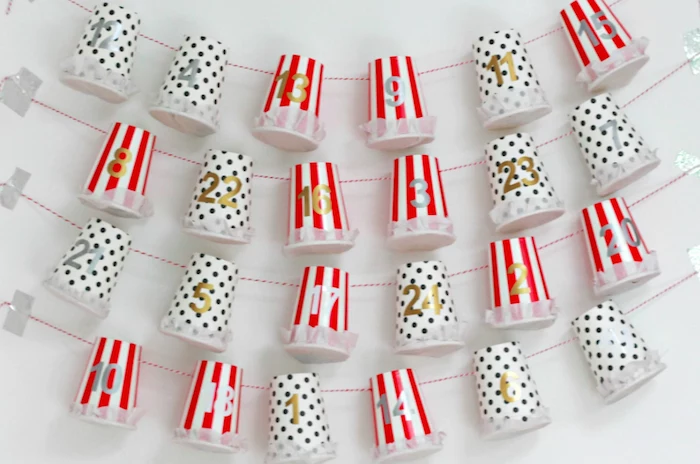
For Quick and Easy Projects: Paper & Glue
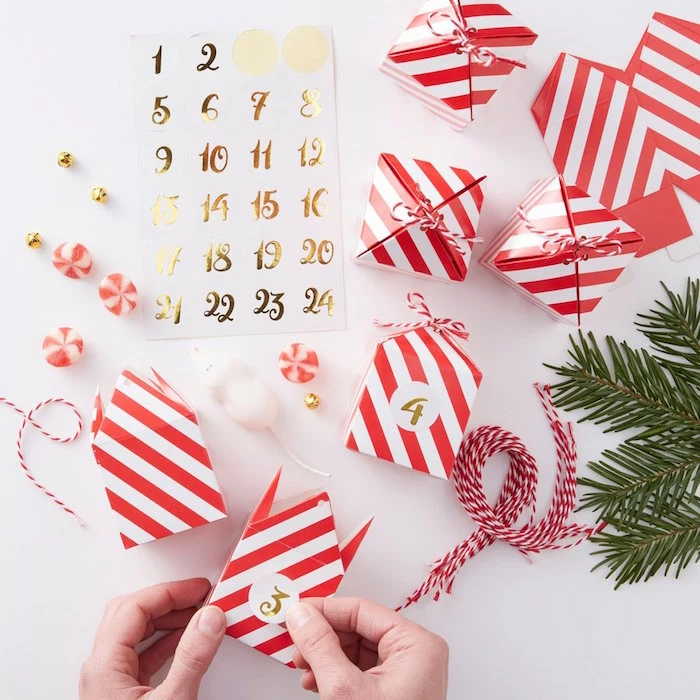
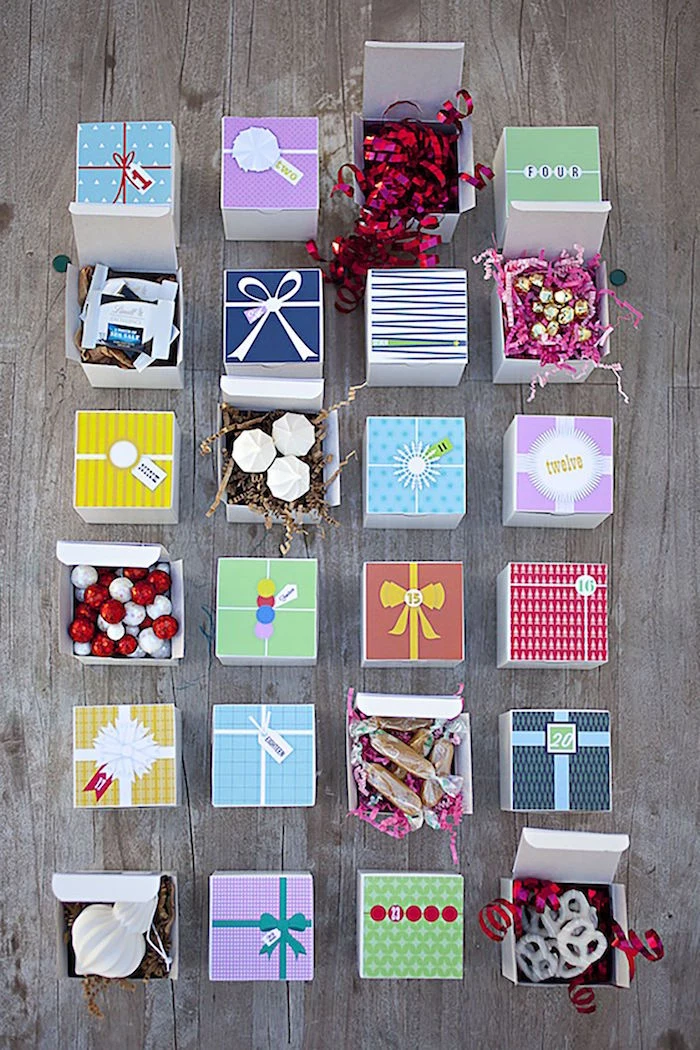
For simpler calendars using paper or cardstock, it’s all about weight and longevity. For anything that needs to hold a shape, like little gift boxes, you need cardstock that’s at least 200 GSM (grams per square meter). Regular printer paper is just too flimsy. And if you want this to last, look for acid-free paper so it won’t get yellow and brittle over time.
A quick word on glue: for wood, a proper wood glue like Titebond creates a bond that’s literally stronger than the wood itself. For paper, a clear-drying craft glue like Aleene’s is your best bet. A hot glue gun is handy for tacking on bulky items, but the bond is weaker and can fail in the cold. Plus, hot glue burns are no joke. I always keep a small bowl of cold water on my workbench, just in case.
A Quick Word on Safety (Don’t Skip This!)
Even simple crafts involve sharp or hot tools, so let’s get this out of the way. Always cut away from your body with a craft knife, use a fresh blade (dull ones are more dangerous), and keep your free hand far from the cutting line. If you’re using power tools for a wood project, safety glasses are non-negotiable, and a dust mask is a great idea for sanding.
Here’s something people often forget: installation safety. Some of these calendars get surprisingly heavy once they’re full! I once made a gorgeous calendar from reclaimed wood and 25 little metal buckets. It was heavy. The client hung it on two small nails in plain drywall. A week later, I got a call—the whole thing had fallen, leaving two giant holes in their wall. Ouch.
The lesson? Heavy items need to be screwed directly into a wall stud. What’s a stud? It’s the vertical wood beam inside your wall. You can find them with a cheap stud finder tool (it beeps when it’s over the wood). No tool? Try the tap test: knock along the wall. A hollow sound is just drywall, but a solid thud means you’ve probably found a stud. If you can’t use a stud, you MUST use a drywall anchor that’s rated for the weight of your calendar.
And if you have young kids around, please use non-toxic, water-based paints and be mindful of small parts that could be choking hazards. An activity-based calendar can be a fantastic, safe alternative to small toys or candies.
Choosing Your Project: A Quick Breakdown
Okay, ready to make something? Here’s the rundown on the three projects we’ll cover to help you pick the right one for you.
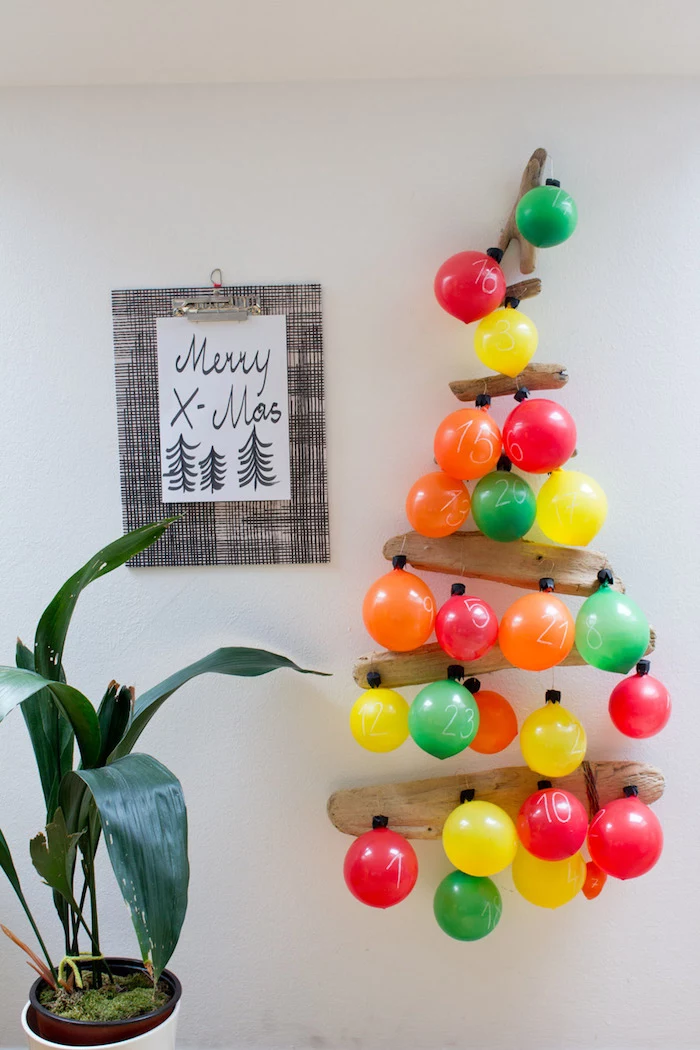
First is the Beginner’s Branch Calendar. This is your go-to if you want something fast, cheap, and stylish. It’ll take you an afternoon, tops, and probably cost you less than $15, especially if you find the branch for free. The skill level is super low—if you can tie a knot, you’re golden.
Next up is the Intermediate Fabric Pocket Calendar. This is a great weekend project that introduces some basic sewing. It’s more of an investment in time, but the result is a durable, charming calendar you can reuse for years. Expect to spend between $20 and $40 on materials, depending on the fabric you choose.
Finally, we have the Advanced Heirloom Wooden Cabinet. This is a true woodworking project that creates a stunning piece of furniture. It takes more skill, time, and money—plan on spending $50 to $75. But what you get is a real family heirloom. By the way, there’s a great shortcut here: you can buy an unfinished cabinet and just focus on the custom finishing, which is where the artistry really happens.
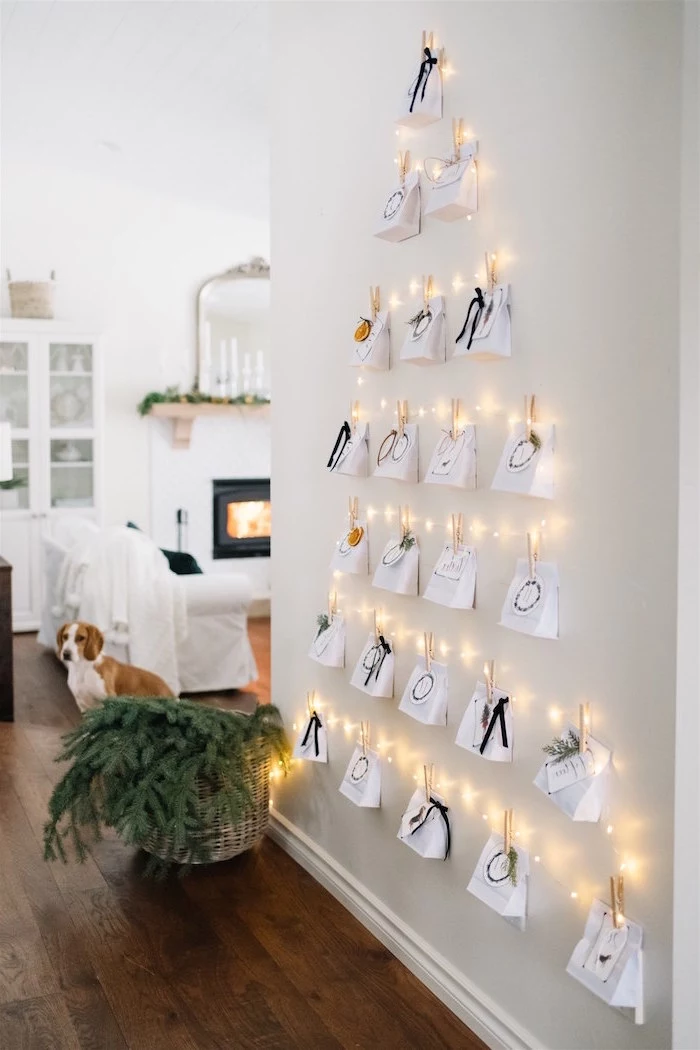
Project 1: The Beginner’s Branch Calendar (An Afternoon Project)
This project is perfect for a first-timer. It’s modern, connects you with a bit of nature, and is incredibly budget-friendly.
Materials You’ll Need:
- A sturdy, dry tree branch (about 3-4 feet long)
- Twine or string
- 24 small paper or fabric pouches (you can find these at craft stores like Michaels)
- Number stamps and an ink pad, or just some number stickers
- Small treats or activity notes to fill the bags
- A screw hook for hanging
- Estimated Cost: Under $15
The Technique:
- Prep the Branch: Find a nice fallen branch that’s completely dry. A wet one can bring mold into your home. Brush off any dirt or loose bark. I like to let mine sit in a warm, dry spot for a week just to be sure.
- Prep the Packages: Number your 24 bags or pouches. Stamping gives a nice handmade look, but stickers are way faster. Fill ’em up!
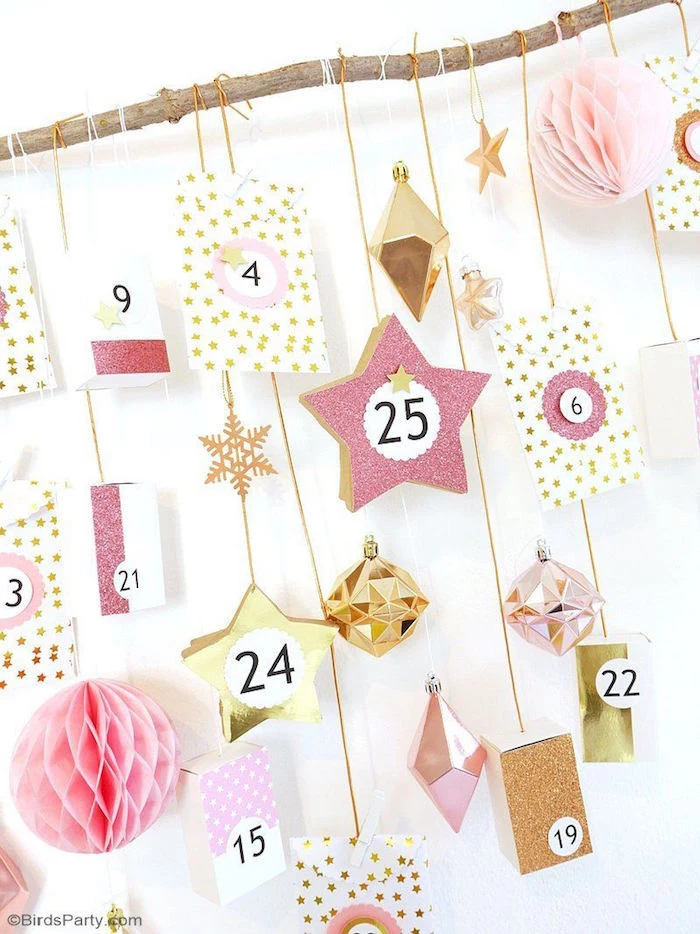
- Attach the Packages: Cut 24 pieces of twine in different lengths, anywhere from 6 to 18 inches. This variation is what makes it look so cool. Tie one end to a bag and the other to the branch. A simple double knot works fine.
- Balance Everything: As you add packages, spread them out to keep the branch balanced. I like to hang the longer strings in the middle and shorter ones near the ends to create a nice V-shape.
- Hang It Up: Install your hook securely into a wall stud. Tie a piece of twine to both ends of the branch to create a hanger, and you’re done!
This calendar is beautiful, but the paper bags might not last more than one season. That’s okay! Making a new set of bags each year can just become part of the tradition.
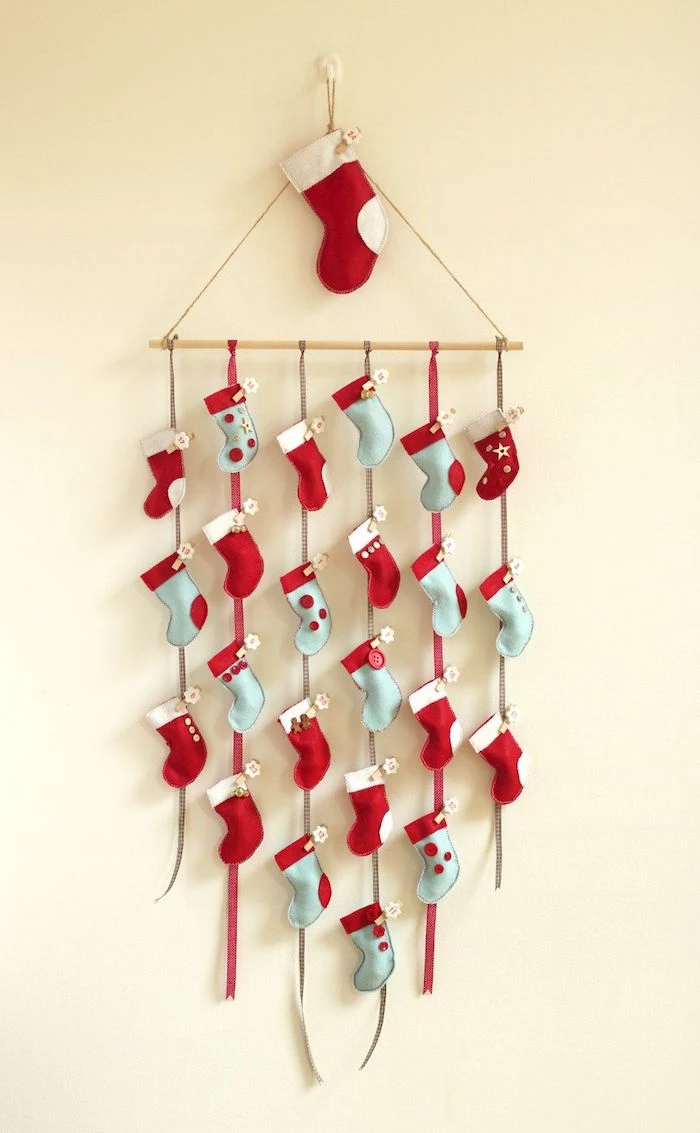
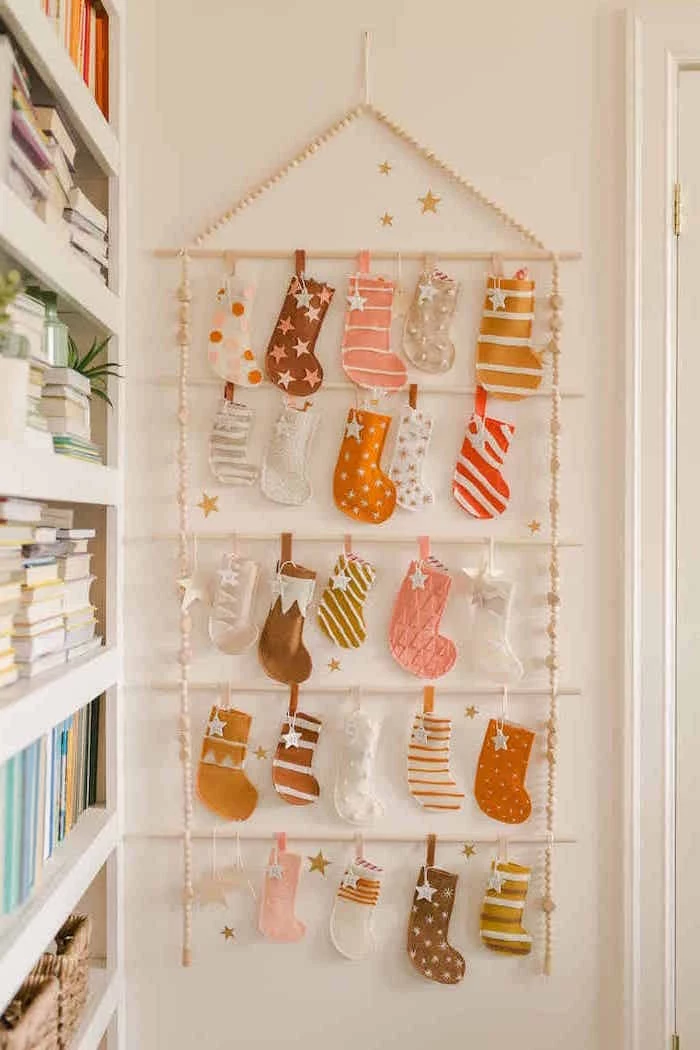
Project 2: The Intermediate’s Fabric Pocket Calendar (A Weekend Project)
This project creates a soft, durable calendar that you can pull out year after year. It takes a bit more patience, but the result is so worth it.
Materials You’ll Need:
- 1 yard of sturdy background fabric (heavy felt, canvas, or denim)
- 1/2 yard of contrasting fabric for the pockets (felt or quilting cotton)
- Matching thread
- Felt numbers or fabric paint
- A wooden dowel, slightly wider than your fabric panel
- A sewing machine (or you can hand-sew with patience!)
- Estimated Cost: $20 – $40
The Technique:
- Prep the Back Panel: Cut your main fabric to size (around 24″ wide by 36″ tall is good). If it frays, hem all four edges.
- Create and Attach Pockets: Cut 24 squares for your pockets, maybe 4×4 inches. Lay them out in a grid on your back panel (I like 4 columns of 6). Use a ruler to get the spacing right and pin them in place.
- Sew the Pockets: Sew down the left, bottom, and right sides of each pocket, leaving the top open. Backstitch at the start and end to lock the seam.
- Create the Hanging Channel: Fold the top edge of the main panel over to the back by about 2 inches and stitch it down to create a tube for your dowel.
- Number and Finish: Glue on felt numbers or use a stencil and fabric paint. Slide the dowel in, tie a string to the ends, and it’s ready for the wall.
Quick Tip: If your pockets look a little saggy or droopy, here’s a great trick. Before you sew them on, iron a small square of fusible interfacing onto the back of each pocket square. You can get it at any fabric store. It adds stiffness without much bulk and keeps the pockets looking sharp.
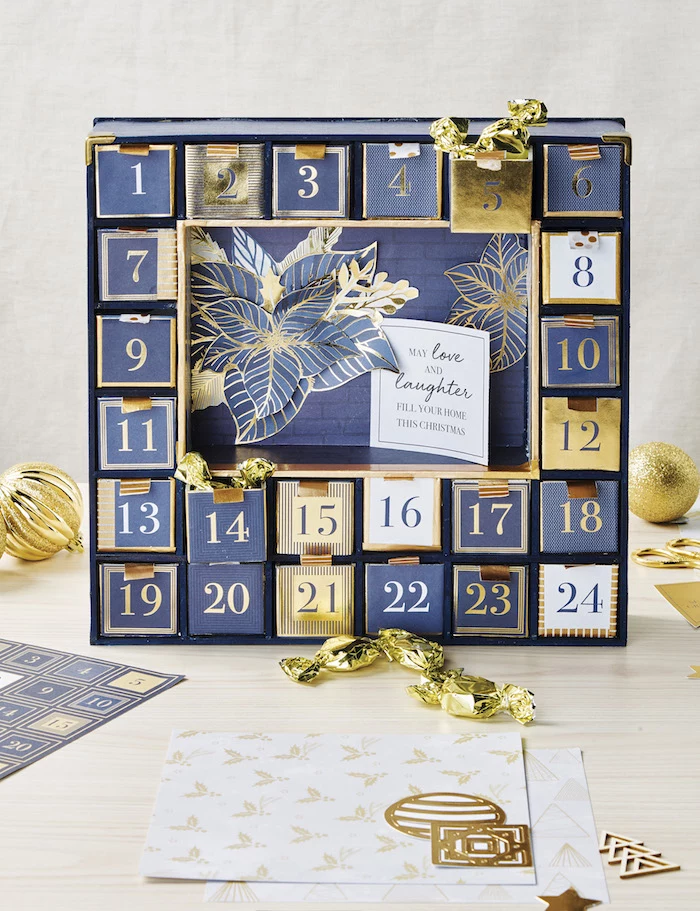
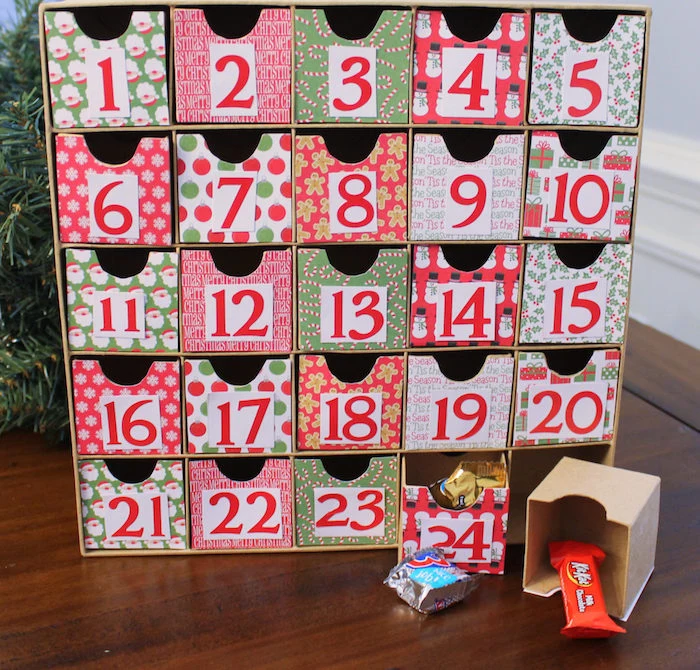
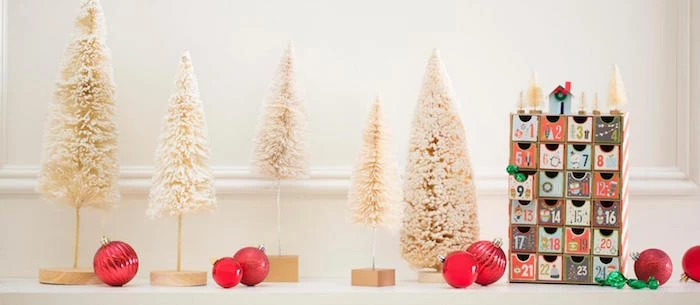
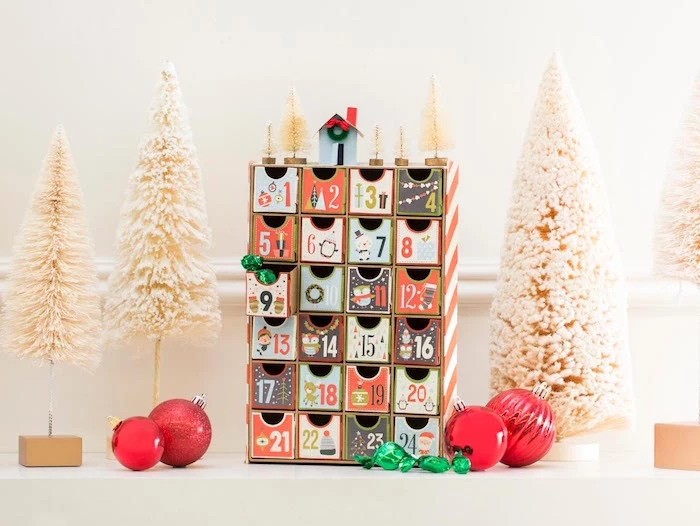
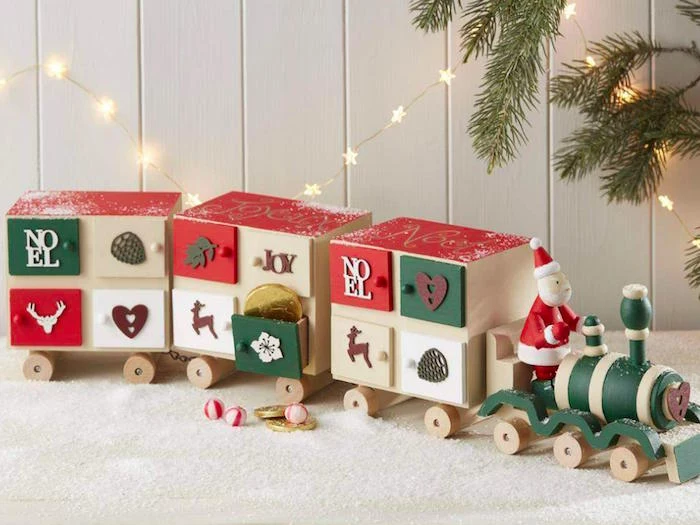
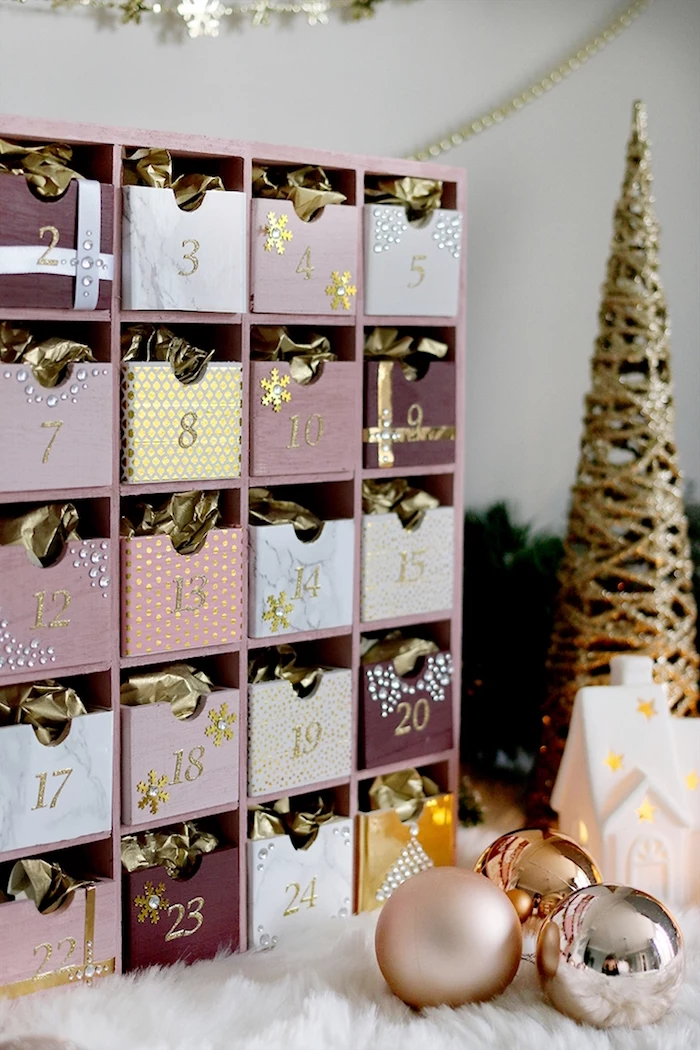
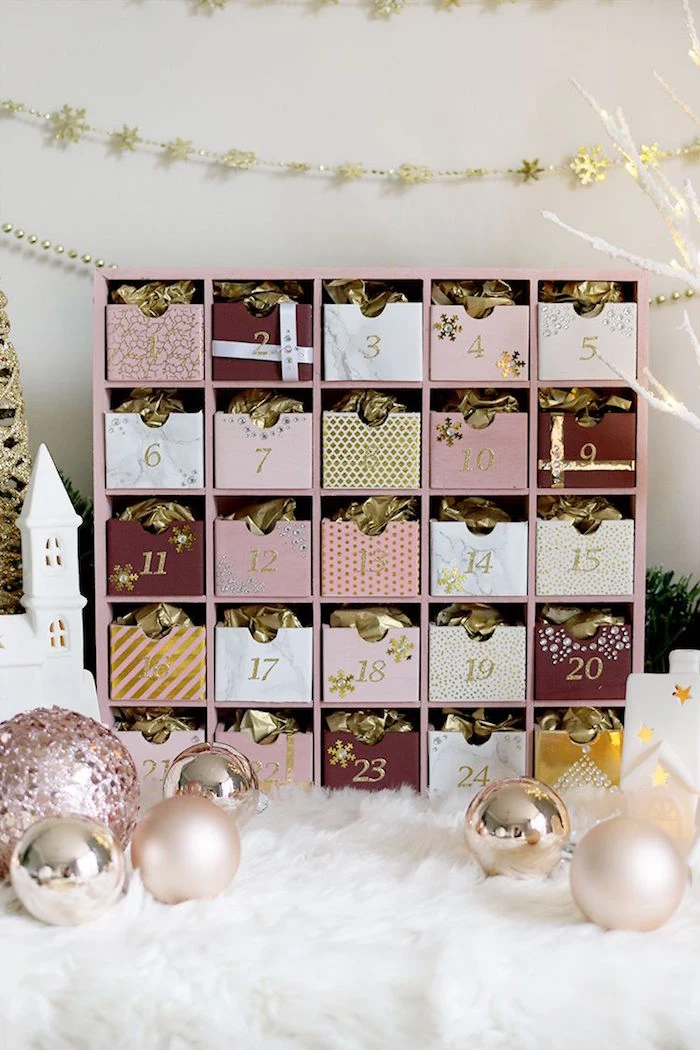
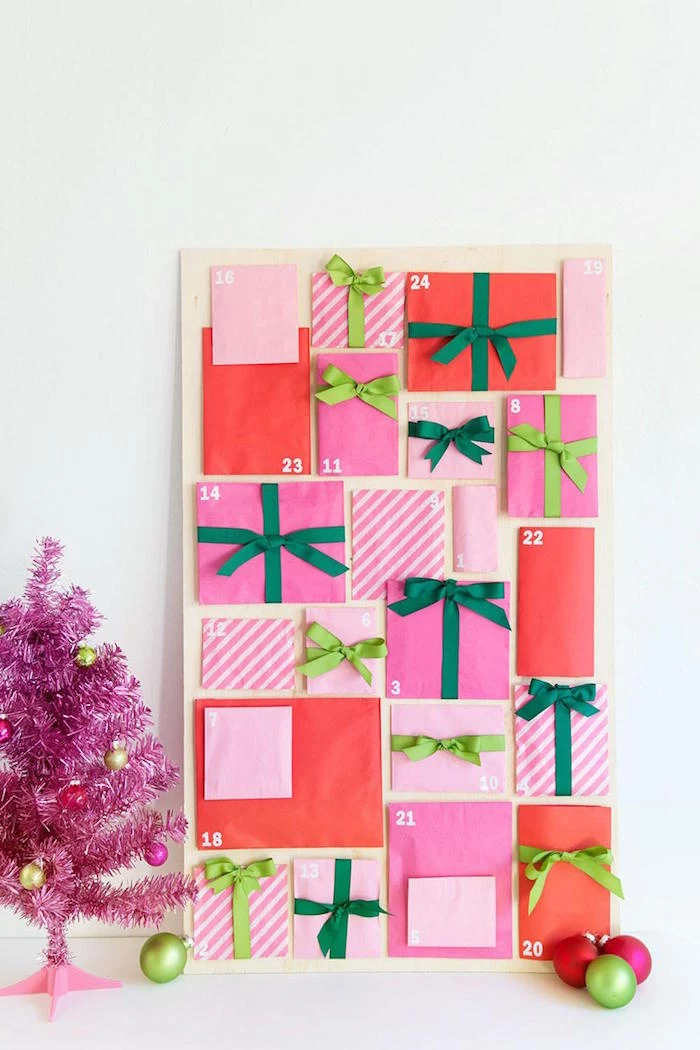
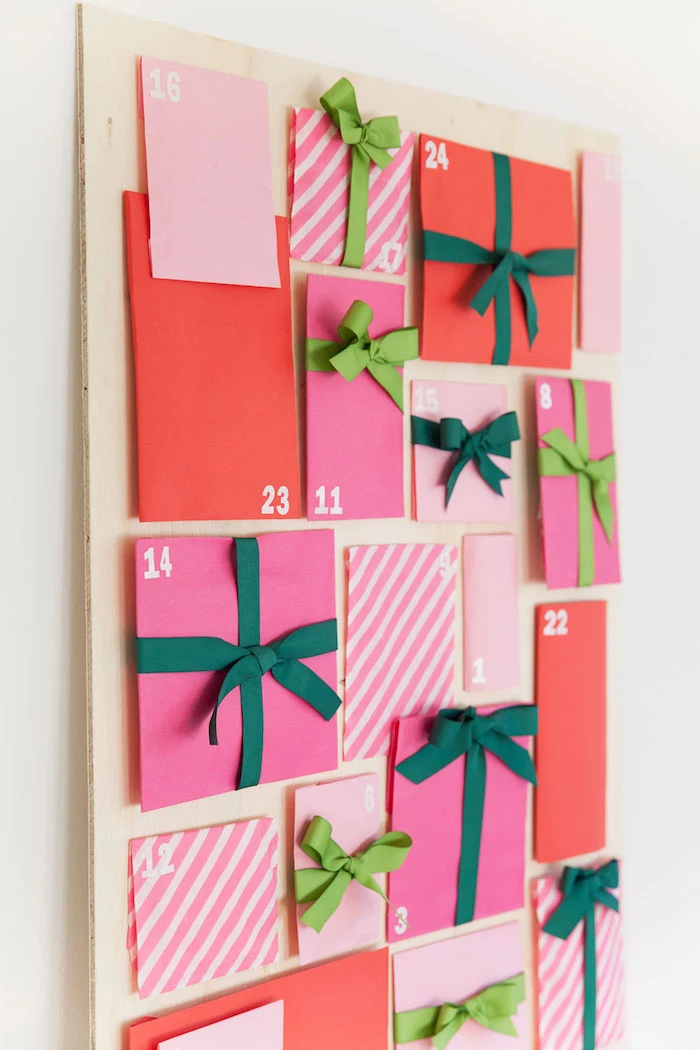
Project 3: The Advanced Heirloom Wooden Cabinet (A Multi-Week Project)
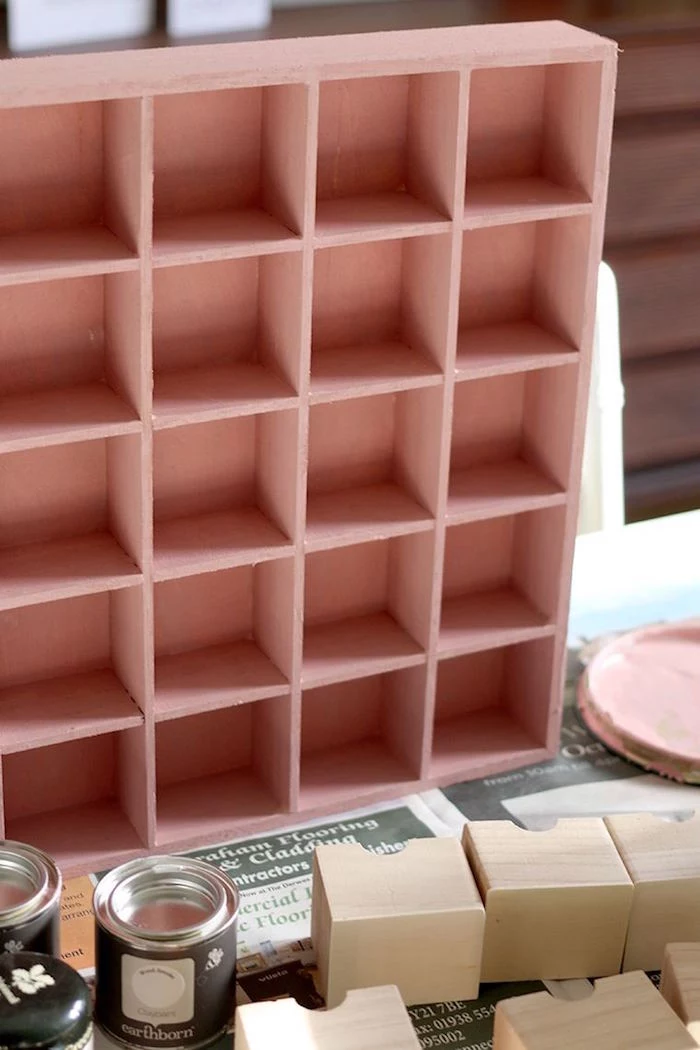
This is the big one—a true woodworking project that becomes a piece of holiday furniture. As I mentioned, a fantastic shortcut is to buy a pre-made, unfinished wood cabinet from a craft store like Michaels, Hobby Lobby, or even on Amazon. This lets you focus on the finishing, which is the fun part anyway!
Materials You’ll Need:
- Unfinished wooden advent cabinet
- Wood primer
- Acrylic craft paints
- Small paintbrushes
- 220-grit sandpaper
- Clear topcoat (water-based polyurethane is best)
- Tiny knobs or pulls (optional)
- A bit of wax from an old candle (I’ll explain why!)
- Estimated Cost: $50 – $75
The Technique:
- Prep is Everything: Remove all the drawers. Lightly sand every single surface—the main cabinet and all sides of every drawer. This gives the primer something to grip. Wipe all the dust away.
- Prime Everything: Apply one even coat of primer to the cabinet and all 24 drawers. Don’t forget the insides! Let it dry completely.
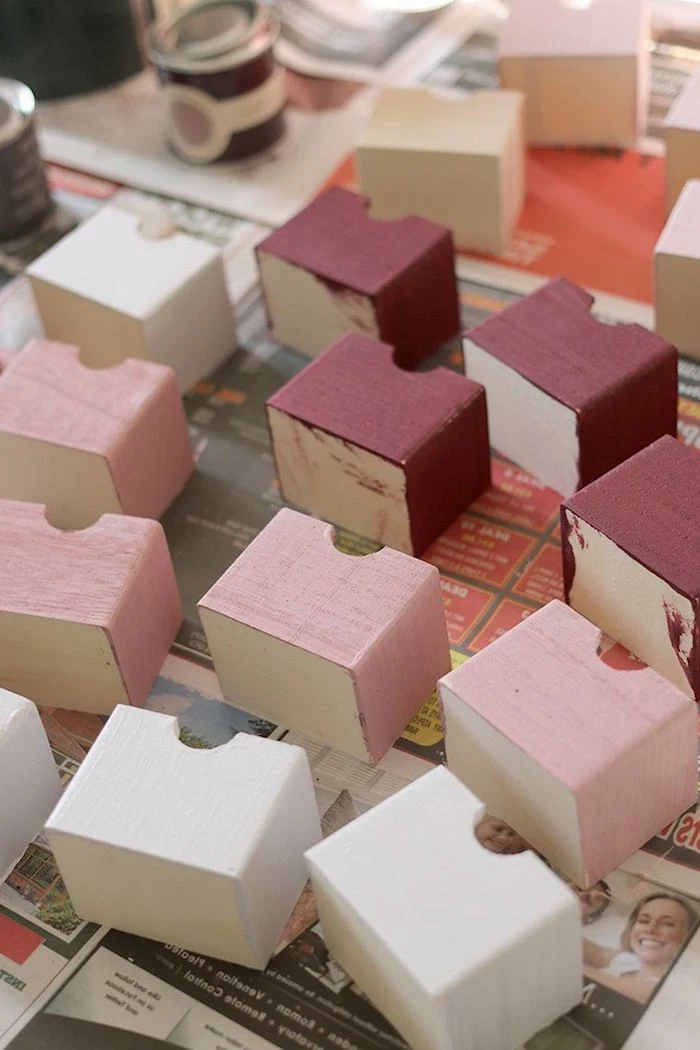
- The Critical Sanding Step: The primed surface will feel rough. Lightly sand it all smooth again. This is the single most important step for getting that professional, non-crafty look. Wipe away the dust.
- Painting: Apply your first thin coat of color. Let it dry completely—don’t rush this! Rushing is the #1 mistake. Paint might feel dry to the touch but can still be soft underneath.
- Second Sanding and Final Coat: Once dry, give it one last, super-light sanding to knock down any dust nibs. Wipe it clean and apply your final coat. The difference will be amazing.
- Protect Your Work: After the paint has cured for a day, apply a clear topcoat. It protects against chipping and makes it easy to clean. Two thin coats are perfect.
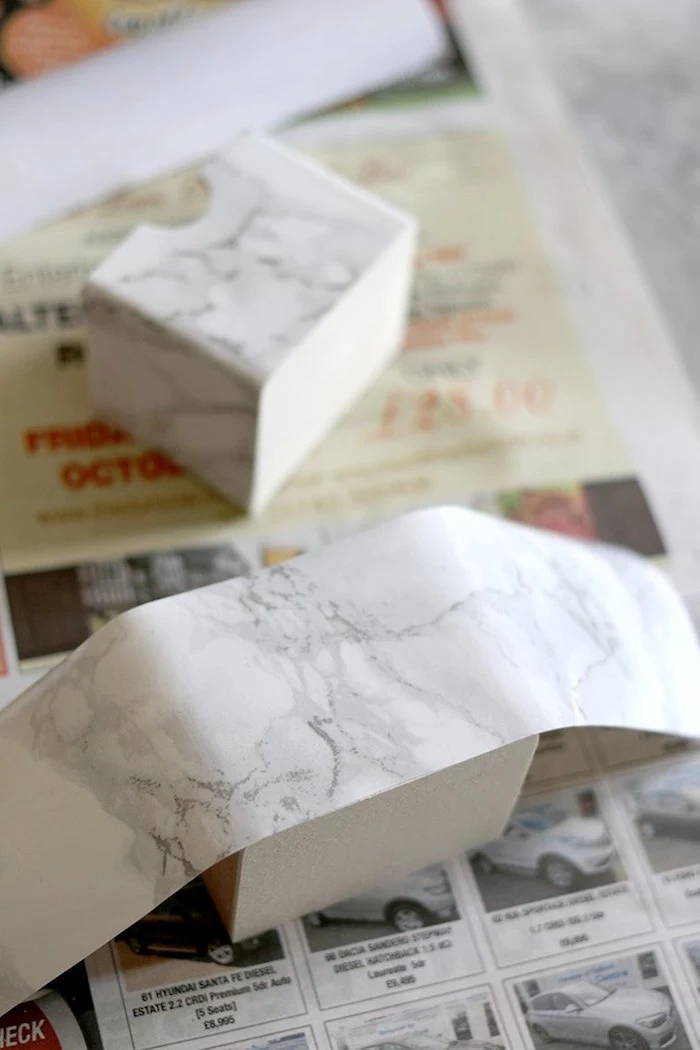
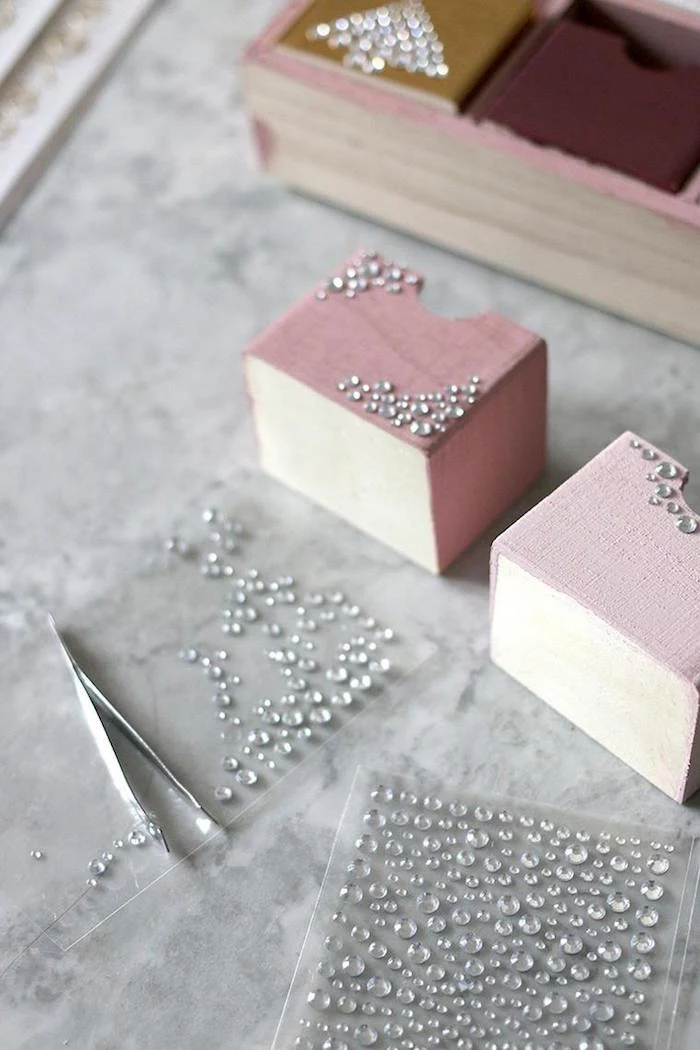
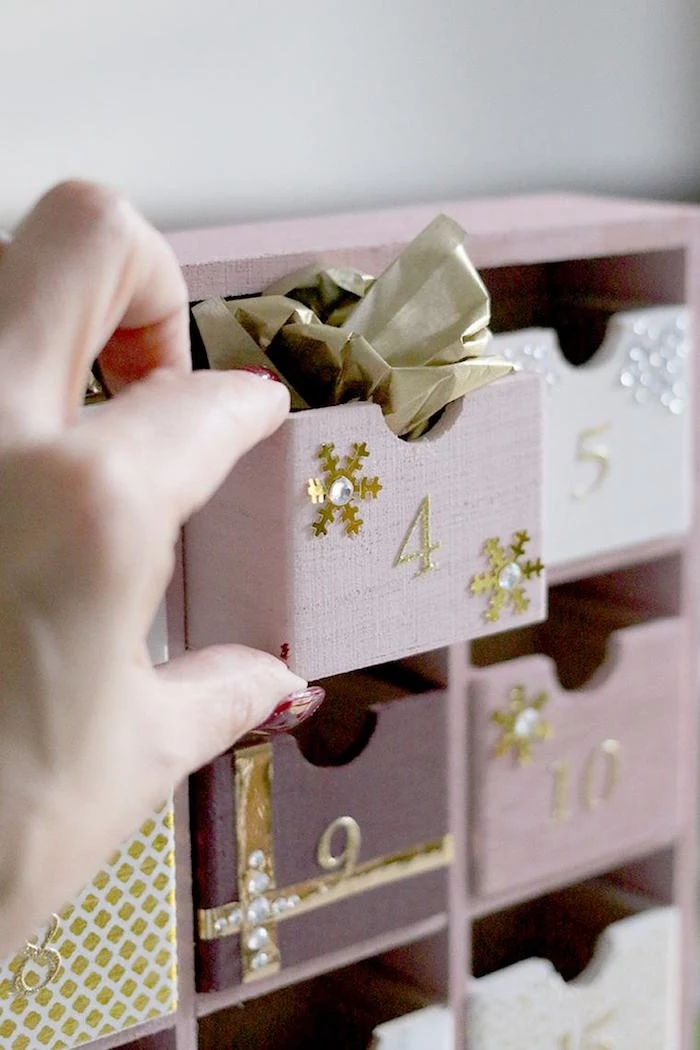
- Details and Assembly: Add your numbers with stencils, stickers, or by hand. Attach any tiny knobs you bought. Now, reassemble… and here’s a pro-tip: If the drawers are sticky after painting, just rub a bit of wax from a candle on the bottom runners of each drawer. They’ll slide like a dream.
Final Touches and Filling It Up
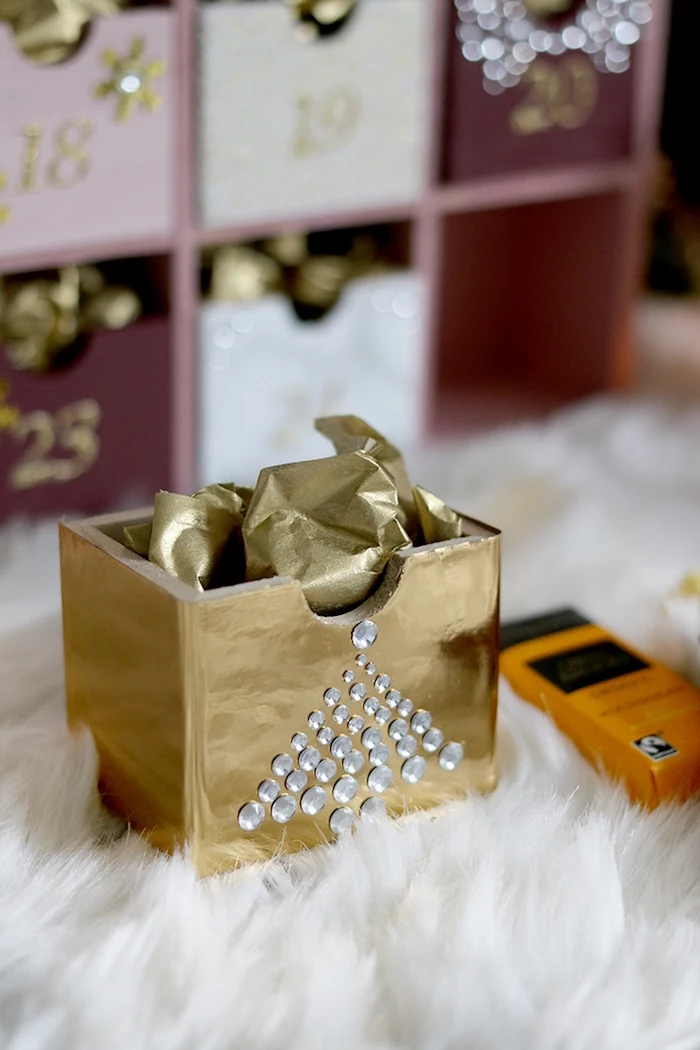
A calendar is more than its structure; the real heart is in what you put inside. Think beyond just candy!
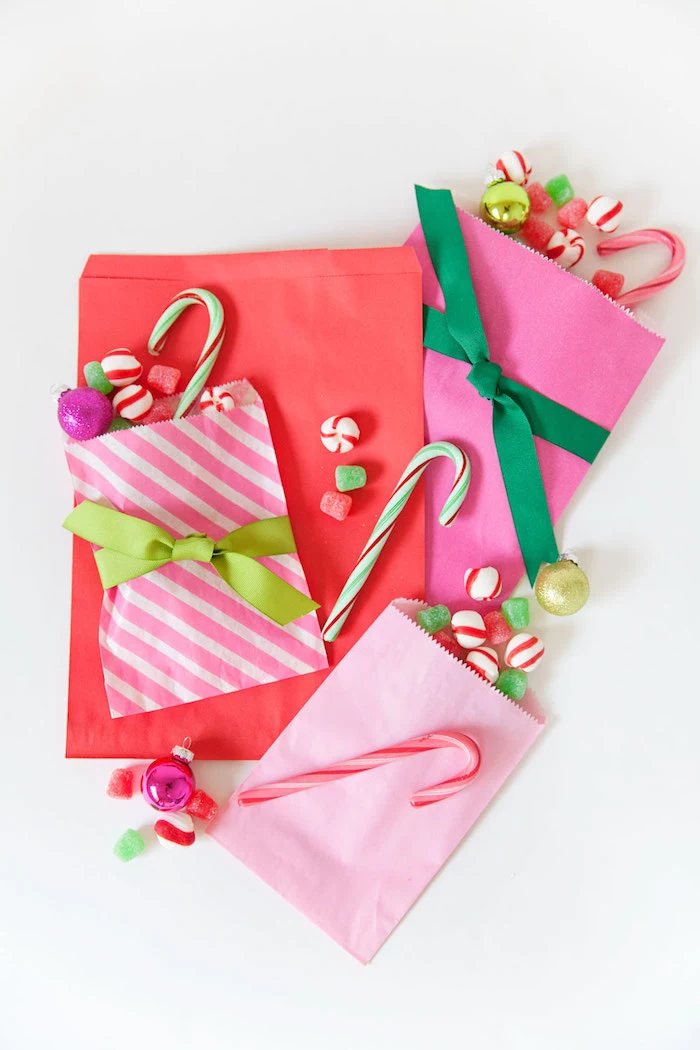
For kids, try small toys, a few Lego bricks each day to build a whole set by Christmas, or coupons for special activities like “Let’s bake cookies today!” For adults, think gourmet chocolates, little samples of coffee or tea, or even just handwritten notes of appreciation. For the whole family, an activity-a-day calendar is amazing. A little slip of paper can hold a promise: “Watch a holiday movie tonight,” “Go look at Christmas lights,” or “Drink hot chocolate with extra marshmallows.” It turns the whole month into a shared experience, which is really what this is all about.
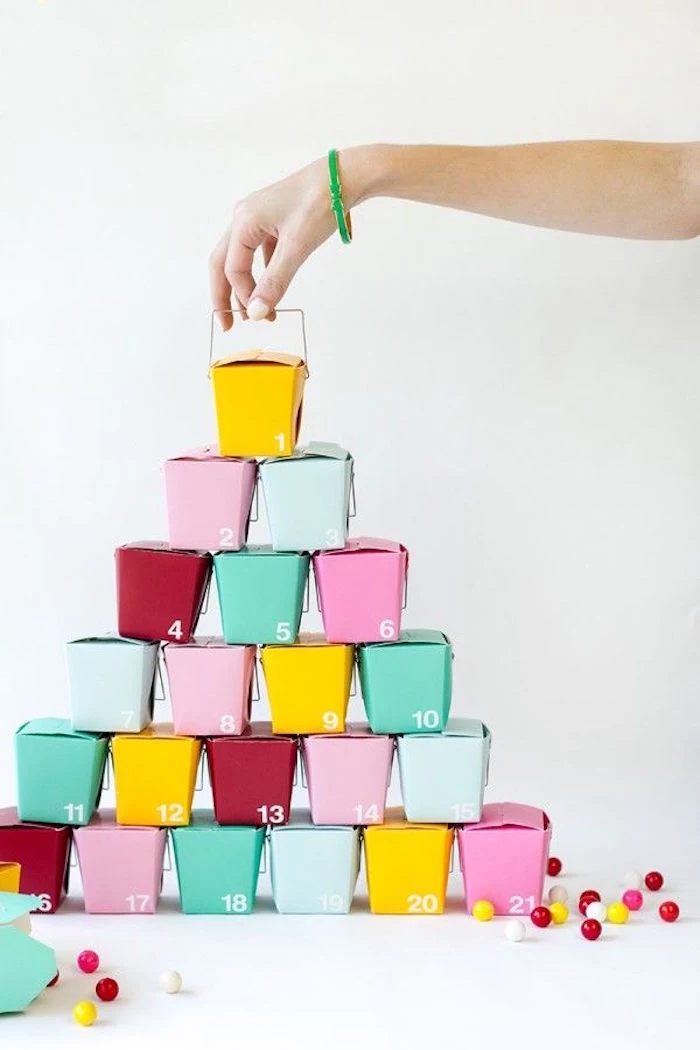
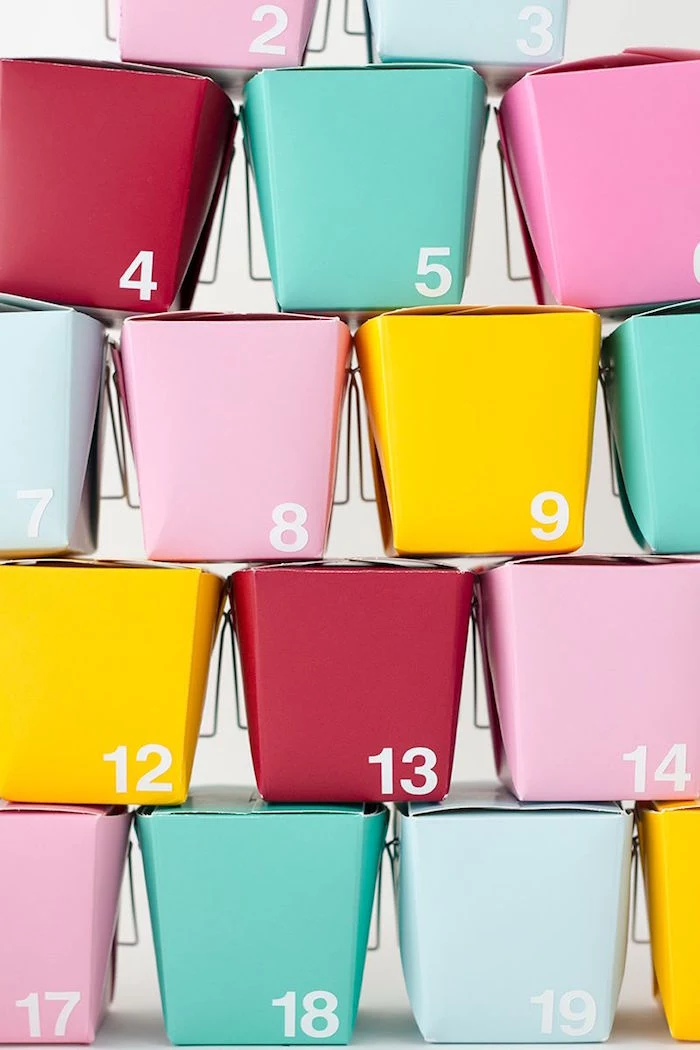
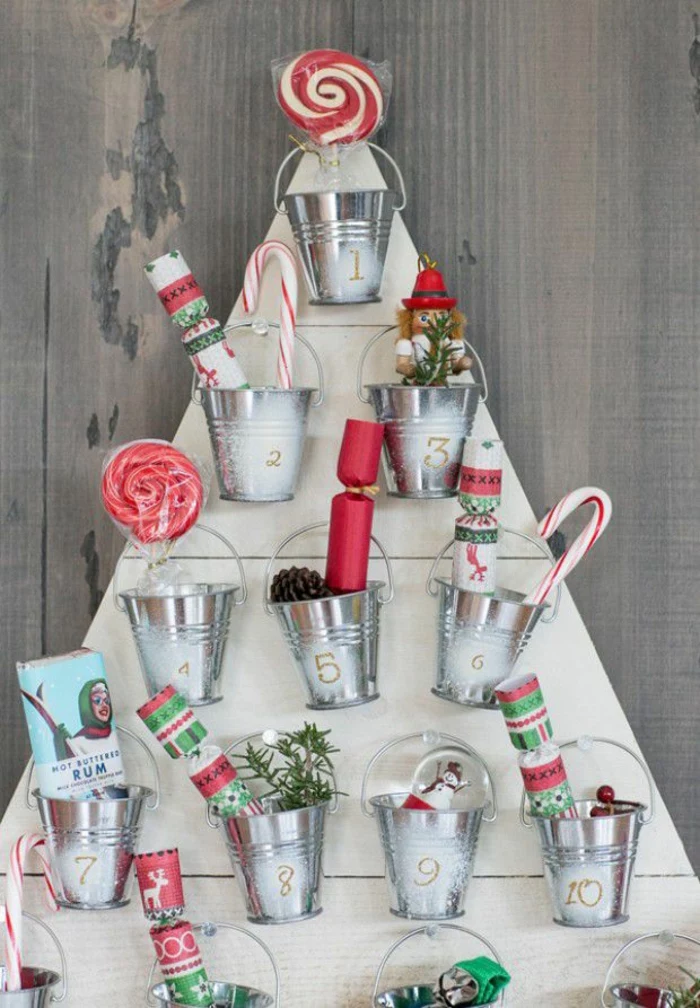
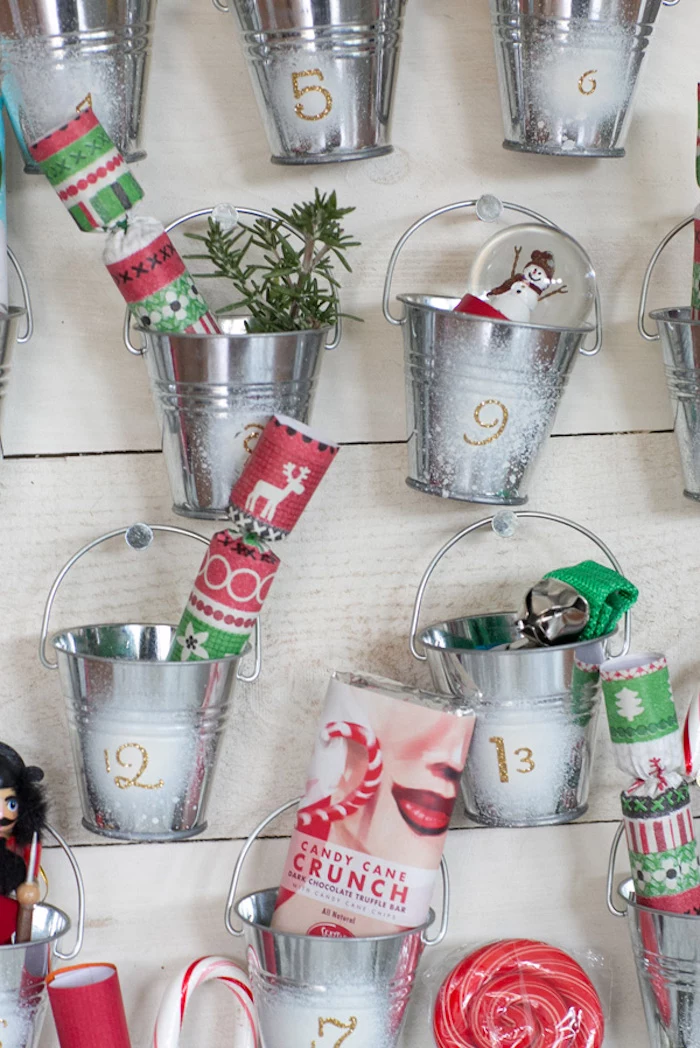
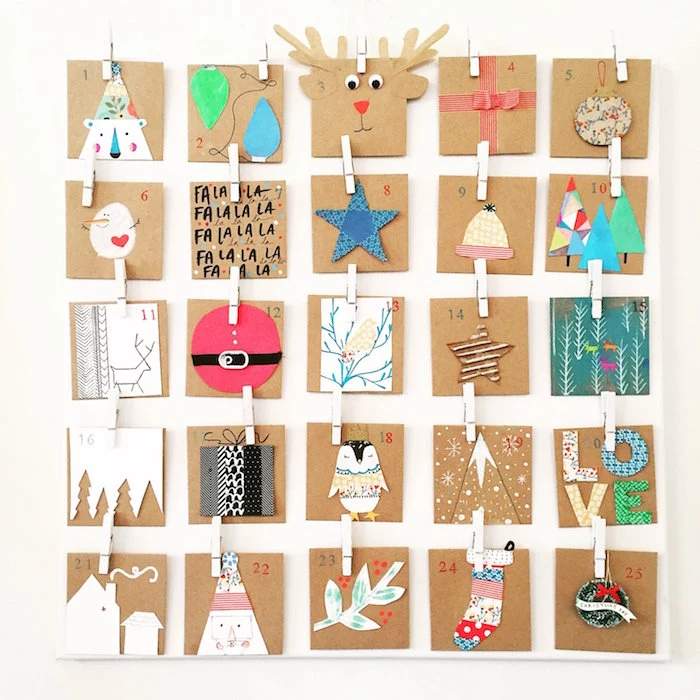
Inspirational Gallery
Think beyond chocolate. The real magic of a daily treat is the ritual, not just the sugar. To make it truly personal, mix in different kinds of surprises:
- A handwritten coupon for a shared activity (

The first printed Advent calendar is attributed to Gerhard Lang in Germany in the early 1900s, inspired by his mother who would attach 24 cookies to a piece of cardboard to help him count down the days.
For a look that never goes out of style, consider a color palette drawn from nature. Instead of bright reds and greens, think of the muted tones of a winter forest: deep spruce, dusty sage, warm birch, and cranberry. These colors blend beautifully with most home decor and give your calendar a sophisticated, heirloom quality that won’t feel dated next year.

How do I protect the paint on my wooden calendar so it doesn’t chip?
The secret is a final top coat. After your paint is completely dry (wait at least 24 hours), apply a thin layer of a clear, non-yellowing sealant. For a soft, matte finish that feels modern, try Minwax Polycrylic in a Matte or Satin finish. It’s water-based, so cleanup is easy, and it will protect your handiwork from scratches and dust for years to come.


Hand-painted Numbers: Offers a charming, perfectly imperfect look. Use a fine-tipped brush and acrylic paint. The personal touch is undeniable.
Stamped Numbers: Provides a crisp, uniform, and slightly rustic appearance. An alphabet stamp kit and a good quality ink pad (like a StazOn for wood or fabric) are a great investment for many craft projects.
The choice depends on the final vibe you’re aiming for: unique artist vs. tidy artisan.

A critical detail: Plan your hanging method *before* you start building. A calendar made of plywood and filled with 24 small gifts can be surprisingly heavy. A simple ribbon won’t cut it. For a sturdy wooden backboard, install two D-ring hangers on the back, just as you would for a heavy mirror, to ensure it hangs securely and straight.


- It’s soft and safe for little hands, with no sharp corners.
- It’s lightweight and easy to hang on any wall or door.
- It won’t warp or crack in a dry, heated home.
The secret to a fabric calendar that isn’t floppy? Iron-on fusible interfacing. Applied to the back of your main fabric panel before sewing, a product like Pellon 809 Decor-Bond adds stiffness and body, giving your creation a professional, crisp structure.
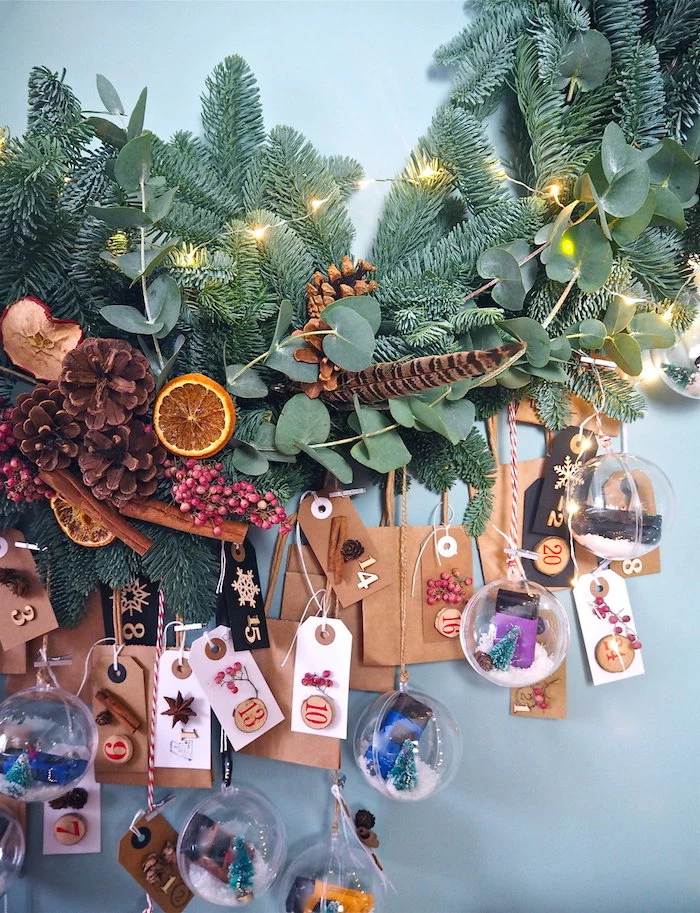
Don’t forget the sensory experience. Tuck a small cinnamon stick, a few cloves, or a sprig of dried pine into one of the pockets. The faint, festive scent that greets you each morning will create a powerful memory, connecting the visual object to the distinct smell of Christmas.

A study on positive psychology found that anticipating a future event often brings more happiness than the event itself. An Advent calendar is the perfect physical embodiment of joyful anticipation.
This is why the daily ritual is so powerful. It’s not just a countdown; it’s 24 small, structured moments of positive expectation, building a gentle wave of happiness that lasts all month long.


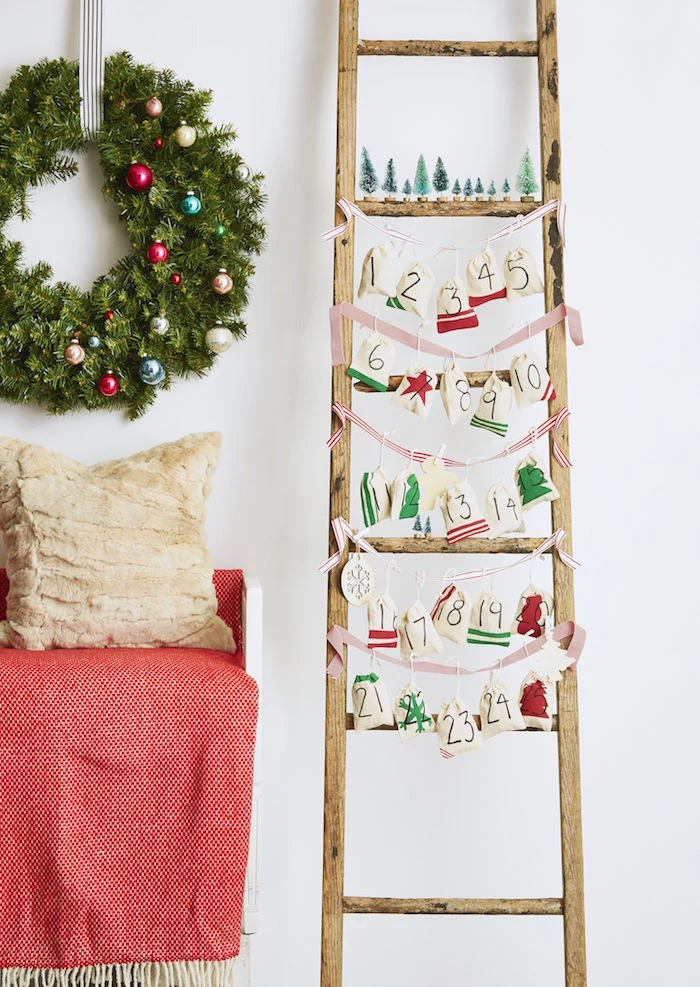
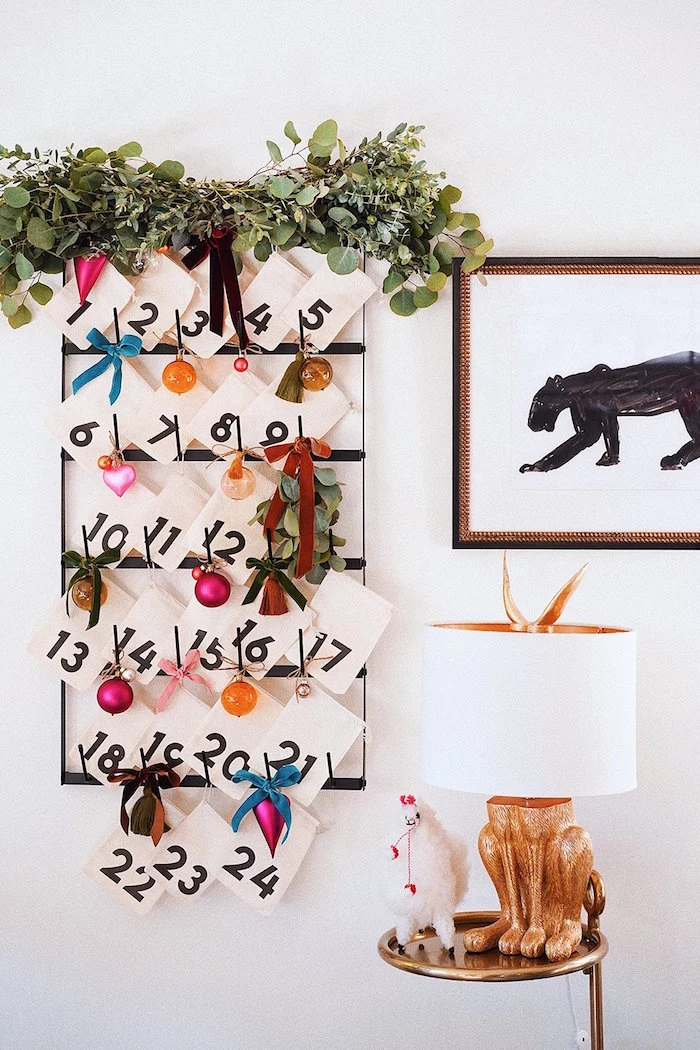
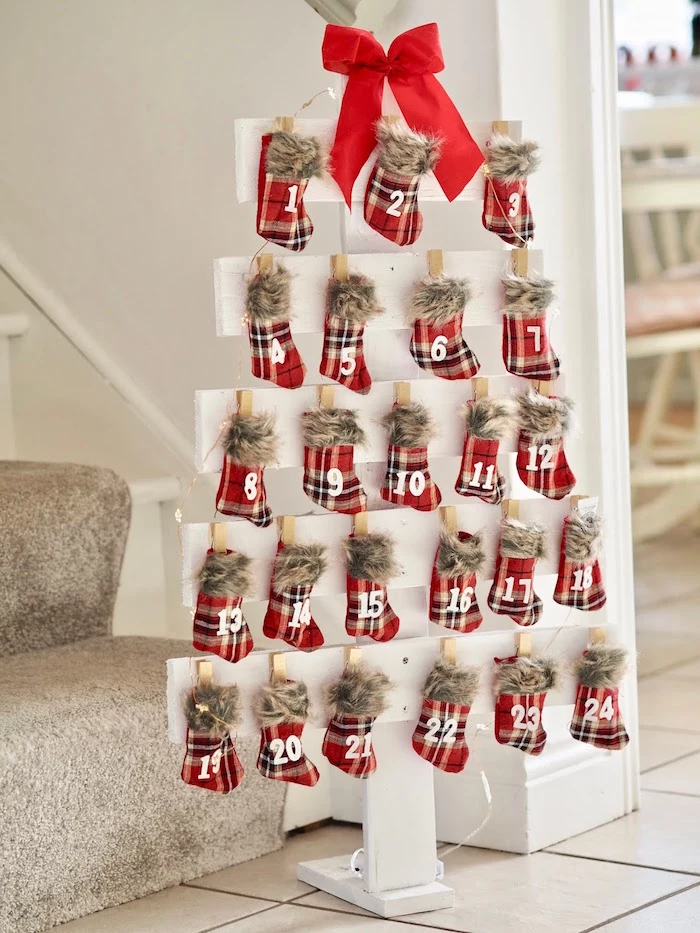
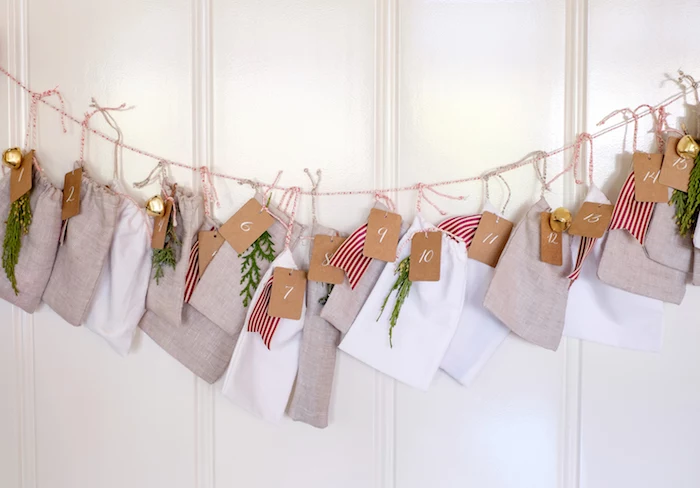
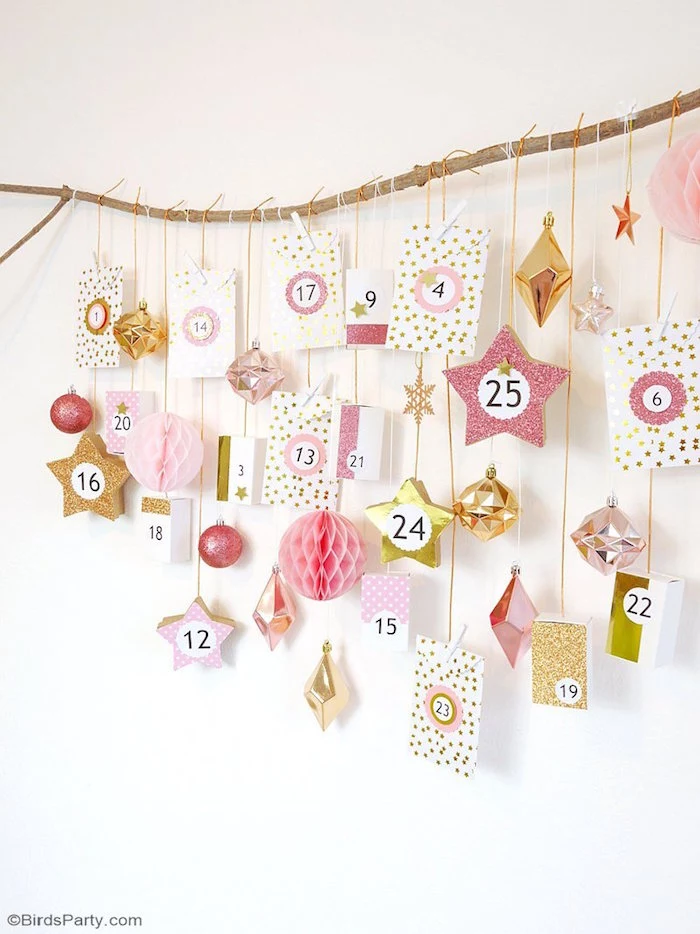
If a full-blown construction project feels daunting, embrace the simple elegance of a branch calendar. Find a sturdy, interesting branch on a winter walk. Suspend it from the ceiling or mount it on the wall with clear hooks. Then, hang 24 small, numbered muslin bags or kraft paper envelopes from it using varying lengths of twine. It’s minimalist, organic, and incredibly chic.

I love the idea, but I have zero woodworking tools. What’s a good alternative?
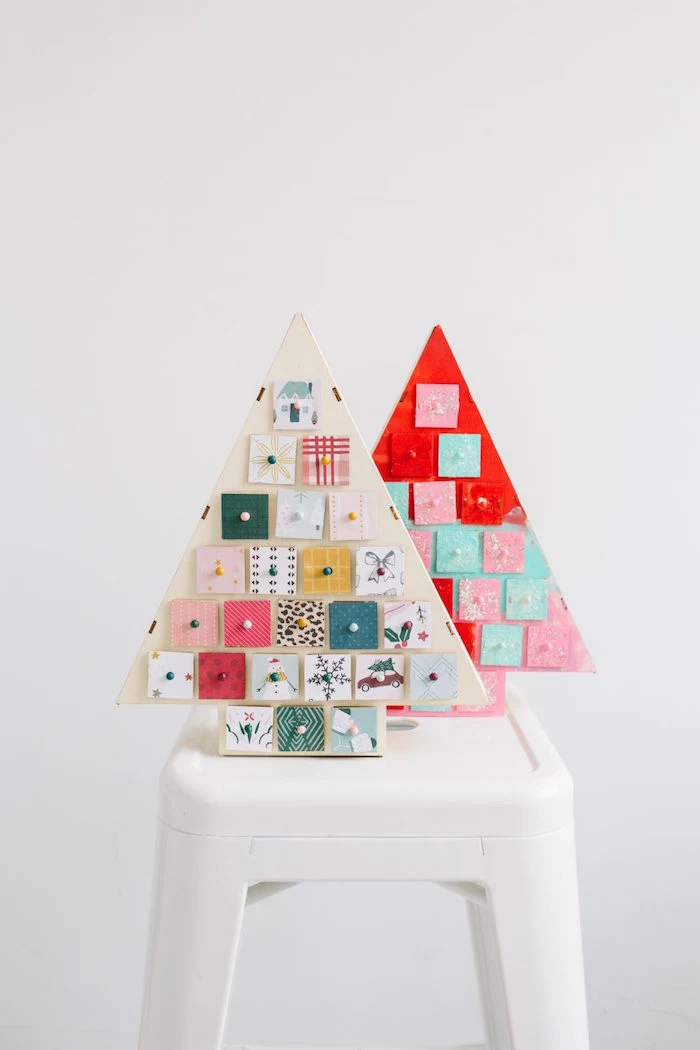
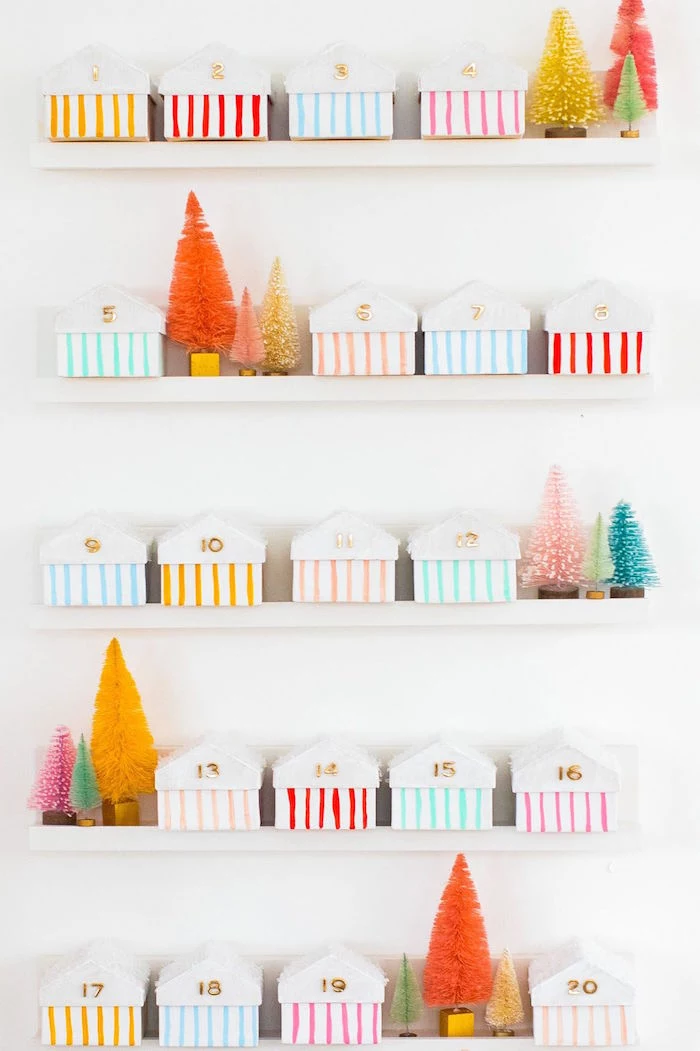
Look for pre-made, unfinished wood products at craft stores like Michael’s or Hobby Lobby. They often sell ‘shadow boxes’ with multiple compartments or unfinished wooden house-shaped shelves. These are the perfect blank canvas. You can paint, decorate, and add doors or fabric curtains to the compartments without a single saw cut.

For a truly modern, architectural feel, think in monochrome. A board painted in a deep charcoal grey (like Benjamin Moore’s ‘Kendall Charcoal’) with crisp white numbers creates a stunning graphic statement. Use small, simple black or silver tins as containers to complete the minimalist aesthetic.


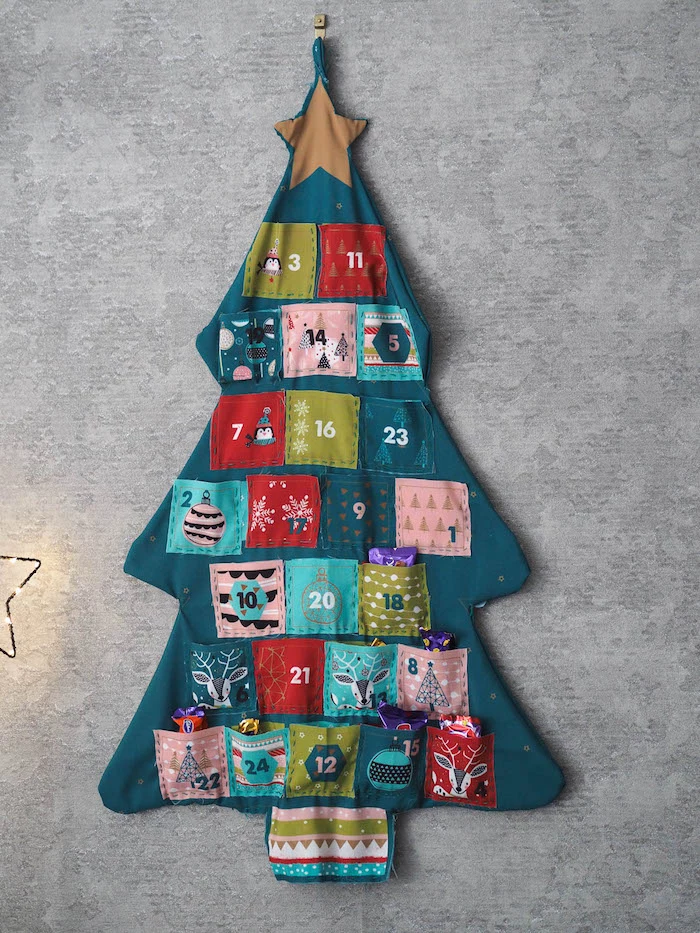
The #1 Mistake: Making the pockets, boxes, or drawers too small. Before you finalize your dimensions, gather a few examples of the *actual items* you plan to put inside. A tiny drawer that can only fit a single chocolate coin is far less versatile than one that can hold a Hot Wheels car, a small jar of jam, or a pair of festive socks. Measure your largest planned gift, then add a little wiggle room.

Wood Glue: For any wood-to-wood joint, like attaching drawer guides or a frame, nothing beats a true wood glue like Titebond II. It creates a bond that is literally stronger than the wood itself.
Super Glue/CA Glue: Perfect for small, quick attachments where clamping isn’t possible, like gluing a tiny decorative star onto a drawer front. Use a gel formula for better control.
Hot Glue: Reserve this for purely decorative, non-structural elements on fabric or paper calendars. It’s fast, but not a long-term solution for anything with weight.

Want to turn your project into a true family heirloom? Add a hidden signature. On the back of the calendar, use a wood-burning tool or a permanent archival pen (like a Pigma Micron) to write a small message:


According to Etsy’s 2023 trend report, searches for ‘personalized gifts’ and ‘heirloom quality’ items have surged over 35%. People are actively seeking meaningful objects over mass-produced goods.
Your handmade Advent calendar is part of this powerful movement. By creating something with intention and care, you’re crafting an object that pushes back against a disposable culture and tells a story of love and tradition.
Inject a little magic with a string of micro LED fairy lights. Choose a battery-operated set with a thin, flexible wire (copper or silver looks best). Weave it around the frame of your calendar, through the branches of a tree design, or tuck it behind the pockets. The soft, warm glow in the dim light of a December morning is pure enchantment.

The Scandinavian ‘Hygge’ style is perfect for a cozy Advent calendar.
- Use natural, touchable textures like thick wool felt, unbleached linen, and raw twine.
- Keep the colors neutral and calm: whites, creams, grays, and natural wood tones.
- Incorporate simple, nature-inspired elements like tiny pinecones or wooden beads.

How should I store my calendar to keep it safe?
Proper storage is key to longevity. For a wooden calendar, wrap it in an old, clean cotton sheet or bubble wrap to prevent scratches and dings. Avoid storing it in a damp basement or a hot attic where extreme temperature swings can cause wood to warp. A spot under a bed or in a dry closet is ideal. For fabric calendars, roll them gently around a cardboard tube to prevent creasing.


- Requires no complex building skills.
- Is incredibly budget-friendly.
- Can be stored almost completely flat.
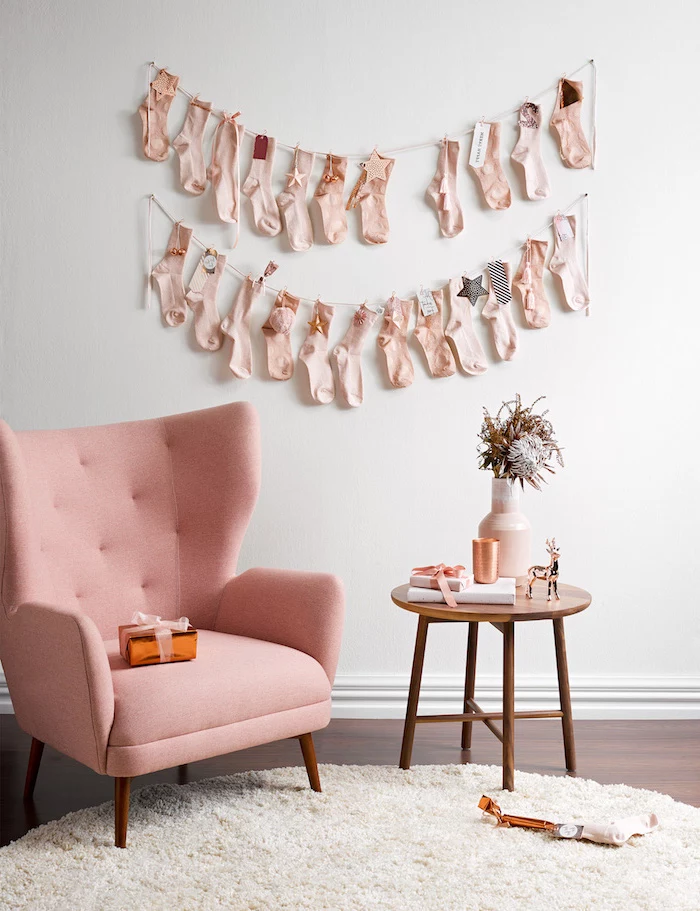
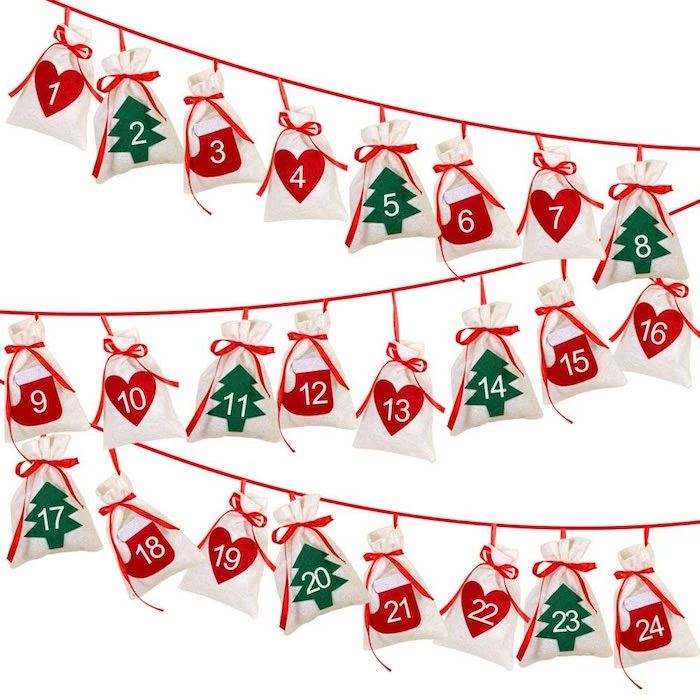
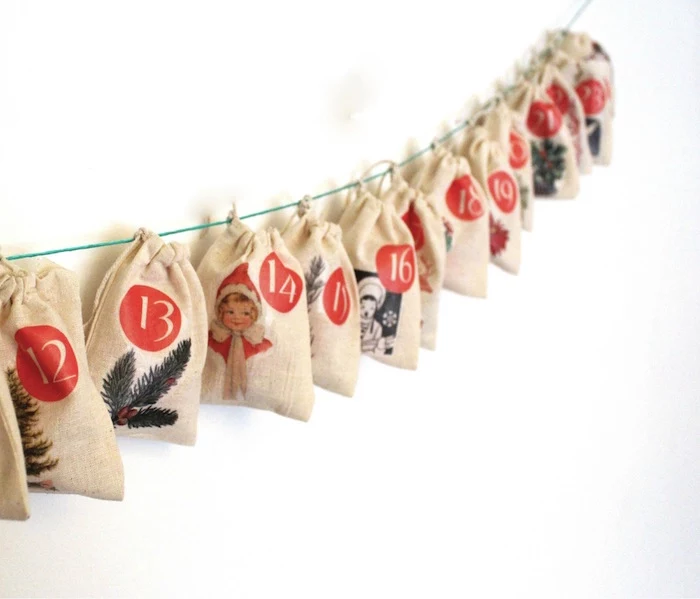
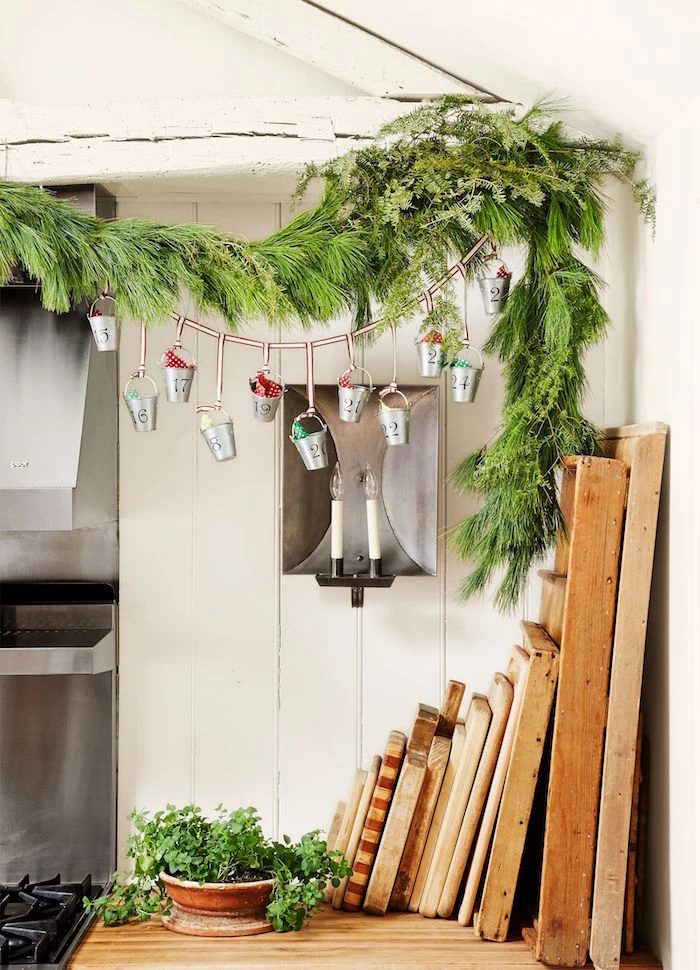
The secret? A garland-style calendar. Simply string a beautiful ribbon or jute twine across a mantelpiece or wall. Then, use miniature clothespins to attach 24 small, numbered paper bags or fabric pouches. It’s charming, rustic, and can be assembled in under an hour.

Embroidery Hoop Base: A large, 14-inch or 18-inch wooden embroidery hoop makes a fantastic, modern frame for a fabric calendar. Simply stretch your main fabric panel inside it for an instant circular structure.
Dowel Rod Base: The classic wall-hanging method. A simple wooden dowel fed through a channel sewn at the top of a fabric panel allows it to hang straight and can be suspended from a single, decorative cord.
The hoop offers a contemporary, contained look, while the dowel rod is traditional and simple.
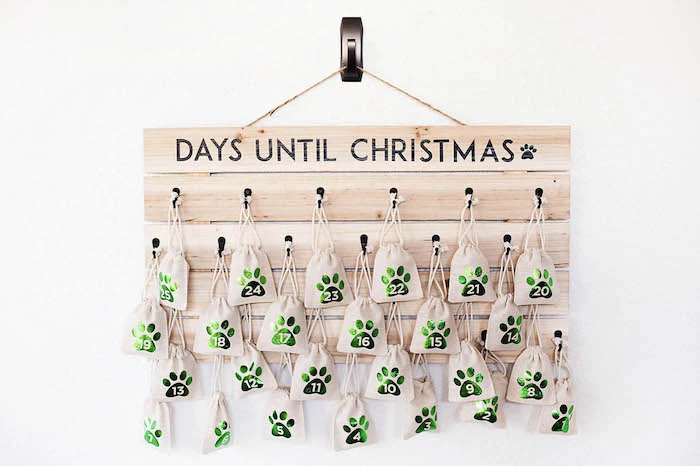
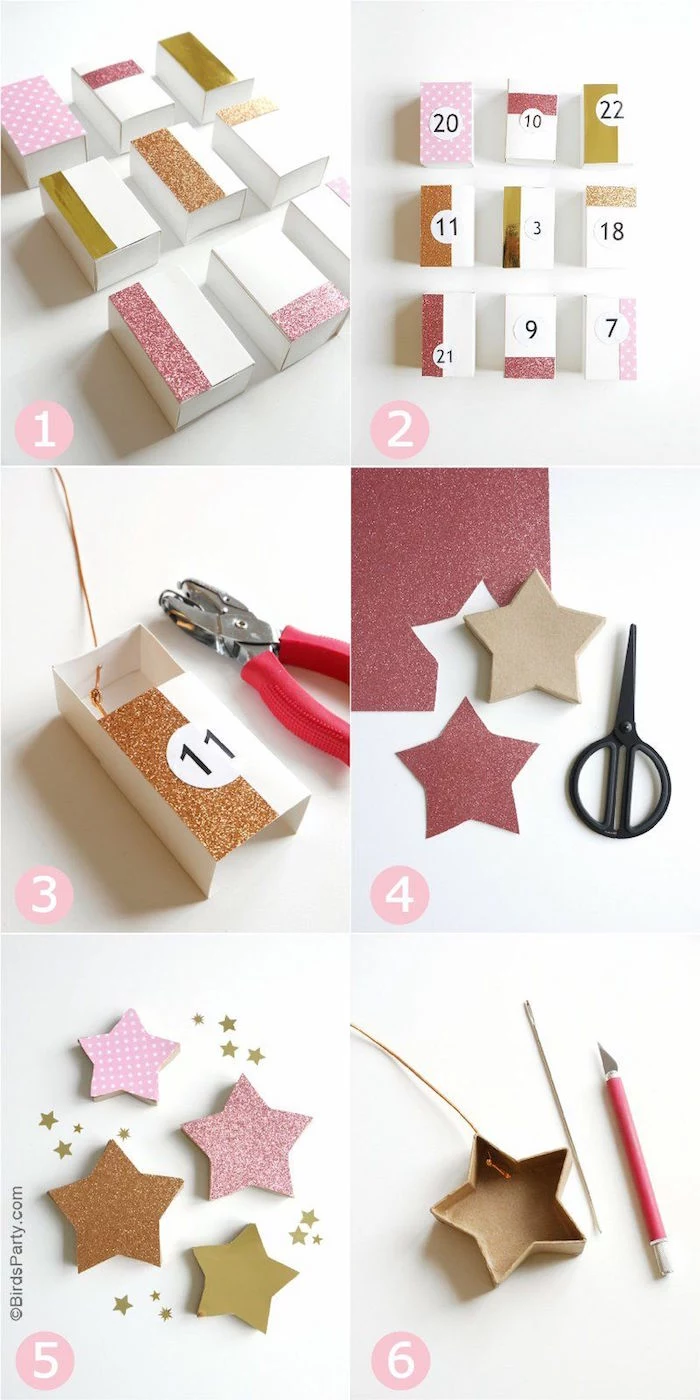
Before you throw them out, look at everyday objects with new eyes. An Advent calendar can be a masterpiece of upcycling. Consider using 24 thoroughly cleaned baby food jars, a collection of empty matchboxes wrapped in festive paper, or even toilet paper rolls pinched and folded into tiny gift boxes. It’s sustainable, creative, and adds a layer of quirky charm.

My handwriting is awful! How can I get professional-looking numbers?
You have great options that don’t require a steady hand! Small number stencils and a sponge dauber give a sharp, spray-painted look. For a super clean, modern vibe, buy pre-made vinyl number decals from a seller on Etsy—you can just peel and stick. Or, search for small, laser-cut wooden numbers that can be glued on for a 3D effect.
Join the trend of ‘experience’ calendars. Instead of a physical gift, each day reveals a slip of paper with a family activity. This shifts the focus from ‘getting’ to ‘doing’ and builds a bank of shared memories. Ideas can be as simple as