Holiday Mailbox Decor That Won’t Blow Away: A Pro’s Guide
Over the years, I’ve seen countless holiday trends cycle through, but one thing has always stayed true: your mailbox is your home’s first handshake. It’s the first bit of holiday spirit your guests and mail carrier see, and giving it some love shows you really care about the details. Honestly, it’s not about dropping a ton of cash. It’s about using the right stuff and the right techniques to create something that looks fantastic from day one and just as good thirty days later.
In this article
So many people either forget their mailbox entirely or grab a flimsy, pre-made decoration that the first strong gust of wind sends tumbling down the street. Let’s fix that. I’m going to walk you through how the pros build mailbox decorations that are built to last. We’re talking more than just tying on a bow—we’ll cover picking the right greenery, using the proper tools, and most importantly, respecting the person who needs to use that mailbox every day.
First Things First: Know Your Mailbox and The Rules
Before you even think about buying a single sprig of pine, take a good, hard look at your mailbox. What are you working with? Is it a standard metal box on a simple post? A sleek, modern design? Or a big, chunky brick or stone pillar? The type of mailbox you have is your starting point, as a lightweight box just can’t handle the same kind of arrangement as a sturdy brick one can.
But even more important are the rules set by the United States Postal Service (USPS). This isn’t just a friendly suggestion; it’s a hard requirement. I’ve seen some truly beautiful creations get removed by mail carriers because they made it impossible to deliver the mail. When I teach workshops, this is lesson number one.
Heads up! Keep these guidelines in mind at all times:
- Keep the Flag Clear: The mail carrier needs to be able to see and flip the red flag up and down without any hassle. Don’t wrap anything around it or hide it.
- Don’t Block the Door: The door must open all the way. Your greenery, ribbons, and wires can’t get in the way of placing mail and small packages inside.
- Numbers Must Be Visible: Your house or apartment number needs to be perfectly clear for mail, deliveries, and, most importantly, emergency services.
- Give It Some Space: The USPS suggests leaving about 1 to 3 inches of clearance around the box. This is so the mail truck’s mirrors don’t snag your beautiful work.
- Secure Everything Tightly: Loose ribbons or dangling ornaments look lovely until they get tangled in the wind or caught on something. Cinch it all down.
My best advice? Build your decoration, then do a test run. Can you stick your arm inside easily? Can you operate the flag without a fight? If not, it’s time to adjust.
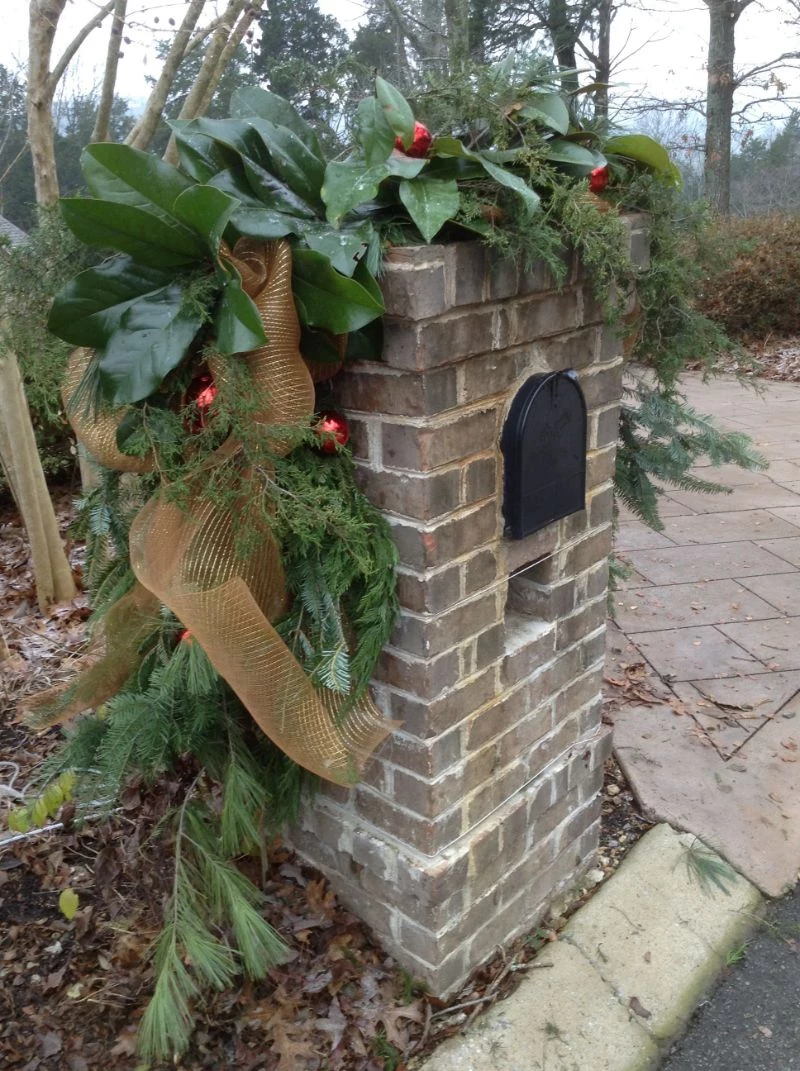
Quick Tip: What About Brick or Stone Mailboxes?
Attaching decorations to masonry can feel tricky, but you have options. Tying a swag around a thick brick pillar often looks awkward. Instead, look for specialty brick clips (you can find these online or at hardware stores for about $10-$15 for a pack). These clips grip onto the brick without drilling. Another pro move is to create a simple saddle-like wood form that sits on top, giving you a base to wire your decor onto. A tension rod wedged in an alcove can also work wonders for hanging a garland.
Fresh vs. Artificial Greenery: The Great Debate
Ah, the big question: real or fake? I use both all the time, and to be frank, there’s a place for each. Your decision really comes down to your climate, budget, and how much you want to fuss with it.
Nothing beats the smell of fresh pine and cedar on a crisp winter day—it’s pure holiday magic. If you go this route, choose greens that are known for their staying power. Noble fir, Fraser fir, and cedar are my top picks because they have strong needles that hang on for dear life. I love mixing the structure of fir with the soft, draping look of cedar. On the other hand, try to avoid things like hemlock or spruce, as they tend to drop needles like crazy and can look sad within a week. If you live in a dry or super sunny place, your fresh greens will brown up fast. A quick fix is to get an anti-desiccant spray (like Wilt-Pruf) from a garden center. A light misting seals in moisture and can easily add another week or two of life to your arrangement.
Then there’s the artificial route. A good artificial piece is an investment upfront, for sure. You might spend $60 to $100 on a high-quality swag or garland from a place like Balsam Hill or Nearly Natural, but you’ll be using it for the next five, maybe even ten years. The quality these days is amazing, with realistic textures and color variations. The key is to spend time “fluffing” it. When you pull it out of the box, you have to separate every single tip and bend the branches into a natural shape. It takes a little patience, but it’s the difference between a flat, sad-looking piece and something lush and believable.
My Go-To Toolkit for Mailbox Decor
Having the right tools makes this job so much faster and more secure. You don’t need a whole workshop, just a few key items.
- Paddle Wire: This is my absolute non-negotiable. I use a 22-gauge green floral wire on a paddle. The paddle keeps it from becoming a tangled nightmare, and the 22-gauge is the perfect balance of strength and flexibility. A paddle will run you about $5-$8 at a craft store and will last you ages.
- Wire Cutters: Please don’t ruin your good scissors! A cheap pair of dedicated wire cutters gives you a clean, safe cut every time.
- Styrofoam Block: For saddle-style arrangements, you want a block of dense, dry craft foam (the white, crunchy kind). Do NOT use the green wet foam for fresh flowers; it will disintegrate into dust outdoors.
- Rubber-Coated Twist Ties or Zip Ties: While I build the arrangement with wire, I often use these to attach the final piece to the mailbox post. The rubber coating is a small detail that prevents scratching the paint.
- Wired Ribbon: For big, beautiful bows that don’t flop in the rain, wired ribbon is a must. A 2.5-inch width is perfect for most projects. Look for ribbons made of outdoor-friendly fabric like canvas for the best results.
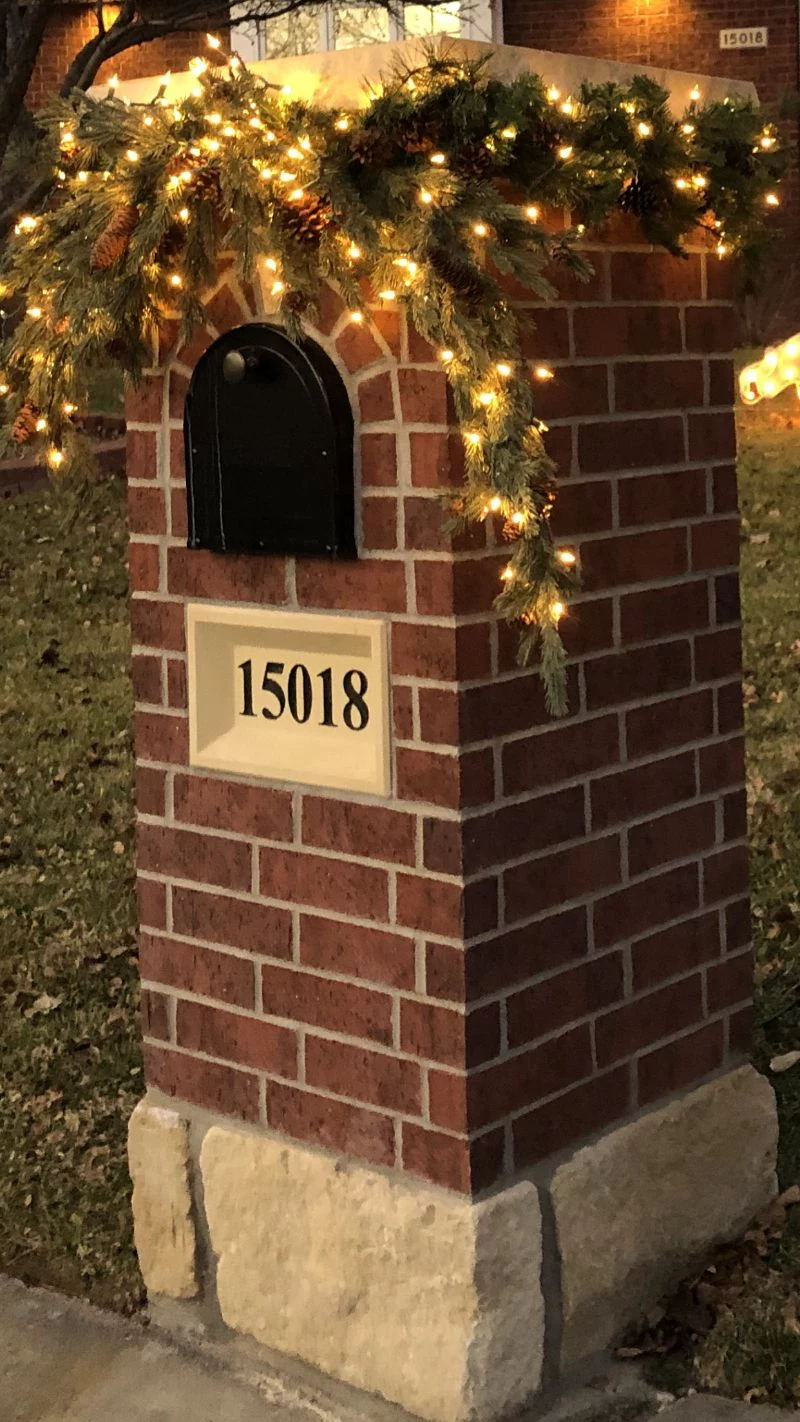
Let’s Talk About Lights!
Adding a little twinkle is a fantastic touch, but you have to use the right kind of lights. The key is to find a set of battery-powered LED lights that are specifically rated for outdoor use. And trust me on this, get a set with a built-in timer function (like 6 hours on, 18 hours off). You don’t want to be trekking out in your slippers every single night to turn them on and off.
Pro Tip for Hiding the Battery Pack: The ugly green or black battery box can ruin the look. Here’s the trick: place the battery pack inside a small Ziploc-style baggie, squeeze the air out, and seal it. For extra protection, wrap the top seal with a bit of electrical tape. Then, you can tuck this waterproofed pack deep inside the greenery where no one will ever see it.
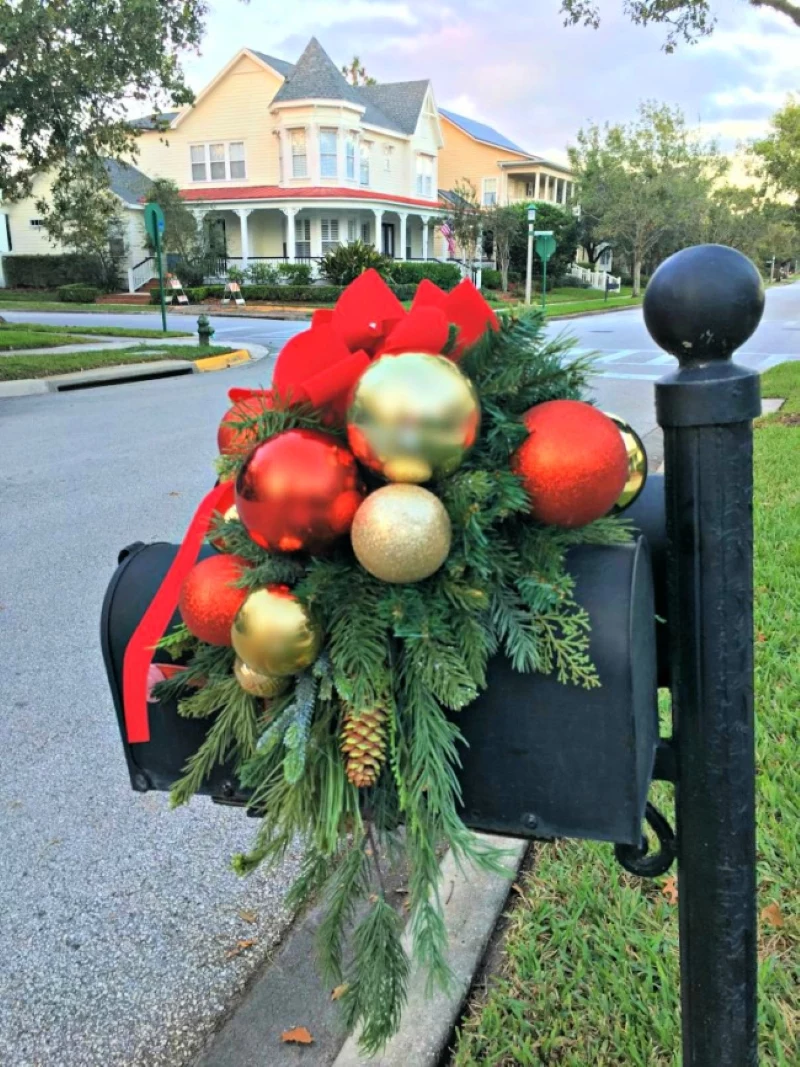
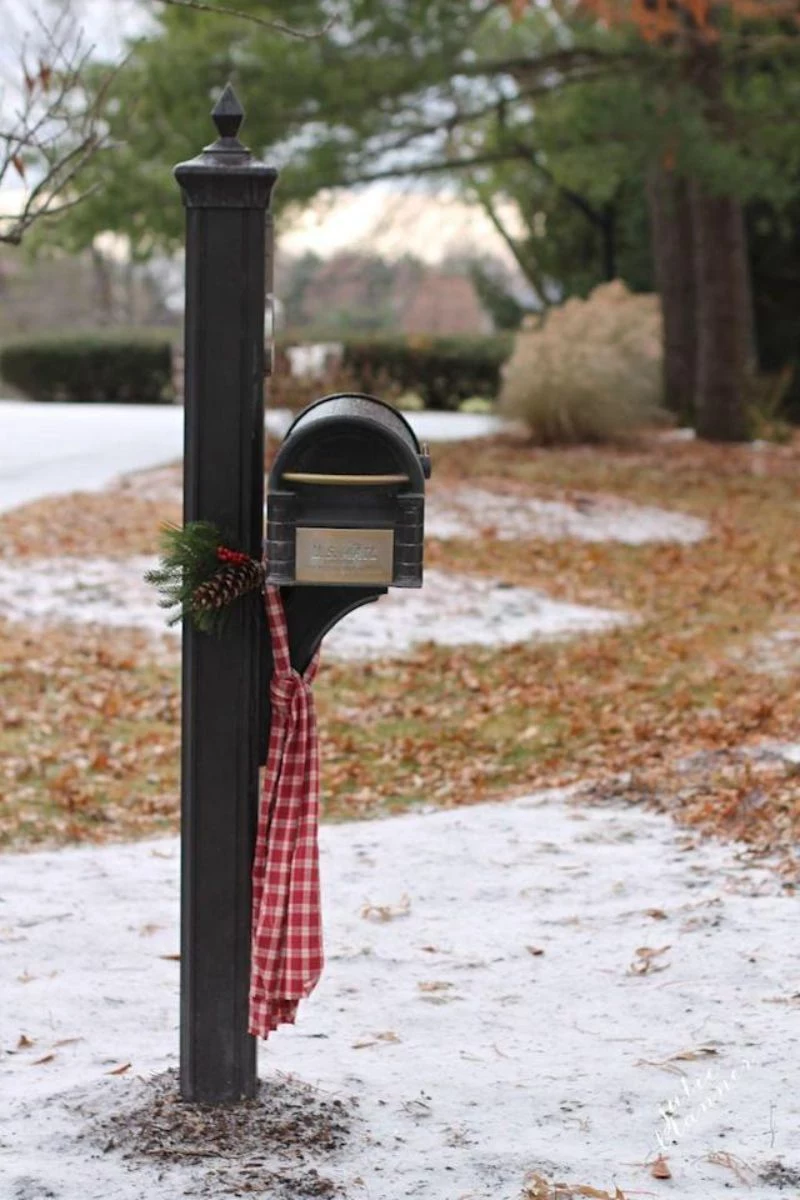
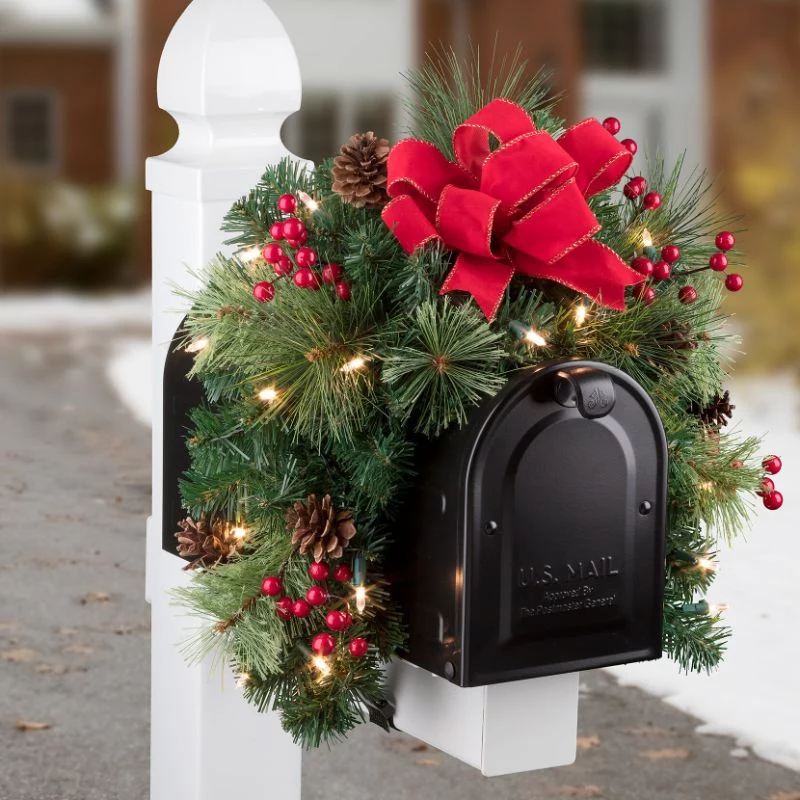
Project 1: The Timeless & Easy Mailbox Swag
This classic design is quick, easy, and looks elegant on any post. We’ll build it with fresh greens here, but the steps are identical for artificial ones.
- Time Commitment: About 30-45 minutes.
- Budget: Roughly $20-$35 for fresh materials.
Step 1: Build Your Greenery Base. Layer your branches, starting with a stiff fir branch as the backbone. Lay a softer branch, like cedar, on top for drape and fullness. Gather enough so the bundle of stems is about as thick as your wrist. The total length should be about one and a half times the height of your mailbox door for good visual balance.
Step 2: Secure the Bundle. Grip the cut ends tightly and wrap your paddle wire around them 5-6 times, pulling it super tight. This solid anchor point is what keeps your swag from falling apart. Don’t cut the wire yet!
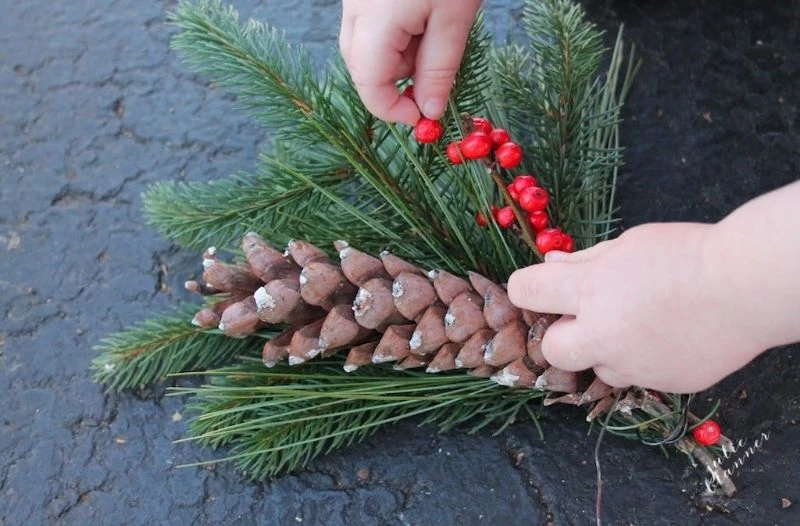
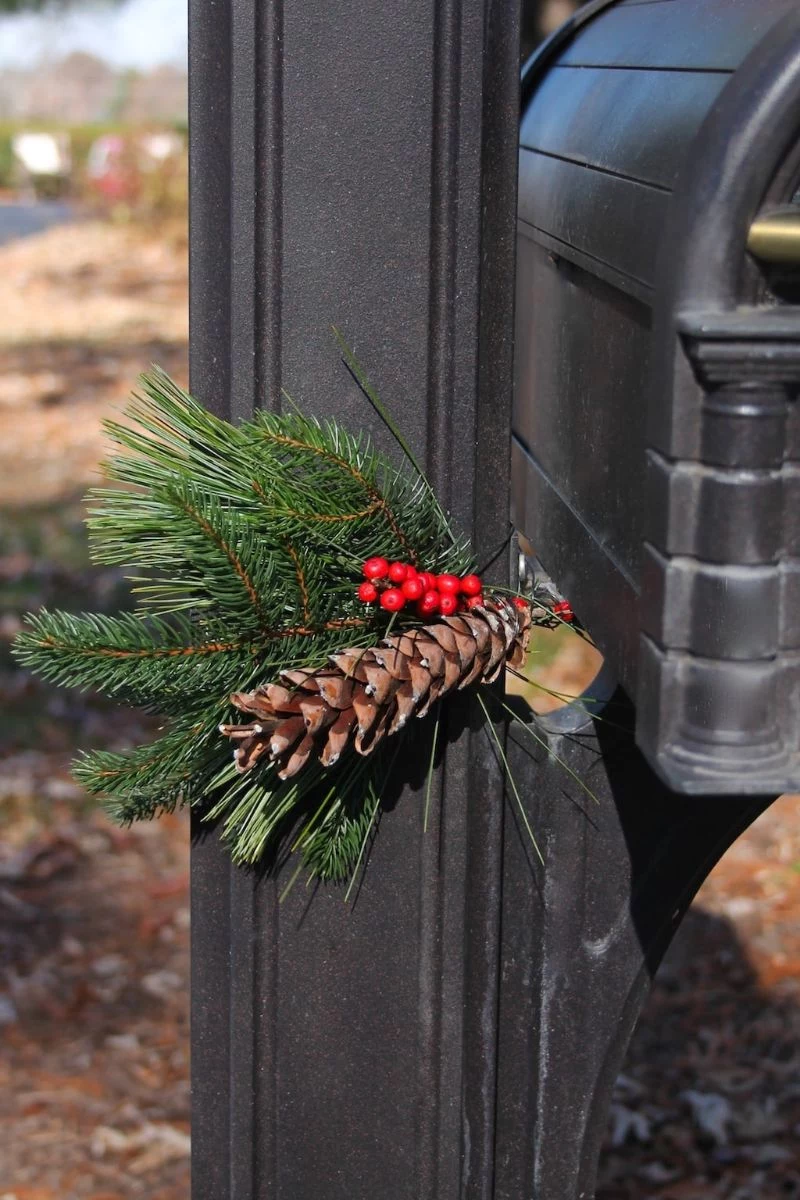
Step 3: Add Embellishments. Wire your pinecones by slipping a 10-inch piece of wire through their bottom scales and twisting it to create a stem. Attach the pinecones and any berry clusters by weaving their wire stems into the greenery bundle and wrapping them around the main stems to lock them in place.

Step 4: Make a Big, Beautiful Bow. Making a bow is easier than it looks! Start by making a small center loop and pinching it. Then, make a larger loop to the right and pinch it at the center. Make a matching loop on the left. Continue making 3-4 loops on each side, keeping them tight at the center. Secure the whole thing by wrapping a piece of wire tightly around the pinched middle, leaving long wire tails. (By the way, there’s absolutely no shame in buying a nice, pre-made outdoor bow. It’s a great time-saver!)
Step 5: Attach and Mount. Use the bow’s wire tails to attach it to the top of the swag, hiding all your wirework. Then, use a few rubber-coated ties to attach the swag securely to the mailbox post. Do a final check to make sure the door and flag are clear!
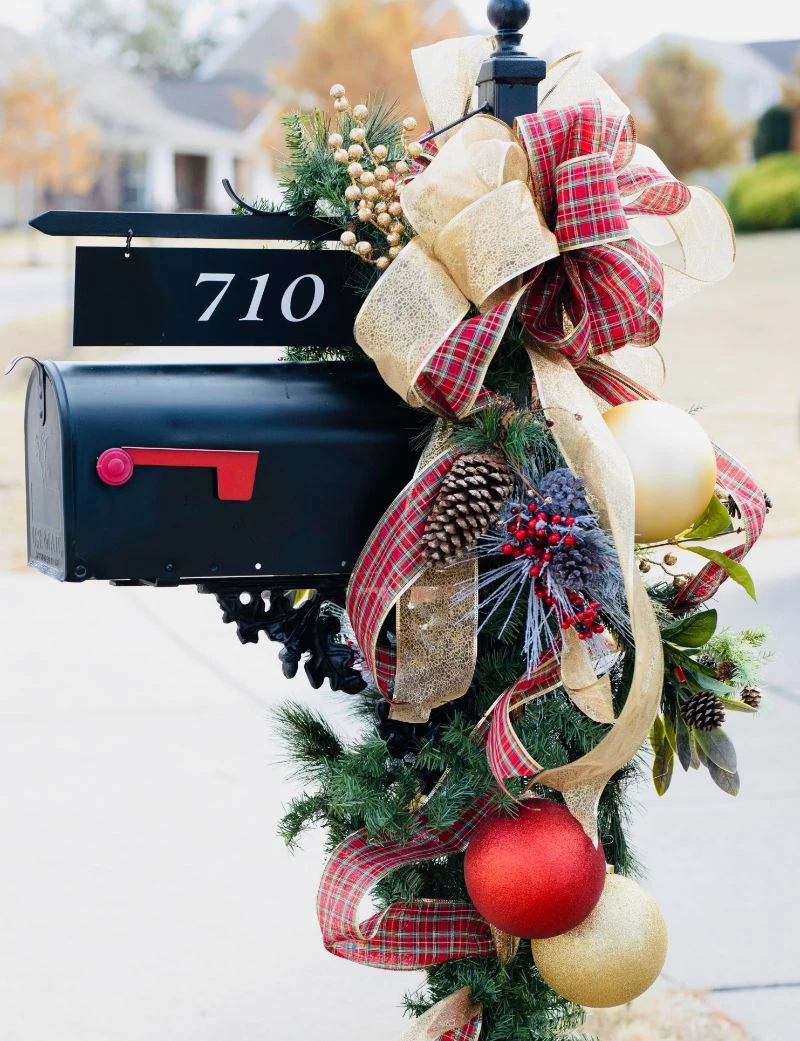
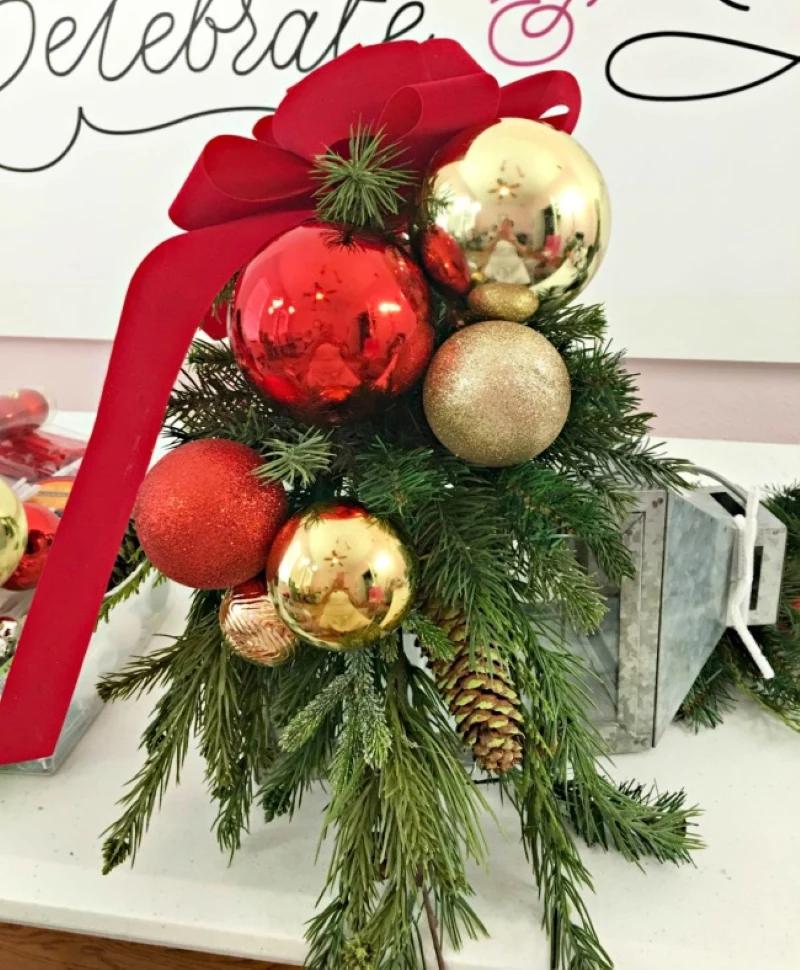
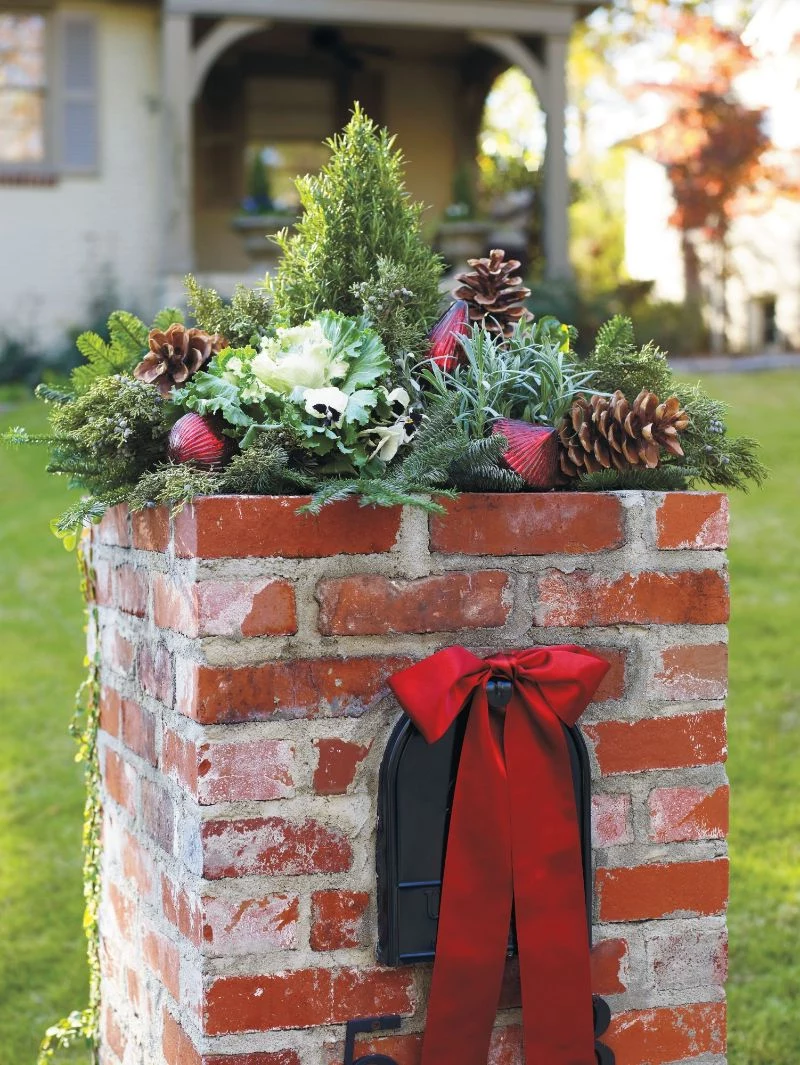
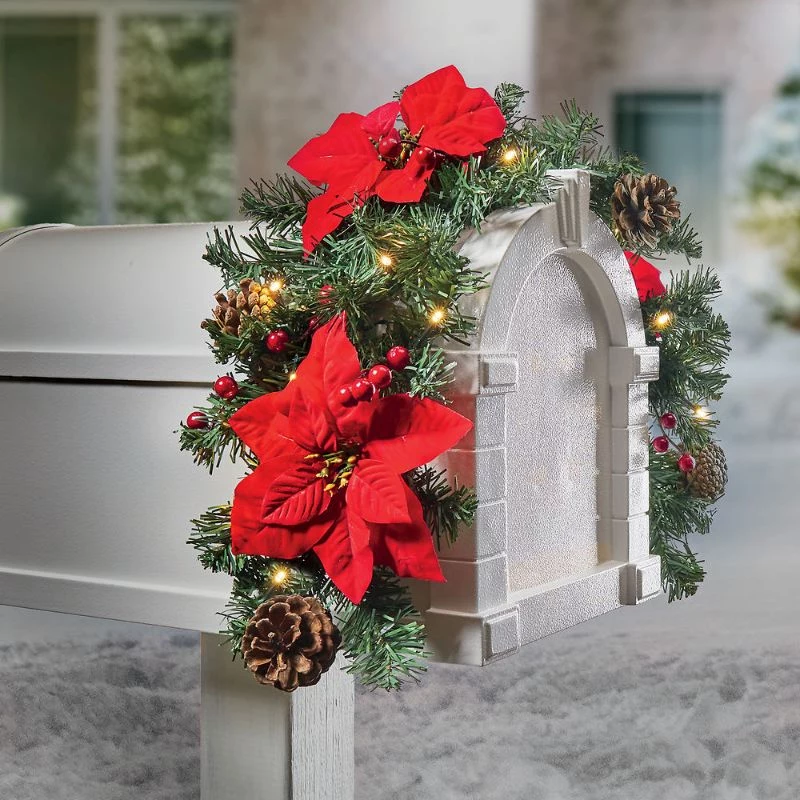
Project 2: The Lush & Luxurious Mailbox Saddle
This design sits right on top of a standard arched mailbox and gives a really full, professional look. It’s a bit more involved but is a total showstopper. This works best with artificial greens.
- Time Commitment: 1.5 – 2 hours.
- Budget: $60 – $100+ (but the materials are reusable for years).
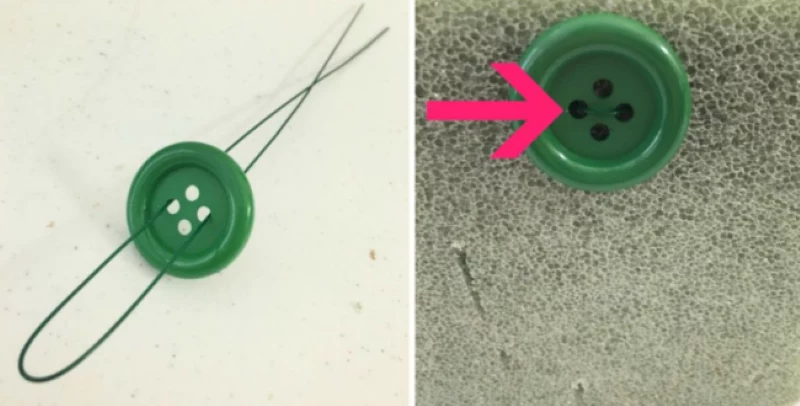
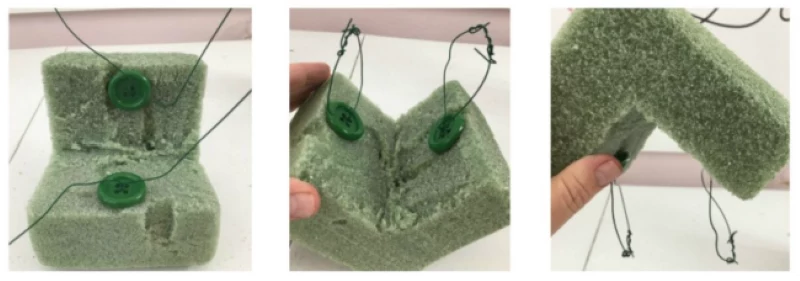
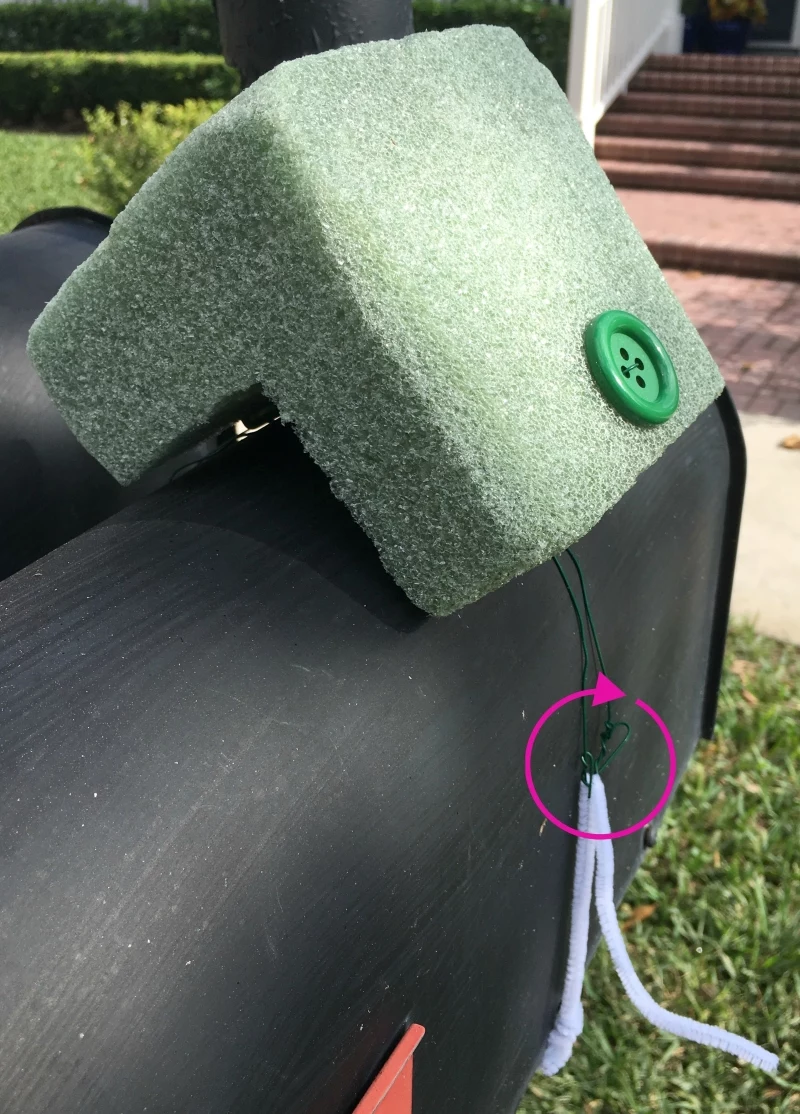
Step 1: Shape the Foam Base. This is the most important part. You need to carve a channel into the bottom of your Styrofoam block so it fits perfectly over the arch of your mailbox. I usually trace the curve and then carefully carve it out with a serrated knife. A snug fit is everything.
Step 2: Attach the Foam First! A common mistake is to decorate the foam before it’s on the mailbox. Don’t do it! Secure the bare foam block to the mailbox first using two heavy-duty zip ties looped underneath. This anchor is essential for a stable arrangement.
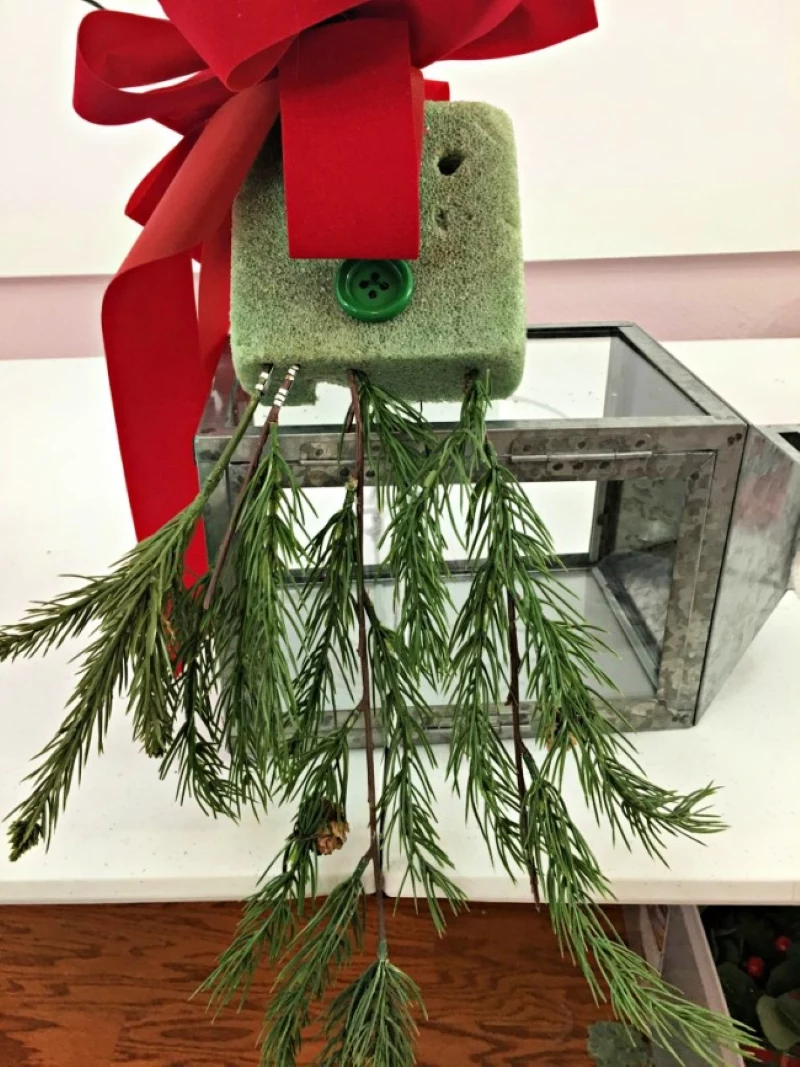
Step 3: ‘Green’ the Foam. Now, start filling the foam with your artificial greenery. Cut the stems at an angle to make them easier to insert. Start with your longest pieces on the sides to create the draping shape, then fill in the top. Your goal is to completely hide all the white foam.
Step 4: Add Your Focal Point. Attach your large bow to the top center using its wires or floral pins. This anchors the whole design visually.
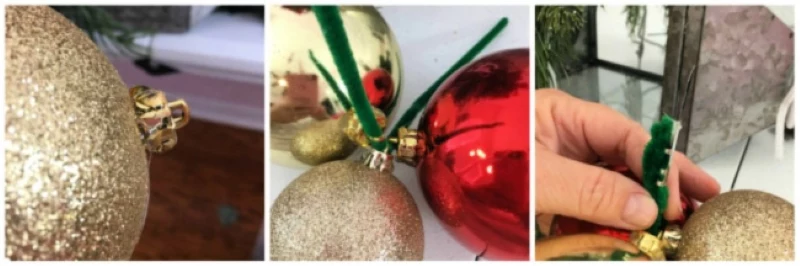
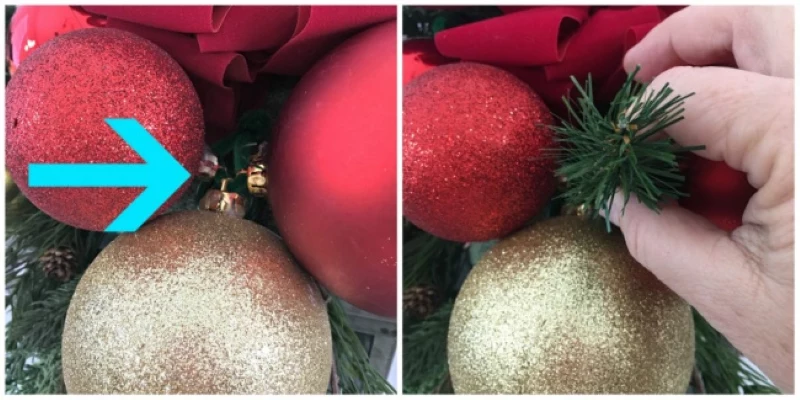
Step 5: Place Your Accents. Add your ornaments or berry clusters, grouping them in odd numbers (like clusters of three) for the most impact. Secure them with hot glue or by pushing their stems deep into the foam.
Step 6: The Final Check. Walk all the way around it. See any gaps? Tuck in a small piece of greenery. Give it a gentle tug to make sure it’s secure. And, of course, double-check that door and flag!
A Final Word on Care and Storage
When the holidays are over, don’t just rip the decoration off. Carefully cut the zip ties or wires to avoid scratching your mailbox. If you used artificial materials, now’s the time to protect your investment. Gently dust off the arrangement and store it in a big plastic tub—you know, the kind you can get at Target or Home Depot. Label it “Mailbox Decor,” and future you will be very grateful.
Creating a beautiful mailbox decoration is a small project with a big payoff. By using a few of these pro techniques, you can make something that brings a little extra joy to you, your visitors, and your mail carrier all season long.
Inspirational Gallery
When selecting greenery, durability is key. For arrangements that need to withstand winter weather, your best choices are branches that retain their needles and color even when cut.
- Noble Fir: Its strong, stiff branches can support heavier ornaments and won’t droop.
- Fraser Fir: Famous for excellent needle retention, it will look fresh for weeks.
- Cedar: Offers a beautiful, lacy drape and a wonderful holiday fragrance.
- Boxwood: Ideal for a classic, dense look and holds its shape exceptionally well.
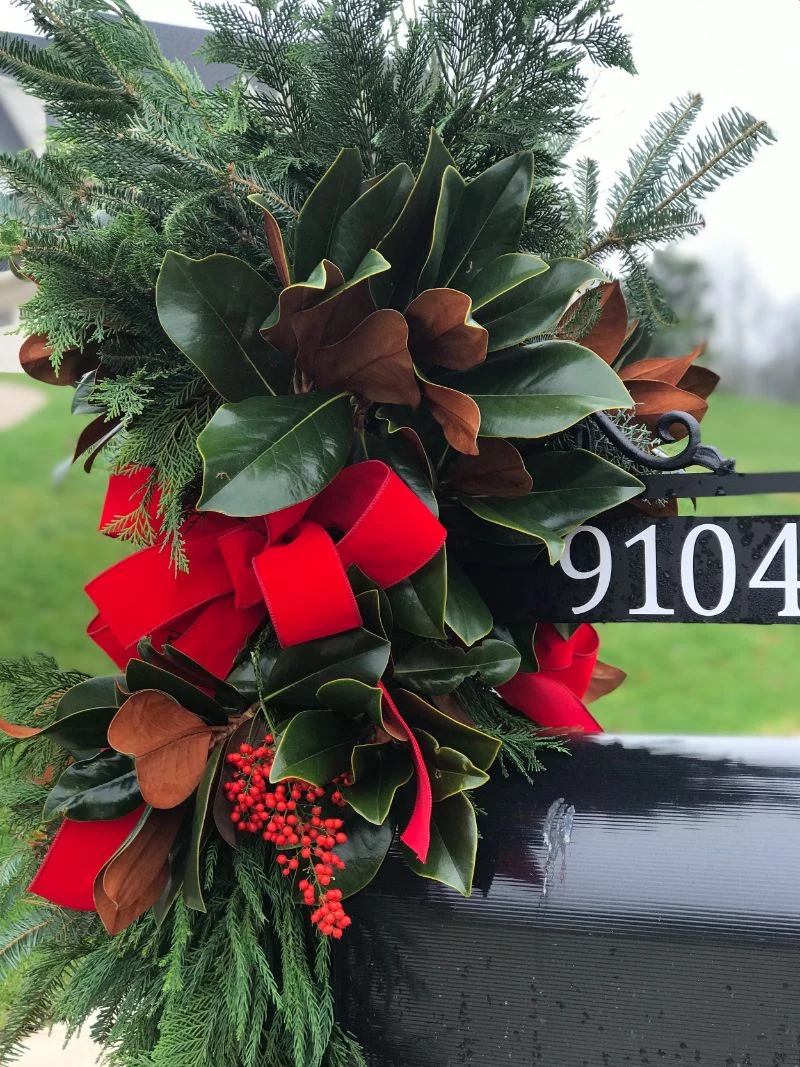
The secret to those perfect, full bows that don’t droop after the first snowfall? It’s always wired, outdoor-rated ribbon.
Look for fabric described as ‘flocked vinyl’ or ‘weatherproof velvet’. The internal wire is the magic ingredient, allowing you to shape generous loops and flowing tails that can be easily re-fluffed and repositioned after wind or precipitation, keeping your design looking pristine all season long.
Want to add a festive glow without a nearby outlet?
The solution lies in battery-operated outdoor LED string lights with a built-in timer function. Seek out options with a weatherproof battery pack, often rated IP65 or higher. Brands like Philips or Pro-Line offer ‘micro’ or ‘fairy’ light strings on fine wire that are easy to weave through greenery. The timer (e.g., 6 hours on, 18 hours off) saves battery life and ensures your mailbox lights up automatically each evening without any daily effort.
Florist Wire: Green-coated wire is nearly invisible among evergreen branches, offering a clean, professional finish. It’s flexible and perfect for attaching delicate items like berry sprigs or small ornaments.
UV-Resistant Zip Ties: For securing the main swag to the mailbox post, nothing beats the strength of a heavy-duty zip tie. Choose black or green to blend in. They provide a much tighter, more reliable hold than twine or ribbon alone, which is crucial for wind resistance.
Consider a more sophisticated color palette to stand out. Move beyond the traditional red and green by exploring themes that complement your home’s exterior.
- Winter Frost: Combine silver, icy blue, and white elements with frosted greenery for a cool, elegant look.
- Gilded Forest: Mix deep evergreens with accents of gold, bronze, and copper for a warm, luxurious feel.
- Nordic Charm: Embrace simplicity with natural pinecones, birch twigs, and a simple black and white plaid ribbon.
A common mistake: Only decorating the sides visible from the street. Remember that your mailbox is a three-dimensional object. From your own front door or driveway, a bare backside looks unfinished. Securing a few extra sprigs of greenery and a small pinecone cluster on the back of the arrangement creates a complete, 360-degree design that feels truly professional.
- It perfectly conforms to the shape of a standard mailbox.
- It provides a secure, stable base for inserting greenery and accents.
- It protects your mailbox surface from scratches from wire and stems.
The secret? A pre-formed mailbox saddle or swag form. You can find these foam or wire frames at craft stores like Michaels or Hobby Lobby, giving you the professional foundation you need to build a lush, secure arrangement.
Did you know? High-quality faux greenery, like the options from Balsam Hill or Afloral, often uses molds from real branches and up to 10 different color tones per branch for maximum realism.
Investing in top-tier artificial greens means your mailbox arrangement is not only weatherproof but also reusable for years. It won’t wilt, drop needles, or attract insects. Plus, you can assemble your decoration in the comfort of your home, well before the cold weather sets in, and install it in minutes.
Look to Scandinavian design for a ‘less is more’ approach. Instead of a large, dense swag, try a minimalist but impactful statement. A single, elegant branch of silver dollar eucalyptus or a wispy sprig of juniper simply tied to the mailbox post with a natural linen or black velvet ribbon can be incredibly chic. It’s an exercise in restraint that feels both modern and festive.
A 2022 survey by a major delivery service found that 78% of mail carriers feel a decorated mailbox brightens their day during the hectic holiday season.
Go beyond the visual and add a touch of unexpected texture. This creates depth and a high-end feel. Weave in dried natural elements like the velvety brown undersides of magnolia leaves, bundles of cinnamon sticks tied with twine, pheasant feathers, or even lotus pods. These items add a layer of organic sophistication that sets your design apart from the standard pine-and-ribbon combo.
The Pinecone Perk: Weatherproof natural elements by giving them a quick coat of clear matte spray varnish before adding them to your arrangement. This simple step helps them repel moisture and prevents them from getting waterlogged and heavy in rain or snow, ensuring your decor stays light and lovely.


