The Real Deal on Planting Tulips: A Pro’s Guide to Getting It Right
I’ve spent a huge chunk of my life with my hands in the dirt, planting literally tens of thousands of bulbs. I’ve done the whole nine yards—from hyper-manicured public gardens to those sprawling, natural-looking private estates. Early on, I was lucky enough to learn from a master gardener trained in the classic Dutch methods. He taught me the most important lesson: a stunning tulip display has almost nothing to do with luck. It’s all about understanding what the bulb needs and working with it.
In this article
- So, What Exactly Is a Tulip Bulb?
- Getting Started: The Pro’s Shopping List and Prep Work
- Planting Tulips in Pots (For the Balcony Gardeners!)
- Climate is Everything: Hot vs. Cold Regions
- Solving Problems: Pests, Diseases, and Aftercare
- Getting Fancy: Pro-Level Design Tricks
- A Quick Word on Safety
- Inspirational Gallery
A lot of folks think you just dig a hole, plop in a bulb, and call it a day. And sure, that might work… once. But if you want those strong, reliable, gorgeous blooms that come back year after year? You need a better game plan. This is that game plan.
By the way, if you’re short on time, here are the absolute must-knows:
- Buy better bulbs. Get big, heavy bulbs from a specialty supplier, not the sad-looking ones in a bag at a big-box store. The difference is night and day.
- Plant deep. The rule is to plant a bulb three times as deep as it is tall. For most tulips, that’s a solid 6 to 8 inches down.
- Feed the bulb, not the flower. After they bloom, snip off the dead flower head immediately. But—and this is critical—let the leaves die back on their own. Don’t you dare cut them!
So, What Exactly Is a Tulip Bulb?
Before you even think about grabbing a trowel, let’s get one thing straight. A tulip bulb isn’t a seed; it’s more like a fully-charged battery pack for a flower. Tucked inside that papery skin (called a tunic) is a tiny, perfectly formed flower bud, surrounded by fleshy layers packed with all the food it needs to grow and bloom exactly one time. The quality of that first bloom was actually decided a year ago in a field somewhere far away.
Our job is just to provide the right environment for it to do its thing. And the two most critical factors are temperature and water.
First, tulips need a long, cold nap to bloom. It’s a process called vernalization. To get the hormones going, the bulb needs 12 to 16 weeks in temperatures between 35°F and 45°F (that’s about 2°C to 7°C). This mimics a real winter and tells the bulb it’s time to get ready for spring. Without this chilling period, you’ll get a few sad leaves and maybe a flower that gives up halfway. This is the #1 reason tulips fail, especially in warmer areas.
Second is drainage. Let me be blunt: tulips HATE wet feet. If a bulb sits in soggy, waterlogged soil, it will rot into a disgusting, foul-smelling mush. Good soil should be loose and crumbly. When you grab a handful and squeeze, it should fall apart when you open your hand, not stay in a solid, muddy clump.
Getting Started: The Pro’s Shopping List and Prep Work
A great display starts with smart shopping, not just hard work. This is where you can really set yourself up for success.
Choosing Your Bulbs (and Where to Get Them)
Honestly, the quality of your bulbs is everything. I always recommend buying from reputable online suppliers that specialize in bulbs. Think places like Colorblends, Van Engelen, or Brent and Becky’s Bulbs. You might pay a bit more, say $1 to $2 per bulb versus $0.50 for a bag at a hardware store, but you’re paying for health and performance. It’s worth it.
Here’s what to look for:
- Weight: A healthy bulb feels solid and heavy for its size. Lightweight bulbs are likely dried out.
- Firmness: Give it a gentle squeeze. It should be rock-solid. Any soft spots are a major red flag for rot.
- Size: For the big, classic tulips like Darwin Hybrids, bigger is always better. Look for bulbs that are 12cm in circumference or larger. They have more fuel in the tank for a bigger flower.
- Condition: The papery outer layer should be mostly intact. A little surface mold (the blue-green stuff) is fine and can be wiped off, but if you see fuzzy black or grey mold, pass on it.
When and Where to Plant
Forget the calendar. The real signal to plant is soil temperature. You want to plant when the soil is consistently below 60°F (15°C). Planting in soil that’s too warm can trick the bulb into sprouting in the fall, and that weak growth will just get zapped by the first frost. Do yourself a favor and buy a soil thermometer—they’re only about $10-$15 online or at any garden center. Just push it 6 inches deep and check it for a few days. Once it’s hanging out in the 50s, you’re good to go.
Prepping the Soil Bed
Okay, this is where the real work comes in, and it pays off big time. For a 5×5 foot bed, expect the digging and amending to take about 2-3 hours, but the actual planting part is quick, maybe 30 minutes.
- Dig the Whole Thing Out: Don’t just dig dinky individual holes. For a group planting, excavate the entire area to a depth of at least 12 inches. This ensures even drainage below the bulbs.
- Fix Your Soil: If you have heavy clay, mix in one part coarse sand and one part compost or pine bark fines to break it up. If you have sandy soil that drains too fast, mix in plenty of compost to help it hold moisture.
- Add Some Food: At the bottom of your trench, work in some bone meal. It’s a great source of phosphorus for strong roots. A bag costs around $10-$20 and will last you a while. Use about a tablespoon per square foot. Avoid high-nitrogen fertilizer at planting time; it just makes for weak, leafy growth.
When you’re ready to plant, place the bulbs pointy-end-up about 4-6 inches apart. Then, just backfill the whole bed with your improved soil. This trenching method is so much faster and ensures every bulb is at the same, correct depth.
Planting Tulips in Pots (For the Balcony Gardeners!)
Don’t have a yard? No problem. Tulips look amazing in containers, but the rules are a little different. So many people get this wrong.
- Go Deep: Choose a large, deep pot. It needs to be at least 15-18 inches deep to allow for proper soil depth and drainage. A shallow pot is a recipe for failure.
- Use Potting Mix ONLY: Never, ever use garden soil in a pot. It will compact into a solid brick and won’t drain. A big bag of quality potting mix is your best friend here, probably costing you around $15-$25.
- Chill Out: Unless you live in a cold climate, your pot won’t get cold enough on its own. You’ll still need to pre-chill your bulbs in the fridge (more on that below).
- Winter Protection: In cold climates, a pot can freeze solid, killing the bulbs and cracking your container. Move the pot into an unheated garage or shed once the temperatures really drop. You can also wrap the pot in burlap or bubble wrap for insulation.
Heads up! It’s usually best to treat potted tulips as annuals. They put on a fantastic show for one year, but it’s very difficult for them to gather enough energy to return in a container.
Climate is Everything: Hot vs. Cold Regions
The advice that works in Vermont will be a disaster in Georgia. You have to adapt.
In Colder Climates (Zones 3-7): You’ve got it easy! The winter does the chilling work for you. Your main job is to add a 2-3 inch layer of mulch (shredded leaves work great) after the ground freezes solid. This isn’t to keep the ground warm; it’s to keep it frozen, preventing the freeze-thaw cycles that can push bulbs out of the soil.
In Warmer Climates (Zones 8-10): You have to become the winter. You must buy your bulbs in the fall and pre-chill them in your fridge for 12 to 16 weeks. Put them in a paper or mesh bag—never plastic. And this is CRITICAL: do not store them with fruit, especially apples. Ripening fruit releases ethylene gas, which will kill the flower bud inside the bulb. You’ll get leaves, but no flower. I once saw a massive shipment of bulbs for a project ruined because they were stored near a kitchen’s fruit supply. It was a costly, heartbreaking lesson. Plant them immediately after they come out of the fridge, usually in late December or January.
Solving Problems: Pests, Diseases, and Aftercare
A huge part of gardening is just being a good problem-solver. Here are the most common issues you’ll face.
The Critter Battle: Squirrels and chipmunks think tulip bulbs are a delicious snack. The best defense is a physical barrier. For large beds, my go-to method is to lay a sheet of chicken wire over the soil after planting. Pin it down with landscape staples and cover it with a thin layer of mulch to hide it. What do you do in the spring? Nothing! Just leave it. The stems grow right through the holes, but the critters can’t dig down. It’s brilliant.
The Dreaded Tulip Fire: This is the worst tulip disease, a fungus that causes twisted, spotted leaves and moldy flowers. It thrives in cool, wet spring weather. I’ll never forget the first time I had to deal with a serious outbreak at a client’s home; we had to be ruthless and dig up an entire prize-winning border. Prevention is the only real cure. If you see an infected plant, dig it up immediately—bulb, soil, and all—seal it in a plastic bag, and trash it. Never compost it. To avoid it, give your bulbs good air circulation by not overcrowding them.
After the Flowers Fade: What you do now determines if they’ll ever bloom again. As soon as the petals fall, snap off the flower head. This stops the plant from wasting energy on making seeds. But DO NOT cut the leaves. I can’t say this enough. The leaves are the solar panels that recharge the bulb for next year. You have to tolerate the messy-looking foliage for about six weeks until it’s completely yellow and pulls away easily. It’s a test of patience, but it’s essential.
Getting Fancy: Pro-Level Design Tricks
Once you’ve got the basics down, you can start having some real fun.
Which Tulips Actually Come Back?
Want perennial tulips? You have to pick the right varieties. It’s a spectrum. On one end, you have many Triumph or Single Late tulips; they’re stunning for a season but are best treated as annuals. For a better long-term investment, go with Darwin Hybrids. They’re tall, classic, and can come back strong for 5-7 years in a well-prepared bed. Some reliable Darwin Hybrid stars are ‘Pink Impression’ and ‘Apeldoorn’. For the absolute toughest and most reliable returners, look to Species tulips. They are smaller and look a bit more wild, but they are tough as nails and will multiply over time.
The “Lasagna” Planting Method
For a non-stop flower show in one spot, you can layer bulbs like you’re making lasagna. Dig a deep, wide hole and plant in layers based on bloom time. Here’s a can’t-miss recipe for a gorgeous pink and purple combo:
- Bottom Layer (deepest, 8″): Plant a late-blooming, tall variety like Allium ‘Purple Sensation’.
- Middle Layer (6″): Cover the alliums with a couple inches of soil, then plant a mid-season tulip like the Darwin Hybrid ‘Pink Impression’.
- Top Layer (shallowest, 4″): Add more soil, then plant an early-blooming small bulb like Crocus ‘Flower Record’ or Grape Hyacinth.
Cover it all up, and you’ll get waves of color for up to two months, starting with the crocuses and ending with the alliums.
A Quick Word on Safety
Let’s not forget to be safe. First, tulip bulbs are toxic if eaten by pets or people, so if you have a dog that’s a determined digger, the chicken wire barrier is a must. Second, always wear gloves when handling a lot of bulbs (a simple pair of cotton garden gloves for $5 is fine). Some people develop a nasty skin rash known as “tulip fingers.” It’s an easy thing to prevent.
At the end of the day, gardening with tulips teaches you patience. Not every bulb will be perfect, and that’s okay. But if you follow these steps—grounded in how the plant actually works—you’re giving yourself the best possible shot at a truly spectacular spring show.
Inspirational Gallery
During the Dutch Golden Age, a single Semper Augustus tulip bulb was famously valued at more than the price of a house in Amsterdam.
This period, known as ‘Tulip Mania’ in the 1630s, saw bulb prices skyrocket to incredible heights before the market spectacularly crashed. It serves as a historical reminder of the intense passion and value people have placed on these beautiful flowers for centuries.
Struggling with squirrels digging up your hard work? You’re not alone. These furry thieves are notorious bulb bandits. Try laying down a sheet of chicken wire or hardware cloth over the planting area, just below the soil surface, after you’ve planted your bulbs. The stems will grow right through the gaps, but the critters can’t dig through the barrier.
Darwin Hybrid Tulips: These are the giants of the tulip world, prized for their huge, classic-shaped flowers on strong, tall stems. They are excellent for perennializing, often returning reliably for several years. Perfect for bold, impactful statements in beds and borders.
Triumph Tulips: The workhorses of the mid-spring garden. They offer the widest range of colors imaginable and have sturdy stems of medium height, making them incredibly weather-resistant. Ideal for containers, forcing indoors, and creating intricate color schemes.
Want a continuous display of flowers from one pot all spring long?
Try the ‘bulb lasagna’ method. It involves layering different types of bulbs in a deep container. Start with late-blooming tulips at the bottom (like ‘Queen of Night’), add a layer of soil, then plant mid-season daffodils, more soil, and finally, early-spring crocuses or grape hyacinths near the top. As one set of blooms fades, the next is ready to emerge, giving you a non-stop show.
- A vibrant, living bouquet on your windowsill in the dead of winter.
- The sweet, fresh scent of spring weeks before the thaw.
- An up-close view of the magic of a flower unfurling.
The secret? Forcing bulbs indoors. By potting select tulip varieties in the fall and giving them a required 12-14 week cold treatment in a garage or spare fridge, you can trick them into blooming early inside your warm home.
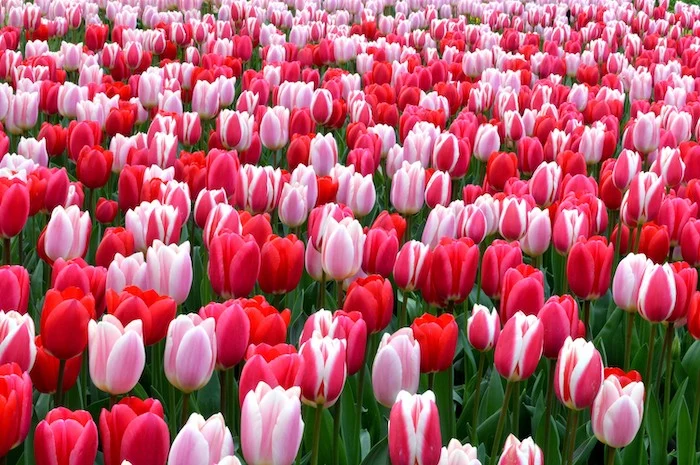
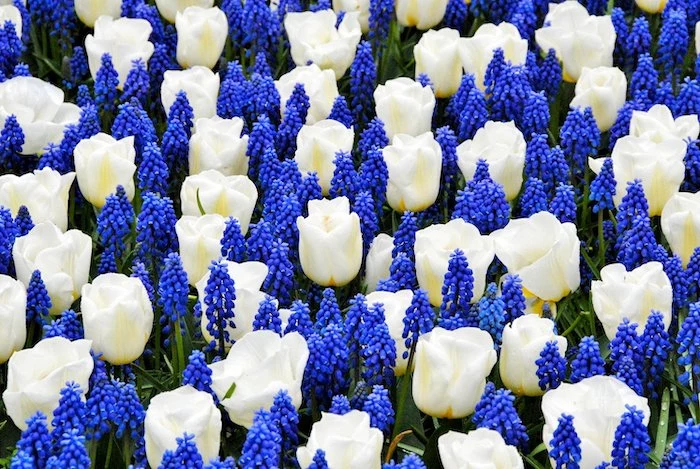
The secret to a professional-looking tulip display isn’t just about planting in drifts; it’s about connecting them with a ‘color echo’. Pick a standout color from a mixed tulip variety, like the deep purple in ‘Suncatcher’ tulips, and repeat that exact hue elsewhere with a solid block of another flower, like Grape Hyacinths (Muscari) or Pansies. This simple trick makes the entire design feel intentional and cohesive.
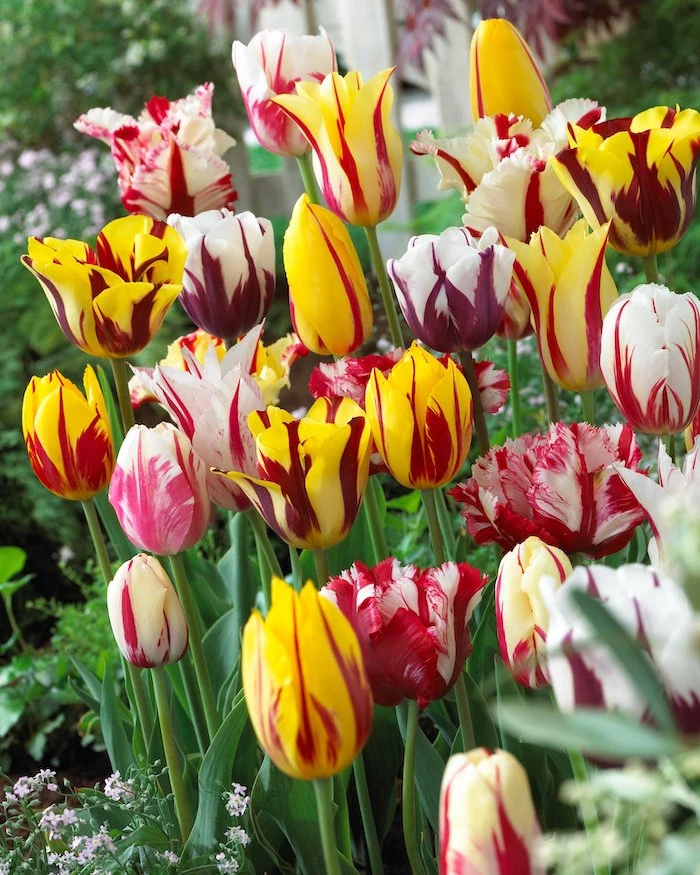
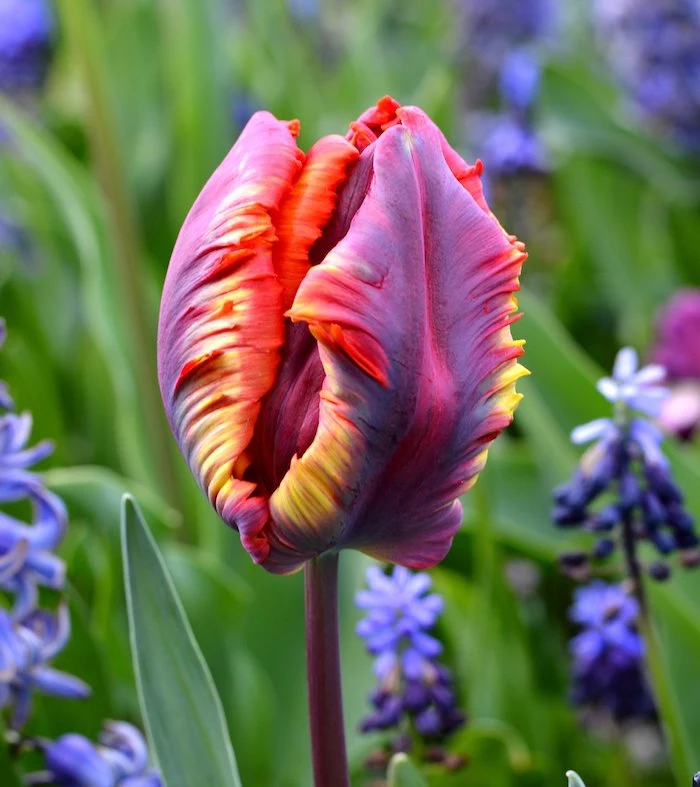
Beyond the classic cup shape lies a world of extraordinary tulip forms. For a touch of the dramatic, seek out Parrot tulips, with their ruffled, feather-like petals in flamboyant colors. Fringed tulips offer a delicate, crystalline edge, as if dipped in ice. Or for pure elegance, Lily-flowered varieties have slender, pointed petals that arch outwards gracefully. Reputable suppliers like John Scheepers or Colorblends are fantastic sources for these unique showstoppers.
While a hand trowel works, investing in a long-handled bulb planter can be a back-saver, especially for a large planting. Tools from brands like DeWit are forged from high-quality steel and built to last a lifetime. Their cone-shaped head is designed to eject a perfect plug of soil with a simple tap, making the repetitive task of digging dozens of holes much faster and more ergonomic.
The Perennial Question: Not all tulips are created equal when it comes to returning year after year. While many large modern hybrids are best treated as annuals, some categories are naturally better at perennializing.
- Kaufmanniana & Greigii: These shorter, early-blooming varieties are rock-solid performers that often multiply.
- Darwin Hybrids: As mentioned, many in this class come back strongly for a few years.
- Species Tulips: These are the original wild tulips, like Tulipa clusiana or Tulipa tarda. They are the most reliable of all for naturalizing and spreading over time.
Did you know? A tulip bulb is made up of about 87% water.
This high water content is what makes them so susceptible to rot. While they need moisture to initiate root growth in the fall, sitting in waterlogged soil is a death sentence. This is why good drainage is non-negotiable. If you have heavy clay soil, amending it with compost or planting in raised beds is the key to bulb survival.


