Garden Borders for Beginners: From Dirt Patch to Dream Edge
I’m going to let you in on a little secret, one I’ve learned from years of being elbow-deep in soil. A garden’s edges tell the real story. They’re the difference between a random jumble of plants and a space that feels intentional and truly pulled together. So many people just think of a border as a line of flowers, but oh, it’s so much more. A great border is the frame that makes your garden a work of art.
In this article
Sure, you can use hard edges like metal, stone, or brick for a crisp, formal look. They definitely have their place. But for me, the real magic happens when you create a living border—a planting bed where the plants themselves define the space. It softens the hard lines of a house or walkway, creates a haven for bees and butterflies, and puts on a show that changes with the seasons. It’s a dynamic performance that starts with the first little buds of spring and doesn’t end until the last frosty seed heads of winter.
This isn’t just going to be a list of pretty flowers. We’re going to walk through the whole process, from understanding your land to picking the right plants and keeping them happy. My goal is to give you the confidence to build a border that doesn’t just look good this year, but gets better and better over time.
Before You Buy a Single Plant: A Reality Check
So, you’re excited. I get it! But the biggest mistake I see people make is heading to the garden center and buying plants on a whim. A gorgeous plant in the wrong spot is just a slow, sad death sentence. Before you even think about flowers, you have to become an expert on your own patch of ground. The pros call this a “site analysis,” but really, it’s just paying attention. And the best part? It’s free.
Understanding Sunlight: A Game of Hours
Sunlight is plant food, plain and simple. You need to know exactly how much your future border gets. And vague terms like “it’s a sunny spot” won’t cut it. Here’s a simple trick: On a fairly typical day, take your phone out and check on the spot every hour or so. Make a note. When does the sun first hit it? When does it go into shade? Doing this for just one day will tell you almost everything you need to know.
- Full Sun: This means 6 or more hours of direct, unfiltered sun. Think wide-open spaces with no trees. This is where you can grow things like lavender and coneflowers.
- Part Sun / Part Shade: This is the sweet spot of 3 to 6 hours of direct sun. A good rule of thumb is that “part sun” usually means it gets the gentler morning sun, while “part shade” often implies it gets hit with the more intense afternoon sun. This distinction matters for plants that can get scorched.
- Full Shade: We’re talking less than 3 hours of direct sun. This isn’t a dark cave; it’s usually the dappled, filtered light you find under a big tree. Perfect for hostas and ferns.
Just knowing this will immediately save you from a lot of heartache and wasted money. Seriously. A hosta will turn to a crispy critter in full sun, and a lavender plant will just give up in the shade.
Get Your Hands Dirty: A 30-Second Soil Test
Soil is everything. It’s the foundation of your garden’s health. To figure out what you’re working with, just grab a handful of slightly damp soil and give it a squeeze.
- Clay Soil: If it forms a tight, smooth ball that you can roll into a ribbon, you’ve got clay. It’s rich in nutrients but drains poorly, which can lead to root rot.
- Sandy Soil: Feels gritty and falls apart immediately. Water and nutrients run right through it.
- Loam: The gardener’s dream! It holds a loose shape but crumbles easily. It has the best of both worlds—it holds moisture but also drains well.
Don’t panic if you have clay or sand; most of us do. The answer, nine times out of ten, is compost. It’s the miracle worker. It breaks up heavy clay and helps sandy soil hold water. A bag of good quality compost will run you about $8-$12 at a home improvement store, and it’s the best money you’ll spend on your garden.

Know Your Zone
You’ve probably heard of the “USDA Hardiness Zone.” It’s a map that tells you the average coldest winter temperature in your area. This is your first filter for plant shopping. If you live in Zone 5, a plant rated for Zone 7 just won’t make it through the winter. By the way, you can easily find your zone by searching for the “USDA Plant Hardiness Zone Map” online and typing in your zip code. It’s a game-changer.
Heads up, though: it’s not a perfect system. A plant that’s fine in a dry Zone 6 might rot in a wet and rainy Zone 6. Use it as a starting point, not a guarantee.
Thinking Like a Designer: The Fun Part!
Okay, with the homework done, you can now start thinking about the design. A beautiful border isn’t random; it follows a few simple principles that create a look that just feels right.
Structure First: The Bones of Your Border
Flowers are fleeting, but good structure lasts all year. The “bones” of your border are the plants that look good even in the dead of winter. Think small evergreen shrubs (like a dwarf boxwood), sculptural ornamental grasses, or perennials with a strong shape. For a border that’s about 3 feet deep, I like to place an ‘anchor’ plant like a dwarf mugo pine every 8 feet or so. A small shrub might cost you $25, but it’s an investment in having something to look at in January.
Layer Up for a Lush Look
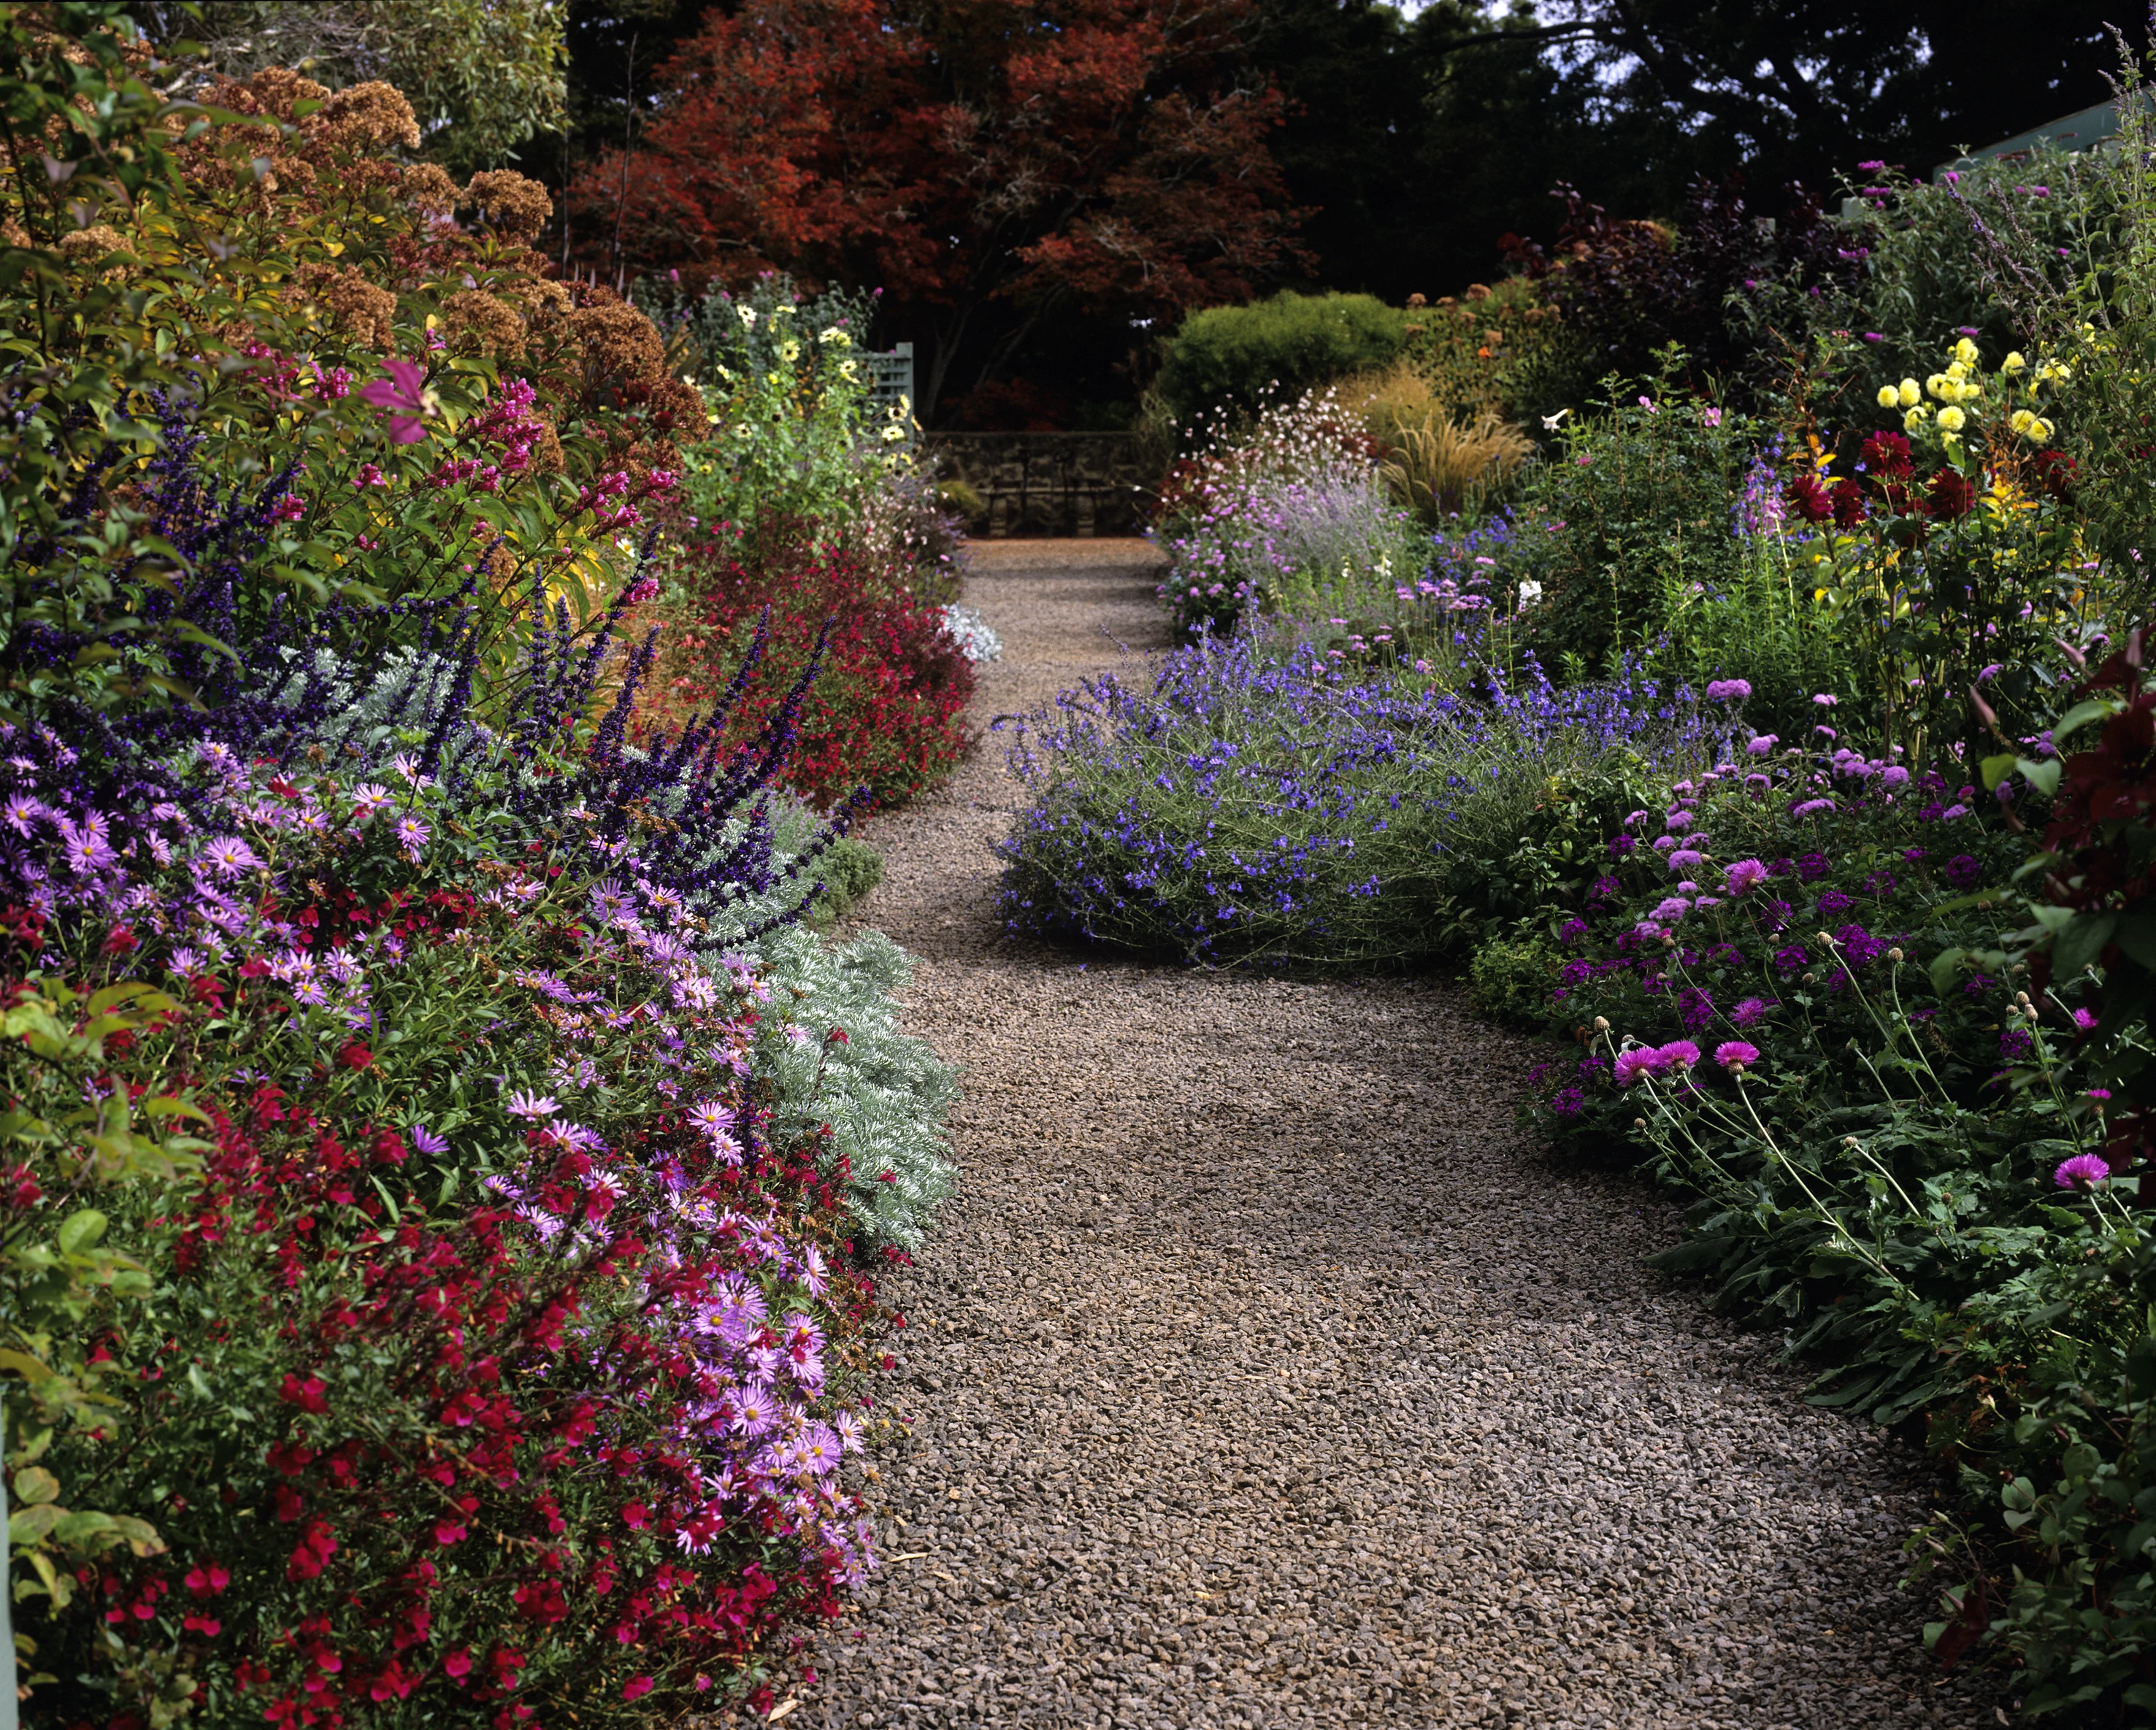
Your border shouldn’t look like a single-file line of soldiers. It needs depth. A simple way to think about this is like a class picture: shorties in the front, tall kids in the back.
- Front (Spillers): These are your short plants, usually under a foot tall, that soften the border’s edge by spilling over it. Think creeping groundcovers.
- Middle (Fillers): This is the heart of your border, with plants typically 1 to 3 feet tall. They provide the main show of color and texture.
- Back (Thrillers): These are your tallest plants that provide a backdrop and draw the eye upward.
Quick tip: Don’t plant in straight rows! Stagger your plants in a zigzag or triangle pattern. A simple pro-looking layout is to plant one “filler” or “thriller,” and then two “spillers” in front of it, slightly offset. Repeat that pattern, and your border will look incredibly full and natural as it grows in.
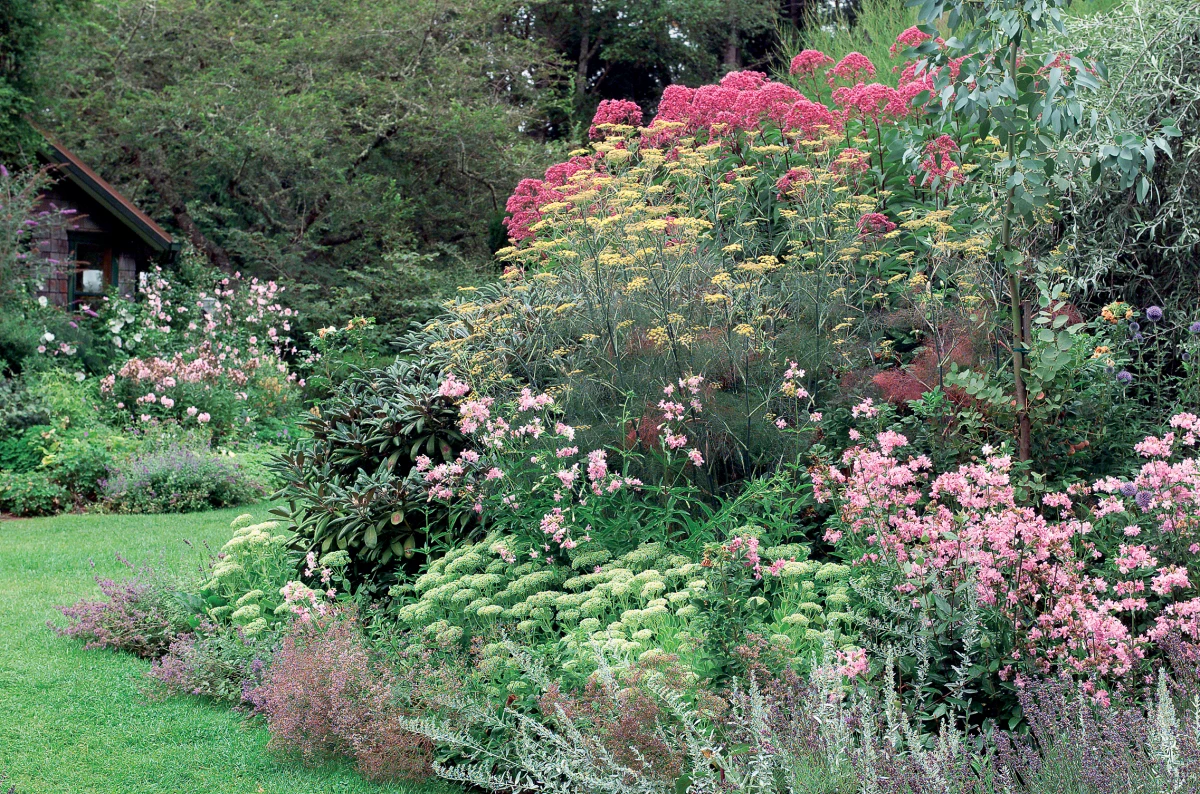
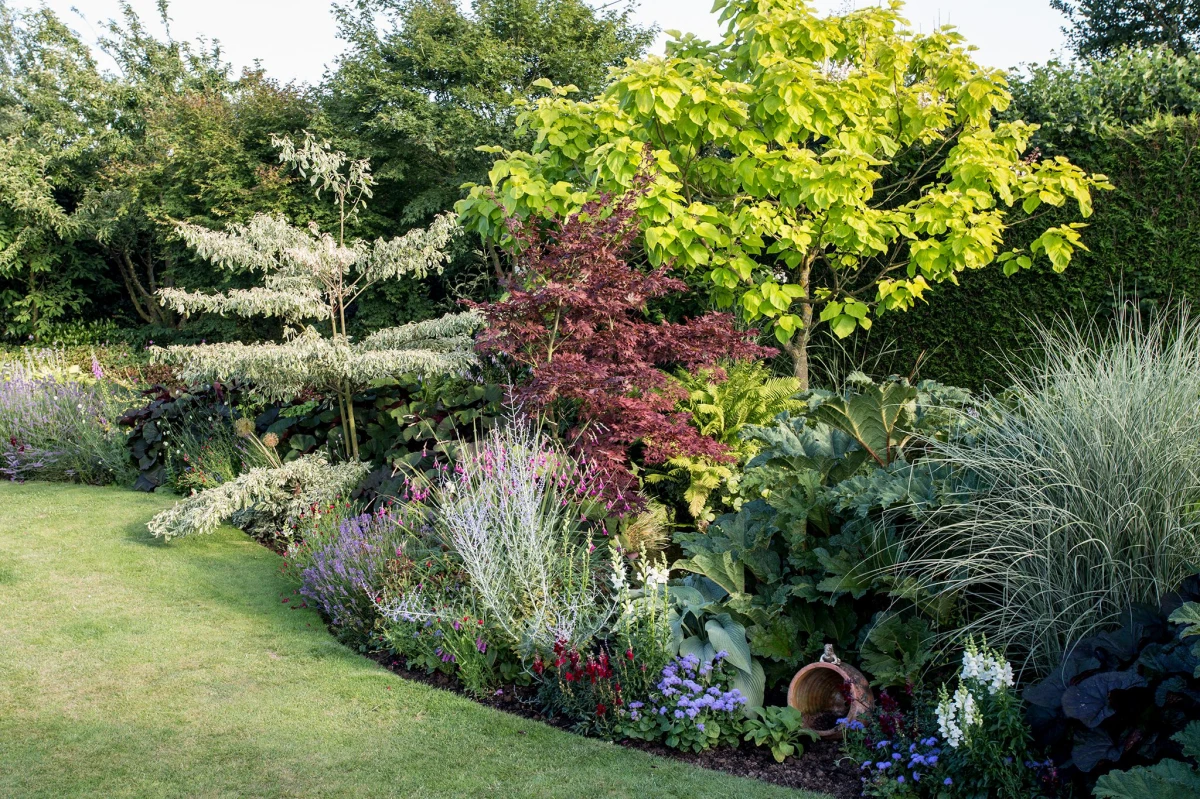
Beyond Blooms: It’s All About Texture
I always tell new gardeners that flowers are the jewelry, but foliage is the outfit. You can create a stunning garden with barely any flowers at all, just by focusing on texture. Contrast a plant with big, bold leaves (like a Hosta) with something that has fine, feathery foliage (like an Astilbe or a fern). Place a spiky, upright grass next to a soft, mounding plant. These contrasts create visual interest that lasts long after the petals have dropped.
Let’s Talk Plants: A Few of My Go-To’s
Alright, here are some reliable, hardworking plants that have proven themselves to me over and over. I’ve broken them down by the conditions they love.
The Shade All-Stars: For Cool, Protected Spots
Shade isn’t a problem; it’s an opportunity to play with a whole different palette of gorgeous plants.
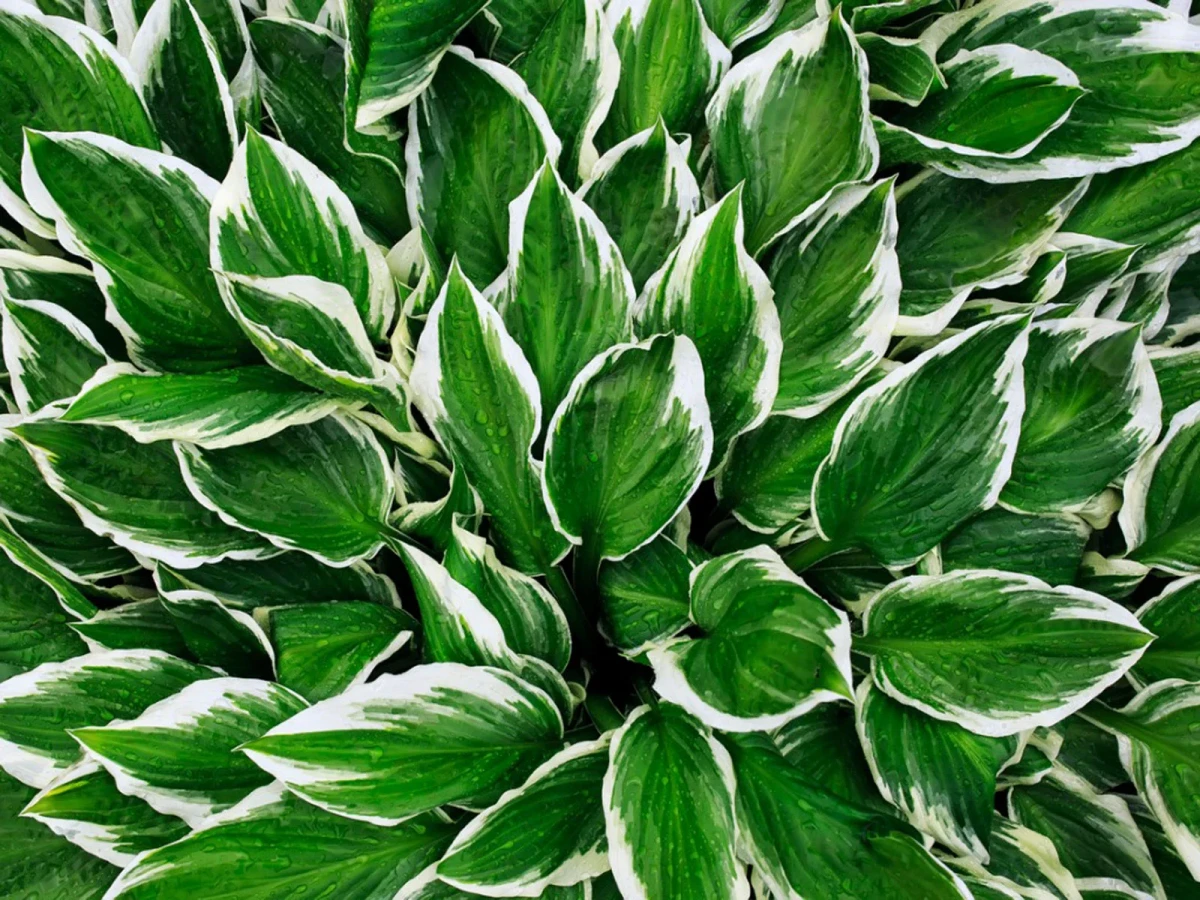
Hosta (Plantain Lily)
This is the undisputed king of the shade garden. Its value is all in the leaves, which come in every size and color imaginable. Hostas are the perfect mid-border filler. Expect to pay between $10 for a small starter plant and up to $30 for a giant, fancy cultivar at a local nursery.
Planting & Care: They love rich, moist soil, so I always mix in a scoop of compost when planting. Give them room to grow! Their mature size is on the tag, so believe it.
Common Mistake: Planting them too close together. They’ll just look sad and cramped. Also, slugs and snails find their leaves delicious. I use a pet-safe iron phosphate bait called Sluggo to keep them at bay.
Astilbe (False Spirea)
If Hosta is the bold foliage, Astilbe is the feathery, romantic flower. Their plume-like blooms in pink, red, or white seem to float over lacy foliage. They’re a fantastic textural contrast to hostas and cost about $12-$25 a plant.
Planting & Care: This is critical: Astilbes must have consistently moist soil. They will not forgive you if they dry out. Don’t even try to plant them under a big, thirsty tree.
Common Mistake: Letting them dry out. Crispy brown leaf edges are a cry for help. They need that moisture to thrive.
Heuchera (Coral Bells)
Breeders have gone wild with this plant, which now comes in stunning shades of deep purple, zesty orange, and near-black. They’re a foliage superstar and are more drought-tolerant than Hostas, making them great for dry shade.
Planting & Care: The most important thing for Heuchera is good drainage. They will rot in heavy, wet soil, especially over the winter. If your soil is heavy, mix in some small gravel or perlite.
Common Mistake: Planting in soggy soil. They’re also prone to “frost heave” in winter, where the plant gets pushed out of the ground. A 2-inch layer of mulch after the ground freezes helps, and just be sure to check them in spring and gently press them back down.
The Sun Worshippers: For Hot, Tough Spots
Got a spot that bakes all day? No problem. These plants can take the heat.
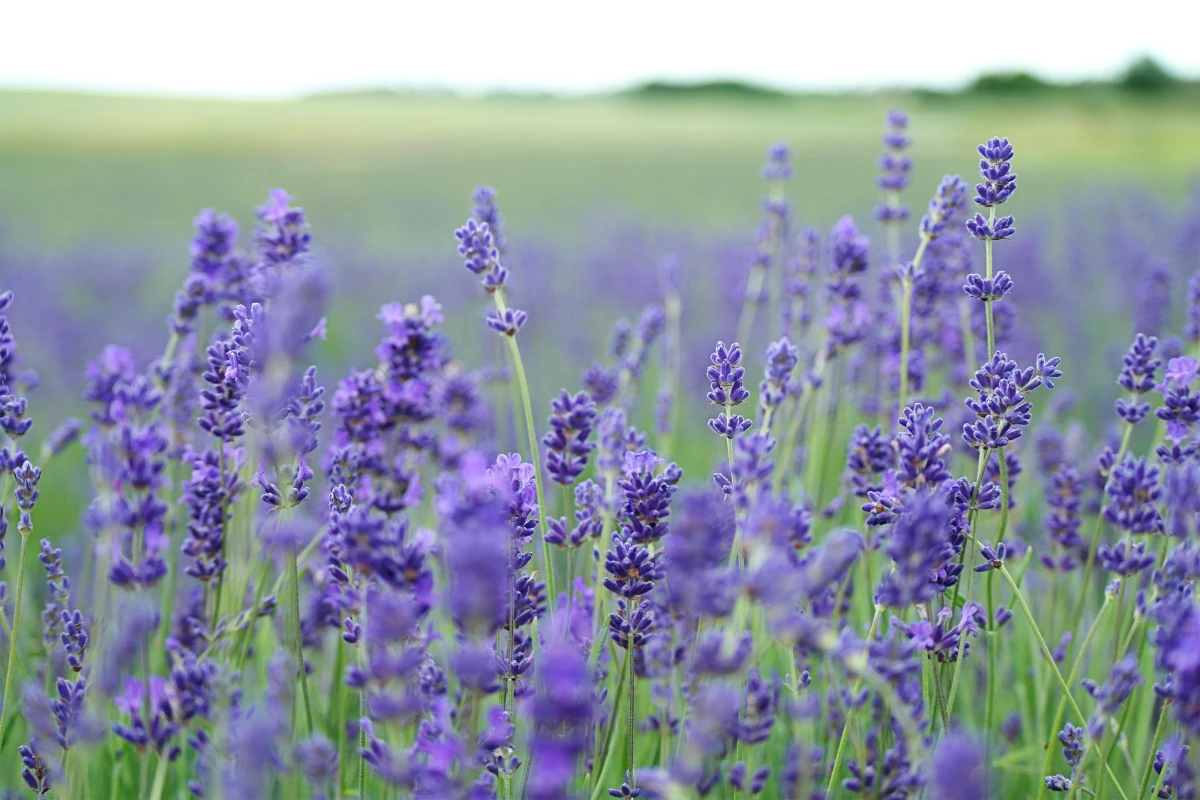
Lavender (Lavandula)
Everyone loves the look and smell of lavender. To be successful, you have to give it what it wants: blazing sun and gritty, fast-draining soil. It’s perfect for a hot strip along a concrete driveway.
Planting & Care: I can’t say this enough: lavender hates having wet roots. It will rot in clay soil. If you have clay, you have to amend with sand or gravel, or better yet, plant it in a raised bed.
Common Mistake: Planting it in rich, moist garden soil. It’s counterintuitive, but this plant thrives on what others would consider neglect. Also, a heads up for pet owners: lavender can be toxic to dogs and cats if they eat a lot of it.
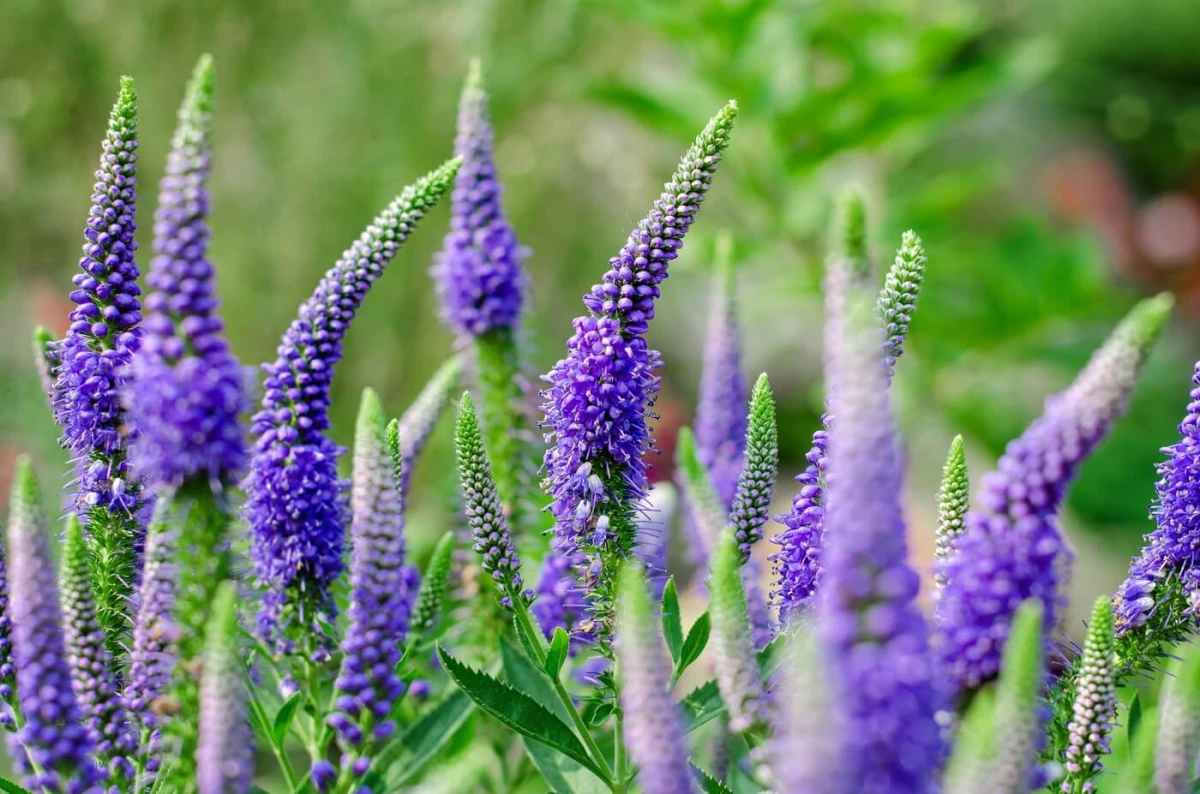
Veronica (Speedwell)
This is one of the most reliable and long-blooming flowers for a sunny border. Its spiky blooms add a great vertical pop, and pollinators go crazy for it. It’s tough, dependable, and a real workhorse.
Planting & Care: Veronica isn’t fussy. Full sun and average soil are all it asks. The secret to more flowers is deadheading—once the first blooms fade, cut the flower stalks back. It only takes a few minutes and often rewards you with another round of blooms later in the summer.
Common Mistake: Forgetting to deadhead. You’re missing out on a whole second wave of color if you skip this simple step.
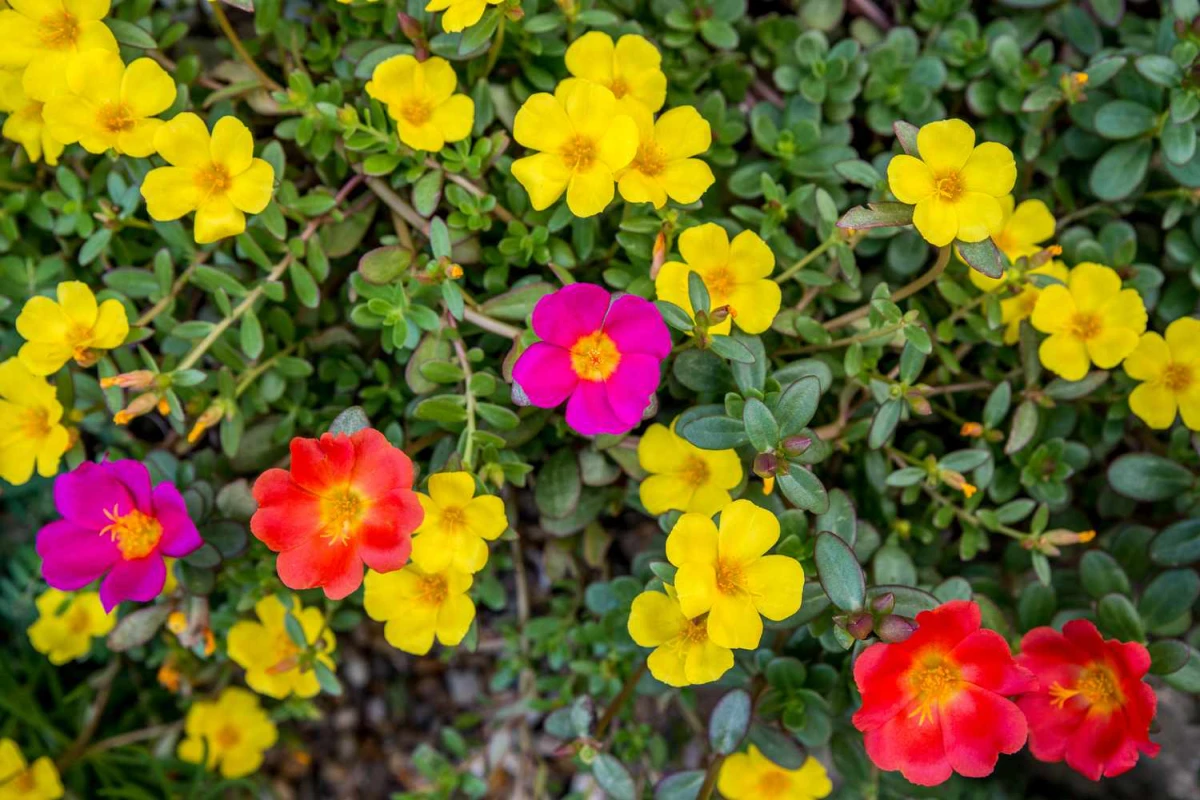
Moss Rose (Portulaca)
If you have a spot that feels like the surface of the sun—that strip between the sidewalk and the street—this is your plant. It’s a low-growing annual that thrives on heat and dry soil. You can often buy a whole flat of them for under $20.
Planting & Care: It couldn’t be easier. Just pop them in the ground. You can even grow them from seed.
Common Mistake: Overwatering. These plants are built for drought. Water them when you plant them, and then honestly, pretty much forget about them.
Finishing Touches and Long-Term Success
A garden isn’t a one-and-done project. It’s an evolving space that needs a little love to stay looking its best.
Getting Free Plants: The Art of Dividing
After 3 to 5 years, perennials like Hostas and Daylilies can get a bit crowded and tired. Dividing them is like a reset button, and it’s how you get free plants! It’s easiest in the spring or fall.

- Gently dig up the entire clump.
- Use a sharp spade or even an old bread knife (seriously, it works great!) to slice the clump into a few healthy sections. Make sure each piece has some roots and some leaves or shoots.
- Replant one section in the original spot (add some fresh compost!) and plant the others elsewhere or share them with friends.
Mulch: Your Garden’s Best Friend
I mulch every single garden. A 2-inch layer of shredded bark or leaf mold suppresses weeds, keeps moisture in the soil (so you water less!), and slowly feeds the soil as it breaks down. A 2-cubic-foot bag of shredded bark mulch runs about $5-$7 and covers roughly 12 square feet. Just be sure not to pile it up against the plant stems, as that can cause rot. Leave a little donut-hole of space around each plant.
Budget, Time, and a Simple Shopping List
Okay, let’s talk brass tacks. How much does this all cost and how long does it take? For a simple 20-foot long by 3-foot deep border, you should plan for a full weekend project. Day one for clearing the area, amending the soil, and placing the plants. Day two for planting, watering, and mulching.
As for budget, here’s a rough idea:
- Soil Amendments: Plan on 4-5 bags of compost or garden soil. (~$40-$60)
- Plants: For a 20-foot border, you’ll need around 15-20 plants, depending on size. Budgeting $15 per plant is a safe average. (~$225-$300)
- Mulch: You’ll need about 5 bags to cover the area. (~$25-$35)
- Total Estimated Cost: Around $300-$400. You can absolutely do it for less by choosing smaller plants, starting from seed, or getting divisions from a friend!
Good to know: If your project involves changing the slope of your yard or building retaining walls, that’s the time to call in a pro. It can save you a world of hurt later on.
Feeling Overwhelmed? A Quick Win
If all this feels like too much, just start small. Seriously. Go to the store and buy three pots of Veronica. Plant them in a sunny spot. Water them. That’s it. You’ve officially started a garden border. You can always add to it next month or next year. The first step is always the hardest, so make it an easy one.
Inspirational Gallery with Photos
My new border looks so empty. Did I not buy enough plants?
Patience is a gardener’s greatest virtue! A common beginner mistake is planting perennials too close together, forgetting their mature size. Most perennials follow a
Corten Steel Edging: Known for its signature rustic, weathered look, this thick steel forms a protective rust layer that prevents further corrosion. It’s incredibly durable and makes a bold, modern statement, ideal for straight lines or gentle curves.
Recycled Plastic Edging: A budget-friendly and flexible choice, often sold in rolls from brands like EcoBorder. It’s perfect for creating sweeping curves and is practically invisible once the border plants fill in, offering a subtle and sustainable option.
Look beyond flowers and consider the power of texture. The interplay between different leaf shapes and forms creates a sophisticated, season-long tapestry. Imagine the fine, airy fronds of a fern brushing against the broad, waxy leaves of a Heuchera, or the soft, silvery foliage of Lamb’s Ear (Stachys byzantina) providing a fuzzy carpet at the base of spiky ornamental grasses.
A single bee colony can pollinate 300 million flowers each day.
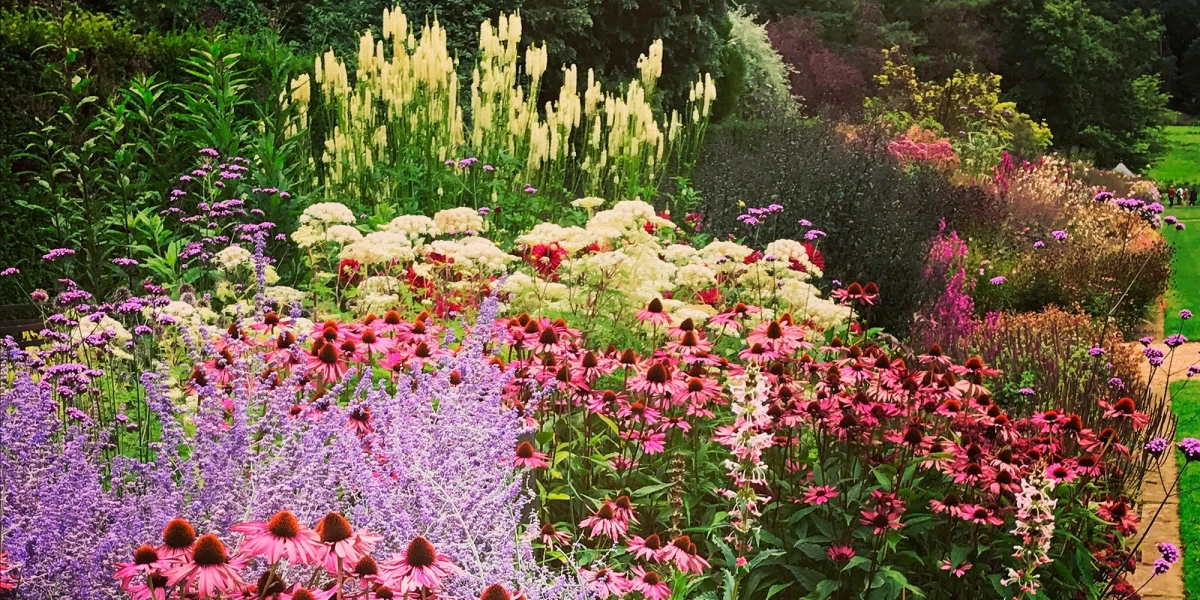
Your garden border can be more than just beautiful; it can be a vital lifeline. By incorporating native plants like Coneflower (Echinacea), Bee Balm (Monarda), and Goldenrod (Solidago), you create a high-energy service station for bees, butterflies, and other essential pollinators. It’s a small action with a huge ecological impact.
A great border doesn’t go dormant in winter; it just changes its costume. To ensure year-round visual appeal, think beyond summer blooms and incorporate elements of structure.
- Evergreen anchors: Small boxwoods or dwarf conifers provide green structure when all else has faded.
- Grasses with presence: The dried stalks of Switchgrass (Panicum virgatum) or Miscanthus stand tall, catching the frost and low winter light.
- Persistent seed heads: The dark, sculptural heads of Sedum ‘Autumn Joy’ and Echinacea look stunning dusted with snow.
The single best investment for your border isn’t a rare plant: it’s amending the soil. Before you plant anything, enriching your native soil with several inches of quality compost, like Black Kow or Coast of Maine, will improve drainage, retain moisture, and provide a slow-release source of nutrients. It’s the foundational work that turns a good border into a spectacular one for years to come.
- A dramatic focal point that provides height and draws the eye.
- A lush middle layer that fills out the body of the bed.
- A graceful cascade that spills over the edge, softening the hard lines.
The secret? It’s the time-tested
For a crisp, professional edge without buying materials, try the classic spade-cut method. Simply use a half-moon edger or a sharp, flat spade to cut a clean vertical line along your border. Then, from the lawn side, cut in at a 45-degree angle to remove a wedge of turf and soil. This small trench creates a barrier that grass roots struggle to cross, giving you a defined, clean look for free.
The love of gardening is a seed once sown that never dies. — Gertrude Jekyll
Don’t just plan your border for the eyes; design it for the nose. Fragrance adds an invisible, immersive layer to the garden experience. Tuck drifts of Sweet Alyssum along the very front edge, where its delicate honey scent can greet visitors. Plant robust clumps of Lavender ‘Hidcote’ or Nepeta ‘Walker’s Low’ where you might brush past, releasing their essential oils. For a truly memorable moment, position a fragrant shrub like a mock orange (Philadelphus) or a classic David Austin rose where its perfume can be carried on the summer breeze.


