Your Ultimate Guide to Building a Compost System That Actually Works
My first compost pile was, to be frank, a complete disaster. I built it more than twenty years ago, a sad little heap of grass clippings and kitchen scraps tucked behind the shed. I did everything wrong—it was too small, way too wet, and I never, ever turned it. The result? A slimy, smelly mess that taught me a huge lesson.
In this article
Composting isn’t just about tossing your garbage in a pile and hoping for the best. It’s about managing a living, breathing system. Since that first failure, I’ve built dozens of compost systems for clients and learned exactly what works, what doesn’t, and why.
The first step is building a container. A good bin isn’t just for show; it helps hold everything together, maintains heat, manages moisture, and keeps critters out. And you absolutely do not need an expensive store-bought model. Some of the best composters are built from simple, upcycled materials. This guide will walk you through the designs I trust and the principles you need to know to create that rich, dark, beautiful compost for your garden.
First, a Little Science (The Fun Part, I Promise!)
Before you grab a single tool, it helps to know what you’re building a home for. Your compost pile is a bustling city of microorganisms, mostly bacteria and fungi. Your job is to be the perfect host, giving them the right balance of food, water, air, and warmth to do their jobs.
Food: The Famous “Browns and Greens” Mix
The microbes in your pile need a balanced diet, often called the carbon-to-nitrogen (or C:N) ratio. Don’t get bogged down by the numbers; just think of it as a simple recipe of “browns” and “greens.” A good starting point is about three parts brown material to one part green material by volume.
- Carbon (The Browns): These are your dry, woody materials. They’re the energy food for the microbes. Think dry leaves, straw, sawdust, shredded newspaper, and torn-up cardboard (like toilet paper rolls and egg cartons).
- Nitrogen (The Greens): These are the moist, fresh materials. They provide the protein for microbes to grow and multiply. This includes kitchen scraps like fruit and veggie peels, coffee grounds, fresh grass clippings, and garden trimmings.
Heads up! A pile with too many greens will get dense, soggy, and stinky. It’ll go “anaerobic,” which is a fancy way of saying the air-hating microbes take over, and they produce some truly foul smells. On the flip side, a pile with too many browns will just sit there, dry and sad, taking forever to break down.
Air and Water
The best composting microbes need oxygen to thrive. That’s the whole reason we turn a compost pile—to fluff it up and get air into the center. The design of your bin is also super important for letting air in.
Moisture is just as critical. Your pile should feel like a wrung-out sponge. If you grab a handful and squeeze, you should only get a drop or two of water. Too dry, and the microbe party grinds to a halt. Too wet, and water fills up all the air pockets, suffocating your helpful microbes and creating that dreaded rotten-egg smell.
Temperature: The Sign of a Happy Pile
When your microbes are happily working, they generate a lot of heat. This is a great sign! A hot pile, ideally hitting between 130°F and 160°F, is hot enough to kill off most weed seeds and plant diseases. But to get that hot, your pile needs to be big enough—it needs critical mass.
This is probably the #1 reason beginner compost piles fail. Your pile needs to be at least 3 feet wide by 3 feet deep by 3 feet high to generate and hold enough heat. Anything smaller will struggle to get cooking.
Which Compost Bin is Right for You?
Before you build, let’s figure out the best fit. Think about your yard, how much kitchen waste your family produces, and how much effort you want to put in. Here’s a quick rundown of the options we’ll cover.
- The Wire Mesh Bin: This one’s the speed-demon of compost bin construction. It’s fantastic for beginners who want something simple and effective with amazing airflow. Cost: $20 – $40. Build Time: Less than 30 minutes.
- The Pallet Bin: The undisputed workhorse. Perfect for serious gardeners who need a steady supply of compost. It’s cheap (or free!) and can be expanded into a multi-bin system. Cost: Free – $50. Build Time: 1-2 hours.
- The Garbage Can Composter: A great choice for small spaces, patios, or anyone worried about pests. It keeps everything neat and tidy. Cost: $25 – $50 for the can. Build Time: About 45 minutes (mostly drilling).
- The Cinder Block Bin: The long-term investment. This thing is permanent, durable, and will probably outlast your garden shed. It’s more work upfront but requires zero maintenance later. Cost: $75 – $150+. Build Time: A half-day project.
Let’s Get Building: Four Proven Compost Bin Designs
1. The Wire Mesh Bin: Simple and Speedy
This is the fastest way to get a compost bin up and running. Its open design provides fantastic aeration, making it almost impossible for the pile to get stinky.
What You’ll Need:
- A 10-foot long, 4-foot high roll of hardware cloth (1/2-inch mesh is perfect) or welded wire fencing.
- Heavy-duty zip ties or pieces of wire.
Construction: Seriously, it couldn’t be easier. Roll the mesh into a cylinder, overlapping the ends by a few inches. Then, secure the seam with zip ties every 6-8 inches. Done. You now have a bin that’s over 3 feet in diameter—the perfect size.
Pro Tip: The magic of this system is how you turn it. Don’t try to dig the compost out. Instead, just undo the zip ties, unroll the wire cage, and set it up right next to the pile. Then, use a pitchfork to move all the material back into the empty cage. It’s the most thorough and easy way to mix a pile I’ve ever found.
2. The Pallet Bin: The Free Workhorse
This is my go-to for almost every project. You can often get pallets for free from local businesses (just ask first!), making this an incredibly budget-friendly and efficient system.
What You’ll Need:
- 4 to 7 pallets of the same size.
- A power drill and 3-inch deck screws.
- Heavy-duty gloves.
- (Optional but recommended) A roll of chicken wire or hardware cloth.
Safety First: Choosing Pallets: This part is non-negotiable. Look for a stamp on the pallet that says “HT.” This means it was heat-treated. AVOID any pallet stamped “MB,” which stands for methyl bromide—a nasty chemical you don’t want anywhere near your garden. No stamp? It’s best to skip it.
Construction (The Three-Bin System): For continuous compost, the three-bin system is king. You’ll need seven pallets. Build a long, E-shaped structure: one pallet for the back of each of the three bins, and one for each of the four vertical dividers.
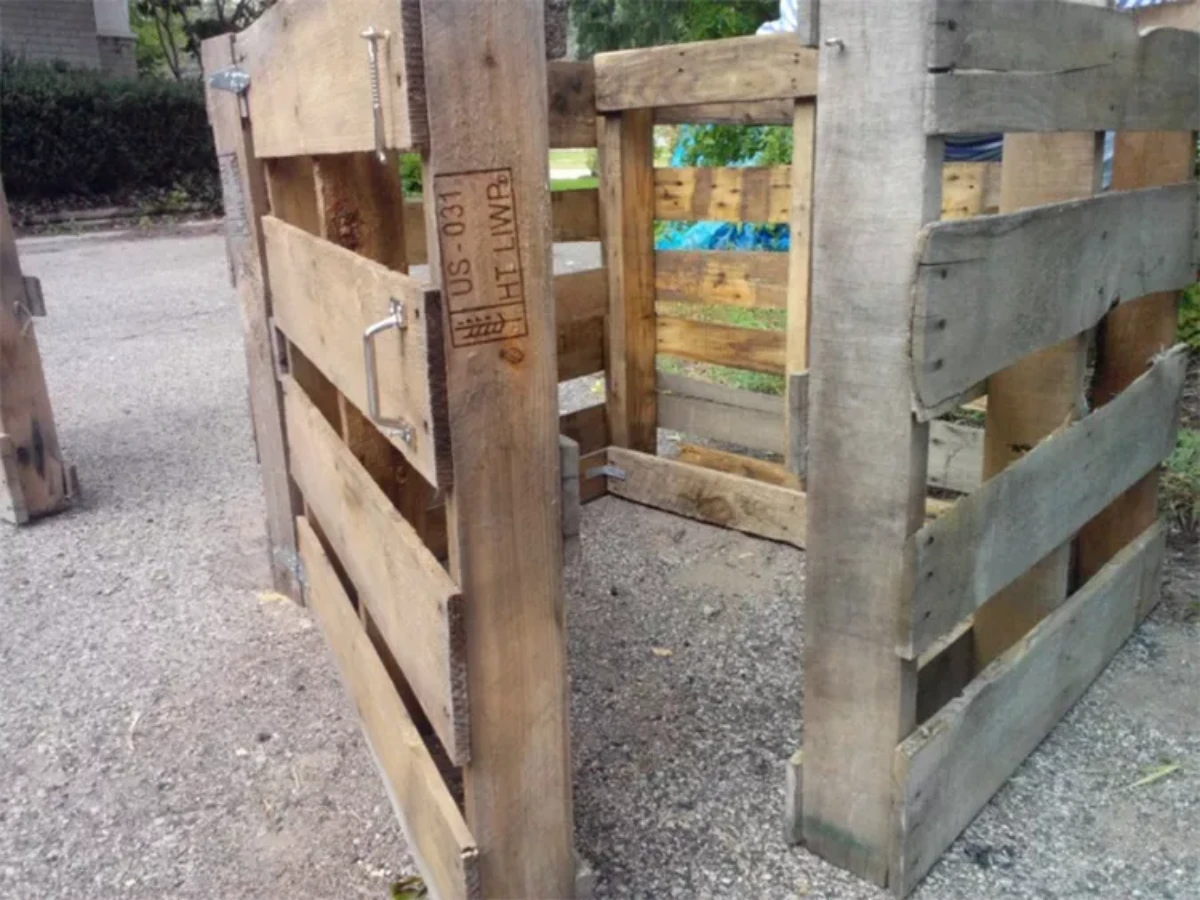
- Bin 1: This is where you add all your fresh materials.
- Bin 2: After a few weeks, you turn the contents of Bin 1 into this middle bin to continue decomposing.
- Bin 3: This is the finishing bin. Material from Bin 2 gets turned into here to cure into beautiful, finished compost.
This assembly line is incredibly efficient. You can be harvesting finished compost from Bin 3 while still adding fresh scraps to Bin 1.
Quick Fix: The slats on pallets are wide. To stop compost from falling out and to help keep rodents at bay, I always line the inside walls with chicken wire, stapling it directly to the wood.
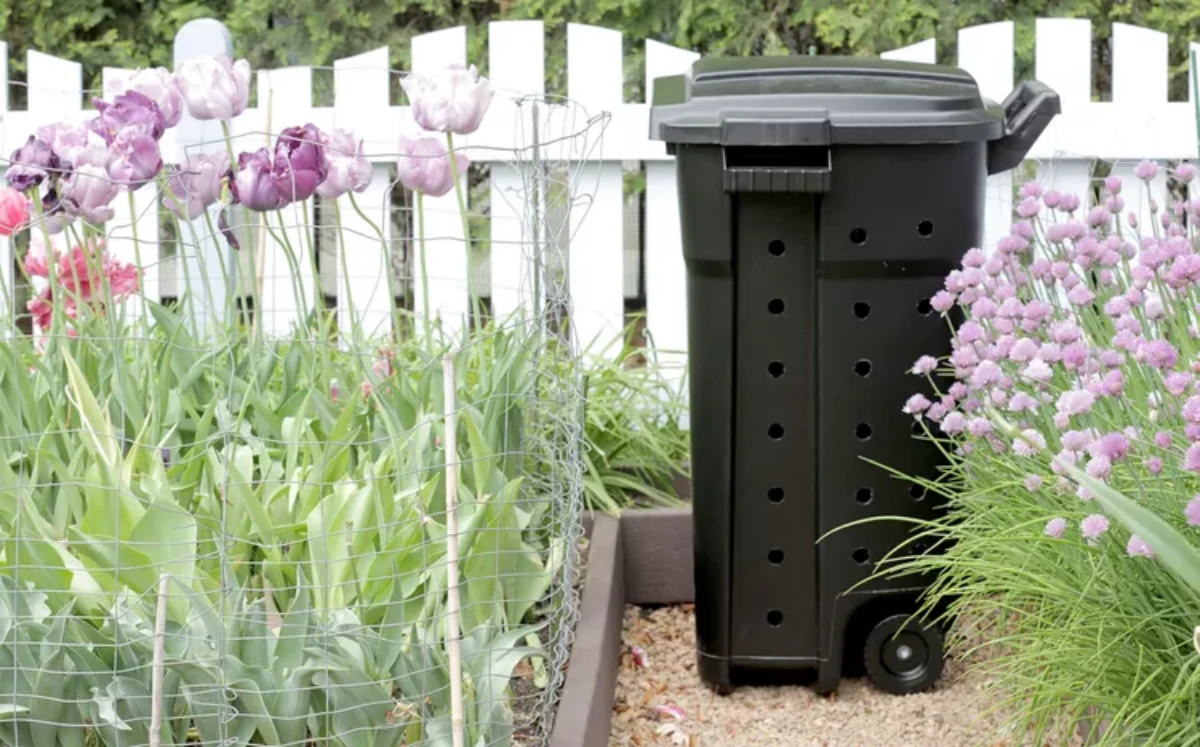
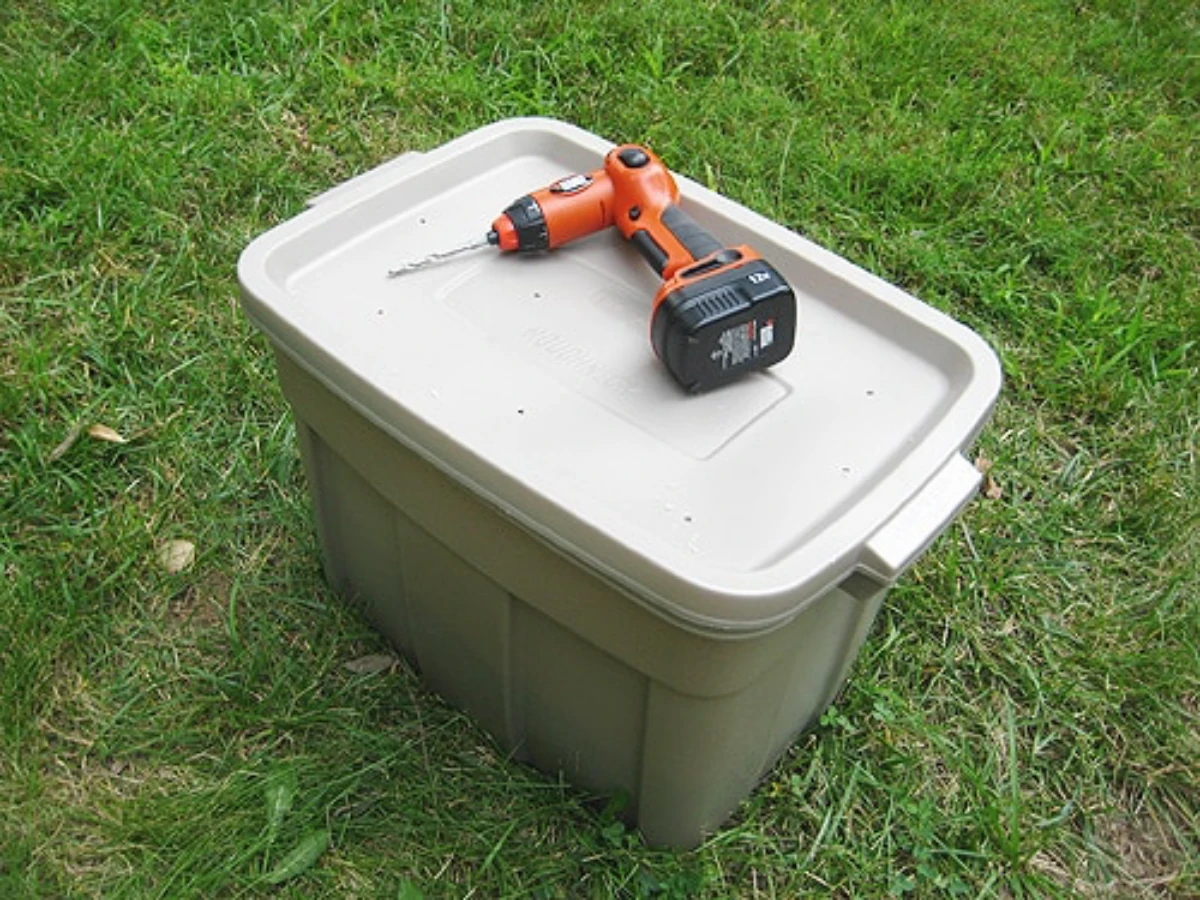
3. The Garbage Can Composter: Tidy and Contained
If you have a small yard or are worried about attracting pests, this is a great solution. The main challenge? Getting enough airflow.
What You’ll Need:
- A large plastic garbage can (30-50 gallons) with a tight-fitting lid.
- A power drill with a 1/2-inch or larger spade bit.
Construction: You need to drill holes. A LOT of holes. More than you think. Drill them every 4-6 inches all over the can—the sides, the lid, and especially the bottom. Drainage is so important. Without holes in the bottom, you’ll end up with a disgusting, waterlogged swamp.
From my experience, don’t be shy with the drill. I once helped someone whose bin was stinking up their whole patio. They’d only drilled a few tiny holes. We spent 30 minutes adding dozens of large holes to the sides and bottom, mixed in some shredded cardboard, and the smell was gone in a week.
How to Turn It: Turning is a bit awkward. The easiest way is to fasten the lid securely, lay the can on its side, and roll it around your yard. It’s not a perfect mix, but it does the job.
4. The Cinder Block Bin: Built to Last
Want a permanent, rock-solid compost bin? This is it. It’s more work to build, but it will last for decades with zero maintenance.
What You’ll Need:
- Concrete Masonry Units (CMUs), or cinder blocks. You can find these at any home improvement store for a few bucks each.
- Heavy-duty work gloves and steel-toed boots.
- (Optional) Untreated 2×6 boards for the front.
Construction: No mortar needed! Level the ground and lay your first course of blocks in a ‘U’ shape, leaving the front open. When you lay the next course, stagger the joints like bricks for strength. Here’s the key trick: on each layer, turn a few of the blocks sideways so the holes face outward. These create built-in air vents all through your pile.
For a pro finish, you can build channels into the front of the side walls. Then you can slide boards into the channels to close off the front, adding or removing them as the pile gets bigger or smaller.
Managing Your Pile Like a Pro
Building the bin is just step one. Now for the day-to-day stuff.
Quick Win: Don’t have a bin yet? You can still start today! Grab a cardboard box or a paper bag and start collecting your ‘browns’—shredded junk mail, egg cartons, and amazon boxes. When you build your bin, you’ll have a stockpile ready to go!
By the way, a small countertop compost pail with a charcoal filter is a game-changer for collecting kitchen scraps. It keeps your kitchen clean and reminds you to take the scraps out regularly. You can find them online or at kitchen supply stores for about $25.
When you start a new pile, build it like a lasagna. A layer of chunky browns on the bottom for airflow, then a layer of greens, then a layer of browns, and so on. Give each layer a light sprinkle of water as you go.
Troubleshooting Common Problems
Sooner or later, every composter runs into an issue. Don’t worry, they’re all fixable.
- Problem: My pile smells like ammonia or rotten eggs.
Diagnosis: It’s gone anaerobic. Too wet, not enough air, or too many greens.
Solution: Get in there with a pitchfork and turn it immediately to get air in. As you turn, mix in a generous amount of dry, brown material—shredded leaves and torn-up cardboard are perfect for this. - Problem: My pile just isn’t heating up.
Diagnosis: Usually one of three things: it’s too small, too dry, or needs more nitrogen.
Solution: If the pile isn’t at least 3x3x3 feet, you need more stuff! Add to it. If it feels dry, give it a good watering as you turn it. If it’s moist but still cold, it’s hungry for nitrogen. Add a fresh batch of grass clippings or kitchen scraps. - Problem: I’ve got uninvited guests (rats, raccoons, etc.).
Diagnosis: Your pile is either too easy to get into, or you’re adding things they love to eat.
Solution: First, a big rule: NEVER add meat, bones, dairy, or oily foods to a backyard pile. Always bury fresh kitchen scraps deep in the center of the pile. If pests are persistent, a fully enclosed bin (like the garbage can or a fully-lined pallet bin with a lid) is your best bet.
A Few Final Words on Safety
Always wear gloves when handling compost. If you’re turning a dry, dusty pile, it’s a good idea to wear a simple dust mask. Compost is full of molds and fungi, and while they’re great for the soil, you don’t want to be inhaling clouds of them.
And be incredibly careful about what you add. Besides the no-meat-and-dairy rule, avoid pet waste, as it can contain harmful parasites. Also, be wary of grass clippings from lawns treated with herbicides. Seriously, ask your neighbor if they spray their lawn. Some “Weed and Feed” products contain chemicals that can survive the composting process and will damage or kill your vegetable plants. When in doubt, leave it out.
Your compost is ready when it’s dark, crumbly, and smells like a forest floor. This can take anywhere from two months for a hot, active pile to a year for a lazy one. Sift it through a simple screen to filter out big chunks, toss those back in the active bin, and get ready to watch your garden thrive. Happy composting!
Inspirational Gallery with Photos
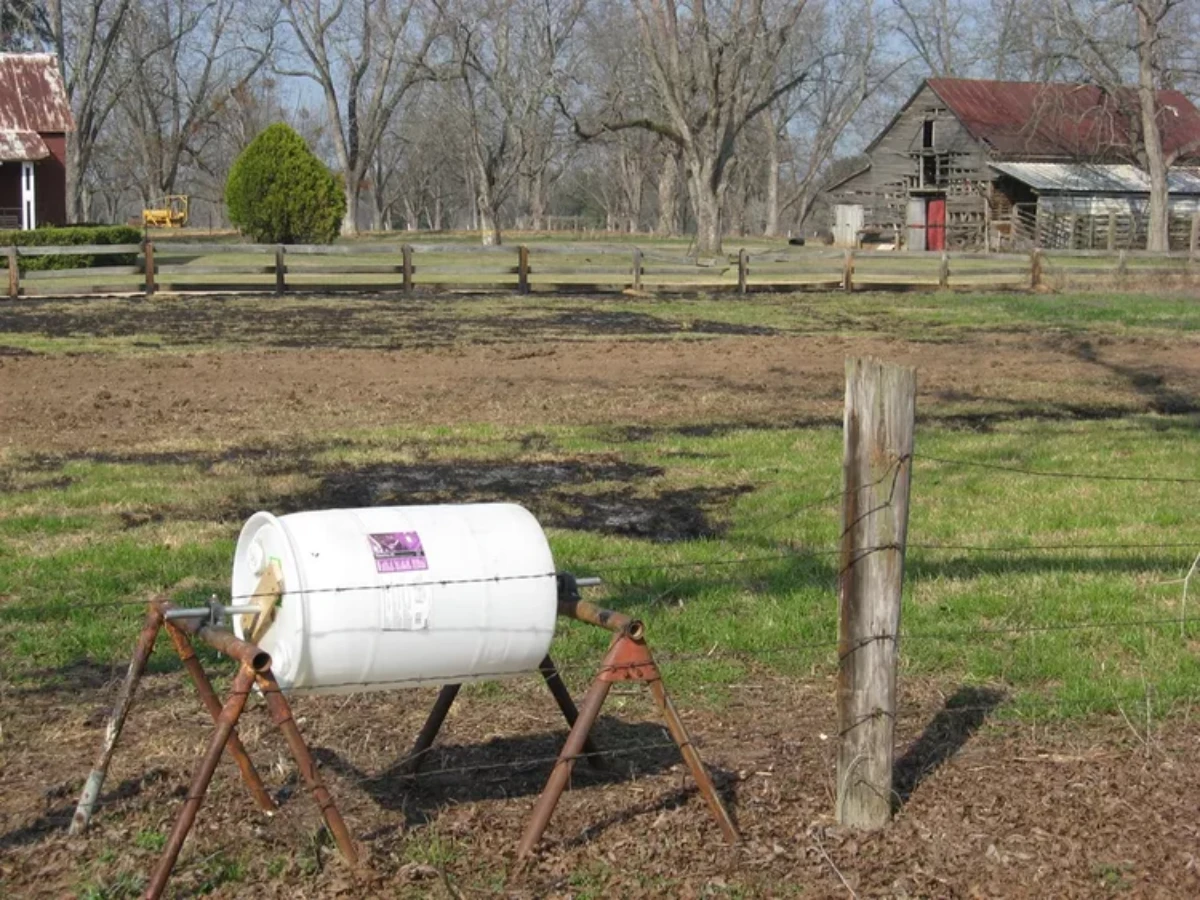
Compost Tumbler: A sealed drum on an axle, like the popular Envirocycle models. It’s clean, keeps pests out, and turning is as easy as giving it a spin. Ideal for smaller yards and faster results, but offers limited capacity.
Stationary Bin: Typically a larger, open-bottomed container made of wood, pallets, or plastic. It holds more material and connects directly with soil organisms, but requires manual turning with a pitchfork, which can be hard work.
For most gardeners, starting with a stationary bin offers more flexibility and volume, while tumblers are a great, tidy solution for urban or patio composting.
Over 30% of what we throw away is food scraps and yard waste. In a landfill, this organic matter releases methane, a greenhouse gas 28 times more potent than carbon dioxide.
Every bucket of scraps you divert to a compost pile isn’t just feeding your garden; it’s an active step in reducing your household’s climate impact. Your compost pile becomes a personal carbon sink, transforming potential pollution into nutrient-rich soil.
What’s that awful smell coming from my compost?
That foul, ammonia-like odor is the tell-tale sign of an anaerobic pile—it’s suffocating! This happens when you have too many nitrogen-rich
While it’s tempting to toss everything organic in the pile, some items are a recipe for disaster. For a healthy, odor-free compost, strictly avoid:
- Meat, fish, and bones (they attract pests and smell as they rot)
- Dairy products and eggs
- Oily or greasy foods
- Pet waste from dogs or cats (can contain harmful pathogens)
- Diseased plants or invasive weeds that might spread
The secret to a fast, hot pile: regular turning. Don’t just layer materials and walk away. Aim to turn your compost with a garden fork or compost aerator once every 1-2 weeks. This single action is crucial for introducing the oxygen that aerobic bacteria need to work their magic, breaking down matter quickly and preventing smelly, anaerobic pockets from forming.
- Diverts all kitchen waste, including meat and dairy.
- Produces nutrient-rich compost tea in just a few weeks.
- Operates without foul odors in a compact, sealed system.
The secret? The Bokashi method. This Japanese technique uses a special inoculant, often a fermented wheat bran from brands like SCD Probiotics, to pickle your kitchen scraps in an airtight bucket. It’s less of a composting process and more of a fermentation, perfect for apartment dwellers or those who want to process absolutely everything from their kitchen.
Don’t want to build a full-on wooden structure? The simplest, most effective DIY bin can be made in five minutes. Just purchase a roll of hardware cloth or chicken wire (about 3 feet high). Unroll a length of it, form it into a circle at least 3 feet in diameter, and use wire or zip ties to secure the ends together. That’s it. You have an instant bin that provides maximum aeration and is easy to lift off when you want to turn the pile.
A single teaspoon of healthy compost can contain over a billion beneficial microorganisms.
For those with limited space or who want to compost indoors, vermicomposting is an incredible alternative. It uses worms, not heat, to break down scraps.
- The best worms for the job are Red Wigglers (Eisenia fetida), not common earthworms.
- They thrive in dedicated bins like the Worm Factory 360, turning scraps into some of the most nutrient-dense fertilizer available.
- They love coffee grounds, tea bags, and crushed eggshells but dislike citrus and onions.
The ultimate reward isn’t the process; it’s the product. Finished compost—often called


