Your First Workshop: A Real-World Guide to Wood, Metal, and Leather
I’ve spent the better part of my life with my hands covered in sawdust, grease, or a stubborn mix of both. My workshop isn’t just a building; it’s my think tank, my problem-solving space, and the place where I can build things that actually last. I got my start with a rusty handsaw and some scrap lumber in the corner of a garage. And yeah, I made a ton of mistakes. I still have a little scar on my thumb to prove it, but every slip-up taught me something vital about the material, the tool, or my own patience.
In this article
These days, with everything being so digital, I think there’s a real hunger to build something tangible. Something you can hold in your hands, use every day, and feel genuinely proud of. If you feel that pull, this guide is for you.
I’m not here to sell you on a dozen expensive hobbies. Instead, I want to walk you through the honest-to-goodness foundations of craft: working with wood, metal, and leather. Each one has its own personality and its own rules. Learning their secrets will teach you precision, patience, and a deep sense of satisfaction that you just can’t download. But before we touch a single tool, let’s talk about the most important thing you’ll ever build: a safe place to work.

The Foundation: Your Workshop Space
Before you even think about buying a cool new tool, you need a dedicated, safe place to use it. This doesn’t mean you need a pro-level shop. A corner of the garage, a spot in the basement, or even a sturdy shed will do the trick. My first ‘shop’ was barely big enough to turn around in. What truly matters is how you set it up for safety. Honestly, safety is the first and most important skill in any craft.
Your ‘Get Started Safe’ Shopping List:
- Good Ventilation: Sawdust and metal grinding dust are terrible for your lungs, and fumes from finishes or welding can be straight-up toxic. At a minimum, have a window you can open and a decent box fan (about $25 at any big-box store) to pull the bad air out. If you get serious, a dedicated dust collector is a game-changer. I’ve been in shops with bad air, and the constant coughing is your body screaming at you.
- Bright Lighting: You can’t do good work if you can’t see. Bad lighting is a recipe for mistakes and injuries. I swear by LED shop lights—they’re bright, cheap to run, and don’t heat up your space. A 4-foot LED light usually runs about $30. Position them so your body doesn’t cast a shadow right where you’re trying to cut.
- Smart Electricals: You’re going to be running power tools, and overloading a circuit is a serious fire risk. I learned this the hard way when I tripped a breaker running a sander and a shop vac at the same time. The spark that jumped out of the outlet was a real wake-up call. Always use heavy-duty extension cords rated for your tools (expect to pay around $40 for a good 25-footer). And a quick tip: all outlets in a garage or basement should be GFCI-protected. If you’re not sure, it’s worth paying an electrician for an hour of their time to check things out. It’s the best money you’ll ever spend on your shop.
- Fire Prevention: You’ll be making sparks and flammable dust. It’s just part of the deal. Keep a fire extinguisher rated for Class A (wood), B (liquids), and C (electrical) fires right by the door. A good ABC extinguisher costs about $35 and is non-negotiable. Also, and this is a big one, never leave oily rags balled up in a pile. They can literally catch fire all by themselves through spontaneous combustion. Lay them flat to dry outside or store them submerged in water in a sealed metal can.
Setting up your space doesn’t have to be expensive. A solid-core door laid across two sawhorses makes a fantastic first workbench. Just make it safe before you make it pretty.

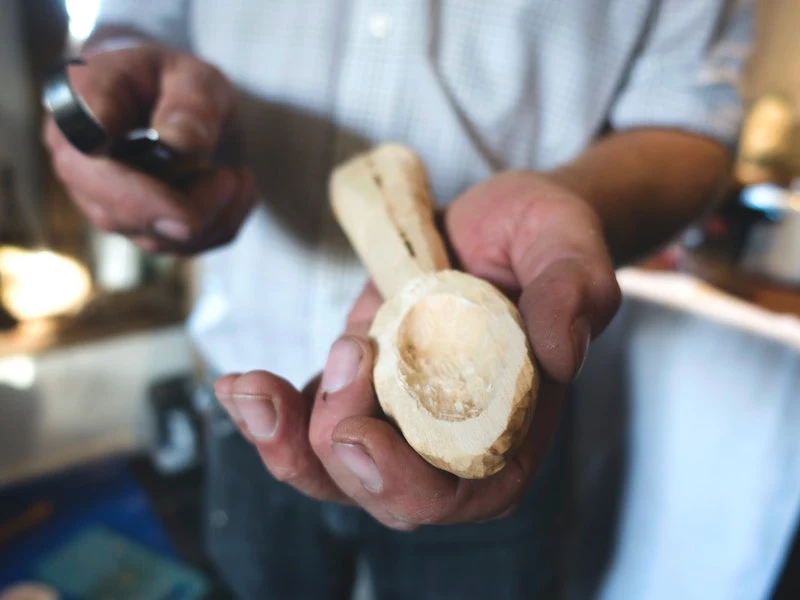
Working with Wood: The Soul of the Craft
Wood is a fascinating material. Even long after it’s been cut and dried, it breathes, moving with the humidity. Understanding this is the absolute core of good woodworking. If you try to fight the wood, you will always lose. Cabinet doors will stick, and tabletops will crack themselves apart. I’ve seen it happen.
A good way to think about it is to picture wood grain as a tight bundle of drinking straws. It’s incredibly strong along its length, but it can split easily across its width. It also expands and contracts almost entirely across the grain. That’s why the pros use special clips or slotted holes to attach a solid wood tabletop to its base—it holds the top securely but gives it room to shift with the seasons.
For a beginner, I’d suggest starting with a clear-grained pine or poplar. They’re affordable and pretty forgiving. You can find them at most home improvement stores. Just try to pick through the stack to find the straightest, driest boards with the fewest knots.

Your First Project: A Simple Bench Hook (About 1 Hour)
A bench hook is a shop appliance that holds your wood steady while you cut it. It’s the perfect first project because it teaches you to mark and cut accurately.
- Materials: You’ll need one piece of solid wood, roughly 1 inch thick, 8 inches wide, and 12 inches long. You’ll also need a smaller piece for the ‘hooks,’ about 1 inch thick and 2 inches wide. You’ll also need some basic wood glue.
- Tools: A handsaw (a basic crosscut saw from a brand like Irwin will run you about $25), a combination square for marking, and a pencil.
- The Steps: First, cut your main board to 12 inches long, making sure the ends are perfectly square. Then, cut your smaller piece into two sections, each 8 inches long to match the width of your main board. Glue one of these ‘hook’ pieces to the top face at one end. Flip the board over and glue the other hook to the bottom face at the opposite end. Make sure they’re flush with the edges and square. Let the glue dry for a few hours, and you’re done! You’ve made your first useful tool.
A Quick Word on Safety: The table saw is probably the most intimidating tool in a woodshop for a reason. Always use the riving knife (the metal fin behind the blade) to prevent the wood from pinching and kicking back at you. And always, always use a push stick. Your fingers will thank you. Eye and ear protection are not optional.
Shaping Metal: Bending Steel to Your Will
Metal can feel cold and unforgiving, but with a bit of heat and the right technique, you can shape it with surprising grace. My own journey into metalwork started because I needed some custom brackets for a furniture project and just couldn’t find what I wanted.
For most projects, you’ll be using mild steel. It’s cheap, strong, and easy to work with. You can find it at a local ‘metal supplier’ or ‘steel yard’—just search for one in your area. Don’t be intimidated! You can walk in and ask for a 4-foot piece of 1/4-inch A36 mild steel square bar, and it will probably cost you less than a fancy coffee.
Starting Without a Forge
A lot of people think metalworking means you need a giant, fire-breathing forge. Not at all! You can do a ton with basic tools. A great first project is to make a simple wall hook by bending the steel cold. Just clamp that 1/4-inch steel bar in a sturdy bench vise, slip a piece of pipe over the end for leverage, and bend it into a hook shape. You can cut it to length with a good hacksaw, smooth the edges with a file, and drill a hole for a screw. It’s a fantastic way to get a feel for the material.
Your First Forged Project: A Classic Wall Hook (About 2-3 Hours)
Okay, ready for fire? You can build a simple forge by stacking fire bricks (from a hardware store) in a U-shape on a non-flammable surface. For fuel, use lump charcoal. A hairdryer aimed into a small opening at the base can act as your bellows. As for an anvil? A real one is great but expensive. A chunk of railroad track or even a big sledgehammer head set securely in a bucket of concrete works just fine to start.
- Materials: A piece of 1/4-inch or 3/8-inch square steel bar, about 12 inches long.
- Tools: A forge, a hammer (a 2-3 pounder is good), an ‘anvil,’ and tongs or locking pliers to hold the hot metal.
- The Steps: Heat the end of the bar until it glows a bright orange-red. Hammer the tip to a point. Reheat as needed. Then, heat the middle and carefully bend it around a piece of pipe or the edge of your anvil to form the hook. Finally, heat the other end, hammer it flat, and drill a hole for a screw. Let it cool slowly, then scrub it with a wire brush and give it a coat of paste wax to prevent rust.
Heads Up! Metalworking Safety: An angle grinder is an incredibly useful tool, but it’s also one of the most dangerous. Never, ever take the safety guard off. I once saw a cutting disc shatter on a grinder without a guard, and a piece flew past my coworker’s head like a bullet. He got lucky. Always wear a face shield over your safety glasses. And remember, hot metal looks exactly like cold metal. I’ve got a few small, round scars from learning that lesson. Always assume it’s hot.

Working with Leather: A Timeless Craft
Leather is one of our oldest materials for a reason—it’s warm, flexible, and unbelievably durable. It’s also a quiet, focused craft that’s more about patience than power.
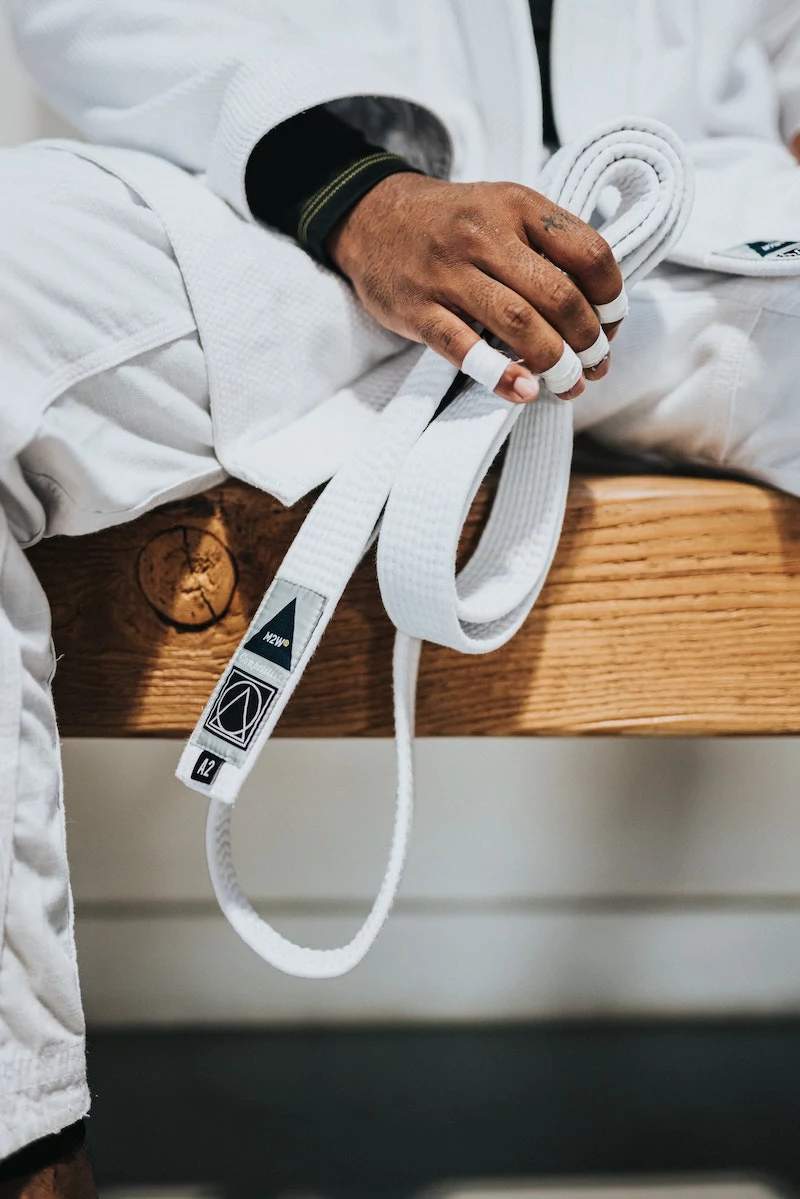
The main thing to know is the difference between tanning methods. For making things like belts, wallets, and sheaths, you want ‘vegetable-tanned’ (or ‘veg-tan’) leather. It’s firm and can be carved, stamped, and molded. You can find starter pieces and kits online; search for ‘veg-tan leather scraps’ on Etsy, or check out dedicated suppliers like Tandy Leather or Weaver Leather Supply. A beginner’s kit with basic tools and a bit of leather might run you $50 to $70.
The Saddle Stitch: Your Secret Weapon
The strongest stitch you can make by hand is the saddle stitch. It uses two needles on one thread, and unlike a machine stitch, it won’t unravel if one loop breaks. Learning it is a rite of passage. The rhythm of it is almost meditative, and the result is a seam that can literally last a lifetime.
Your First Project: A Simple Card Wallet (A Quiet Afternoon Project)
- Materials: A small piece of 3-4 ounce veg-tan leather, waxed thread, and two harness needles.
- Tools: A sharp utility knife, a metal ruler, and a tool to mark your stitch holes (a pricking iron is best, but an awl works too).
- The Steps: Cut two pieces of leather to your desired size (say, 4 inches by 3 inches). Use a stitching groover or the tip of your knife to carve a faint line where your stitches will go. Mark your holes evenly along that line. Glue the edges together, clamp your wallet in a stitching pony (or just hold it carefully), and sew it up with the saddle stitch. To finish, you can rub the edges briskly with a piece of canvas or a smooth piece of wood to give them a polished, professional look.
Common Pitfalls: Don’t worry, your first stitch line will probably be a little wobbly. Everyone’s is. A common mistake is pulling the thread too tight, which can pucker the leather. Just aim for snug, not strangled. This is a craft where sharp tools are your friend—a sharp knife cuts easily with less pressure, which means you have more control and are less likely to slip.
A Journey, Not a Destination
Look, these crafts aren’t just about the finished product. They’re about the process. The intense focus needed to cut a straight line, the patience to sand a surface perfectly smooth, the care it takes to sew a perfect seam… these are skills that bleed over into the rest of your life.
You are going to make mistakes. Your first joints will have gaps. Your first weld might look like a melted pile of bubblegum. Your first stitches will be crooked. That’s not just okay; it’s a critical part of learning.
So start small. Buy a few good tools instead of a garage full of cheap ones. Be patient with yourself. And find the joy in the work itself. The feeling of using something you made—something that exists in the world only because you took the time to shape it—is a kind of satisfaction that no screen can ever replicate. Welcome to the workshop. Now go get your hands dirty.
By the way, once you get a feel for the basics, a whole world of learning opens up. Try searching for online forums dedicated to woodworking or bladesmithing, or look up video tutorials on specific skills like ‘how to sharpen a hand plane’ or ‘how to saddle stitch.’ You’ll find an amazing community of makers, from seasoned experts to people just a few steps ahead of you, all happy to share what they know.
Inspirational Gallery
Your most important tool isn’t a saw or a drill—it’s your workbench. If it’s not perfectly flat and sturdy, every measurement you take, every cut you make, and every piece you assemble will inherit its flaws. Building a rock-solid, dead-flat assembly table is the best first project you can possibly undertake. It will pay you back on every single project that follows.
When you’re ready for your first power tool, don’t just grab the biggest saw. Consider a track saw. It’s safer for beginners than a table saw and delivers perfectly straight cuts on large sheets of plywood—something that’s notoriously difficult otherwise. Brands like Makita or Festool are top-tier, but more affordable options from WEN or Kreg offer an excellent entry point into clean, precise woodworking.
A 2019 study in the Journal of Health Psychology found that engaging in creative, hands-on activities can lead to a more positive state of mind.
This isn’t just about making an object; it’s a form of active meditation. The focus required to follow a cut line or tool a piece of leather pushes away daily anxieties. It connects your brain and your hands, creating a feedback loop of problem-solving and accomplishment that’s profoundly good for the soul.
My first metal welds look like lumpy, burnt caterpillars. What’s the secret?
Focus on the three ‘C’s. First, Cleanliness: grind or sand your metal until it’s bright and shiny. Paint, rust, and mill scale are the enemy of a good weld. Second, Current: make sure your welder’s amperage is set correctly for the metal thickness. Too cold and it won’t penetrate; too hot and you’ll blow through. Finally, Consistency: maintain a steady travel speed and arc length. It’s a rhythm you develop with practice, like learning a musical instrument.
A beautiful finish doesn’t have to be complicated or toxic. For beginners, a fool-proof finish protects your work and makes the grain pop without the stress of spraying lacquer. Three easy options:
- Tung Oil or Boiled Linseed Oil: Simply wipe on, let it soak in, and wipe off the excess. It creates a warm, natural, in-the-wood feel.
- Hardwax Oils: Products like Osmo Polyx-Oil or Rubio Monocoat are incredibly durable and easy to apply and repair. They combine oils and waxes for a satin, water-resistant finish.
- Shellac: A classic finish that dries in minutes. A simple
- They cut with less effort and a thinner kerf.
- They offer unparalleled precision for fine joinery.
The secret? A Japanese pull saw. Unlike Western saws that cut on the push stroke, these saws cut on the pull, which puts the blade under tension and prevents it from buckling. It’s a game-changer for hand-tool woodworking.
There’s a unique incense to a well-used workshop. It’s the sharp, clean scent of freshly sawn oak, the faint, sweet smell of Titebond wood glue, and the cool, metallic tang of steel filings. It’s not a perfume you can buy; it’s the earned aroma of creativity and effort, a scent that tells a story of things made and problems solved.
Kintsugi is the Japanese art of repairing broken pottery by mending the areas of breakage with lacquer dusted or mixed with powdered gold.
Think about this in your own work. A mistake isn’t always a failure. A flaw can be an opportunity for a creative repair—an inlaid
Vegetable-Tanned (Veg-Tan) Leather: This is the classic, stiff leather perfect for tooling, stamping, and molding. It develops a beautiful patina over time but is susceptible to water spots. Ideal for belts, wallets, and sheaths.
Chrome-Tanned Leather: Softer, more pliable, and water-resistant. It’s the stuff used for most jackets and upholstery. It comes in many colors but can’t be tooled like veg-tan.
For a first project, a simple veg-tan keychain or cardholder is a fantastic way to learn the basics of cutting, finishing, and stitching.


