My Pro Secrets to Outdoor Lighting That Doesn’t Look Cheap
I’ve spent a good chunk of my life on my hands and knees in garden beds, learning the ins and outs of outdoor lighting. I started out learning how to bury cable in tough clay soil, and now I run my own crew and teach the craft to the next generation. After all this time, I’ve seen exactly what makes a lighting system look amazing and what makes it fail in just a couple of years. Here’s a secret: good lighting is so much more than just sticking a few fixtures in the ground. It’s a blend of art, safety, and function that can completely change how you see and use your home after sunset.
In this article
A lot of people see outdoor lights as just decoration. But honestly, that’s just scratching the surface. A well-designed system is a huge safety upgrade. It lights up steps and pathways, which drastically cuts down the risk of a trip or fall. It also makes your property feel more secure by getting rid of those dark, creepy corners where someone could hide. And the best part? It literally extends your living space. A well-lit patio or deck becomes another room in your house on a beautiful evening. This guide is me, opening up my playbook to help you make smart choices, whether you’re going the DIY route or looking to hire a pro.
First Things First: Let’s Talk About Light Itself
Before you even think about buying a single fixture, you need to speak the language of light. Getting this part right is the absolute foundation of a project that looks professional, not amateur. We use these terms every day to get precise effects, and understanding them will help you nail the look you’re going for.
Think in Lumens, Not Watts
Back in the day, we talked about brightness in watts. With today’s LED technology, watts just tell you how much energy a bulb uses, not how bright it is. The real measure of brightness is lumens. This is a critical shift in thinking. Too many lumens, and you get harsh glare that looks awful. Too few, and that beautiful tree you wanted to feature just… disappears. Here are the general lumen ranges I use as a starting point:
- Path Lights: 100-200 lumens is the sweet spot. It’s enough to see where you’re walking without feeling like you’re on an airport runway.
- Step Lights: Keep it subtle, around 12-100 lumens. The goal is safety, not a grand entrance.
- Uplighting Small Shrubs: 200-400 lumens works well.
- Uplighting a Taller Tree (around 25 feet): You’ll need more punch, so think 500-800 lumens.
- Wall Washing or Flood Lights: For broader areas, you’re looking at 700-1300 lumens.
By the way, these are just guidelines. A backyard in a dark, rural area needs a lot fewer lumens than a home in a bright suburban neighborhood.
Kelvin (K): The Vibe of Your Light
The color temperature of light, measured in Kelvin (K), sets the entire mood. For residential projects, I almost always stick to the 2700K to 3000K range. This creates a warm, cozy white light that feels like an old-school incandescent bulb. It makes brick, stone, and plants look rich and natural.
You’ll see bulbs at 4000K or 5000K, which give off a cool, bluish-white light. This is great for commercial security or parking lots, but in a home setting, it can feel cold and sterile. I once got a call to fix a system where the homeowner used 5000K lights on their gorgeous stone house. It looked like a hospital morgue at night. We just swapped the bulbs for 2700K ones, and the difference was night and day. The warmth came right back.
Color Rendering Index (CRI)
CRI tells you how accurately a light source reveals the true colors of an object. The scale goes to 100 (which is basically natural sunlight). For outdoor lighting, look for a CRI of 85 or higher. A high CRI makes your green hostas look lush and vibrant, and the red tones in your brick pop. Cheaper lights with a low CRI can make everything look washed out or just… weird. Good manufacturers always list the CRI on the spec sheet, so it’s an easy thing to check for.
Beam Spread: It’s All in the Angle
The beam spread is simply the angle of the light cone coming from the fixture. A narrow beam gives you a dramatic spotlight, while a wide beam creates a soft wash. Using the wrong one is a classic rookie mistake.
- Narrow Spot (10-15 degrees): Perfect for skinny things, like a flagpole or a thin column on a porch.
- Spot (20-30 degrees): My go-to for most accent lighting on trees or specific parts of a house.
- Flood (35-60 degrees): Use this to light up wider trees, a big shrub, or to wash a wall with light.
- Wide Flood (100+ degrees): Best for really large areas, like the entire side of a house or a long stone wall.
Heads up! If you use a narrow beam on a wide house, you’ll get an awkward-looking bright dot. And if you use a wide beam on a tall, skinny tree, you’re just wasting light on the empty space next to it.

Pro Techniques for Placing Your Lights
The real artistry comes from layering light. The pros think in three distinct layers to create a space that’s safe, useful, and beautiful. A great design uses all three.
The Three Layers of Light
- Ambient Light: This is your base layer of general light. It’s not dramatic, just functional, providing enough light to move around safely. Think porch lights or a lamp post.
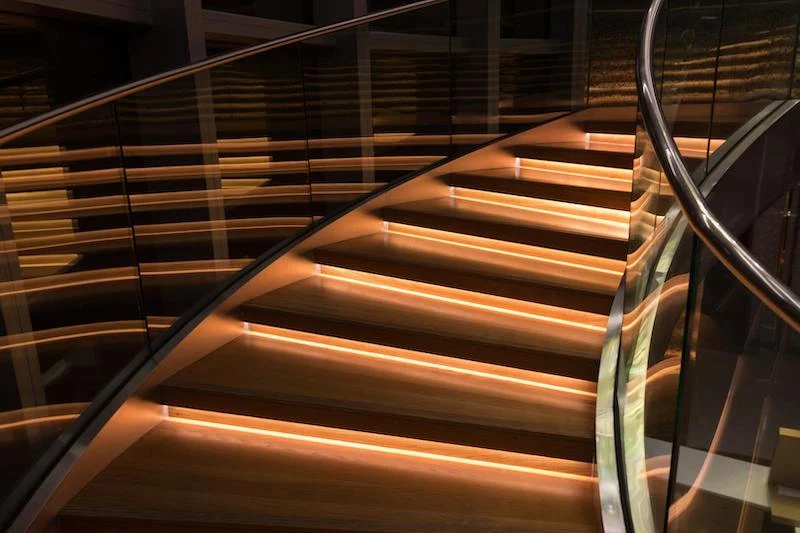
- Task Light: This is focused light for doing specific things. Lights over a grill, on your house numbers, or built into stair treads are all task lights. Their purpose is purely practical.
- Accent Light: This is where the magic happens. Accent lighting is what you use to create drama, highlight your home’s best features, and add depth to your landscape. This is what we’ll focus on.
My Favorite Accent Lighting Tricks
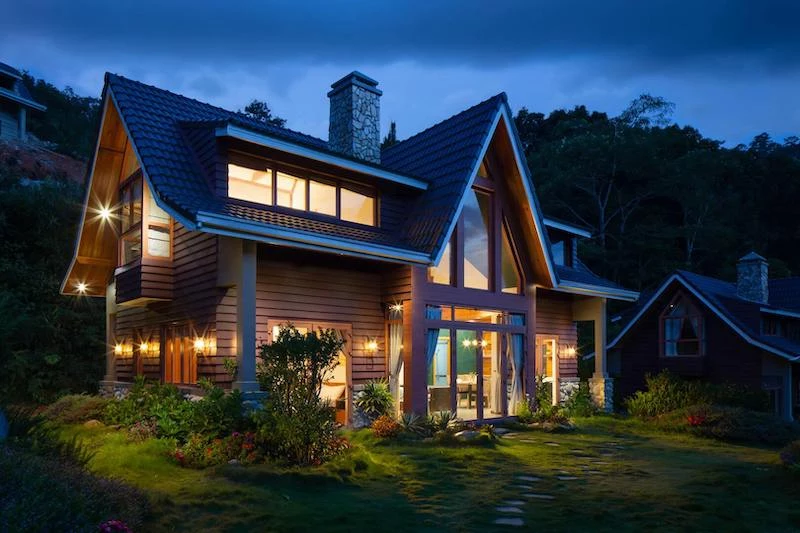
- Uplighting: The most common technique for a reason. You place a spotlight at the base of an object and aim it up. It’s fantastic for trees and architectural columns. Pro tip: For a big, mature tree, use two or even three lights from different angles to make it look full and not like a flat cardboard cutout.
- Grazing: This is how you bring out amazing texture. Place a light right up against a stone or brick wall and aim it straight up. The light “grazes” the surface, creating deep shadows that make the texture pop. A wider beam usually works best here.
- Silhouetting (or Backlighting): This is the reverse of uplighting. You put the light behind a cool-shaped object, like a Japanese maple or a sculpture, and light up the wall or fence behind it. The object itself stays dark, creating a stunning silhouette.
- Moonlighting: This is a more advanced technique, but the effect is incredible. We mount a fixture with a wide beam high up in a mature tree, aiming down. The light filters through the leaves and branches, creating soft, dappled shadows on the ground below, just like real moonlight. This one is best left to pros, as it involves climbing and using special tree-safe mounting gear.
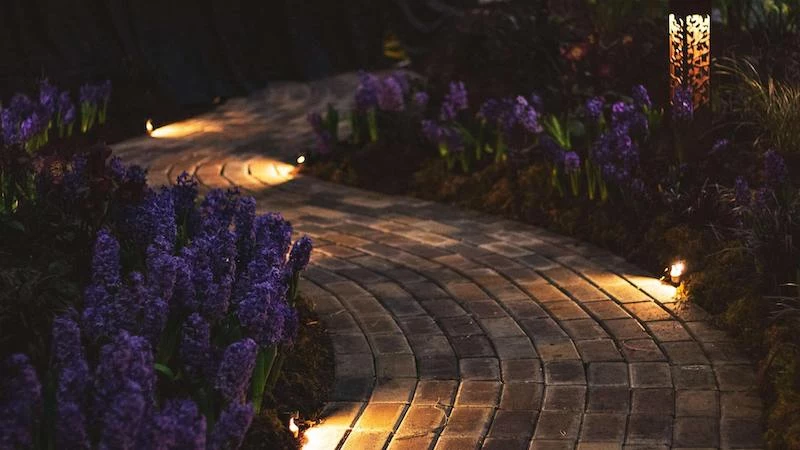
- Path Lighting: The biggest mistake I see is the “runway effect”—placing lights in a straight, evenly spaced line down both sides of a path. It looks unnatural. Instead, stagger the lights, alternating from one side to the other. As a rule of thumb, I space them about 8 to 12 feet apart, making sure the pools of light on the ground overlap just enough for a continuous, safe walkway.
Let’s Talk Hardware: The Stuff That Lasts
The quality of your gear will absolutely determine how long your system survives. I’ve ripped out so many cheap, big-box store systems that were crumbling after just a few years. Investing in quality hardware is the single most important financial decision you’ll make in this project.
Fixture Materials: A Quick Guide to What’s Worth It
Let’s get real about what you’re paying for. You can find fixtures at a wide range of prices, and the material is usually the reason why.
- Brass: This is the pro’s choice, hands down. Cast brass fixtures are heavy, tough, and basically indestructible. They resist corrosion and will last for decades. They cost more upfront—think $80 to $200+ per fixture—but you only buy them once. I have brass systems I installed 15 years ago that look and work like new.
- Copper: Copper is beautiful and ages to a lovely green-blue patina. It’s very durable, but it’s a softer metal than brass, so it can get dinged up more easily. It’s often in the same price range as brass.
- Powder-Coated Aluminum: This is a common mid-range option, probably what you’ll find at the home improvement store for $30 to $70 a fixture. It’s way better than plastic, but the coating can chip or fade. Once that happens, the aluminum underneath corrodes, especially in wet climates.
- Composite: High-quality composite fixtures can be surprisingly durable and won’t corrode, making them a decent choice for salty coastal areas. They just don’t have the premium look or feel of solid metal.
Where to Buy the Good Stuff? For the pro-quality brass or copper fixtures, you’ll want to look beyond the big-box stores. Check out dedicated online landscape lighting retailers. Brands like Volt, FX Luminaire, and Kichler have great reputations and sell durable gear that both pros and serious DIYers can buy.
The Transformer: The Heart of Your System
The transformer plugs into a standard outdoor outlet and steps the power down from a dangerous 120 volts to a safe 12 volts. Don’t skimp here. To size it right, add up the total wattage of all your planned lights, then choose a transformer with a capacity that’s at least 20-30% higher. This buffer prevents you from overworking it and gives you room to add more lights later. A quality magnetic transformer can cost between $200 and $400, but it’s the engine of your whole system.
Wiring: Ditch the Daisy Chain for the Hub Method
In the old days, we’d run one long wire and connect lights to it one after another—the “daisy chain” method. The problem is voltage drop; the lights at the end of the line end up dimmer than the ones at the beginning. The modern, professional way is the hub method. You run a main, heavy-gauge wire to a central point in a garden bed. From that “hub,” you run smaller wires out to each fixture. This ensures every light gets the same amount of power and looks equally bright.
Good to know: When I say “heavy-gauge wire” for the main line, I mean 10- or 12-gauge direct-burial landscape wire. For the shorter runs from the hub to each light, 16- or 18-gauge is perfectly fine.
Your Game Plan for Installation
A little planning saves a ton of headaches. Don’t just start digging holes. For a first-timer, I’d say a 10-light system is a solid weekend project. Take your time!
My Go-To Toolkit for a DIY Install:
- A flat spade or trenching shovel
- Good quality wire strippers
- Silicone-filled, waterproof wire nuts (more on this below!)
- A powerful flashlight (for nighttime aiming)
- A roll of electrical tape
Step 1: Sketch Your Property
Draw a simple map of your yard. Mark the house, paths, big trees, garden beds, and, most importantly, the location of your outdoor GFCI outlet. This is where your transformer will live.
Step 2: Take a Nighttime Walk with a Flashlight
This is the single most important step. Seriously. After dark, grab a bright flashlight and use it to “paint” with light. Shine it up a tree from different angles. Graze it along your brick wall. Stand back at the street and see how it looks. Look out your windows from inside. Make notes on your sketch about what you love and where the fixtures should go.
Step 3: The Mock-Up and Final Install
Before you bury a single wire, lay everything out on the ground exactly where you plan to install it. Connect all the wires and plug it in. Wait until it’s pitch black, then turn it on. This is your chance to make adjustments. Move a fixture a few feet, change an angle. Once you’re 100% happy with the look, then you can bury the wire. Low-voltage cable only needs to be about 6 inches deep. Just slice a narrow trench with a spade, tuck the wire in, and press the soil back down.
A Quick Word on Budget & Where to Start
So, what does a real system cost? If you’re going the DIY route with quality brass fixtures, a good transformer, and all the wire you’ll need for a 10-light system, a realistic budget is probably somewhere between $1,500 and $2,500. A professional installation for a similar system could range from $3,000 to $7,000+, depending on the complexity and your location. The pro price includes design expertise, labor, and a warranty, which is often worth it.
Quick Win If You’re on a Tight Budget: Don’t have the cash for a full system right now? No problem. Buy just ONE high-quality brass uplight and a small, simple transformer. You can get a solid little kit for under $150. Aim it at the best-looking tree in your yard. I promise, the instant curb appeal will get you hooked.
Safety Is Not a Suggestion. It’s a Requirement.
Even though we’re working with low voltage, we’re still dealing with electricity. Please take this seriously.
Always Use a GFCI Outlet: Your transformer MUST plug into a Ground Fault Circuit Interrupter (GFCI) outlet. This is the kind with the little “test” and “reset” buttons. It’s a lifesaver that instantly shuts off power if it detects a problem. If you don’t have one, hire an electrician to install one. It’s non-negotiable.
Make Waterproof Connections: The cheap clip-on connectors that come with most kits are garbage. Throw them out. They are the #1 point of failure. The only way to do it right is with silicone-filled wire nuts. They cost a few bucks more but create a waterproof seal that will last for years.
Quick Tip: How to Make a Perfect Connection
1. Strip about a half-inch of insulation off the ends of the two wires you’re connecting.
2. Hold the bare copper ends parallel to each other and twist them together tightly with pliers.
3. Screw on a silicone-filled wire nut. Keep twisting until it’s snug and you see a little bit of the silicone goo squish out the bottom. That’s how you know you have a perfect, waterproof seal.
Should You DIY or Call a Pro?
A handy person can definitely install a great low-voltage system. But it’s time to call in a professional lighting designer or installer if you answer ‘yes’ to any of these questions:
- Is your project larger than 15-20 lights or very complex?
- Do you want a truly high-end, artistic design?
- Do you need any 120V work done (like installing a new outlet)?
- Does the job require climbing ladders higher than 10 feet to mount lights on trees or the house?
- Honestly, do you just not have the time or interest to do it yourself?
A pro brings years of design experience, access to trade-only fixtures, and knowledge of all the local rules. A great lighting system is a real investment in your home’s beauty and value. Plan it right, use good stuff, and you’ll enjoy it for years to come.
Inspirational Gallery
The secret to professional-grade lighting isn’t just brightness, it’s warmth. Pay close attention to the light’s color temperature, measured in Kelvin (K). For a welcoming, high-end residential feel, stick to the 2700K to 3000K range. 2700K emits a warm, almost incandescent glow perfect for cozy patios. 3000K is slightly whiter and crisper, excellent for highlighting plant textures. Anything over 4000K can look sterile and commercial, like a parking lot—the exact opposite of the intimate atmosphere you’re trying to create.
- Draws attention to the beautiful texture of stonework or brick.
- Creates a dramatic play of light and shadow on a flat façade.
- Adds a sense of depth and dimension to your home’s architecture after dark.
The technique behind these effects? It’s called
Can my landscape lighting be smart?
Absolutely, and it’s a game-changer for convenience and ambiance. Modern low-voltage systems can be equipped with a smart transformer, like those from FX Luminaire or VOLT, allowing you to control zones, schedules, and dimming from a smartphone app. For even more creative control, integrated systems like Philips Hue Outdoor offer a wide range of color options, perfect for setting a festive mood for a party or a subtle, warm glow for a quiet evening.
According to the International Dark-Sky Association, at least 30 percent of all outdoor lighting in the U.S. alone is wasted, largely due to unshielded and poorly aimed fixtures.
This doesn’t just waste energy; it contributes to light pollution that disrupts wildlife and obscures our view of the night sky. The pro solution is to always use fixtures with built-in glare shields or adjustable cowls, and to aim them precisely at the target—be it a tree, a path, or a wall—and nowhere else.
For a truly magical effect, try the
Solid Brass: The professional’s choice for a reason. It’s incredibly durable, weathers corrosive soil and coastal air without failing, and develops a beautiful, natural patina over time that blends seamlessly into the landscape.
Powder-Coated Aluminum: A more budget-friendly option. It’s lighter and looks great out of the box, but it’s more susceptible to chipping from lawn equipment or scratches, which can expose the metal to corrosion.
For lifetime performance and a system that truly looks better with age, brass is the superior investment.
Once you’ve decided on the fixtures, consider their beam spread. This is the angle of the light beam, and choosing the right one is crucial for a polished look.
- Narrow Spot (10-15 degrees): Perfect for precisely illuminating tall, thin architectural columns or the trunk of a towering tree.
- Medium Flood (35-60 degrees): Your workhorse for most tasks, from uplighting shrubs to accenting architectural features.
- Wide Flood (100+ degrees): Use this for broad wall-washing effects or illuminating a wide garden bed from a single source.
Don’t be afraid to go cordless for flexibility. For intimate gatherings or areas far from a power source, high-end portable outdoor lamps add a touch of sophisticated, temporary light. A rechargeable LED lantern, like the stylish Fermob Balad or the elegant FollowMe by Marset, can sit on a dining table or next to a lounge chair, providing a warm, contained glow exactly where you need it, for exactly as long as you need it.
A 2018 survey by the National Association of Realtors found that 41% of real estate agents recommended sellers undertake a landscape lighting project before putting their home on the market.
Why? Because a well-executed lighting scheme does more than just look pretty. It enhances curb appeal, extends the home’s usable living space to the outdoors, and significantly boosts the perception of safety and security—all key selling points that can lead to a higher perceived value and a faster sale.
Think of your garden lighting as creating layers, just like an interior designer would. A successful scheme combines three types of light:
- Ambient: The general, soft base layer of light, often achieved through downlighting from trees or eaves.
- Task: Focused, functional light that ensures safety on pathways, steps, and cooking areas on the patio.
- Accent: The dramatic highlights that draw the eye to your favorite features, like a beautiful statue, a specimen tree, or an interesting architectural detail.


