How to Use Ribbon on a Christmas Tree Like a Pro (It’s Easier Than You Think)
I’ve styled a lot of Christmas trees over the years, from tiny ones in city apartments to massive showstoppers in hotel lobbies. And you know what? The most memorable trees aren’t always the biggest. They’re the ones that have a certain harmony, a visual flow that just feels right. That flow almost always starts with the ribbon.
In this article
Honestly, ribbon is the one thing that can take a tree from a simple collection of ornaments and turn it into a cohesive piece of art. It’s the roadmap for your whole design. But I get it—a lot of people find ribbon totally intimidating. They worry about getting it straight or making it look bunched up, so they often slap it on last. That’s probably the single biggest mistake people make.
So let’s reframe this. Ribbon isn’t an afterthought; it’s the foundation, second only to getting the lights right. And getting the ribbon right is way easier than it looks. It just takes the right supplies and a few insider techniques. Forget the frustration—let’s make this the fun part.
First Things First: Your Shopping List
Your success story begins long before you even touch the tree. It starts in the aisles of the craft store. Getting the right ribbon and tools is truly half the battle, and this is where you can separate a professional-looking tree from an amateur one.
Wired Ribbon is Non-Negotiable
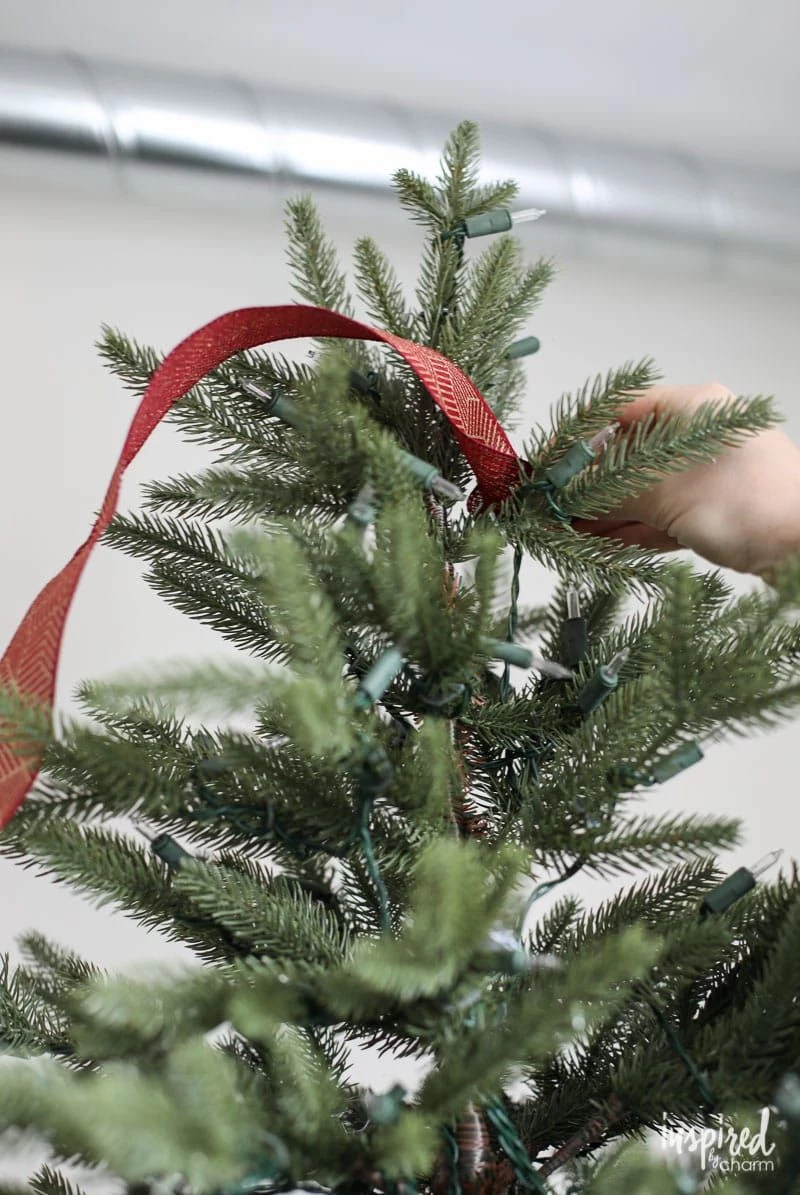
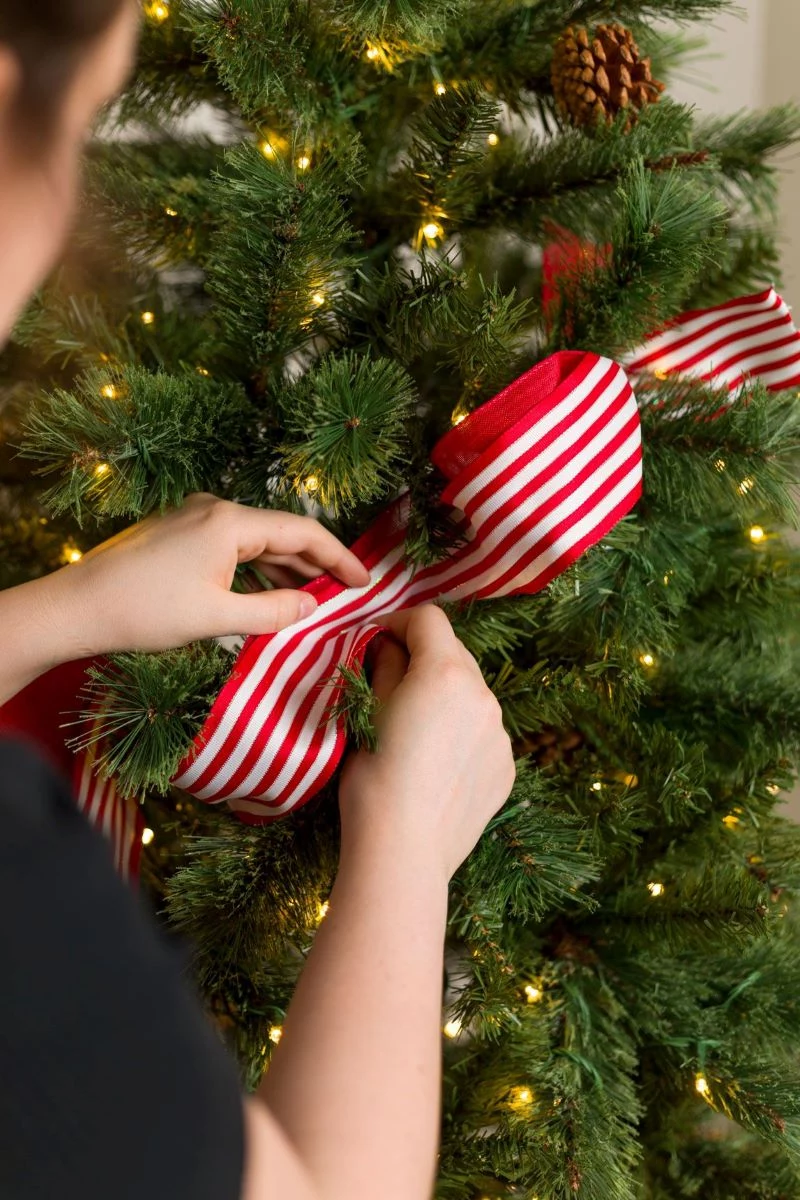
I’m going to say this as clearly as I can: you need to use wired ribbon. For nearly every design out there, it’s the only real option. That thin, flexible wire sewn into the edges is the secret sauce. It lets you sculpt the ribbon, creating loops, curves, and poufs that hold their shape. You’re basically a ribbon artist. Without that wire, any ribbon—no matter how pretty—will just sag and look lifeless. It’s the difference between a tree with dynamic energy and a tree that just looks… sad.
Non-wired ribbon, like satin or simple fabric, just wants to hang straight down. Unless you’re an advanced designer going for a very specific draped look (and are willing to use a ton of pins to hold it in place), just skip it. It’s a recipe for frustration.
Picking the Right Width and Texture
The scale of your ribbon should match the scale of your tree. It’s a simple concept but easy to get wrong.
- For smaller tabletop trees (under 4 feet): Stick with a narrower ribbon, around 1 to 1.5 inches wide.
- For standard trees (6 to 8 feet): The 2.5-inch width is the absolute sweet spot. It’s bold enough to make a statement but won’t swallow your branches whole.
- For big trees (9 feet and up): Go bold with a 4-inch ribbon as your base. You can always layer a skinnier one on top for contrast.
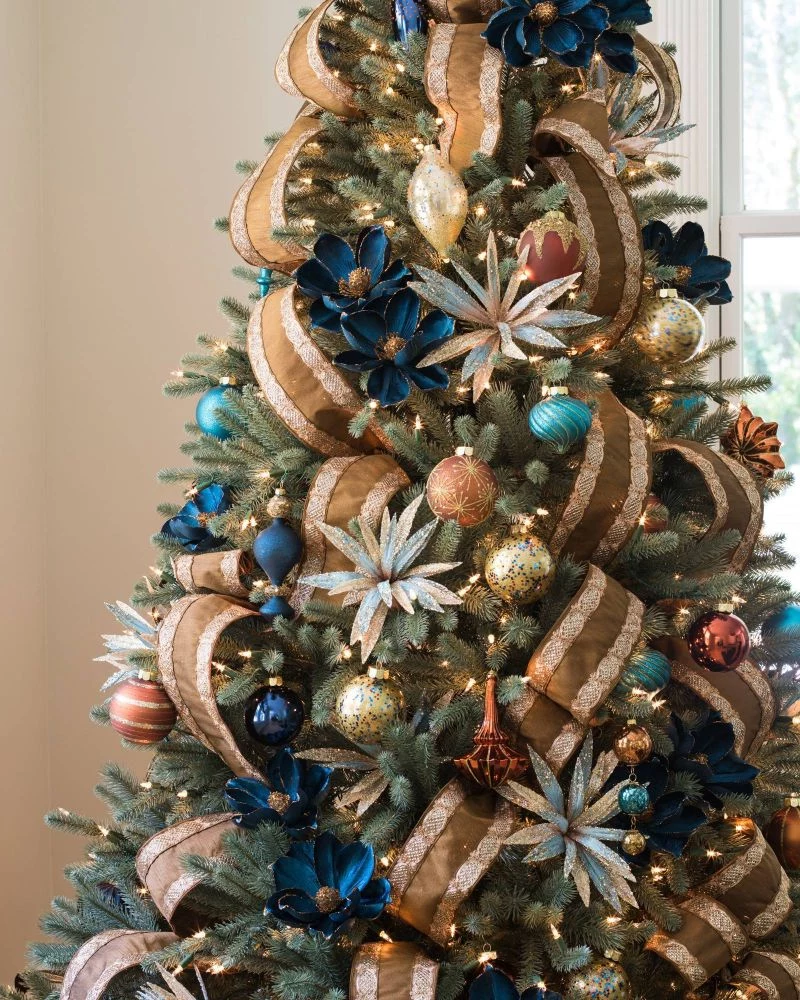
As for the material, think about your overall theme. Velvet feels luxurious and traditional, while burlap gives you that perfect rustic, farmhouse vibe (quick tip: higher-quality burlap won’t shed as much all over your floor). A wired taffeta is a dream to work with because it’s both lightweight and stiff, reflecting the light beautifully. Sheer or organza ribbons are fantastic as a second layer, especially when they catch the glow of the lights.
The Magic Formula for How Much Ribbon to Buy
Running out of ribbon mid-wrap is the worst. Here’s the simple formula the pros use to get a reliable estimate. I always recommend getting a little extra, because you can use it to wrap the presents under the tree for a super-coordinated look.
The Basic Formula: Plan for about 10 feet of ribbon for every vertical foot of your tree. This gives you plenty to work with for loops and billows.
So, for a 7.5-foot tree: 7.5 ft x 10 = 75 feet of ribbon.
Since ribbon is sold by the yard (which is 3 feet), you just convert it: 75 / 3 = 25 yards.
PAUSE & DO IT NOW: Seriously, grab your measuring tape. Got your tree height? Multiply it by 10, then divide by 3. That’s your magic number in yards. Write it down!
Good to know: If your tree is super slim or a pencil style, you can probably reduce that amount by 20%. If it’s extra wide and fluffy, add about 20% more. And a heads-up: I always, always buy one extra roll than my calculation. I’ve been saved more than once from having to run back to the store, only to find my perfect ribbon is sold out.
Your Actionable Shopping List
Good tools make the job cleaner and faster. Here’s what you’ll need.
- Sharp Fabric Scissors: Please don’t use your junk-drawer kitchen scissors. They’ll crush the wire and fray the fabric. A dedicated pair will run you $15-$25, and they are worth every single penny.
- Green Floral Wire: This stuff is about $5 a paddle and is perfect for securing ribbon ends because it just disappears into the branches. Pipe cleaners also work in a pinch!
- Wire Cutters: For trimming the floral wire or the thick wire in some heavy-duty ribbons. They save the blades on your good scissors.
- A Sturdy Step Stool: No explanation needed. Safety first!
The Pro’s Order of Operations
There’s a right way to layer decorations to get that polished, cohesive look. It ensures every element has its moment to shine. Plan for this to be a whole afternoon project, not a quick 30-minute task!
- The Tree & Fluffing (30-45 mins): First, make sure your tree is secure. Then, for artificial trees, you MUST fluff the branches. I spend a solid 30-45 minutes on a 7.5-foot tree, separating every single tip. This is the boring but critical first step.
- The Lights (30-60 mins): Lights are always, always second. Weave them deep into the tree, from the trunk out to the tips and back again, to create depth. And for the love of all that is festive, test them before you put them on!
- The Ribbon (45-90 mins): Now it’s our turn! The ribbon goes on before the ornaments. It creates the structure and flow, leaving perfect little pockets for the ornaments to nestle into later.
- The Ornaments (1-2 hours): Start with your biggest, heaviest ornaments, placing them deeper inside the tree. Then work your way out with medium and smaller ones.
- The Topper & Skirt: The final touches to crown your masterpiece.
Choosing Your Ribbon Technique
Okay, let’s get to the fun part. There are three main ways to do this, each with a different vibe. Before you dive in, here’s a quick rundown to help you choose:
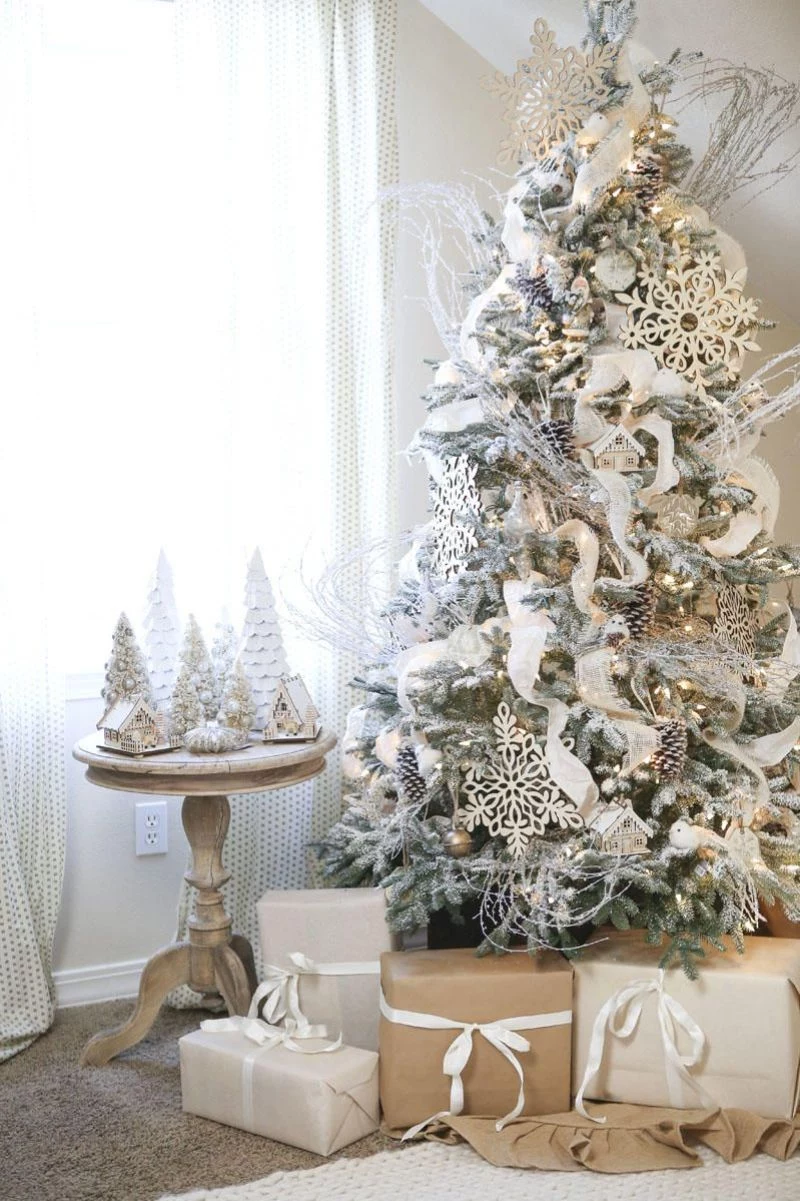
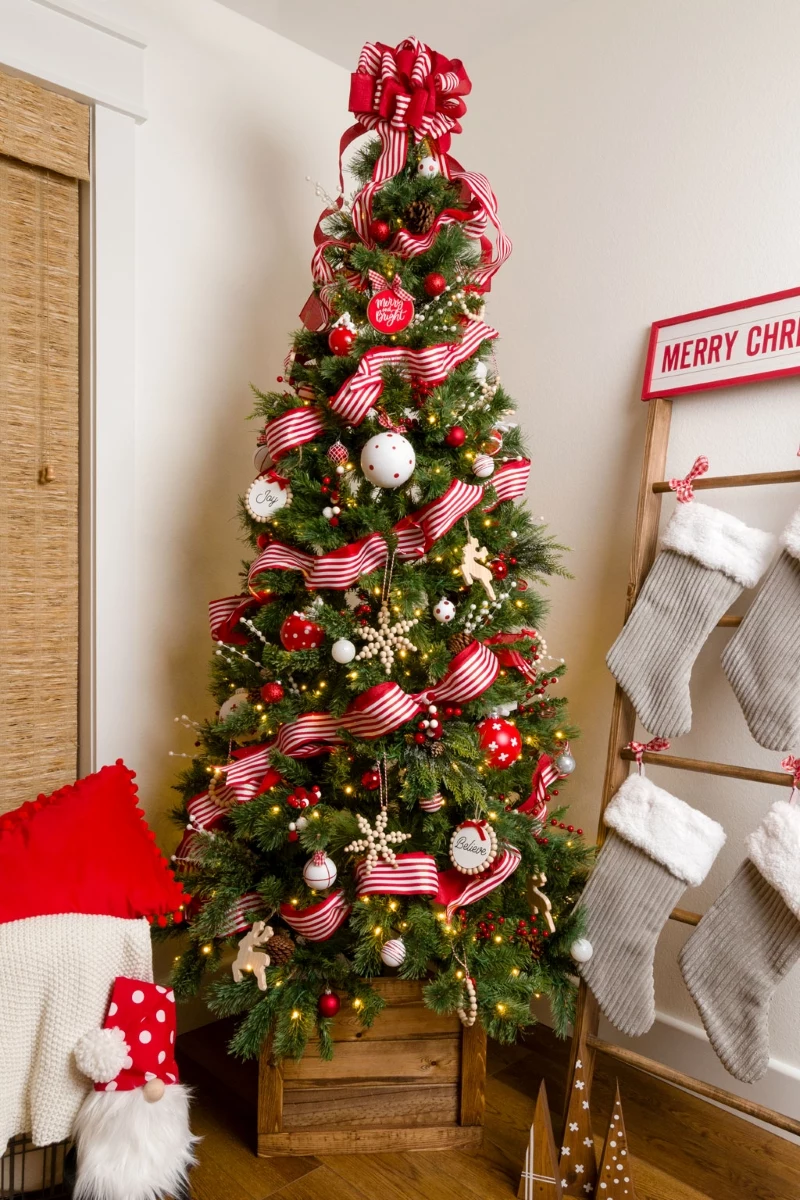
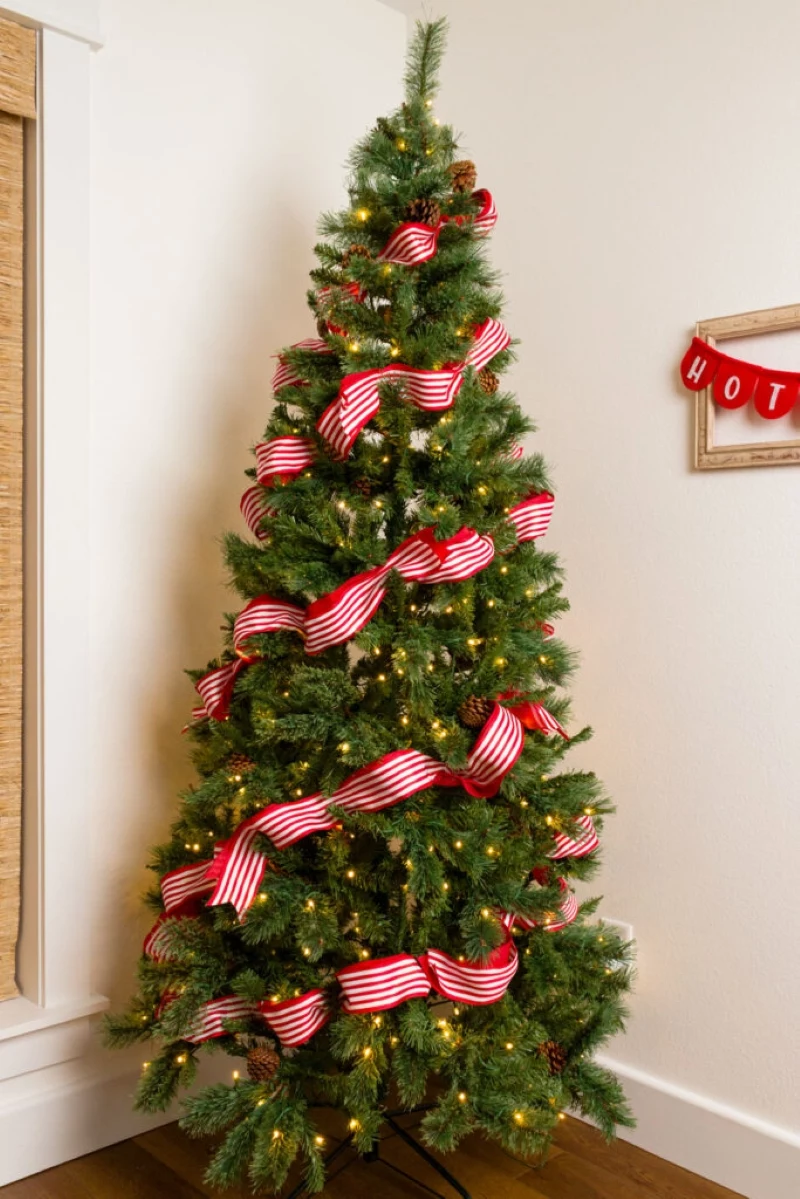
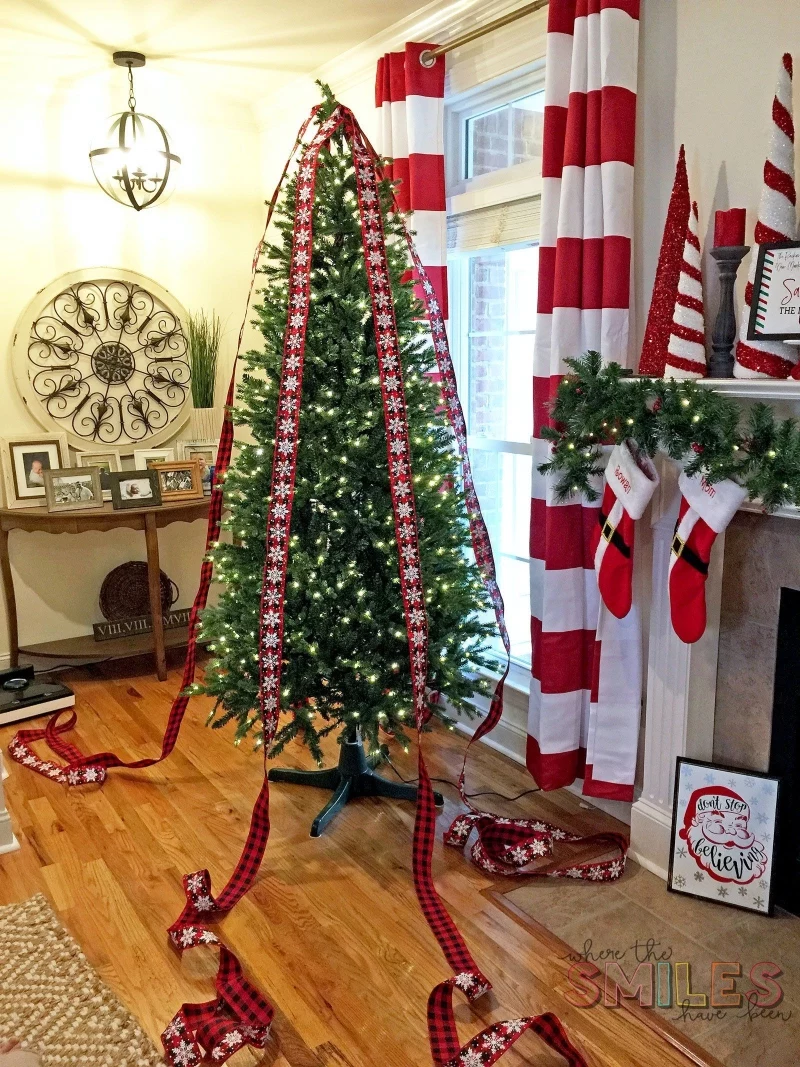
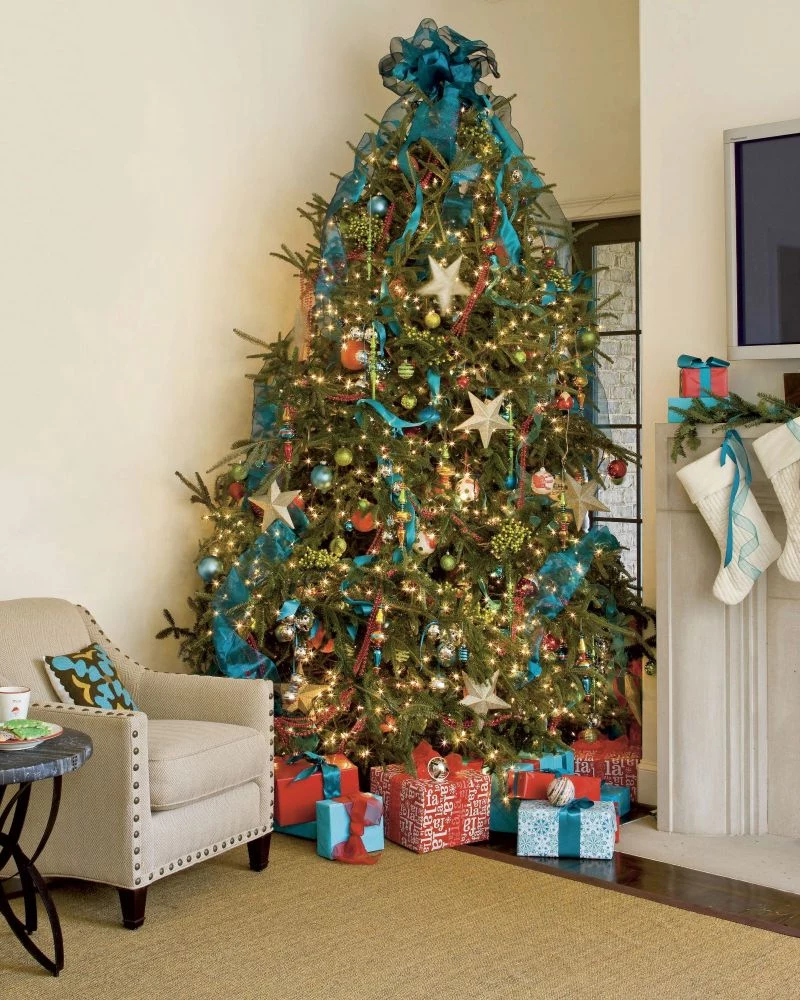
- The Vertical Cascade: This is the easiest method and uses the least amount of ribbon. It’s perfect for beginners or for a more formal, elegant look.
- The Classic Spiral: This gives you that full, traditional look. It uses more ribbon and takes a bit more practice to get the ‘pouf’ just right, but the result is a classic for a reason.
- The Segmented Pouf: This is the most budget-friendly in terms of ribbon usage and is fantastic for filling in gaps. It’s also the best method for layering different ribbons together.
Technique 1: The Vertical Cascade
This is a clean, elegant method that works beautifully with patterned ribbons.
Simply cut your ribbon into long strips, about 6-8 inches longer than the height of your tree. You’ll probably need 8-12 strips for a standard tree. Pinch one end of a strip and secure it deep inside the top of the tree with a branch or floral wire. Let the ribbon cascade down, and about halfway, gently tuck it into a branch and let it billow out again to give it some life. Finally, tuck the bottom end into a branch so it disappears. Repeat this, spacing the cascades evenly around the tree.
Rookie Mistake: Pulling the ribbon too tight. It should look like a soft, relaxed waterfall, not a rigid stripe. The wire is there to give it gentle shape, not tension.
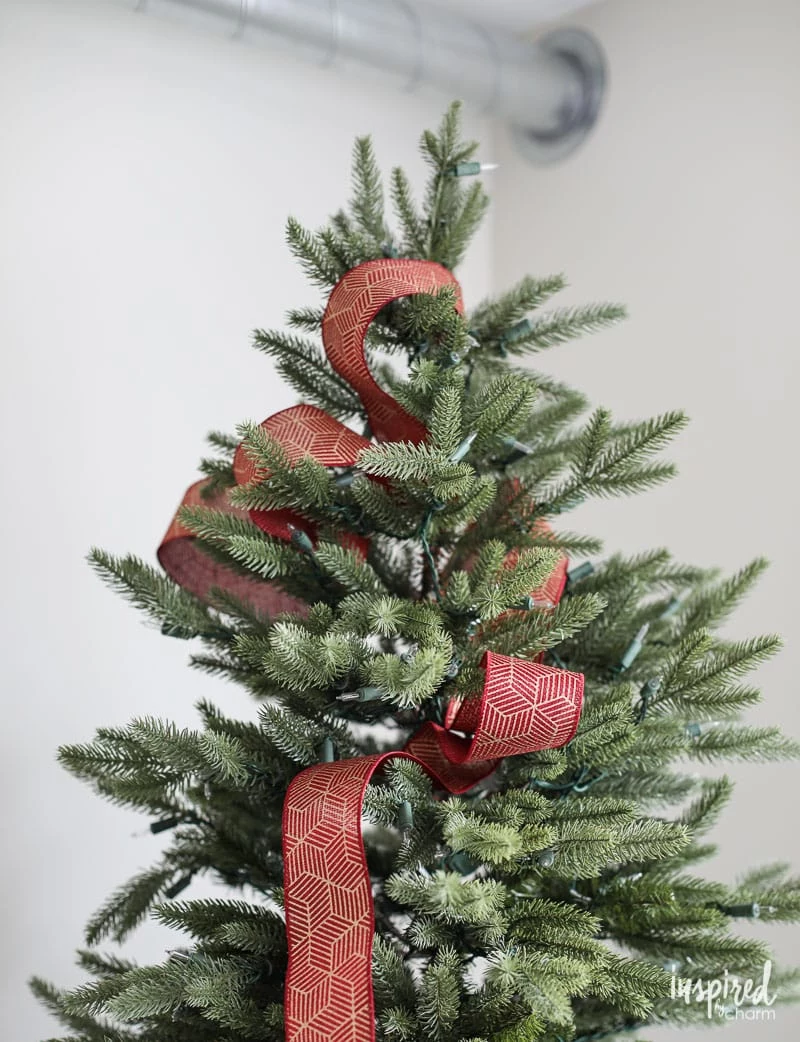
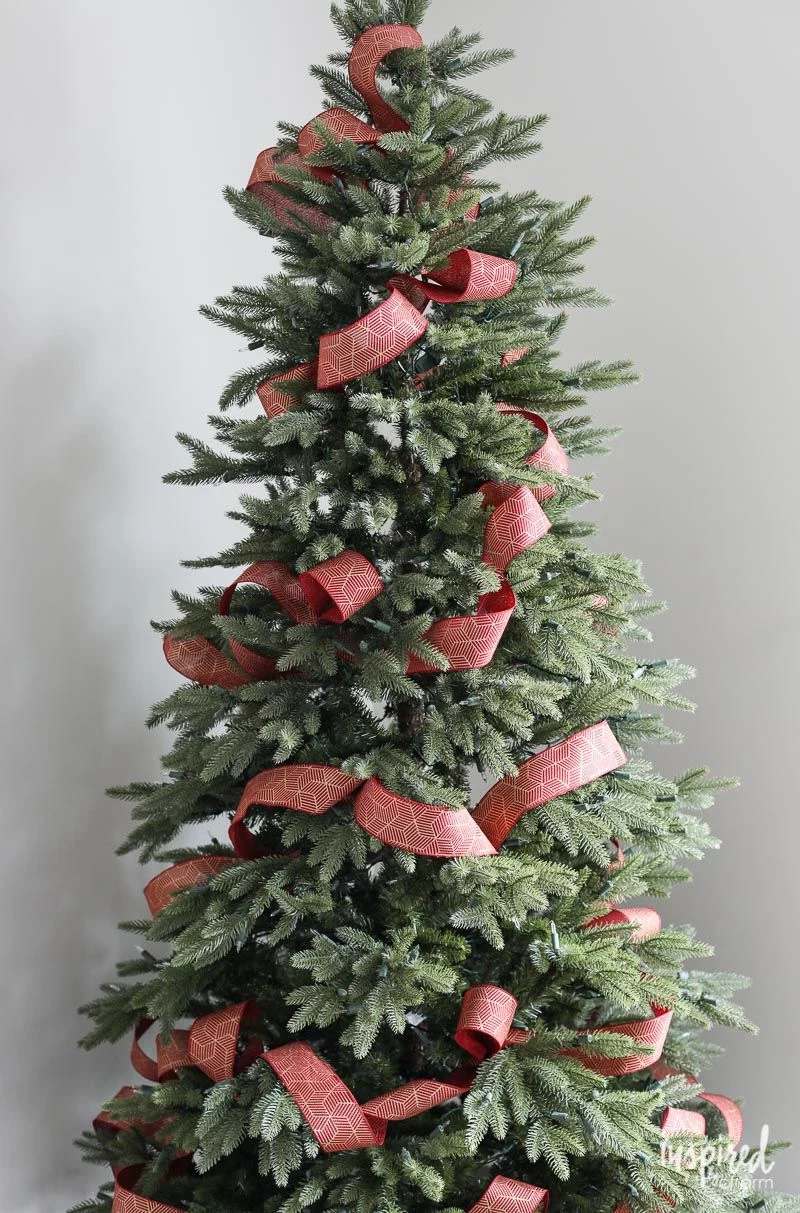
Technique 2: The Classic Spiral Wrap
This is the look most people go for. The secret is to keep it loose and organic.
Start by securing the end of your ribbon roll deep in the top of the tree. Then, begin spiraling the ribbon down the tree at a gentle angle. Here’s the most important part: the ‘tuck and pouf.’ Every 12-18 inches, tuck the ribbon deep into a branch, and then let it billow out in a soft ‘pouf’ before tucking it in again. This prevents the ‘strangled tree’ look.
Rookie Mistake: Wrapping the ribbon tightly around the outside of the branches. It makes the tree look stiff and restricted. Remember, you want soft, airy arcs, not rigid candy cane stripes. Vary the size of your poufs and the depth of your tucks for a more natural, professionally-styled look.
I learned this the hard way on a big corporate job. I wrapped a 12-foot tree too tightly, and from a distance, it looked ridiculous. I had to take it all off and redo it with the tuck-and-pouf method. It took way longer, but the tree suddenly had movement and life. Lesson learned.
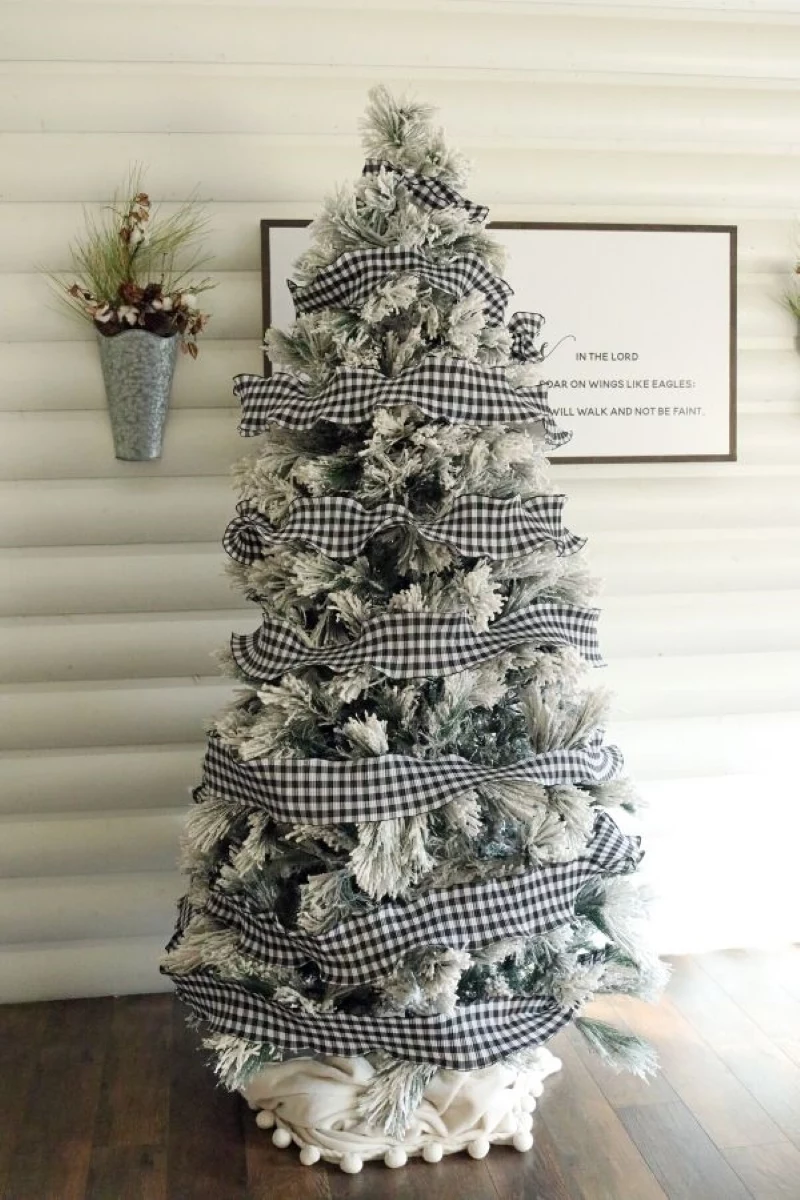
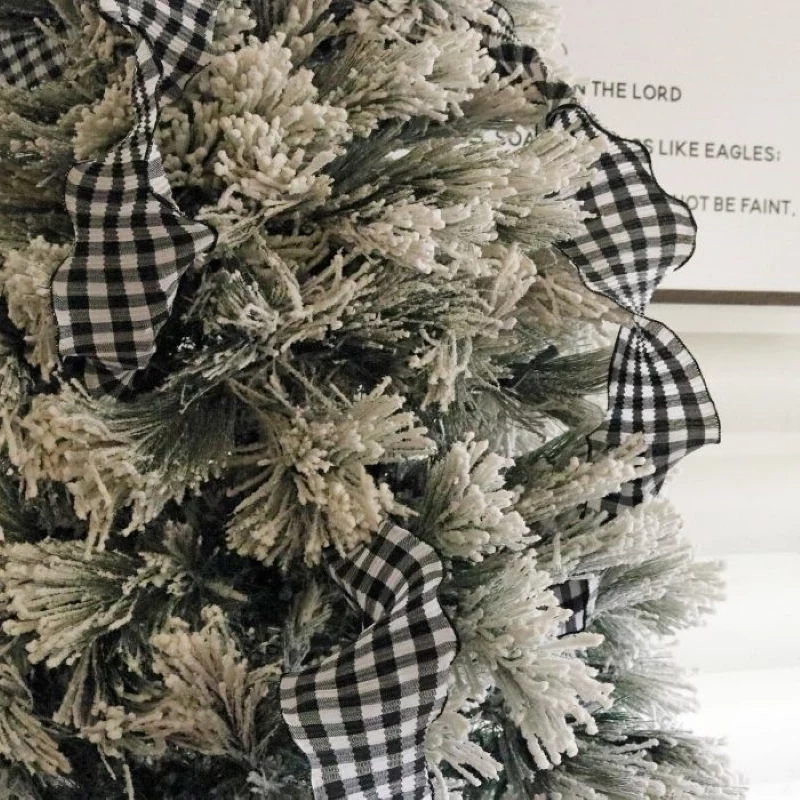
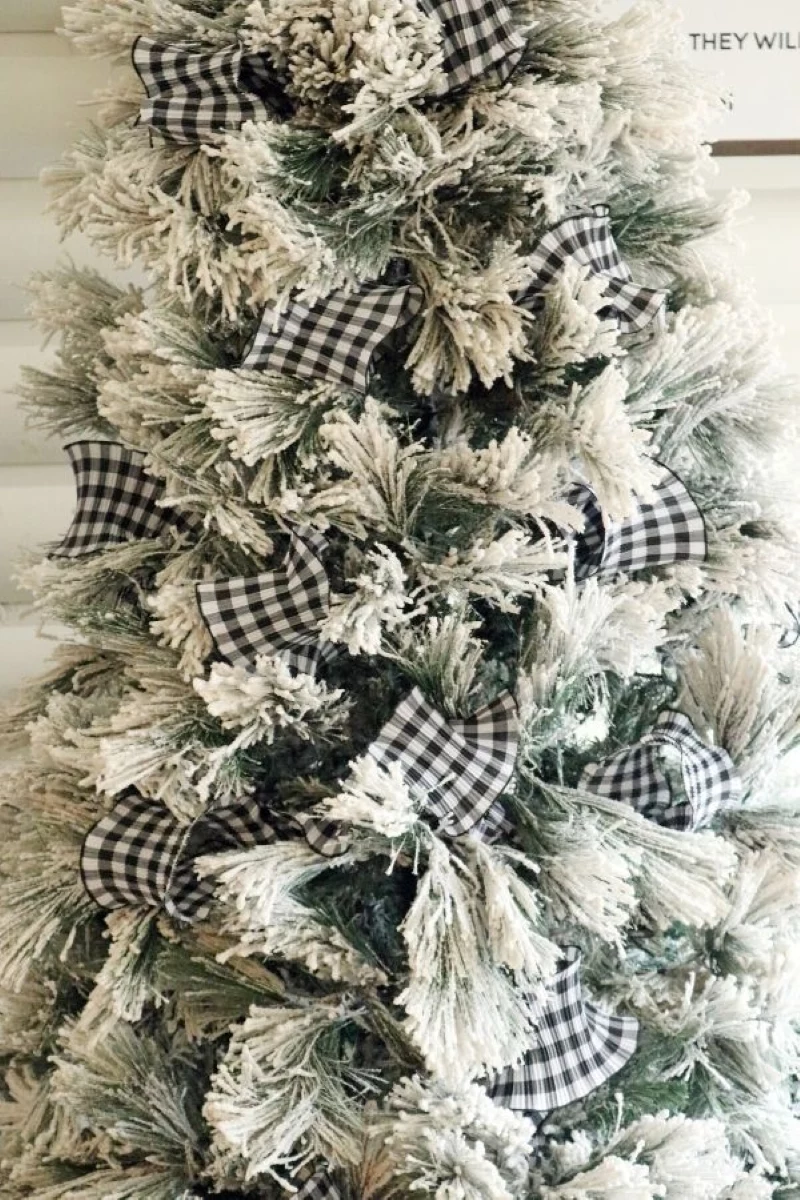
Technique 3: The Segmented Pouf
This is my secret weapon for filling gaps and adding tons of texture, especially if you’re on a budget.
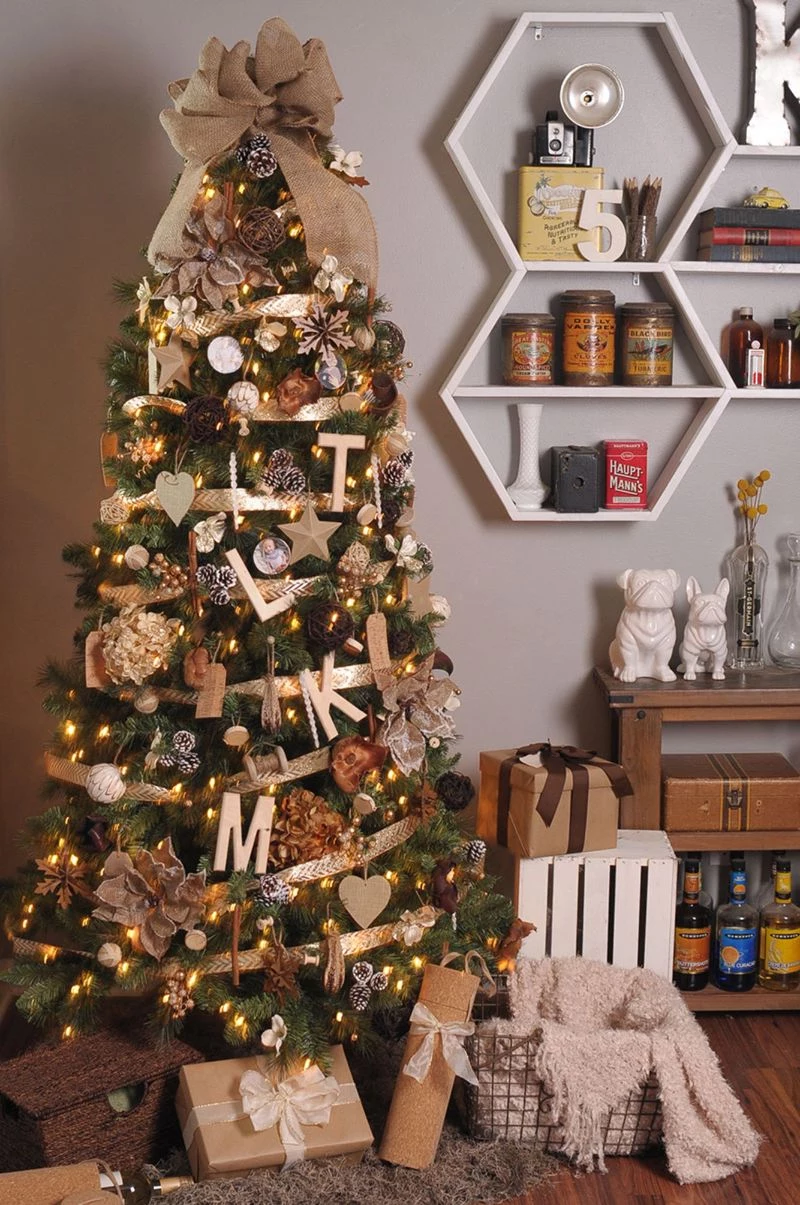
Cut your ribbon into shorter pieces, between 12 and 24 inches long. Take one piece, pinch both ends together to form a loop, and then push the pinched ends deep into a bare spot on the tree, securing them with a branch. Fluff the loop into a nice, full pouf. Continue making and placing these randomly all over the tree.
Rookie Mistake: Making all the poufs the same size or placing them in an obvious grid. The goal is a random, organic feel, as if one long ribbon is weaving in and out of the branches. This is also the BEST way to layer. Just hold two different ribbons together (like a wide burlap and a thin plaid) and create your poufs. It adds incredible richness with almost no extra effort. I once saved a client’s sparse-looking artificial tree with this trick—it looked twice as full by the time we were done!

Finishing Touches and Final Checks
Once the ribbon is on, take a moment to step back and assess your work before the ornaments go on.
Walk to the other side of the room. Squint your eyes until the tree is just a blur of color and shape—it’s an old artist’s trick that helps you see the overall flow without getting distracted by details. Do you see any weird gaps or crowded spots? Now is the time to adjust. It’s so much easier than when the tree is covered in fragile glass balls.
And a quick but serious note on safety: make sure any lights you use are UL-listed and check the cords for any frays. Modern LED lights are much safer because they run cool and won’t heat up your ribbon. And please, never leave your tree lights on when you’re asleep or out of the house. No exceptions.
Don’t be afraid to try a method and decide you don’t like it. The beauty of wired ribbon is that you can take it off and start again. With a little practice, you’ll find the ribbon is your favorite part of decorating, setting the stage for a truly magical tree.
Inspirational Gallery
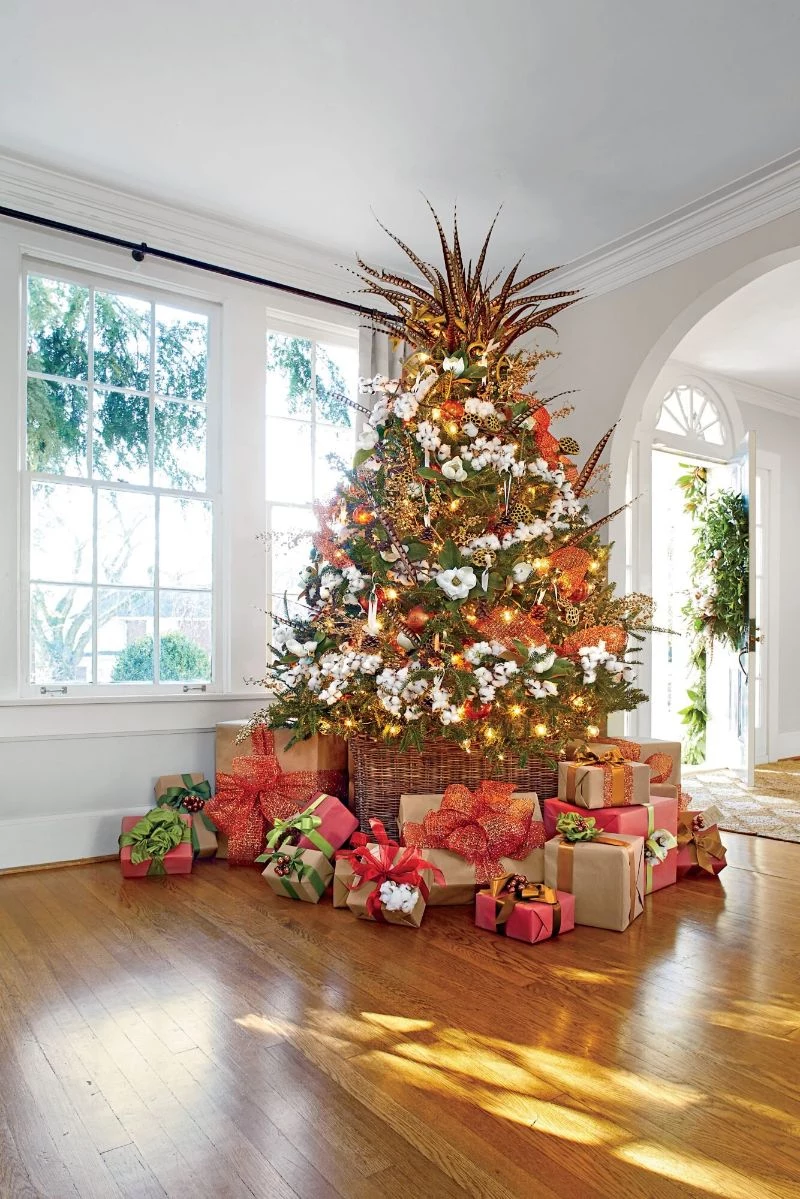
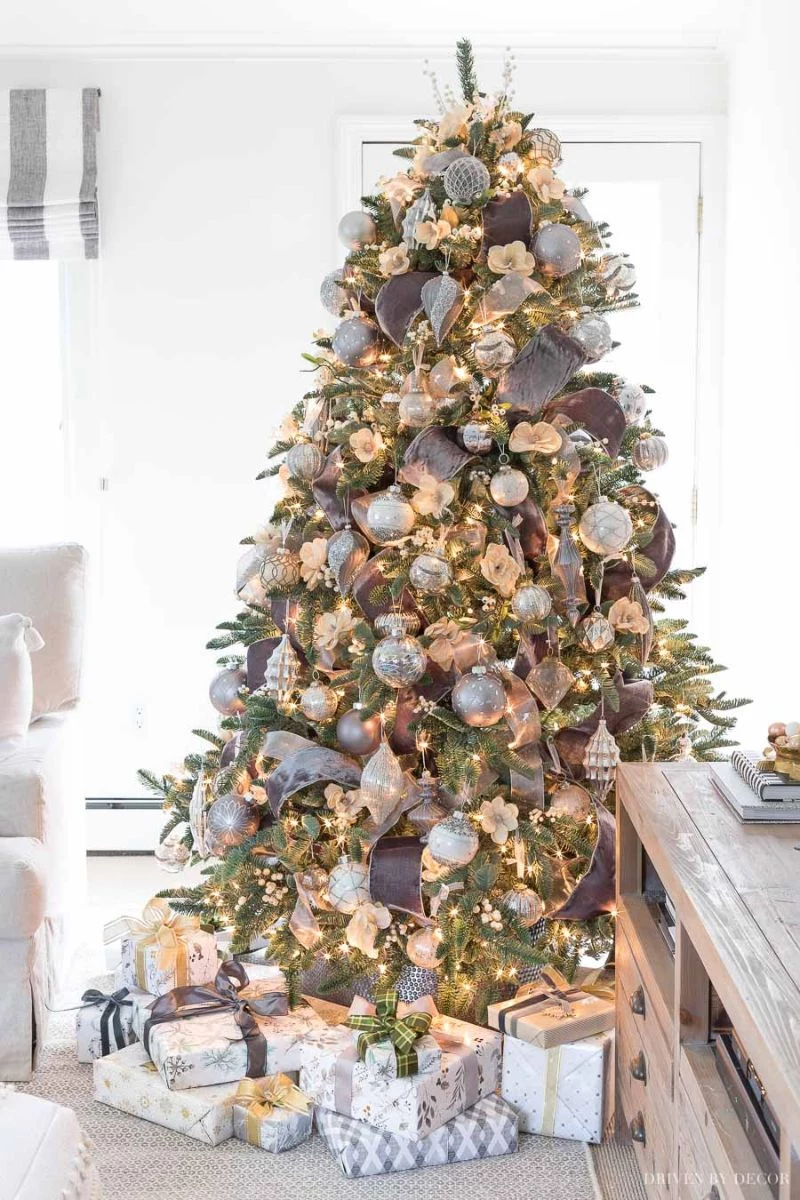
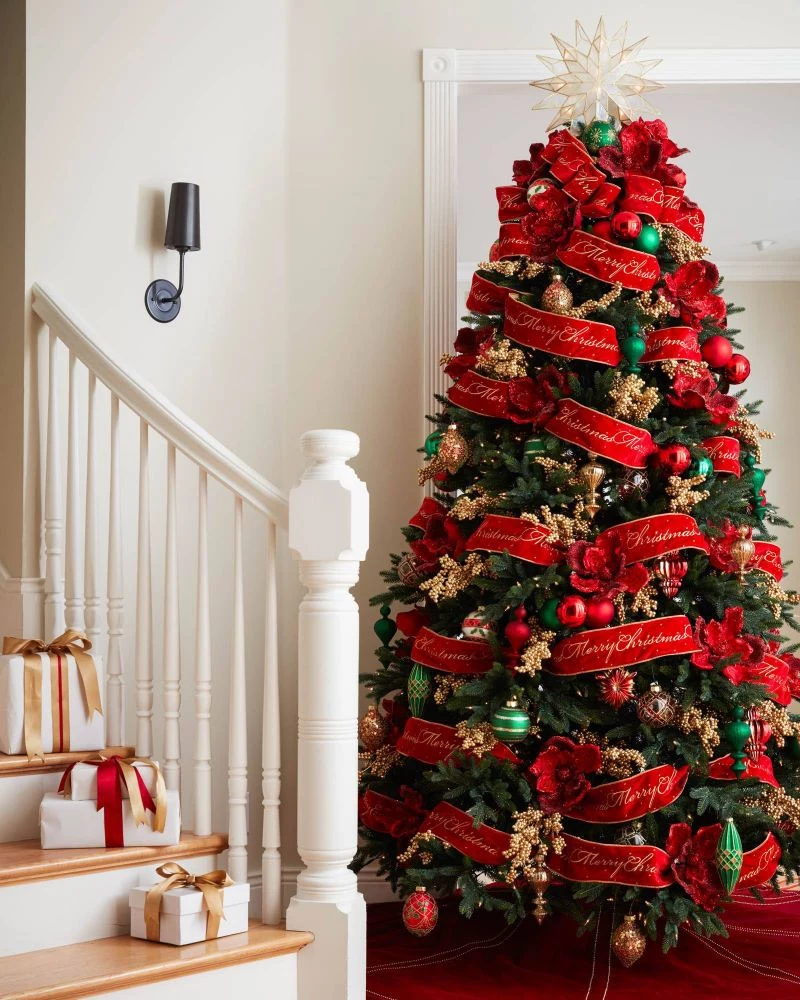
Luxe Velvet: For a deep, light-absorbing texture that exudes classic luxury, choose a plush, wired velvet ribbon, like those from d.stevens fine ribbons. It’s perfect for a sophisticated, traditional tree.
Rustic Burlap: For a farmhouse or woodland theme, a wide, wired burlap ribbon offers a coarse, natural feel that adds a touch of homespun charm and pairs beautifully with pinecones and simple white lights.
The choice depends entirely on the atmosphere you want to create: opulent and rich, or cozy and down-to-earth.
The common mistake: Pulling the ribbon taut. Your tree needs to breathe! A tightly wound ribbon constricts the branches and looks stiff and unnatural. The goal is to drape and tuck it gently, letting it cascade with natural volume and flow between the branches.
How do you make the ribbon stay put without mangling the branches?
The secret is using a few inches of green floral wire or a simple pipe cleaner. Instead of twisting a delicate branch around your ribbon, find a sturdier, inner branch and use the wire to loosely attach the ribbon. It’s invisible, secure, and lets you position the ribbon exactly where you want it without causing any damage.

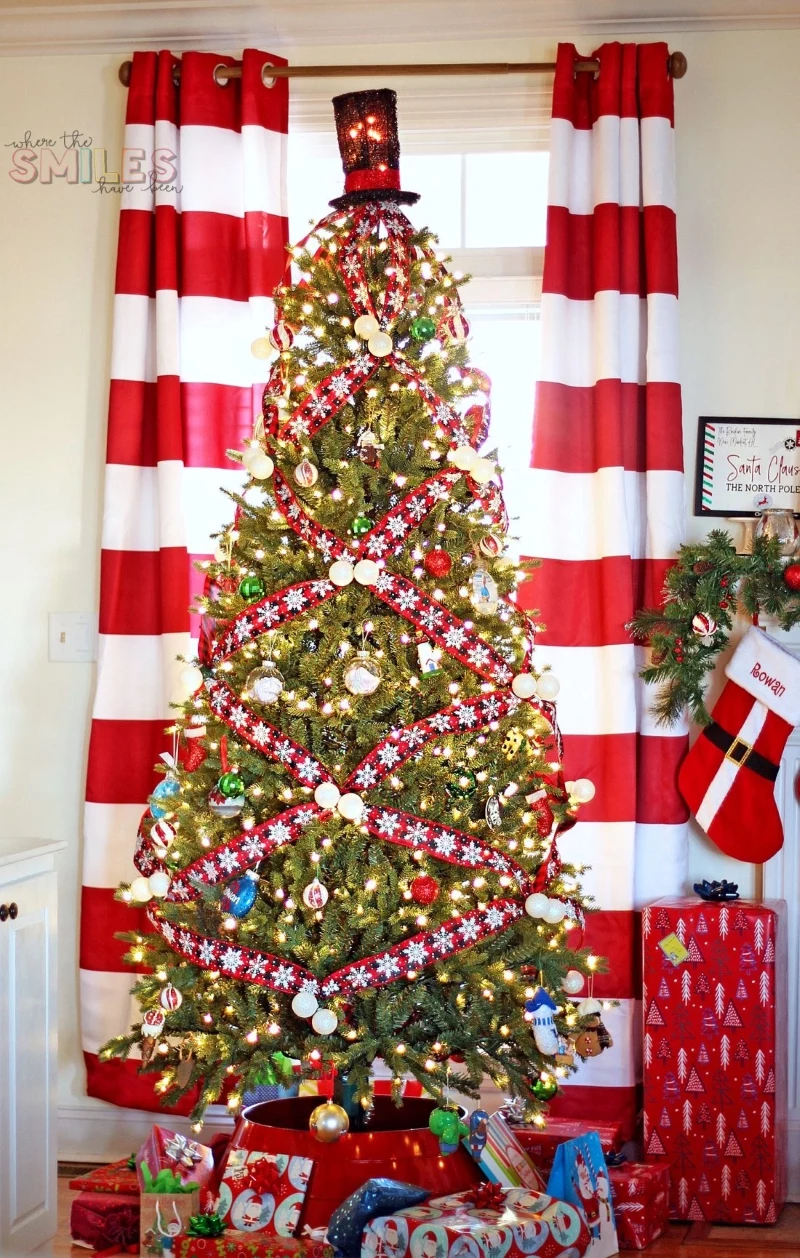
In visual design, diagonal lines are dynamic and guide the eye, creating a sense of movement and excitement.
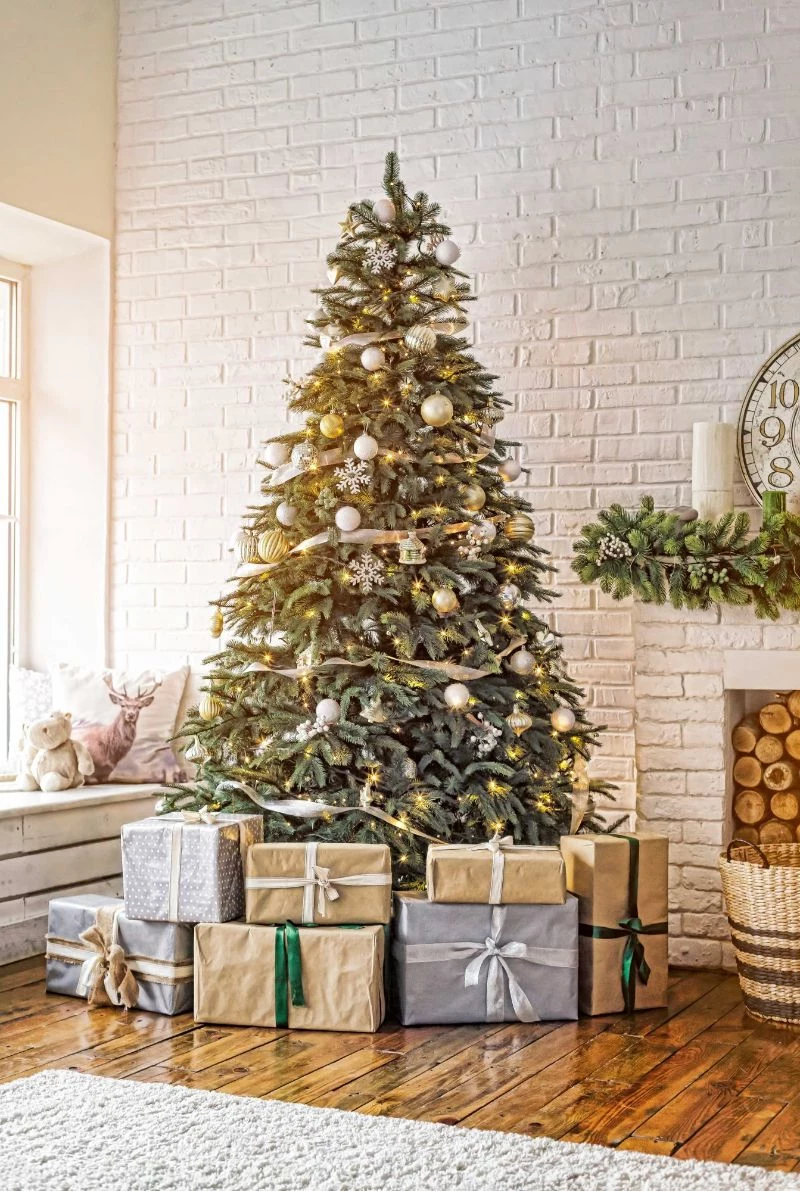
This is exactly what ribbon does for your tree. Whether cascading downwards or wrapping around, it breaks up the static horizontal lines of the branches, giving your entire design a professional, energetic feel.
Don’t let your beautiful ribbon get crushed in storage. To keep it perfect for next year:
- Don’t fold or crease the wire edges; instead, roll the ribbon back onto its original spool or a cardboard tube.
- For larger

One ribbon is great, but two can be spectacular. Layering ribbons adds incredible depth. The key is to pair contrasting textures and widths. Try a wide, 4-inch burlap with a narrow, 1.5-inch red-and-black plaid ribbon on top. Or, for a glam look, pair a sheer, glittery gold ribbon like one from Offray over a solid, opaque navy velvet.

- Achieve perfectly consistent, fluffy loops every time.
- Easily fill in any gaps on your tree after the ornaments are on.
- Make your expensive ribbon go further by using it in targeted spots.
The trick? Don’t apply the ribbon in one continuous strand. Instead, cut 12-14 inch sections, fold them into a simple loop, pinch the end, and attach it to a branch with floral wire. This creates individual

For a touch of Scandinavian simplicity, move beyond glitter and satin. Consider a simple, wired linen or even a wide cotton ticking stripe ribbon. The natural texture and understated pattern create a calm, cozy
A well-placed ribbon does more than just add color; it leads the eye on a journey around the tree, connecting disparate ornaments into a single, harmonious story.

Wondering how to end the ribbon at the bottom of the tree? Avoid an abrupt, straight cut. Let the final strand cascade a bit longer than the lowest branches, then cut the end into a classic dovetail or

Mesh Alternative: If you love a full, voluminous look, consider deco mesh. Used just like a very wide ribbon, its open weave is lightweight and won’t weigh down branches. It fills space quickly and is incredibly easy to shape into large, dramatic poufs. It’s a fantastic base layer to pair with a more traditional patterned ribbon.
A rising trend is the move toward personalization. Many online specialty shops now offer custom-printed wired ribbon where you can add a family name, a special year, or a simple holiday message. It turns a decorative element into a meaningful keepsake that tells your family’s story right on the tree.