Don’t Hire a Window Installer Until You Read This
After more years in this trade than I can count, fitting all kinds of windows and doors, I’ve learned a truth that most people miss. The real success of your project? It has far less to do with the window brand you pick and everything to do with the hands that put it in.
In this article
Seriously. A top-of-the-line, premium fiberglass window that’s installed poorly is a guaranteed failure. It’s going to leak air, let water in, and be a pain to open and close. On the flip side, I’ve seen modest, well-built vinyl windows installed by a true craftsperson perform beautifully for decades. The difference is the skill and knowledge behind the work.
I got my start as an apprentice, learning from old-school pros who trusted their level, their square, and their gut. They taught me that installing a window is really just a masterclass in managing water. If you get that wrong, nothing else you do matters. I’ve run my own crews, trained new folks, and, yeah, I’ve fixed an awful lot of jobs where others cut corners. This guide is basically what I teach my own people. It’s the info I wish every single homeowner had before they signed a contract. This isn’t about finding the cheapest price; it’s about finding the right partner for a huge investment in your home.
The Window is Only Half the Equation
Here’s a little insider tip: an installer who only wants to sell you a product will lead with brand names and warranties. A true professional starts by asking about your house and your goals. What are you trying to achieve? Are you trying to block out street noise? Maybe cut down on that blistering afternoon sun? Improve security? Your answers are what point to the right materials and glass package, long before we even whisper a brand name. Getting a handle on these components yourself is your best defense against a bad investment.
Frame Materials: It’s More Than Just Looks
The frame is the skeleton of your window. The material dictates its lifespan, how much maintenance you’ll be doing, and how efficient it is. Your installer should be able to walk you through these trade-offs without pushing one over the other unless there’s a really good reason for it.
- Vinyl (PVC): This is the most common for a reason. It’s affordable and pretty much maintenance-free. But let’s be clear: not all vinyl is created equal. I always look for frames with multiple internal chambers for better insulation and strength. The corners need to be fusion-welded for a seamless, strong joint, not just screwed together. A key ingredient in a quality vinyl blend is titanium dioxide, which provides UV resistance so the frame doesn’t get yellow and brittle. Cheaper windows often skimp on this, and trust me, it shows after a few years in the sun. Budget-wise, a good professionally installed vinyl window can run anywhere from $750 to $1,600 per unit, depending on size and features.
- Wood: You just can’t beat the classic, warm look of a wood window. It’s also a fantastic natural insulator. But… it’s a commitment. Wood expands and contracts, so it needs a solid coat of paint or stain to protect it from moisture. I’ve been called out to replace beautiful wood windows that rotted out because the upkeep was neglected. For homeowners who love the look but hate the work, I often suggest wood frames with aluminum or vinyl cladding on the outside. You get all the beauty on the inside without the weekend-stealing exterior maintenance.
- Fiberglass: From a pure performance standpoint, fiberglass is the champ. It’s made from glass fibers and resin, and its superpower is stability. Fiberglass expands and contracts at almost the same rate as the glass it’s holding. What does that mean for you? The seals between the frame and glass are under way less stress, which means a much lower risk of seal failure (that foggy look between the panes). They are incredibly strong and can be painted. The only real downside is the cost. If a vinyl window is $1,200, you can expect a similar fiberglass one to be in the $1,800 to $3,000+ range. You’re paying for top-tier performance.
- Aluminum: You’ll see aluminum mostly in commercial buildings or super-modern homes. It’s light and very strong, which allows for razor-thin frames and huge expanses of glass. The big catch, however, is that aluminum is a fantastic conductor of energy. Without a proper ‘thermal break’—a piece of less-conductive material separating the inside and outside frame—it will transfer cold right into your house. I’ve literally seen frost form on the inside of old aluminum frames. Any modern aluminum window for a home absolutely must have a quality thermal break.

Let’s Talk About the Glass
The glass package is where the magic of energy efficiency happens. If an installer just glosses over these details, consider it a major red flag. They should be able to explain this stuff in plain English.
- U-Factor: Think of this like a golf score—the lower the number, the better. It measures how well the window insulates, or keeps heat inside. In a cold climate, a low U-factor is probably the most important number on that sticker.
- Solar Heat Gain Coefficient (SHGC): This measures how much heat from the sun the window blocks. The lower the number, the less solar heat it lets in. For a south-facing window in a hot place like Arizona, a low SHGC is your best friend for keeping cooling costs down. But here’s a pro tip: in a cold climate, you might actually want a higher SHGC on your south-facing windows to get some free, passive solar heat in the winter. A good installer gets this nuance.
- Low-E Coatings: Low-E simply means low-emissivity. It’s an invisible, microscopic layer of metal oxide on the glass that acts like a bouncer at a club. In the winter, it reflects heat back into your house to keep it warm. In the summer, it reflects the sun’s heat away to keep it cool. Simple as that.
- Gas Fills: That space between the panes of glass in a double- or triple-pane window is often filled with an inert gas, usually argon or krypton. These gases are denser than air and terrible at conducting heat, which is exactly what you want. It dramatically slows down heat transfer, which lowers the U-factor. By the way, if you see condensation between the panes of an old window, it means the seal has failed, the gas is gone, and its insulating value is shot.

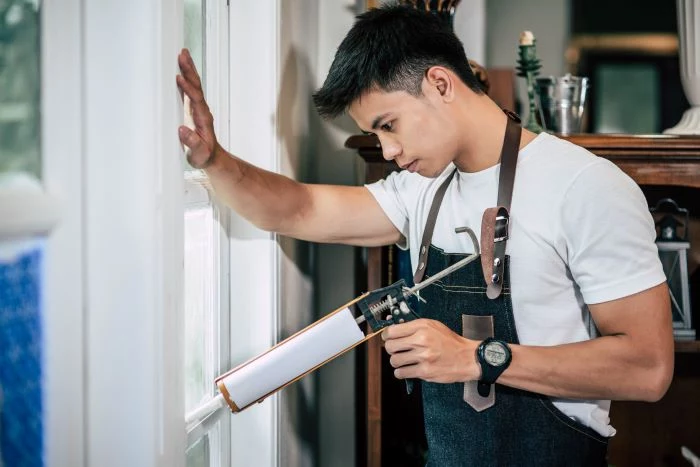
The Installation Itself: Where a Job Is Won or Lost
You can buy the best, most expensive window in the world, but the installation will determine more than 90% of its real-world performance. This is where experience isn’t just a bonus; it’s everything. The most important work is hidden behind trim and siding, but you can bet that any mistakes will show up later as water damage, drafts, or windows that just won’t work right.
Before a new window even gets near the wall, a pro focuses on the rough opening. We check to make sure it’s plumb (perfectly vertical), level (perfectly horizontal), and square (perfect 90-degree corners). Older homes are almost never perfect. An amateur will try to jam the new window into a crooked opening, which is a recipe for disaster. It twists the frame, stresses the seals, and makes the window a nightmare to open.
A pro knows how to correct the opening or shim the window so the unit itself sits perfectly square, even if the house around it has settled. A quick tip: you should be able to lock your window with one finger. If you have to force it, something is wrong with the installation.
The Unforgiving Path of Water
If you remember one thing from this article, make it this. Every single window will get wet. Rain, snow, condensation—it’s a fact of life. The goal isn’t to create an impenetrable seal that lasts forever (it won’t). The goal is to build a system that manages water, directing any moisture that gets past the first line of defense safely back outside. This is all about the flashing.
I’ve seen so many failures here. Installers who just slap some caulk around the edge and call it a day. Caulk dries, cracks, and fails. The right way involves layers, like shingles on a roof.
- The Sill Pan: The bottom of the opening is the most vulnerable spot. We ALWAYS install a sill pan—either a pre-formed plastic one or one we custom-make with flexible flashing tape. It’s basically a little gutter. Any water that sneaks in is caught by the pan and drained back outside. A simple flashing mistake on a single window sill once led to a $5,000 rot repair in the wall below. It’s a mistake you only make once.
- Flashing Tapes: We use modern, self-adhering flashing tapes. Think of it as a high-tech, waterproof bandage for your house. We layer it so water always flows down and out: bottom piece first, then the side pieces go over the bottom piece, and finally, the top piece goes over the side pieces. Ask potential installers how they flash their windows. If they can’t explain this shingle-style layering, they don’t truly understand water management.

Securing, Insulating, and Sealing
Once the window is perfectly placed and shimmed, we secure it. Then, we insulate the gap between the window frame and the house frame. Heads up! We use a special low-expansion foam made for windows. Using regular construction foam is a rookie mistake; it can expand with enough force to bow the window frame, making it impossible to operate.
The final step is sealing the outside with a continuous bead of high-quality sealant. This is your first line of defense, but it’s the flashing system underneath that’s the real hero.
Finding the Right Crew: Your Pre-Hire Checklist
Okay, now you know what a quality job looks like. How do you find the person who can deliver it? It’s all about asking the right questions.
First, Let’s Talk Red Flags
Be on the lookout for these warning signs during the quote process:
- High-Pressure Sales: If a salesperson says, “This price is only good if you sign today,” walk away. That’s a classic, high-pressure tactic, not a real discount.
- Vague on Details: If they can’t clearly explain their flashing method or what kind of insulation they use, they either don’t know or don’t want you to know. Both are bad.
- Cash-Only or Huge Upfront Payment: A demand for the full payment upfront is a massive red flag. A reputable company will have a clear payment schedule.
- No Written Quote: A price scribbled on a business card is not a contract. Demand a detailed, itemized quote.
The Non-Negotiables: License and Insurance
This is the absolute bare minimum. Ask for their state contractor’s license number and check it online with your state’s licensing board to make sure it’s active. But that’s not enough. You need to see proof of two types of insurance:
- General Liability: This covers damage to your property. If they drop a window on your new floor, this is what pays for it. Look for at least $1 million in coverage.
- Workers’ Compensation: This is arguably even more critical. It covers the installers if they get hurt on your property. Without it, if a worker falls off a ladder, YOU could be sued for their medical bills.
Quick tip: Don’t just glance at the insurance certificate. Call the insurance agency listed on the form to verify the policy is active. A true pro will have this ready for you and will not be the least bit offended that you checked. In fact, they’ll respect you for it.
Who’s Showing Up at Your House?
Many large window companies are really just sales organizations that subcontract the installation. This can be a total crapshoot. You have no idea who is showing up or what their training is like. I’ve always used an in-house crew because I train them myself and I’m directly responsible for their work. If you’re considering a company that uses subcontractors, ask them: “How do you vet your subs? Are they independently licensed and insured? Does your labor warranty cover their work?” Their answers will tell you everything about their commitment to quality.
The Final Pieces: The Quote, The Timeline, and The Warranty
The paperwork is your final safety net. A professional’s contract will be detailed and transparent.
A Quote is More Than a Number
A professional proposal should be several pages long and spell everything out. It needs to include an itemized list of the products (brand, model, glass package), a detailed scope of work (demolition, flashing, insulation, trim, cleanup), what’s NOT included (like painting the new trim), and a clear payment schedule. Never, ever pay 100% upfront. A common schedule is one-third to order materials, one-third when work begins, and the final third only when you are completely satisfied.
Oh yeah, and always get at least three quotes. Not just to find the cheapest, but to compare them. Often, the most detailed quote comes from the most thorough contractor, and that’s who you want, even if they aren’t the rock-bottom price.
How Long Should This Take?
It’s good to have realistic expectations. For a single, straightforward window replacement, a good crew can be in and out in just a few hours. If you’re replacing a whole house of, say, 15 windows, you should plan for the crew to be on-site for about 3 to 5 days. This can vary based on the complexity of the job, of course.
The Warranty Maze: What Are You Actually Covered For?
This is where a lot of people get confused. There are almost always two separate warranties, and you need to understand both.
- The Manufacturer’s Warranty: This comes from the company that made the window (you might see familiar names like Andersen, Pella, or Marvin here). It covers defects in the physical product itself—things like seal failure, cracks in the frame, or hardware problems. These can range from 10 years to “limited lifetime.”
- The Labor Warranty: This comes from the installation company, and frankly, it’s the more important one. This covers any problems that arise from the installation work itself, like leaks or drafts. This is a direct reflection of how much the installer stands behind their own work. A one-year warranty is not a great sign. You should be looking for a minimum of 5 years, and honestly, the best crews I know offer 10 years or even a lifetime, transferable warranty. That’s the ultimate sign of confidence.
Inspirational Gallery
Installer asking about a “full-frame” vs. an “insert” replacement?
It’s a crucial question. An insert replacement (or pocket replacement) fits a new window within the existing frame. It’s faster and less expensive but can reduce your glass area slightly. A full-frame replacement removes the entire window, frame and all, down to the rough opening. This is the best choice for addressing any rot or water damage in the wall, but it’s a more involved and costly job. A good pro will explain which is right for your home and why.
More than 90% of window failures are due to installation errors, not product defects.
This statistic from industry studies underscores the article’s main point: the person holding the caulk gun is more important than the logo on the glass. Water management, proper flashing (like using a quality tape such as DuPont Tyvek Flashing Tape), and a perfectly level set are the true markers of a window that will last a generation.
- Eliminates cold spots near windows in winter.
- Prevents water from seeping into your wall cavity, avoiding rot and mold.
- Creates a continuous, airtight seal that boosts energy efficiency.
The secret? A meticulously applied window flashing system. An expert installer doesn’t just rely on caulk; they create a multi-layered barrier using specialized tapes and membranes around the window opening before the unit even goes in.
Don’t forget the final walk-through. Once the job is done, but before you pay the final bill, check these key details:
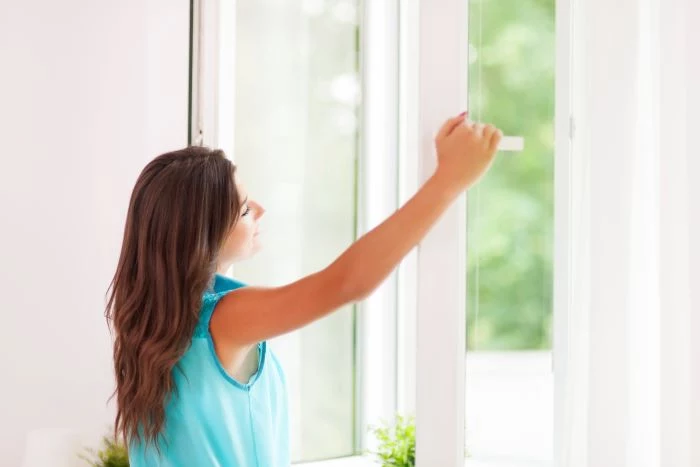
- Operate every window. Does it open, close, and lock smoothly?
- Inspect the caulk lines, both inside and out. They should be smooth, continuous, and neat.
- Look for any scratches on the glass or frames that may have happened during installation.
- Ensure the job site is clean, with all debris and old windows removed.
The glass package is where you customize performance. Ask your installer about the NFRC label, which is like a nutrition label for windows. The U-Factor measures insulation (lower is better), while the Solar Heat Gain Coefficient (SHGC) measures how much heat it blocks from the sun. In a cold climate, you might want a higher SHGC to capture winter sun; in a hot climate, a low SHGC is essential to reduce cooling costs.
Acoustic-grade laminated glass can reduce outside noise levels by up to 50%.
Black Frames: The Modern Choice: This trend is hugely popular for a reason—it creates a dramatic, high-contrast look. But be aware: dark colors absorb more heat. On a lower-quality vinyl frame, this can lead to warping or fading over time. For black or other dark finishes, it’s often worth investing in fiberglass frames, like those from Marvin’s Essential or Elevate lines, which are far more stable under thermal stress.
Important point: Ask for a copy of the installer’s liability insurance and workers’ compensation certificates. Don’t just take their word for it. A reputable company will provide this documentation without hesitation. This protects you if a worker gets injured on your property or if your home is damaged during the installation.
Think of window hardware as the jewelry of the installation. The right finish can tie the window into your home’s overall design scheme. Beyond standard white or beige:
- Matte Black: Offers a bold, contemporary look that pairs well with modern or industrial styles.
- Satin Nickel: A versatile and timeless choice that complements most decors.
- Oil-Rubbed Bronze: Provides a warm, rustic feel, perfect for traditional or craftsman-style homes.
Full-bed caulk vs. Face caulk: A pro installer often uses a technique called a “full-bed” sealant method. This means they lay a continuous bead of high-quality sealant (like a polyurethane sealant) on the mounting flange *before* setting the window. This creates a primary gasket-like seal. Relying only on a bead of caulk around the exterior trim afterward (“face caulk”) is a common shortcut that can lead to leaks down the road.


